
VRT 76325 VW - Vacuum Cleaner BEKO - Free user manual and instructions
Find the device manual for free VRT 76325 VW BEKO in PDF.
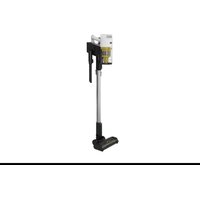


| Brand | Beko |
| Model | VRT 76325 VW |
| Vacuum type | Cordless stick vacuum |
| Color | White and gray |
| Maximum suction power | 450 W |
| Power supply | Power adapter 100-240 V ~ 50/60 Hz, output 32 V === 0.45 A |
| Battery type | Built-in rechargeable lithium-ion |
| Charging time | 4 to 6 hours |
| Maximum runtime | 60 minutes (minimum speed, without motorized brush) |
| Average runtime | 30 minutes (average speed, without motorized brush) |
| Full power runtime | 10 minutes (maximum speed, without motorized brush) |
| Runtime with motorized brush (minimum speed) | 37 minutes |
| Runtime with motorized brush (average speed) | 25 minutes |
| Runtime with motorized brush (maximum speed) | 8 minutes |
| Filtration system | Pre-filter + metal filter + EPA E12 filter |
| Brush type | Motorized brush with roller |
| Included accessories | 2-in-1 crevice tool, crevice tool, wall charging station |
| LED indicator | Battery level, blockage alert, missing filter alert, blocked roller alert |
| Speed modes | 3 levels (minimum, average, maximum) |
| Dust tank cleaning | Empty and clean after each use recommended |
| Filter maintenance | Shake filters (do not wash) |
| Brush cleaning | Disassemble roller, remove hair or debris |
| Storage | On the wall charging station |
| Weight | Approximately 2.5 kg |
Frequently Asked Questions - VRT 76325 VW BEKO
User questions about VRT 76325 VW BEKO
0 question about this device. Answer the ones you know or ask your own.
Ask a new question about this device
Download the instructions for your Vacuum Cleaner in PDF format for free! Find your manual VRT 76325 VW - BEKO and take your electronic device back in hand. On this page are published all the documents necessary for the use of your device. VRT 76325 VW by BEKO.
USER MANUAL VRT 76325 VW BEKO
Cordless Stick Vacuum Cleaner
User Manual

VRT 76325 VW
EN - TR - FR - IT - RO - PL - SR - HR - SK - MK - SQ
Please read this guide first!
Dear Customer,
Thank you for choosing a Beko product. We would like you to achieve the optimal efficiency from this high quality product which has been manufactured with state of art technology. Please make sure you read and understand this guide and supplementary documentation fully before use and keep it as a reference. Include this guide with the unit if you hand it over to someone else. Observe all warnings and information herein and follow the instructions.
Symbols and their meanings
These symbols are used throughout this guide:

Important information and useful hints about usage.

WARNING: Warnings against dangerous situations concerning the security of life and property.

Electric shock protection rating
CONTENTS
ENGLISH 03-19
TÜRKÇE 20-40
FRENCH 41-58
ITALIAN 59-78
ROMANIAN 79-100
POLISH 101-117
SERBIAN 118-134
CROATIAN 135-151
SLOVAK 152-168
MACEDONIAN
1 Important safety and environmental instructions
This section contains safety instructions to prevent hazards that can result in injury or property damage.
Any warranty is void if these instructions are not followed.
1.1 General safety
• This appliance complies with international safety standards. - This device can be used by children over 8 years of age, people with physical, sensory or mental challenges or people with lack of experience or knowledge; as long as control is ensured or information is provided regarding the hazards. Children must not play with the appliance. Cleaning and user maintenance shall not be carried out by unattended children. - Do not use the appliance if the power cord or the appliance is damaged. Contact authorized service.
- Your mains power supply shall match the information shown on the rating plate label of the appliance.
- Do not use the appliance with an extension cord. • To prevent damage to the power cord, prevent it from being pinched, crimped or rubbed against sharp edges.
- Do not touch the plug of the appliance with damp or wet hands while the appliance is plugged in.
- Do not pull on the cord while unplugging the appliance.
- Do not vacuum flammable materials and ensure that the cigarette ashes are cooled down before vacuuming them.
- Do not vacuum water and other fluids.
- Protect the appliance against precipitation, humidity and heat sources.
1 Important safety and environmental instructions
- Do not use the appliance in or near explosive or flammable environments and substances.
- Unplug the appliance before cleaning and maintenance.
- Do not immerse the appliance or its power cord in water for cleaning.
- Do not disassemble the appliance.
- Use only original parts or parts recommended by the manufacturer. • To prevent blockage of the filter or damage to the motor, do not vacuum cement, plaster or fragments of compressed paper.
- Use the appliance with the adapter delivered with the appliance only.
- Do not use the appliance without filters, it may get damaged.
- If you keep the packaging materials, keep them out of the reach of children.
- This appliance is not intended to be used by persons, including children, with physical, sensory and mental disabilities or those who have not adequate experience and knowledge regarding its use, unless they are under the supervision of a person responsible for their safety or they are informed about the operation of the appliance.
•Children shall be supervised to prevent them from playing with the appliance.
- Unplug the adaptor and remove the battery pack before any cleaning or maintenance procedure.
•To avoid any risk of hazard, a damaged adaptor shall be replaced by the manufacturer, the authorized representative of the manufacturer or a similarly qualified technician.
- Keep your fingers, hair and loose clothes away from moving parts or clearances while vacuuming.
1 Important safety and environmental instructions
- Batteries shall be removed from the appliance before discarding the appliance.
- Disconnect the appliance from power supply before removing the battery.
- Please discard used batteries in accordance with local laws and regulations. •The batteries included in this appliance may only be replaced with qualified persons. •Appliance is not intended to be operated for commercial purposes. This appliance is not designed for commercial use, it is intended for home use and in applications as follows:
- In the staff kitchens of the stores, offices and other working environments
- In farm houses;
- By customers in hotels, motels or other accommodation facilities
- In hostels or similar environments.
- WARNING: Use the HCX1501-3200450E removable supply unit delivered with the appliance to charge to the battery.
- This appliance shall not be operated by children and people with limited physical, sensory and cognitive skills or people with lack of experience and knowledge unless they are under supervision or they are provided with the relevant instructions.
•Children shall be supervised to prevent them from playing with the appliance.
1 Important safety and environmental instructions
1.2 Compliance with the WEEE Directive and disposal of the waste product
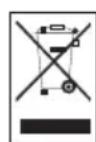
This product complies with EU WEEE Directive (2012/19/EU). This product bears a classification symbol for waste electrical and electronic equipment (WEEE). This symbol indicates that this product shall not be disposed with other household wastes at the end of its service life. Used device must be returned to official collection point for recycling of electrical and electronic devices. To find these collection systems please contact to your local authorities or retailer where the product was purchased. Each household performs important role in recovering and recycling of old appliance. Appropriate disposal of used appliance helps prevent potential negative consequences for the environment and human health.
1.3 Packaging information

Packaging materials of the product are manufactured from recyclable materials in accordance with our National Environment Regulations. Do not dispose of the packaging materials together with the domestic or other wastes. Take them to the packaging material collection points designated by the local authorities.
1.4 Information on Waste Batteries
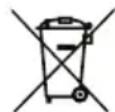
This symbol on rechargeable batteries/batteries or on the packaging indicates that the rechargeable battery/battery may not be disposed of with regular house hold rubbish. For certain rechargeable batteries/batteries, this symbol may be supplemented by a chemical symbol. Symbols for mercury (Hg) or lead (Pb) are provided if the rechargeable batteries/batteries contain more than 0,0005 % mercury or more than 0,004 % lead.
Rechargeable batteries/batteries, including those which do not contain heavy metal, may not be disposed of with household waste. Always dispose of used batteries in accordance with local environmental regulations. Make enquiries about the applicable disposal regulations where you live.
1.5 What to do for energy saving
- When using your appliance, adjust the speed settings according to the surface, in order to save energy.
- Normally, lower speeds are used when cleaning hard surfaces, curtains and sofas, while high speeds are used in for cleaning carpets.
1.6 Compliance with RoHS Directive
The product you have purchased complies with EU RoHS Directive (2011/65/EU). It does not contain harmful and prohibited materials specified in the Directive.
2 Overview
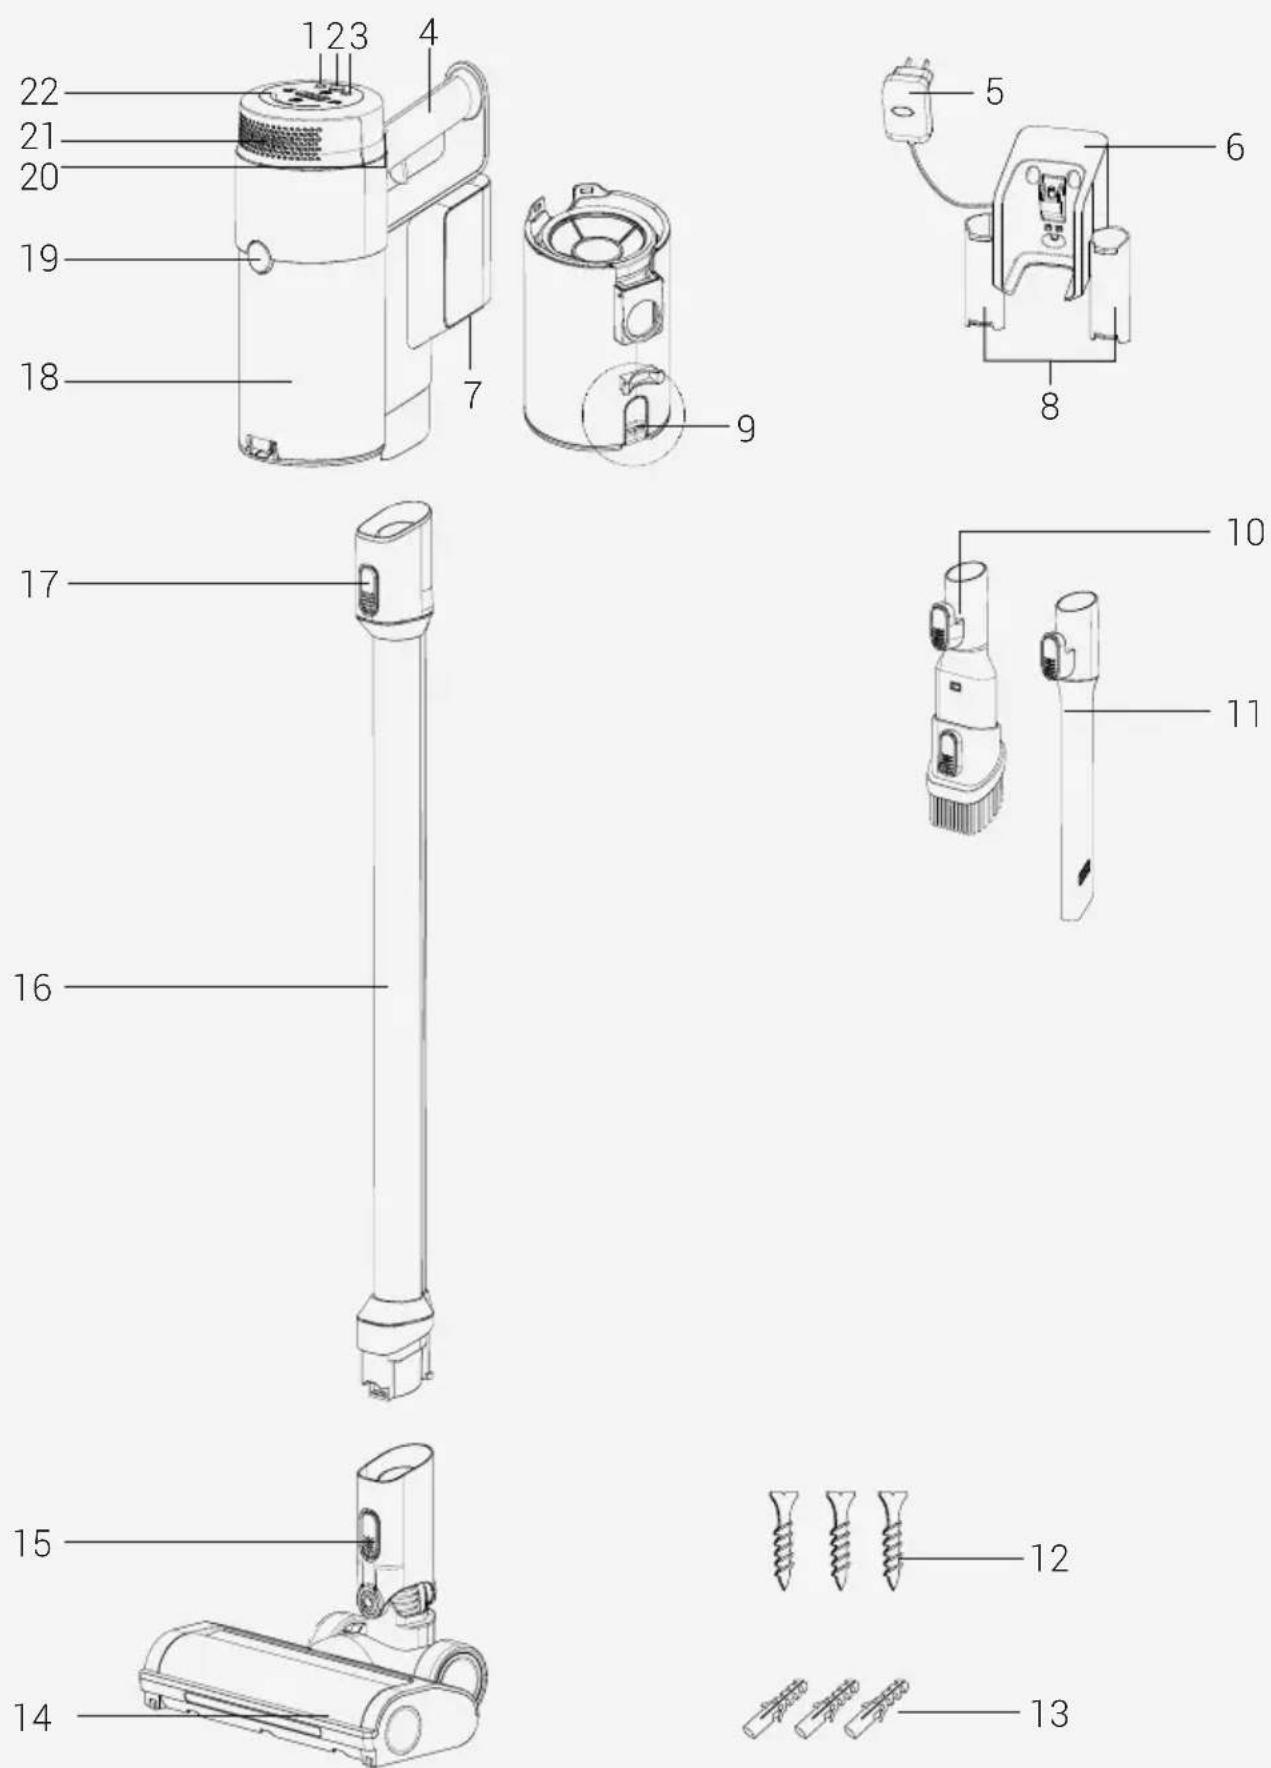
2.1 Controls and components
- Speed level adjustment button
- On/off button
- Speed level adjustment button
- Handle
- Adaptor
- Charging dock
- Battery pack release button
- Accessory attachment compartments
- Dust container empty button
- Combination tool
- Crevice 12.Screw (3 pcs)
- Dowel (3 pcs)
- Electrical turbo brush
- Electrical turbo brush release button 16.Tube
- Tube release button
- Dust container
- Dust container release button 20. Hepa filter cover release button
- Hepa filter cover 22. LED screen
2.2 Technical data
| 450 W | |
| Input 100 - 240 V~ 50-60 Hz | 0,5 A |
| Output 32 V | --- 0.45 A |
| Charging time 4-6 hours | |
| Runtime at max. power 10 mins | |
| Runtime at mid power 30 mins | |
| Runtime at min. power 60 mins |
The rights to make technical and design changes are reserved.
The values provided with the appliance or its accompanying documents are laboratory readings in accordance with the respective standards. These values may differ depending on the use and ambient conditions.
External Power Supply Parameter
| Manufacturer: Guangdong Huachuangxing Power Supply Co.,Ltd | |
| Model ID: HCX1501-3200450E | |
| Input Voltage: 100-240V~ | |
| Input Frequency: 50-60Hz | |
| Input Current: 0.5A | |
| Output Voltage 32.0V | |
| Output Current 0.45A | |
| Output Power: 14.4W | |
| Average active efficiency: 85.5% | |
| Efficiency at low load (10%): | 83.33% |
| Power consumption under no load: | 0.041W |
| Usage Type Speed Level Usage Time | |||
| Use with tube and brush | Minimum speed Up to 37 min | 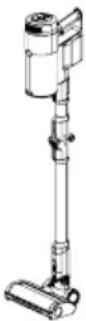 | |
| Medium speed Up to 25 min | |||
| Maximum speed | Up to 8 min | ||
| Handheld (With non-motorized accessories) | Minimum speed Up to 60 min | 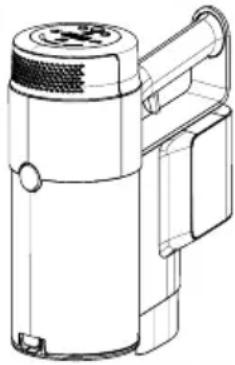 | |
| Medium speed Up to 30 min | |||
| Maximum speed | Up to 10 min | ||
3 Installation
3.1 Intended use
This appliance is intended for household use and it is not suitable for industrial use.
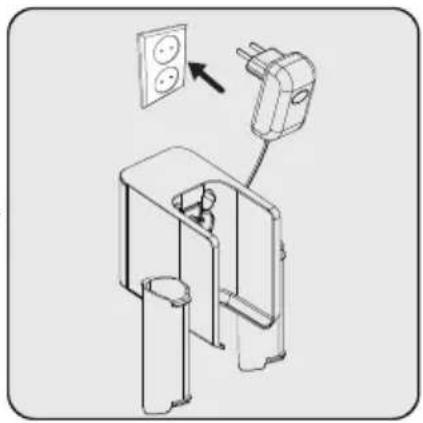
3.2 Installation of the charging dock
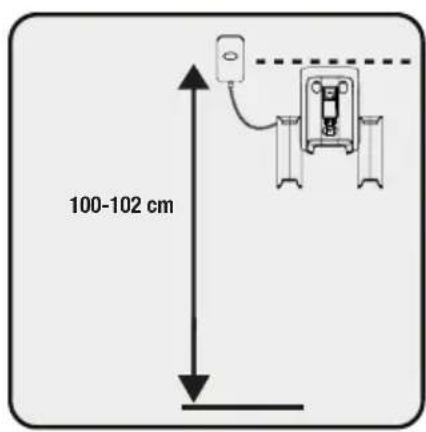
Position the charging dock at a height of minimum 100-102 cm from the ground.
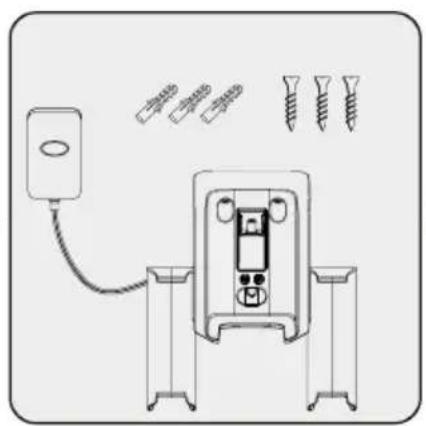
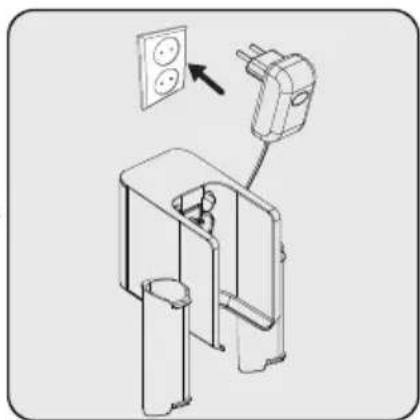
1- Fix four dowels on the wall 2- Place four screws into their locations on the charging dock and mount on the dowels on the wall.
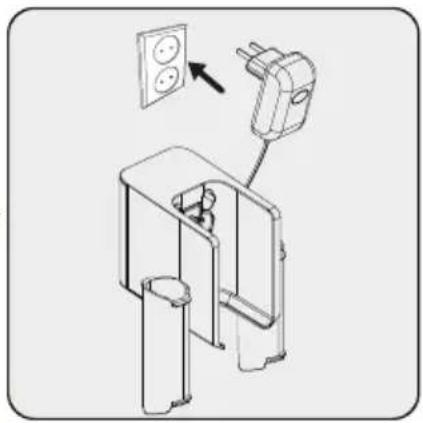
Plug the charging adaptor to the socket.
3.3 Installation of the body and the brush
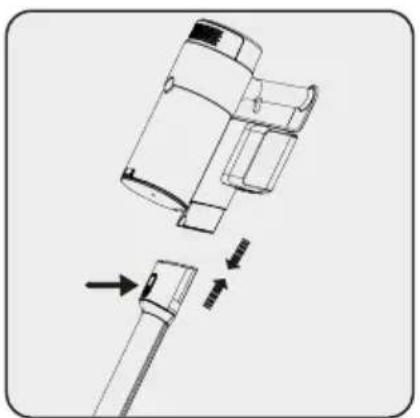
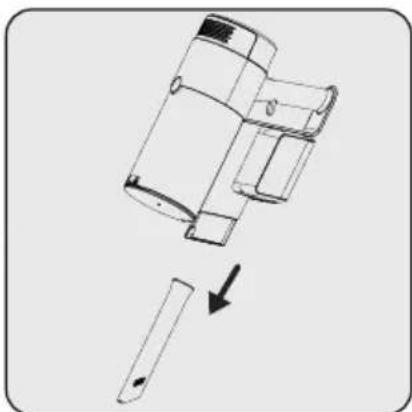
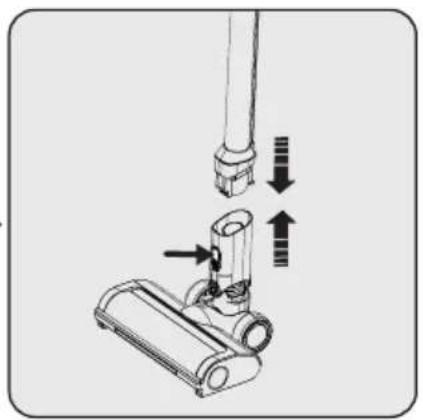
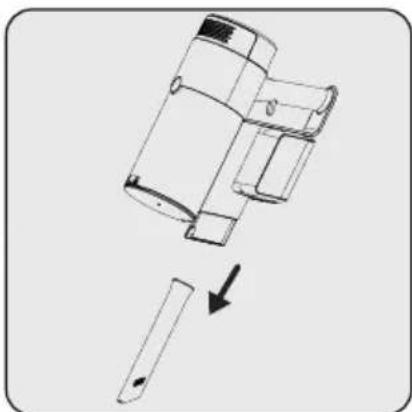
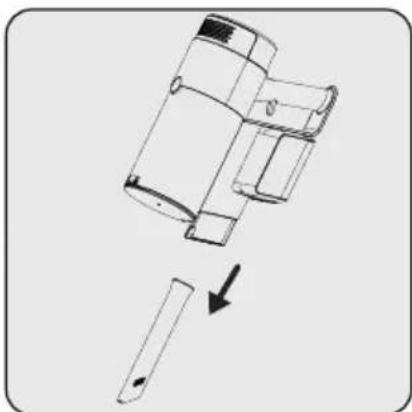
Push the tube in the direction of the arrow towards the body by pressing the tube release button.
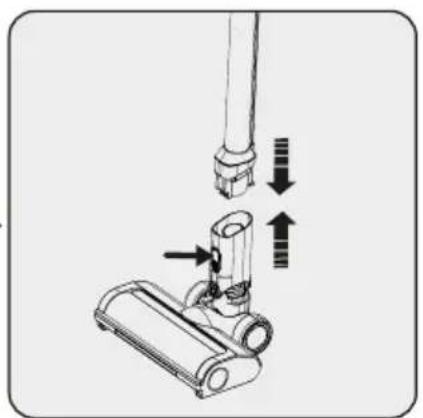
Press the release button on the electric turbo brush and push it in the direction of the arrow towards the tube.
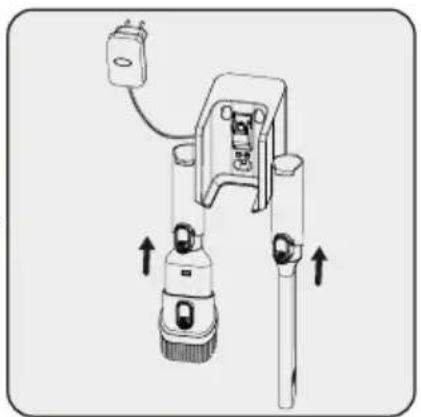
Attach the crevice tool and combination tool to the charging dock.
4 Operation
4.1 Charging the appliance

WARNING: If you are using the device for the first time or after a long period of inactivity, fully charge the batteries before use.
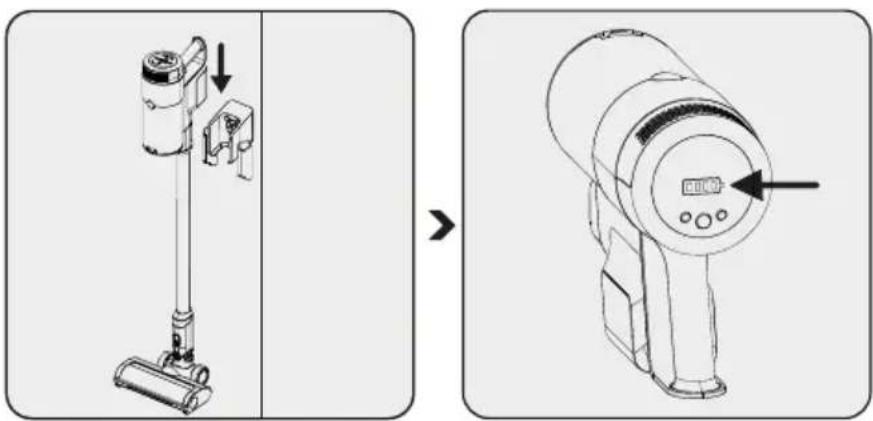
Place the appliance on the charging dock.
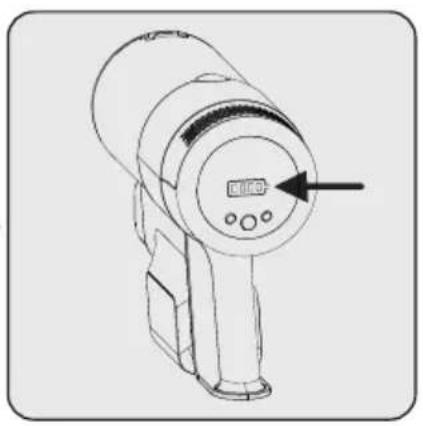
When you place the appliance on the charging dock, it starts charging and the battery charge levels are displayed on the screen. When all battery levels are full and stable, the charging process is complete.

It takes up to 4 to 6 hours to fully charge the appliance. The appliance should not be operated while charging.

If the appliance is placed on the charging dock while it is operating, it will stop automatically.
4 Operation
4.2 Usage
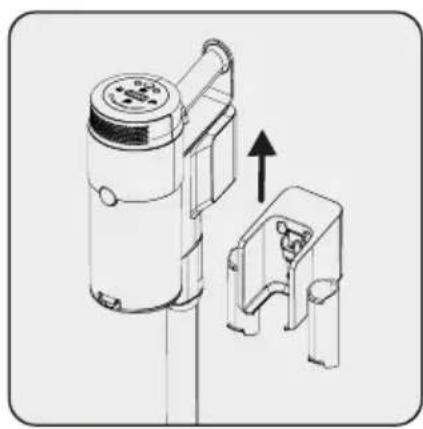
1- Lift the appliance upward from the charging dock.
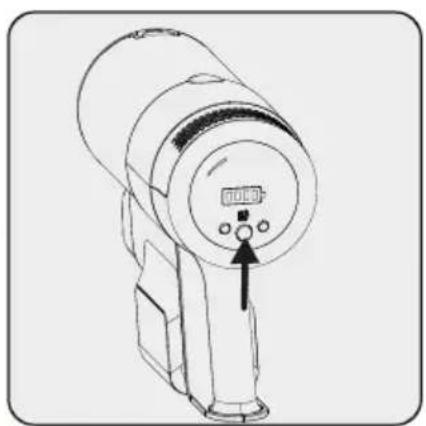
Press the on/off button to operate the appliance. The appliance starts operating at minimum power when the on/off button is pressed.
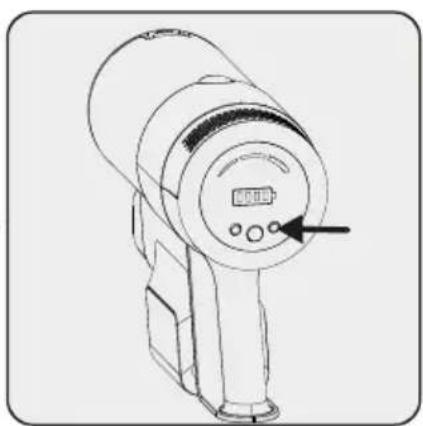
To adjust the speed level, press the button. The screen will show which suction mode is being used: min, mid, or high. By pressing the - and + buttons, the speed level can be adjusted.

The appliance may be placed for charging before the battery is completely discharged. The appliance may be kept continuously on the charging dock until the next operation.
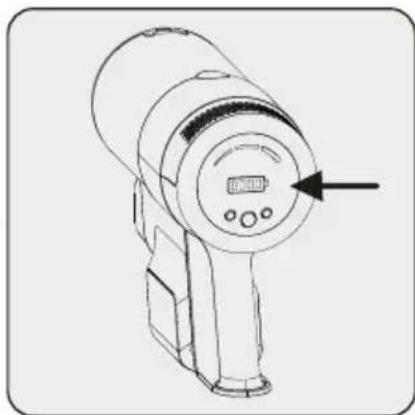

Pay attention to the battery levels during operation. Battery levels should be tracked during usage; when it is empty, the appliance stops operating automatically.
4 Operation
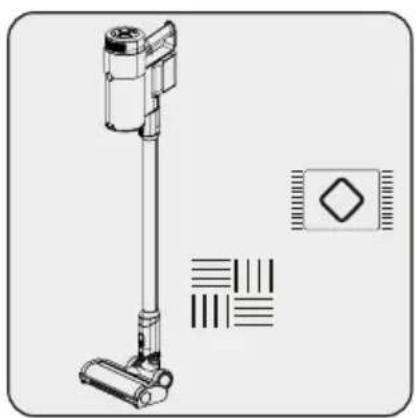
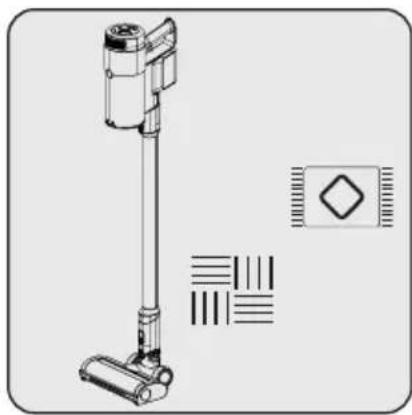
This appliance is suitable for use on carpets and hard floors.
4.3 LED screen indicators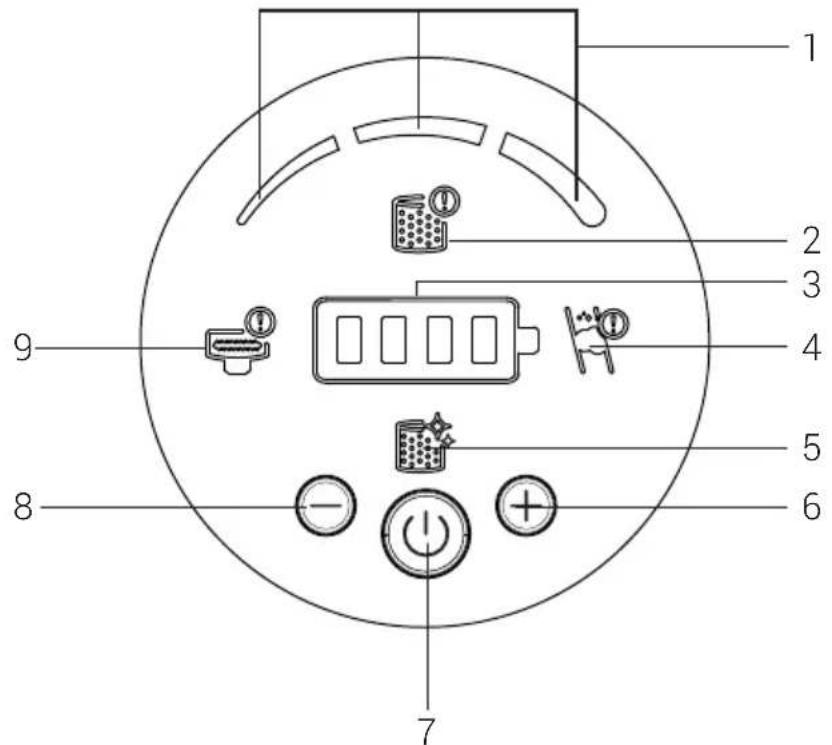
- These icons will show the suction mode that is being used.
- If the prefilter or EPA12 filter is not put into the device, this icon will warn the user, and the product will not turn on if the prefilter or EPA12 filter is absent to protect the machine. Make sure the filters are installed.
- Remaining battery level status with iconic show
- Indicates that there is air blockage. Please check the tube inside, the suction mouth of the product body to find the foreign material that blocks the machine.
- Indicates that the filter needs to be cleaned.
- Speed boost button
- On/Off button
- Speed power reduction
- Indicates that there is a blockage on the rollers and needs to be cleaned.
4 Operation
4.4 Accessories
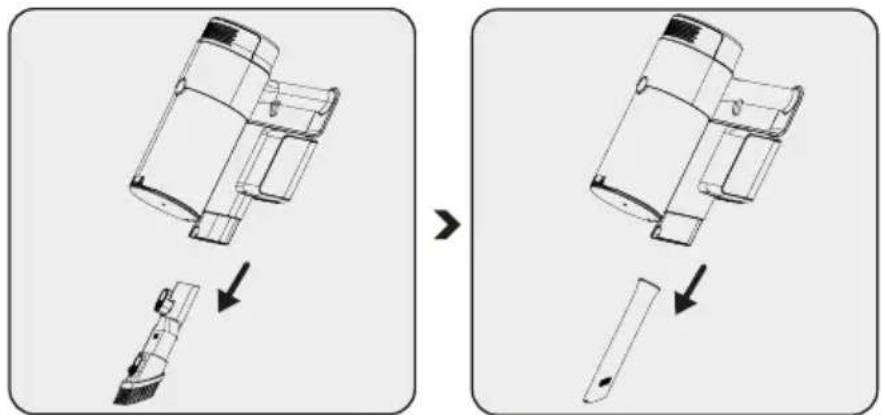
Combination tool:
Suitable for vacuuming curtains, sofas, waxed furniture and delicate and fragile objects.
Crevice: Suitable for vacuuming the rear of the furniture, hard to reach areas and narrow areas.
5 Cleaning and maintenance
Turn off and unplug the appliance before cleaning.

WARNING: Never use gasoline, solvent, abrasive cleaners, metal objects or hard brushes to clean the appliance.

WARNING: Deformation may occur on the filters within time as a result of usage. It shall be replaced with a new one to prevent loss of performance. Contact with the customer services to buy a new one.
5.1 Cleaning the Dust container and Filters

WARNING: Do not wash the filters.

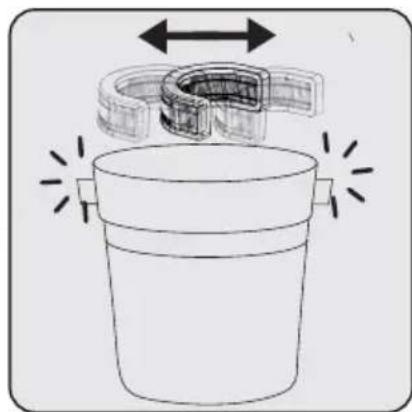
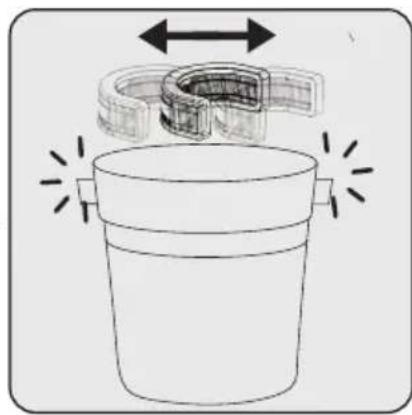
We recommend you to clean the dust container after each operation.
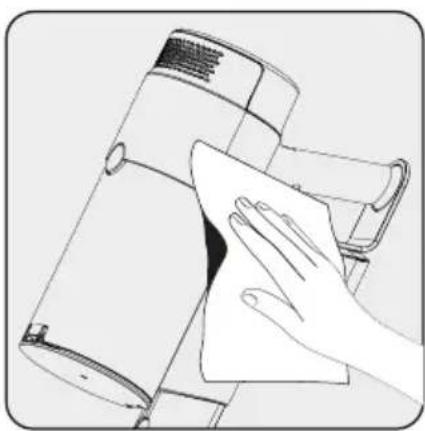
Wipe the surface of the body with a wet cloth.

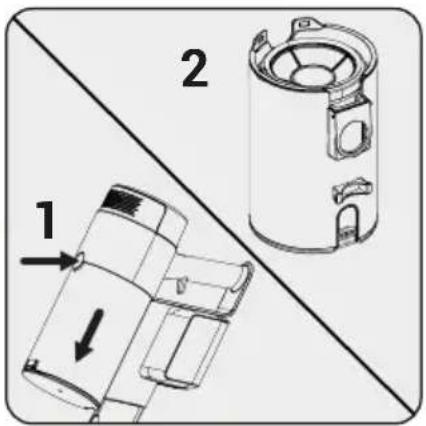
Press the dustbin release button and pull dustbin part.

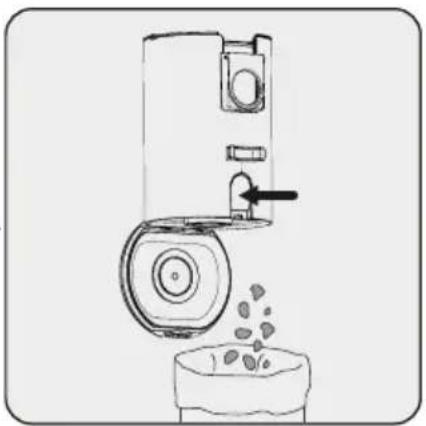
Press the dustbin cover release button and empty the dustbin.
5 Cleaning and maintenance
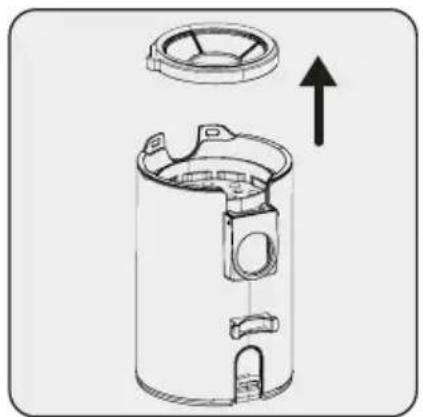
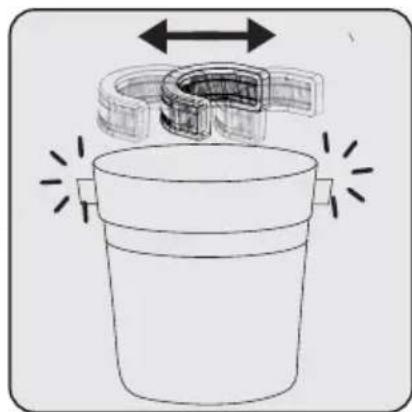
For a detailed cleaning of filters, remove the pre-filter part upward.

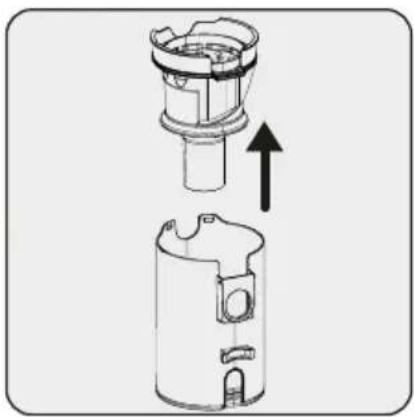
Pull the mesh filter part upward.

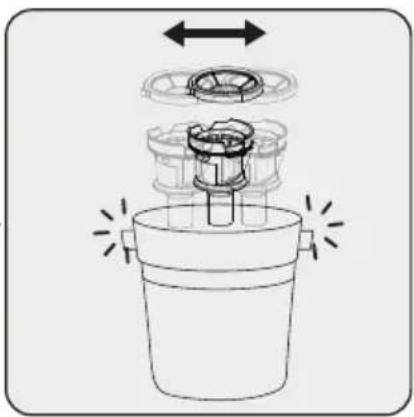
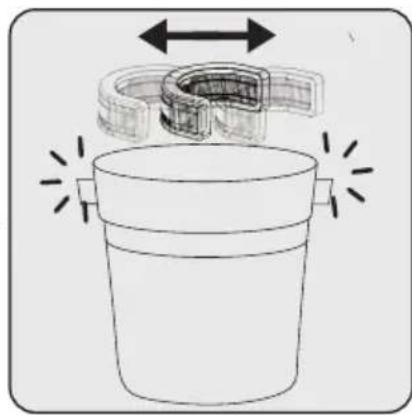
Clean the mesh filter and pre-filter by shaking in order to clean the dust.
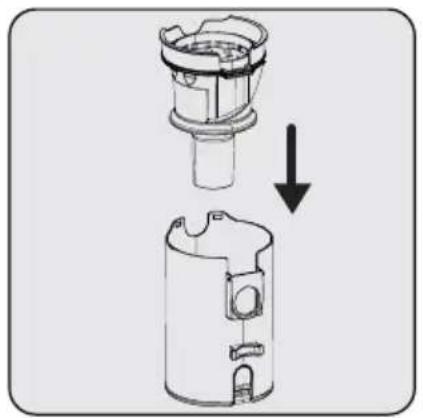
Insert the mesh filter into dustbin.

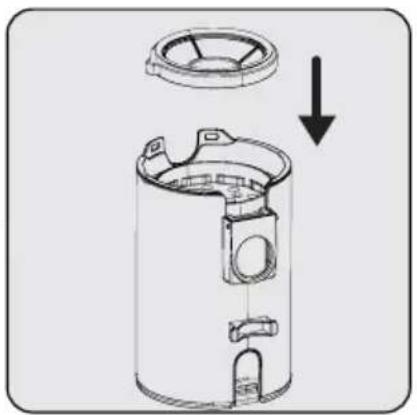
Insert the pre-filter on mesh filter.
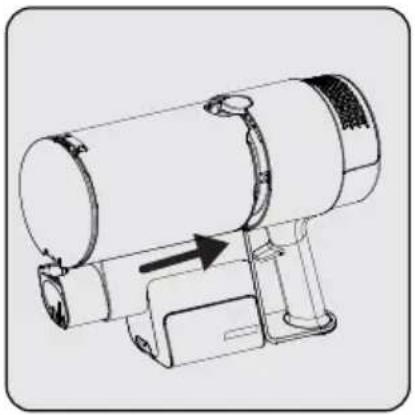
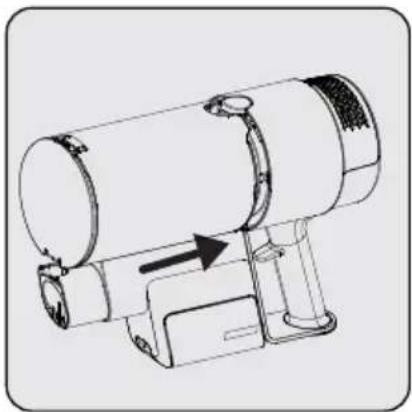
First, place the dustbin on the product body so that its back side fits into the body, and then place it in the button area.
5 Cleaning and maintenance
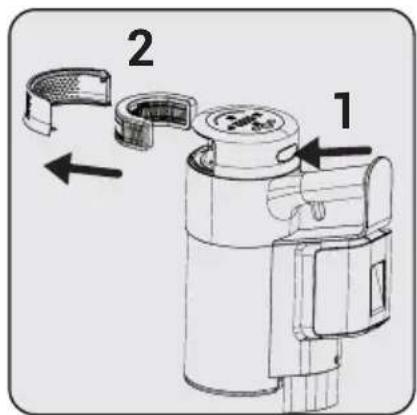

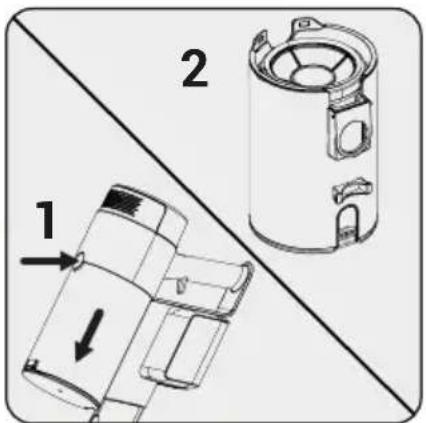
In order to clean EPA E12 Filter, press the button (1) and remove the filter part.
Clean the EPA E12 filter by shaking in order to clean the dust.
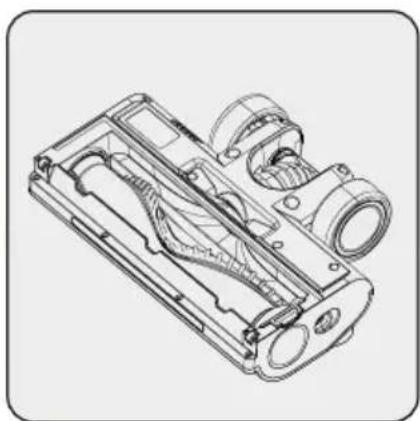
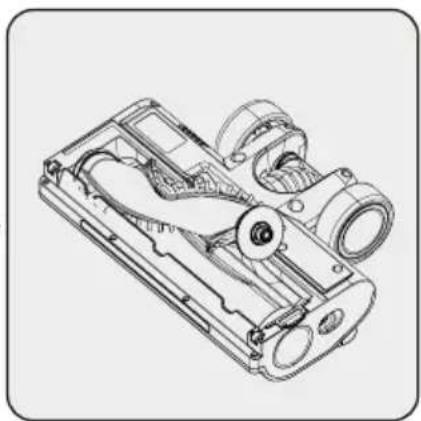
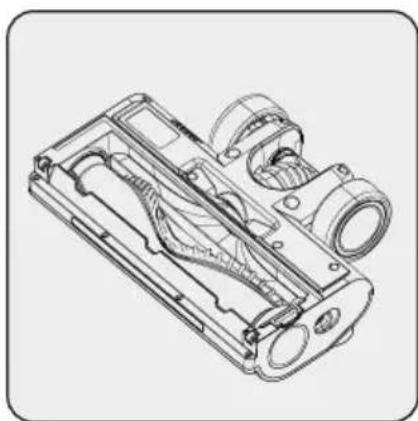
5.2 Cleaning of the brush

WARNING: Do not wash the turbo brush and the main roller.
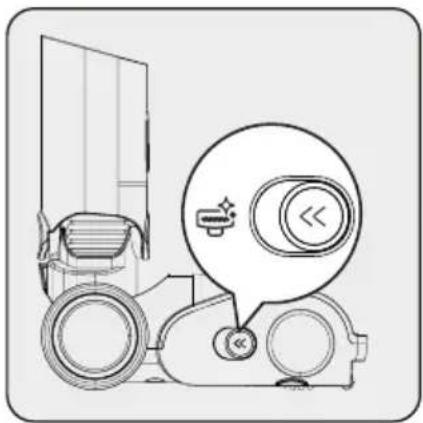
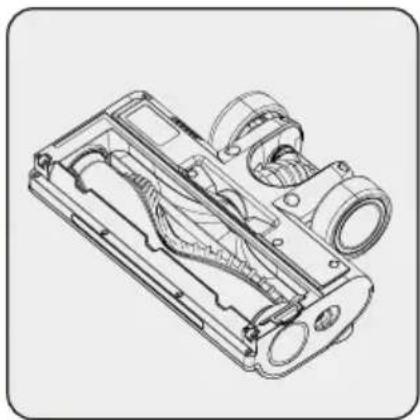
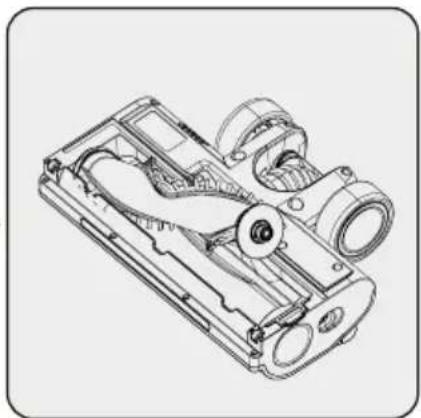
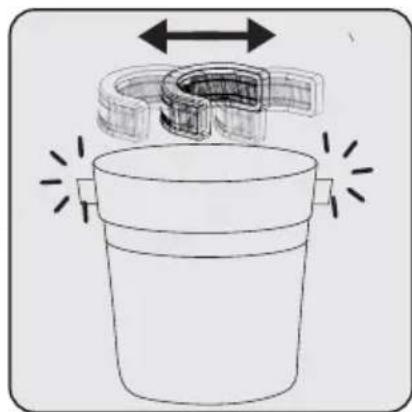
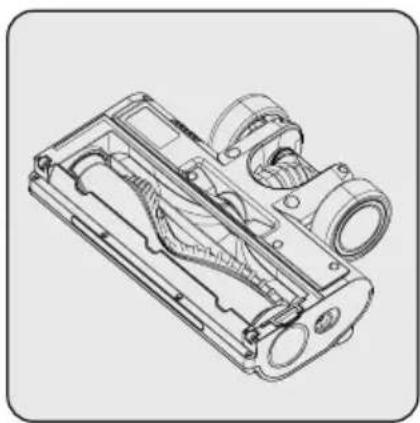
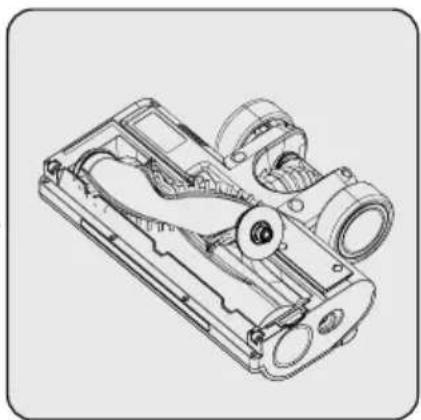
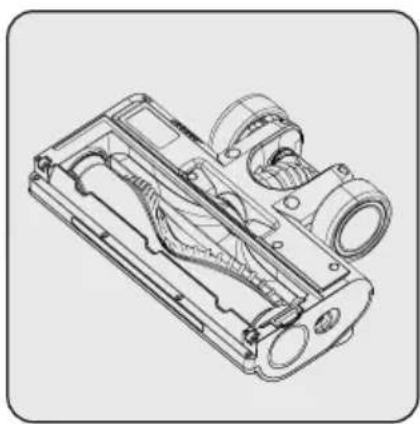
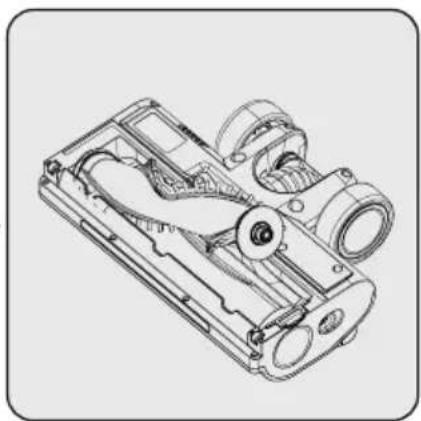
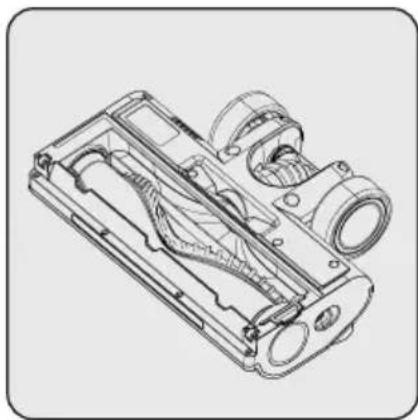
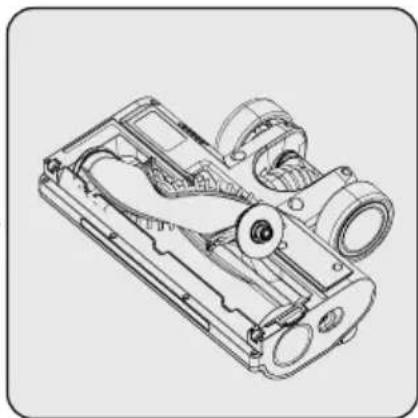
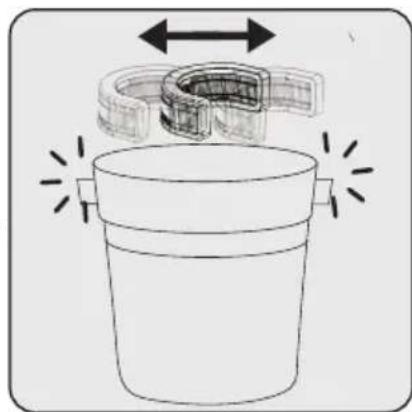
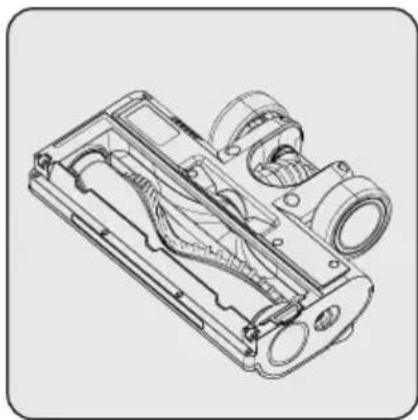
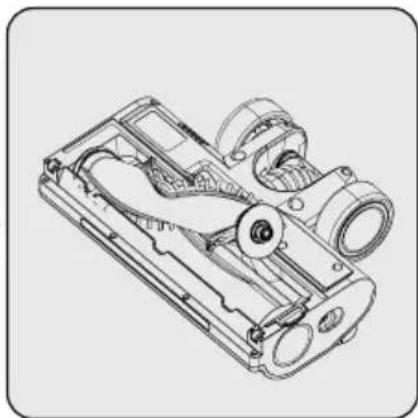
Push the roller release button to the left side.
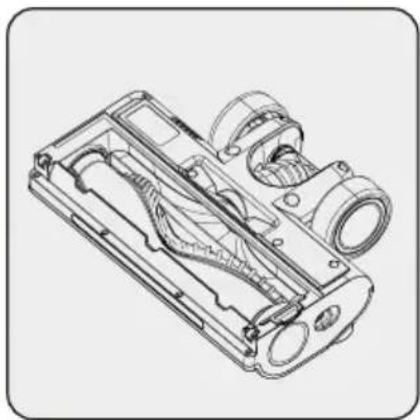
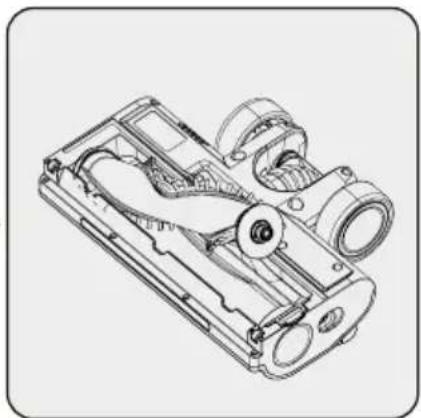
Remove the dust on it by tapping it lightly to a hard surface or remove the dust with a brush. If any hair, etc. is tangled, remove it by cutting it off.
Fix the roller back to its place by pushing.
5 Cleaning and maintenance
5.3 Storage
- If you do not intend to use the appliance for a long time, store it carefully.
- Unplug the appliance.
- Ensure that the appliance is kept out of reach of children.
- Store the battery on a non-conducting material, and do not allow the battery to contact metal directly. This shall damage the battery.
- If you shall not be using the product for a long period of time, please at least keep it at half charged condition. Do not charge or discharge completely. The product should be recharged at least once every three months.
5.4 Transport and shipping
- During transport and shipping, carry the appliance with its original packaging. The packaging of the appliance will protect the appliance against physical damage.
- Do not put heavy objects on the appliance or its packaging. Otherwise the appliance may be damaged.
- If the appliance is dropped, the appliance may not operate or permanent damage may occur.

Multi-function accessory:
- https://twitter.com/beko_tr
- https://www.facebook.com/bekoturkiye/
- https://www.youtube.com/user/BekoChannel
* Our postal address:
Dear customer,

Clean the surface of the body with a damp cloth.



□ □ Electric convector
□ Humidifier
Model / Series:
SELLER
Invoice no.:......Date:......

1 - Attach four wall plugs to the wall. 2 - Place four screws in their positions on the charging station and mount them onto the wall plugs.
Push the tube in the direction of the arrow towards the body while pressing the tube release button.
Press the electric turbo brush release button located on the electric turbo brush and press it in the direction of the arrow towards the tube.
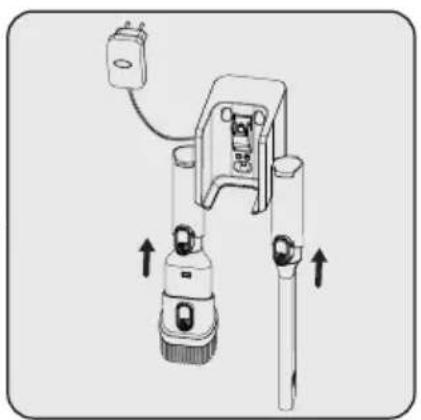
Attach the crevice nozzle and the combination tool to the charging station.
4 Operation
1 - Pull the appliance off the charging station.
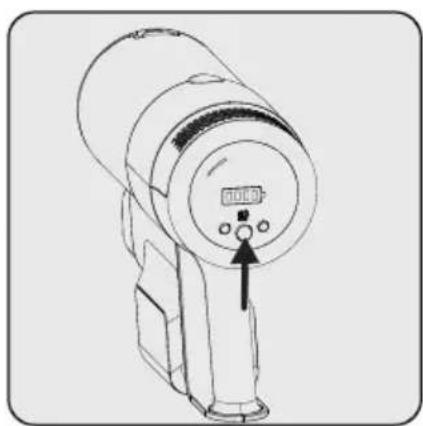
To adjust the speed level, press the button. The suction mode used will be displayed on the screen as min, medium, and high. By pressing the - and + buttons, the speed level can be adjusted.

The appliance can be placed on charge before the batteries are completely discharged. The appliance can be continuously charged at the charging station until the next use.
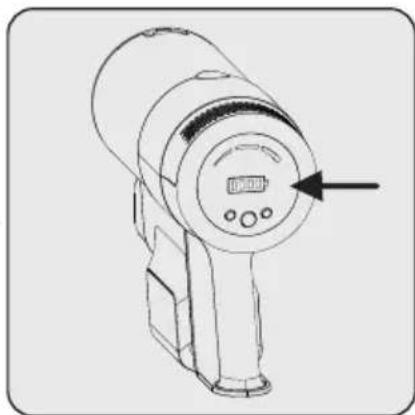

Pay attention to the battery charge levels during operation. Battery levels should be monitored during use; when empty, the device automatically stops working.
4 Operation
Wipe the inside of the device with a damp cloth.
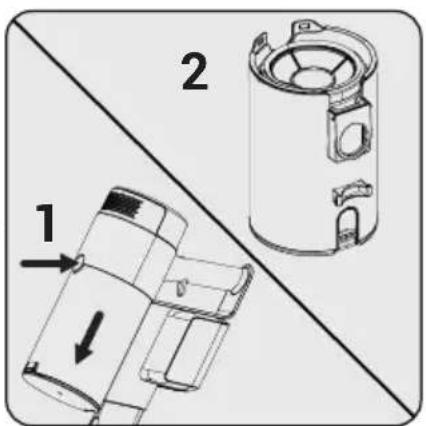
Press the dustbin release button and pull the dustbin part.
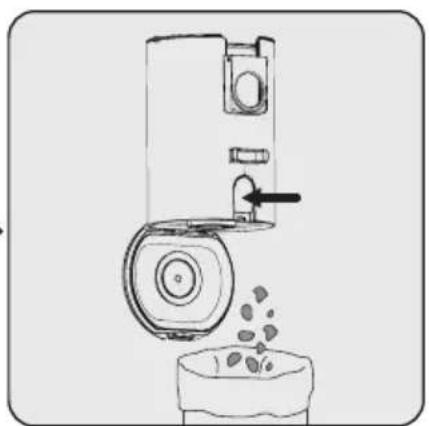
Press the dustbin cover release button and empty the bin.
For detailed filter cleaning, remove the pre-filter part upward.

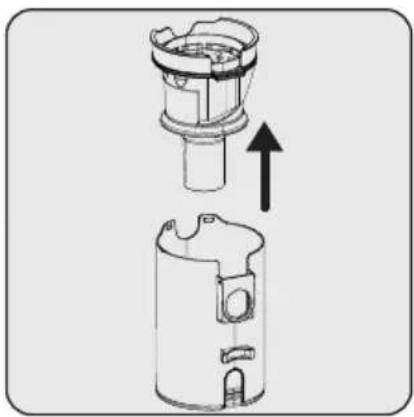
Pull the mesh filter part upward.

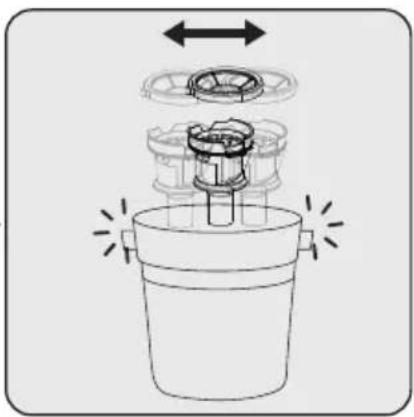
Clean the mesh filter and pre-filter by shaking them to remove dust.
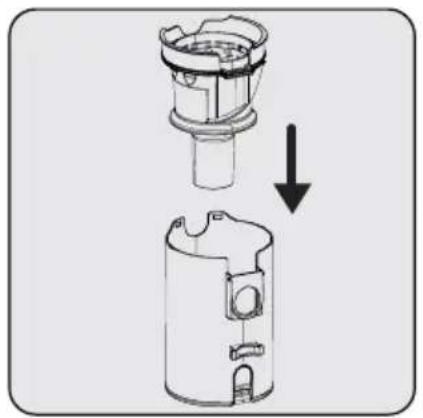
Insert the pre-filter onto the mesh filter.
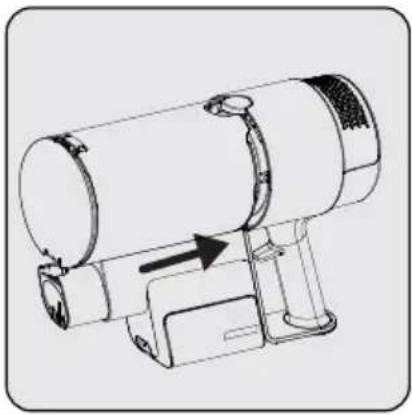
First, place the dustbin onto the product body so that its rear side fits into the body, then position it in the button area.
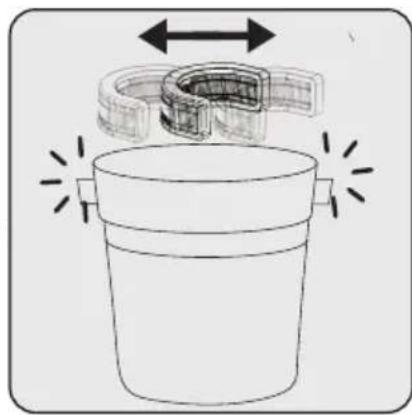
To clean the EPA E12 filter, press the button (1) and remove the filter part.
Clean the EPA E12 filter by shaking it to remove dust.
5.2 Cleaning the Brush

WARNING: Do not wash the turbo brush and the main roller brush.
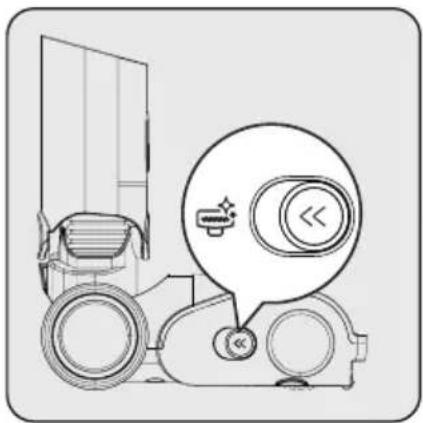
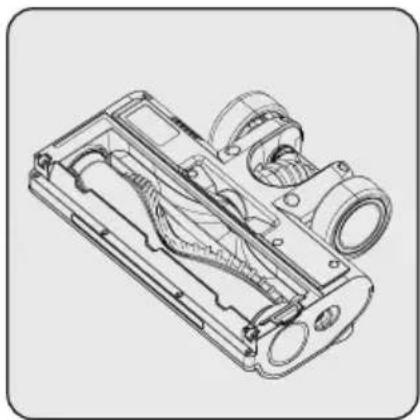
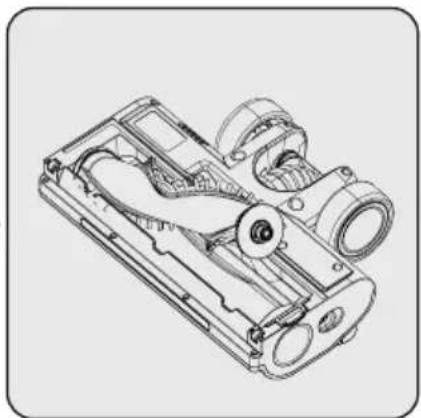
Press the roller brush release button on the left side.
5.4 Transport and Shipping
- During transport and shipping, carry the device in its original packaging. The device's packaging protects it from physical damage.
- Do not place heavy objects on the device or its packaging. Otherwise, the device may be damaged.
- If the device is dropped, it may not work or may suffer permanent damage.
Please read these instructions first!
Dear user,
1 - Attach the four dowels to the wall. 2 - Place the four screws in their positions on the charging station and mount the dowels to the wall.
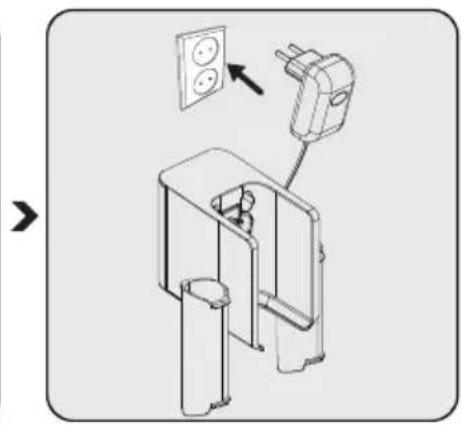
Attach the tubular extension and the combination tool to the charging station.
4 Operation
Place the device on the charging station.
Press the on/off button to operate the device. The device starts working at minimum power when the on/off button is pressed.
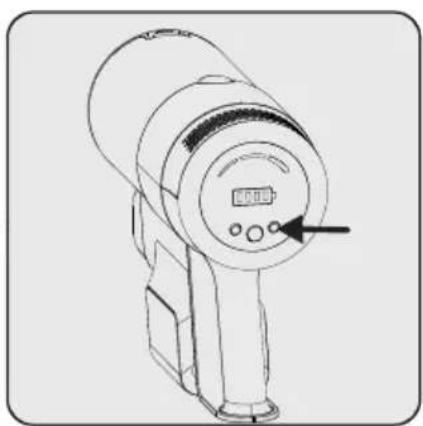
To adjust the speed level, press the button. The display will show the suction power mode in use: minimum, medium, and maximum suction power. By pressing the - and + buttons, you can adjust the speed level.
You can place the device on charge before the battery is completely drained. The device can be kept on the charging station and continuously charged until next use.
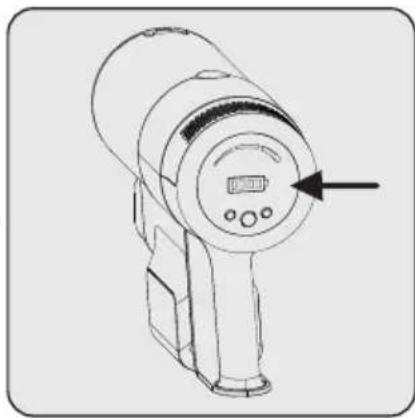
This device is suitable for use on carpets and wooden floors.
4.3 LED Display Indicators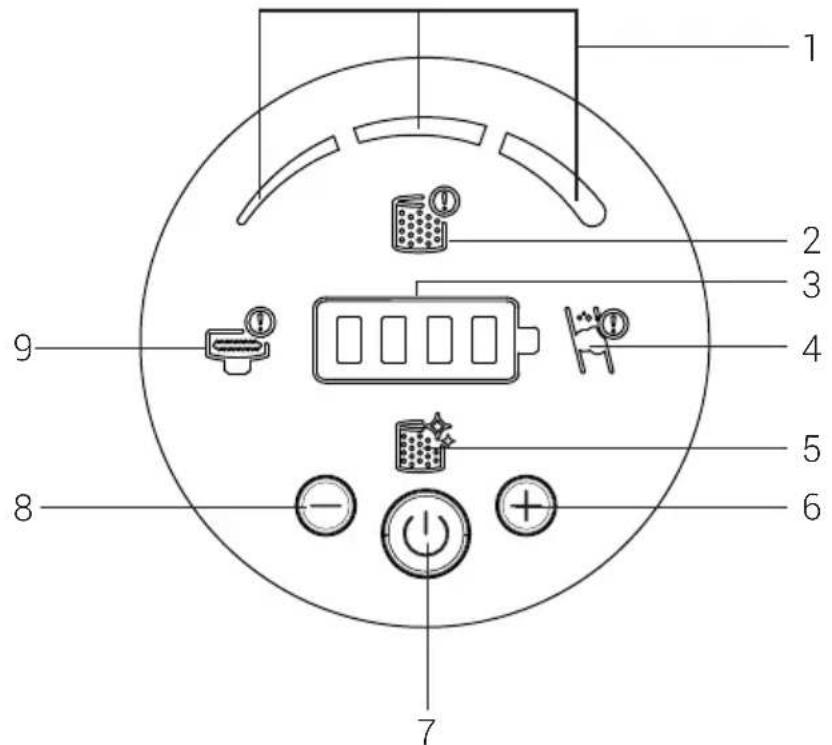
Combined tool:
Press the button to release the dust container and pull out the dust container part.

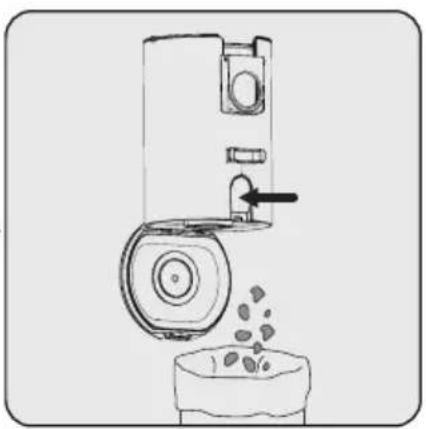
Press the button to release the dust container lid and empty the dust container.
For detailed cleaning of the filters, remove the pre-filter part by pulling it upwards.

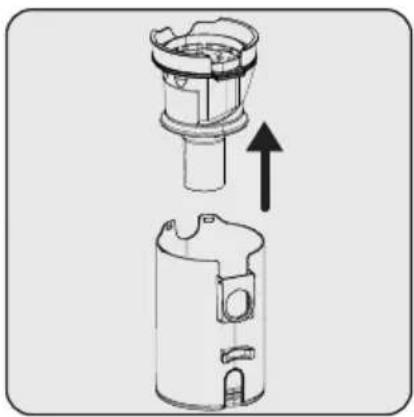
Pull the mesh filter part upwards.

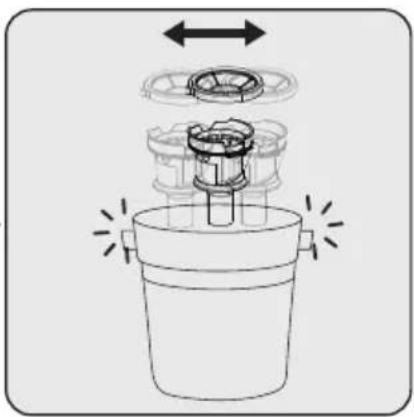
Clean the mesh filter and pre-filter by shaking them and knocking the dust off.
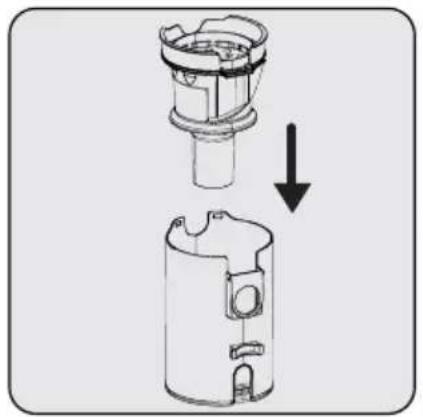
Insert the pre-filter into the mesh filter.
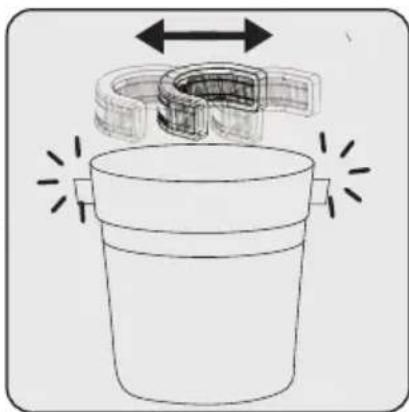
To clean the EPA E12 filter, press the button (1) and remove the filter part.
Clean the EPA E12 filter by shaking it and knocking the dust off.
5.2 Cleaning the brush

1- Attach four wall plugs to the wall
2- Place the four screws in their positions on the charging dock and attach them to the wall plugs on the wall.
1- Pull the appliance out of the charging dock upwards.
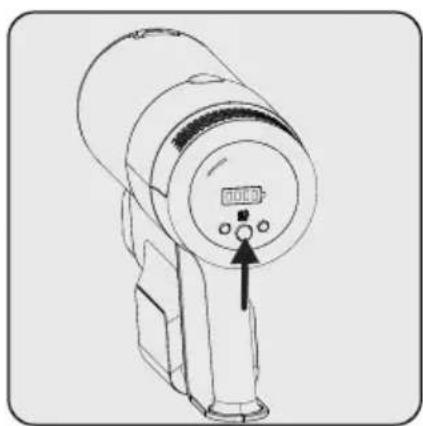

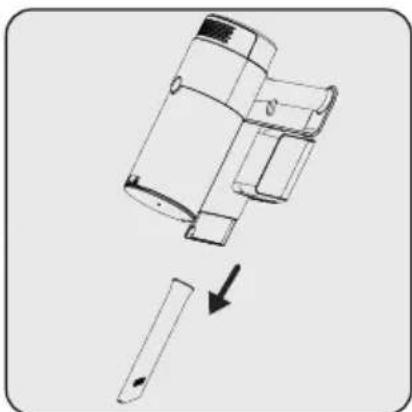
Wipe the surface of the body with a damp cloth.

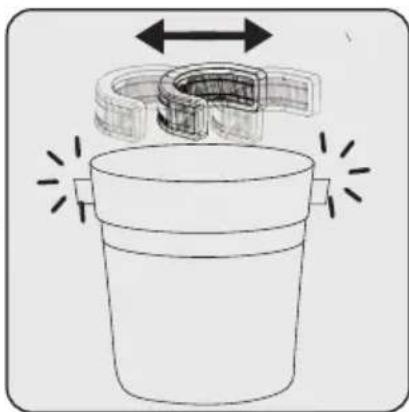
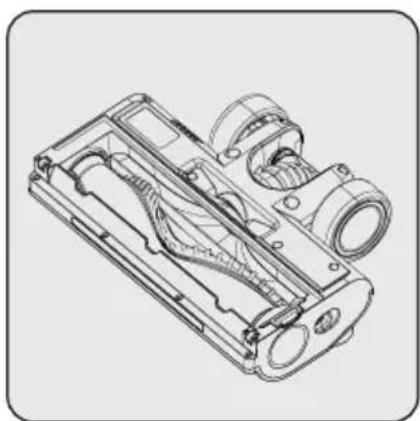
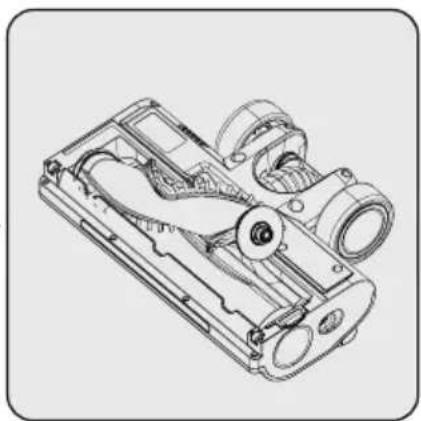
Press the release button of the roller on the left side.
Combined
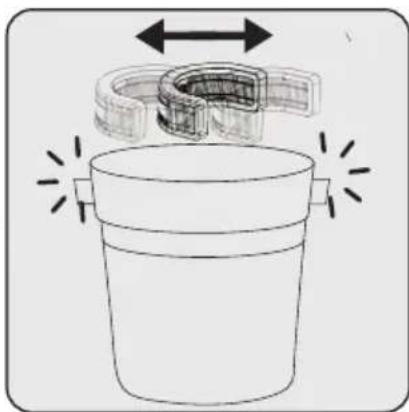
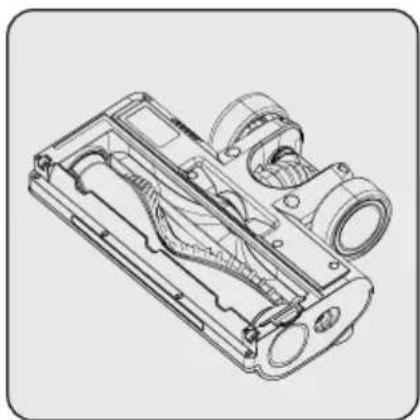

Place the device at the charging station.
1 - Remove the device upward from the charging station.
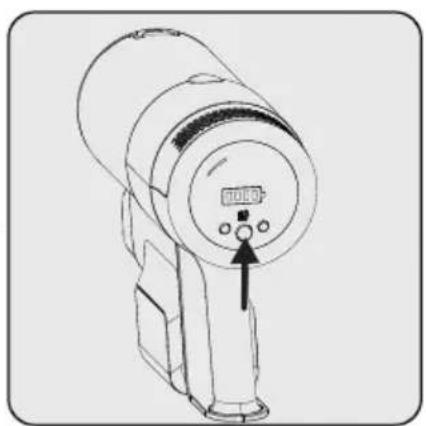

Combination tool:
- CORDLESS STICK VACUUM CLEANER
- PLEASE READ THIS GUIDE FIRST
- SYMBOLS AND THEIR MEANINGS
- CONTENTS
- IMPORTANT SAFETY AND ENVIRONMENTAL INSTRUCTIONS
- GENERAL SAFETY
- COMPLIANCE WITH THE WEEE DIRECTIVE AND DISPOSAL OF THE WASTE PRODUCT
- PACKAGING INFORMATION
- INFORMATION ON WASTE BATTERIES
- WHAT TO DO FOR ENERGY SAVING
- COMPLIANCE WITH ROHS DIRECTIVE
- OVERVIEW
- CONTROLS AND COMPONENTS
- TECHNICAL DATA
- INSTALLATION
- INTENDED USE
- INSTALLATION OF THE CHARGING DOCK
- INSTALLATION OF THE BODY AND THE BRUSH
- OPERATION
- CHARGING THE APPLIANCE
- USAGE
- ACCESSORIES
- COMBINATION TOOL
- CLEANING AND MAINTENANCE
- CLEANING THE DUST CONTAINER AND FILTERS
- CLEANING OF THE BRUSH
- STORAGE
- TRANSPORT AND SHIPPING
- MULTI-FUNCTION ACCESSORY
- SELLER
- CLEANING THE BRUSH
- PLEASE READ THESE INSTRUCTIONS FIRST
- COMBINED TOOL
- COMBINED
Brand : BEKO
Model : VRT 76325 VW
Category : Vacuum Cleaner