Loudbox Mini Charge - Guitar amp Fishman - Free user manual and instructions
Find the device manual for free Loudbox Mini Charge Fishman in PDF.


User questions about Loudbox Mini Charge Fishman
0 question about this device. Answer the ones you know or ask your own.
Ask a new question about this device
Download the instructions for your Guitar amp in PDF format for free! Find your manual Loudbox Mini Charge - Fishman and take your electronic device back in hand. On this page are published all the documents necessary for the use of your device. Loudbox Mini Charge by Fishman.
USER MANUAL Loudbox Mini Charge Fishman
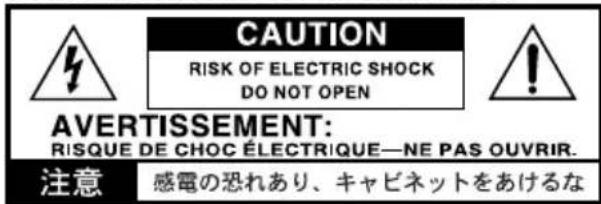
Whenever this symbol appears, it alerts you to the presence of important operating and maintenance (servicing) instructions in the user's manual for this amplifier.

Wherever this symbol appears, it alerts you to the presence of uninsulated dangerous voltage inside the enclosure that may be sufficient to constitute a risk of shock.

CAUTION
Risk of electric shock.
Do not open.

No user serviceable parts inside. Refer servicing to qualified personnel. Do not expose to rain or moisture.
Important Safety Instructions
To ensure your personal safety and the safety of others, operate this apparatus only after reading these instructions and heeding the warnings listed below.
- Read these instructions.
- Keep these instructions.
- Heed all warnings.
- Follow all instructions.
- Do not use this apparatus near water.
- Clean only with a dry cloth.
- Do not block the ventilation openings. Install in accordance with the manufacturer's instructions.
- Do not install near any heat sources such as radiators, heat registers, stoves or other apparatus (including amplifiers) that produce heat.
- Do not defeat the safety purpose of the polarized or grounding-type plug. A polarized plug has two blades with one wider than the other. A grounding-type plug has two blades and a third grounding prong. The wide blade or the third prong are provided for your safety. If the provided plug does not fit into your outlet, consult an electrician for replacement of the obsolete outlet.
- Protect the power cord from being walked on or pinched, particularly at the plugs, convenience receptacles and the point where they exit from the apparatus.
- Use only attachments/accessories specified by the manufacturer.
- Use only with a cart, stand, tripod, bracket or table specified by the manufacturer, or sold with the apparatus. When a cart is used, use caution when moving the cart/apparatus combination to avoid injury from tip-over.
- Unplug this apparatus during lightning storms or when unused for long periods of time.
- Refer all servicing to qualified service personnel. Servicing is required when the apparatus has been damaged in any way, such as a power-supply cord or plug is damaged, liquid has been spilled or objects have fallen into the apparatus, the apparatus has been exposed to rain or moisture, does not operate normally, or has been dropped.
- Do not expose the apparatus to dripping or splashing liquids and do not place objects filled with liquids (such as a beverage container or a vase) on the apparatus.
- Warning" To reduce the risk of fire or electric shock, do not expose this apparatus to moisture.
- The device is designed and evaluated under the condition of non-tropical climate; and, it can be only used in locations in non-tropical climate areas. Using the device in tropical climate areas would result in high safety risk.
- Normal operating environmental temperature range: 0 °C [32 °F] to 35 °C [95 °F].
- WARNING: The battery (battery or batteries or battery pack) shall not be exposed to excessive heat such as sunshine, fire or the like.
- CAUTION: Danger of explosion if battery is incorrectly replaced. To replace battery use Fishman's approved battery kit only at Certified Service Centers
- No naked flame sources, such as lighted candles, should be placed on the apparatus.
- Do not install this equipment in a confined or building-in space such as a book case or similar unit, and remain a well ventilation conditions at open site. The ventilation should not be impeded by covering the ventilation openings with items such as newspaper, table-cloths, curtains etc.
Warning: The mains plug/appliance coupler is used as disconnect device, the disconnect device shall remain readily operable.
Copyright © 2018 FISHMAN TRANSDUCERS, INC.
All rights reserved. No part of this document may be reproduced in any form without the written permission of FISHMAN TRANSDUCERS, INC.
INFORMATIONS IMPORTANTES DE SECURITE
WARNING:
TO REDUCE THE RISK OF FIRE OR ELECTRIC SHOCK DO NOT EXPOSE THIS PRODUCT TO RAIN OR MOISTURE.
The Loudbox Mini amplifier is capable of cleanly reproducing the sound of your instrument at very high volume levels. Prolonged repeated exposure to high sound pressure levels (SPLs) without protection can cause permanent hearing loss. OSHA has set guidelines and specified permissible sound-exposure limits for those who work in high SPL environments.
Permissible Noise Exposures
Duration per day, hours Sound level dBA slow response
| 8 90 | |
| 6 | 92 |
| 4 | 95 |
| 3 | 97 |
| 2 | 100 |
| 1 1/2 102 | |
| 1 | 105 |
| 1/2 110 | |
| 1/4 or less 115 |
To ensure against permanent hearing loss, wear hearing protection when you perform with amplification.
This symbol means the product must not be discarded as household waste, and should be delivered to an appropriate collection facility for recycling. For more information on disposal and recycling of this product, contact your local municipality, disposal service, or the shop where you bought this product.
FCC Compliance Notice
This equipment has been tested and found to comply with the limits for a Class B digital device, pursuant to Part 15 of the FCC Rules. These limits are designed to provide reasonable protection against harmful interference in a residential installation. This equipment generates, uses, and can radiate radio frequency energy and, if not installed and used in accordance with the instructions, may cause harmful interference to radio communications. However, there is no guarantee that interference will not occur in a particular installation. If this equipment does cause harmful interference to radio or television reception, which can be determined by turning the equipment off and on, the user is encouraged to try to correct the interference by one or more of the following measures:
– Reorient or relocate the receiving antenna.
– Increase the separation between the equipment and receiver.
- Connect the equipment into an outlet on a circuit different from that to which the receiver is connected. – Consult the dealer or an experienced radio/TV technician for help. Changes and modifications not expressly approved by FISHMAN TRANSDUCERS can void your authority to operate this equipment under Federal Communications Commissions rules.
Loudbox Mini
Contains FCC ID: RMU-PROLBX500
Contains IC: 10812A-PROLBX500
FCC Compliance Statement
The device complies with Part 15 of the FCC Rules. Operation is subject to the following two conditions:
- This device may not cause harmful interference, and
- This device must accept any interference received, including interference that may cause undesired operation.
EU Declaration of Conformity CE: Hereby, Fishman declares that this Loudbox Mini is in compliance with the essential requirements and other relevant provisions of Directive 2014/53/EU, 2014/30/EU, 2014/35/EU.
This device complies with Industry Canada license-exempt RSS standard(s): Operation is subject to the following two conditions: (1) this device may not cause interference, and (2) this device must accept any interference that may cause undesired operation of the device.
Cet appareil est conforme aux normes Industry Canada exemptes de licence standard RSS(s):
The Bluetooth ^® word mark and logos are registered trademarks owned by Bluetooth SIG, Inc. and any use of such marks by Fishman Transducers is under license. Other trademarks and trade names are those of their respective owners.
WARNING!
FCC and IC Radiation Exposure Statement:
The device complies with FCC's and IC's RF radiation exposure limits set forth for an uncontrolled environment under the following conditions:
- This equipment should be installed and operated such that a minimum separation distance of 20cm is maintained between the radiator (antenna) & user's/nearby person's body at all times.
- This transmitter must not be co-located or operating in conjunction with any other antenna or transmitter.
Before using Loudbox Mini, carefully read the following:
Important Safety Instructions (Page 2)
Getting Started (Page 7)
Thank you for making Fishman a part of your acoustic experience. We are proud to offer the fi nest acoustic amplifi cation products available; high-quality professional-grade tools which empower you to sound your very best.
natural_image
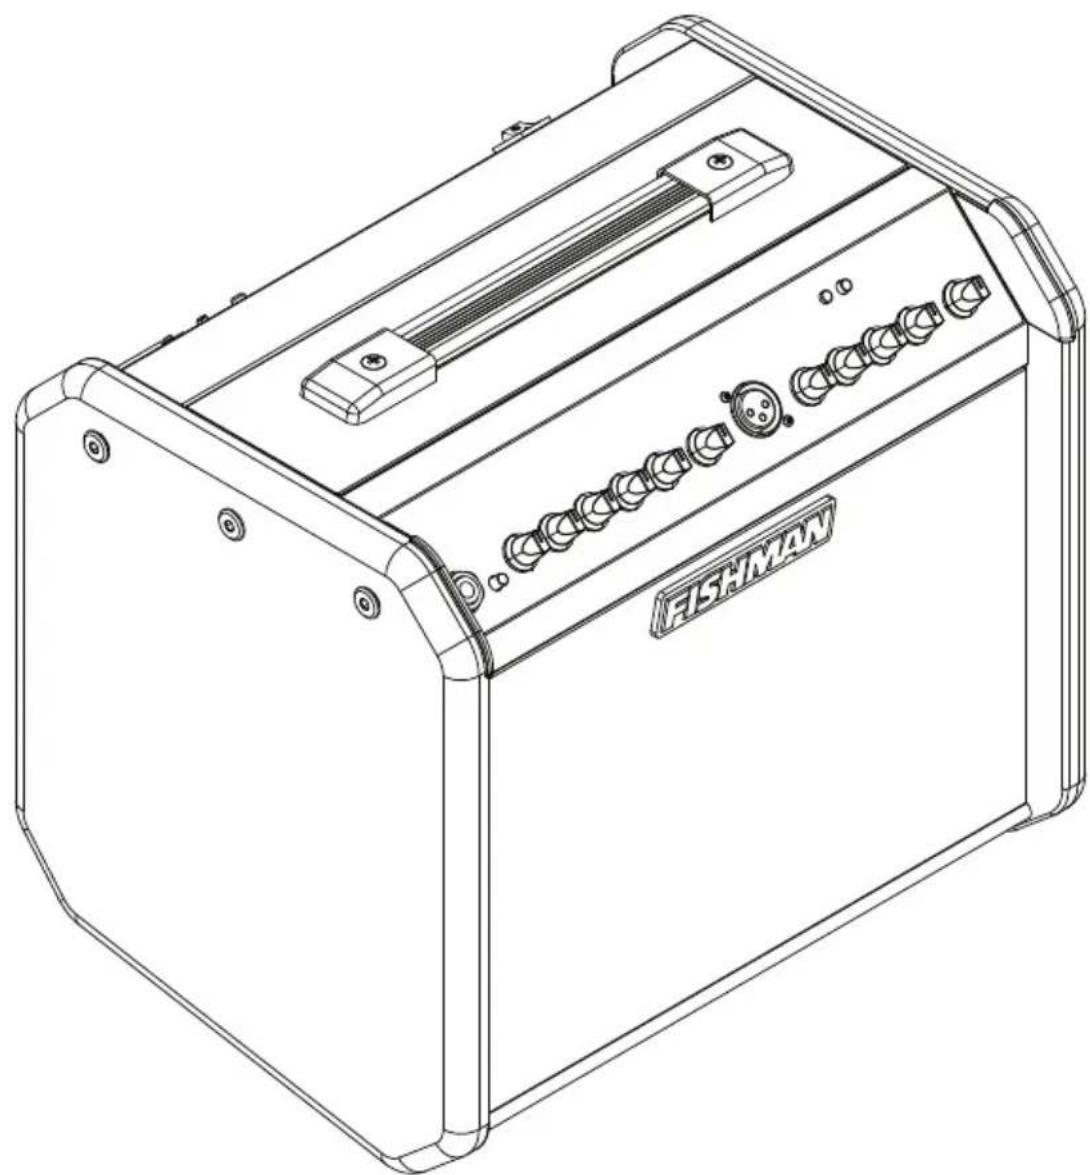
Line drawing of a fishman audio amplifier box with buttons and ventilation slots (no text or symbols)Your new Loudbox Mini is a portable amplifier designed to faithfully reproduce the sound of acoustic instruments and a diverse assortment of vocal or recorded accompaniments.
With the addition of Bluetooth ^® wireless connectivity, you can now easily add backing tracks or other accompaniment to your performances.
Here are some basic setup tips to help get you going. To operate your Loudbox Mini safely, please read the entire manual, especially the Important Safety Instructions on page 2.
- Locate the Power switch (next to the rear panel power cord terminal) and switch it off, then connect the power cord.
- Plug the Loudbox Mini into an electrical outlet with the appropriate AC voltage.
-
Turn down the Master Volume control and turn on the Power switch. The Power Indicator should illuminate.
-
Connect your instrument to the Instrument input with a shielded 14 " cable.
-
Gradually increase the Instrument channel Gain:
-
For instruments featuring active (battery-powered) onboard preamps, start with the control around 10 o'clock.
-
For passive pickups, you may start with the control set much higher. It is normal to run this control near its maximum with many passive soundhole pickups.
-
Slowly raise the Master Volume to the desired level.

text_image
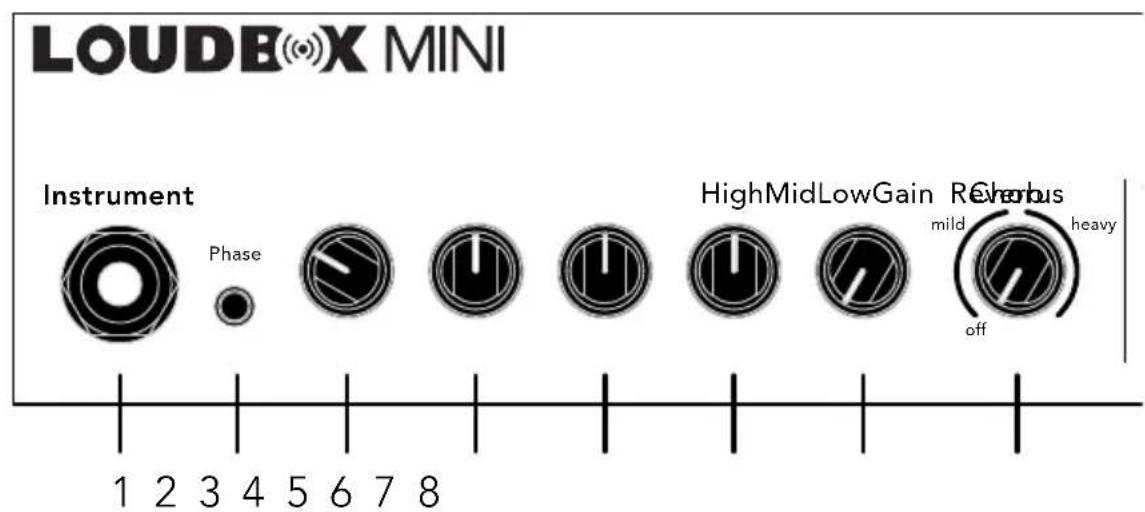
LOUDEBOX MINI Instrument Phase HighMidLowGain Reverbus mild heavy off Mic Gain Low High Reverb Master power1. Instrument Input
This 1/4" input accepts all types of passive or active acoustic pickups.
2. Phase
Use the Phase switch to improve bass at low volume and suppress feedback at high volumes.
3. Gain
Use the Gain knob to set the signal level for the instrument input.
4. Low
Boost here to add weight to the sound. In general, boost bass at low volumes and cut bass at higher levels. With the dial set at 12 o'clock, the control is effectively out of the circuit.
5. Mid
This control affects how well the instrument blends in or stands out in the mix. At loud volumes, a midrange cut will achieve a more natural sound. With the dial set at 12 o'clock, the control is effectively out of the circuit.
6. High
Boost highs to add "air" to the sound of the instrument. With the knob set at 12 o'clock, the control is effectively out of the circuit.
7. Reverb
Controls the amount of digital reverb in the Instrument channel.
8. Chorus
Controls the depth of two separate chorus presets.
text_image
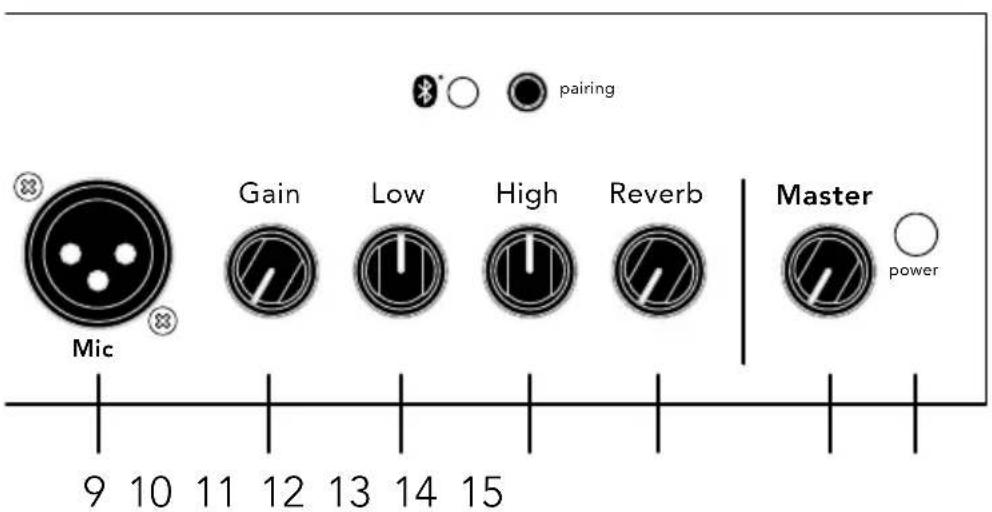
LOUDEoX MINI Instrument Phase HighMidLowGain Corpus mild heavy off 1 2 3 4 5 6 7 89. Mic Input
Plug in a balanced microphone into this XLR input for vocal or for your instrument. The Loudbox Mini makes an excellent mini PA or vocal monitor. You may also connect an outboard preamp with balanced XLR out to this input.
10. Gain
Use the Gain knob to set the signal level for the Microphone input.
11. Low
Boost here to add weight to the sound. In general, boost bass at low volumes and cut bass at higher levels. With the dial set at 12 o'clock, the control is effectively out of the circuit.
12. High
Boost highs to add "air" to the sound of the microphone. With the knob set at 12 o'clock, the control is effectively out of the circuit.
13. Reverb
Controls the amount of digital reverb in the Microphone channel.
14. Master Volume
Set the overall level of the Loudbox Mini with the Master Volume. In general, put the Master Volume as high as possible using less Gain (2 o'clock to 5 o'clock) to achieve the cleanest sound.
15. Power
Lights up when the amplifier power is on. The Power switch is located behind the amp next to the power cord socket.
text_image
Miq Gain Low High Reverb Master power 9 10 11 12 13 14 15 pairing16. Bluetooth® Indicator
This green indicator will display a medium flash indicating the Bluetooth® module is ready for pairing. It will display a slow flash indicating the module is ready for reconnection with a previously paired device. The indicator will be on when playback is active and display a fast flash when playback is paused.
17. Bluetooth® Pairing
To pair a Bluetooth® enabled device for the first time, hold the Pairing button more than 5 seconds. You will hear an ascending tone and the Bluetooth® Indicator will change from a slow flash to a fast flash indicating it is ready to pair. Ensure your Bluetooth® enabled device is in pairing mode. Once paired the indicator will stop flashing and will allow you to stream music to the amplifier.
If the button is pressed during paired playback, the playback will be paused and the Bluetooth® Indicator will display a fast flash. Press the button again to resume playback and the Bluetooth® Indicator will return to on.
To activate Bluetooth® for a previously paired device, hold the Pairing button for approximately 1-2 seconds (must be less than 5 seconds). An ascending tone will play briefly to indicate the Bluetooth® is powering on. The Bluetooth® Indicator will slowly flash informing it is ready to reconnect and will pair if your device is in pairing mode.
To turn off the Bluetooth® when already paired, hold the button for 1-2 seconds. A descending tone will indicate that the connection is powering down and the Bluetooth® Indicator will turn off.

text_image
16 17 pairing
text_image
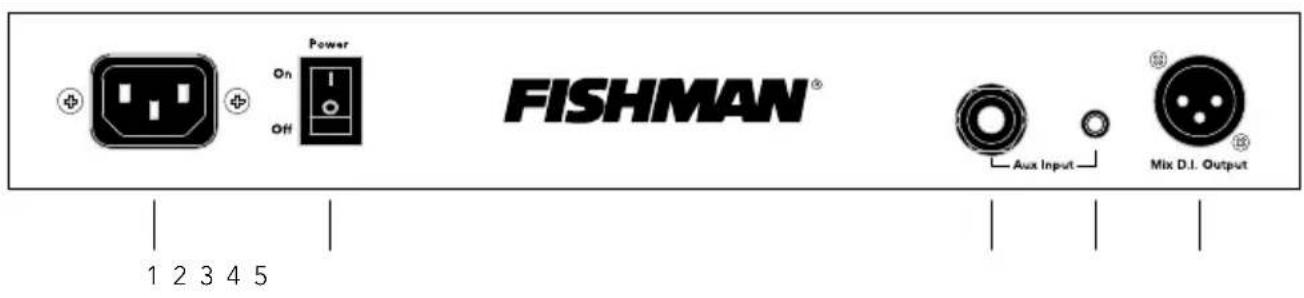
Reverb Chorus mild heavy off Mic Gain Low High Rev1. AC power
Operate the amplifier only at the voltage indicated on the rear panel.
For 120V amplifiers purchased in the USA, Canada and Mexico, plug in the supplied detachable AC power cable.
For 100V and 230V amplifiers purchased outside the USA and Canada, you will need to supply your own detachable AC cable. This cable must have an IEC-style 320 connector at one end, and a male AC plug appropriate for your region at the other.

Disconnect device is AC inlet or power switch.
2. Power switch
Lower the Master Volume before you turn on the amp. Flip the power switch to the up position.
3 & 4. Aux Input - 1/4" & 1/8"
Plug in a line level stereo audio source such as a CD or MP3 player in this input. Both inputs may be used at the same time. They are stereo (TRS) inputs, however the left and right signals are mixed to mono.
5. Mix D.I. (Post)
Plug in here when you wish to send signals from both Channel 1 and 2 to a mixing console or a slave amplifier. This post-EQ output is always ground isolated to prevent ground loop hum.
text_image
FISHMAN® Aux Input Mix D.I. Output 1 2 3 4 5Set up
For reference, start with the tone controls set straight-up, (twelve o'clock). In this position, there is no additional boost or cut equalization applied to your sound. Begin at a very low volume and work your way up. As you turn up, try adjusting the Loudbox Mini's tone controls as recommended below.
1. Low volume
At a low volume (just above conversation level) our ears are not very sensitive to bass and treble, so give the Low and High controls a good boost. Try three o'clock on the dial.

text_image
LOUDB@X MINI Instrument HighMidLowGain Reverbs Mid heavy Mic Gain Low High Reverb Master2. Medium volume
At medium levels, when you need to raise your voice to be heard over the music, the human ear is quite sensitive to midrange. Cut the Mid control to about ten o'clock or to your taste. At this level, our perception of bass and treble starts to catch up to the rest of the tonal spectrum, so you can back off the Low and High controls slightly for good tonal balance.

text_image
LOUDBOX MINI Instrument HighMidLowGain Reverbs MIC Gain Low High Reverb Master3. High volume
At loud levels, when you must shout to be heard over the music, your ears (and your audience) will benefit from a deep midrange cut. Set the Mid dial between nine and seven o'clock. Our perception of bass and treble "fl attens out" at high volumes, so you won't need much, if any, Low or High boost. Set the Low and High knobs to between twelve and one o'clock. In many cases, you can also improve the tone at very high volume if you cut bass. Try setting the Low knob between ten and eleven o'clock.

text_image
LOUDBOX MINI Instrument Phase HighMidLowGain Reverb mild heavy Mie Gain Low High Reverb Master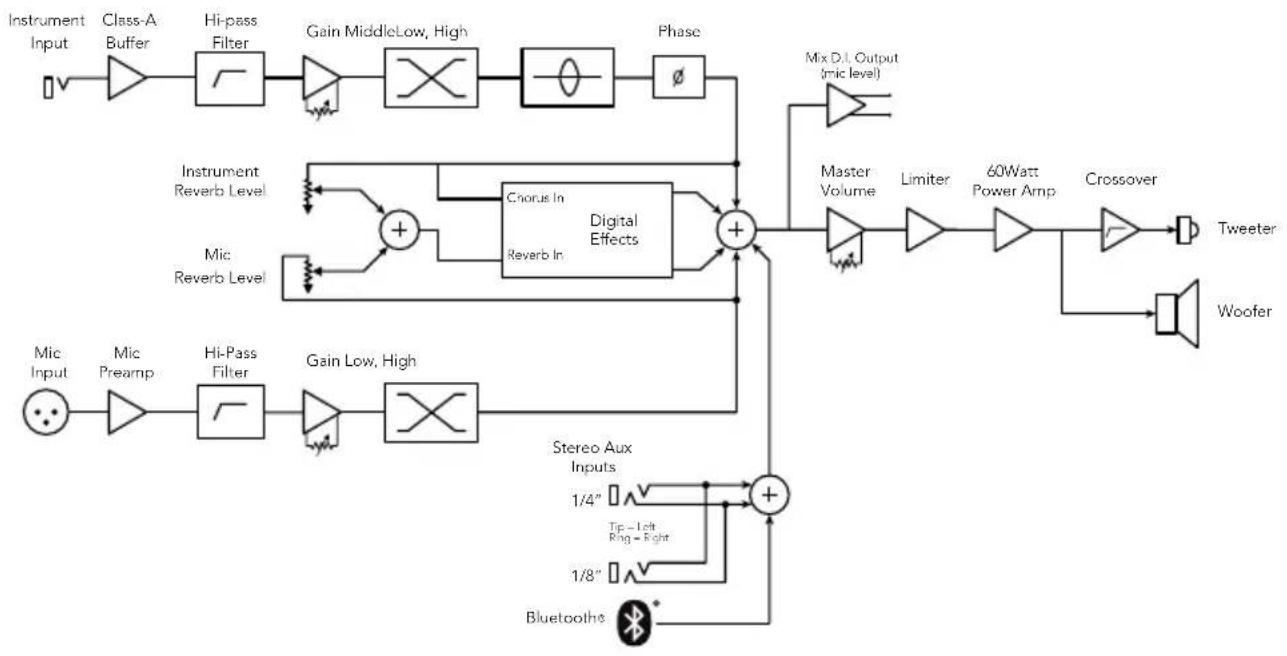
flowchart
graph TD
    A["Instrument Input"] --> B["Class-A Buffer"]
    B --> C["Hi-pass Filter"]
    C --> D["Gain MiddleLow, High"]
    D --> E["Phase"]
    E --> F["Master Volume"]
    F --> G["Limiter"]
    G --> H["60Watt Power Amp"]
    H --> I["Crossover"]
    I --> J["Tweeter"]
    I --> K["Woofer"]
    L["Mic Input"] --> M["Mic Preamp"]
    M --> N["Hi-Pass Filter"]
    N --> O["Gain Low, High"]
    O --> P["Chorus In Reverb In"]
    P --> Q["Digital Effects"]
    Q --> R["+"]
    R --> S["Master Output (mic level)"]
    T["Instrument Reverb Level"] --> U["+"]
    V["Mic Reverb Level"] --> W["+"]
    X["Stereo Aux Inputs 1/4" Tip - Left Ring - Right 1/8""] --> Y["+"]
    Z["Bluetooths *"] --> AA["+"]
    AB["Winch/Max Gain"] --> AC["+"]
Output rating:
SPL @ 1 meter 108 dB (measured)
Frequency Response 80 Hz – 20 kHz
Power rating: 60 W
Input impedance:
Ch. 1 10 MΩ
Ch. 2 2 kΩ
Aux Input (stereo) 10 kΩ
Tone controls:
Low ±12 dB @ 80 Hz (resonant)
Mid ±10.5 dB @ 750 Hz (resonant)
High ±12.5 dB @ 15 kHz (shelving)
Mix D.I. out:
Output Impedance 600 Ω balanced, mic level
Phantom power tolerant
Speaker system:
Woofer 6.5" paper cone
Tweeter 1" soft dome
Baffle Angle 10 degrees
Physical:
Dimensions 9.7" [D] × 13.7" [W] × 12" [H]
(24.7 cm × 34.9 cm × 30.5 cm)
Weight 21.2 lbs (9.6 kg)
Connectivity:
Playback Bluetooth® 4.0
We reserve the right to change any of the specifications and information in this manual without notice.
FISHMAN®
fi shman.com