82TX10 - Grass trimmer Cramer - Free user manual and instructions
Find the device manual for free 82TX10 Cramer in PDF.


User questions about 82TX10 Cramer
0 question about this device. Answer the ones you know or ask your own.
Ask a new question about this device
Download the instructions for your Grass trimmer in PDF format for free! Find your manual 82TX10 - Cramer and take your electronic device back in hand. On this page are published all the documents necessary for the use of your device. 82TX10 by Cramer.
USER MANUAL 82TX10 Cramer
natural_image
Technical line drawing of a handheld electric shaver tool (no text or symbols)English(original instructions)
Product Overview
Your machine has been engineered and manufactured to high standard for dependability, ease of operation, and operator safety. When properly cared for, it will give you years of trouble-free performance.
Know your String trimmer
| 1. Battery release button 12. Upper shaft | |
| 2. Carrying strip 13. Clamp | |
| 3. Switch trigger 14. Slot | |
| 4. Auxiliary handle 15. Knob | |
| 5. Speed button/lock-out button 16. Bolt | |
| 6. On/off button 17. Clamp | |
| 7. 4-step speed limiter indication LED 18. Bump feed | |
| 8. Coupler 19. Spool cover | |
| 9. Guard 20. Spool | |
| 10. Cut-off blade 21. Tab | |
| 11. Lower shaft | |
Packing List
1 String trimmer attachment
2 Auxiliary handle
3 Guard
4 Operator's manual
5 Shoulder strap
The recommended ambient temperature range:
| ITEM TEMPERATURE | |
| String trimmer storage Temperature range | -4 °F (-20 °C) ~ 158 °F (70 °C) |
| String trimmer operation temperature range | -4 °F (-20 °C) ~ 104 °F (40 °C) |
| Battery Charging Temperature Range 41°F (5°C) ~ 125.6 °F (52 °C) | |
| Charger Operation Temperature Range 39°F (4°C) ~ 104 °F (40 °C) | |
| Battery storage Temperature range | 1 year: 32°F (0°C) ~ 73 °F (23 °C) |
| 3 month: 32°F (0°C) ~ 113 °F (45°C) | |
| 1 month: 32°F (0°C) ~ 140 °F (60 °C) | |
| Battery Discharging temperature Range | 6.8 °F (-14 °C) ~ 149 °F (65°C) |
Safety Precautions

Carefully read all the safety warnings and instructions in this manual before operating this string trimmer. Save this operator's manual for future reference.
Intended Use
This product is only intended for use outdoors.
This product is designed for cutting grass, light weeds, and other similar vegetation at or about ground level.
The cutting plane should be approximately parallel to the ground surface.
The product should not be used to cut or trim hedges, bushes or other vegetation
where the cutting plane is not parallel to the ground surface.
Training
- Read the instructions carefully. Be familiar with the controls and the correct use of the machine.
- Never allow children or people unfamiliar with these instructions to use the machine. Local regulations can restrict the age of the operator.
- Keep in mind that the operator or user is responsible for accidents or hazards occurring to other people or their property.
Preparation
- Before use, check the battery pack for signs of damage or aging. If the battery
becomes damaged during use, switch off the appliance and remove the battery immediately. Do not use the appliance if the battery is damaged or worn.
- Before use, always visually inspect the machine for damaged, missing or misplaced guards or shields.
- Never operate the machine while people, especially children, or pets are nearby.
Operation
- Keep power cords away from cutting means.
- Wear eye protection and stout shoes at all times while operating the machine.
- Avoid using the machine in bad weather conditions especially when there is a risk of lightning.
- Use the machine only in daylight or good artificial light.
- Do not expose to rain or in damp condition. Please note that rain, fog
and other humidity can vary in intensity and the equipment can not be used in extreme conditions. Keep batteries away from saline environment and contaminated liquids. After use, the battery and the device are to be dried.
- Never operate the machine with damaged guards or shields or without guards or shields in place.
- Switch on the motor only when the hands and feet are away from the cutting means.
-
Always disconnect the machine from the power supply (i.e. remove the plug from the mains, remove the disabling device or removable battery)
-
whenever the machine is left unattended;
- before clearing a blockage;
- before checking, cleaning or working on the machine;
- after striking a foreign object;
- whenever the machine starts vibrating abnormally.
• Take care against injury to feet and hands from the cutting means.
- Always ensure that the ventilation openings are kept clear of debris.
Maintenance and Storage
- Disconnect the machine from the power supply (i.e. remove the plug from the mains, remove the disabling device or removable battery) before carrying out maintenance or cleaning work.
- Use only the manufacturer's recommended replacement parts and accessories.
- Inspect and maintain the machine regularly. Have the machine repaired only by an authorized repairer.
- When not in use, store the machine out of the reach of children. Make sure to store the product indoors, in a dry place.
Grass trimmer safety warnings
- Children shall not play with the appliance.
- The battery must be removed from the appliance before it is scrapped.
- The appliance must be disconnected from the supply mains when removing the battery.
• The battery is to be disposed of safely. - Do not overreach. Keep proper footing and balance at all times. This enables better control of the power tool in unexpected situations.
- Dress properly. Do not wear loose clothing or jewellery. Keep your hair, clothing and gloves away from moving parts. Loose clothes, jewellery or long hair can be caught in moving parts.
- This appliance is not intended for use by persons (including children) with reduced understanding, or lack of experience and knowledge, unless they have been given supervision
or instruction cnocerning use of the appliance by a person responsible for their safety.
- Children should be supervised to ensure that they do not play with the appliance.
Intended Use
This product is only intended for use outdoors.
This product is designed for cutting grass, light weeds, and other similar vegetation at or about ground level.
The cutting plane should be approximately parallel to the ground surface.
The product should not be used to cut or trim hedges, bushes or other vegetation where the cutting plane is not parallel to the ground surface
Service
- Servicing requires extreme care and knowledge and should be performed only by a qualified service technician. For service we suggest you return the product to your nearest AUTHORISED SERVICE CENTRE for repair. When servicing, use only identical replacement parts.

The operation of any power tool can result in foreign objects being thrown into your eyes, which can result in severe eye damage. Before beginning power tool operation, always wear safety goggles, safety glasses with side shields, or a full face shield when needed. We recommend Wide Vision Safety Mask for use over eyeglasses or standard safety glasses with side shields. Always use eye protection which is marked to comply with EN 166.
SAVE THESE INSTRUCTIONS. REFER TO THEM FREQUENTLY AND USE THEM TO INSTRUCT OTHERS WHO MAY USE THIS UNIT. IF YOU LOAN SOMEONE THIS UNIT, LOAN THEM THESE INSTRUCTIONS ALSO.
Disposal

Do not dispose of the power tool with other household waste. Dispose of power tool in return and collection systems designated for environmental safe recycling.

Separate collection of used products and packaging allows materials to be recycled and used again. Re-use of recycled materials helps prevent environmental pollution and reduces the demand for raw materials.
Batteries

At the end of their useful life, discard batteries with due care for our environment. The battery contains material which is hazardous to you and the environment. It must be removed and disposed of separately at a facility that accepts lithium-ion batteries.
Symbol
| SYMBOL | DESCRIPTION/EXPLANATION |
| [7SZ4] | Read and understand all instructions before operating the product, follow all warnings and safety instructions. |
 | Wear eyes protection and ears protection. |
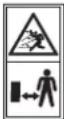 | Beware of thrown or flying objects. Keep all bystanders, especially children and pets, at least 15m away from the operating area. |
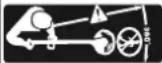 | Keep bystanders a safe distance away from the machine. |
 | The maximum rotational frequency of the spindle. |
 | Noise value. |
 | Double-insulated construction. |
Assembly
Unpacking
This product requires assembly.
- Carefully remove the product and any accessories from the box. Make sure that all items listed in the packing list are included.

WARNING!
Do not use this product if any parts on the Packing List are already assembled to your product when you unpack it. Parts on this list are not assembled to the product by the manufacturer and require customer installation. Use of a product that may have been improperly assembled could result in serious personal injury.
- Inspect the product carefully to make sure no breakage or damage occurred during shipping. - Do not discard the packing material until you have carefully inspected and satisfactorily operated the product.

WARNING!
If any parts are damaged or missing, do not operate this product until the parts are replaced. Use of this product with damaged or missing parts could result in serious personal injury.

WARNING!
Do not attempt to modify this product or create accessories not recommended for use with this string trimmer. Any such alteration or modification is misuse and could result in a hazardous condition leading to possible serious personal injury.

WARNING!
To prevent accidental starting that could cause serious personal injury, always remove the battery pack from the product when assembling parts.
Attach the guard(see Figure 2)

WARNING!
Avoid contact with the blade. Failure to avoid contact can result in serious personal injury.
1 Invert the string trimmer to access the trimmer head.
2 Put the lower shaft into the groove of the guard.
3 Insert the bracket into the slot. Align the screw holes on the bracket with the screw holes on the guard.
4 Install and tighten the screws.
Attaching the auxiliary handle (see Figure 3)
1 Put the auxiliary handle into the groove of the lower clamp.
2 Put the upper clamp onto the handle. Make sure the handle is installed in
the groove.
3 Insert the knob through the upper clamp.
4 Tighten the knob.
Installing the attachments to the split shaft coupling (see Figure 4)
1 Loosen the knob on the coupler.
2 Push in the release button located on the lower shaft. Align the release button with the positioning hole and slide the two shafts together. Rotate the lower shaft until the button locks into the positioning hole.
3 Tighten the knob securely.
NOTE: If the button does not release completely in the positioning hole, the shafts are not locked into place. Slightly rotate from side to side until the button is locked into place.
Installing the battery pack(see Figure 5)
- Put the battery pack in the trimmer. Align the raised ribs on battery pack with the grooves in the trimmer's battery port. Make sure the battery pack is fully seated and secured in the trimmer before beginning operation.
Removing the baterry pack (see Figure 5)
1 Push and hold the battery release button on the side of the rear housing.
2 Take out the battery pack and release the button.
Operation

WARNING!
Do not allow familiarity with products to make you careless. Remember that a careless fraction of a second is sufficient to inflict serious injury.

WARNING!
Always wear eye protection. Failure to do so could result in objects being thrown into your eyes resulting in possible serious injury.

WARNING!
Do not use any attachments or accessories not recommended by the manufacturer of this product. The use of attachments or accessories not recommended can result in serious personal injury.
Hold the product with the right hand on the trigger handle and the left hand on the left handle. Keep a firm grip with both hands while in operation. Power head should be held at a comfortable position with the rear handle about hip height. Always operate power head at full throttle. If debris becomes wrapped around the attachment, RELEASE THE SWITCH TRIGGER, and remove the debris.
Use the harness when operation.
Starting/Stopping the trimmer (see Figure 5)
To start:
1 Press the on/off power button.
2 Pull the safety lock button back and meanwhile squeeze the switch trigger to start.
3 Push the speed button forward to adjust speed depending upon grass condition.
To stop:
1 Release the trigger to stop the trimmer.
2 Press the power button to turn the unit off.
4-Step speed limiter
- 4-step speed limiter function can be used to set the preferred rpm of the trimmer head. This feature helps the user to hold the rpm at a suitable level and by that saving run time. The limiter is adjusted by pushing the speed button (6) forward one step at the time.

WARNING!
Noise. A degree of noise from the machine is not avoidable. Route noisy work is to be licensed and limits for certain periods. Keep rest periods and they may need to restrict the working hours to a minimum. For their personal protection and protection of people working nearby, an appropriate hearing protection shall be worn;
Vibration. Always wear safety and anti-vibration glove. Excessive vibration may cause white finger disease or carpal tunnel syndrome. If you notice an unpleasant sensation or skin discoloration during use of the machine on your hands once you stop working. Place an adequate work breaks. And continual and regular users should monitor closely the condition of their hands fingers.

WARNING!
Contact with the trimmer cutting head while operating can result in serious personal injury.
ADVANCING LINE (see Figure 6)
While the string trimmer is operating, the cutting line gets worn down and becomes shorter. This trimmer is equipped with bump feed line advancement, which advances additional line once the head is bumped on the ground while rotating. The cutting blade will cut the line to keep an accurate cutting swath.
Cutting Tips (see Figure 7)
- Keep the trimmer tilted toward the area being cut; this is the best cutting area.
- The trimmer will cut better when moved from left to right across the area to be cut; it is less effective when moved from right to left.
- Use the tip of the cutting line to do the cutting; do not force cutting head into uncut grass.
- Wire and picket fences cause extra cutting line wear, even breakage. Stone and brick walls, curbs, and wood may wear cutting line rapidly.
- Avoid trees and shrubs. Tree bark, wood moldings, siding, and fence posts can easily be damaged by the cutting line.
LINE CUT-OFF BLADE (see Figure 8)
This trimmer is equipped with a line cut-off blade on the grass deflector. For best cutting, advance line until it is trimmed to length by the line cut-off blade. Advance line whenever you hear the engine running faster than normal, or when trimming efficiency diminishes. This will maintain best performance and keep line long enough to advance properly.

WARNING!
When servicing, use only identical replacement parts. Use of any other parts may create a hazard or cause product damage.

WARNING!
To avoid serious personal injury, always remove the battery pack from the tool when cleaning or performing any maintenance.
Maintenance
Before each use, inspect the entire product for damaged, missing, or loose parts such as screws, nuts, bolts, caps, etc. Tighten securely all fasteners and caps and do not operate this product until all missing or damaged parts are replaced.
Avoid using solvents when cleaning plastic parts. Most plastics are susceptible to damage from various types of commercial solvents and may be damaged by their use. Use clean cloths to remove dirt, dust, oil, grease, etc.

WARNING!
Do not at any time let brake fluids, gasoline, petroleum based products, penetrating oils, etc. come in contact with plastic parts. They contain chemicals that can damage, weaken or destroy plastic.

WARNING!
To avoid serious personal injury, always remove the battery pack from the tool when cleaning or performing any maintenance.
Only the parts shown on the parts list are intended to be repaired or replaced by the customer. All other parts should be replaced at an Authorised Service Centre.
SPOOL REPLACEMENT (see Figure 9-10)
Use original manufacturer's replacement cutting line for best performance.
- Remove the battery pack.
- Push in tabs on both sides of the spool cover.
- Remove the spool cover and the old spool.
- To install the new spool, make sure the cutting line is captured in the slot on the new spool. Make sure the end of the cutting line is extended approximately 15cm beyond the slot.
• Install the new spool so that the cutting line and the slot are aligned with the eyelets in the cutting head. Thread the cutting line through the eyelets.
• Pull the cutting line extending from the cutting head so the cutting line
releases from the slot in the spool.
- Reinstall the spool cover by depressing tabs into slots and pushing down until spool cover clicks into place.
CUTTING LINE REPLACEMENT
A (see Figure 11)
- Remove the battery pack.
- Remove the spool from the cutting head.
NOTE: Remove any old cutting line remaining on the spool.
• Cut a piece of cutting line approximately 3m long.
- Bend the line at the midpoint and hook the loop into the slot in the center rim of the spool. Ensure the line snaps into position in the slot.
- Wind the line in the direction of the arrow shown on the bottom of the spool. Once completed, put the line in the slots so it does not unwind.
- Do not wind the line beyond the edge of the spool.
B (see Figure 12)
Storing the trimmer
- Remove the battery pack from the trimmer before storing.
• Store it in a place that is inaccessible to children. - Keep away from corrosive agents such as garden chemicals and de-icing salts.
- Store and charge your batteries in a cool area. Temperatures above or below normal room temperature will shorten battery pack life.
- Store the battery pack where the temperature is below 23°C and away from moisture.
- All batteries gradually lose their charge. The higher the temperature, the quicker they lose their charge. If you store your unit for long periods of time without using it, recharge the batteries every month or two. This practice will prolong battery pack life.
- Secure the trimmer during transport to prevent damage or injury. Clean and maintenance before storage, use of guards on cutting attachments with metal blades. Use of cover for metal blades during transport and storage.
Environmental protection
- Environmental protection should be a priority of considerable importance when using the machine, for the benefit of both social coexistence and the environment in which we live. Try not to cause any disturbance to the surrounding area.
- Scrupulously comply with local regulations for the disposal of packaging, deteriorated parts or any elements with a strong environmental impact; this waste must not be disposed of as normal waste, it must be separated and taken to specified waste disposal centres where the material will be recycled.
- Scrupulously comply with local regulations for the disposal of waste materials after mowing.
- At the time of decommissioning, do not pollute the environment with the machine, but hand it over to a disposal centre, in accordance with the local laws in force.
Troubleshooting
| PROBLEM | POSSIBLE CAUSE | SOLUTION |
| String will not advance when using the bump-feed head. | String is welded to itself. | Replace string. |
| Not enough string on spool. | Install more string. Refer to string replacement earlier in this manual. | |
| String is worn too short. | Pull string while pressing line release button. | |
| String is tangled on spool. | Remove string from spool and rewind. Refer to string replacement earlier in this manual. | |
| Grass wraps around shaft housing and string head. | Cutting tall grass at ground level | Cut tall grass from the top down to prevent wrapping. |
| Motor fails to start when switch trigger is depressed. | Battery is not secure. | To secure the battery pack, make sure the latch on bottom of the battery pack snaps into place. |
| Battery is not charged. | Charge the battery pack according to the instructions included with your model. | |
| Shaft not connected completely | Make sure lower shaft is fully seated in shaft coupler on upper shaft and secure shaft coupler. |
Technical Data
| PROPERTY VALUE | |
| Model | 82TX10 |
| No load speed 4500 - 5000 - 5500 - 6000 rpm ±10% | |
| Cutting head Bump feed | |
| Cutting Line Diameter 2 mm | |
| Cutting Path Diameter 40 cm | |
| Battery pack | 82V220G/82V430G/82V220/82V430 |
| Charger 82C2/82C6 | |
| Weight (without battery pack) 4.9 kg | |
| Measured sound pressure level | L_PA = 74.96 dB(A), K_PA = 3 dB(A) |
| Measured sound power level | L_WA = 94.96 dB(A) |
| Guaranteed sound power level | L_WA = 96 dB(A) |
| Vibration < 2.5 m/s | ^2, k=1.5m/s^2 |
* If the fault is not solved, you must go to your distributor and/or nearest Authorized Technical Service.
CE Declaration of Conformity
Manufacturer Name: Changzhou Globe Co., Ltd.
Address: No.65 Xinggang Road Zhonglou Zone Changzhou, Jiangsu 213000 P.R.China
Name and address of the person authorised to compile the technical file
Name: Peter Söderström
Address: Propellergatan 1
211 15 Malmö
Sweden
WE HEREBY DECLARE UNDER OUR OWN RESPONSIBILITY THE MACHINE
Original Instruciotn
Type String trimmer
Brand Cramer
Model 82TX10
Serial No See product rating label
Has been manufactured in accordance with the standards or regulatory documents:
Electromagnetic compatibility EN-55014-1/EN-55014-2
Electrical safety EN60335-1/EN 50636-2-91/EN
ISO 3744/ISO 11094
Noise Emission Directive 2000/14/EC amended by
2005/88/EC
And conforms to the essential requirements of the following directives:
Machine directive 2006/42/EC
Electromagnetic compatibility directive
2014/30/EU
Model 82TX10
Measured sound power level
L_WA=94.96 dB(A)
Guaranteed sound power level
L_WA=96 dB(A)
Ted Qu
Ted Qu Haichao
Quality Director
Changzhou, 22/07/2017
Produktüberblick
Address: Propellergatan 1
211 15 Malmö
Sweden
Endereço: No.65 Xinggang Road Zhonglou Zone Changzhou, Jiangsu 213000 P.R.China
Address: Propellergatan 1
211 15 Malmö
Sweden
VEDLIKEHOLD OG LAGRING
Attaching the auxiliary handle (se Figure 3)
Brug selen under betjening.
Starte/stoppe trimmeren (se Figur 5)
For at starte:
To avoid serious personal injury, always remove the battery pack from the tool when cleaning or performing any maintenance.
Adrese: No.65 Xinggang Road Zhonglou Zone Changzhou, Jiangsu 213000 P.R.China