
SSWC056D1B - Wine cellar DANBY - Free user manual and instructions
Find the device manual for free SSWC056D1B DANBY in PDF.
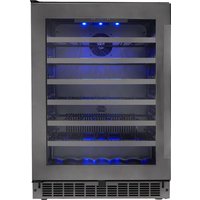


| Product Type | Wine Cellar |
| Brand | Danby |
| Model | SSWC056D1B |
| Maximum Capacity | 48 bottles (750 ml) |
| Dimensions (W x D x H) | 60.96 x 63.5 x 86.8 cm (24 x 25 x 34 9/16 in) |
| Weight | Approximately 50 kg (estimate) |
| Power Supply | 115 V ~ 60 Hz, individual circuit 15 or 20 A |
| Temperature Range | 5 °C to 20 °C (adjustable in increments of 1 °C/°F) |
| Temperature Control | Electronic, digital display with +/− buttons |
| Door | Tempered low-emissivity glass, reversible |
| Door Gasket | Magnetic, airtight |
| Interior Lighting | LED, turns on when door opens |
| Air Ventilation | Front (for built-in installation) |
| Leveling Legs | 2 adjustable legs at the front |
| Number of Shelves | Sliding wire shelves |
| Open Door Alarm Function | Yes, after 5 minutes |
| High/Low Temperature Alarm Function | Yes (HI/LO display) |
| Temperature Memory | Retains setting after power outage |
| Cabinet Material | Painted steel, plastic interior |
| Warranty | 24 months parts and labor |
| Maintenance | Clean with mild detergent, no ammonia or alcohol |
Frequently Asked Questions - SSWC056D1B DANBY
User questions about SSWC056D1B DANBY
0 question about this device. Answer the ones you know or ask your own.
Ask a new question about this device
Download the instructions for your Wine cellar in PDF format for free! Find your manual SSWC056D1B - DANBY and take your electronic device back in hand. On this page are published all the documents necessary for the use of your device. SSWC056D1B by DANBY.
USER MANUAL SSWC056D1B DANBY
Read and follow all safety rules and operating instructions before first use of this product.

PRECAUTION
Dear Valued Customer: We hope your Silhouette appliance fulfills all of your entertaining needs. Your satisfaction is our priority. Please contact our Customer Care Center toll-free via 1.844.455.6097 for any inquiries you may have about your new purchase.
DO NOT RETURN THIS APPLIANCE TO THE RETAILER UNTIL FURTHER NOTICE
Owner's Use and Care Guide. 1-12
- Safety Instructions Before Use
- Installation Instructions Features
- Operating Instructions Care and Maintenance Troubleshooting Warranty

CAUTION:
Read and follow all safety rules and operating instructions before first use of this product.

WARNING:
We know you're excited. We are too! However, the more familiar you are with your new appliance, the better experience you will have. We therefore strongly suggest that you read this Owner's Manual before plugging in your new appliance. It contains important operational information that will help you make full use of the technical features available in your appliance. The manual also contains information designed to enhance operating reliability and safety, as well as tips to maintaining your new appliance so that it brings you happiness for years to come.
Please visit www.silhouetteappliances.com to access self-service tools, FAQs and more. Should you need additional assistance, please call 1-844-455-6097.
Note: You will need the below information to obtain service under warranty.
To receive service, you must provide the original receipt.
Model Number:
Serial Number:
Date of Purchase:
NEED HELP?
Before you call for service, here are a few things you can do to help us serve you better:
Read this Owner's Manual:
It contains instructions to help you use and maintain your appliance properly.
If you received a damaged appliance:
Immediately contact the retailer (or builder) that sold you the appliance.
Save time and money:
- Check the Troubleshooting section at the end of the guide before calling. This section helps you solve common problems that may occur.
If you do need service, you can relax, knowing help is only a phone call away.
1-844-455-6097

Important Safety Information READ AND FOLLOW ALL SAFETY INSTRUCTIONS

IMPORTANT WARNING
An empty unit is a very dangerous attraction to children. Remove either the gasket or lid from unused appliances, or take some other action that will guarantee it harmless.
DANGER: Risk of child entrapment. Before you throw away your old unit:
Take off doors. - Leave the shelves in place so that children may not easily climb in.
DON'T WAIT! DO IT NOW!
This appliance must be grounded. In the event of an electrical short circuit, grounding reduces the risk of electrical shock by providing an escape wire for the electrical current.
ELECTRICAL REQUIREMENTS
WARNING
ELECTRICAL RATING: The serial rating plate indicates the voltage and frequency the appliance is designed for.
Please ensure that component parts shall be replaced with like components and that servicing shall be done by factory authorized service personnel, so as to minimize the risk of possible ignition due to incorrect parts or improper service.
To avoid installation / operation difficulties, read these instructions thoroughly.
- This appliance must be grounded. Connect only to a properly grounded outlet. See "Grounding Instructions" section.
- Do not operate this appliance if it has a damaged power cord or plug, if it is not working properly, or if the appliance has been damaged or dropped.
- Never allow children to operate, play with, or crawl inside the appliance.
- Never clean appliance parts with flammable fluids. The fumes can create a fire hazard or explosion.
- Do not store or use gasoline or any other flammable vapors or liquids in the vicinity of this or any other appliance. The fumes can create a fire hazard or explosion.
- Do not splice the power cord that is equipped with this appliance.
- Keep power cord away from heated surfaces.
- Do not immerse power cord, plug or the appliance itself in water.
- Do not use this product near water for example, in a wet basement, near a swimming pool or near a sink.
- Do not use corrosive chemicals or vapors in this appliance.
- Use this appliance only for its intended use, as described in this manual.
- Store beverages in sealed containers only.
- See door surface cleaning instructions in the Care and Maintenance section of this manual.
- Do not cover or block any openings on the appliance.
- Do not store perishable food items such as (but not limited to) meats and dairy products in your cooler. This appliance is intended for household use only. Do not attempt to operate or store this appliance outdoors. This appliance should be serviced only by qualified service personnel. Contact the nearest authorized service facility for examination, repair or adjustment. This unit is not designed for outside installation, including installation anywhere that is not temperature controlled (garages, porches, carports, etc.).

Important Safety Information READ AND FOLLOW ALL SAFETY INSTRUCTIONS
GROUNDING INSTRUCTIONS
This appliance is equipped with a cord having a grounding wire with a grounding plug. The plug must be plugged into an outlet that is properly installed and grounded.
This appliance must be grounded. In the event of an electrical short circuit, grounding reduces the risk of electric shock by providing an escape wire for the electric current.
WARNING - Improper use of the grounding plug can result in a risk of electric shock. Consult a qualified electrician or service agent if the grounding instructions are not completely understood, or if doubt exists as to whether the appliance is properly grounded.
If the outlet is a standard 2-prong wall outlet, it is your personal responsibility and obligation to have it replaced with a properly grounded 3-prong wall outlet.
For best operation, plug this appliance into its own electrical outlet to prevent flickering of lights, blowing of fuse or tripping of circuit breaker.
DO NOT USE AN EXTENSION CORD.
Use an exclusive 115V wall outlet. Do not connect your appliance to extension cords or together with another appliance in the same wall outlet. Do not splice the cord. Do not under any circumstances cut or remove the third (ground) prong from the power cord. Do not use an adapter plug with this appliance.
SAVE THESE INSTRUCTIONS!

Installation Instructions
FOR YOUR SAFETY
- While performing installations described in this section, gloves and goggles or safety glasses should be worn. Two people should be used when moving the cooler.
- Remove interior and exterior packaging prior to installation. Before connecting the appliance to a power source, let it stand upright for approximately 6 hours; this will reduce the possibility of a malfunction in the cooling system from handling during transportation.
- Place your cooler on a floor that is strong enough to support it when it is fully loaded. To level your cooler, adjust the front leveling leg at the bottom of the unit.
- Locate the cooler away from direct sunlight and sources of heat (stove, heater, radiator, etc.). Direct sunlight and heat sources may increase electrical consumption. Extreme cold ambient temperatures may also cause the unit to perform improperly.
- Avoid locating the unit in moist areas.
- Plug the cooler into an exclusive, properly installed-grounded wall outlet. Do not under any circumstances cut or remove the third (ground) prong from the power cord. Any questions concerning power and/or grounding should be directed toward a certified electrician or an authorized service centre.
- Do not cover shelves with aluminum foil or any other material which may prevent air circulation.
- In order for the cabinet to remain efficient, do not overload it.
- Do not open the door unless necessary.
- Should the cooler be stored without use for long periods, it is suggested, after careful cleaning, to leave the door ajar. This will allow air to circulate inside the cabinet in order to avoid possible formations of condensation, mold and odors.
LOCATION
Selecting the proper location will ensure peak performance levels for your appliance. Choose a location where the unit will not be exposed to heat emitting sources (e.g. a fireplace or a barbeque). The cooler should not be exposed to direct sunlight. Do not use product near water, for example in a wet basement, near a swimming pool or sink. To achieve operating efficiency, the recommended (room ambient) operating temperatures should be between 16°C (61°F) to 32°C (90°F).
NOTE: This unit is front breathing. Do not block the front air vent. Blockage of the vent will result in high operating temperatures and system failure.
Fig.G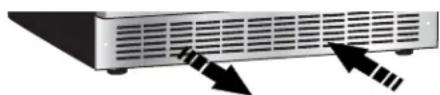
PREPARING THE ENCLOSURE
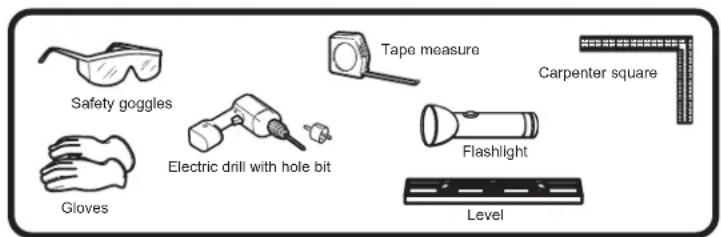
Tools you will need:
While performing installations described in this section, gloves and safety glasses or goggles should be worn.
Electrical Requirements:
The appliance must be connected to an individual, properly grounded electrical outlet, protected by a 15 or 20 ampere circuit breaker or time delay fuse.
It is recommended that you do not install the unit into a corner (i.e. directly beside a wall). This is to allow the door to have a greater than 90° opening swing. A limited door swing may lead to damaging the door gasket, however, if it is necessary to install the unit in a corner, be sure to allow 2-4 inches of clearance at each side. The rough cabinet opening must be on a level floor area and at least 24" (60.96 cm) deep by 24" (60.96 cm) wide (min). The opening should also have a height of at least 34 3/4" (88.26 cm). The electrical outlet may be positioned from within either side of the adjacent cabinetry, or the rear of the shaded area (as shown in Fig. 2). If the electrical outlet is located inside the adjacent cabinetry, cut a 1-1/2" (3.81 cm) diameter hole to admit the power cord. If the cabinet wall is metal, the hole edge must be covered with a bushing or grommet.
PREPARING THE ENCLOSURE (continued)
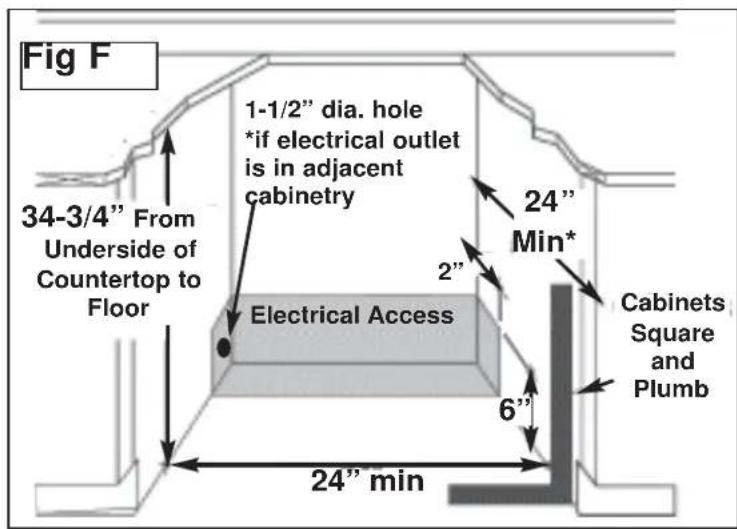
Important: The listed depth requirement for the installation is assuming that the electrical outlet is located in the adjacent cabinetry or is flush mounted in the rear wall, not surface mounted in the enclosure.

Operating Instructions
FEATURES
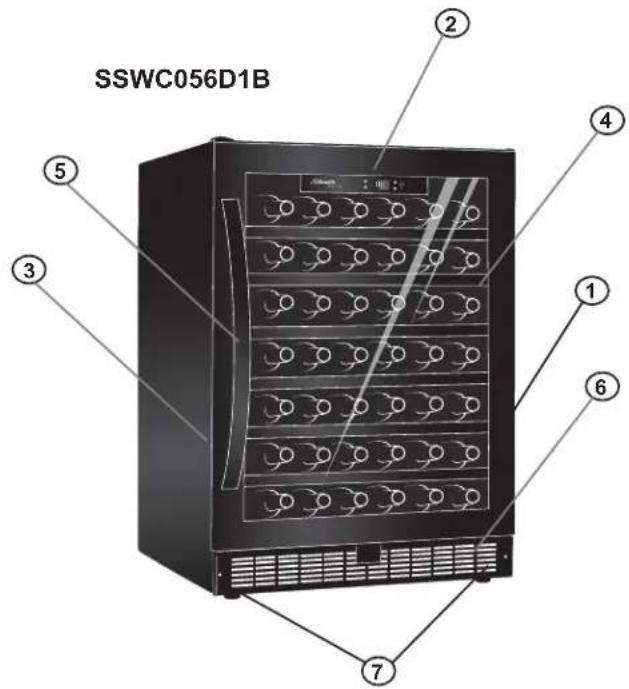
- Tempered Glass Door: Low-E glass, used to reflect and absorb heat.
- Electronic Display and Controls: For viewing and regulating the temperature of the wine cooler.
- Magnetic Door Gaskets: Tight fitting seals retain all the cooling power and humidity levels.
- Shelves
- Handle
- Front Mounted Exhaust: Allows for integrated (built-in) applications.
- Leveling Legs
- Interior Light (not shown): LED lighting illuminates the interior without the heat of an incandescent bulb.

Operating Instructions
FEATURES
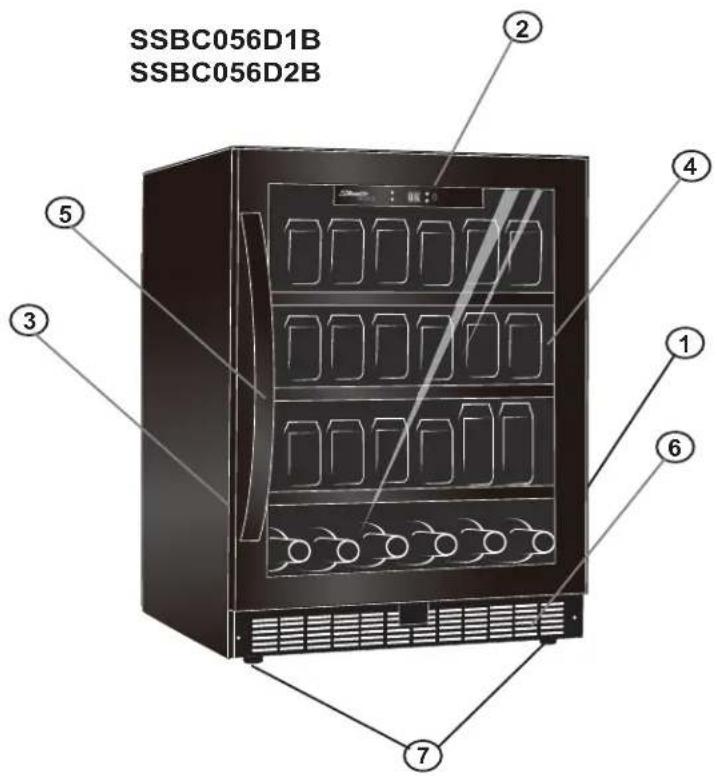
- Tempered Glass Door: Low-E glass, used to reflect and absorb heat.
- Electronic Display and Controls: For viewing and regulating the temperature of the Beverage Centre.
- Magnetic Door Gaskets: Tight fitting seals retain all the cooling power and humidity levels.
- Shelves
- Handle
- Front Mounted Exhaust: Allows for integrated (built-in) applications.
- Leveling Legs
- Interior Light (not shown): LED lighting illuminates the interior without the heat of an incandescent bulb.
CONTROL PANEL

Indicator light illuminates to signify the cooling mode is currently in operation.

Control the interior light ON/OFF. (If you press this button, the inner light is not controlled by the Mechanical Switch, it is continuously lit).

To turn appliance on/off (press and hold this button for approximately 3 seconds).

Used to raise (warm) the temperature by 1° increments.

Used to lower (cool) the temperature by 1° increments.
°C / °F Adjacent indicator light denotes which scale of temperature is being displayed.
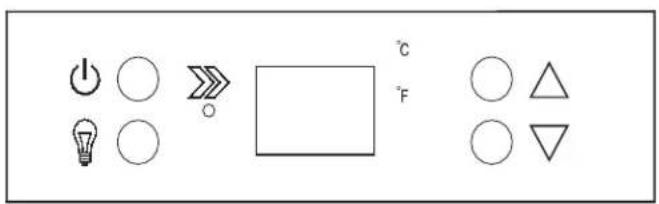
Setting the Temperature Controls
When you plug in your beverage centre for the first time the temperature will automatically be set to 12°C (54°F). The default setting is °F.
Each depression of the or button will allow you to adjust the temperature in 1° increments. To switch the display between °F and °C, depress the ∧ and simultaneously for approximately 3-5 seconds.
FUNCTION INSTRUCTION
Door Ajar Alarm Function
If the door is not closed completely, the alarm will sound after 5 minutes. Please close the door completely to avoid the loss of cold energy. The alarm will stop once the door is closed.
Temperature Memory Function
If power is lost, the set temperature will be saved by the unit. Once the power is back on, the unit will return to the same set temperature.
Temperature Alarm Function
If the inner temperature is higher than 23°C (73°F), "HI" is shown on the display panel and the alarm will sound after one hour. It is to inform you that the inner temperature is too high; please check the reason. If the inner temperature is lower than 0°C (32°F), "LO" is shown on the display panel and the alarm will sound and the malfunction indicator light will appear at the same time.
If too many bottles/cans are put in at once or the door has not been closed tightly, the unit will display the "HI" signal in the display panel. This is normal; please wait 5 minutes after you close the door and "HI" will disappear.
It is normal that the cabinet shows "HI" or "LO" from time to time. If it occurs frequently or lasts for a long time, you can restart the unit by unplugging it. If the problem occurs once again after restart, please contact customer service.
SSWC056D1B STORAGE
IMPORTANT
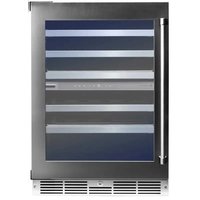
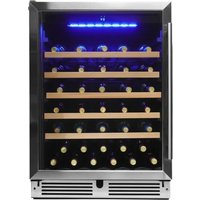
The maximum* capacity of the unit is 48 (750ml) wine bottles. - Store wine in sealed bottles only.
*When stocked as per instructions
In order to achieve the maximum storage capacity of forty-eight (48) bottles, it will be necessary to position 7 bottles each on the 6 shelves and 6 bottles on the bottom of the unit.
SSBC056D1B / SSBC056D2B STORAGE
IMPORTANT
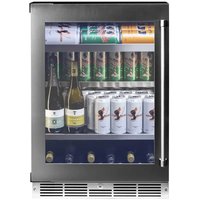
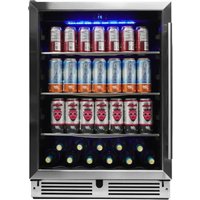
The maximum capacity of the unit is 6 (750ml) wine bottles and 138 (355ml) beverage cans. When stocked as per instructions
In order to achieve the maximum storage capacity of six (6) bottles and 138 beverage cans, it will be necessary to put 46 cans on each of the 3 shelves and 6 bottles on the bottom of the unit.
SSWC056D1B SHELVES
Important: Do not cover the gap on the racks with aluminum foil or any other material that will prevent adequate air circulation within the cabinet.
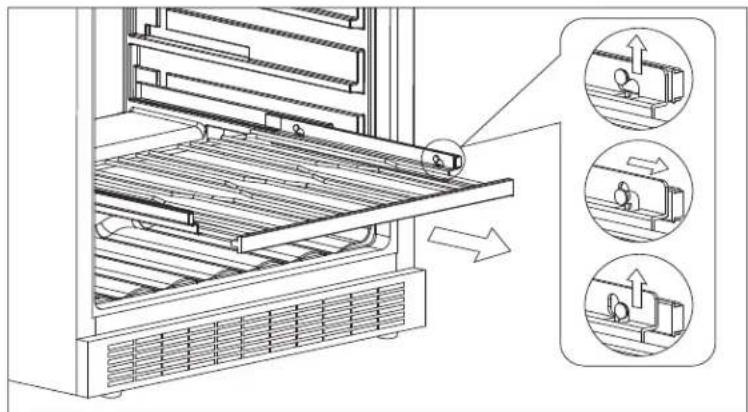
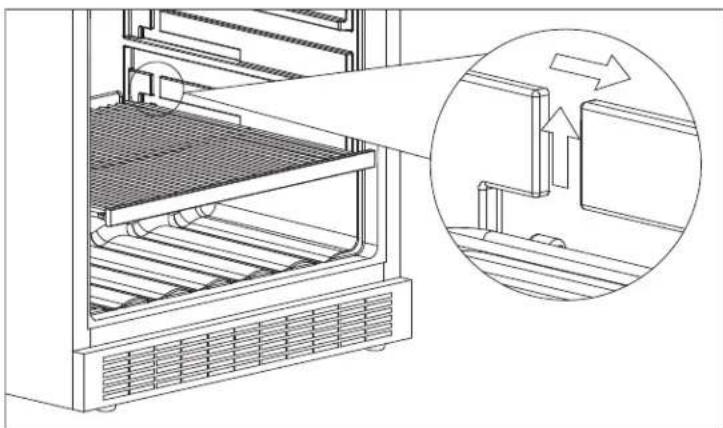
To remove wine shelves:
- Fully extend the shelf you wish to remove.
- Lift the front of the shelf up.
- Holding the shelf track, push the shelf in, then up to release from the rear dampers.
SSBC056D1B / SSBC056D2B SHELVES
Important: Do not cover the gap on the shelves with aluminum foil or any other material that will prevent adequate air circulation within the cabinet.
To remove shelves:
- Lift the back of the shelf up so the shelf pegs are above the lower rail.
- Slide the shelf out of the unit with the pegs on the upper rail.

Operating Instructions
DOOR REVERSAL
Fig 1A Fig 1B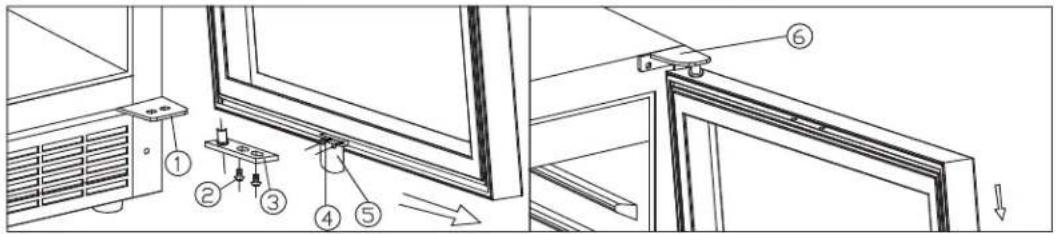
Fig 1C Fig 1D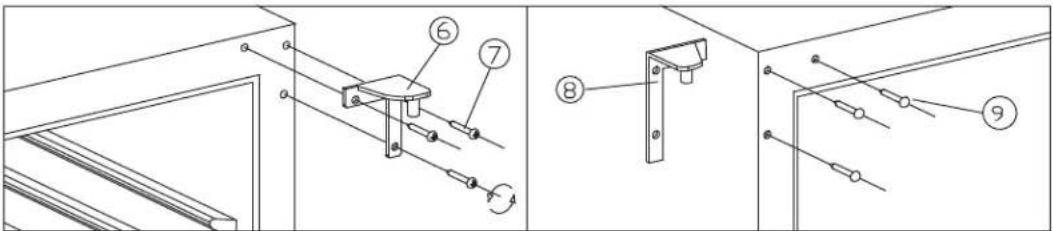
Fig 1E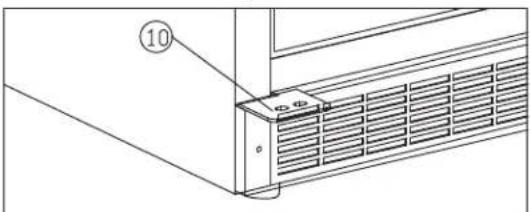
Fig 1F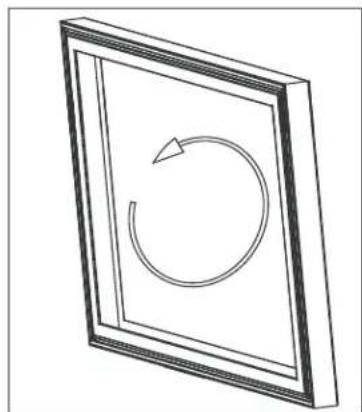
- Bottom Hinge (Right)
- Screws
- Door Axis
- Screws
- Mechanical Switch
- Top Hinge (Right)
- Screws
- Top Hinge (Left)
- Plug
- Bottom Hinge (Left)
- Open the door to a 90° angle, take out 2 screws from the lower door axis (3), remove the door (refer to Fig. 1A), then pull out the door and door axis (Fig. 1A).
- Put the door safely down, unscrew 2 screws (4) at the bottom and remove the mechanical switch (5), then install (5) at the top of the door frame (Fig 1A and 1B).
- Take out 3 screws (7) from the top hinge (right) (6) and remove the right top hinge (Fig. 1C).
- Remove the plug (9) from the top left of the cabinet and install the spare top hinge (left) (8) at the top left of the cabinet with 3 screws (Fig. 1D).
- According to the above procedure, install the spare lower hinge (left) (10) onto the lower left cabinet (Fig. 1E).
- Once the door has been moved, install the door the same way that it was removed and ensure the door is properly aligned.
- Block the hole at the top right of the cabinet with the spare plug.
Please note: Do not lay the unit on its back.
CLEANING YOUR APPLIANCE
Cleaning the Inside:
- Walls, floor, inside window and shelves - Some water deposits and dust can be removed with a dry paper towel, others may require a damp cloth.
Cleaning the Outside:
- Outer Case - It is important to keep the area clean where the door seals against the cabinet. Clean this area with a soapy cloth. Rinse with a damp cloth and let dry.
- Control Panel and Door - Wipe with a damp cloth and dry thoroughly. Do not use cleaning sprays, large amounts of soap and water, abrasive or sharp objects on the panel, they can damage it. Some paper towels may also scratch the control panel and glass on the door.
- Door Surface - Use only mild, non-abrasive detergents applied with a clean sponge or soft cloth. Rinse well with damp cloth.
NOTE: Do not use cleaners containing ammonia or alcohol on the cooler. Ammonia or alcohol can damage the appearance of the appliance.
NOTE: Never use any commercial / abrasive cleaners or sharp objects on any part of the cooler.
POWER FAILURE
- Most power failures are corrected within a few hours and should not affect the temperature of your appliance if you minimize the number of times the door is opened. If the power is going to be off for a longer period of time, you need to take the proper steps to protect your contents.
VACATION TIME
- Short vacations: Leave the cooler operating during vacations of less than three (3) weeks.
- Long vacations: If the appliance will not be used for several months, remove all items and turn off the appliance. Clean and dry the interior thoroughly. To prevent odor and mold growth, leave the door open slightly, blocking it open if necessary.
ENERGY SAVING TIP
- The unit should be located in the coolest area of the room, away from heat producing appliances, and out of direct sunlight.
MOVING YOUR APPLIANCE
- Remove all items.
- Securely tape down all loose items (shelves) inside your appliance.
- Turn the adjustable leg up to the base to avoid damage.
- Tape the door shut.
- Be sure the appliance stays secure in the upright position during transportation. Also protect the outside of the appliance with a blanket or similar item.
Occasionally, a problem is minor and a service call may not be necessary - use this troubleshooting guide for a possible solution. If the unit continues to operate improperly, call an authorized service depot or our Toll Free Number 1-844-455-6097 for assistance.
| PROBLEM POSSIBLE CAUSE SOLUTIONS | ||
| No power • A fuse in your home may be blown or the circuit breaker tripped • Power surge • Plug not fully inserted into wall outlet | • Replace fuse or reset circuit breaker • Unplug the cooler, wait a few seconds and then plug it back in • Make sure the 3-prong plug is fully inserted into the outlet | |
| Cabinet temperature is too high | • Temperature is set too high • Door is not shut properly or opened excessively • Exhaust vent is obstructed • Recently added a large quantity of warm beverages to the cabinet | • Verify the temperature control setting, adjust if necessary • Ensure that the door is fully closed and that the gasket is sealing against the cabinet. Open the doors only as needed and for short periods of time • Verify there is nothing blocking the front mounted exhausting vent • Limit the quantity of warm beverages being introduced to the cabinet at the same time. Attempt to stagger the load introduction if possible |
| Alarm beeping and “HI” is displayed on the control panel | • Recently added a large quantity of warm bottles or cans to the cabinet • The door is not closed tightly • System leak, evaporator fan failure or compressor fan failure | • Limit the quantity of warm items being introduced to the cabinet • Be sure the door is closed tightly • Contact a service centre, to stop the beeping, unplug the unit |
| Alarm beeping and “LO” is displayed in the control panel | • Sensor failure, evaporator temperature is too low | • Contact a service centre, to stop the beeping, unplug the unit |
| Condensation on the cabinet and/or doors | • High humidity conditions in the home • Door not shut properly or opened excessively | • The condensation will subside once humidity conditions return to normal • Ensure that the door is fully closed and that the gasket is sealing against the cabinet. Open the door only as needed and for short periods of time |
Silhouette SELECT
LIMITED IN-HOME APPLIANCE WARRANTY
This quality product is warranted to be free from manufacturer's defects in material and workmanship, provided that the unit is used under the normal operating conditions intended by the manufacturer. This warranty is available only to the person to whom the unit was originally sold by Danby Products Limited (Canada) or Danby Products Inc. (U.S.A.) (hereafter "Danby") or by an authorized distributor of Danby, and is non-transferrable.
TERMS OF WARRANTY
Plastic parts are warranted for thirty (30) days only from purchase date, with no extensions provided.
| First 24 Months | During the first twenty four (24) months, any functional parts of this product found to be defective, will be repaired or replaced, at warrantor's option, at no charge to the ORIGINAL purchaser. |
| To obtain Service | Danby reserves the right to limit the boundaries of "In Home Service" to the proximity of an Authorized Service Depot. Any appliance requiring service outside the limited boundaries of "In Home Service", it will be the consumer's responsibility to transport the appliance (at their own expense) to the original retailer (point of purchase) or a service depot for repair. See "Boundaries of In Home Service" below. Contact your dealer from whom your unit was purchased, or contact your nearest authorized Danby service depot, where service must be performed by a qualified service technician. If service is performed on the units by anyone other than an authorized service depot, or the unit is used for commercial application, all obligations of Danby under this warranty shall be void. |
| Boundaries of In Home Service | If the appliance is installed in a location that is 100 kilometers (62 miles) or more from the nearest service center your unit must be delivered to the nearest authorized Danby Service Depot, as service must only be performed by a technician qualified and certified for warranty service by Danby. Transportation charges to and from the service location are not protected by this warranty and are the responsibility of the purchaser. |
Nothing within this warranty shall imply that Danby will be responsible or liable for any spoilage or damage to food or other contents of this appliance, whether due to any defect of the appliance, or its use, whether proper or improper.
EXCLUSIONS
Save as herein provided, Danby, there are no other warranties, conditions, representations or guarantees, express or implied, made or intended by Danby or its authorized distributors and all other warranties, conditions, representations or guarantees, including any warranties, conditions, representations or guarantees under any Sale of Goods Act or like legislation or statute is hereby expressly excluded. Save as herein provided, Danby shall not be responsible for any damages to persons or property, including the unit itself, howsoever caused or any consequential damages arising from the malfunction of the unit and by the purchase of the unit, the purchaser does hereby agree to indemnify and hold harmless Danby from any claim for damages to persons or property caused by the unit.
GENERAL PROVISIONS
No warranty or insurance herein contained or set out shall apply when damage or repair is caused by any of the following: 1) Power failure. 2) Damage in transit or when moving the appliance. 3) Improper power supply such as low voltage, defective house wiring or inadequate fuses. 4) Accident, alteration, abuse or misuse of the appliance such as inadequate air circulation in the room or abnormal operating conditions (extremely high or low room temperature). 5) Use for commercial or industrial purposes (ie. If the appliance is not installed in a domestic residence). 6) Fire, water damage, theft, war, riot, hostility, acts of God such as hurricanes, floods etc. 7) Service calls resulting in customer education. 8) Improper Installation (ie. Building-in of a free standing appliance or using an appliance outdoors that is not approved for outdoor application). Proof of purchase date will be required for warranty claims; so, please retain bills of sale. In the event warranty service is required, present this document to our AUTHORIZED SERVICE DEPOT.
Warranty Service
In-home
Danby Products Limited
PO Box 1778, Guelph, Ontario, Canada N1H 6Z9
Telephone: (519) 837-0920 FAX: (519) 837-0449
1-800-263-2629
07/13
Danby Products Inc.
PO Box 669, Findlay, Ohio, U.S.A. 45840
Telephone: (419) 425-8627 FAX: (419) 425-8629
All repair parts are available for purchase or special order when you visit your nearest service depot. To request service and/or the location of the service depot nearest you, call the TOLL FREE number.
When requesting service or ordering parts, always provide the following information:
Product Type Model Number Part Number Part Description
- PRECAUTION
- DO NOT RETURN THIS APPLIANCE TO THE RETAILER UNTIL FURTHER NOTICE
- OWNER'S USE AND CARE GUIDE
- CAUTION
- WARNING
- NEED HELP
- READ THIS OWNER'S MANUAL
- IF YOU RECEIVED A DAMAGED APPLIANCE
- SAVE TIME AND MONEY
- IMPORTANT SAFETY INFORMATION READ AND FOLLOW ALL SAFETY INSTRUCTIONS
- IMPORTANT WARNING
- ELECTRICAL REQUIREMENTS
- GROUNDING INSTRUCTIONS
- DO NOT USE AN EXTENSION CORD
- SAVE THESE INSTRUCTIONS
- INSTALLATION INSTRUCTIONS
- FOR YOUR SAFETY
- LOCATION
- PREPARING THE ENCLOSURE
- PREPARING THE ENCLOSURE (CONTINUED)
- OPERATING INSTRUCTIONS
- FEATURES
- CONTROL PANEL
- SETTING THE TEMPERATURE CONTROLS
- FUNCTION INSTRUCTION
- DOOR AJAR ALARM FUNCTION
- TEMPERATURE MEMORY FUNCTION
- TEMPERATURE ALARM FUNCTION
- SSWC056D1B STORAGE
- IMPORTANT
- SSBC056D1B / SSBC056D2B STORAGE
- SSWC056D1B SHELVES
- SSBC056D1B / SSBC056D2B SHELVES
- DOOR REVERSAL
- CLEANING YOUR APPLIANCE
- CLEANING THE INSIDE
- CLEANING THE OUTSIDE
- POWER FAILURE
- VACATION TIME
- ENERGY SAVING TIP
- MOVING YOUR APPLIANCE
- SILHOUETTE SELECT
- LIMITED IN-HOME APPLIANCE WARRANTY
- TERMS OF WARRANTY
- EXCLUSIONS
- GENERAL PROVISIONS
- WARRANTY SERVICE
Brand : DANBY
Model : SSWC056D1B
Category : Wine cellar