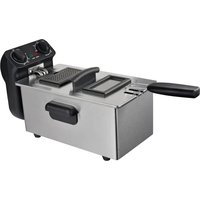
AF-2410S - Deep fryer Brentwood - Free user manual and instructions
Find the device manual for free AF-2410S Brentwood in PDF.

User questions about AF-2410S Brentwood
0 question about this device. Answer the ones you know or ask your own.
Ask a new question about this device
Download the instructions for your Deep fryer in PDF format for free! Find your manual AF-2410S - Brentwood and take your electronic device back in hand. On this page are published all the documents necessary for the use of your device. AF-2410S by Brentwood.
USER MANUAL AF-2410S Brentwood
text_image
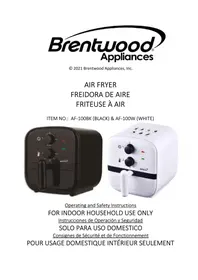
Brentwood® SELECT© 2021 Brentwood Appliances, Inc.
6 IN 1 AIR FRYER OVEN
6 EN 1 HORNO DE FREIDORA DE AIRE
6 EN 1 FOUR FRITEUSE À AIR
INSTRUCTION MANUAL
ITEM NO: AF-2410S
natural_image
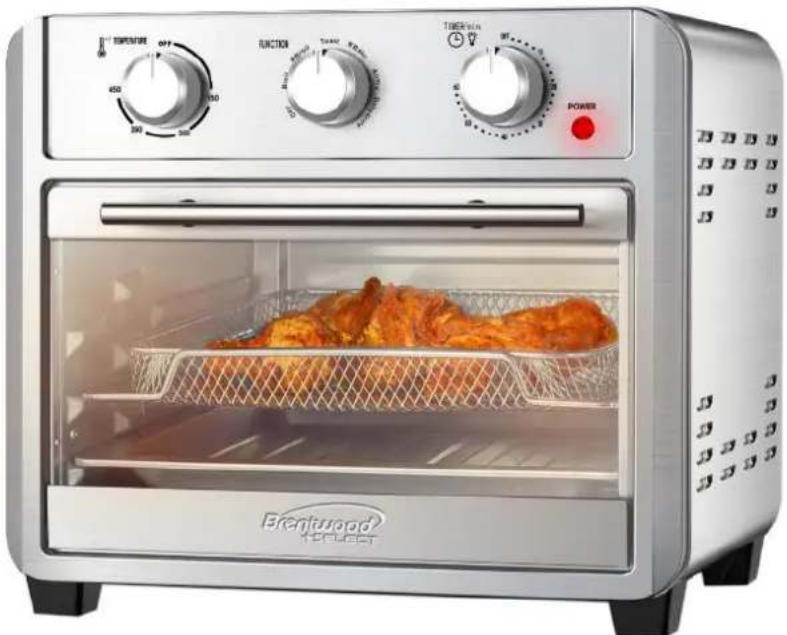
Exterior view of a Brentwood food toaster oven with open grating and control knobs (no visible text or symbols)Operating and Safety Instructions
FOR INDOOR HOUSEHOLD USE ONLY
When using this or any other electrical appliance, always follow these basic safety precautions, especially when children are present.
READ ALL INSTRUCTIONS BEFORE USE
This product is an electric heating appliance. For your safety and convenience, please read this Manual carefully and follow the steps. Please keep it for future reference.
I. Before Use
Please observe the following safety precautions before using this product:
- Please read this user manual carefully before using the product.
- Do not immerse the power cord, plug and oven in water in case of electric shock.
- Before using this oven, be sure to untie all the power cords wrapped around the back to avoid the accident.
- When the electric oven is working or after use, the external surface temperature is high, and touch is not allowed to prevent burns.
- Use this product with extra care when children are around. Children are not allowed to use this product on their own or keep it out of reach of children.
- When the timer is on, do not swing the plug or socket to avoid strong currents and injuries by sparks.
- Never hang the power cord on the edge of a cabinet/table or on a hot surface.
- If the power cord or plug is damaged, or the oven fails, stop using it and seek a professional to repair or replace it.
- If the power cord is damaged, it shall be replaced by the manufacturer or a professional to avoid danger.
- Do not damage, bend, stretch, or twist the power cord; do not place heavy objects on the power cord or clamp the power cord.
- When the electric oven is not in use, the plug shall be pulled out of the socket to avoid electric shock or electric leakage fire due to insulation aging.
- The matching accessories shall be used correctly to avoid fire or injuries caused in operation.
- The electric oven shall be placed in a dry environment and shall not be used outdoors.
- During the use of the electric oven, it is necessary to keep a distance of at least 4 inches.
- Keep the electric oven in a stable place and keep it away from flammable materials.
- Only consumable food can be baked in the oven. Do not put large pieces of food or metal objects in
the electric oven in case of fire or danger.
- To bake greasy oily foods (such as meat), put the bake tray on the bottom layer to prevent the oil from falling onto the bottom heating tube to cause a flame.
- Do not place the following items in the oven for grilling, such as paper, cards, plastic, cloth, and flammable items.
- When moving or repairing the electric oven, unplug the power cord and wait for the electric oven to cool before proceeding.
- When the electric oven is working, do not open the oven door to move the bake tray or other accessories to avoid burns caused by high temperature or high-temperature liquid.
- Avoid sharp edges when using electric ovens.
- Do not place anything on the electric oven. Do not cover or obstruct the heat dissipation position of the electric oven.
- No items are allowed on the glass door.
- Bake trays or other items are not allowed to be put directly on the heating elements of the electric oven.
- Please watch out for starchy foods (such as bread) to avoid fire.
- Once the set cooking time is done, it will beep notifying you it is complete and safe to open the oven door.
- This product is for home use only. Do not use this oven for any other purpose not specified.
- All maintenance must be carried out by professional personnel.
- This appliance cannot be operated with an external timer or a separate remote control.
- This device cannot be used by children, mental patients, people with physical challenges and those who are slow to respond unless guided by a person who is able to use it.
II. Labels and Function Description
Broil  | Upper baking: Two upper heating tubes on both sides |
* Broil  | Upper baking + convection: Two upper heating tubes on both sides+ convection |
Toast  | Upper and bottom baking: Two upper heating tubes on both sides + bottom heating tubes at the same time |
* Bake  | Upper and bottom baking + convection: Two upper heating tubes on both sides + bottom heating tubes + convection |
Airfry  | Airfryer: All upper heating tubes + convection |
| Dehydrate | Upper baking + convection: Two upper heating tubes in the middle + convection |
III. Names of Main Parts
| Bake Tray | 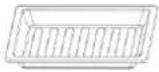 | Air fry Basket |  |
| Bake Rack | 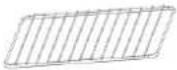 | Crumb Tray | 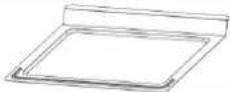 |
| Tray Handle |  |
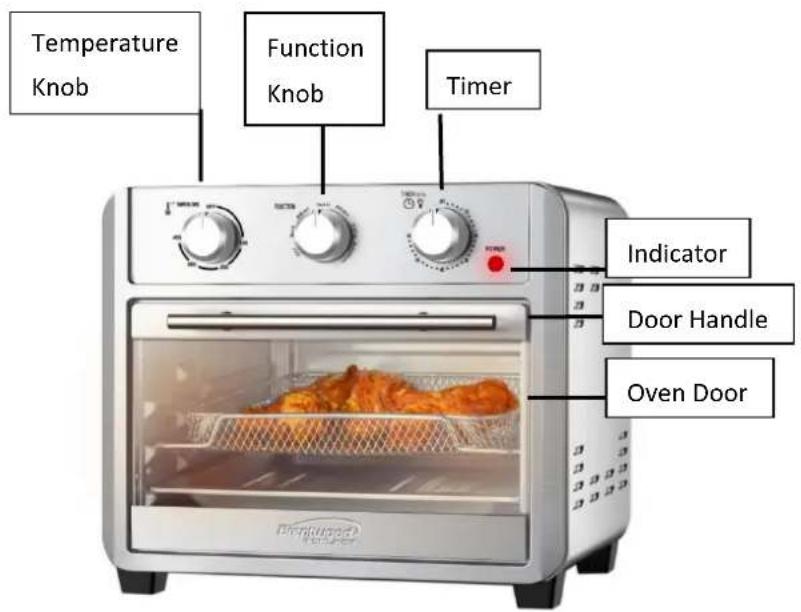
text_image
Temperature Knob Function Knob Timer Indicator Door Handle Oven DoorIII. User Guide
Note before using electric oven for the first time:
- Read the User Manual carefully.
- Remove all accessories and parts from the oven or package.
- Use warm water to clean accessories. Wipe the inside of the oven with a soft, soapy cloth and wait until it is completely dry.
- There shall be enough space around the oven and make sure the surface of the oven is more than 4 inches from the other objects. No objects shall be put on the top of the oven.
- Before using the electric oven for the first time, set the temperature knob to the maximum (450°F scale mark), preheat it for 10-15 minutes to remove the machine oil from the electric oven. It is normal if smoke appears when used.
1. Accessories
Bake tray: used to bake the food.
Bake rack: used to bake the food.
Tray handle: used to take out the bake tray and bake rack.
Air Fry basket: used for small-sized food.
Crumb tray: used to hold the oil.
2. General Steps
① Put the bake tray or bake rack on the appropriate layer of the chamber, depending on the size of the food.
② Put the food on the bake tray or bake rack.
③ Use the Temperature knob to select the desired temperature.
④ Turn the Function knob clockwise to select the appropriate function, depending on how to cook the food.
⑤ Turn the Timer clockwise to set the baking time according to the size of the food and baking color preferred.
⑥ When finished, turn the Function knob to "OFF", and the Timer to "OFF".
⑦ Remove food with oven gloves or tray handle.
Tips: Do not use flammable materials such as plastic or paper; do not use glass or ceramic plates or lids; do not let the grease drip directly to the bottom of the oven. When baking foods with much fat, place the bake tray on the grill and place the crumb tray on the bottom rack; set the desired temperature according to the recipe or personal preference.
3. Broil
The ‘Broil’ function places food close to the oven's heating element so that it can quickly cook, brown, char or caramelize.
① Put the bake tray or bake rack on the middle or top layer of the chamber.
② Put food that needs to be defrosted on the bake tray or bake rack.
③ Use the Temperature knob to set the desired temperature.
④ Set the function to Broil. After the power is turned on, the two upper side heating tubes will heat up at the same time.
⑤ The indicator light will be on when the power is on. Use the Timer to set the baking time in a clockwise direction.
⑥ When you hear signal sound, the pre-set time is off and take the food out with special accessories.
4. Convection Broil
The ‘Convection Broil’ function shortens broiling times for thicker cuts of meat, fish, and poultry.
① Put the bake tray or bake rack on the middle or top layer of the chamber.
② Put the prepared food on the bake tray or bake rack.
③ Use the Temperature knob to select the desired temperature.
④ Turn the Function knob clockwise to Brasil, and the two upper side heating tubes and the air fan will work at the same time, after the power is on.
⑤ The indicator light will be on when the power is on. Use the Timer to set the baking time in a clockwise direction.
⑥ When you hear signal sound, the pre-set time is off. Make sure the food is cooked enough and take it out with special accessories.
5. Toast
The ‘Toast’ function applies an equal amount of heat from the top and the bottom perfect for evenly cooking foods like toast, sandwiches, and more.
① Put the bake tray or bake rack on the middle or bottom layer of chamber.
② Put the prepared food on the bake tray or bake rack.
③ Use the Temperature knob to select the desired temperature.
④ Turn the Function knob clockwise to Toast, and the two upper side heating tubes and bottom heating tubes will work at the same time, after the power is on.
⑤ The indicator light will be on when the power is on. Use the Timer to set the baking time in a clockwise direction.
⑥ When you hear signal sound, the pre-set time is off. Make sure the food is cooked enough and take it out with special accessories.
6. Convection Bake
The ‘Convection Bake’ function circulates air, which results in a steady, dry temperature. Foods will cook faster and the surface of foods will be dry. Best for browning, roasting, and quick baking.
① Put the bake tray or bake rack on the middle or bottom layer of chamber.
② Put the prepared food on the bake tray or bake rack.
③ Use the Temperature knob to select the desired temperature.
④ Turn the Function knob clockwise to *Bake. After the power is on, the two upper side heating tubes, bottom heating tubes and the air fan will work at the same time.
⑤ The indicator light will be on when the power is on. Use the Timer to set the baking time in a clockwise direction.
⑥ When you hear signal sound, the pre-set time is up. Make sure the food is cooked enough and take it out with special accessories.
7. Air Fry
The ‘Air Fry’ function rapidly circulates very hot air around the food to produce a crunchy, crispy exterior. Faster than convection bake and ideal for foods that would traditionally be deep fried.
① Put the bake tray or bake rack on the top layer of the chamber.
② Put the food on the bake tray or bake rack (also for the food that requires the rotisserie or bake cage).
③ Use the Temperature knob to set the desired temperature.
④ Turn the function knob clockwise to Air Fry. When the power is on, all the upper heating tubes and air fan will work at the same time.
⑤ After the power is on, turn the Timer clockwise to set the baking time, and the power indicator will be on.
⑥ When you hear signal sound, the pre-set time is up. Make sure the food is cooked enough and take it out with special accessories.
8. Dehydrate
The ‘Dehydrate’ function is used for drying various fruits, vegetables, and meats.
① Put the bake tray or bake rack on the middle or top rack.
② Put food on the bake tray or bake rack.
③ Use the Temperature knob to set the desired temperature.
④ Turn the Function knob clockwise to Dehydrate. When the power is on, the two upper middle heating tubes and air fan will work at the same time.
⑤ The indicator light will be on when the power is on. Use the Timer to set the baking time in a clockwise direction.
⑥ When you hear signal sound, the pre-set time is off. Make sure the food is cooked enough and take it out with special accessories.
Note: The baking time is adjusted depending on the temperature and size of the food. Frozen and chunky foods generally take longer to bake.
IV. Cooking Guide
- Cooking time varies according to the temperature, quantity, and weight of the food. Please refer to the recipe table.
- For continuous cooking, since the starting temperature inside is high, cooking time can be shorter than the time when used for the first time. Please make adjustment according to the actual food.
- When the heating temperature in the oven is too high, the built-in thermostat will automatically shut off and the heating tube will stop working. Once cooled, the oven will be operatable again.
Always use a food thermometer to check internal food temperature. The following cooking times are estimates and food may require additional cooking time.
| Types of Food | Temperature inside Oven | Cooking Time |
| Steak | 450°F | 10-20 minutes |
| Ribs | 450°F | 20-30 minutes |
| Prawn | 355°F | 10-12 minutes |
| Sausages | 355°F | 12-15 minutes |
| Beef cake | 450°F | 15-17 minutes |
| Egg tart | 450°F | 18-20 minutes |
| Doughnut | 450°F | 7-10 minutes |
| Chips | 450°F | 25-30 minutes |
| Toasts | 450°F | 5-8 minutes |
| Chicken wings | 450°F | 15-18 minutes |
V. Clean and Maintenance
- Unplug the power cord before cleaning the oven and allow the oven to cool down completely.
- The inner and outer surfaces of the electric oven and accessories can be cleaned with a soft cotton cloth or sponge with a neutral detergent and cleaned with water.
- Do not use hard brushes or articles for cleaning to avoid damaging the inner surface of the electric oven and the protective layer of accessories.
- Do not use toxic and corrosive cleaning agents such as gasoline, thinners, or polish.
- The cleaned parts must be wiped dry before plugging in.
- Please do not clean the heating tube, the heating tube cleans itself.
- Do not immerse the electric oven in a liquid such as water.
ONE YEAR LIMITED WARRANTY
Write down the following information about your appliance to better help you obtain assistance or service if you ever need it.
CUSTOMER RECORD
Date of
Purchase Store/Dealer
Model/Item No: ____
THIS WARRANTY APPLIES TO PRODUCTS PURCHASED AND USED IN THE CONTINENTAL U.S. AND CANADA ONLY. This is the only express warranty for this product and is in lieu of any other warranty or condition. This product is warranted to be free from defects in material and workmanship for a period of one (1) year from the date of original purchase. During this period, your exclusive remedy is repair or replacement of this product, at our option; however, you are responsible for all costs associated with returning the product to us and our returning a product or component under this warranty to you. If the product or component is no longer available, we will replace with a similar one of equal or greater value. This warranty does not cover glass, filters, wear from normal use, use not in conformity with the printed directions, or damage to the product resulting from accident, alteration, abuse, or misuse.
THIS WARRANTY EXTENDS ONLY TO THE ORIGINAL CONSUMER PURCHASER. KEEP THE ORIGINAL SALES RECEIPT, AS PROOF OF PURCHASE IS REQUIRED TO MAKE A WARRANTY CLAIM.
This warranty is void if the product is used for other than single-family household use or subjected to any voltage and waveform other than what is specified on the rating label (E.G., 120V\~60Hz). We exclude all claims for special, incidental, and consequential damages caused by breach of express or implied warranty. All liability is limited to the amount of the purchase price. Every implied warranty, including any statutory warranty or condition of merchantability or fitness for a particular purpose, is disclaimed except to the extent prohibited by law, in which case such warranty or condition is limited to the duration of this written warranty. This warranty gives you specific legal rights. You may have other legal rights that vary depending on where you live. Some states do not allow limitations on implied warranties or special, incidental, or consequential damages, so the foregoing limitations may not apply to you. To make a warranty claim do not return this appliance to the store.
TO OBTAIN WARRANTY SERVICE AND/OR TROUBLESHOOTING INFORMATION:
Call Customer Service at 1-888-903-0060 in the U.S.
Monday through Friday: 9:00am – 5:00pm PST.
U.S. Customers Please Email: warranty@brentwoodus.com
Canadian Customers Please Email: canada.warranty@brentwoodus.com
Go online at www.brentwoodus.com
PRECAUCIONES IMPORTANTES