
DF-706 - Deep fryer Brentwood - Free user manual and instructions
Find the device manual for free DF-706 Brentwood in PDF.


| Product Type | Deep Fryer |
| Brand | Brentwood |
| Model | DF-706 |
| Capacity | 2.5 liters (approx. 2.6 quarts) |
| Power Rating | 1500 watts |
| Voltage / Frequency | 120 V / 60 Hz |
| Dimensions (W x D x H) | 10 x 12 x 8 inches (approx.) |
| Weight | 5 lbs (approx.) |
| Temperature Control | Adjustable thermostat (variable) |
| Indicator Lights | Power on and ready lights |
| Frying Basket | Removable with cool-touch handle |
| Oil Capacity | Approx. 1.5 liters (max fill line) |
| Housing Material | Stainless steel / plastic |
| Non-Stick Coating | Yes (on inner pot) |
| Safety Features | Automatic shutoff, cool-touch exterior, overheat protection |
| Cleaning | Removable oil reservoir and basket are dishwasher safe |
| Warranty | 1 year limited |
Frequently Asked Questions - DF-706 Brentwood
User questions about DF-706 Brentwood
0 question about this device. Answer the ones you know or ask your own.
Ask a new question about this device
Download the instructions for your Deep fryer in PDF format for free! Find your manual DF-706 - Brentwood and take your electronic device back in hand. On this page are published all the documents necessary for the use of your device. DF-706 by Brentwood.
USER MANUAL DF-706 Brentwood
Brentwood® Appliances
© 2021 Brentwood Appliances, Inc.
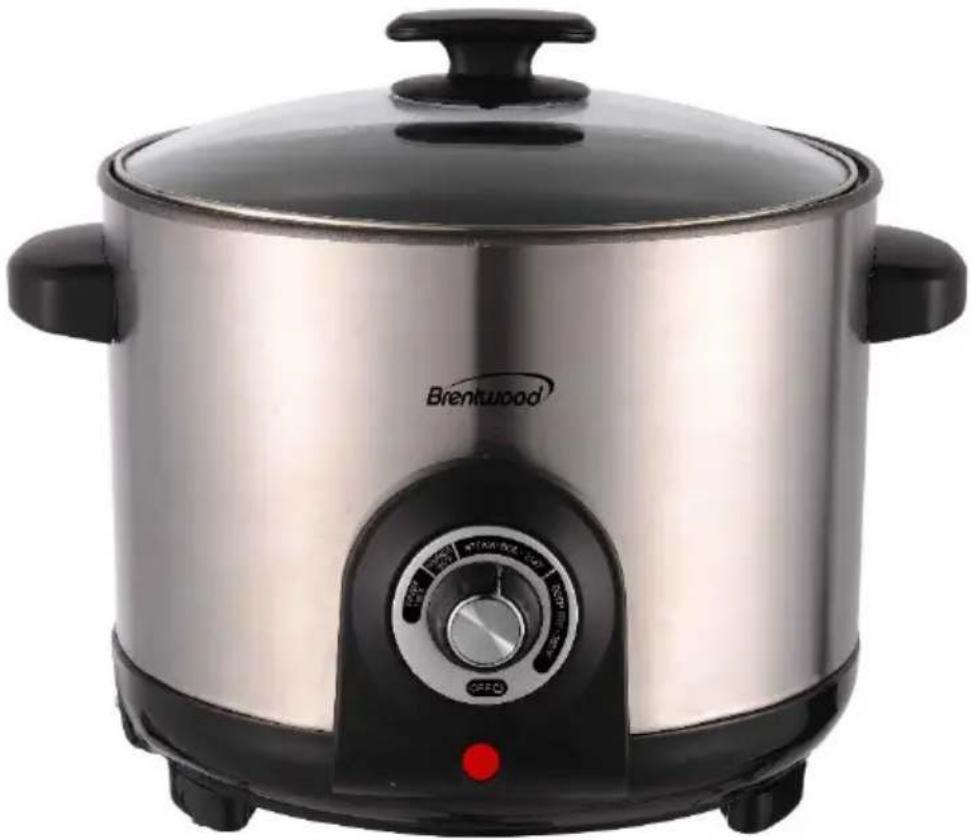
MULTI-FUNCTION DEEP FRYER FREIDORA MULTIUSO
ITEM NO.: DF-706
natural_image
Brentwood rice cooker with black and silver casing, no visible text or symbols on bodyWhen using this or any other electrical appliance, always follow these basic safety precautions, especially when children are present.

READ ALL INSTRUCTIONS BEFORE USE
⚠ WARNING-To reduce the risk of fire, electric shock, serious personal injury and property damage please note the following:
- This product is not intended for use by children. Keep the product out of reach of children and pets. Extra caution is necessary when using this appliance near children.
- Always ensure the product is unplugged from the electrical outlet and allowed to cool before assembling, disassembling, relocating, or cleaning it.
- Do not leave the product unattended while it is in use. Always unplug the product from the electrical outlet when not in use.
- Do not immerse the Base, Power Cord, or Plug of this product in or expose the Power Cord or Plug to water or other liquids.
- Do not touch hot surfaces. Use handles or knobs when handling product. Use protective oven mitts or gloves when removing the Lid or handling hot containers to avoid burns or personal injury.
- Take proper precautions to prevent burns, fire, or personal or property damage as this appliance generates heat and steam during use.
- Do not use attachments not recommended or sold by the product manufacturer. Attachments, when furnished, may become hot during use. Allow any attachments to cool before handling them.
- Do not place on or near a hot gas or electric burner, in a heated oven, or other heated surfaces.
- Use the product in a well-ventilated area. Keep at least 4-6 inches of space on all sides of the product to allow adequate air circulation.
- Use appliance on a table or flat surface.
- Keep the product away from curtains, wall coverings, clothing, dishtowels, or other flammable materials.
- Do not plug or unplug the product from the electrical outlet with a wet hand.
- This product is intended solely for non-commercial, non-industrial, household use in cooking of food for human consumption; do not use the product outdoors or for any other purpose.
- Do not operate the product empty.
-
Do not let cord hang over edge of table or counter where it may be tripped over or pulled. Do not allow cord to touch hot surfaces.
-
Do not operate the product if it has a damaged or cut Power Cord or plug, if wires are exposed, if it malfunctions, if it is dropped or damaged, or if the Motor Housing is dropped in or exposed to water.
- This product has no user-serviceable parts. Do not attempt to examine or repair this product yourself. Please review the Warranty Policy on Page 9.
- Do not put any stress on the power cord where it connects to the product, as the power cord could fray and break.
SPECIAL INSTRUCTIONS:
- Do not move the Deep Fryer when there is hot oil in the appliance.
A short power supply cord is provided to reduce the risk of becoming entangled in or tripping over a longer cord. An extension cord is not recommended for use with this product, but if one must be used:
- The marked electrical rating must be at least as great as that of the product.
- If the product is of a 3-prong grounding type, the extension cord must be a grounding-type 3-wire cord.
- Arrange the extension cord so that it will not drape over the countertop or tabletop where it can be tripped over or pulled.
WARNING: This product is equipped with a polarized plug (one blade is wider than the other blade) to reduce the risk of electrical shock. This is a safety feature. The plug will fit into a polarized outlet only one way. If you are unable to insert the plug into the electrical outlet, try reversing the plug. If the plug still does not fit, contact a qualified electrician. Never use the plug with an extension cord unless you can fully insert the plug into the extension cord. Do not alter the plug. Do not attempt to defeat the safety purpose of the polarized plug.
Before First Use
IMPORTANT: Please check all packaging material carefully before discarding as there may be accessory parts contained within the packaging material.
WARNING: Do not place any part of the product in a dishwasher.
- Make sure the Fryer is unplugged.
- To remove any dust that may have accumulated, wash the Fryer Basket with warm soapy water and dry thoroughly. Wipe the interior and exterior of the Deep Fryer with a damp towel. Dry thoroughly.
Note: NEVER immerse the appliance body, cord, or plug in water.
-
Attach the magnetic end of the cord directly into the fryer socket. See Figure A) correct method is with wording "This side up" facing up.
-
Unlock Lid by pressing the Lid Release Button.
-
Remove the Frying Basket by inserting the basket handle into the basket hook. See Section: Deep Frying, 'B', Step 1, Step 2, Step 3.

natural_image
Line drawing of a plug inserted into a socket (no text or symbols)Figure A
SAVE THESE INSTRUCTIONS FOR FUTURE REFERENCE
Parts:

Using Your Deep Fryer:
Please note measurement Information:
MAX CAPACITY FOR OIL: 1.5L / 6.3 CUPS / 1.58 QUARTS
FULL CAPACITY OF POT: 5L / 21.1 CUPS / 5.28 QUARTS
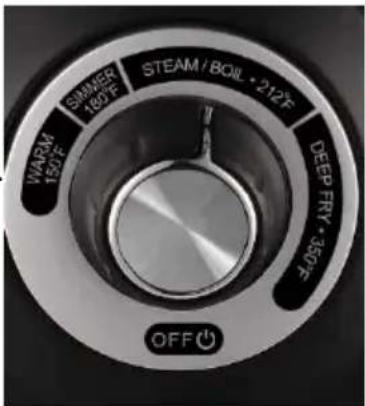
WARNING: Never turn on the fryer with an empty OIL RESERVOIR and make sure it is on a flat, heat resistant surface. Please adjust the function dial as the following illustration:
- Note: when the desired temperature is reached, the indicator light may go on and off during the operation. This is a normal situation as the thermostat is activated to maintain the temperature.
Deep Frying
A. Heating oil:
- Pour the oil into the pot. Make sure the oil-filling level is between the MIN and MAX level lines, which are located on the inside of the pot.
- Turn the dial to the setting "DEEP FRY".
- Close the lid of the multi-cooker.
- Attach the cord to the unit by aligning the magnetic plug end of the cord assembly with the plug face up, where marked with the words "THIS SIDE UP".
- Plug another end of the cord assembly into a 120V wall outlet. The indicator light comes on.
- Preheat oil until the indicator light goes off. At this moment, the oil temperature is ready for frying the foods.
Note:
- Use only blended vegetable oil, pure corn oil, or peanut oil.
- Do not use ground-nut oil, sunflower oil, soya oil, olive oil, lard or dripping.
- Never mix different oils and fats together.
- Do not mix the used oil with the new oil together if possible.
- Store the used oil in the pot with lid closed, without being plugged in, to keep it fresh and clean.
B. Filling the frying basket:
- Gently place the foods to be fried into the frying basket and do not exceed the capacity of the basket. Never overfill.

Note:
- Moist foods, such as chipped potatoes, need to be blotted with a towel before frying. Moist foods cause excess foaming, spattering, and crackling.
- Remove any ice crystals before putting the frozen foods into the hot oil. Frying frozen foods will take a little longer time.
C. Frying food:
- Insert the basket handle by sliding the end of the handle into the fixing groove of the basket to hold the basket. See the following photos for the details.
- Make sure that the indicator light goes out before frying food.
- Hold the basket with foods and slowly lower it into the interior bottom of the pot. Then take the basket handle off the basket.
- Cover the pot with the glass lid, if you prefer, to avoid occasional spattering of hot oil.
- Follow the food pack instructions or cooking guide on Page 8 for the frying time and in the meanwhile, you can monitor the frying effect through the glass lid.
- Wait a couple of minutes to let the oil vapor escape when food reaches desired brownness. Turn off the unit and then open the glass lid.
- Insert the basket handle into the basket groove. Lift the basket with fried food out of the pot and place the fried food on the absorbent paper. Season to taste.
- Unplug the cord from wall outlet and then from the unit when unit is not in use.
Caution:
- Do not plunge the basket quickly into hot oil.
- Do not touch the pot and glass lid when unit is hot. Grasp the plastic lid knob to open the lid.
- Do not carry or move the unit when the oil is hot.
Note:
- If too much food is fried at the same time, the food will not get crisp.
- The pieces of food should be of equal size and thickness.
- Avoid cooking pieces of food that are extra thick.
Suggestion: It is time to replace the cooking oil if any of the following occur:
• The oil is dark in color.
- The oil has an unpleasant odor.
- The oil smokes when it is heated.
- The oil foams excessively during frying.
• After 8-12 uses.
Stewing
- Remove the lid and basket.
- Add some water or soup in the pot per the cooking instructions guide on Page 8.
- Place the food into the pot. Cover the lid.
- Turn the dial to the setting "SIMMER".
- Adjust the dial to keep the liquid continuously appearing small bubbles when the liquid is boiling.
- Follow the cooking guide on Page 8 instructions for the stewing time. Taste food when cooking time is up. Add more stewing time if the softer taste is needed.
Note:
- Frozen foods need to be defrosted before stewing.
- Avoid removing the lid during stewing.
- Make sure that the water or soup covers the food to be stewed.
Steaming
- Add sufficient water into the pot, but don't overflow the steamer rack.
- Place the food into the basket. And then cover the lid.
- Turn the dial to the setting "STEAM/BOIL".
- Follow the cooking guide on Page 8 for instructions on steaming time. Add more steam time if softer food is preferred or food requires more steaming time.
Note:
- Frozen foods need more steaming time.
- Avoid removing the lid during steaming.
- Food may be placed before heating or after boiling depending on the instruction on the cooking guide on Page 8.
- Add more boiling water, if needed, to extend the steaming time.
- Use aluminum foil in the basket to hold the food if you intend to retain the juice from the food.
Cleaning Your Deep Fryer:
WARNING: Always turn the appliance to "OFF" and unplug the product, allow it to cool before cleaning or storing it.
NOTICE: Always disconnect appliance from the outlet and then remove the Magnetic Plug from the unit. The plug should always remain on during operation. If it becomes disconnected, immediately unplug the cord from the wall outlet then reconnect the magnetic cord to the socket.
- Clean the outside of the Multicooker with a damp cloth, and then dry.
- Clean the inside of the Multicooker and the basket when you change oil. Use a cloth, hot water and soap. For stains use non-scratching cream cleaner.
- Rinse and thoroughly dry the pot before refilling with oil.
- Clean the lid in hot water and kitchen detergent solution.
- Do not use abrasive powders, hard abrasive scourers, and wire wool or washing soda crystals.
USEFUL FRYING TIPS:
After the frozen food thaw, please fill the food into the basket.
Always dry food well, especially chipped potatoes. If left damp they will not turn crisp. All foods, except those with a high starch content (chips, doughnuts), should be coated before frying. Typical coating is seasoned flour, breadcrumbs, or batter. When frying, carefully time foods to avoid overcooking. The cooking time may vary according to the quantity and thickness of the food being fried.
Remember a difference of one or two minutes can result in over cooked food.
Frying Times and Temperature Guide:
The Frying times in this chart are a guide and should be adjusted to accommodate the different quantitates, thickness, and taste.
| Food Being Fried | Recommended Temperature | Recommended Time (Minutes) |
| Apple Fritters | 360°F | 4-5 |
| Chinese Spring Rolls (Frozen) | 360°F | 10-12 |
| Chicken (Bone-In) | 360°F | 17-20 |
| Chicken Strips (Boneless) | 375°F | 6-8 |
| Chicken Nuggets (Frozen) | 360°F | 4-5 |
| Donuts | 375°F | 2-3 (until golden brown) |
| Fish (Battered) | 375°F | 4-5 |
| Fish (Fresh) | 320°F | 5-7 |
| French Fries (Frozen) | Follow directions on package | Package Time |
| French Fries (Homemade) | 320°F | 4-6 |
| Onion Rings | 375°F | 2-4 |
| Shrimp (Breaded) | 375°F | 3-5 |
| Vegetable Fritters | 340°F | 2-3 |
NOTE: MEASUREMENT INFORMATION
MAX CAPACITY FOR OIL: 1.5L / 6.3 CUPS / 1.58 QUARTS
FULL CAPACITY OF POT: 5L / 21.1 CUPS / 5.28 QUARTS
ONE YEAR LIMITED WARRANTY
Write down the following information about your appliance to better help you obtain assistance or service if you ever need it.
CUSTOMER RECORD
Date of Purchase ____ Store/Dealer ____
Model/Item No: ____
THIS WARRANTY APPLIES TO PRODUCTS PURCHASED AND USED IN THE CONTINENTAL U.S. AND CANADA ONLY. This is the only express warranty for this product and is in lieu of any other warranty or condition. This product is warranted to be free from defects in material and workmanship for a period of one (1) year from the date of original purchase. During this period, your exclusive remedy is repair or replacement of this product, at our option; however, you are responsible for all costs associated with returning the product to us and our returning a product or component under this warranty to you. If the product or component is no longer available, we will replace with a similar one of equal or greater value. This warranty does not cover glass, filters, wear from normal use, use not in conformity with the printed directions, or damage to the product resulting from accident, alteration, abuse, or misuse.
THIS WARRANTY EXTENDS ONLY TO THE ORIGINAL CONSUMER PURCHASER. KEEP THE ORIGINAL SALES RECEIPT, AS PROOF OF PURCHASE IS REQUIRED TO MAKE A WARRANTY CLAIM.
This warranty is void if the product is used for other than single-family household use or subjected to any voltage and waveform other that a specified on the rating label (E.G., 120V\~60Hz). We exclude all claims for special, incidental, and consequential damages caused by breach of express or implied warranty. All liability is limited to the amount of the purchase price. Every implied warranty, including any statutory warranty or condition of merchantability or fitness for a particular purpose, is disclaimed except to the extent prohibited by law, in which case such warranty or condition is limited to the duration of this written warranty. This warranty gives you specific legal rights. You may have other legal rights that vary depending on where you live. Some states do not allow limitations on implied warranties or special, incidental, or consequential damages, so the foregoing limitations may not apply to you. To make a warranty claim do not return this appliance to the store.
TO OBTAIN WARRANTY SERVICE AND/OR TROUBLESHOOTING INFORMATION:
Call Customer Service at 1-888-903-0060 in the U.S.
Monday through Friday: 9:00 am – 5:00 pm PT
U.S. Customers Please Email: warranty@brentwoodus.com
Canadian Customers Please Email: canada.warranty@brentwoodus.com
Go online at www.brentwoodus.com
PRECAUCIONES IMPORTANTES
natural_image
Line drawing of a plug inserted into a socket (no text or symbols)Figura A
© 2021 Brentwood Appliances, Inc.
- Brentwood® Appliances
- MULTI-FUNCTION DEEP FRYER FREIDORA MULTIUSO
- READ ALL INSTRUCTIONS BEFORE USE
- SPECIAL INSTRUCTIONS:
- Before First Use
- SAVE THESE INSTRUCTIONS FOR FUTURE REFERENCE
- Parts:
- Using Your Deep Fryer:
- Deep Frying
- Heating oil:
- Note:
- Filling the frying basket:
- Frying food:
- Caution:
- Stewing
- Steaming
- Cleaning Your Deep Fryer:
- USEFUL FRYING TIPS:
- Frying Times and Temperature Guide:
- ONE YEAR LIMITED WARRANTY
- CUSTOMER RECORD
- PRECAUCIONES IMPORTANTES
Brand : Brentwood
Model : DF-706
Category : Deep fryer