
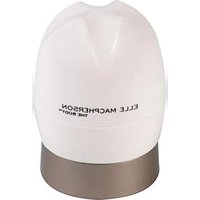
PED-500 - Manicure and pedicure set HOMEDICS - Free user manual and instructions
Find the device manual for free PED-500 HOMEDICS in PDF.

| Product Type | Manicure and Pedicure Set |
| Brand | Homedics |
| Model | PED-500 |
| Power Source | 2 AA batteries (alkaline recommended) |
| Number of Speeds | 2 (position 1: low, position 2: high) |
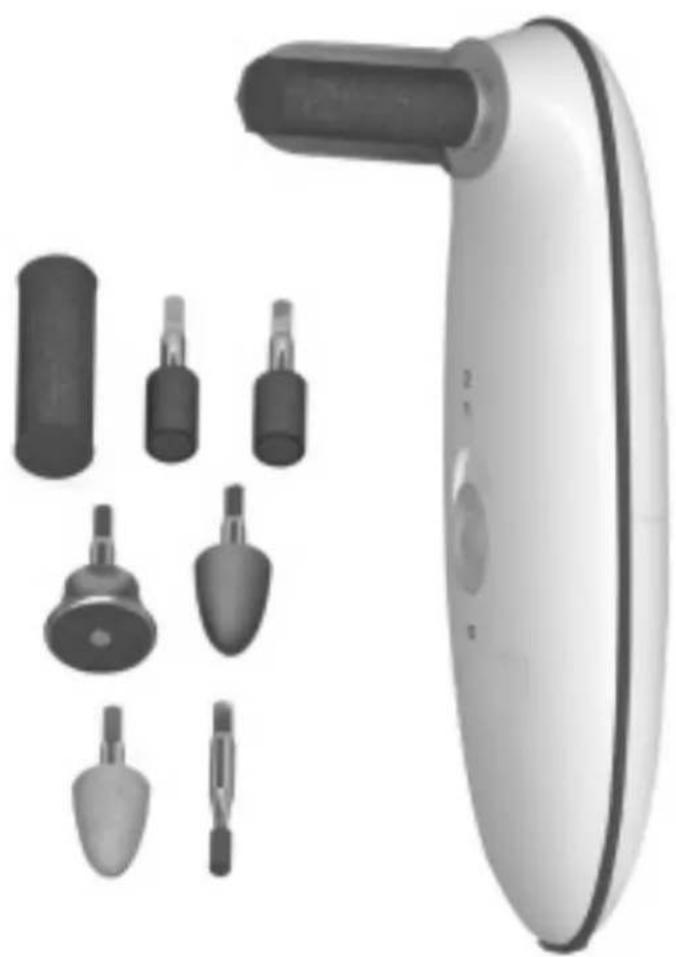
| Included Accessories | Large 40 mm abrasive roller, small 12.5 mm abrasive roller, long coarse sapphire cone, sapphire disc, small cylinder sander, felt cone, adjustable transparent guard |
| Main Function | Foot and nail care: callus removal, filing, polishing |
| Recommended Use | For adults, subject to medical contraindications |
| Target Audience | Adults (children >8 years under supervision) |
| Maintenance and Cleaning | Clean with a damp cloth; remove batteries if not used for a long time |
| Safety Precautions | Do not use on irritated skin, lesions, varicose veins; consult a doctor if you have health problems |
| Repairability | Not repairable by user; contact HoMedics service |
| Spare Parts | Interchangeable accessories via magnetic shaft |
| Estimated Battery Life | Varies depending on batteries; use alkaline batteries for best performance |
| Dimensions | Approximately 20 cm x 5 cm (not specified) |
| Weight | Approximately 200 g (without batteries) |
Frequently Asked Questions - PED-500 HOMEDICS
User questions about PED-500 HOMEDICS
0 question about this device. Answer the ones you know or ask your own.
Ask a new question about this device
Download the instructions for your Manicure and pedicure set in PDF format for free! Find your manual PED-500 - HOMEDICS and take your electronic device back in hand. On this page are published all the documents necessary for the use of your device. PED-500 by HOMEDICS.
USER MANUAL PED-500 HOMEDICS
Register your product today at www.homedicsgroup.com/register
8 in 1 Pedicure System
natural_image
Product photo of a white electric shock absorber with various accessories (no visible text or labels)Instruction Manual
PED-500-EU
2year guarantee
READ ALL INSTRUCTIONS BEFORE USE.
SAVE THESE INSTRUCTIONS FOR FUTURE REFERENCE.
IMPORTANT SAFEGUARDS:
WHEN USING ELECTRICAL PRODUCTS, ESPECIALLY WHEN CHILDREN ARE PRESENT, BASIC SAFETY PRECAUTIONS SHOULD ALWAYS BE FOLLOWED, INCLUDING THE FOLLOWING:
- This appliance can be used by children aged from 8 years and above and persons with reduced physical, sensory or mental capabilities or lack of experience and knowledge if they have been given supervision or instruction concerning use of the appliance in a safe way and understand the hazards involved. Children shall not play with the appliance. Cleaning and user maintenance shall not be made by children without supervision.
- DO NOT reach for an appliance that has fallen in water or other liquids. Switch off at the mains and unplug it immediately. Keep dry – DO NOT operate in wet or moist conditions.
- NEVER insert pins or other metallic fasteners into the appliance.
- Use this appliance for the intended use as described in this booklet. DO NOT use attachments not recommended by HoMedics.
- Excessive use could lead to the product's excessive heating and shorter life. Should this occur, discontinue use and allow the unit to cool before operating.
- NEVER drop or insert any object into any opening.
• DO NOT operate where aerosol (spray) products are being used or where oxygen is being administered. - DO NOT operate under a blanket or pillow. Excessive heating can occur and cause fire, electrocution or injury to persons.
- DO NOT attempt to repair the appliance. There are no user serviceable parts. For service, send to a HoMedics Service Centre. All servicing of this appliance must be performed by authorised HoMedics service personnel only.
- Never block the air openings of the appliance or place it on a soft surface, such as a bed or couch. Keep air openings free of lint, hair etc.
- Do not place or store appliance where it can fall or be pulled into a bath or sink. Do not place in or drop into water or other liquid.
SAFETY CAUTIONS :
PLEASE READ THIS SECTION CAREFULLY BEFORE USING THE APPLIANCE.
- If you have any concerns regarding your health, consult a doctor before using this appliance.
- If you have any concerns regarding your health, consult a doctor before using this appliance.
- If you are susceptible to allergic reactions or if you have circulatory problems, consult a physician before using this product.
- Do not use on irritated, sunburned or chapped skin, or on any area with dermatological problems.
- Do not apply over skin eruptions, warts, moles or varicose veins.
- Use should be easy and painless. If you experience nail or skin irritation, or hand discomfort when using this product, discontinue use. If a more extreme reaction occurs, consult your doctor
- Individuals with pacemakers and pregnant women should consult a doctor before using this appliance. Not recommended for use by Diabetics
- DO NOT use on an infant, invalid or on a sleeping or unconscious person. DO NOT use on insensitive skin or on a person with poor blood circulation.
• If you feel any discomfort whilst using this appliance, discontinue use and consult your doctor. - Care should be taken when using heated surfaces. If the product feels excessively hot, switch off at mains and contact the HoMedics Service Centre.
- Use of this product should be pleasant and comfortable. Should pain or discomfort result, discontinue use and consult your GP.
- Ensure that your hands are dry when operating the controls or removing the plug.
- This product should NEVER be used by any individual suffering from any ailments that would limit the user's capacity to operate the controls.
Battery directive

This symbol indicates that batteries must not be disposed of in the domestic waste as they contain substances which can be damaging to the environment and health. Please dispose of batteries in anated collection points.
WEEE explanation

This marking indicates that this product should not be disposed with other household wastes throughout the EU. To prevent possible harm to the environment or human health from uncontrolled waste disposal, recycle it responsibly to promote the sustainable reuse of material resources. To return used device, please use the return and collection systems or contact the retailer where the product was based. They can take this product for environmental safe recycling.
INSTRUCTIONS FOR USE :
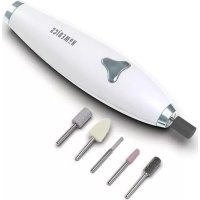
A - On/Off switch (0/1/2)
B-Guard
C - Long abrasive roller (rough/fine)
D - Small abrasive roller (rough/fine)
E - Sapphire grain cone
F - Felt cone
G - Sapphire disk
H – Small Cylinder shaper
I - Battery door
J - Magnetic fitment Rod

Figure 1
Inserting the batteries
This pedicure set uses 2 x AA batteries, preferably Alkaline batteries. Batteries are supplied with the product.
- Remove the battery door by applying pressure to the oval grip area and sliding the case away from the product. See figure 2.
- Ensure that the batteries are fitted the right way round observing the + and - signs on the battery and the product.
- Ensure battery compartment case is securely replaced before using the product
- Replace all batteries at the same time. Do not mix new and old batteries or batteries of different types.

natural_image
Interior view of a white remote control device showing internal components and battery pack (no text or symbols visible)Figure 2
Switching the device on and off
- The on/off switch is located in front of the Pedicure unit (See Figure 1, part A).
- Slide up switch to the "1" or "2" position to turn ON and slide back to "0" position to turn OFF.
- The pedicure unit has 2 speeds, position "1" is Low speed, position "2" is High speed.
How to attach the pedicure attachments
- All the attachments fit simply on to the magnetic fitment rod (see figure 1).
- To connect the attachments to the pedicure unit, directly insert them into the magnetic fitment rod, so that the metal pin of the attachment is inside the cylinder of the magnetic fitment rod. It may be necessary to slightly twist the attachment to ensure it clicks into place.
- The metal pin of the two large abrasive rollers are inside the attachment and these fit over the fitment rod like a sleeve.
• To remove the attachments, simply pull out away from the product. - The transparent guard(B) is optional during operation, the angle of fitment can be adjusted to minimise mess from dead skin and filed nails by localising the mess and avoiding the deposits covering a large area.
- It is supplied already fitted, but can be removed or adjusted by simply unfixing the attachment first and then pulling the transparent guard out away from the product. Then either put safely to one side, or pushing back into place at the desired angle.
- The guard should always be attached before fixing the pedicure tool into the magnetic fitment rod.
Correct use of the attachments
Skin care attachments – High speed (setting 2) is recommended for smoothing the skin
- Large 40mm abrasive roller (C) is used for hardened and callused skin removal on the heels, soles or other large areas of the feet.
- Small 12.5mm abrasive roller (D) is used for removing the hardened and callused skin in between the gap of the toes or other more precise treatment areas.
- Sapphire grain cone (E) can also be used for removing hardened and callused skin as required
Nail Care attachments – Low speed (setting 1) is recommended for nail treatment
- Sapphire disk (G) is used for shortening and shaping nails.
- Sapphire grain cone (E) - can be used for filing and finishing nails
- Small Cylinder shaper (H) – for treating cuticles and corners of nails where greater precision is required.
- Felt Cone (F) - for polishing nails at the end of the pedicure.
- Adjustable transparent guard (B) is to avoid the pedicure residue creating a mess during pedicure treatment.
Maintenance and Storage
- Only a damp cloth should be used to clean the pedicure unit and its attachments
• Store batteries away from metal objects. - Remove batteries if equipment is not going to be used for extended periods of time.
- Store batteries in a cool dry place away from direct sunlight.
LIRE TOUTES LES INSTRUCTIONS AVANT UTILISATION. LES CONSERVER POUR POUVOIR LES CONSULTER ULTÉRIEUREMENT.
Figure 1
Installation des piles
natural_image
Interior view of a white remote control device showing internal components and battery pack (no text or symbols visible)Figure 2
Abb 1
natural_image
Interior view of a white remote control device showing internal components and battery pack (no text or symbols visible)Abb 2
Figura 1
natural_image
Interior view of a remote control device showing internal components and battery pack (no text or symbols visible)Figura 2
G - Disco in zaffiro
Figura 1
natural_image
Interior view of a white remote control device showing internal components and wiring (no text or symbols visible)Figura 2
A - Interruptor ligado/desligado (0/1/2)
B - Protecção
C – Rolo abrasivo longo (áspero/macio)
Figure 1
natural_image
Interior view of a white remote control device showing internal components and battery pack (no text or symbols visible)Figure 2

Ligar e desligar o dispositivo
A - På/Av-bryter (0/1/2)
B - Beskyttelse
C - Lang sliperull (grov/fin)
D - Liten sliperull (grov/fin)
E - Safirkorn-kjegle
F - Filtkjegle
G - Safirplate
H - Liten sylinderformer
I - Batteriluke
J - Magnetstang
Figur 1
natural_image
Interior view of a white remote control device showing internal components and battery pack (no text or symbols visible)Figur 2
Figuur 1
natural_image
Interior view of a remote control device showing internal components and battery pack (no text or symbols visible)Figuur 2
A - On/Off -nappula (0/1/2)
B – Suojus
Kuva 1
natural_image
Interior view of a remote control device showing internal components and battery pack (no text or symbols visible)Kuva 2
Figur 1
Sätt i batterierna
natural_image
Interior view of a remote control device showing internal components and battery casing (no text or symbols visible)Figur 2
Figur 1
natural_image
Interior view of a remote control device showing internal components and battery casing (no text or symbols visible)Figur 2
Tænd/sluk
Şekil 1
Pillerin takılması
natural_image
Interior view of a remote control device showing internal components and battery pack (no text or symbols visible)Şekil 2
σχήμα 1
natural_image
Interior view of a remote control device showing internal components and wiring (no text or symbols visible)σχήμα 2
рис. 1
Установка батарей
natural_image
Interior view of a white remote control device showing internal components and battery pack (no text or symbols visible)рис. 2
rys. 1
Instalacja baterii
natural_image
Interior view of a white remote control device showing internal components and wiring (no text or symbols visible)rys. 2
PLEASE READ THIS SECTION CAREFULLY BEFORE USING THE APPLIANCE.
Obrázek 1
Vložení baterií
natural_image
Interior view of a remote control device showing internal components and battery casing (no text or symbols visible)Obrázek 2
ábra 1
natural_image
Interior view of a white remote control device showing internal components and battery casing (no text or symbols visible)ábra 2
Obrázok 1
Vloženie batérií
natural_image
Interior view of a remote control device showing internal components and battery pack (no text or symbols visible)Obrázok 2
Zapínanie a vypínanie zariadenia
- READ ALL INSTRUCTIONS BEFORE USE.
- SAVE THESE INSTRUCTIONS FOR FUTURE REFERENCE.
- IMPORTANT SAFEGUARDS:
- WHEN USING ELECTRICAL PRODUCTS, ESPECIALLY WHEN CHILDREN ARE PRESENT, BASIC SAFETY PRECAUTIONS SHOULD ALWAYS BE FOLLOWED, INCLUDING THE FOLLOWING:
- SAFETY CAUTIONS :
- PLEASE READ THIS SECTION CAREFULLY BEFORE USING THE APPLIANCE.
- Battery directive
- WEEE explanation
- INSTRUCTIONS FOR USE :
- Inserting the batteries
- Switching the device on and off
- How to attach the pedicure attachments
- Correct use of the attachments
- Skin care attachments – High speed (setting 2) is recommended for smoothing the skin
- Nail Care attachments – Low speed (setting 1) is recommended for nail treatment
- Maintenance and Storage
- LIRE TOUTES LES INSTRUCTIONS AVANT UTILISATION. LES CONSERVER POUR POUVOIR LES CONSULTER ULTÉRIEUREMENT.
- Installation des piles
- Ligar e desligar o dispositivo
- Sätt i batterierna
- Tænd/sluk
- Pillerin takılması
- Установка батарей
- Instalacja baterii
- Vložení baterií
- Vloženie batérií
- Zapínanie a vypínanie zariadenia
Brand : HOMEDICS
Model : PED-500
Category : Manicure and pedicure set