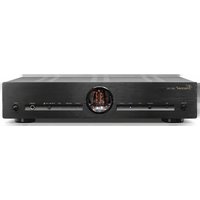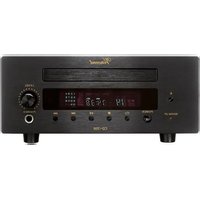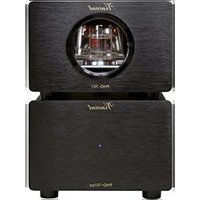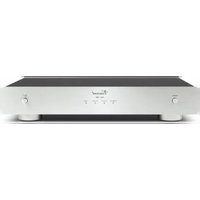
DAC-1 MK - Earphones VINCENT - Free user manual and instructions
Find the device manual for free DAC-1 MK VINCENT in PDF.


User questions about DAC-1 MK VINCENT
0 question about this device. Answer the ones you know or ask your own.
Ask a new question about this device
Download the instructions for your Earphones in PDF format for free! Find your manual DAC-1 MK - VINCENT and take your electronic device back in hand. On this page are published all the documents necessary for the use of your device. DAC-1 MK by VINCENT.
USER MANUAL DAC-1 MK VINCENT
Instructions for use
english

we thank you for the confidence you prove in purchasing our product. It will match your high demands towards sound and manufacturing quality. Though it is understandable that you want to plug and play this product instantaneously, we encourage you to read this manual carefully before installation.
It will help you in handling and operating this machine in your system and obtaining the best possible performance, even if it was installed by your dealer.
Please follow the security precautions, though some of those things may seem obvious.
In the appendix to this manual you will find a glossary explaining some established technical terms.
If there are open questions your audio specialist dealer will help you. He also represents your contact person in case of needed warranty service or repairs after the warranty period and is interested to hear from your experiences with Vincent products.
We wish you plenty of joy with your / our product,
your Vincent-Team
Cher client,
| Safety guidelines | 22 |
| Other instructions | 23 |
| Included in delivery | 24 |
| Description of the appliance | 25 |
| Installation | 27 |
| Operating the appliance | 33 |
| Tips | 34 |
| Search for errors | 35 |
| Technical specifications | 36 |
| Glossary | 37 |
english
8. Voltage Selector:
Spannungsumschalter
natural_image
Two types of electrical connectors: one with a black X symbol and the other with a straight conductor (no text or labels)This appliance was produced under strict quality controls. It complies with all established international safety standards. Nonetheless, the following instructions should be fully read and observed in order to prevent any hazard:

Do not open the appliance! Risk of electric shock!
There are no parts in the appliance that require maintenance by the user.

Maintenance/Alterations

All equipment that is connected to the domestic mains voltage can be dangerous to the user if not handled properly. Leave maintenance work to qualified professionals. The product is only permitted for connection to AC 230Volt/50Hz, for earthed sockets and use in enclosed areas. Altering the product or manipulating its serial number voids the warranty. After a fault, leave the appliance's fuse to be replaced only by a professional with one of the same kind.
Power Cable Connection
Always pull the plug and never the power cable if you want to disconnect the appliance from the mains power. Make sure when setting up the appliance that the power cable is not squashed, severely bent or damaged by sharp edges. Do not touch the power lead with wet or damp hands. Use the power cable supplied or another one from Vincent.

Switching Off
Switch the appliance off every time before you connect or remove other components or loudspeakers, disconnect or connect it to the mains power, leave it unused for a longer period or want to clean its outside. On all amplifiers and receivers, wait approx. 1 minute after this before disconnecting or reconnecting the cable.
Moisture/Heat/Vibration

Contact of electrically operated equipment with liquids, moisture, rain or water vapour is dangerous for such equipment and the user and must be avoi-
ded without fail. Take care that no liquids or objects get inside the appliance (ventilation slots etc.).
It must be disconnected from the mains power immediately and examined by a professional if this happens. Never expose the appliance to high temperatures (direct sunshine) or strong vibration.

Heat Build-up
Make sure that a gap of 5 cm remains around the appliance and that the surrounding air can circulate (do not install in enclosed cupboards). Vents must not be covered up.
Volume

The maximum tolerable volume is always reached well below the maximum possible setting on the amplifier. Be careful with the volume setting, therefore, in order to prevent damage to hearing. So that you do not expose yourself to high volumes unintentionally, always set to a low level before changing the input channel.
Cleaning

Pull out the power plug before cleaning the outside of the product. Whenever possible, use a soft, lint-free cloth that has been dampened. Do not use abrasives, solvents, thinners, flammable chemicals, polishes and other cleaning products that leave marks.
OTHER INSTRUCTIONS
Setting up the appliance

How the system is set up has an effect on the sound quality. Therefore only place it on a suitable, stable surface. To make the most of your system's sound quality, we recommend placing the equipment on Vincent racks and not putting them on top of each other.
Old electronic equipment
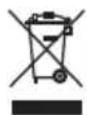
This appliance is subject to the conditions set out in the European Directive 2012/19/EC. This is identified by the symbol of a crossed out waste bin on the appliance.
What this means for you as a consumer:
All old electrical and electronic equipment that is no longer used must be disposed of separately from domestic waste using places provided by the authorities. By doing so you can prevent damage to the environment and help to encourage manufacturers to produce more durable or reusable products. For further information about disposing your old appliance, please consult your local authority, waste disposal agency or the shop where you bought the product.
CE sign

This appliance complies with the current EU directives about attaining the CE mark and thus meets the requirements for electrical and electronic equipment (EMC regulations, safety regulations and regulations for low voltage equipment).
Declarations

This document is a product of Sintron Distribution GmbH, 76473 Iffezheim and may not be copied or distributed partly or in full without express, written consent.
Vincent is a registered trademark of Sintron Distribution GmbH, 76473 Iffezheim.
Vincent works continually to improve and develop its products. Therefore, the appearance and technical design of the appliance are subject to changes, as long as they are in the interest of progress.
The content of these instructions is for information purposes only. It can be changed at any time without prior notice and does not constitute any obligation on the part of the trademark's owner. The latter assumes no responsibility or liability for errors or inaccuracies, which may be included in these operating instructions.
Storage of the packaging
We strongly recommend that you keep the original packaging in case you need to transport the equipment again at a later date. Transport damages are mainly caused by improper packaging of the HiFi-devices. Because the original packaging fits the equipment accurately it will reduce the risk of damage if transport is necessary.


Explanation of the symbols
The lightening bolt tells you that dangerous voltages are present in the appliance, which can cause an electric shock.
This symbol brings your attention to particularly important information regarding operation and maintenance.
This symbol identifies useful information and advice about how to handle the appliance.
INCLUDED IN DELIVERY
Please check the contents of the packaging, which in addition to the appliance should contain the following accessories:
- 1 power cable
• 1 cable for the POWER CONTROL
• 1 stereo set of RCA - 1 USB-Cable
- this manual
DESCRIPTION OF THE APPLIANCE
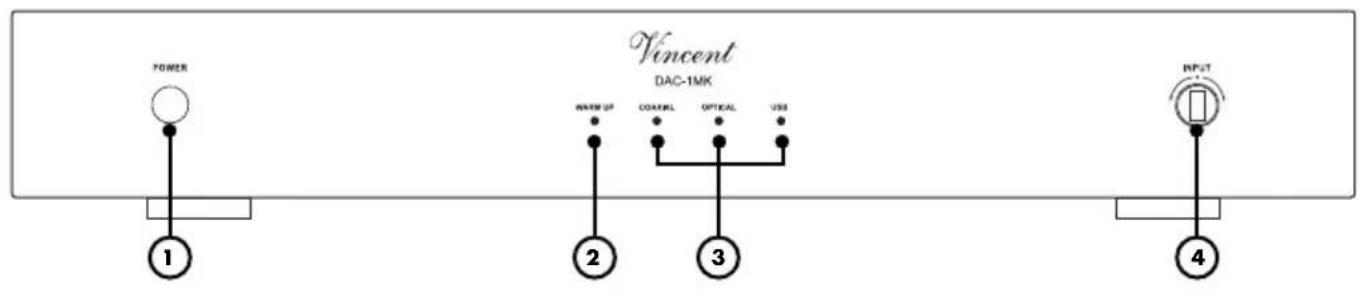
FRONT VIEW
text_image
POWER Vincent DAC-1MK WATER UP COASTIL OPTICAL US ① ② ③ ④1. POWER
This is the main power switch for turning on and off the device.
2. Warm Up
This LED lights while the unit is starting.
3. Input LED
The LED, which is related to the selected input, lights.
4. Input Selector
Choose the desired digital input with this turning knob.
REAR VIEW
text_image
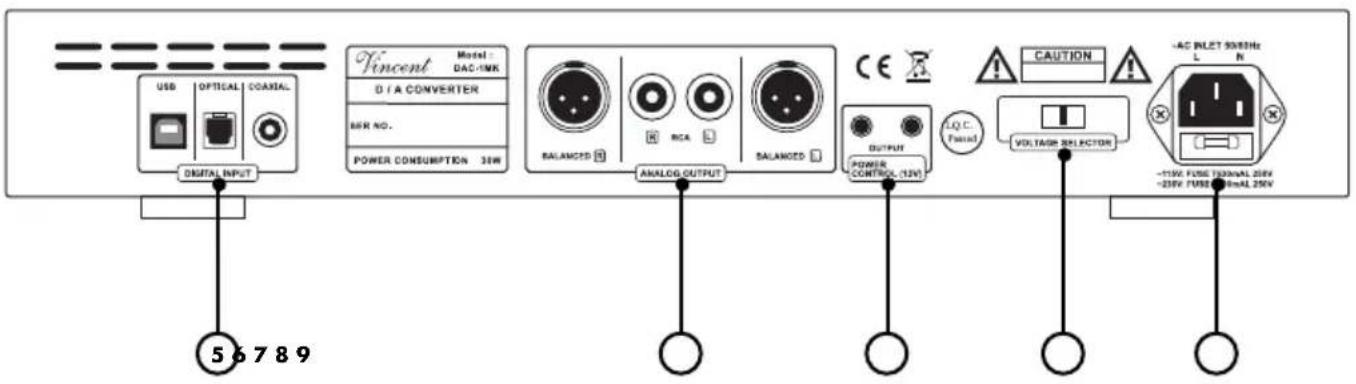
USB OPTICAL COAVAL DIGITAL INPUT Vincent Model: DAC-1MK D / A CONVERTER BER NO. POWER CONSUMPTION 35W BALANCED RCA BALANCED ANALOG OUTPUT OUTPUT POWER CONTROL (12V) LQ C. Focal CAUTION VOLTAGE SELECTOR -119V FUSE 1330mAAL 25kV -25kV FUSE 68mAAL 25kV -AC INLET 50/3Hz L R 5 6 7 8 95. Digital Inputs
You can connect your digital source on those inputs via USB, Optical or coaxial.
6. ANALOG OUTPUT:
analogue audio signal outputs
Either the RCA connector pair or the XLR sockets ("BALANCED") must be connected to the matching input of the amplifier, preamplifier etc.
7. POWER CONTROL (12V)
These jack connectors (3.5 mm) send the signals for the standby control (12V Trigger).
8. Voltage Selector:
The voltage selector behind the panel allows switching the voltage from 230 V to 110 V.
Refer to safety instructions for further information (p. 28, "Switching the Voltage")
9. AC 220-240V: Power Connector
To establish the power supply, connect the plugs of the power cable to the device and to a suitable wall outlet.
INSTALLATION
Set up the cable links in a sequence as follows. Connect the power cable between device and power supply only after all other connections have been made.

DURING INSTALLATION PLEASE OBSERVE THE FOLLOWING ADVICE:

Protective caps
Prior to the first installation the protective plastic caps must be removed from all the connections used at the rear of the unit.
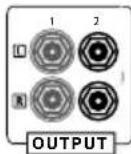
RCA connections
Mechanically identical RCA plugs are available for analogue and digital outputs. Make sure that you do not get these connections confused during installation!
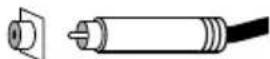
Make sure that you do not mix up the analogue connectors for right and left. The RCA plugs for these are mostly colour coded as follows: red for the right channel, black or white for the left channel.
Contacting the middle pin of the RCA plugs with the outer ring of the RCA chassis jack may lead to damages to the main amplifier if it is switched on! To avoid this hazard, connect or disconnect only in switched-off state and more than one minute after deactivating!
Cable connections
Make sure that all plugs fit tightly. Inadequate connections can cause noise interference, failures and malfunctions.
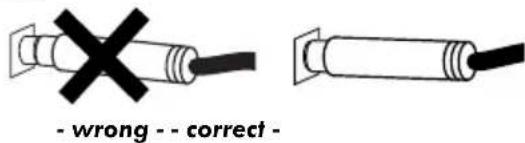
text_image
- wrong - - correct -To make the most of the components' sound potential, only high quality loudspeakers and connecting cables, for example Vincent cables, should be used. Your local stockist will be glad to advise you about this.
SWITCHING THE VOLTAGE
This device is equipped with a switch (8) that can be used to change the country-specific voltage from 230 V to 110 V.
Please never actuate the switch during operation! The voltage must only be switched by a technician, since the device fuse must also be replaced after actuation of the switch! Information about the device fuse can be found on the back of the device.
Unauthorised actuation of the switch will void any warranty claim!
CONNECTION OF THE SOURCE EQUIPMENT
Connection of a USB-source device
The D/A converter makes it possible to transfer digital music signals directly from the computer through the amplifier similar to the boxes. For this, the USB jack serves as input.
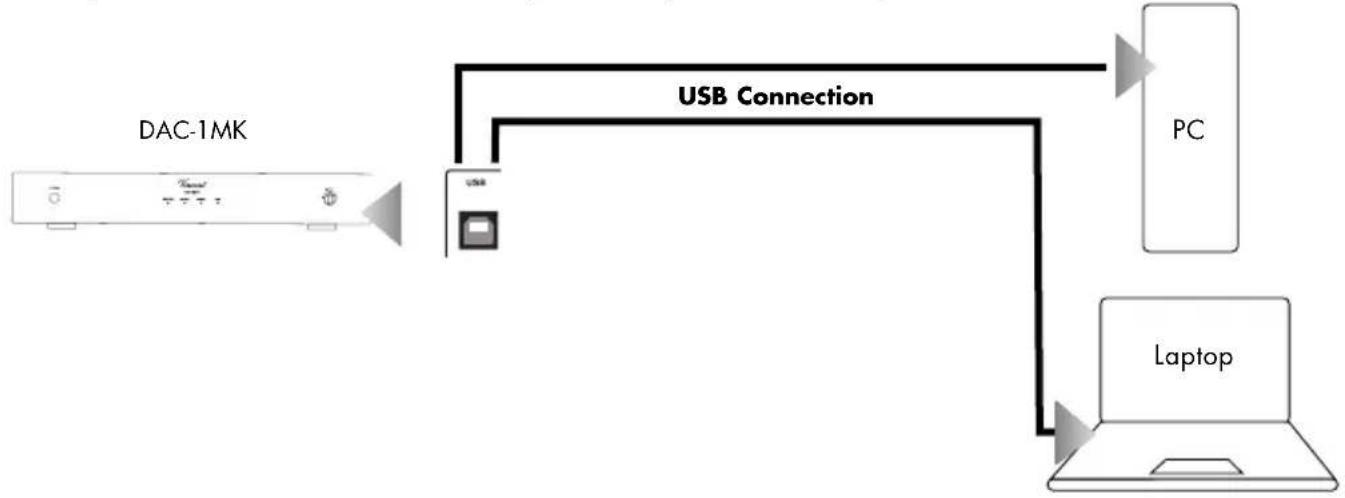
flowchart
graph TD
    A["DAC-1MK"] --> B["USB Connection"]
    B --> C["PC"]
    B --> D["Laptop"]
CONNECTION OF SOURCE DEVICES OVER OPTICAL IN AND COAXIAL IN
The D/A converter makes it possible to receive also digital audio signals via an optical and/or coaxial cable and to transmit them analogously to the amplifier.
Digital audio source with optical signal connection

flowchart
graph LR
    A["DAC-1MK"] --> B["USB OPTICAL COBOLI"]
    B --> C["OPTICAL"]
    C --> D["DIVD, SACD, CD, TV/Radioreceiver"]
    B --> E["Digital INPUT"]
    C --> F["Optical digital cable"]
    F --> G["DIGITAL OUT"]
Digital audio source with coaxial signal connection

flowchart
graph LR
    A["DAC-1MK"] --> B["USB"]
    B --> C["COXIAL"]
    C --> D["COAXIAL Digital cable (RCA)"]
    D --> E["DIV, SACD, CD, TV/Radioreceiver"]
    B --> F["Digital INPUT"]
    C --> G["Digital OUT"]
CONNECTION TO AMPLIFIER, RECEIVER OR PREAMPLIFIER
The DAC-1 MK has two analogue signal outputs on the back of the device. The signal can be input to a traditional analogue audio component (amplifier) via the analogue outputs (6).
Use of one of the analogue outputs with RCA connectors
This is where the stereo audio signal converted to analogue by the high quality D/A converter and amplified by the output stage. An RCA cable is required for connection to an amplifier. Connect one pair of RCA connectors ("L" and "R") in the field "ANALOG OUTPUTS" (6 with the left and right audio connectors of the amplifier input (standard line level input) which is usually labelled "CD," "LINE IN" or "FRONT R/L". If you want, you can use both outputs at the same time.
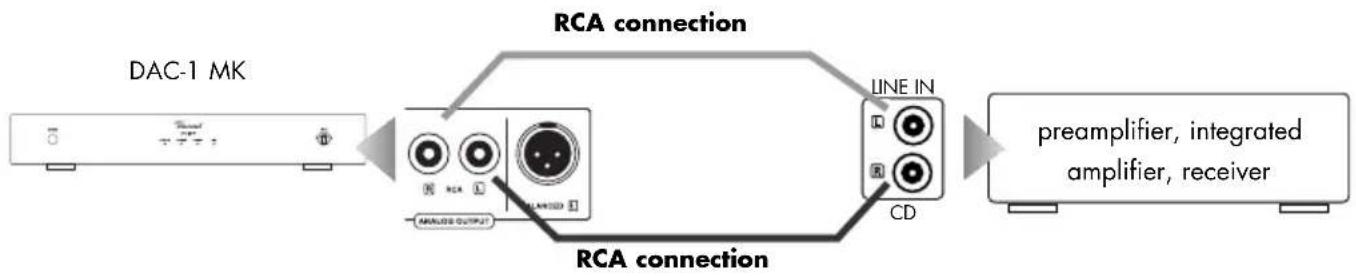
flowchart
graph LR
    A["DAC-1 MK"] --> B["RCA connection"]
    B --> C["LINE IN"]
    C --> D["preamplifier, integrated amplifier, receiver"]
    B --> E["RCA connection"]
    E --> F["Line IN"]
    F --> G["CD"]
    style A fill:#f9f,stroke:#333
    style D fill:#ccf,stroke:#333
Use of the analogue output with XLR connectors
This is where the stereo audio signal converted to analogue by the high quality D/A converter and amplified by the output stage. Two XLR cables are required for connection to an amplifier. Connect the XLR connectors "L" and "R" in the field "ANALOG OUTPUTS" (6) with the left and right connectors of the XLR amplifier input which is usually labelled "CD," "XLR IN," "BALANCED IN" or "FRONT R/L".

flowchart
graph LR
    A["DAC-1 MK"] --> B["XLR connection"]
    B --> C["CD"]
    B --> D["BALANCED IN"]
    C --> E["preamplifier, integrated amplifier, receiver"]
    D --> E
    B --> F["BALANCED OUTPUT"]
    B --> G["ANALOG OUTPUT"]
CONNECTIONS FOR THE STANDBY CONTROL (POWER CONTROL)
Many AV-Systems consist of a multitude of individual components. To avoid the necessity of switching them on and off before and after every use, many manufacturers have equipped their devices with what is known as "POWER CONTROL" circuit or "TRIGGER". This kind of remote-controlled standby circuit is used primarily for preamplifier and power amplifiers. Particularly for preamplifiers and main amplifiers this kind of remote standby control is utilized, as power amplifiers are often placed far from other devices near the speakers. To employ these functions, direct or indirect cable connections must be made between the preamplifier (or integrated amplifier) and all the devices which support this function. The "POWER CONTROL" function operates in such a way that each switching on or off of one device in the system (usually the preamplifier) automatically brings about the switching on or off of all the connected devices which support this function. Please keep in mind that all devices which respond to the power control are not disconnected from the mains network when switched off. They are set to a standby state instead. For connecting cables, two-core cables with 3.5 mm jack plugs (mono) are used. For each connection between two devices one of those cables is needed.
If you don't wish to use this function or if the other components do not support it, all you have to do is leave out these cable connections.
The DAC-1MK has an Input and a Output connection for the power control. It could receive an input signal and could transfer the signal to another unit.
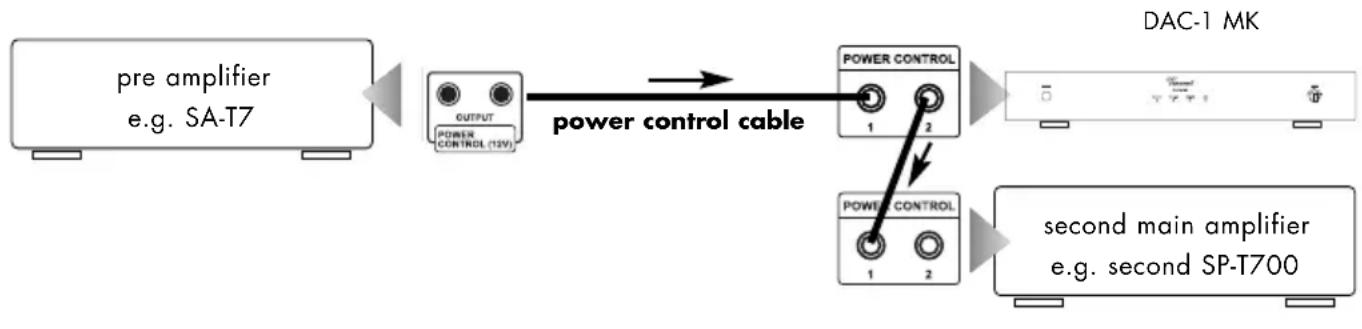
flowchart
graph LR
    A["pre amplifier e.g. SA-T7"] --> B["power control cable"]
    B --> C["POWER CONTROL 1 2"]
    B --> D["POWER CONTROL 1 2"]
    C --> E["DAC-1 MK"]
    D --> F["second main amplifier e.g. second SP-T700"]
CONNECTIONS FOR THE STANDBY CONTROL (POWER CONTROL)

Caution:
Many devices which can be controlled by a switching signal (not preamplifiers or integrated amplifiers), have two terminals which do not differentiate between input and output. In this case either of the two can be selected.
"POWER CONTROL" sockets of preamplifiers or integrated amplifiers must not be interconnected! All receiving devices must not be connected to more than one preamplifier or integrated amplifier (directly or indirectly)!
Check that the electricity supply to your home is appropriate to the device. The required voltage and frequency can be read on the back of the device beside the socket for the mains. If the electricity supply is appropriate, push the inlet connector of the supplied mains cable firmly into socket for the mains on the back of the device. Connect the other end of the mains cable to a mains socket.
OPERATING THE APPLIANCE
| Operation Button(s) Description | ||
| Switch on and off | POWER (1) | The unit is switched on and off using this button at the front panel. It has no standby option. When switched off the device is internally separated from the AC power. After switching on, the device needs up to 5 seconds before it is ready to operate. |
| Select input source | (3) Input | With this knob, you can select between 3 input sources. |
TIPS
Burn in/ Warm up
Your audio components need a certain time period until they reach maximum performance. The duration of this "warm up" time is very different for the various elements of your audio system. Higher and homogeneous sound quality is achieved while keeping the device switched on.
Your audio specialist dealer has enough experience to give you more information.
Net frequency noise
Some audio source devices may in combination with the amplifier cause a humming noise at power line frequency audible from your speakers. Usually, its volume varies with the volume setting of the amplifier. This is no sign of a defect or fault of your audio products but has to be eliminated. Generally, every wall-powered device connected to the ground wire of the power plug can cause this problem when connected to the amplifier.
Experience shows that this problem is mainly caused by antenna-connected components (as TV-sets or Tuners), personal computers, electrostatic loudspeakers, subwoofers, record players or headphone amplifiers that are connected to the audio inputs of the amplifier. Another possible reason for humming noise is electromagnetic interference of other components' power supplies with pick-up-systems of record players (change the place of the record player for a test).
In most electric devices the ground potentials of all signals are connected to each other at one central point, where they have one common connection. If the device uses the protective conductor of the wall outlet, the corresponding wire of the line cord is connected intractably to the metal housing of the device. This is mostly the point where the central grounding point is attached to. By doing this the housing is able to shield all signals from external radiated noise. Some main amplifiers are equipped with a "Ground Lift" switch. If it is activated, ground potential of the chassis and the protective ground wire are being separated from the central signal ground point. The protective ground wire keeps its function. Sometimes this helps prevent noise caused by errors in grounding.
If the problem occurs and cannot be solved by yourself your audio specialist dealer will help you.
SEARCH FOR ERRORS
| Symptom | Possible Cause | Countermeasure |
| Unit does not work after pressing the power button | Mains cable is not connected to a suitable mains wall outlet.Mains cable has not been firmly inserted into wall power socket and the device's socket. Otherwise it may be defective.Unit fuse or unit is defective. | Connect to a functioning socket using a suitable mains voltage.Check the power cable. If necessary, exchange it with a suitable mains cable and push its plug firmly into wall socket and the device's power connector.Contact your dealer. |
| No sound on both channels although the unit is ready for use (one of the LEDs for the input selection is lit). | The currently selected audio source is giving no signal.One of the audio settings of a connected DVD player (analogue/digital) has not been correctly selected.Wrong input channel has been selected at the preamplifier.The amplifier is muted (MUTE function).The used data format can not be played or is damaged. | Switch on the source unit and begin playback.Correct the settings in the player's setup.Set the amplifier to the input that your desired source is connected to.Deactivate mute function.Please check the data you want to play if it is compatible with the device. |
| No audio playback on one channel | The source equipment is giving signal on only one channel.One of the signal cables between audio source and amplifier has not yet been plugged in or is defective. | Check the audio source. You can try to use it at a different amplifier for a test.Check the cable connections, tighten them if necessary. |
| Poor sound quality | The cable connections are not tight, the connectors are dirty or a cable is defective. | Check the cables and cable connections. |
| Humming low frequency noise is audible, even as no audio source is playing back | See section "Net frequency noise" in the chapter "Tips". | See section "Net frequency noise" in the chapter "Tips". |
TECHNICAL SPECIFICATIONS
| Sampling Rate Coaxial, Optical: | PCM 24 Bit / 192 kHz (DSD 64) |
| Samplig Rate USB: | PCM 32 Bit / 384 kHz (DSD 256) |
| Frequency Response: | 20 Hz - 20 kHz (+/- 0.5 dB) |
| Harmonic Distortion: | < 0.004 % |
| Signal-Noise Ratio: | >95 dB |
| Dynamic Range: | >100 dB |
| Audio Output Voltage: | 2.5 V |
| Channel Separation: | >90 dB |
| Max. Power Consumption: | 35 Watt |
| Inputs: | 1 x USB, 1 x optical, 1 x Coax, 3,5mmjack power control |
| Outputs: | 1 x Stereo RCA, 1 x Stereo XLR, 3,5mmjack power control |
| Playable Formats: | MP3, WMA, AAC, AAC+, ALAC, FLAC,APE, WAC, DSD |
| Colour: | black / silver |
| Weight: | 5.5 kg |
| Dimensions (WxHxD): | 430 x 79 x 343 mm |
FURTHER INFORMATION AS DEFINDE BY THE ECODESIGN REGULATION
| Power consumption in OFF-mode: | <0,4 W |
| Power consumption in auto standby mode: | <0,4 W |
Time without input signal until auto-standby: 15 min. (autostandby can be switched off).
GLOSSARY
Audio Sources/Source devices
These are the components of your HiFi system and all other appliances, whose sound you want to hear over the system and are thus connected to the pre-amplifier, amplifier or receiver. This includes CD players, DVD players, FM tuners, cassette players, DAT recorders, personal computers, re cord players, portable audio devices and many more.
Input sensitivity
Term for the smallest average (RMS) input voltage which causes the maximum output power at the maximum volume setting on the amplifier. Examples: 100 mV to 500 mV (Millivolts) on line level inputs, 2 mV to 5 mV on the phono MM input or 0.1 mV to 0.5 mV on the phono MC input.
dB Level
This is a way of describing any physical quantity; it is a common measurement for signal voltages and the volume. It is given in decibels (dB). Alternating signal voltages below 1V (RMS) are described as "line level" voltages, which are suitable as music signals for amplifier inputs. Inputs on amplifiers (mostly represented by RCA sockets), which are designed for signals on the CD player, tape recorder, DVD player etc. are also referred to as "line level inputs". Those signal inputs must not be confused with inputs that accept preamplified signals.
RCA
RCA is the American name for a type of coaxial connectors and sockets, originally the abbreviation for "Radio Corporation of America", the name of a United States company. Both the plug and cable consist of a rod-shaped inner lead and a cylindrical-shaped outer lead. This enables a mono audio signal or a video signal to be transmitted. Compared to the XLR plug connector, this type of connection is also called "unbalanced signal connection".
Dynamics
The volume difference between the quietest and the loudest sounds possible in audio signals, without distortion or transition to noise.
NOTIZEN / NOTES
NOTIZEN / NOTES
CONSIGNES DE SECURITE
German Brand since 1995
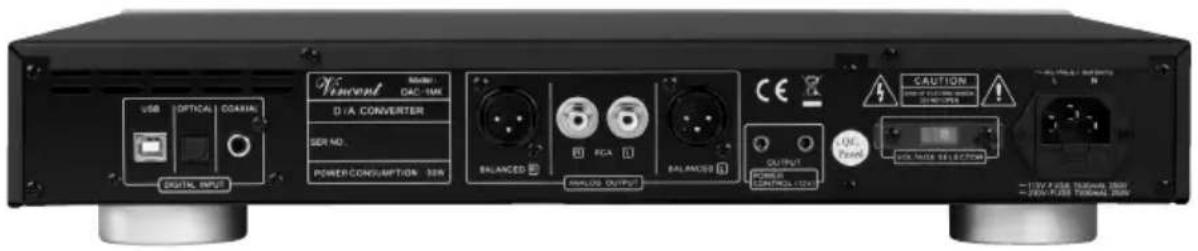
text_image
VH/VWNT Model: DAC-1MX D/A CONVERTER SER NO. POWER CONSUMPTION: 50N BALANCED ANALYZ OUTPUT OUTPUT POWER CONTROL 12A CAUTION OFFICE SWITCH SWITCH ON/OFFIC SWITCH ON/OFFIC SWITCH ON/OFFIC SWITCH ON/OFFIC SWITCH ON/OFFIC SWITCH ON/OFFIC SWITCH ON/OFFIC SWITCH ON/OFFIC SWITCH ON/OFFIC SWITCH ON/OFFIC SWITCH ON/OFFIC SWITCH ON/OFFIC SWITCH ON/OFFIC SWITCH ON/OFFIC SWITCH ON/OFFIC SWITCH ON/OFFIC SWITCH ON/OFFIC SWITCH ON/FAI 3/4/2016 TINAM 200V ON/FAI 3/4/2016 TINAM 200VPlease keep the receipt, store it together with this manual. The receipt is your proof for the beginning of the warranty period. Note the serial number in the following box, you can read it from the rear side of the device.