Palena Compact 23/575 - Fireplace Olsberg - Free user manual and instructions
Find the device manual for free Palena Compact 23/575 Olsberg in PDF.


User questions about Palena Compact 23/575 Olsberg
0 question about this device. Answer the ones you know or ask your own.
Ask a new question about this device
Download the instructions for your Fireplace in PDF format for free! Find your manual Palena Compact 23/575 - Olsberg and take your electronic device back in hand. On this page are published all the documents necessary for the use of your device. Palena Compact 23/575 by Olsberg.
USER MANUAL Palena Compact 23/575 Olsberg
Kaminofen Palena Compact 23/575
Instructions Page 19 - 25
F
natural_image
Exterior view of a modern cylindrical industrial lamp or filter unit with a transparent glass interior and metal bracket (no text or symbols visible)
natural_image
Illustration of a wooden press or lifting mechanism with two logs, no text or symbols present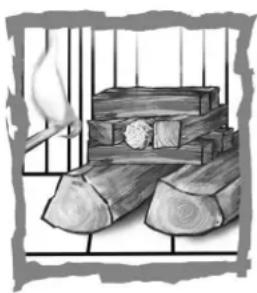
natural_image
Illustration of a wooden log stack inside a cage with a hand holding a tool (no text or symbols)natural_image
Illustration of a wooden press or clamping device with two cylindrical components stacked on a grid base (no text or symbols)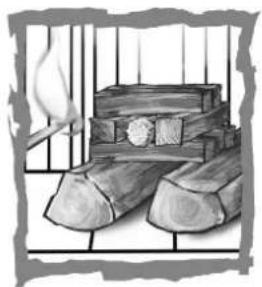
natural_image
Illustration of a wooden box placed inside a cage with barred windows (no text or symbols)natural_image
Close-up of a metallic mechanical bracket with mounting holes and a tool inserted (no visible text or symbols)natural_image
Technical line drawing of a mechanical assembly with no visible text or symbolsRegulations to be observed....13
Chimney design 13
Combustion air supply 13
Ambient air independent combustion air connection ....13
Installing the stove....14
Assembly sequence....14
Operation....15
Permissible fuels....15
Please note before heating for the first time....15
Igniting....15
Combustion air slide valve....16
Regulation of combustion air 16
Fire grate....16
Wood storage compartment....16
Heating....17
Heating during the transition period....17
Cladding....17
Special information....17
Cleaning 17
Replacement parts 18
What to do if ...? 18
Foreword
This stove is a top quality modern heating technology product.
A large degree of user comfort and high fuel utilisation enable it to be used as high quality space heating, without having to do without the cosy atmosphere of an open fire. Proper installation and correct handling and care are indispensable for problem-free operation and a long service life. Please therefore observe all the information given in these instructions. We are convinced that you will then derive a great deal of pleasure from this stove. Please keep these instructions in a safe place so that you can read through them at the start of each heating period.
Should you find any transport damage, please report it to your supplier immediately as otherwise it will not be possible to correct the damage free of charge.
Technical Data
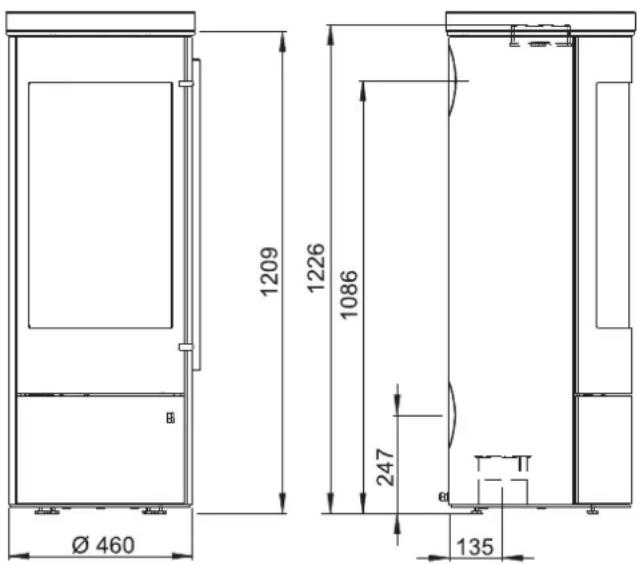
- Nominal thermal output....5,0 kW
- Room heat output....5,0 kW
- Connection pipe....Ø 150 mm
- max. Weight....130 kg
- Connection combustion air ....∅ 125 mm
- Operating mode .... Intermitting burning
text_image
Ø 460 1209 1226 1086 247 135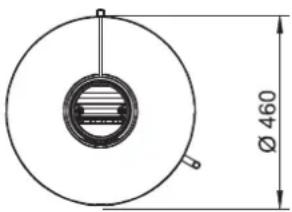
natural_image
Technical drawing of a circular mechanical component with internal slot and dimension标注 (no text or symbols)Regulations to be observed
- Local and building law regulations
- The stove must be installed by a professional and connected to the chimney. The specific national regulations for safe installation of the connector must be complied with. The connecting piece used must possess an opening for cleaning.
- The stove must be regularly checked by a professional.
- The stove has national technical approval from the Deutsches Institut für Bautechnik (DIBt) (German Institute for Civil Engineering) for room-air independent operation.
Due to its general technical approval, the stove can be used simultaneously with an approved ventilation system without additional safety device.
Equipped with a self-closing combustion chamber door, the stove is approved to be connected to multi-flue chimneys provided that it operates with a room-air dependent combustion-air supply.
Room-air independent operation requires that the exhaust gases of the fireplace be discharged through a single-flue chimney or the exhaust duct of a single-flue air-exhaust chimney. Exhaust gases may also be discharged into multi-flue exhaust gas systems if all connected fireplaces are part of the same utilisation unit/action range of the ventilation system. Individual differences can be discussed with your district master chimney sweep.
Chimney design
The chimney design is according to DIN EN 13384 -1 and -2 or to the specific national regulations.
The chimney must comply with the temperature class T400.
Necessary data
Closed operation
with billet wood / wood briquettes:
- Nominal thermal output 5,0 / 5,0 kW
- Waste air mass flow rate....4,5 / 5,6 g/s
- Waste air temperature at connection duct....330 / 320 °C
- Minimum delivery pressure at nominal thermal output....12 / 12 Pa
Combustion air supply
The stove can be operated conventionally, dependent on the ambient air as well as independent of the ambient air. It must be guaranteed that there is enough combustion air available for the stove. For the proper function of the stove, a necessary combustion air volume current of 18,7 m^3/h must be considered.
Ambient air independent combustion air connection
By an ambient air independent operating mode, the combustion air must be added from outside through a leak-proof line or through a supply duct in the chimney. Thus, speak with your district chimney sweep master.
Due to energy saving reasons, the combustion air inlet should be able to be blocked if the stove is not being operated. This can occur through a shut-off valve in the combustion air line or through the air slide valves on the stove. If a shut-off valve is used, this must be clearly identified with CLOSED/OPEN.
Through the shutoff, it is avoided that heat is removed from the set-up room through the constant circulation of cold combustion air and cold combustion air lines may lead to an increased formation of condensation.
Attention:
The combustion air line may not be closed during operation!
In order to feed the combustion air to the stove externally via a pipe instead of from the room in which it is installed, it is possible to screw a ∅ 125 mm combustion air pipe to the back of the stove or at the bottom. If the combustion air pipe installed is longer than 3 m, calculations will have to be carried out to verify an adequate supply of combustion air. At extremely low outdoor temperatures, condensation can occur on the combustion air duct. For this reason it must be insulated with a suitable insulating material. Observe the rules of the oven and air heating construction craft.
Use the Olsberg combustion air pipes with sealing lip.
Installing the stove
The floor on which the stove is installed must be even and horizontal. The stove may only be installed on an adequate load-bearing floor. The stove can be stood on a metal floor sheet or glass sheet to protect the flooring.
If the flooring or carpet is inflammable, a stable and non-combustible spark protection plate must be used. This must extend 50 cm to the front and 30 cm to each side beyond the edge of the combustion chamber opening. Under the stove no spark protection plate is required.
Assembly sequence
• If intended, install the OEC.
- The ∅150mm stovepipe connection can be installed at the top or rear. The stove is supplied ready for connection from above. If you wish to connect it at the rear, the following steps must be carried out to make the necessary modifications:
- Break out the cover in the back panel.
- Replace the connector sleeve and the sealing cover.
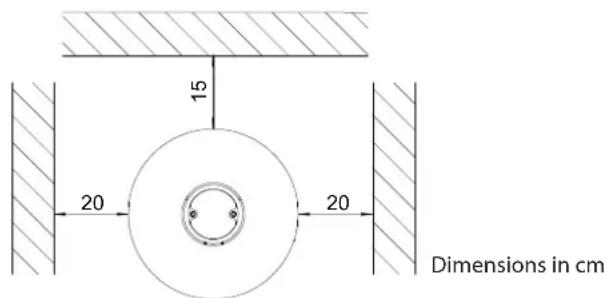
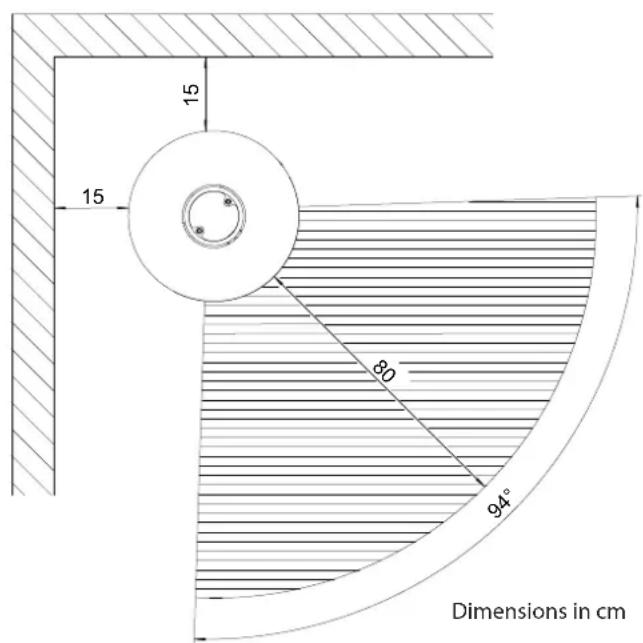
- Decide where the stove is to be installed. There must be no objects made of combustible materials within a distance of 80 cm of the stove's radiation area, measured from the combustion chamber's inspection glass, nor may any be placed within this area subsequently.
Depending on the installation position of the stove in front of walls that need to be protected (flammable or load-bearing), the following distances from walls need to be observed in accordance with the position of the combustion chamber door to the wall / side panel or the back panel (see schematic diagram).
When not dealing with walls that need to be protected, you merely need to observe a minimum distance of approx. 5 cm to allow for proper heat dissipation.
If the "Palena Compact" is set up with the turntable, then the turntable must be positioned in such a manner that the radiation area of the glass pane cannot be turned in the direction of components that must be protected, or the distance must be at least 80 cm.
- Install the pipe lining (provided on site) in the chimney. The connection height can be individually specified for a top stovepipe connection, however should not exceed 1.5 m from the connector sleeve. For the rear stovepipe connection heights please refer the "Technical Data" chapter. No combustible material is permitted within a radius of 20 cm around the stove pipe.
- Connect the stovepipe at both connection points with stove putty so that the stove pipe is permanently sealed.
- Push the stove onto its planned position and orient it so that the stovepipe fits into the pipe lining.
The stovepipe connections must be tight. The stovepipe must not protrude into the chimney.
Bear in mind that on partition walls in accordance with test specification EN 13240 the temperature of 85^ C can be reached, and with light wallpaper or similar combustible construction materials this can result in colour changes.
text_image
15 20 20 Dimensions in cmStove installed straight in corner
text_image
15 15 80 94° Dimensions in cmStove installed diagonally in corner
Operation
Permissible fuels
The following fuels are approved:
• Natural shopped wood in the form of billet wood
Maximum length: 33 cm
Circumference:......approx. 30 cm
• Wood briquettes to DIN EN 14691
Size class HP 2
Maximum length: 20 cm
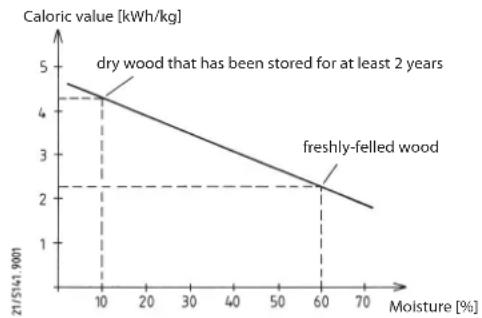
Billet wood reaches a moisture content of 10 to 15% after being stored outdoors for 2 to 3 years (only covered at the top) and is then ideally suited for heating.
Freshly cut wood has a very high moisture content and so burns badly. Apart from the very low calorific value it is also harmful for the environment. The increased condensate and tar formation can lead to fireplace and chimney sooting.
This diagram shows that the consumption rate with freshly-felled wood (calorific value 2.3 kWh/kg) is almost twice as high as the consumption rate with dry wood (calorific value 4.3 kWh/kg).
line
| Moisture [%] | Caloric value [kWh/kg] | | :--- | :--- | | 10 | 4.5 | | 60 | 2.5 | | 70 | 1.8 |You will only achieve optimum combustion and heat in an environmentally friendly way with these fuels. Adding the fuel in small quantities avoids unnecessary emissions. Clean burning can be identified by the fact that the firebrick becomes a light colour.
According to the German Federal Immission Control Act, it is forbidden e.g. to burn the following fuels in stoves:
- Moist wood or wood treated with wood preservatives
- Sawdust, chippings, grinding dust
- Bark and chipboard waste
- Slack coal
- Other wastes
• Paper and cardboard (except for igniting)
Straw
Please note before heating for the first time
- Remove all accessories from the ash pan and combustion chamber.
- The odour given off by the evaporation of the protective coating disappears after the stove has been burning for several hours (ventilate the room well).
- The stove has a high quality temperature resistant coat, which does not achieve its final strength until the stove has been heated for the first time. You should therefore never leave anything on the stove and not touch the surfaces as the paint coat could otherwise be damaged.
- As soon as the kindling material has burned down, put on 2 burnouts consisting of 3 kg wood ensuring that the temperature resistant coating reaches its final firmness.
Igniting
- Before ignition, check that no flammable objects are placed on the stove.
- Empty the ash pan if necessary and slide back in.
- Open the combustion air slide valve complete.
- Grate in open position = operating lever pulled out
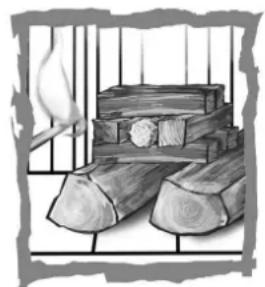
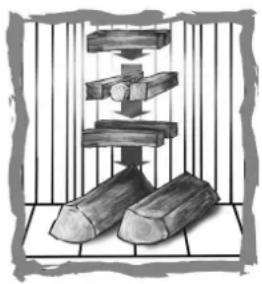
- Stack small amounts of firewood and, on top of it, kindling material (igniter cubes and dry, smaller kindling) and set the material alight.
natural_image
Illustration of two wooden tools under a vertical rack, no text or symbols present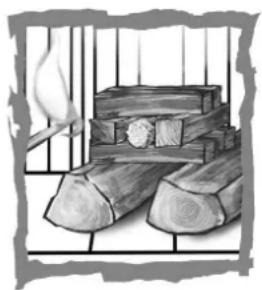
natural_image
Illustration of a wooden bench with logs and a hand holding a tool, enclosed in a cage-like frame (no text or symbols)- Close the door to the combustion chamber so that the kindling material can catch fire.
- Once there is a basic firebed, add more fuel according to the heat requirement (see chapter "Heating").
Caution:
When heating up the fireplace, difficulties in igniting the firewood can occur if a flue draught has not yet formed in the chimney, and ventilation devices/systems are operated at the same time. In this case briefly opening a window in the installation room or temporarily switching off the ventilation system can help.
Combustion air slide valve
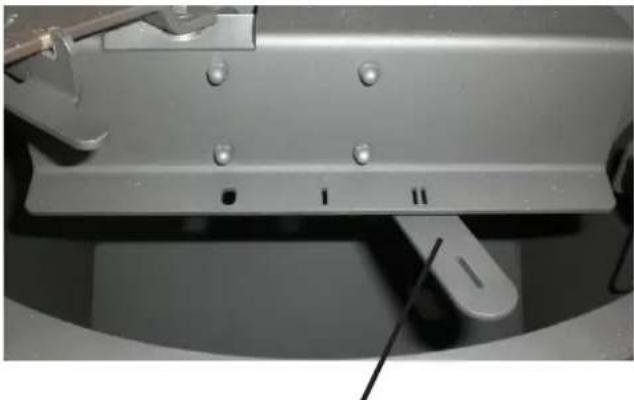
natural_image
Close-up of a metallic mechanical bracket with mounting holes and a tool inserted (no visible text or symbols)Operating lever for combustion air supply
- Operating lever on „0“: all slide valves closed
- Operating lever on „I“: Secondary slide valve completely open / Primary air slide valve completely closed
- Operating lever on „II“: Secondary slide valve completely open / Primary air slide valve completely open
Regulation of combustion air
Position of operating lever:
"II".....Ignition position, max. heat output
"I".....Nominal heat output with billet wood
"I".....Nominal heat output with wood briquettes
"0".....Obtain glow
- As the secondary air also contributes to the cleanliness of the glass pane, the operating lever should be set on "I" minimum. This also applies in the event of low-load operation.
- When not operating the lever should be set on "0", to reduce the cooling down of the room.
Fire grate
natural_image
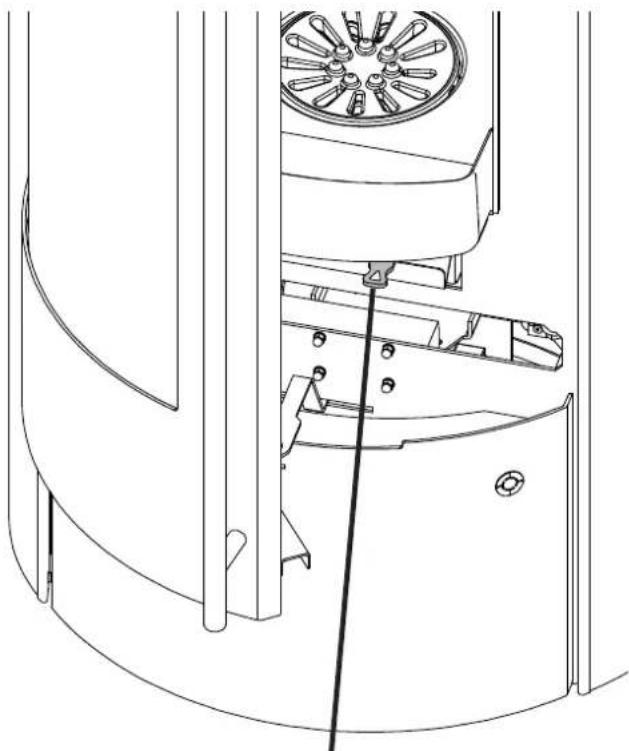
Technical line drawing of a mechanical assembly with no visible text or symbolsOperating lever for the fire grate
- With the help of the operating lever the fire grate can be opened or closed to move the ash from the combustion chamber to the ash pan by pushing the fire grate back and forth.
- Primary air can only enter the combustion chamber if the fire grate is set on open position.
Wood storage compartment
text_image
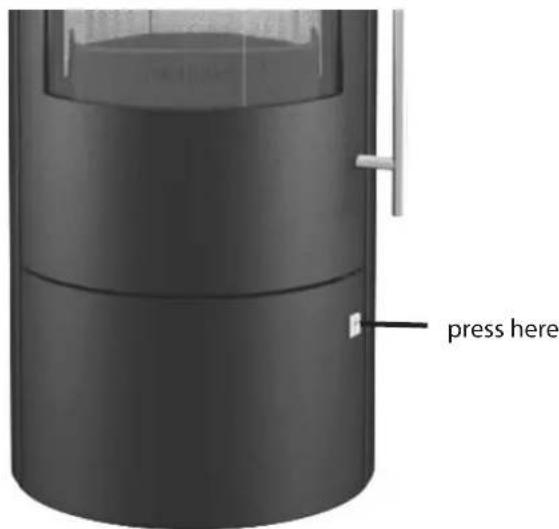
press hereThe wood storage compartment below the combustion chamber is fitted with a magnetic pressure closure. It can be opened by lightly pressing on the button (Olsberg logo). Likewise it can be closed by lightly pressing.
Heating
- Only place the quantity of fuel required to achieve the heating requirement.
For a nominal heating output 5,0 kW:
- max. 1,5 kg billet wood; burning time >45 min
- max. 1,3 kg wood briquettes; burning time >45 min
For max. heat output allowed:
- max. 3 kg billet wood
- max. 3 kg wood briquettes
- Open the combustion chamber door slowly for adding new fuel, as otherwise the combustion gases can escape.
- Empty the ash pan or combustion chamber in good time. Otherwise it is possible for the combustion air intake to be blocked or for the grate to be damaged.
- Only remove the ash pan to empty it.
- Clean the ash pan compartment regularly after removing the ash pan to remove any ash that may have been spilled (e.g. use a vacuum cleaner).
Attention:
Any stove and ash residues must have been left to cool before being removed.
Heating during the transition period
Prerequisite for the stove to function well is the correct delivery pressure (chimney draught). This very much depends on the external temperature. Therefore, if the external temperatures are high (above 16^ C) the delivery pressure can be disrupted.
What to do?
- Open the combustion air slide valve complete.
- Only put on a small quantity of fuel.
• Frequently stoke the ash.
Cladding
- The cladding may not be overheated, as cracks could appear.
- Use a maximum of 3 kg wood or briquette for heating.
- As the natural cladding comes from a „grown“ boulder, structure and colour scheme may be very different.
- The surface may be altered under temperature influence.
Special information
The manufacturer's guarantee expires if the stove is significantly or permanently overloaded above the nominal heating output, or if fuels other than those listed are used.
- The stove must only be used with the combustion chamber door shut.
- Never remove hot ashes. Only store ashes in a fireproof, non-combustible container.
- Attention: The surfaces get hot! Always use the enclosed glove when operating the stove.
- Convection air openings may not be covered.
- Never use white spirit, benzene or other inflammable, hazardous materials to ignite the fire.
- The combustion air supply fittings must never be altered. In particular, it must be ensured that any necessary combustion air pies are open while the fireplace is being used.
- Do not make any changes or modifications to the stove.
Cleaning
| What? How often? Using what? | ||
| inside of stove at least 1 x per year | hand brush, vacuum cleaner | |
| connection piece at least 1 x per year | hand brush, vacuum cleaner | |
| glass panel as required | when cold using glass cleaner for stoves- and oven glasses | |
| painted surfaces as required | when cold with a slightly damp microfibre cloth |
Replacement parts
Attention:
Please ask your specialist trader for any replacement parts required. Always use original spare parts only. We guarantee a ten-year availability of spare parts.
In order to process your order as quickly as possible, it is imperative that you send us the type and fabrication number given on the stove's rating plate.
The stove identification plate is situated in the wood storing compartment.
We recommend the relevant numbers here before installing the stove to ensure that you always have them to hand:
Type number: 23/____
Fabrication number: ____
What to do if ...?
... the stove doesn't draw properly?
• Is the chimney or the stovepipe not tight?
- Has the chimney been incorrectly designed?
• Is the external temperature too high?
- Are the doors of other fireplaces connected to the chimney open?
... the room doesn't get hot?
• Is the heating requirement too high?
• Is the waste gas pipe blocked?
• Is the combustion air supply been closed?
• Is the chimney draught too low?
• Is the wood used as fuel not dry?
... the stove gives off too much heat?
• Is the combustion air supply open too wide?
• Is the delivery pressure too high?
... the grate becomes damaged or slags are formed?
• The stove was overloaded.
- The ash pan was not emptied in good time.
... a fault occurs?
- Do not add any more fuel.
- Do not open the combustion chamber door.
- Allow the fire in the chimney to burn itself out in a controlled fashion.
... the chimney catches fire?
- Minimize the air supply to the stove and call the fire department.
• Inform the chimney sweep.
• Have a professional determine the cause?
Table des matières
Préface....19
natural_image
Technical drawing of a circular mechanical component with internal slot and dimension标注 (no text or symbols)- Puissance nominale ....5,0 / 5,0 kW
natural_image
Illustration of a wooden press or clamping mechanism with two logs, no text or symbols present