
EOS-FW-304 - Faucet FRANKE - Free user manual and instructions
Find the device manual for free EOS-FW-304 FRANKE in PDF.

| Product Type | Faucet for filtered water |
| Brand | Franke |
| Model | EOS-FW-304 |
| Mounting Hole Dimensions | 32 mm diameter |
| Maximum Countertop Thickness | 2 inches (50.8 mm) |
| Recommended Water Pressure | 35-75 PSI (2.4-5 bar) |
| Maximum Water Pressure | 145 PSI (10 bar) |
| Recommended Hot Water Temperature | 50-60 °C (120-140 °F) |
| Supply | Cold water only |
| Main Functions | Filtered water dispensing, 360° swivel spout |
| Compliance | ASME A112.18.1 / CSA B125.1, NSF/ANSI/CAN 61-2020, NSF 372, NSF 58 |
| Material | Chrome-plated brass (estimated) |
| Maintenance and Cleaning | Clean with a soft sponge and soapy water. Do not use harsh detergents, solvents, or chlorine-based products. |
| Safety | Do not operate both handles simultaneously to avoid overpressure in the heating tank. |
| Main Spare Parts | Cartridge (F3401), handle assembly (F3440), connector kit (F3403), push-fit adapters 3/8" (F3439) and 1/4" (F3406), supply hoses 3/8" (10305) and 1/4" (F3405), mounting kit (F3407) |
| Repairability | Replaceable ceramic disc cartridge |
| Package Contents | Faucet, escutcheon, washers, plastic flange, mounting plate, tightening nut, push-fit connectors 1/4" and 3/8", poly tubes, silicone tube, clamps |
| General Information | Installation recommended by a professional plumber. Use only genuine Franke components. |
Frequently Asked Questions - EOS-FW-304 FRANKE
User questions about EOS-FW-304 FRANKE
0 question about this device. Answer the ones you know or ask your own.
Ask a new question about this device
Download the instructions for your Faucet in PDF format for free! Find your manual EOS-FW-304 - FRANKE and take your electronic device back in hand. On this page are published all the documents necessary for the use of your device. EOS-FW-304 by FRANKE.
USER MANUAL EOS-FW-304 FRANKE
Eos Neo Little Butler
natural_image
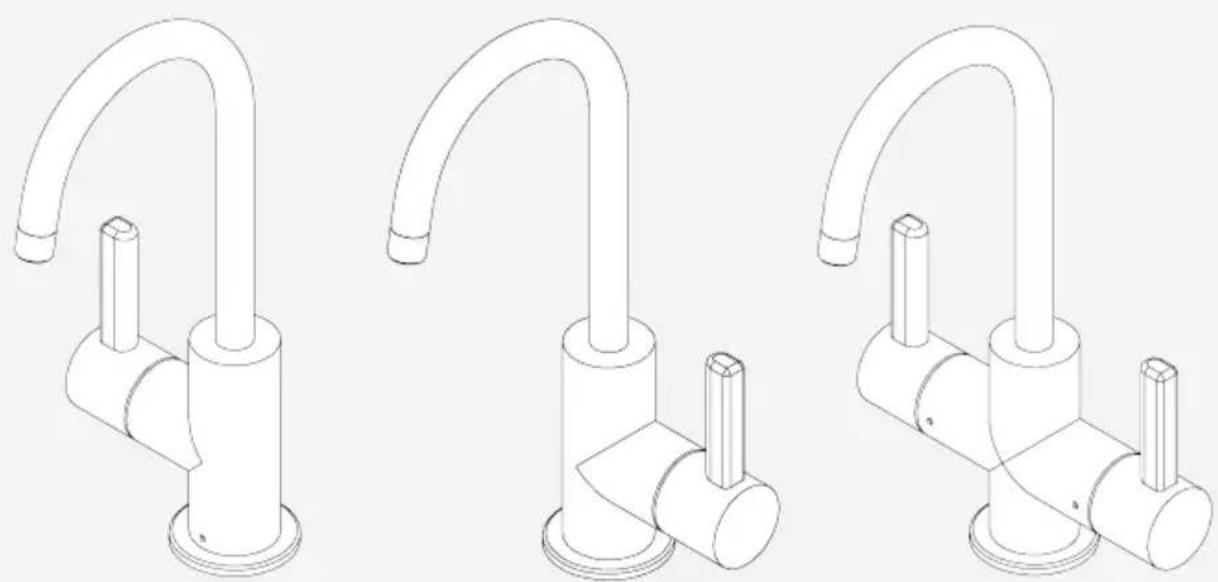
Three identical line drawings of a kitchen sink with curved pipes and fittings, shown from different angles (no text or symbols)EOS-HC-304 EOS-HO-304 EOS-FW-304 EOS-FW-CHR EOS-FW-IBK EOS-FW-GLD EOS-HO-CHR EOS-HO-IBK EOS-HO-GLD EOS-HC-CHR EOS-HC-IBK EOS-HC-GLD
EN Installation manual Kitchen Faucet
Installation instructions 5
Before you begin 5
Hot water installation options 5
Cold water installation options 5
Preliminary steps 6
Installation steps EOS-FW-304 7
Installation steps EOS-HO-304/EOS-HC-304 8
Usage and maintenance 9
Usage 9
General maintenance 9
Replacing the cartridge 10
Spare/replacement list EOS-FW-304 11
Spare/replacement list EOS-HO-304 12
Spare/replacement list EOS-HC-304 13
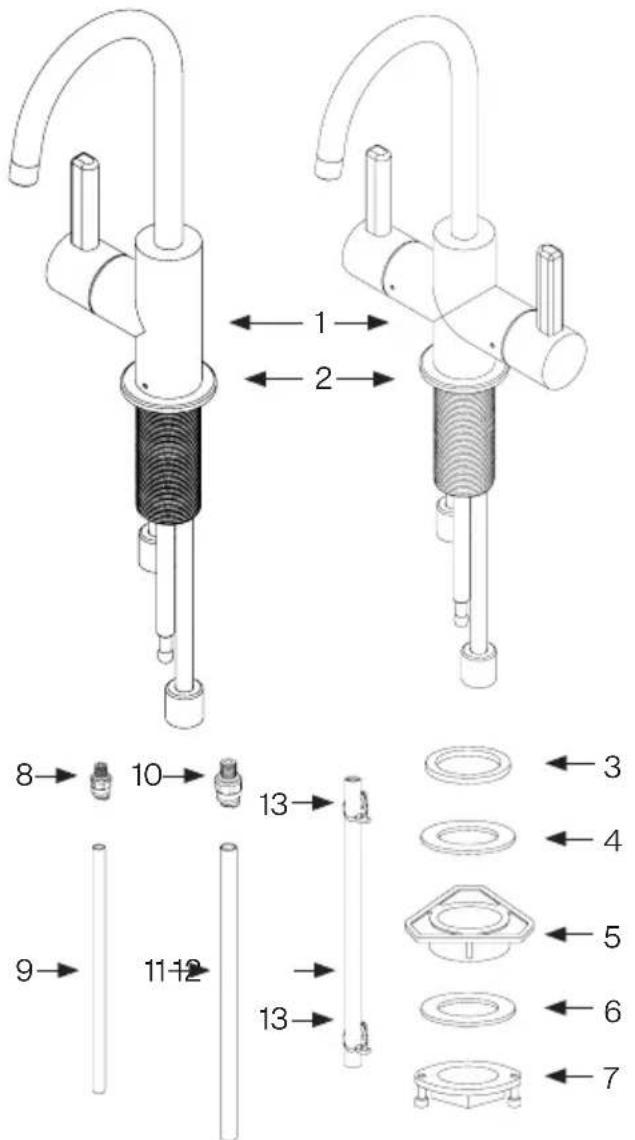
Contents in box
EOS-HO-304
- Faucet Assembly
- Escutcheon
- Escutcheon Rubber Washer
- Rubber Washer
- Plastic Flange
-
Fixing Plate
-
Fixing Nut
- 1/4" Push Fitting
- 1/4" Poly-tube
- 3/8" Push Fitting
- 3/8" Poly-tube
- Silicone Tube
- Plastic Clamps

Note: Contact us immediately if you see inconsistencies.
phone: 1-800-626-5771
website: www.franke.us/ks
email: ks-customerservice.us@franke.com
EOS-FW-304
- Faucet Assembly
- Escutcheon
- Escutcheon Rubber Washer
- Rubber Washer
- Press Plate
- Fixing Nut
- 3/8" Push Fitting
- 3/8" Poly-tube
Technical data
Operating data Value
Water Pressure (recommended) 35-75 PSI 2.4-5 bar 240-500 kPa
Water Pressure (max.) 145 PSI 10 bar 1000 kPa
Hot Water Temperature (recommended) 120-140°F 50-60°C
Hole Size For Faucet 1-1/4" 32 mm

Certifies this faucet complies with ASME A112.18.1 / CSA B125.1, NSF/ANSI/CAN 61-2020 (AB100 compliant, Q<1), NSF 372 & NSF 58. The faucet also complies with water usage requirements of the California Energy Commission and the US Department of Energy.
Installation instructions
Before you begin
For best results, Franke recommends this faucet be installed by a licensed, professional plumber. The installer should familiarize themselves with how this dispensing faucet will be installed and function as part of a point-of-use water dispensing arrangement before the products are installed because there are several installation options. Make certain to observe all local plumbing and building codes during the installation.
Hot water installation options
The EOS-HO-304 Series dispenser offers hot water only. This dispenser is required to be used in conjunction with a Franke heating tank unit. Use of a Franke filtration system in addition to the heating tank is optional, but strongly recommended in order to prolong the life and improve the performance of the heat tank, as well as providing much higher quality water as compared to un-filtered water entering the tank.
The EOS-HC-304 Series dispenser offers hot and filtered water separately. This dispenser must be used in conjunction with both a Franke heating unit and a Franke filtration system.
These models both utilize 3 tubes to connect to the system.
- A 3/8" poly-tube for the cold water supply into the dispending faucet.
- A 1/4" poly-tube to carry the filtered water from the dispensing faucet to the heating tank unit.
- An opaque high temperature silicone tube to carry the heated water from the heating tank back to the dispensing faucet.
Cold water installation options
The EOS-FW-304 Series dispenser provides filtered drinking water as well as the option of chilled drinking water. This dispenser is required to be used in conjunction with a Franke filtration system. For chilled drinking water, a Franke chiller tank unit is required. This model utilizes a 3/8" poly-tube to supply filtered water to the faucets.
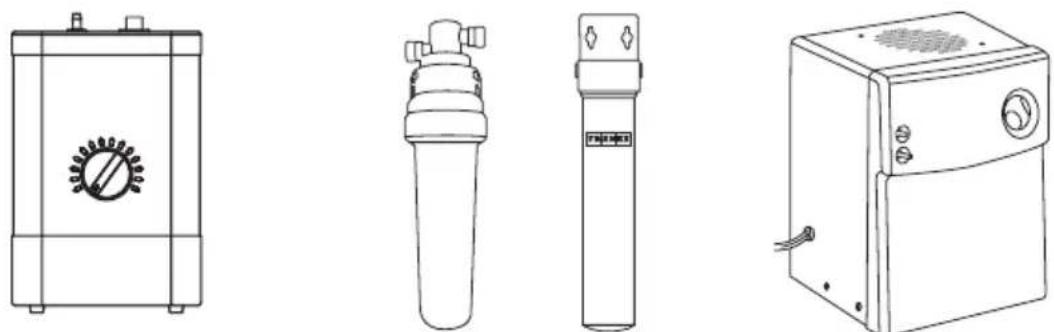
Heating Tank Filtration Systems Chiller Tank
Important: Franke strongly recommends using only genuine Franke components in tandem with all Franke dispensing faucets. The function of the dispensing faucets cannot be guaranteed if using filtration products, heating tanks, or accessories other than genuine Franke components.
Preliminary steps
- It is recommended to take the components and locate their optimum positions before starting the installation.
- Make sure there is adequate clearance for the dispenser handle(s) to open fully without interference.
- Make sure all plumbing and electrical connections will reach the intended mounting positions for all the components and there will be no obstruction or sharp bends in the plumbing.
- Make sure the counter top is no thicker than 2".
Important: For subsequent steps, it will be required to cut and route tubing to fit the specific application in your home. All tubing must be cut squarely and free of burrs. Ensure there is no damage within 1" of the cut end.
Do not use any form of sealing compounds. This is not required for push fit connections, and using sealing compounds could cause leaks.
All tubing connections must be routed to avoid sharp bends and have enough slack to avoid straining connections. Pull gently on each connection to make sure they are secure. See diagram below for details on tubing installation and removal.
-
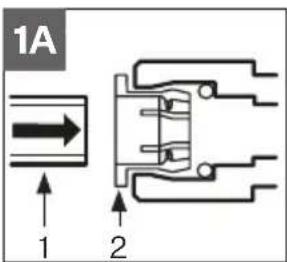
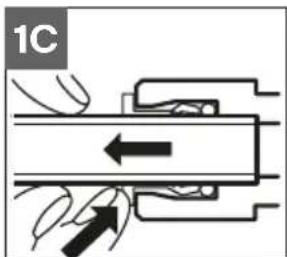
How to insert/remove tubing in push fit connections:
-
Insert the Tubing (1) squarely (fig. 1A).
- Make sure to insert tubing completely (fig. 1B).
natural_image
Pure mechanical assembly diagram without any text, numbers, or symbols- To remove, push in Collet (2) and pull out Tubing (1) (fig. 1C).
natural_image
Diagram of a hand pressing a mechanical component with directional arrows (no text or symbols)- Remove all contents from the package and check for completeness.
- Cut mounting hole 1-1/4" in diameter (32 mm) in the desired position (if one isn't available).
- Turn off water supply.
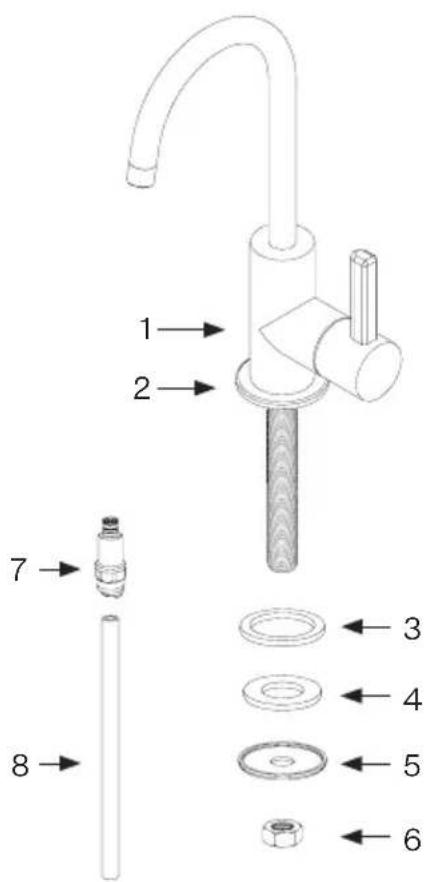
Installation steps EOS-FW-304
- Remove mounting hardware from faucet body shank.
- Slide the Escutcheon (1) over the shank. Make sure the Rubber Washer (2) is positioned in its seat in the Escutcheon (fig. 2A).
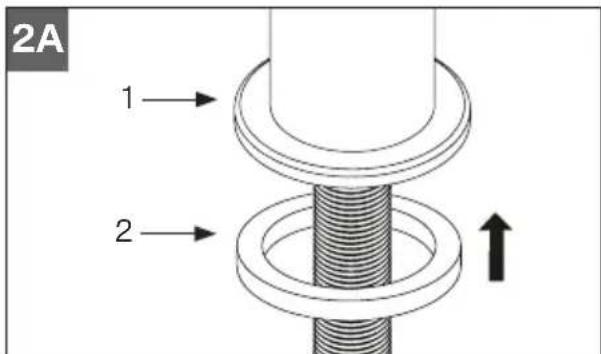
- Place the faucet in the hole, orienting the spout towards the sink bowl with the handles in position to rotate forward.
- Install mounting hardware underneath the mounting surface in the following order: Rubber Washer (3), Press Plate (4) and Fixing Nut (5) (fig. 2B).
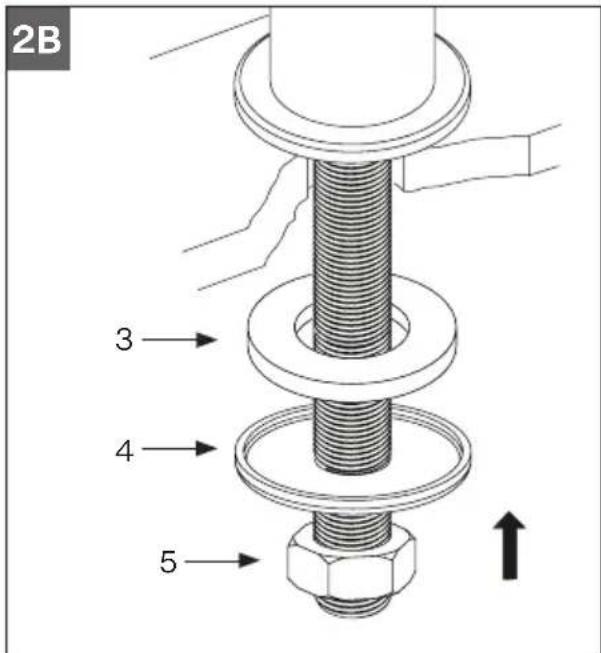
- Connect the cold water supply to the faucet:
- Screw in 3/8" Push Fitting (6) into Mounting Shank (7) (fig. 2C). Hand tighten only!
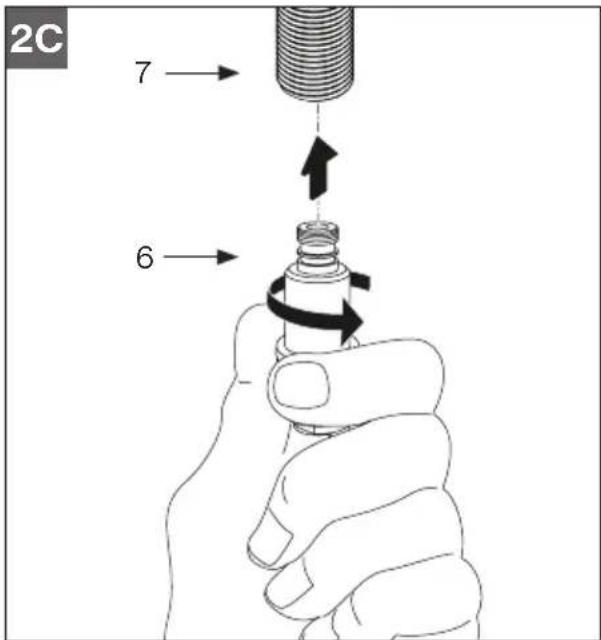
Warning: Use of tools to tighten this fitting can lead to leaks!
- Insert the 3/8" poly-tube into the push fitting (fig. 1A, 1B).
Note: There should be a service label attached to the poly-tubing. Do not remove label.
- Connect the 3/8" poly-tube to the outlet of the filtration system as outlined in the filtration system instructions.
- Turn on the water and check for leaks.
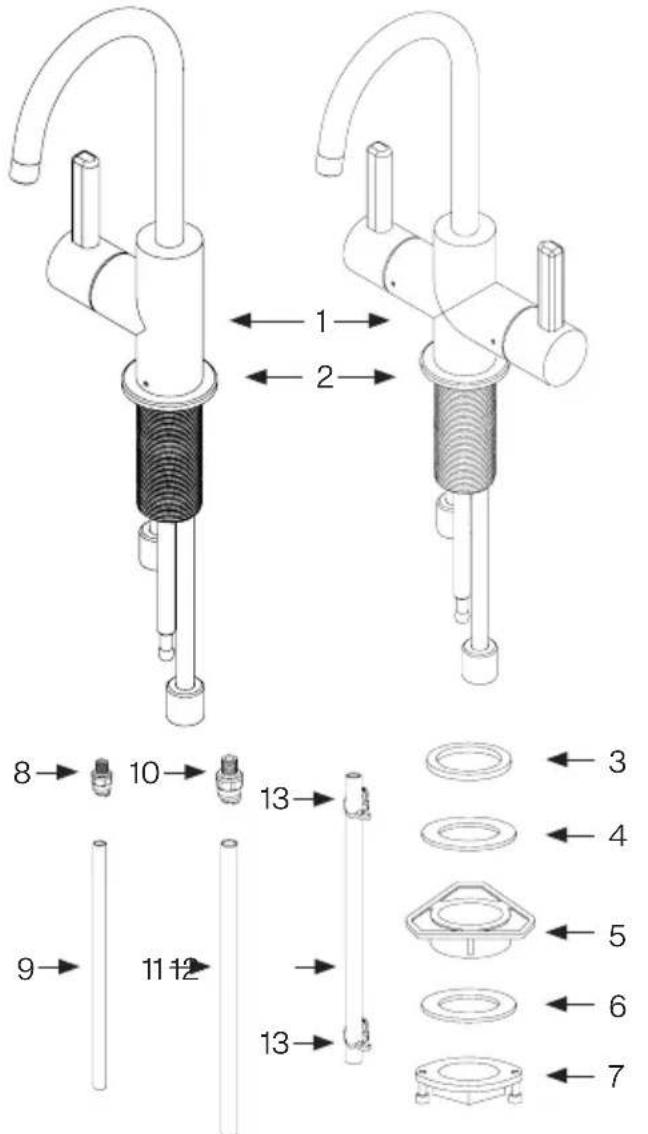
Installation steps EOS-HO-304/ EOS-HC-304
- Remove mounting hardware from faucet body shank.
- Slide the Escutcheon (1) over the shank. Make sure the Rubber Washer (2) is positioned in its seat in the Escutcheon (fig. 3A).
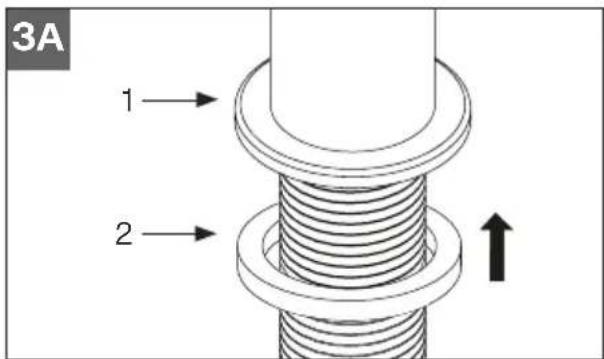
- Place the faucet in the hole, orienting the spout towards the sink bowl with the handles in position to rotate forward.
- Install mounting hardware to the mounting shank underneath the mounting surface in the following order: Rubber Washer (3), Plastic Flange (4), Fixing Plate (5) and Fixing Nut (6) (fig. 3B).
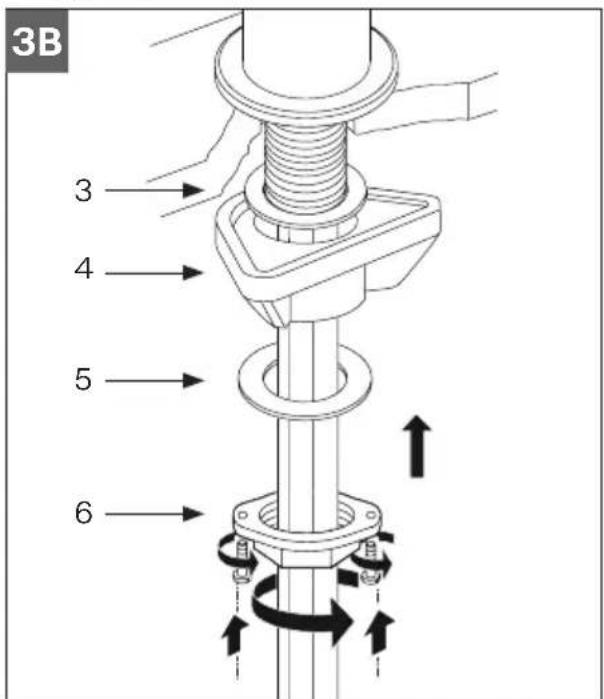
- Tighten 2 screws in Fixing Nut (6) to secure the nut (fig. 3B).
- Screw in the 1/4" Push Fitting (8) into the Hot Water Inlet (7) and screw the 3/8" Push Fitting (9) into the Cold Water Inlet (10) (fig. 3C). Hand tighten only!

Warning: Use of tools to tighten this fitting can lead to leaks!
- For the cold side, connect the 3/8" poly-tube to the 3/8" push fitting (fig. 1A, 1B) and connect the other end of the tube to the filtration system as outlined in the filtration system instructions.
Note: There should be a service label attached to the water supply pipes from the faucet. Do not remove label.
-
For the hot side, connect the 1/4" poly-tube to the 1/4" push fitting (fig. 1A, 1B) and connect the other end of the poly-tube to the heating tank inlet as outlined in the heating tank instructions.
-
Connect the high temp Silicone Tube (12) to the Mounting Nipple (11) and secure the tubing using the Hose Clips (13) (fig. 3D).
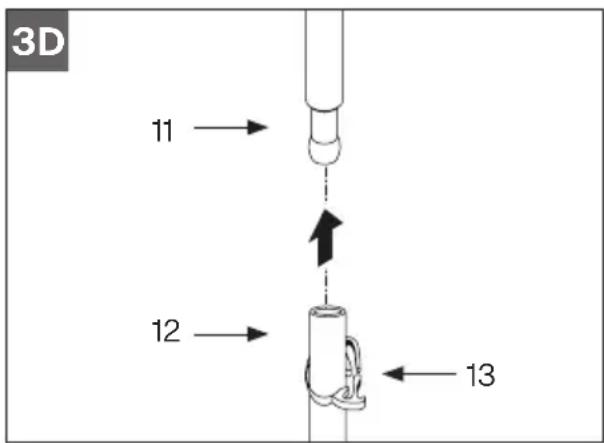
- Connect the other end of the high temp silicone tube to the heating tank outlet as outlined in the heating tank instructions.
Note: All tubing provided with the faucet is intended to be longer than will be necessary to make the connections to the heating tank. It is recommended to cut these tubes to the proper length to remove anyunnecessary loops or low spots in tubing after installed.
- Turn on the water and check for leaks.
Usage and maintenance
Usage
Pull the handle(s) forward to turn on the water supply. Both valves will stay in the 'on' position until rotated back to upright position.
Note: The spout has a 360^ swivel capability.
Warning: Do not operate both handles at the same time, as this can build up pressure in the heating tank causing the bladder to expand and eventually burst. Such damage is not covered by the warranty.
Seasonal Shutdown: If you plan to be away from home for extended periods of time, refer to the filtration system and/or heating tank system instructions (if applicable) under the Winterizing or Seasonal Shutdown sections to prevent system failures.
General maintenance
Do not use harsh detergents, solvents, chemical agents, especially CHLORINE based cleaners, metallic sponges, etc. that could harm the surface and damage the finish. Clean only with soft sponge and soapy water.
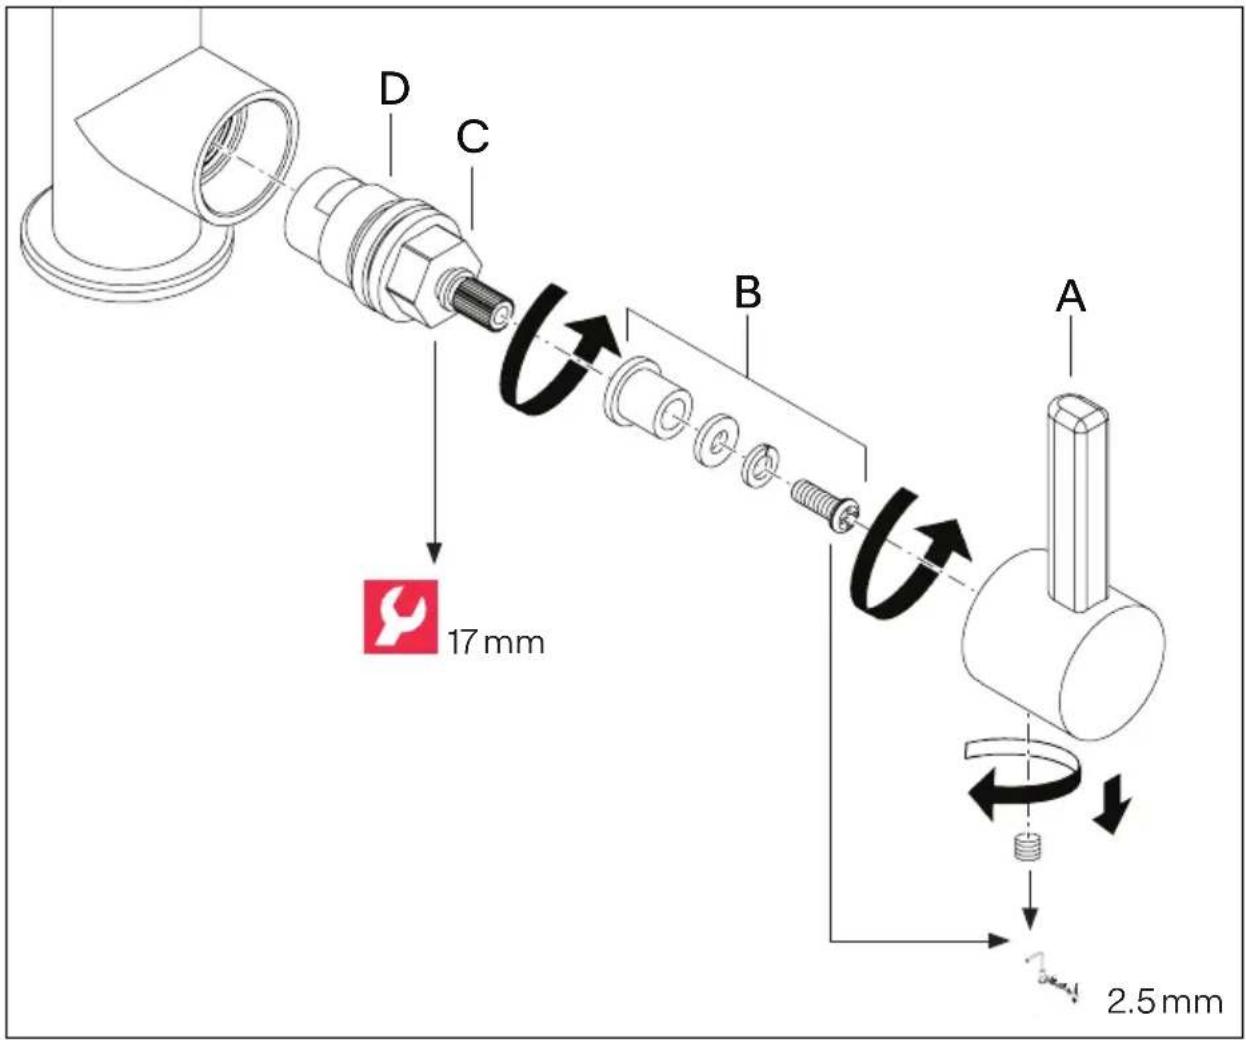
Replacing the cartridge
- Shut off the water supply to the faucet.
- Turn on the faucet briefly to relieve any pressure inside the faucet.
- Move the faucet handle to the "OFF" position.
- Remove the set screw from the Handle Assembly (A) using a 2.5 mm Hex Key.
- Pull the Lever Handle (A) from faucet body.
- Unscrew the Connector Kit (B) from the cartridge.
- Uscrew the Cartridge Lock Nut (C).
- Lift Ceramic Disc Cartridge (D) from the body and replace it with a new one.
- Re-assemble faucet in reverse order.
- Test for leakage.
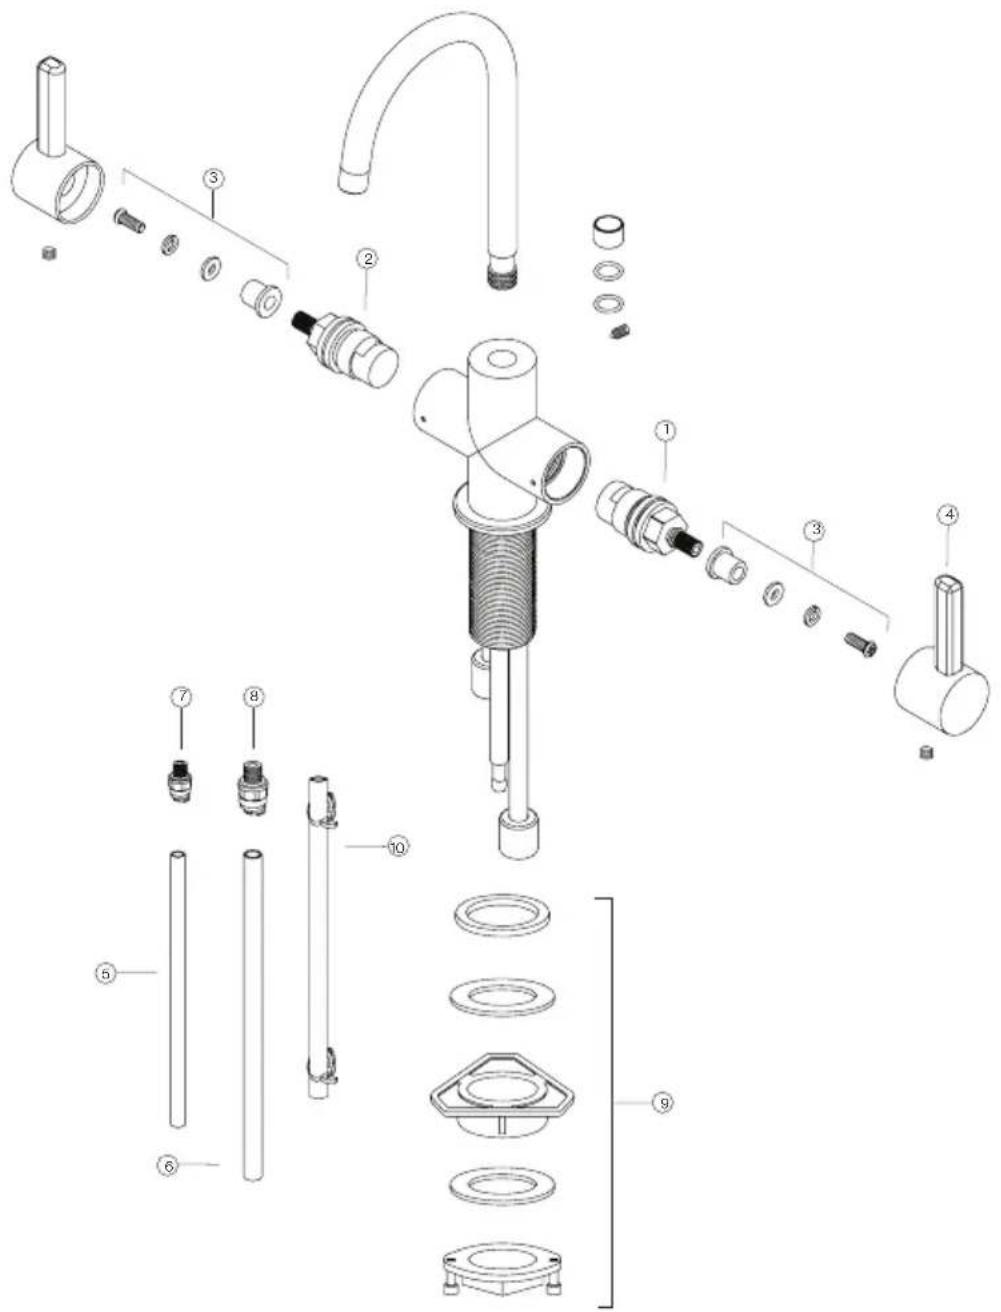
Spare/replacement list EOS-FW-304
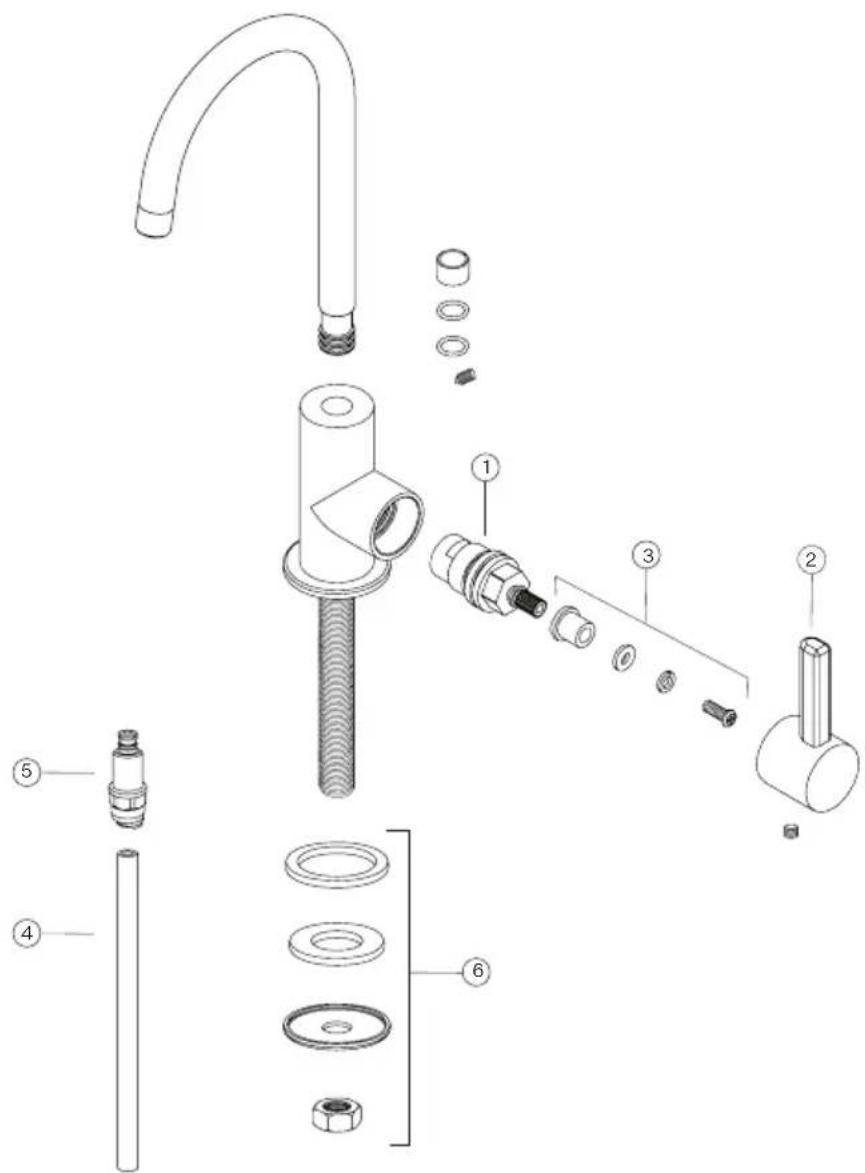
| 1 | F3401 Cold Cartridge |
| 2 | F3440 Handle Assembly* |
| 3 | F3403 Cartridge Connector Kit |
| 4 | 10305 3/8" Water Supply Tubing |
| 5 | F3439 3/8" Push Fitting Adapter |
| 6 | F3407 Fastening Set |
* Must Specify Finish
Spare/replacement list EOS-HO-304
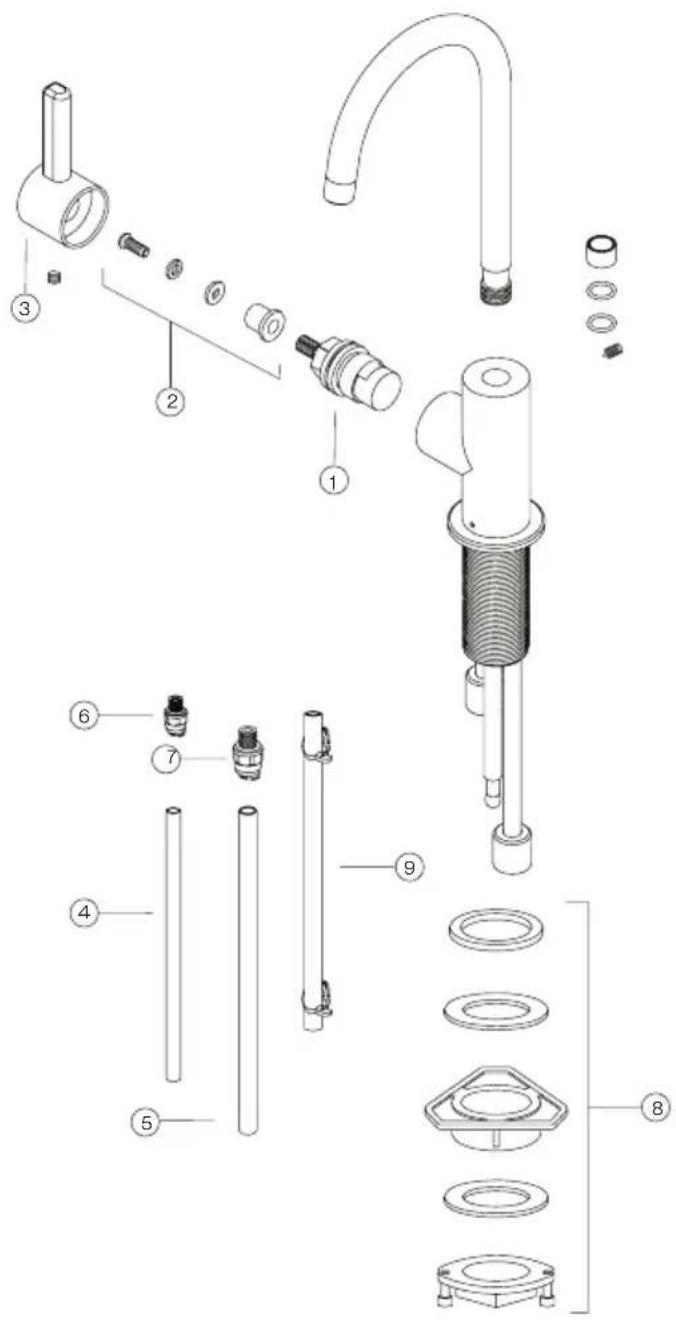
| 1 | F3402 Hot Cartridge | 6 | F3406 1/4" Push Fitting Adapter |
| 2 | F3403 Cartridge Connector Kit | 7 | F3438 3/8" Push Fitting Adapter |
| 3 | F3440 Handle Assembly* | 8 | F3408 Fastening Set |
| 4 | F3405 1/4" Water Supply Tubing | 9 | F3409 Silicone Tubing Kit |
| 5 | 10305 3/8" Water Supply Tubing |
* Must Specify Finish
Spare/replacement list EOS-HC-304
| 1 | F3401 Cold Cartridge | 6 | 10305 3/8" Water Supply Tubing |
| 2 | F3402 Hot Cartridge | 7 | F3406 1/4" Push Fitting Adapter |
| 3 | F3403 Cartridge Connector Kit | 8 | F3438 3/8" Push Fitting Adapter |
| 4 | F3440 Handle Assembly* | 9 | F3408 Fastening Set |
| 5 | F3405 1/4" Water Supply Tubing | 10 | F3409 Silicone Tubing Kit |
* Must Specify Finish
For any further information about our products, about the installation of them or about the warranty please contact our customer service department:
Franke Kitchen Systems
800 Aviation Parkway
Smyrna, TN 37167, USA
Phone: 1-800-626-5771
HS-Warranty.US@Franke.com
Franke Kindred Canada Ltd.
1000 Franke Kindred Way
Midland, ON LR4 4K9
Phone: 1-866-687-7465
HS-Warranty.CA@Franke.com

Warranty website: https://www.franke.com/us/en/hs/support/warranty.html

EOS-HO-304 EOS-HC-304

natural_image
Pure mechanical assembly diagram without any text, numbers, or symbols| 1 | F3402 Cartucho Caliente | 6 | F3406 Adaptador de Empuje de 1/4" |
| 2 | F3403 Kit de Conexión de Cartuchos | 7 | F3438 Adaptador de Empuje de 3/8" |
| 3 | F3440 Ensamblaje de la Manija* | 8 | F3408 Set de Sujeción |
| 4 | F3405 1/4" Tubo de Suministro de Agua | 9 | F3409 Kit de tubos de Silicona |
| 5 | 10305 3/8" Tubo de Suministro de Agua |
Franke Home Solutions
North America, LLC
800 Aviation Parkway
Smyrna, TN 37167, USA
EOS-HO-304 EOS-HC-304 EOS-FW-304
800 Aviation Parkway
Smyrna, TN 37167, USA
Téléphone: 1-800-626-5771
HS-Warranty.US@Franke.com
Franke Kindred Canada Ltd.
1000 Franke Kindred Way
Midland, ON LR4 4K9
Téléphone: 1-866-687-7465
HS-Warranty.CA@Franke.com

Site Web de la garantie : https://www.franke.com/us/en/hs/support/warranty.html

Canada
Franke Kindred Canada Ltd.
1000 Franke Kindred Way
Midland, ON LR4 4K9
Phone: 1-866-687-7465
USA and Mexico
Franke Home Solutions North America, LLC
800 Aviation Pkwy
Smyrna, TN 37167, USA
Phone: 1-800-626-5771