
LS-600BT - Soundbar KENWOOD - Free user manual and instructions
Find the device manual for free LS-600BT KENWOOD in PDF.

| Product Type | Soundbar |
| Brand | Kenwood |
| Model | LS-600BT |
| Dimensions (W x H x D) | 900 x 79 x 84.5 mm |
| Weight | 2.17 kg |
| Power Supply | AC adapter 100-240 V AC, 50/60 Hz, output 24 V / 1.75 A |
| Standby Power Consumption | 0.09 W |
| Output Power | 2 x 30 W RMS |
| Frequency Response | 70 Hz - 20 kHz |
| Signal-to-Noise Ratio | ≥ 70 dB |
| Bluetooth | Version 5.0, Class 2, range up to 10 m |
| Audio Inputs | HDMI (ARC), Optical (TOSLINK), AUX (3.5 mm), USB |
| USB Audio Formats | MP3 (FAT16/FAT32) |
| Sound Modes | Music, Movie, News, 3D |
| Sound Adjustments | Treble and bass adjustable from -5 to +5 |
| Wall Mounting | Yes (brackets provided) |
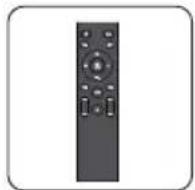
| Remote Control | Yes, range 8 m, batteries included |
| Energy Saving Function | Auto standby after 20 min without signal |
| Maintenance | Clean with a dry or slightly damp cloth (mild detergent) |
| Safety | Do not expose to water, do not block ventilation, use the supplied adapter |
| Warranty | 2 years |
Frequently Asked Questions - LS-600BT KENWOOD
User questions about LS-600BT KENWOOD
0 question about this device. Answer the ones you know or ask your own.
Ask a new question about this device
Download the instructions for your Soundbar in PDF format for free! Find your manual LS-600BT - KENWOOD and take your electronic device back in hand. On this page are published all the documents necessary for the use of your device. LS-600BT by KENWOOD.
USER MANUAL LS-600BT KENWOOD
natural_image
Simple rectangular outline with a horizontal line inside, no text or symbols present.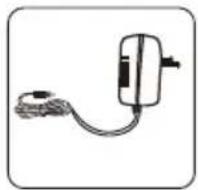
Netzadapter FernbedienungSoundbar

Wandhalterung
natural_image
Three simple line drawings of a cabinet with a fruit on the side (no text or symbols)4.2 Wandmontage
natural_image
Technical line drawing of a mechanical component with an inset showing a magnified detail (no text or symbols)natural_image
Technical line drawing of a mechanical assembly with a magnified inset showing a component detail (no text or symbols)natural_image
Two identical diagrams showing a container with cross-shaped handles and a rectangular block below, no text or symbols present.1. Before start-up 3
2. EU Declaration of Conformity 6
3. Start-up 7
3.1 Unpacking 7
3.2 Control elements and connectors 7
4. Positioning the Soundbar 9
4.1 Placing on a shelf or cabinet 9
4.2 Wall mounting 9
5. Basic operation 10
5.1 Switching On / Off (standby) 10
5.2 Adjusting the volume 10
5.3 Setting the sound 10
5.4 Source selection 10
6. Connection and usage 10
6.1 HDMI (TV ARC) Mode 10
6.2 OPTICAL mode 11
6.3 AUX Mode 12
6.4 USB mode 12
6.5 BLUETOOTH mode 13
7. Maintenance and care 13
8. Troubleshooting 14
9. Disposal 15
10. Technical specifications 16
11. Guarantee 17
1. Before start-up
IMPORTANT SAFETY INSTRUCTIONS
Attention: Read this page carefully to ensure safe operation of the device.
Read instructions carefully!
- Follow all safety and operating instructions when using this product.
Keep the instructions in a safe place!
- You should keep the safety and operating instructions for future reference.
Follow the warning instructions!
- You should strictly follow all warnings provided on the product and listed in the operating instructions.
Clean only with a dry cloth!
- Pull out all cables from the device before cleaning this product. Never use liquid cleaning detergents or cleaning sprays. Use only a slightly damp cloth for cleaning.
Accessories
- Use only the accessories specified by the manufacturer.
Do not use this device near water
- The device should never be exposed to water droplets or water splashes, such as those found near a bathtub, wash basin, kitchen sink, washing machine, wet basement or swimming pool. Never place containers filled with liquids, such as e.g. flower vases, on the device or directly next to the device.
Ventilation
- Slots and openings in the housing are used to ventilate the device to ensure reliable operation of the device and to protect the device from overheating and possible autoignition. Do not block the ventilation holes. Install the device according to the manufacturer's instructions. Never block the ventilation holes by placing the device on a bed, sofa, rug, or similar soft surfaces. This device should not be installed in a bookshelf or built-in wardrobe unless adequate ventilation is ensured.
Power supply
- This device may only be connected to the mains voltage with the supplied mains adapter. Use the mains adapter exclusively for Soundbar LS-600BT. In any case, make sure that the local mains voltage matches the specifications on the mains adapter. If you are unsure about the type of power supply in your home, contact your specialised dealer or power company.
Mains adapter
- Make sure that the power adapter is not mechanically damaged and the cable is not tripped over. Under no circumstances should the cable be crushed or bent, including when being pulled out of the mains adapter.
Thunderstorm
- The device should be disconnected from the mains during thunderstorms and if it is not used for a long time.
Overload
- Never overload mains sockets, extension cords or multiple sockets, otherwise there is a risk of fire or electric shock.
Penetration of foreign material and liquid
- Be careful not to allow foreign materials or liquids to penetrate into this device or the mains adapter through the openings, as otherwise it may come into contact with high voltage components or short circuit resulting in fire or electric shock. Never spill liquids of any kind on this device or its mains adapter.
Maintenance
- Never attempt to carry out the maintenance of this device yourself, because live parts can be exposed through the openings or by removing covers, contacting which can be hazardous. Leave all maintenance to qualified service personnel.
Damage requiring repair
- Maintenance and repair work should only be carried out by a qualified customer service. Maintenance/repair is required if the device has been damaged (e.g. the mains adapter), if liquid has penetrated into the device, if objects have entered the device, if the device has been exposed to rain or moisture, it stops working properly or has fallen down.
Spare Parts
- If spare parts are needed, make sure that the service technician uses spare parts prescribed by the Manufacturer or that have similar properties as that of the original parts. Unauthorised parts may cause fire, electric shock or other accidents.
Safety test
- Once maintenance or repair of this device has been completed, ask the customer service technician to perform a safety check to determine if the equipment is in perfect working order.
Heat
- Do not install the device near hot surfaces, such as radiators, fan heaters, stoves or other devices (including amplifiers) that can be hot. Never place objects with open flame, such as candles or lanterns, on or near the device. The batteries installed in the remote control should not be exposed to excessive heat such as direct sunlight, fire, etc.
Batteries
- If you do not use the Device for a month or longer, remove the batteries from the battery compartment to prevent it from leaking. Immediately dispose of leaking batteries properly and observe all relevant statutory regulations. Leaking batteries can cause injury and damage the device. Never mix batteries of different types or old and new batteries.
Caution!
Risk of explosion
- if incorrect batteries are used;
- high or low extreme temperatures to which a battery may be exposed during use, storage or transport;
- low air pressure at high altitude;
- if the batteries are disposed of in fire or in a heated oven;
• with mechanical crushing or cutting of a battery; - when leaving a battery in an environment with extremely high temperatures or with extremely low air pressure, which may cause an explosion or escaping of flammable liquids or gases.
To minimise the risk of electric shock, fire, etc. do not remove screws, covers or housing parts. The power button does not completely disconnect the power supply in any position. In order to completely disconnect the device from the mains adapter, please pull the mains adapter out of the mains socket.
Risks associated with high volume
To prevent possible hearing damage, do not listen at high volume for long periods.
Protect your furnishings
This model is equipped with non-slip rubber feet which prevent the device from moving when you operate the controls. The “feet” consist of a non-migrating rubber material specially developed to not leave any marks or stains on your furnishings. Certain types of oil-based furniture polishes, wood protection materials or cleaning spray can, however, lead to the rubber feet to soften, leaving marks or rubber residues on the furnishings. To avoid damages on your furnishings, we urgently recommend that you not purchase any self-adhesive felt pads, available everywhere in hardware stores, and not to glue these on the underside of the rubber feet before installing the device.
Important
This Soundbar has been specially developed for LED/LCD/Plasma TVs. It should not be used in combination with CRT TVs (Cathode Ray Tube TV's) to avoid image interference.
Automatic energy saving function
The device is equipped with an automatic energy saving function. This switches the device within 20 minutes to the standby mode, if no audio signal is received or there is no operation.
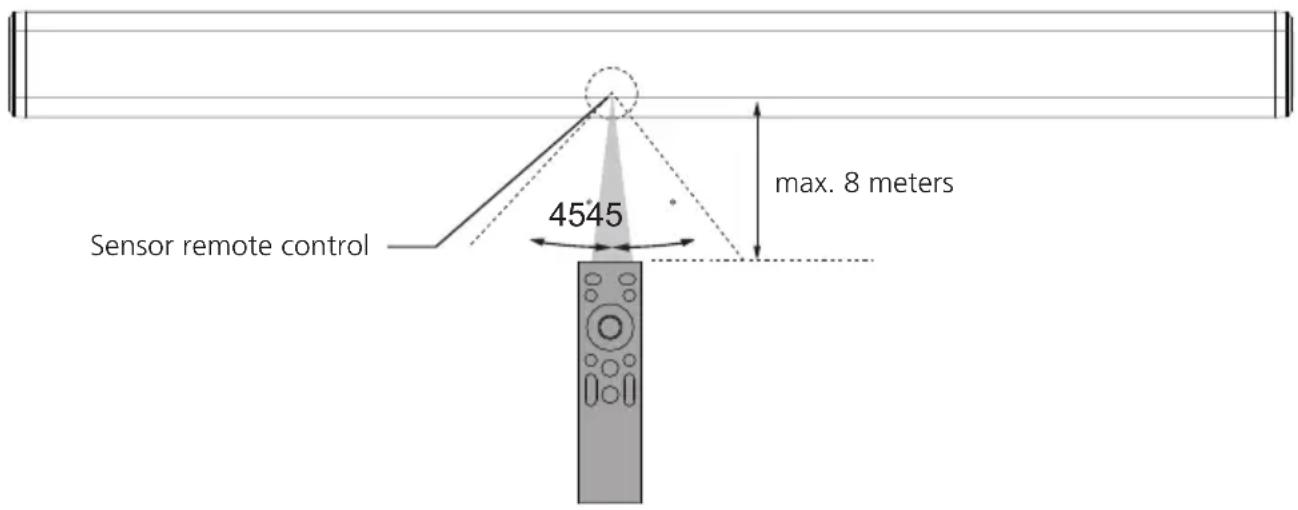
Remote control range
- The remote control has a range of maximum 8 meters.
- Even if the remote control is operated within the effective range of 8 m, it can happen that the operation is not possible if there are obstacles between the device and the remote control.
- There might be malfunctions if the remote control is operated in the vicinity of other products that use infrared rays, or if there are other remote controls near the device. Conversely, other devices may also not function properly.
2. EU Declaration of Conformity
Hereby, JVCKENWOOD Corporation declares that the radio equipment type LS-600BT complies with Directive 2014/53/EU. The full text of the EU Declaration of Conformity is available at the following Internet address: http://www.kenwood.com/euukdoc/
Manufacturer:
JVCKENWOOD Corporation
3-12. Moriyacho, Kanagawa-ku, Yokohama-shi, Kanagawa 221-0022, JAPAN
Authorised Representative (EU):
JVCKENWOOD EUROPE B.V., Amsterdamseweg 37, 1422 AC UITHOORN, THE NETHERLANDS
The Bluetooth® word mark and logos are registered trademarks of BLUETOOTH SIG Inc. and any use of such marks by JVCKENWOOD Corporation takes place under license. Other trademarks and trade names are those of their respective owners.
3. Start-up
3.1 Unpacking
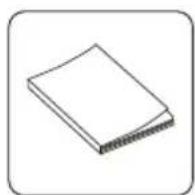
Carefully unpack the device and make sure all accessories are present:
natural_image
Simple rectangular outline with a horizontal line inside, no text or symbols present.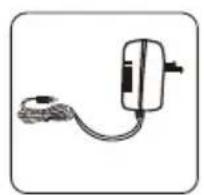
natural_image
Simple line drawing of a handheld device connected to a cable (no text or symbols)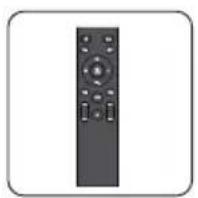
Mains adapter Remote ControlSoundbar
natural_image
Diagram of two rectangular blocks with arrows indicating direction, no text or symbols presentWall mounting
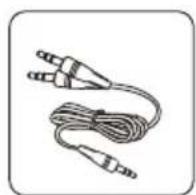
Audio cable Operating instructions Battery x2

Open the battery compartment of the remote control and insert the batteries with correct polarity. The specified polarity (+/-) is marked in the battery compartment.
3.2 Control elements and connectors
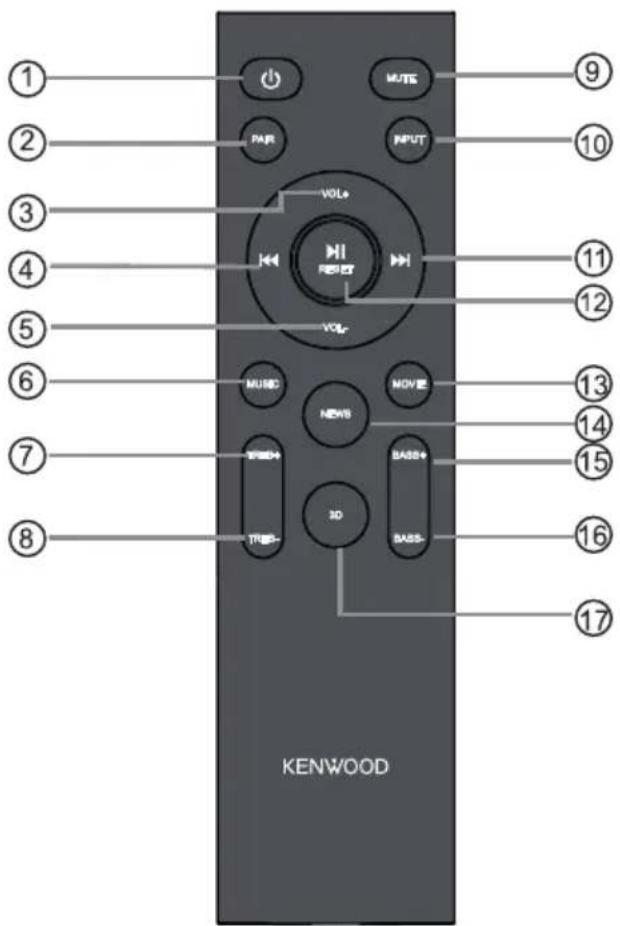
1 Standby On/Off
2 BLUETOOTH pairing
3 Increase the volume
4 Skip track backwards (USB & BT)
5 Reducing volume
6 Sound mode "MUSIC"
7 "Treble" sound control +
8 "Treble" sound control -
9 Mute On / Off
10 Playback source selection
11 Skip track forwards (USB & BT)
12 Play/Pause (USB & BT), Factory Reset (RESET)
13 Sound mode "MOVIE"
14 "NEWS" sound mode
15 "Bass" + sound control
16 "Bass" sound control -
17 "3D" sound mode
3.2 Control elements and connectors
Front side

Backside
Right lateral view
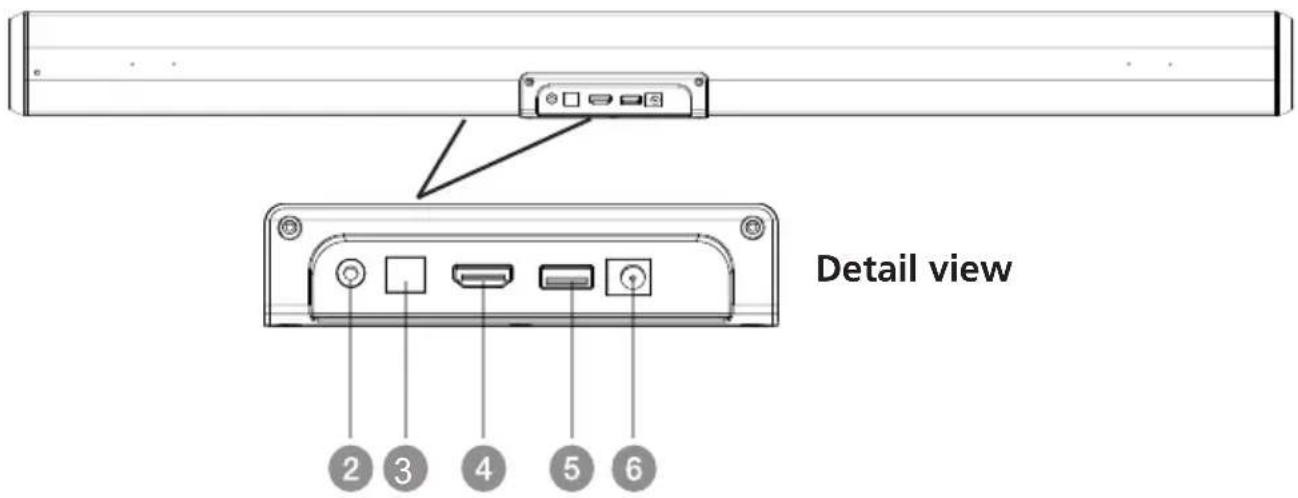
1 Display
2 AUX input
3 OPTICAL input
4 HDMI (TV ARC) Input
5 USB input
6 Mains adapter connection
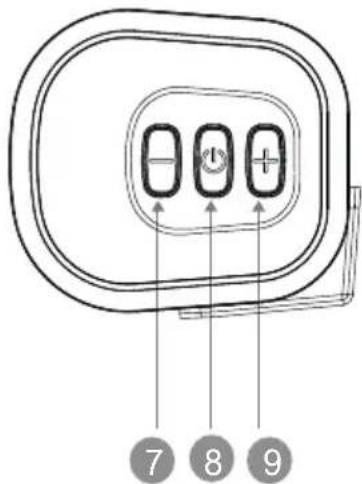
7 Reducing volume
8 Standby On / Off
9 Increase the volume
4. Positioning the Soundbar
4.1 Placing on a shelf or cabinet
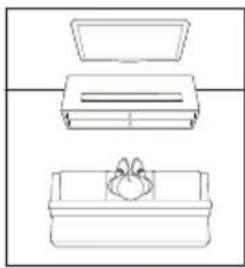
- Set the Soundbar horizontally on a cabinet or shelf and centre it under the TV screen.
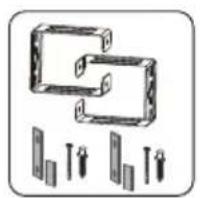
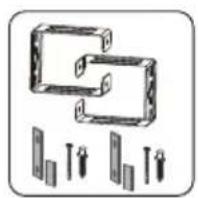
4.2 Wall mounting
Perform the following steps for mounting the Soundbar on the wall
natural_image
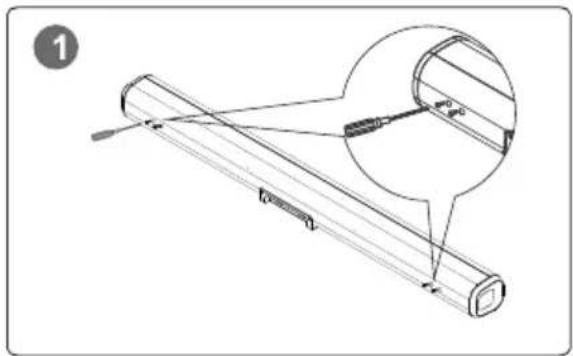
Technical line drawing of a mechanical component with an inset magnified detail (no text or symbols)Step 1 Remove the 4 screws on the Soundbar.
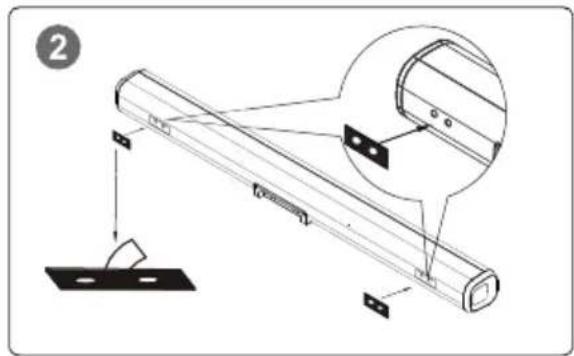
Step 2 Glue 2 pcs. EVA foam material (with holes) on the Soundbar and align the holes with those of the Soundbar.
natural_image
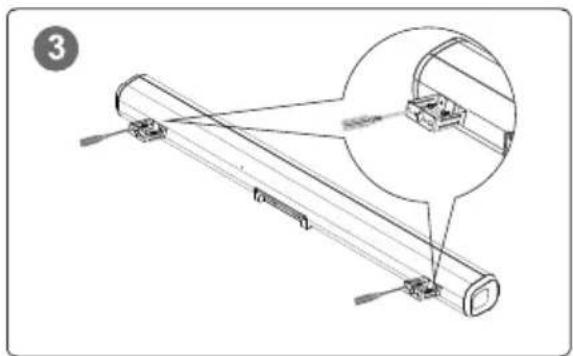
Technical line drawing of a mechanical assembly with a magnified inset showing a component detail (no text or symbols)Step 3 Fasten the 2 brackets on the Soundbar with the 4 previously removed screws.
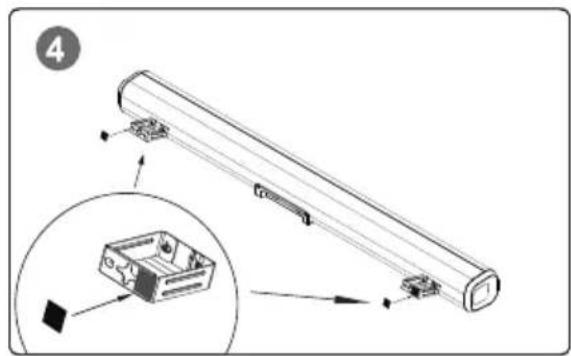
Step 4 Attach the 2 EVA foam materials (without holes) on the two brackets as per the figure.
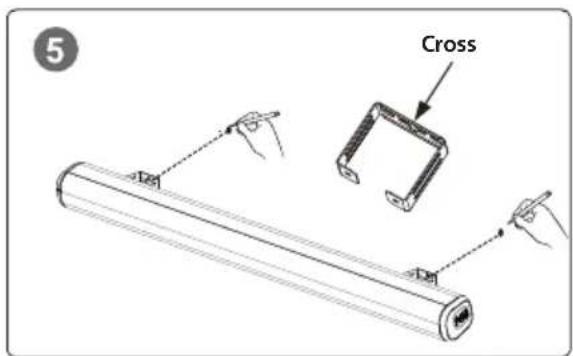
Step 5 Use the brackets as template and mark the drilling points on the wall. For this, use the cross in the bracket.
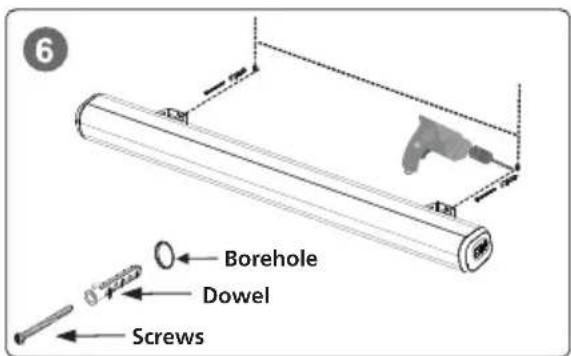
Step 6 Drill the holes, insert the dowel and screw in the screws. Then, fasten the wall bracket on the screws with the cross.
natural_image
Simple line drawing of three rectangular containers with different internal compartments, no text or symbols present.5. Basic operation
5.1 Switching On / Off (standby)
Connect the Soundbar with the mains adapter, and plug in the latter into a mains socket. Press the Standby button on the device or on the remote control to switch on the remote control. Press the button again to put the device into standby mode. To switch it off completely, disconnect the remote control from the power supply.
5.2 Adjusting the volume
Use the
5.3 Setting the sound
The Soundbar has four preset sound modes: "MUSIC" / "MOVIE" / "NEWS" / "3D" These can be selected with the relevant button on the remote control.
In addition, using the
5.4 Source selection
The following input sources can be selected using the button:
• HDMI (TV ARC) / Display "HD"
- USB / Display "US" (can be selected only for inserted USB memory)
- AUX / Display "AU"
- BLUETOOTH / Display "bt"
• OPTICAL / Display "OP"
Relevant detailed information available in Chapter 6.
6. Connection and usage
6.1 HDMI (TV ARC) Mode
The Soundbar supports HDMI with Audio Return Channel (ARC). Using a single HDMI cable you can listen to the TV audio via your Soundbar. For this, however, your TV must be ARC compatible. For further information refer to the manual of your TV.
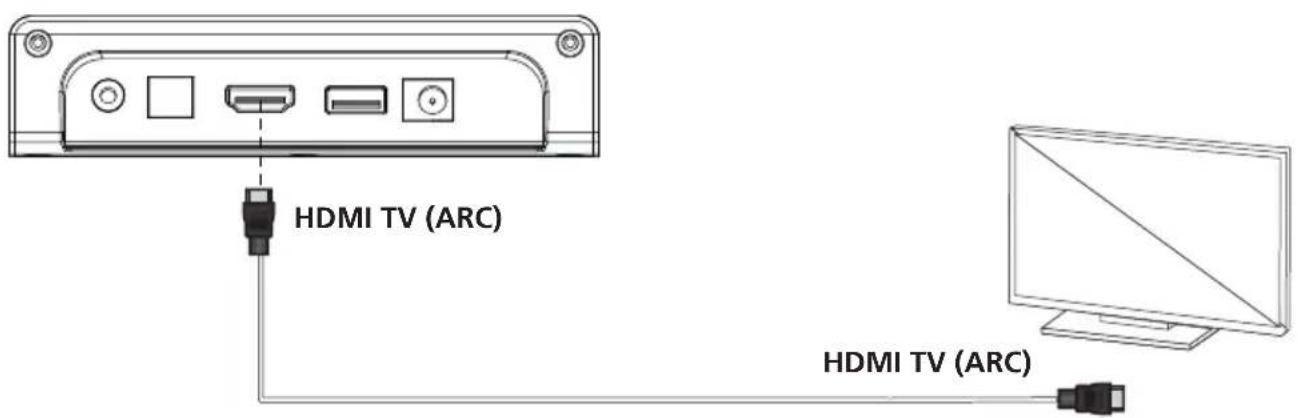
- Using an ARC compatible HDMI cable (not included in the scope of delivery) connect the HDMI TV (ARC) connection to the Soundbar with the HDMI (ARC) connect on the remote control. The HDMI (ARC) connection on the TV might be labelled differently.
- If an HDMI cable is connected, the audio setting of the TV in the "audio output" must be set to
- Press the button on the remote control or the
- Set the volume and the sound mode with the corresponding button on the remote control.
Please note:
If you connect a device such as a TV/ Set-Top-Box/DVD/Game console with HDMI (ARC) cable, set the audio output mode of the device to PCM mode
6.2 OPTICAL Mode
Connect the Soundbar and the TV with an optical cable (not included in the scope of delivery). Use this mode to playback the audio from a TV with optical digital output on the Soundbar. Select the optical connection in the sound settings of the TV (output for Audio). If the optical cable is connected, the audio output of the TV is set to PCM format. The TV must have an optical digital output. Use a commercially available optical cable.
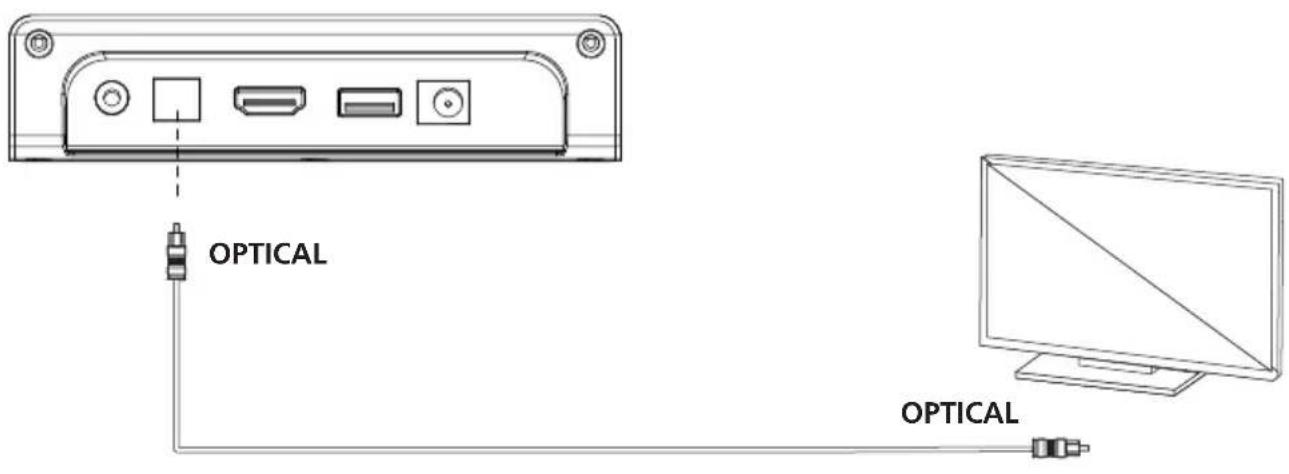
- Connect the optical cable to the optical digital output of your TV.
- Connect the optical cable to the optical digital output of the Soundbar.
-
Switch on the TV and the Soundbar. Set the connected TV to "PCM Stereo". Set the audio output mode to
or < decoded output in PCM-Format>. -
Press the button on the remote control or the
button on the Soundbar to select the OPTICAL mode. - Set the volume and the sound mode with the corresponding button on the remote control.
Please note:
If you connect a device such as a TV/Set-Top-Box/DVD/Game console via an optical cable, set the audio output mode of the device to PCM mode (digital optical output). Do not bend the optical cable, as otherwise the light conductors on the inside can be damaged.
6.3 AUX Mode
Connect the Soundbar and the TV with the supplied audio cable.
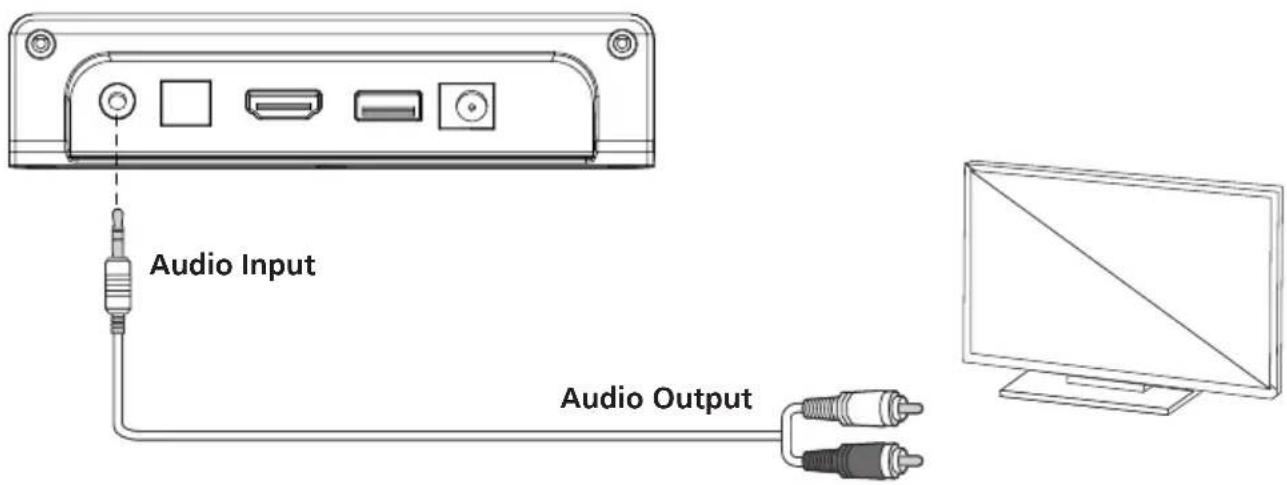
- Press the button on the remote control or the
- Set the volume and the sound mode with the corresponding button on the remote control.
6.4 USB mode
The Soundbar automatically switches to the USB input mode if a USB Stick is inserted. If a USB Flash drive is inserted and the Soundbar is switched on, press the button on the remote control or the
• Make sure that your USB Flash drive contains MP3 audio files (other file types are not supported).
- Connect the USB Flash drive to the USB connection of the Soundbar and the music will start to play automatically.
- Control the playback using the
- Set the volume and the sound mode with the corresponding button on the remote control.
6.5 BLUETOOTH mode
Switch on the Soundbar and briefly press the
- Switch on the BLUETOOTH on your device, search for "LS-600BT" in the BLUETOOTH and then select the BLUETOOTH connection.
- If the pairing is successful, you will hear a tone and the "bt" indicator stops flashing. Then the music on your telephone or another compatible device that you have selected can be played on the Soundbar.
- Press and the hold the
button on the remote control for longer than two seconds to disconnect the connection to the paired BLUETOOTH device or to reconnect the previously disconnected BLUETOOTH device. - Control the playback using the
, and buttons. - Set the volume and the sound mode with the corresponding button on the remote control.
Please note:
The pairing process described above must not be repeated with the same device once paired. If the connected device is switched off or manually disconnected, the Soundbar automatically switches to the Pairing mode.
If the connected device is removed out of the range of the Soundbar (up to 10 meters), the connection is disconnected and the Soundbar is successfully connected to the device as soon as it is once again in within the range. To setup a connection with another device, repeat the above pairing steps. If a BLUETOOTH was already connected, the Soundbar connects with the last connected device. Disconnect this connection to connect a new device. There is no automatic shut-down in the Pairing mode. The Soundbar remains in the Pairing mode even if no device is paired.
7. Maintenance and care
Cleaning the housing
Use a cloth lightly moistened with a mild detergent. Do not use detergents containing alcohol, ammonia or scouring agents.
Cautions on condensation
Condensation (dew) may form inside the unit if there is a significant difference between the temperature of the unit and the ambient temperature. If condensation occurs inside the unit, proper function is no longer guaranteed. In this case, you have to wait a few hours; After the moisture has dried, the device can be reused.
Special care should be taken in the following circumstances
When the unit is moved from one place to another at a much higher or lower temperature, or when the humidity at the installation site increases, etc.
Notes on using a USB device
This device is capable of playing audio files stored on a flash memory or digital audio player if these devices have a USB port (these devices are referred to as USB Devices in this document).
The following restrictions apply to the usable USB Devices:
Usable USB Devices
- USB Devices that belong to the USB Mass Storage Class.
- USB Devices whose maximum power consumption is 500 mA or less.
- USB Mass Storage Class: USB Devices that the PC recognises as external storage without the need for a special driver or application software.
- Consult your dealer if you are not sure whether your USB device complies with the specifications for the USB Mass Storage Class.
- Using a USB device that is not supported may result in erroneous playback or display of the audio file.
Even if you use a USB device that meets the above specifications, audio files may not play back properly depending on the type or condition of the USB device.
8. Troubleshooting
| Problem Solution | |
| No function • Is the mains | adapter properly connected? |
| No sound | • Is the volume fully turned down?• Increase the volume on the playback device, if needed.• Is the source used correctly connected? |
| The Soundbar does not respond at the touch of a button | • Remove the mains adapter and reconnect t again. |
| Problems with the BLUETOOTH connection | • BLUETOOTH on the device deactivated?• BLUETOOTH set as source?• Is the telephone, etc. paired with another BT device?• Are the BLUETOOTH versions incompatible? |
| Remote control not functioning | • Outside the range of the remote control?• Are the batteries weak?• Is the Soundbar sensor blocked by objects?• Is the sensor of the Soundbar exposed to direct sunlight? |
| Problems with HDMI playback | • Are you using an ARC compatible HDMI cable?• Is your TV ARC compatible?• Have you set the correct audio format on the TV?Please consult the Operating Instructions of the TV. |
| No audio in OPTICAL mode | • Try another optical cable.• Have you set the correct audio format on the TV? |
| No audio in USB mode | • Please make sure that exclusively MP3 files are in the USB memory.• Use another USB memory. |
9. Disposal
Disposal of used electrical and electronic equipment and batteries.
natural_image
Two identical diagrams showing a container with cross-shaped handles and a rectangular block below, no text or symbols present.The (crossed-out wheeled bin) symbol on the product or its packaging indicates that this product must not be handled as normal household waste, but handed in to a collection point managed by public waste management authorities or to a collection point set up by the manufacturer or distributor, free of charge.
The owners of electrical devices should usually separate the waste batteries and waste accumulators which are not firmly enclosed in the waste devices from these waste devices before handing them over to collection points. This does not apply if the waste devices are prepared for recycling with the participation of a public waste management authority. By helping to properly dispose of this product, you are protecting the environment and the health of your fellow human beings. Improper or incorrect disposal endangers the environment and health. For more information on the recycling of these electrical devices and batteries, please contact your local authority or your municipal waste disposal companies.
Disposal instructions for consumers in Germany: https://www.e-schrott-entsorgen.org/
Disposal instructions for consumers in Austria: https://www.elektro-ade.at/
- Technical Specifications LS-600BT
| Power supply AC voltage ~ 100 – 240 V | |
| AC input frequency 50/60 Hz | |
| Manufacturer power adapter Foshan Shunde GUANYUDA | A Power Supply Co., Ltd.No. 1 of South, Jiefang East Road Xichong, Lunjiao,Shunde Foshan, Guangdong, P.R.CHINA |
| Power adapter brand and model identifie GVE GM42-24 | 0175-2A |
| Output voltage / Current / Power 24.0 V / 1.75 A / 42 W | |
| Average operational efficienc 87.66 % | |
| Power consumption at no-load 0.09 watt | |
| USB devices Playable files: MP | Compatible with USB1.1 full-speed, FAT16, FAT32Max. 500 mA, Bit rates: 32 kBit/s to 320 kBit/s |
| BLUETOOTH | |
| BLUETOOTH version V5.0 | |
| Power class Class 2 | |
| Maximum transmission power 1 dBm | |
| Reach About 10 meters (may vary depending on the environment) | |
| Frequency range | 2.402 GHz – 2.480 GHz |
| BLUETOOTH profil | A2DP (Advanced Audio Distribution Profile, VRCP(Audio/Video Remote Control Profile |
| AUX-In | 3.5 mm jack socket |
| TV (ARC) | HDMI |
| OPTICAL | TOSLINK |
| Amplifier part | |
| Output capacity | 2 x 30 watts RMS |
| Frequency range | 70 Hz - 20 kHz |
| Signal-to-noise ratio | ≥ 70 dB |
| Dimensions and weight | |
| Soundbar (without wall mounting) | (W x H x D) 900 x 79 x 84.5 / 2.17 kg |
| Temperature range | 0°C to +35°C |
11. Guarantee
Dear customer,
thank you for purchasing this Kenwood product. If this product shows defects in material or workmanship under normal operating conditions, we will remove these free of charge or replace the device in accordance with the following warranty provisions.
Please keep this warranty card in a safe place.
Kenwood guarantees this device for a period of two years from the date of purchase as shown on the invoice or sales receipt from the Kenwood dealer.
This warranty covers material and workmanship defects. We reserve the right to replace the product if cost-efficient repair is no longer possible. Costs for packaging and installation as well as costs and risks in connection with the actual repair are not included in the warranty and will be invoiced.
Conditions
A. To assert warranty claims, in addition to submitting this warranty card, the following information is required:
(a) Your name with full address
(b) The receipt or invoice from a retailer based in an EU country indicating the original date of purchase.
(c) The full name and address of the retailer from whom the product was purchased.
(d) The serial number and model name of the product.
Kenwood reserves the right to refuse warranty service if the aforementioned information is missing or if changes have been made to the product since it was first pu chased.
B. At the time of delivery to the retailer, this product complies with all standards and safety regulations applicable in the country of destination. Modifications required to operate the device in countries outside the country of destination are not covered by the aforementioned warranty conditions. In addition, we do not accept any liability for work in this context or for damage to the product resulting from such work.
If the product is used in a country for which it was not designed and manufactured, warranty work will only be carried out if the user bears the costs for upgrading the device to nationally applicable standards and safety regulations.
In addition, if the product differs from the products sold by the official importer and if spa e parts are not available for the repair of this product, the user must bear the costs of transporting the device to and from the country of purchase.
The same applies if no warranty services can be offered in the country concerned for other legitimate reasons.
C. The following are excluded from the warranty:
(a) Changes to the product, as well as normal maintenance and adjustment work, including the regular checks mentioned in the Operating Instructions.
(b) Damage to the product caused by inadequate or improper work if this work was carried out by third parties who are not authorised to carry out warranty services on behalf of the manufacturer.
(c) Damage caused by negligence, accidents, changes, improper installation, defective packaging, incorrect operation or the use of incorrect spare parts for repairs.
(d) Damage caused by fi e, water damage, lightning strikes, earthquakes, inadequate ventilation, force majeure, connection to incorrect mains voltage or other causes for which Kenwood is not responsible.
(e) Damage to speakers due to operation at a power higher than that specified. Damage to records, audio tapes, audio and video cassettes, compact CDs and other objects that are not part of the product.
(f) Consumable or wearing parts that have to be replaced as part of normal customer service, such as: Pick-up systems, needles, drive belts, tape heads, plug-in units, audio consoles, dry batteries, rechargeable batteries, power output tubes, etc.
(g) All products in which the serial number(s) has been completely or partially removed, changed or made illegible.
This warranty can be claimed by anyone who has purchased the product legally.
In accordance with the aforementioned warranty conditions, the product will be repaired or replaced free of charge. This right does not in any way affect other rights of the user within the framework of the applicable legal provisions.
Repairs or replacements do not extend the warranty period.
Further claims are excluded, in particular those for conversion, reduction or compensation.
Contact address:
JVCKENWOOD U.K. Limited
First Floor, Gleneagles, the Belfry, Colonial Way, Watford, Hertfordshire WD24 4WH
Email : Enquiries@uk.jvckenwood.com www.kenwood-electronics.co.uk
KENWOOD
KENWOOD
Barre de son 2.0CH
LS-600BT
NOTICE D'EMPLOI
JVCKENWOOD Corporation
Table des matières
Sommaire Page
natural_image
Simple rectangular outline with a horizontal line inside, no text or symbols present.
2 Appariage BLUETOOTH
natural_image
Technical line drawing of a mechanical component with an inset magnified detail (no text or symbols)natural_image
Technical line drawing of a mechanical assembly with a magnified inset showing a component detail (no text or symbols)natural_image
Simple line drawing of three rectangular containers with different internal compartments, no text or symbols present.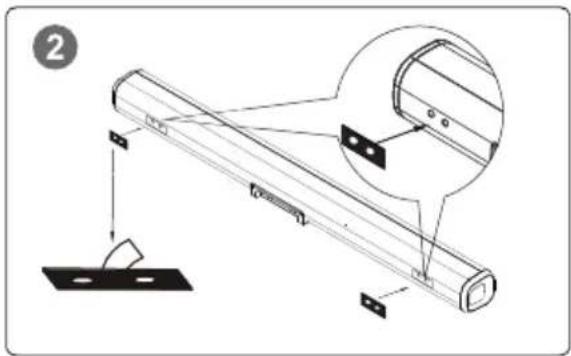
JVCKENWOOD EUROPE B.V. Succursale France
7 Allee des Barbanniers,
92632 Gennevilliers CEDEX
Tel. 09-69-390-811 www.kenwood-electronics.fr
KENWOOD
KENWOOD
2.0CH Soundbar
LS-600BT
natural_image
Simple rectangular outline with a horizontal line inside, no text or symbols present.
natural_image
Technical line drawing of a mechanical component with an inset showing a magnified detail (no text or symbols)natural_image
Technical line drawing of a mechanical assembly with a magnified inset showing a component detail (no text or symbols)natural_image
Simple line drawing of three rectangular containers with different internal compartments, no text or symbols present.
natural_image
Simple rectangular outline with a horizontal line inside, no text or symbols present.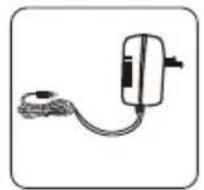

Netadapter AfstandsbedieningSoundbar
Wandhouder