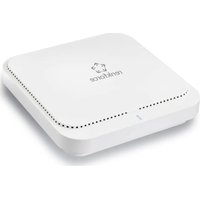
RF-CAP-800 - Access Point Renkforce - Free user manual and instructions
Find the device manual for free RF-CAP-800 Renkforce in PDF.


| Product type | WiFi 6 (802.11ax) access point |
| Brand | Renkforce |
| Model | RF-CAP-800 |
| Order number | 2362172 |
| Dimensions (L x H x D) | approx. 198 x 38 x 198 mm |
| Weight (AP only) | approx. 740 g |
| Power supply | 48 V/DC (PoE IEEE 802.3at) or 12 V/DC (DC IN) |
| Power consumption | max. 0.5 A (PoE) / 1.5 A (DC IN) |
| Interfaces | 1x WAN/PoE (2.5 GbE), 1x LAN (2.5 GbE) |
| WLAN standard | IEEE 802.11b/g/n/ac/ax, WiFi 6, dual-band 4x4 MIMO |
| Frequency bands | 2.4 GHz (max. 1182 Mbit/s), 5 GHz / 5.8 GHz (max. 2475 Mbit/s) |
| Transmit power | ≤ 20 dBm (2.4 GHz), ≤ 23 dBm (5.18-5.24 GHz), ≤ 13.98 dBm (5.745-5.825 GHz) |
| Encryption protocols | WPA/WPA2 |
| Operating modes | Access point (AP), Router (Gateway) |
| Chipset | Qualcomm PQ8072 |
| Memory | SPI-NOR 8 MB, NAND 256 MB |
| Features | MU-MIMO, DL/UL-OFDMA, 1024-QAM, Seamless Roaming, OpenWRT compatible |
| Package contents | Access point, wall/ceiling mount, mounting hardware, PoE power adapter, power cable, RJ45 cable, user manual |
| Care and cleaning | Disconnect before cleaning; use a dry, lint-free cloth; avoid aggressive chemicals |
| Safety | Indoor use only; avoid moisture; follow instructions for the PoE adapter |
| Spare parts and repairability | No spare parts provided; professional repair recommended |
| Operating conditions | 0 to +40 °C, 10 to 90% RH (non-condensing) |
| Storage conditions | -10 to +60 °C, 10 to 90% RH (non-condensing) |
Frequently Asked Questions - RF-CAP-800 Renkforce
User questions about RF-CAP-800 Renkforce
0 question about this device. Answer the ones you know or ask your own.
Ask a new question about this device
Download the instructions for your Access Point in PDF format for free! Find your manual RF-CAP-800 - Renkforce and take your electronic device back in hand. On this page are published all the documents necessary for the use of your device. RF-CAP-800 by Renkforce.
USER MANUAL RF-CAP-800 Renkforce
GB Operating Instructions
RF-CAP-800 WiFi 6 3657 Mbps Wireless Ceiling Access Point
Order No. 2362172
Intended Use
The product is used to expand or create a network. It features 2 operating modes, "AP" (Access Point; Standard) and "Gateway" (router).
"Access Point" mode provides a separate WLAN network. The product will connect to your existing router or network.
In "Router" mode the devices connected to the product are connected to the Internet through your existing modem.
The connection between your devices and the product can be established in all operating modes through WLAN or LAN.
The product is configured on the product's web interface. This can be done using a computer or a smartphone or tablet.
Power is supplied via the enclosed POE power supply.
Only indoor use is permitted; do not use outdoors. Contact with moisture, for example in bathrooms, must be avoided.
For safety and compliance reasons, the product must not be converted or modified in any way. If you use the product for other purposes than those described above, the product may be damaged. Moreover, improper use involves risks such as short-circuits, fire, electric shocks, etc. Please read the operating instructions carefully and do not discard them. Please include these operating instructions when you pass the product on to a third party.
This product complies with the applicable national and European Regulations. All names of companies and products are the trademarks of the respective owners. All rights reserved.
Android ^™ is a registered trademark of Google LLC.
Package contents
- Access point
- Ceiling/Wall Mount
- Installation Material
- PoE power supply
- Power cable
• RJ45 cable (max. 1000 MBit) - Operating instructions

Latest operating instructions
Download the latest operating instructions via the link www.conrad.com/downloads or scan the QR code shown here. Follow the instructions on the website.
Description of the symbols used

The lightning symbol inside a triangle is used when there is a potential risk of personal injury, such as electric shock.

An exclamation mark in a triangle indicates important steps in these operating instructions which should be absolutely observed.

The arrow symbol indicates specific tips and advice on operation.

The product is intended to be installed and used only in dry indoor rooms; it must not get damp or wet.

The product is designed according to Protection Class II.
Safety Instructions

Please read the operating instructions carefully and pay particular attention to the safety instructions. We do not assume liability for any injuries/material damages resulting from failure to observe the safety instructions and the information in these operating instructions regarding the proper use of the product. Furthermore, in such cases, the warranty/guarantee will be null and void.

a) PoE power supply
- The design of the PoE power supply conforms to Protection Class II. Connect the PoE power supply only to a normal mains socket connected to the public supply network.

• The electrical outlet should be situated near the product and easily accessible.
- If the power adapter or power cord is damaged, do not touch it; electric shock is life threatening.
Switch off the mains voltage to the mains socket to which the PoE power supply is connected (e.g., switch off at the corresponding circuit breaker or remove the safety fuse and then switch off the corresponding RCD). Only then unplug the power cable from the mains socket and take the product to a specialised workshop.
• Always check the adapter and the power cable for damage each time before using it!
- If you detect any damage, DO NOT connect the product to the mains supply! Danger to life!
b) General Information
- The product is only suitable for dry, enclosed indoor areas. The product should not become damp or wet; never handle it, if your hands are wet!
Danger of electric shock!
- The product is not a toy. Keep out of the reach of children and pets. There is danger of a life-threatening electric shock!
- Do not carelessly leave the packaging material lying around. It may become a dangerous plaything for children.
- Protect the product from extreme temperatures, direct sunlight, strong vibrations, high humidity, moisture, combustible gases, vapours and solvents.
- Please handle the product with care. The product can be damaged if crushed, struck or dropped, even from a low height.
- If you have any questions that are not answered in this manual, please contact our technical service or another specialist.
Product overview
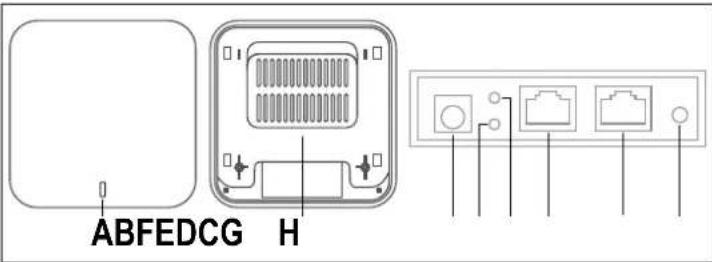
A Status LED shows the system and the WLAN status
B Ceiling bracket
C "DC" - Port for power supplied through a normal plug-in power adaptor, if PoE is not to be used
D "LAN LED" - LED for the "LAN" port, which is lit when connected and flashes when data is transmitted
E "WAN LED" - LED for the "WAN/POE" port, which is lit when connected and flashes when data is transmitted
F "WAN/POE" - This port is used for power supply through PoE and for the connection to an existing network or router
G "LAN" - This port can be used to connect devices to the Access Point
H "RST" - Button to reset the product to factory settings
Installation and connection
a) Mounting the ceiling bracket
- Choose a place that is suitable to attach the bracket.
- Only mount the Access Point on a solid surface. Either ceiling or wall mount are possible. Use screws and plugs that are suitable for the surface.
- If you intend to install the product on a suspended room ceiling, remove the ceiling tile and mount the ceiling bracket instead.
- Keep in mind when installing the ceiling bracket that the cables that need to be connected to the device must also exit from the ceiling in the area of the recess (at the edge of the ceiling bracket).
- If plugs are needed to affix the bracket to the ceiling of the room (depending on the texture of ceiling), mark the position of the drill holes through the holes in the ceiling bracket.
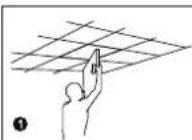
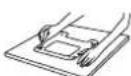
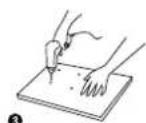
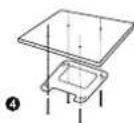
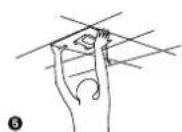
- If your ceiling is made of wood, for example, you can drive the screws in directly, without using plugs. However, we would recommend here to pre-drill the holes anyway.

When drilling the holes or locking the screws into place, make sure that you do not damage any existing electrical wires, gas or water pipes.
b) Connecting and installing the device
- Make sure that all the necessary cables are connected, before locking the device into the ceiling bracket.
- Connect the "WAN/POE" port (F) to "POE" at the PoE power supply using a 1 to 1 connected network cable (must be PoE capable).
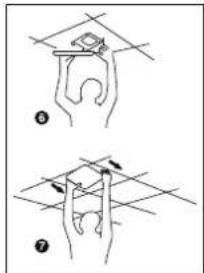
- Lock down the device into the ceiling bracket.
To do this, insert the 4 retaining bolts on the device into the 4 recesses on the ceiling bracket and slide the device away from the connecting lines until it clicks into place.
- Connect the "LAN" port of the PoE power supply to a free port
on your router, network switch or modem (depending on the desired operating mode) with a 1 to 1 connected network cable. - Connect the enclosed power cable to the corresponding socket on the POE power supply and plug the other end into a mains outlet.
→ Usually, only the network cable is at the ceiling, where the Access Point is mounted. The POE power supply is usually connected near by the router, network switch or modem.
If you have a network switch that is PoE capable and supports 48 V (with sufficient power), you could also connect the device directly to the switch without using the PoE power supply. Consult the operating instructions for your network switch.
Preparing for the configuration
→ You can configure AP using a computer, laptop, MAC or a tablet/smartphone. You can do this wireless through WLAN or through the LAN ports of the AP.
Due to the image size, we do not recommend using a smartphone for the configuration.
From here on, we will use in the instructions only the terms "AP" (that is the product and stands for Access Point), "PC" (for computers, laptops, Mac, etc.), "Tablet" (for tablets and smartphones, no matter the manufacturer/operating system) and "iPads" (for iPads and iPhones).
Whether you choose to configure with a PC or a smartphone, you always have to assign a static IP address during the initial configuration.
a) General information
- WLAN name: „Wireless 2.4G_XXXXXX“ / „Wireless 5.8G_XXXXXX“ (without quotation marks; XXXXXX is a certain number that is unique for each device)
WLAN password: "66666666" (without quotation marks)
• IP address of the AP: 192.168.133.253 Subnet mask: 255.255.255.0 - Web interface: http://192.168.188.253/ Login password: "admin" (without quotation marks)
b) Preparing the configuration for Windows 10 ^®
- If you intend to configure through a wired connection, connect the AP's "LAN" port directly to the LAN port on your PCs.
- If you would rather configure wirelessly through WLAN, connect your computer to the AP's WLAN.
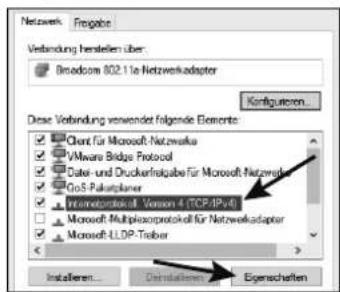
- In order to assign a static IP address to the device (whether LAN or WLAN), you have to edit the properties of the respective interface. In the case of Windows 10^8 , there are various ways to do this.
- Simply press the key combination "Windows key + R" to execute a command. Alternatively, right-click the Windows icon and select „Run“.
- In the command line enter "ncpa.cpl" and click OK.
- A window opens that shows all of your PC's network connections. Right-click the appropriate connection and select the item "Properties".
- Now click on the marked item “...(TCP/IPv4)” and then „Properties“.

WLAN
Wireless 2.4G
Broadcom 802.11a-Netzwerkadap...
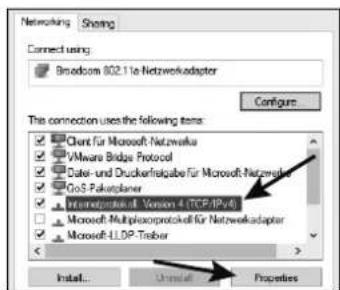
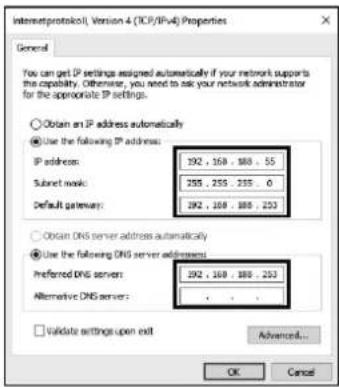
- Now click first in the small empty circle (see arrow in the picture).
- Enter the data as shown in the picture.
- The last block of the IP address is customizable and could be anything between 1 and 252. Everything else must be entered exactly as shown in the picture.
The "Standard Gateway" is also the AP's IP address.
- Confirm by clicking "OK".
→ If you encounter any connection problems, set a static IP address for the LAN/WLAN interface and then reconnect.
c) Preparing the configuration for the iPad
- Establish the WLAN connection to the AP.
- While WLAN is still being configured, tap the WLAN connection's blue Info icon on the right-hand side.
- Swipe down to IP Configuration.
- Tap the Configure IP item and select "Manual".
- Enter an IP address, etc. (see picture in the previous chapter). The "Standard Gateway" is called here "Router".
- Tap Save at the top right and go back to WLAN in the next window.
- Now you are connected.
d) Preparing the configuration for an Android™ smartphone
- Open the WLAN settings on your smartphone.
- Tap the WLAN of the AP to connect.
- Enter the WLAN password and select the box below for advanced settings.
- Tap the IP Settings item and select "Static".
- Enter an IP address, etc. (see picture in the previous chapter). It could be that in place of "255.255.255.0" you simply have to enter "24".
- Tap the button to connect.
e) Logging in to the web interface
- Once you are connected, open your web browser.
- In the address bar type "http://192.168.188.253/" (without quotation marks) and confirm.
If you face problems with the presentation on your tablet or iPad, rotate the device to landscape mode.
- Enter the password "admin" and confirm to log in.
- You should now see the main page of the web interface.
Configuration
a) Basic configuration (for all modes)
- In the main page of the web interface, choose first the correct time zone.
To do this, click "Manage" on the left and then "Time Manager" at the top.
From the menu, select your time zone and confirm with "Apply".
- Now you are going to set the correct region for your WLAN.
To do this, click "WiFi" on the left and then "Advanced" at the top.
From the menu, select the region "ETSI" for Europe and confirm with "Apply".
- Now change the password for the web interface.
To do this end, click on the green button with the 4 squares at the top and then select the button below with the security icon.
Enter first the old password (default is "admin" without quotation marks) and then enter the new password twice. Ideally, it should consist of 8 characters, including numbers and upper and lower case letters.
Confirm with the button "Save".
Next time when you reopen the web interface, you have to enter the new password that you created as your login password during the basic configuration and not the default password.
b) Configuration of WLAN networks (all modes)
- You can configure the two WLAN networks later during the Setup Wizard or directly in the settings. To do this, click on "WiFi".
- Now you can change the name for 2.4GHz WLAN and adjust the other settings.
You should also definitely change the WLAN.password. Ideally, it should consist of 8 characters, including numbers and upper and lower case letters.
• To edit 5 GHz WLAN, click on the tab "5G WiFi".
- Now you can change the name for the 5 or 5.8 GHz WLAN network and adjust the other settings. Also here, you should create a new, secure password.
In principal, you could use the same name and the same password for both WLAN networks. That way, you only need to connect your devices to one WLAN; the best WLAN is always automatically used.
c) "Access-Point" configuration
- Start the setup by clicking the button "Wizard" on the left.
- In order to configure the product as Access Point click the orange "AP Mode" button.
- Here you first have to decide whether and how AP should obtain the IP address from the router. Here we have 3 different options:
„Get IP From AC“ - AP assigns the IP address and keeps the IP "192.168.188.253".
"Get IP From Gateway" - the DHCP server of the router assigns an IP address to AP. This could also be used to configure AP. Check the device list of your router to find the IP address.
"Static IP" - You can assign a fixed IP address to the AP, preferably in the network area of your router. You can always use this IP address to access the AP configuration.
We recommend that you let the router assign the address or you could assign a static IP in the area of your router. That way you are always able to access the web interface from within your network.
- Click "Next".
- Now configure the two WLAN networks, if not done already. See the sub-chapter "Configuration of the WLAN Networks". Confirm each time with the button "Save".
• AP restarts and applies the settings.
→ If you configured via WLAN, you possibly need to reconnect your device to WLAN.
If you have changed the IP address or have the router assign one, then the AP will be available under the new address only. You should also set the IP configuration in the network settings of your device to auto.
d) "Router" configuration
- Start the setup by clicking the button "Wizard" on the left.
- In order to configure the product as Access Point click the orange "Gateway Mode" button.
- First you have to select the type of internet access. If you are using a DSL modem, select "PPPoE" and enter the necessary login details. If you want AP to run behind a cable modem, where no dial-in data is needed, select "DHCP."
- Click "Next".
- Now configure the two WLAN networks, if not done already. See the sub-chapter "Configuration of the WLAN Networks". Confirm each time with the button "Save".
• AP restarts and applies the settings.
→ If you configured via WLAN, you possibly need to reconnect your device to WLAN.
If you have changed the IP address or have the router assign one, then the AP will be available under the new address only. You should also set the IP configuration in the network settings of your device to auto.
Resetting to Factory Settings
In order to reset the product to the factory settings, it should be connected and active. To do this, proceed as follows.
a) At the product
- Press and hold the "RST" button (H) on the product for more than 5 seconds.
- Then release the button. The status LED (A) is red and flashing fast.
- The product will restart with the factory settings. This process will last about 1 to 2 minutes. Once the status LED (A) is lit and white, the process is complete.
b) In the web interface
- Open the product's web interface and log in.
- Open the item "Manage".
- In the tab "Configure" select "Reset Default" and click on "Reset Default" at the bottom to reset.
- The product will restart with the factory settings. This process will last about 1 to 2 minutes. Once the status LED is lit blue, the process is complete.
Care and Cleaning
- Disconnect the product from the power supply before cleaning.
- Use a dry, lint-free cloth to clean the product.
- Never use abrasive cleaning agents, rubbing alcohol or other chemical solutions, since these could damage the casing or even impair operation.
Declaration of Conformity (DOC)
We, Conrad Electronic SE, Klaus-Conrad-Straße 1, D-92240 Hirschau, hereby declare that this product conforms to the 2014/53/EU directive.
The full text of the EU conformity declaration is available at the following Internet address: ____ www.conrad.com/downloads
Select a language from the menu and enter the order number of the product in the search field; Now you can download the EU declaration of conformity in PDF format.
Disposal

Electronic devices are recyclable materials and do not belong in the household waste. Dispose of an unserviceable product in accordance with the relevant statutory regulations.
Technical Data
a) Product
Operating voltage 48 V/DC (PoE); 12 V/DC (DC IN)
Power demand .... max. 0.5 A (PoE); 1.5 A (DC IN)
Ports 2x RJ45 10/100/1000/2500 MBit/s, 1x WAN/PoE, 1x LAN
WLAN ...... IEEE802.11b/g/n/ac/ax; WiFi 6; 2.4 GHz (max. 1182 MBit); 5 GHz, 5.8 GHz (max. 2475 MBit) Dual Band 4*4 MIMO
Frequency range/transmit power ... 2.412 - 2.472 GHz, ≤ 20 dBm; 5.180 - 5.240 GHz, ≤ 23 dBm 5.745 - 5.825 GHz, ≤ 13.98 dBm
Supported protocols ...... IEEE802.3at (48 V PoE); IEEE802.3az
Encryption protocols ...... WPA/WPA2
Operating modes ...... Access Point; router
Supported features .... MU-MIMO; DL/UL-OFDMA; Wave2.0; OFDMA; 1024-QAM; Seamless roaming; QSDK driver; supports OpenWRT
Dimensions (W x H x D) .... approx. 198 x 38 x 198 mm
Weight .... approx. 740 g (AP only); .... including ceiling bracket approx. 810 g
Operating conditions.... 0 to +40 °C / 10 to 90% rel. air humidity (non-condensing)
Storage conditions ....-10 to +60 °C / 10 to 90% rel. air humidity (non-condensing)
b) PoE power supply
Operating voltage 100 - 240 V/AC, 50/60 Hz
Power consumption .... max. 0.8 A
Output 48 V/DC, 500 mA, 24 W
F Mode d'emploi
www.conrad.com/downloads
www.conrad.com/downloads


- GB Operating Instructions
- RF-CAP-800 WiFi 6 3657 Mbps Wireless Ceiling Access Point
- Intended Use
- Package contents
- Latest operating instructions
- Description of the symbols used
- Safety Instructions
- a) PoE power supply
- b) General Information
- Product overview
- Installation and connection
- a) Mounting the ceiling bracket
- b) Connecting and installing the device
- Preparing for the configuration
- a) General information
- b) Preparing the configuration for Windows 10 ®
- c) Preparing the configuration for the iPad
- d) Preparing the configuration for an Android™ smartphone
- e) Logging in to the web interface
- Configuration
- a) Basic configuration (for all modes)
- b) Configuration of WLAN networks (all modes)
- c) "Access-Point" configuration
- d) "Router" configuration
- Resetting to Factory Settings
- a) At the product
- b) In the web interface
- Care and Cleaning
- Declaration of Conformity (DOC)
- Disposal
- Technical Data
- a) Product
- b) PoE power supply
- F Mode d'emploi
Brand : Renkforce
Model : RF-CAP-800
Category : Access Point