BG-1 - Doorbells m-e - Free user manual and instructions
Find the device manual for free BG-1 m-e in PDF.


User questions about BG-1 m-e
0 question about this device. Answer the ones you know or ask your own.
Ask a new question about this device
Download the instructions for your Doorbells in PDF format for free! Find your manual BG-1 - m-e and take your electronic device back in hand. On this page are published all the documents necessary for the use of your device. BG-1 by m-e.
USER MANUAL BG-1 m-e
Thank you for purchasing the wireless doorbell
BG-1. Please read this instruction manual carefully and keep it for later use.
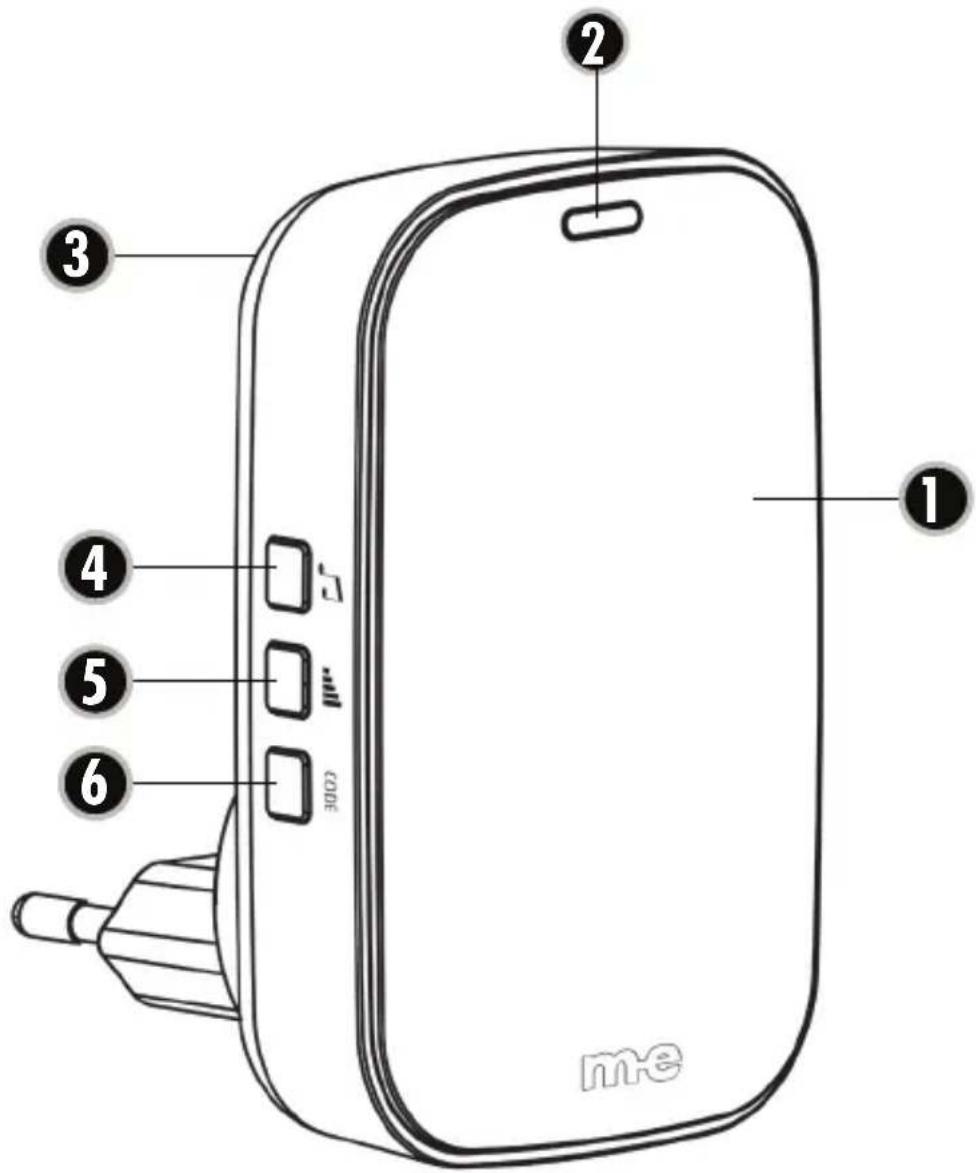
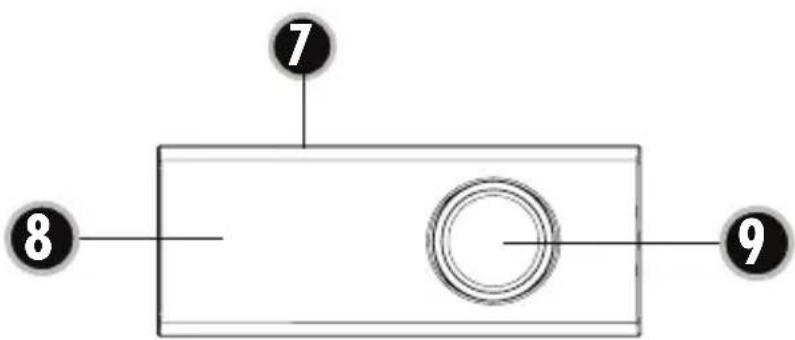
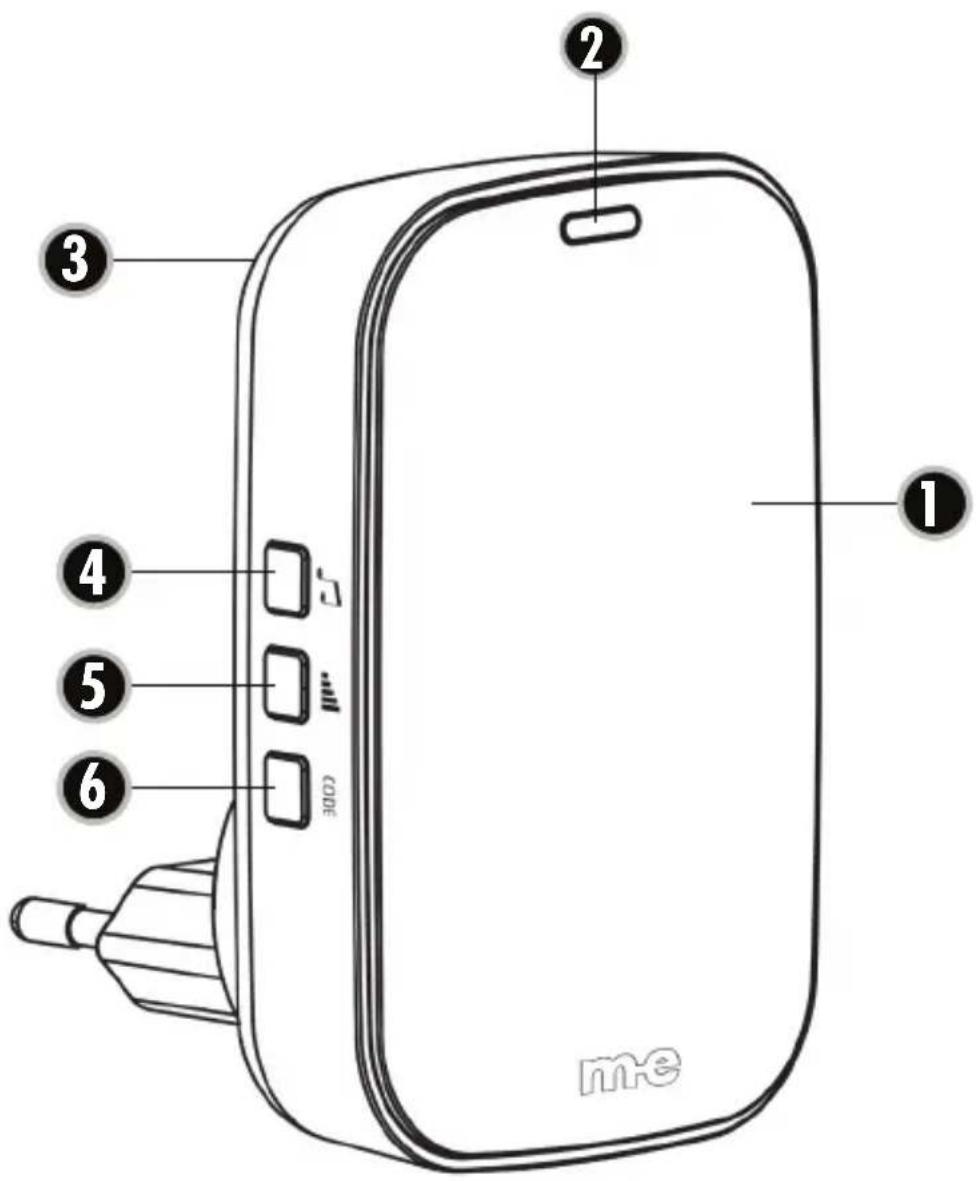
Legend
- Receiver
- LED
- Loudspeaker
- Melody button
- Volume button
- Code button
- Transmitter
- Nameplate
- Bell push-button
TRANSMITTER
Opening the transmitter and inserting the battery
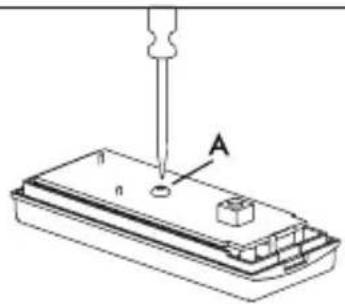
- The transmitter has a small slot on its side to open the enclosure. Insert a screwdriver in the enclosure slot and turn gently to open the enclosure.
- Remove screw (A) and remove the board.
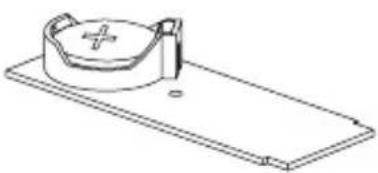
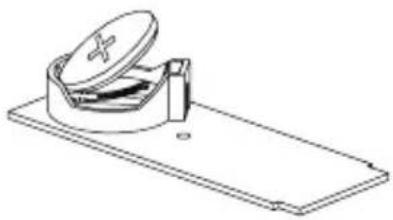
- Remove the old battery and insert a new one (type CR 2032) into the battery holder with the positive pole facing upward.
- Put the board back in place and fix it again with the screw (A).
- Reassemble the housing. The transmitter is now ready for use.
Mounting the transmitter
Each transmitter may be mounted either by means of the included double sided adhesive tape or with screws. The transmitter should not be mounted on metal since this would significantly limit the range. Provisionally mount and test the transmitter before mounting in its final position.
Use the pre-punched holes on the back of the enclosure should you mount the transmitter with screws. These holes are closed ex-factory to prevent moisture from entering the transmitter should the latter be mounted using only double-sided adhesive tape. These holes may simply be pierced with the screw. Screws and dowels are not included in delivery.
RECEIVER
Initial operation
In order to operate the receiver plug it in to a regular, easily accessible mains socket. Then carry out the item 'Coding'.
Coding
Once the receiver is plugged in it is automatically in learning mode. Press each bell button (transmitter) that is to be learned within 40 seconds of plugging the receiver. If no bell button is pressed within these 40 seconds then the receiver will remain in learn mode until a bell button is pressed.
If further transmitters are to be learned after this then press the CODE button (6) again and then the new transmitter within 15 seconds. Repeat this process for further transmitters (up to 4 transmitters are possible).
Set melody
The melody is changed using the side button (4). Every time the button is pressed the next melody is played and then saved automatically. There are 36 melodies to choose from.
Set volume
The volume can be set at one of three levels using the side button (5). The volume of the set melody reduces every time the button is pressed. Once the minimum level is reached the volume will jump to the loudest level if the button is pressed again. The volume is saved automatically.

TROUBLESHOOTING
Receiver does not ring
- Battery in the transmitter empty / Replace the battery in the transmitter
- Not yet coded / carry out the item 'Coding' in these instructions
- Range/ bring the transmitter and the receiver closer together
TECHNICAL DATA
Transmitter
Operating voltage: DC 3 Volt (battery type: CR 2032)
Closed current consumption: <5μA
Current consumption when ringing: <10mA
Frequency: 433.92 MHz +/- 250KHz
Receiver
Operating voltage: 230V / 50Hz, <1W
Volume: approx. 80 db
Frequency: 433.92MHz
Range: approx. 100m (open field)
NOTES
The functionality of the unit can be affected by the influence of strong static, electrical or high frequency fields (discharging, mobile phones, radios, microwaves).
Cleaning and maintenance
Always disconnect mains powered units from the mains supply before cleaning (disconnect the plug). The unit housing can be cleaned using a soapy soft cloth. Do not use any abrasive materials or chemicals. Remove dust build-up
from ventilation slits using a brush and clean up using a vacuum cleaner. Do not hold the vacuum cleaner nozzle directly against the unit.
i SAFETY NOTES
The warranty will be null and void in case of damages arising from violations of these operating instructions. We are not liable for consequential damages!
We accept no liability for material damages or injuries arising from inappropriate use or violation of the safety instructions. In such cases all warranty claims are null and void!
For reasons of safety and licensing (CE), unauthorised conversion and /or modification of the product is prohibited.
The design of the product complies with protection class 1. Only a standard mains socket (230V\~/50Hz) of the public mains supply may be used to power the device. Devices powered by mains voltage must be kept away from children. Please therefore be particularly careful in the presence of children.
Do not take the product apart! There is a danger of lethal electric shock!
Do not leave packaging material lying about since plastic foils and pockets and polystyrene parts etc. could be lethal toys for children.
The receiver is suitable only for dry interior rooms (not bathrooms and other moist places). Do not allow the device to get moist or wet. There is a danger of lethal electric shock!
Please consult a specialist should you have doubts regarding the method of operation, the safety, or the connections of the device.
Handle the product with care – it is sensitive to bumps, knocks or falls even from low heights.
2 YEAR LIMITED GUARANTEE
For two years after the date of purchase, the defect-free condition of the product model and its materials is guaranteed. This guarantee is only valid when the device is used as intended and is subject to regular maintenance checks. The scope of this guarantee is limited to the repair or reinstallation of any part of the device, and is only valid if no unauthorised modifications or attempted repairs have been undertaken. Customer statutory rights are not affected by this guarantee.
i Please note!
No claim can be made under guarantee in the following circumstances:
- Operational malfunction
• Empty batteries or faulty accumulator -
Erroneous coding/channel selection
-
Fault through other radio installation (i.e. mobile operation)
- Unauthorised modifications / actions
- Mechanical damage
- Moisture damage
- No proof of guarantee (purchase receipt)
Claims under warranty will be invalidated in the event of damage caused by non-compliance with the operating instructions. We do not accept any responsibility for consequential damage! No liability will be accepted for material damage or personal injury caused by inappropriate operation or failure to observe the safety instructions. In such cases, the guarantee will be rendered void.
Liability limitation
The manufacturer is not liable for loss or damage of any kind including incidental or consequential damage which is the direct or indirect result of a fault to this product.
GB
These operating instruction are published by m-e GmbH modern-electronics, An den Kolonaten 37, 26160 Bad Zwischenahn/ Germany
The operating instructions reflect the current technical specifications at time of print. We reserve the right to change the technical or physical specifications.
EMETTEUR
text_image
7 8 9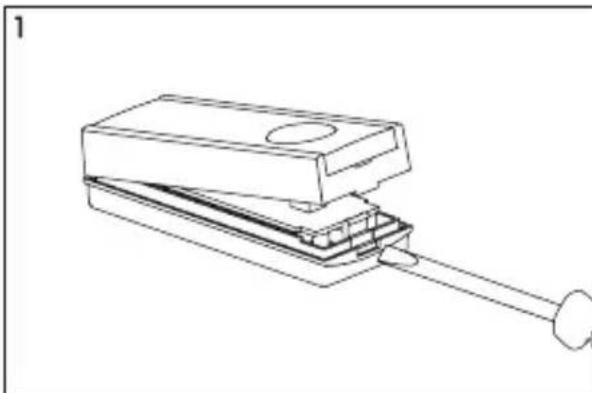
natural_image
Line drawing of a mechanical device with a handle and circular end (no text or symbols)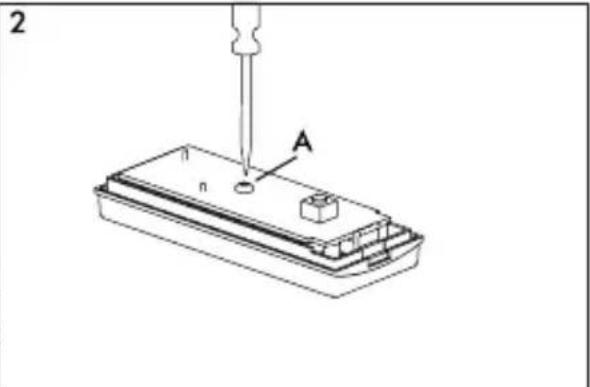
text_image
2 A n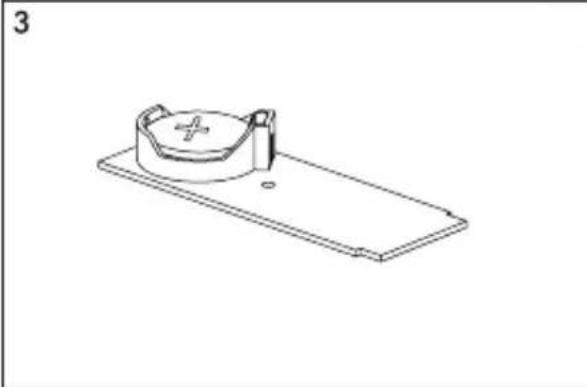
natural_image
Line drawing of a mechanical component with a circular housing and base plate (no text or symbols)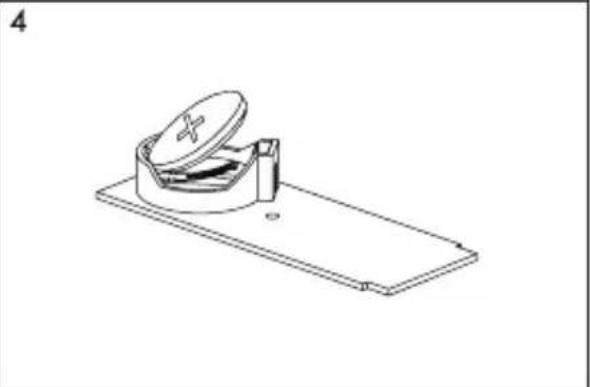
natural_image
Line drawing of a mechanical device with a circular housing and base plate (no text or symbols)RÉCEPTEUR
text_image
me 1 2 3 4 5 6
MANUEL D'UTILISATION BG-1
natural_image
Technical line drawing of a mechanical device with a cylindrical shaft and housing (no text or symbols)2
natural_image
Technical line drawing of a mechanical component with a screwdriver and labeled point A (no text or symbols beyond labels)3
natural_image
Technical line drawing of a mechanical component with a circular housing and mounting base (no text or symbols)4
natural_image
Line drawing of a mechanical device with a circular component and base plate (no text or symbols)ONTVANGER