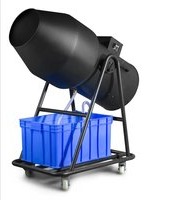
JFC1000 - Effect machine BeamZ - Free user manual and instructions
Find the device manual for free JFC1000 BeamZ in PDF.


User questions about JFC1000 BeamZ
0 question about this device. Answer the ones you know or ask your own.
Ask a new question about this device
Download the instructions for your Effect machine in PDF format for free! Find your manual JFC1000 - BeamZ and take your electronic device back in hand. On this page are published all the documents necessary for the use of your device. JFC1000 by BeamZ.
USER MANUAL JFC1000 BeamZ
SAFETY INSTRUCTIONS....3
UNPACKING INSTRUCTION 4
POWERSUPPLY 4
GENERAL SAFETY INFORMATION BEFORE OPERATION....4
INSTALLATION....4
OPERATING 4
IMPORTANT BY END OF A SHOW 5
CLEANING 5
REPLACING THE FUSE....5
NEDERLANDS
VEILIGHEIDSINSTRUCTIES 6
UITPAKKEN 7
AANSLUITSPANNING....7
ALGEMENE VEILIGHEIDSINFORMATIE VÓÖR GEBRUIK....7
INSTALLATIE 7
BEDIENING....7
BELANGRIJK NA AFLOOP VAN EEN SHOW 8
REINIGING 8
VERVANGEN ZEKERING 8
DEUTSCH
WAZNE NA KONIEC POKAZU 20
CZYSZCZENIE 20
WYMIANA BEZPIECZNIKA 20
TECHNICAL DETAILS
TECHNICAL SPECIFICATIONS....21
SAFETY INSTRUCTIONS

WARNING! Before carrying out any operations with the unit, carefully read this instruction manual and keep it with care for future reference. It contains important information about the installation, usage and maintenance of the unit.
- Unpack and check carefully that there is no transportation damage before using the unit.
- Please read these instructions carefully and follow the instructions.
- Observe all safety warnings. Never remove safety warnings or other information from the equipment.
- Be sure that no ventilation slots are blocked; otherwise the unit will overheated.

WARNING! Before connecting the equipment to the power outlet, first verify that the mains voltage and frequency match the values specified on the equipment. If the equipment has a voltage selection switch, connect the equipment to the power outlet only if the equipment values and the mains power values match. If the included power cord or power adapter does not fit in your wall outlet, contact your electrician.
• After connecting the unit, check all cables in order to prevent damage or accidents, e.g., due to tripping hazards.
• Make sure that the power cord is never crimped or damaged. Check the unit and the power cord from time to time.
- Always disconnect power from the mains, when unit is not used or before cleaning! Only handle the power cord by the plug. Never pull out the plug by tugging the power cord.
• Unplug the power cord and power adapter from the power outlet if there is a risk of a lightning strike or before extended periods of disuse.
• Do not switch the unit on and off in short intervals.
• Do not connect the unit to a dimmerpack.
• Always allow free air space of at least 50 cm around the unit for ventilation.
- This unit is not designed for permanent operation. Consistent operation breaks will ensure that the unit will serve you for a long time without defects.
• Do not swallow the fluid. In case of eye contact, rinse with a lot of water. Consult a doctor should you have accidentally swallowed some fluid.
- Spilled fluid or splashed fluid droplets can cause slip hazard. Mop up the fluid and dispose of it according to regulations.

WARNING! If the power cord of the unit is equipped with an earthing contact, then it must be connected to an outlet with a protective ground. Never deactivate the protective ground of a power cord.
• Make sure that the unit is not exposed to extreme heat, moisture or dust.
• Clean the unit using a dry cloth.
• Do not dismantle or modify the unit.
• For replacement use fuses/bulb of same type and rating only.
• Repairs, servicing and electric connection must be carried out by a qualified technician.
• The ambient temperature must always be between -5^ C and +45^ C.
- If this unit is operated in any other way, than the one described in this manual, the product may suffer damages and the warranty becomes void.
• Plastic bags must be kept out of reach of children.
- Unit must be installed out of the reach of children. Never leave the unit running unattended when connected to a power supply.

This symbol on the product or on its packaging indicates that this product shall not be treated as household waste. Instead it shall be handed over to the applicable collection point for the recycling of electrical and electronic equipment.
By ensuring this product is disposed of correctly, you will help prevent potential negative consequences for the environment and human health, which could otherwise be caused by inappropriate waste handling of this product. The recycling of materials will help to conserve natural resources. For more detailed information about recycling of this product, please contact your local Civic Office, your household waste disposal service or the shop where you purchased the product.
UNPACKING INSTRUCTION

CAUTION! Immediately upon receiving the product, carefully unpack the carton, check the contents to ensure that all parts are present, and have been received in good condition. Notify the shipper immediately and retain packing material for inspection if any parts appear damage
from shipping or the package itself shows signs of mishandling. Save the package and all packing materials. In the event that the product must be returned to the factory, it is important that the product be returned in the original factory box and packing.
If the unit has been exposed to drastic temperature fluctuation (e.g. after transportation), do not switch it on immediately. The arising condensation water might damage your unit. Leave the unit switched off until it has reached room temperature.
POWERSUPPLY
On the label on the backside of the unit is indicated on this type of power supply must be connected. Check that the mains voltage corresponds to this, all other voltages than specified, the light effect can be irreparably damaged. The product must also be directly connected to the mains and may be used. No dimmer or adjustable power supply.

WARNING! Always connect the unit to a protected circuit (circuit breaker or fuse). Make sure the unit has an appropriate electrical ground to avoid the risk of electrocution or fire.
GENERAL SAFETY INFORMATION BEFORE OPERATION
The foam can cause a higher risk of accidents, the following instructions must be observed to ensure safe operation:
• Danger of suffocation for people or animals lying under the foam.
- Maintain sufficient sight in all directions for operator and safety personnel.
• There must be no obstacles in the foam area.
• The floor surface must be non-slip.
• Foam outside the intended area should be removed immediately with a rubber wiper
• Foam generator, pump and tank should be always be attended by an operator.
- When operating the device, a sufficient number of safety personnel has to be present for supervising the foam area so that any "disappearing" person will immediately be noticed. If in doubt, the safety personnel have to limit the number of persons in the foam.
- After switching off the foam machine, the safety personnel must remain in the foam area, until the foam has completely disintegrated and it has been verified by safety personnel that the floor surface is dry and not slippery.
INSTALLATION
Pump and tank should be installed on a location not accessible for the audience and also has to be sufficiently blocked from the audience.
Notes:
- Pump may not be placed in the foaming area.
- Additionally the heavy weight of the tank after filling should be taken in account.
- All cables and hoses must be routed in a way, that persons can not stumble or even rip them off. Also the cables must not get in contact with the foam.
OPERATING
Before operating the unit in public a test foaming must be performed. Check all safety regulations! Correct fitting an tightness must be checked on all cables and hoses.
Operate the device only after having familiarized with its functions. Do not permit operation by persons not qualified for operating the device. Most damages are the result of unprofessional operation!
STEP 1: Place the unit on the desires location.

CAUTION! Ensure a minimum distance between foam machine and audience of 2meter (6.5ft). Never direct the foam output nozzle to the face or the eyes of people.
STEP 2: Connect the hose to the foam tank and the pump.
STEP 3: Connect the hose to the pump and the generator.
STEP 4: Fill the foam tank with water (approx. 10 cm / 11 inch below opening)
STEP 5: Add the foam concentrate fluid in the foam tank. Pay attention to the correct proportions!
STEP 6: Stir the tank contents to homogenize the concentration
STEP 7: Fill the pump with foam fluid. Open the valve to avoid the pump running dry
STEP 8: Plug the pump and foam generator into an electrical outlet.
STEP 9: Open de ball valve on the pump and turn it on. The foam output can be controlled by the position of the valve. Normally a 45^ position should be enough.
STEP 10: Run both units, until the desires foam level is reached.
STEP 11: When the level is reached, the pump must be switched off and the ball valve has to be closed. After approx. 30 seconds the fan can be switched off.
STEP 12: The foam canon may be restarted at any time, but you will always have to check the tank for a correct fluid level.

CAUTION! Dry running of the pump can cause irreparable damage to the pump.

WARNING! Keep this unit away of children! Never leave this device running unattended!
WARNING! Use only original Beamz foam fluid. Warranty will be voided if any other type of liquid is used, improper use of liquid may lead to machine failure and malfunction.
Notes:
- The foam cannon should work max. 30 minutes continuously. After that the machine should be stopped for min. 15 minutes.
- The pump's delivery height is determined by the operating mode (suck or push), the inner diameter of the hose and the degassing behaviour of the fluid. In the supplied configuration, we recommend a maximum feed rate of 6 meter (19.5ft).
IMPORTANT BY END OF A SHOW
The fan must remain running for 15 minutes after the last foaming in order to dry the fan motor. Disconnect the unit from the mains supply before disassembling. Always remember to close the water taps and hydrants. Frequent cleaning and service of generator, pump, tank and hoses will ensure you a long lasting lifetime of our product.
CLEANING
We recommend a frequent cleaning of the unit. Please use a soft lint-free and moistened cloth. Never use alcohol or solvents!

CAUTION! There are no serviceable parts inside the unit except for the fuse. Repairs and service operations are only to be carried out by authorized dealers.
WARNING! Disconnect from mains before starting maintenance operation!
REPLACING THE FUSE
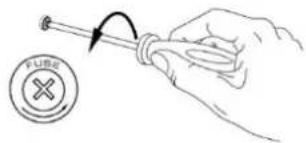
If the fuse is defective, replace the fuse with a fuse of the same type and value. Before replacing the fuse, unplug mains lead.
text_image
FUS自贡Procedure:
Step 1: Open the fuse holder on the rear panel with a fitting screwdriver.
Step 2: Remove the old fuse from the fuse holder.
Step 3: Install the new fuse in the fuse holder.
Step 4: Replace the fuse holder in the housing.
VEILIGHEIDSINSTRUCTIES

REPLACEMENT DU FUSIBLE
WAZNE NA KONIEC POKAZU
Design and product specifications are subject to change without prior notice.
The products referred to in this manual conform to the European Community Directives to which they are subject:
• Low Voltage (LVD) 2014/35/EU
• Electromagnetic Compatibility (EMC) 2014/30/EU
• Restriction of Hazardous Substances (RoHS) 2011/65/EU

BEAMZ
offers a wide range of high performance lighting equipment and related accessories for the rental, entertainment and architectural lighting markets. BeamZ Pro stands for performance, innovation and value pricing!


