8220 - Climbing safety gear Klein Tools - Free user manual and instructions
Find the device manual for free 8220 Klein Tools in PDF.


User questions about 8220 Klein Tools
0 question about this device. Answer the ones you know or ask your own.
Ask a new question about this device
Download the instructions for your Climbing safety gear in PDF format for free! Find your manual 8220 - Klein Tools and take your electronic device back in hand. On this page are published all the documents necessary for the use of your device. 8220 by Klein Tools.
USER MANUAL 8220 Klein Tools
For Professionals... Since 1857® USA
Instructions for Proper Use, Assembly and Care of Klein Pole and Tree Climbers, Including Gaff Sharpening
ENGLISH
Español pg. 10
Français pg. 19
natural_image
Close-up of a black-and-white photo of a shoe's sole with a strap and mesh net, no visible text or symbols.
natural_image
Abstract grayscale texture with vertical striations and faint linear patterns (no text or symbols)KLEIN TOOLS®

For Professionals... Since 1857® USA
Instructions for Proper Use, Assembly and Care of Klein Pole and Tree Climbers, Including Gaff Sharpening
ENGLISH
Español pg. 10
Français pg. 19
natural_image
Close-up of a black-and-white photo of a pair of boots with straps, one wrapped in mesh material (no visible text or symbols)
natural_image
Abstract grayscale texture with vertical striations and small rectangular cutouts (no text or symbols)KLEIN® TOOLS

For Professionals... Since 1857® USA
Instructions for Proper Use, Assembly and Care of Klein Pole and Tree Climbers, Including Gaff Sharpening
General Description
natural_image
Line drawing of a worker in safety gear climbing a rope structure (no text or symbols)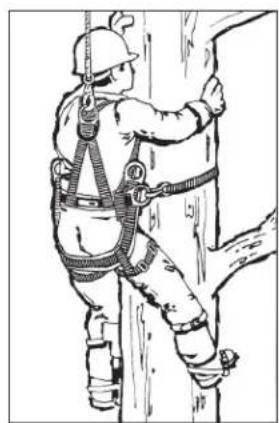
natural_image
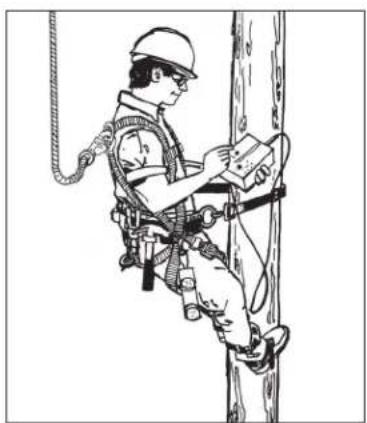
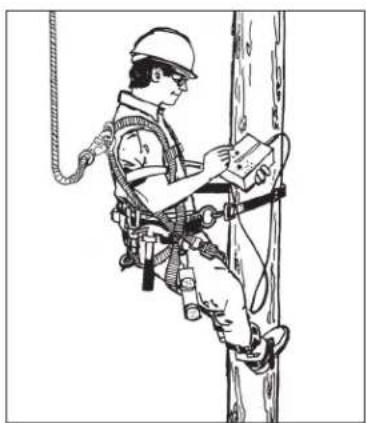
Illustration of a person climbing a rope using a harness (no text or symbols)These instructions apply to Klein pole climbers (Cat. No. 1972AR Series and 1986AR Series) and Klein tree climbers (Cat. No. 1907AR Series).
Klein Tools recommends a combined body, clothing, and tool weight of 300 pounds or less for use with our pole and tree climbers.
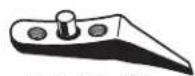
Fig. 1 - Pole Climber Gaffs
Cat. No. 72
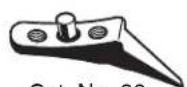
Fig. 2 - Tree Climber Gaff
Cat. No. 07
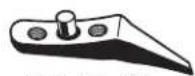
Pole climbers are available in two size-adjustment ranges —15"-19" (381-483 mm) and 17"-21" (432-533 mm). Each climber is adjustable in 1/4" (6 mm) increments for a comfortable fit. Offered with or without pads and ankle straps. Available with either 1-1/2" (38 mm) or 1-9/16" (40 mm) gaffs (see Figure 1).
Tree climbers have the same features as pole climbers except their gaffs come in one size, 2-3/4" (70 mm). (See Figure 2.) Available in two size-adjustment ranges — 15" to 19" (381 to 483 mm) and 17" to 21" (432 to 533 mm). Tree climbers are adjustable in 1/4" (6 mm) increments for a comfortable fit.
Replaceable gaffs are available for Klein pole and tree climbers and can be installed in the field. Many companies now replace all gaffs as they become dull rather than incur the risk of improper resharpening. When resharpening
becomes necessary (for those companies or users who elect not to replace worn gaffs), use only the Klein Cat. No. KG-1 gaff gauge, which is available separately or in the Klein gaff-sharpening kit, Cat. No. KG-2.
To assure proper sharpening, follow the instructions in this booklet exactly. For your protection, we recommend that climbers be replaced when the original gaff and two replacement gaffs have been used on the climbers.
Proper training, inspection, and maintenance are essential to prevent serious injury or death. The cautions and instructions in this booklet apply to climber use. Read, understand, and follow them carefully.
⚠ WARNING: Improper sharpening of gaffs and the use of pole or tree climbers for purposes other than specified here can result in serious injury or death.
⚠ WARNING: The employer and user are solely responsible for obtaining and correctly using the proper climbers, gaffs, and other occupational protective equipment. Use only approved equipment.
⚠ WARNING: Save these instructions. Pole and tree climbers must not be used without first reading, understanding, and following these instructions. Failure to read, understand and follow all instructions may result in serious injury or death. Training and instruction review should be repeated at regular intervals by the user and his or her employer.

natural_image
Simple black silhouette of a human figure in mid-air, no text or symbols presentWARNING:
A fall could result in serious injury or death. Do not use unless properly trained. Read and follow all instructions and warnings.
Construction of Klein Pole and Tree Climbers
A. Climbers are adjustable in 1/4" increments for the most comfortable fit. Available in two size ranges: 15"-19" (381-483 mm) and 17"-21" (432-533 mm).
B. Replaceable gaffs for pole climbers are available in a choice of 1-1/2" (38 mm) or 1-9/16" (40 mm) lengths. Replaceable tree-climber gaffs are 2-3/4" (70 mm) long. Gaffs are positioned by a center pin in the gaff and secured by two flat TORX® cap screws.
C. Leg irons are contoured to position gaff properly for security and comfort.
D. Broad stirrup (4-7/16" [113mm] wide) provides greater support for the foot.
E. High-grade latigo-leather climber pads are cushioned for comfort.
F. Climber straps are made of nylon. Buckles have rollers for easy adjustment.
G. Steel sleeve fits over leg iron, and is secured by two slotted hex-head bolts with lock washers and barrel-type nuts (not visible in Figure 3).
H. Ankle straps are made of nylon.
I. Split ring secures the ankle strap. Allows quick replacement, even in the field.
Figure 3

text_image
Technical diagram of a mechanical clamp or measuring device with labeled parts A through ITo order replacement straps, pads, gaffs, or screws, or to order gaff guards, call Klein Tools Customer Service at 1-800-553-4676.
The Klein Gaff Gauge
Pole and tree climber gaffs must be sharpened to critically-accurate dimensions and configuration to function properly and to assure maximum protection from the possibility of "cut-outs" or tip breakage that could cause serious injury or death from a fall. Although pole-climber gaffs are shorter than tree-climber gaffs (see Figures 1 and 2 on page 1), their points are sharpened to identical configurations.
The Klein gaff gauge precisely measures both gaff types, to accurately determine if gaffs need to be sharpened, even in the field. See the “Climber and Gaff Inspection Procedures” section of this booklet for specific instructions.
This gauge has openings and calibration marks for precisely measuring gaff width, thickness, and point profile (see Figure 4).
A. Slot to measure thickness 1" (25.4 mm) from tip (pole gaffs only)
B. Slot to measure thickness 1/2" (12.7 mm) from tip
C. Slot to measure width 1/2" (12.7 mm) from tip
D. Slot to measure width 1" (25.4 mm) from tip (pole gaffs only)
Figure 4

text_image
A B C D F E G W EE. Proper length-limit marks when measuring thickness or width 1" (25.4 mm) from tip
F. Proper length-limit marks when measuring thickness or width 1/2" (12.7 mm) from tip
G. Template for determining proper tip profile

WARNING: For your protection, Klein recommends that climbers be replaced when original gaff and two replacement gaffs have been used on the climbers.
How to Use Klein Pole and Tree Climbers
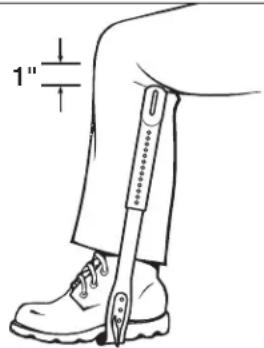
1. Assemble the climber (Figure 5).
A. Remove adjustable sleeves and sleeve fasteners from the box.
B. With climber gaff and strap loop facing outwards, insert climber shank into sleeve.
C. Step into the climber, placing the adjustable sleeve to the inside of the leg.
D. Adjust sleeves to the most comfortable position, about 1" (25 mm) below knee. Insert screws into the two (2) aligned holes of each climber, and tighten the supplied nuts on the screws to secure the adjustment.
Figure 5
text_image
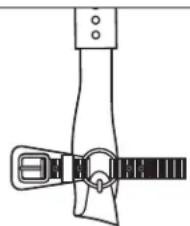
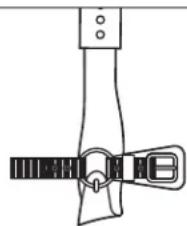
1"2. Assemble the ankle straps (Figure 6).
Note: Ankle straps are already assembled on new Klein climbers. If you are replacing ankle straps, follow the steps listed below. Since no special tools are required, you may install or remove ankle straps in the field.
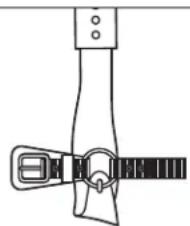
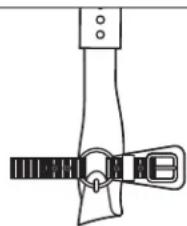
A. Remove old ankle strap and ring from leg iron.
B. Position the new split ring so the wear pad is pointed toward the front of the climber as illustrated in Figure 6.
C. Slightly open the split ring and thread it onto the solid loop on the climber in the same manner as an ordinary key ring.
Figure 6
natural_image
Simple line drawing of a mechanical clamp or bracket with no text or symbolsLeft Strap
natural_image
Simple line drawing of a mechanical component with a belt and handle (no text or symbols)Right Strap
3. Inspect the climbers.
Before each use, visually check that: (1) all buckles are properly closed; (2) climber straps and pads are free of burns, cuts, broken stitches or excessive wear; (3) rivets are not bent, loose, or missing; (4) buckles are not distorted or cracked, tongue does not bind on buckle, and buckle holes are not damaged. (5) If climbers do not pass inspection, remove them from service, destroy and discard them, and replace them immediately.
Also before each use, check that: (1) gaffs are free of dents, gouges or scratches; (2) the underside of the gaff is longer than the minimum length for proper use for that type of gaff (1-7/16" [37 mm] for pole climber gaffs and 2-1/4" [57 mm] for tree climber gaffs); and (3) gaffs have proper width, thickness, and point profile. Only evaluate gaffs with the Klein KG-1 gaff gauge (See Figure 4). (4) If gaffs do not pass inspection, resharpen them, or discard and replace them.
4. Examine the pole or tree.
A. When using pole climbers, remember that poles are not all alike. Different wood species, climate and pole age, as well as different preservative treatments (Creosote, Penta, CCA) affect climbability. Since these factors can result in significant differences in gaff penetration, visually check gaff penetration with your full weight on the climber before starting any climb.
If penetration is shallow, use extreme caution, because the gaff could "cut-out", or the increased stress on the gaff tip could cause the tip to break. To allow for proper penetration, the minimum acceptable length for the underside of a pole climber gaff is 1-7/16" (37 mm).
Avoid gaff contact with metal objects when climbing (such as pole ID tags, nails, poster staples, metal pole hardware, or any other metal on the pole).
B. When using tree climbers, remember that trees are not all alike. Different species and bark thickness affect climbability. Visually check gaff penetration in the same manner described for pole climbers before starting any climb. To allow for proper penetration: (1) Use a tree-climber gaff with a minimum underside length of 2-1/4" (57 mm). (2) When the bark thickness measures more than 2-1/2" (64 mm), make sure the gaff is long enough to properly penetrate the wood under the bark. Avoid gaff contact with metal objects when climbing (such as nails, poster staples, or any other metal on the tree).
5. Wear the climbers properly.
Put on the properly adjusted climbers with gaffs positioned inside the legs. The climbers should be fastened securely and comfortably using the calf and ankle straps. The leg iron stirrups are marked "L" for left foot and "R" for right foot.
6. Protect the gaffs between climbs.
Remove pole or tree climbers between climbs. Gaffs can be damaged if they strike rocks or other hard surfaces, or if they strike against each other while you are walking. Between uses, use gaff guards to protect gaff tips.
How to Use Klein Pole and Tree Climbers (continued)
7. Use additional fall protection.
Always use fall protection if there is a risk of a fall. Although OSHA regulations generally require workers to use fall protection when exposed to a fall of six feet or more, Klein strongly recommends using fall-arrest protection when working at any elevated position. Know the appropriate OSHA regulations. If you have any questions or any doubt as to what regulations apply to you or what safety equipment is required, contact your regional OSHA office.
Note regarding additional Klein fall protection equipment: For full information on Klein protective harnesses or connecting devices, refer to the warning tags or labels attached to those products or to the instruction booklets packed with them.
⚠ WARNING: For your protection, Klein recommends that climbers be replaced when original gaff and two replacement gaffs have been used on the climbers.
⚠ WARNING: Pole and tree climbing equipment is to be used only by individuals who are qualified and properly trained to use this equipment. Improper use of climbing equipment can cause serious injury or death. OSHA mandates that the employer is responsible for user competence and safe work practice.
General Inspection Procedures
1. Check for wear and deterioration.
Before each use, carefully inspect the complete system for signs of wear or deterioration, or evidence of impact loading.
Visually inspect for loose threads, pulled rivets, cuts, abrasions, or other evidence of chemical or physical deterioration that may have weakened the material or assembly.
2. Inspect hardware for malfunctions or cracks.
Check all hardware, including rivets and buckles.
3. Destroy and replace all worn or damaged equipment.
Immediately destroy and replace any component which does not pass inspection.
⚠ WARNING: Inspect leather straps for any deterioration before each use: that is, cracking, wearing thin, tearing, weakening, or chemical attack. Maintain with Neat's-foot oil or equivalent. Remove from service, destroy and discard strap if it does not pass inspection.
Procedures for Inspecting Climbers and Gaffs
Carefully inspect the entire climber and gaff before each use.
1. Check straps and pads.
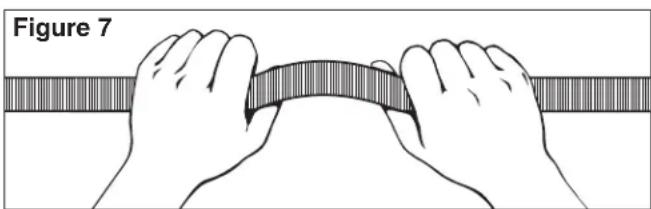
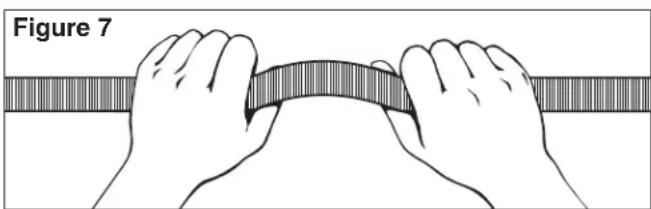
Make sure straps and pads are free of tears, burns, broken stitches, or excessive wear. Carefully check leather for cracking, wearing thin, tearing, weakening, chemical attack, or other signs of deterioration (see Figure 7).
natural_image
Illustration of two hands holding a curved object over a striped band, labeled 'Figure 7' (no text or symbols on the diagram itself)2. Check rivets, buckles and other metal parts.
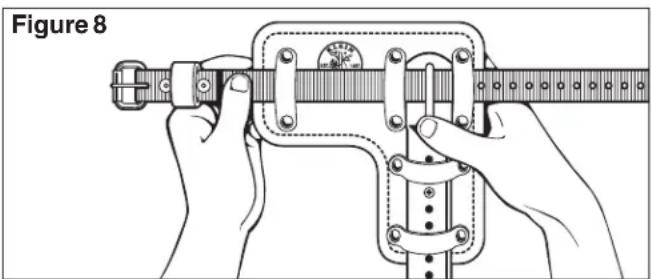
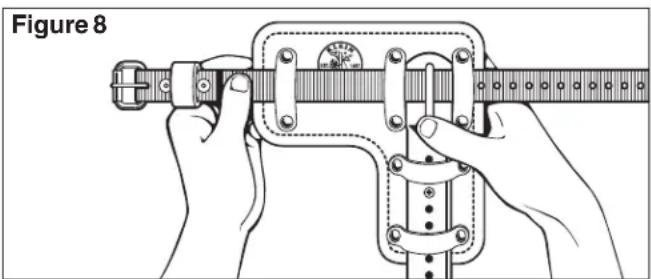
Check that rivets are not bent, loose, or missing. Check that buckles are not distorted or cracked, tongue does not bind on buckle, and buckle holes are not damaged. Also check split ring, leg iron, and steel sleeve for signs of excessive wear or damage (see Figure 8).
natural_image
Illustration of hands using a measuring tool to measure a mechanical component (no text or symbols visible)3. Check gaffs.
Check that gaffs are free of dents, gouges, or scratches.
Procedures for Inspecting Climbers and Gaffs (continued)
4. Check gaff thickness with Klein Gaff Gauge.
For pole gaffs only, insert the gaff as far as possible through the large opening in the gauge marked "TH" (Figure 9). Make sure the top ridge is flush against the gauge base. The point of the gaff should fall within the limits formed by the last line and the edge of the gauge as shown. If it does, the gaff is the proper thickness, as measured approximately 1" (25.4 mm) from the point.
For pole and tree gaffs, insert the gaff as far as possible through the small opening in the gauge marked "TH" (Figure 10). Make sure the top ridge is flush against the gauge base. The point should fall within the center two lines, as shown. If it does, the gaff is the proper thickness, as measured approximately 1/2" (12.7 mm) from the point.
Figure 9
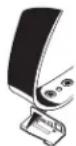
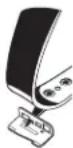
Figure 10
5. Check gaff width with Klein Gaff Gauge.
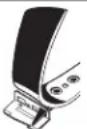
For pole gaffs only, insert gaff as far as possible through the large square opening in the gauge marked "W" (Figure 11). Make sure the top ridge is flush against the gauge base. The point should fall within the limits formed by the last line and the edge of the gauge as shown. If it does, the gaff is the proper width, as measured approximately 1" (25.4 mm) from the point.
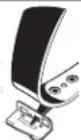
For pole and tree gaffs, insert gaff as far as possible through small opening in the gauge marked "W" (Figure 12). Make sure the top ridge is flush against the gauge base. The point should fall within the center two lines as shown. If it does, the gaff is the proper width, as measured approximately 1/2" (12.7 mm) from the point.
Figure 11
6. Check gaff profile/contour with Klein Gaff Gauge.
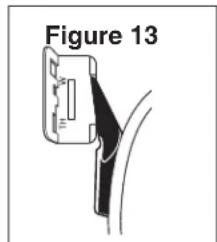
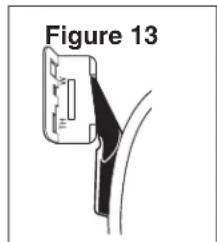
For pole and tree gaffs, place the side of the gaff along the front edge of the gauge with the gaff point resting in the notch. The point should follow the configuration of the gauge to assure the proper "rounding off" of the tip within 1/4" (6.4 mm) of the point (see Figure 13).
Minimum safe length for a pole-climbing gaff is 1-7/16" (37.5 mm), measured on the underside of gaff. Minimum safe length for a tree-climbing gaff is the greater of the
following: (a) 2-1/4" (57 mm), measured on the underside of the gaff, or (b) long enough to penetrate the core of the tree. Before climbing, always test the penetration of tree gaffs at the base of the tree to be sure gaffs extend through the bark and properly penetrate the wood.
natural_image
Diagram of a cable connector with labeled Figure 13 (no text or symbols on the diagram itself)7. Check gaff sharpness with the "plane test".
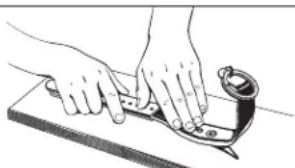
Step 1: Place climber with gaff pointing downward and upper strap loop resting against a horizontal board or pole. Hold the leg iron parallel to the wood surface, with the stirrup vertical. Push the climber horizontally in the direction of the gaff without any downward pressure except the weight of the climber (see Figure 14).
Figure 14
natural_image
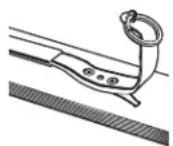
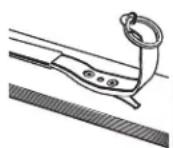
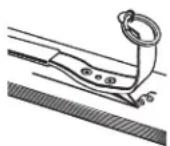
Illustration of hands using a tool on a cutting board (no text or symbols)Step 2: The gaff is properly sharpened if it buries itself in the wood within a few inches of its starting position and can no longer be moved forward (see Figure 15). The gaff is not properly sharpened if it merely slips, slides, or plows a shallow groove in the wood (see Figure 16). In this case, either replace the gaff following the "Gaff Assembly and Ordering Instructions" or resharpen the gaff following the "Gaff Sharpening Instructions", both contained in this booklet. A resharpened gaff must be tested for proper width, thickness, and point profile, and it must also pass the "plane test" before use.
Figure 15 - Right Figure
16 - Wrong
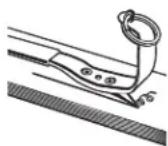
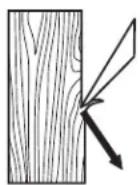
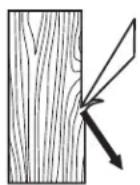
The “plane test” reveals possible penetration problems not noticeable to the naked eye. Figure 17 shows how a properly sharpened gaff cuts its way into the pole for proper support. Figure 18 shows how an improperly sharpened gaff can “cut-out”.
Figure 17 - Right
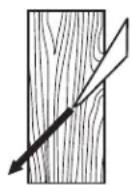
Figure 18 - Wrong
Procedures for Inspecting Climbers and Gaffs (continued)
8. Destroy and replace all worn or damaged OPE equipment.
If evidence of excessive wear, deterioration, or mechanical malfunction is observed, replace the equipment immediately. Never work with worn or damaged OPE equipment. Using damaged or worn equipment can cause serious injury or death.
9. The inspector is the most important part of the inspection.
Check all equipment thoroughly and follow all safety procedures and guidelines. Do not take any shortcuts.
⚠ WARNING: OSHA specifies that all employers covered by the Occupational Safety and Health Act are responsible for inspecting and maintaining all tools and equipment used by employees — whether owned by the employees or by the company. Personal-protective equipment should be inspected before each use and removed from service if signs of wear or damage are found.
⚠ WARNING: Should any unusual conditions be noted during inspection that are not specified here, do not use the suspect equipment until an individual considered by OSHA to be qualified makes a decision on its usability.
Maintenance Procedures
Clean and maintain equipment as recommended.
1. Nylon straps.
Wash nylon only in warm water and mild detergent. Avoid harsh chemical agents such as degreasing compounds, turpentine, paint thinner, gasoline, and other solvents. Allow nylon objects to dry naturally. Do not use heat to speed up the process.
2. Leather components.
Maintain all leather with Neat's-foot oil or equivalent to prolong life. Clean with saddle soap or other mild soap. Allow leather to dry naturally. Do not use heat to speed up the process.
3. Leg iron, steel sleeve, stirrup, gaff, and other metal parts.
A. Make sure all metal parts are clean and free of foreign material.
B. Wipe metal parts dry with a clean cloth.
C. Maintain or replace gaffs as explained in this booklet to preserve proper width, thickness, point profile, and sharpness.
4. Reinspect all equipment after maintenance.
It is mandatory to reinspect the equipment after all maintenance procedures to determine if the maintenance was done properly and effectively.
Gaff Sharpening Instructions
1. Always use a fine-tooth file.
Never grind on a wheel, as you will create heat, which will alter the temper of the gaff and make it dangerous to use. A proper file is contained in the Klein KG-2 kit.
2. File gaff from heel to point.
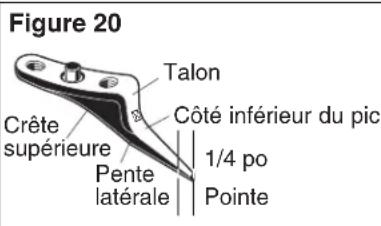
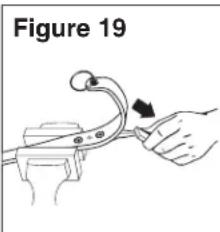
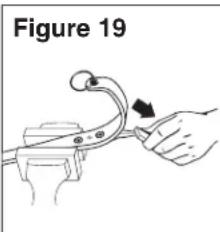
Place the climber in a smooth-jaw vise with the gaff as shown in Figure 19, so that you can file from the heel to the point of the gaff as shown by the arrow in Figure 20. Remove only enough material to make a good point. Never cross file. Cross-filing weakens the point, and under load it may cause tip breakage.
natural_image
Illustration of a hand holding a tool with an arrow indicating motion (no text or symbols)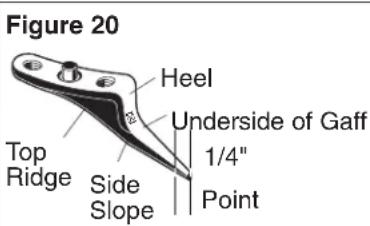
text_image
Figure 20 Heel Underside of Gaff 1/4" Top Ridge Side Slope Point3. Remove any file marks by honing.
Work the honing stone in the same direction as the file (as shown by the arrow in Figure 19.) A compatible honing stone is included in the KG-2 kit.
(continued on next page)
Gaff Sharpening Instructions (continued)
4. Do not make a needle point.
In order to not make a needle point (see Figure 21), file both side slopes to obtain straight edges. The top ridge of the gaff (see Figure 20) must be perfectly straight from the tip back at least 1" (25.4 mm) and should not be altered. Deep nicks, dents, or scratches along the top ridge require gaff replacement. The final point must always be in the top ridge of the gaff.
Wrong
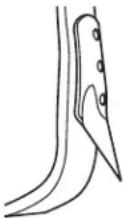
Figure 21
Right
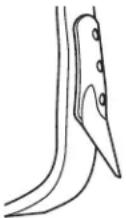
Figure 22
Sharp Cutting Edges
text_image
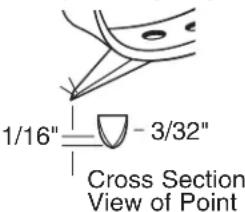
1/16" - 3/32" Cross Section View of Point5. Maintain proper shape on underside of gaff.
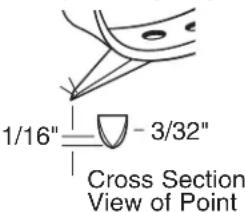
The underside of the gaff should be perfectly straight (flat) to within 1/4" (6.35 mm) of the point, then rounded slightly toward the top ridge of the gaff on a radius of 1/4" (6.35 mm) (see Figure 19). At a distance of 1/16" (1.59 mm)
back from the point, the width should be a minimum of 3/32" (2.38 mm) measured on the underside of the gaff (see Figure 22). The remainder of the underside should be kept perfectly straight (see Figure 20).
6. Replace gaffs when necessary.
Pole climbers should not be used after the underside of the gaffs are worn or filed to 1-7/16" (37 mm) long. Tree climbers should not be used after the underside of gaffs are worn or filed to 2-1/4" (57 mm) long. When bark thickness measures more than 2-1/2" (64 mm), make sure the gaff has adequate length to properly penetrate the wood under the bark.
When climber gaffs measure less than the above limits, they should be replaced with a new pair. For your protection, Klein recommends that climbers be replaced when original gaff and two replacement gaffs have been used on the climbers.
7. Check final result after sharpening.
Use the KG-1 gauge when inspecting the gaff. Replace the gaff if it fails the gauge tests.
Gaff Assembly and Ordering Instructions
Gaff Assembly
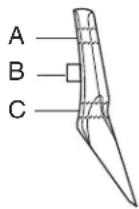
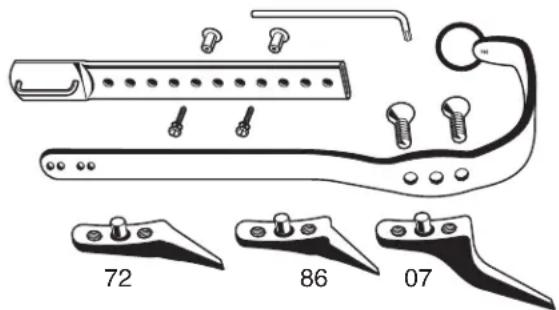
- Attach gaff with locator pin (B) to middle hole of leg iron.
- Thread longer screw (C) into bottom hole (nearest gaff point). Do not seat screw.
- Thread shorter screw (A) through flat portion of gaff.
- Alternate tightening of both screws until seated. Do not exceed 24 ft.-lb. torque on screw.
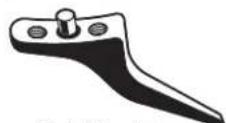
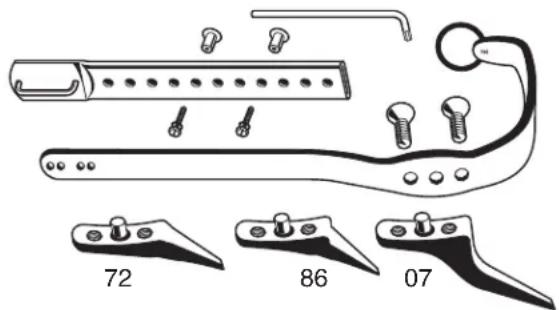
Gaff Ordering. Gaffs are supplied in pairs with TORX ^® screws and wrench. No. 72 gaffs, No. 86 gaffs, and No. 07 gaffs are interchangeable and fit all Klein replaceable-gaff climbers.
Cat. No. Description
72 Pair of 1-1/2" (38 mm) gaffs. For pole climbers only.
86 Pair of 1-9/16" (40 mm) gaffs. For pole climbers only.
07 Pair of 2-3/4" (70 mm) gaffs. For tree climbers only.
text_image
72 86 07Cautions: Pole & Tree Climbers
- Climbing equipment is for use by properly trained professionals only.
- Use climbing equipment only for the specific purpose for which it was designed and intended.
- Klein Tools recommends a combined body, clothing and tool weight of 300 pounds or less for use with our pole and/or tree climbers.
- Always visually check that all buckles are properly closed before use.
- Before each use check that: (1) gaffs are free of dents, gouges, or scratches, (2) gaffs have proper width, thickness, point profile, and sharpness. Only evaluate gaffs with Klein KG-1 gaff gauge. (3) If gaffs fail inspection, resharpen them, or discard and replace them.
- Before each use check that: (1) climber straps and pads are free of burns, cuts, broken stitches, or excessive wear, (2) rivets are not bent, loose, or missing, (3) buckles are not distorted or cracked, tongue does not bind on buckle and buckle holes are not damaged. (4) Remove from service, destroy and discard item if it fails inspection, and replace it immediately.
- Never punch holes in or alter a strap or climber.
- For leather components: Leather is subject to deterioration by cracking, wearing thin, tearing, weakening, and chemical attack. Carefully maintain with Neat's-foot oil or equivalent. Inspect straps before each use. Remove from service, destroy and discard strap if it shows any signs of deterioration and replace immediately.
- While climbing, avoid gaff contact with metal, such as pole hardware, tags, nails, poster staples, etc.
- Poles are not all alike. Different wood species, climate, pole age, and preservative treatments (Creosote, Penta, CCA) affect climbability, resulting in significant differences in gaff penetration. Visually check gaff penetration with your full weight on the climber before any climb. If penetration is shallow, use extreme caution. The gaff could "cut-out", or the increased stress could lead to tip breakage. For proper penetration, the minimum underside length of a pole climber gaff is 1-7/16" (37 mm).
- Trees are not all alike. Different species and bark thickness affect climbability. Visually check gaff penetration as described for pole climbers before any climb. For proper penetration: (1) Use a tree climber gaff with a minimum underside length of 2-1/4" (57 mm). (2) When bark thickness measures more than 2-1/2" (64 mm), make sure gaff has enough length to properly penetrate the wood under the bark.
- After climbs, remove climbers to avoid gaff damage from hard surfaces or from gaffs striking together when walking.
- Use gaff guards to protect gaffs between uses.
-
Limiting gaff replacement on climbers to two times is highly recommended.
-
Employer — instruct employee as to proper use and warnings before use of equipment.
- Read, understand and follow all information provided with climber before use.

WARNING: OSHA states that any OPE equipment actually subjected to in-service loading, as distinguished from static load testing, shall be immediately removed from service and shall not be used again to safeguard employees. If any equipment has arrested a fall, immediately destroy and discard it so it can never be used again.

WARNING: The use of occupational protective equipment without proper instructional materials and training could result in serious injury or death. Klein Tools will supply additional instructional materials, warnings tags, or will answer questions on any piece of Klein occupational protective equipment free of charge. Call Klein Tools, Inc. at 1-800-553-4676.
WARRANTY
For Professionals... Since 1857® USA
natural_image
Close-up of a black-and-white photo of a pair of boots with straps, one lying on a net, next to a textured wooden wall (no text or symbols visible)KLEIN TOOLS®

For Professionals... Since 1857® USA
natural_image
Line drawing of a worker in safety gear climbing a rope, holding a device (no text or symbols present)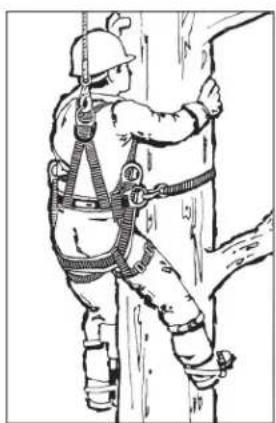
natural_image
Illustration of a worker in full gear climbing a rope (no text or symbols)natural_image
Simple black silhouette of a human figure in mid-air, no text or symbols present
ADVERTENCIA:
text_image
Technical diagram of a mechanical clamp or measuring device with labeled parts A through Itext_image
A B C D F E G W Enatural_image
Illustration of two hands holding a curved object over a striped band, labeled 'Figura 7' (no text or symbols on the diagram itself)natural_image
Diagram of a cable connector labeled Figura 13, showing a black cable inserted into a white housing (no text or symbols on the diagram itself)natural_image
Illustration of hands using a tool on a cutting board (no text or symbols)natural_image
Illustration of a hand holding a tool with a curved handle, labeled 'Figura 19' (no text or symbols on the diagram itself)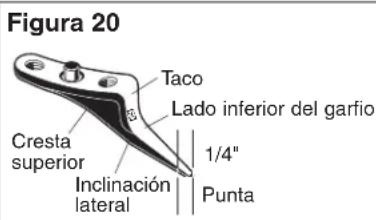
For Professionals... Since 1857® USA
natural_image
Close-up of a pair of boots with black straps, one climbing and the other fixed on a textured wall (no text or symbols visible)KLEIN TOOLS®

For Professionals... Since 1857® USA
natural_image
Line drawing of a worker in safety gear climbing a vertical pole (no text or symbols)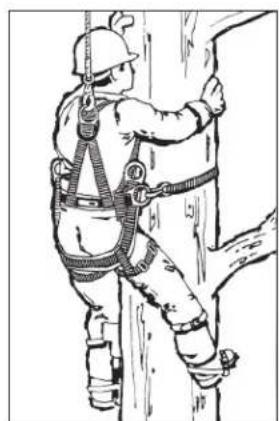
natural_image
Line drawing of a worker in full gear climbing a rope (no text or symbols)natural_image
Simple black silhouette of a human figure in mid-air, no text or symbols presentAVERTISSEMENT
text_image
Technical diagram of a mechanical clamp or clamp device with labeled parts A through Itext_image
A B C D F E G W Enatural_image
Illustration of two hands holding a curved object over a striped band, labeled 'Figure 7' (no text or symbols on the diagram itself)natural_image
Diagram of a cable connector labeled Figure 13, showing a connector inserted into a cable (no text or symbols on the diagram itself)natural_image
Illustration of hands using a tool on a cutting board (no text or symbols)natural_image
Illustration of a hand using a tool to adjust or install a curved mechanical component, labeled 'Figure 19' (no text on diagram itself)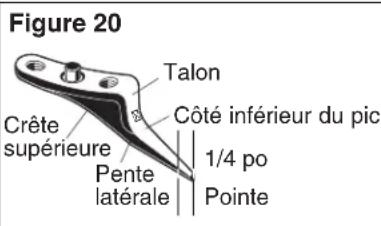
For Professionals... Since 1857® USA
Instructions for Proper Use, Assembly and Care of Klein Pole and Tree Climbers, Including Gaff Sharpening
General Description
natural_image
Line drawing of a worker in safety gear climbing a rope structure (no text or symbols)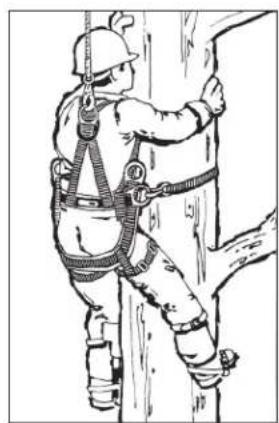
natural_image
Illustration of a worker in full gear climbing a rope, wearing a hard hat and safety harness (no text or symbols)These instructions apply to Klein pole climbers (Cat. No. 1972AR Series and 1986AR Series) and Klein tree climbers (Cat. No. 1907AR Series).
Klein Tools recommends a combined body, clothing, and tool weight of 300 pounds or less for use with our pole and tree climbers.
Fig. 1 - Pole Climber Gaffs
Cat. No. 72
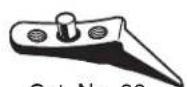
Fig. 2 - Tree Climber Gaff

Cat. No. 07
Pole climbers are available in two size-adjustment ranges —15"-19" (381-483 mm) and 17"-21" (432-533 mm). Each climber is adjustable in 1/4" (6 mm) increments for a comfortable fit. Offered with or without pads and ankle straps. Available with either 1-1/2" (38 mm) or 1-9/16" (40 mm) gaffs (see Figure 1).
Tree climbers have the same features as pole climbers except their gaffs come in one size, 2-3/4" (70 mm). (See Figure 2.) Available in two size-adjustment ranges — 15" to 19" (381 to 483 mm) and 17" to 21" (432 to 533 mm). Tree climbers are adjustable in 1/4" (6 mm) increments for a comfortable fit.
Replaceable gaffs are available for Klein pole and tree climbers and can be installed in the field. Many companies now replace all gaffs as they become dull rather than incur the risk of improper resharpening. When resharpening
becomes necessary (for those companies or users who elect not to replace worn gaffs), use only the Klein Cat. No. KG-1 gaff gauge, which is available separately or in the Klein gaff-sharpening kit, Cat. No. KG-2.
To assure proper sharpening, follow the instructions in this booklet exactly. For your protection, we recommend that climbers be replaced when the original gaff and two replacement gaffs have been used on the climbers.
Proper training, inspection, and maintenance are essential to prevent serious injury or death. The cautions and instructions in this booklet apply to climber use. Read, understand, and follow them carefully.
⚠ WARNING: Improper sharpening of gaffs and the use of pole or tree climbers for purposes other than specified here can result in serious injury or death.
⚠ WARNING: The employer and user are solely responsible for obtaining and correctly using the proper climbers, gaffs, and other occupational protective equipment. Use only approved equipment.
⚠ WARNING: Save these instructions. Pole and tree climbers must not be used without first reading, understanding, and following these instructions. Failure to read, understand and follow all instructions may result in serious injury or death. Training and instruction review should be repeated at regular intervals by the user and his or her employer.

natural_image
Simple black silhouette of a human figure in mid-air, no text or symbols presentWARNING:
A fall could result in serious injury or death. Do not use unless properly trained. Read and follow all instructions and warnings.
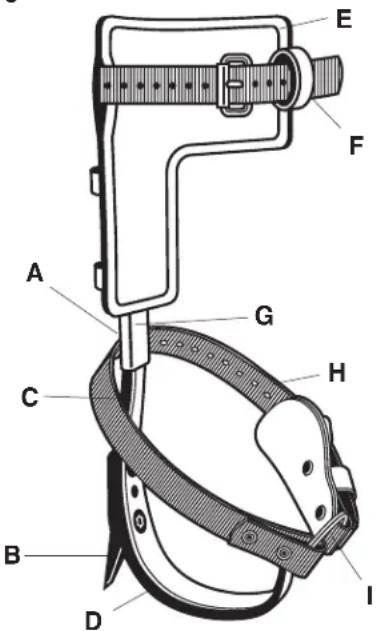
Construction of Klein Pole and Tree Climbers
A. Climbers are adjustable in 1/4" increments for the most comfortable fit. Available in two size ranges: 15"-19" (381-483 mm) and 17"-21" (432-533 mm).
B. Replaceable gaffs for pole climbers are available in a choice of 1-1/2" (38 mm) or 1-9/16" (40 mm) lengths. Replaceable tree-climber gaffs are 2-3/4" (70 mm) long. Gaffs are positioned by a center pin in the gaff and secured by two flat TORX® cap screws.
C. Leg irons are contoured to position gaff properly for security and comfort.
D. Broad stirrup (4-7/16" [113mm] wide) provides greater support for the foot.
E. High-grade latigo-leather climber pads are cushioned for comfort.
F. Climber straps are made of nylon. Buckles have rollers for easy adjustment.
G. Steel sleeve fits over leg iron, and is secured by two slotted hex-head bolts with lock washers and barrel-type nuts (not visible in Figure 3).
H. Ankle straps are made of nylon.
I. Split ring secures the ankle strap. Allows quick replacement, even in the field.
Figure 3
text_image
Technical diagram of a mechanical clamp or measuring device with labeled parts A through ITo order replacement straps, pads, gaffs, or screws, or to order gaff guards, call Klein Tools Customer Service at 1-800-553-4676.
The Klein Gaff Gauge
Pole and tree climber gaffs must be sharpened to critically-accurate dimensions and configuration to function properly and to assure maximum protection from the possibility of "cut-outs" or tip breakage that could cause serious injury or death from a fall. Although pole-climber gaffs are shorter than tree-climber gaffs (see Figures 1 and 2 on page 1), their points are sharpened to identical configurations.
The Klein gaff gauge precisely measures both gaff types, to accurately determine if gaffs need to be sharpened, even in the field. See the “Climber and Gaff Inspection Procedures” section of this booklet for specific instructions.
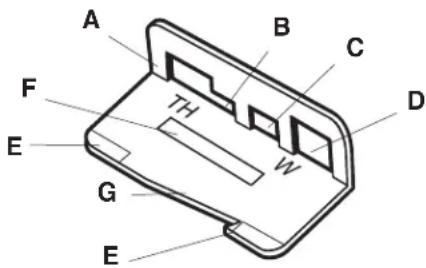
This gauge has openings and calibration marks for precisely measuring gaff width, thickness, and point profile (see Figure 4).
A. Slot to measure thickness 1" (25.4 mm) from tip (pole gaffs only)
B. Slot to measure thickness 1/2" (12.7 mm) from tip
C. Slot to measure width 1/2" (12.7 mm) from tip
D. Slot to measure width 1" (25.4 mm) from tip (pole gaffs only)
Figure 4
text_image
A B C D F E G W EE. Proper length-limit marks when measuring thickness or width 1" (25.4 mm) from tip
F. Proper length-limit marks when measuring thickness or width 1/2" (12.7 mm) from tip
G. Template for determining proper tip profile

WARNING: For your protection, Klein recommends that climbers be replaced when original gaff and two replacement gaffs have been used on the climbers.
How to Use Klein Pole and Tree Climbers
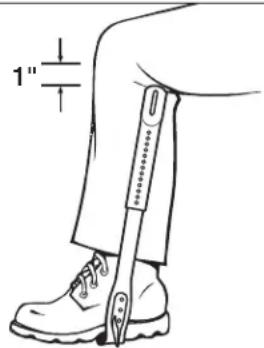
1. Assemble the climber (Figure 5).
A. Remove adjustable sleeves and sleeve fasteners from the box.
B. With climber gaff and strap loop facing outwards, insert climber shank into sleeve.
C. Step into the climber, placing the adjustable sleeve to the inside of the leg.
D. Adjust sleeves to the most comfortable position, about 1" (25 mm) below knee. Insert screws into the two (2) aligned holes of each climber, and tighten the supplied nuts on the screws to secure the adjustment.
Figure 5
text_image
1"2. Assemble the ankle straps (Figure 6).
Note: Ankle straps are already assembled on new Klein climbers. If you are replacing ankle straps, follow the steps listed below. Since no special tools are required, you may install or remove ankle straps in the field.
A. Remove old ankle strap and ring from leg iron.
B. Position the new split ring so the wear pad is pointed toward the front of the climber as illustrated in Figure 6.
C. Slightly open the split ring and thread it onto the solid loop on the climber in the same manner as an ordinary key ring.
Figure 6
natural_image
Simple line drawing of a mechanical clamp or bracket with no text or symbolsLeft Strap
natural_image
Simple line drawing of a mechanical clamp or bracket with no text or symbolsRight Strap
3. Inspect the climbers.
Before each use, visually check that: (1) all buckles are properly closed; (2) climber straps and pads are free of burns, cuts, broken stitches or excessive wear; (3) rivets are not bent, loose, or missing; (4) buckles are not distorted or cracked, tongue does not bind on buckle, and buckle holes are not damaged. (5) If climbers do not pass inspection, remove them from service, destroy and discard them, and replace them immediately.
Also before each use, check that: (1) gaffs are free of dents, gouges or scratches; (2) the underside of the gaff is longer than the minimum length for proper use for that type of gaff (1-7/16" [37 mm] for pole climber gaffs and 2-1/4" [57 mm] for tree climber gaffs); and (3) gaffs have proper width, thickness, and point profile. Only evaluate gaffs with the Klein KG-1 gaff gauge (See Figure 4). (4) If gaffs do not pass inspection, resharpen them, or discard and replace them.
4. Examine the pole or tree.
A. When using pole climbers, remember that poles are not all alike. Different wood species, climate and pole age, as well as different preservative treatments (Creosote, Penta, CCA) affect climbability. Since these factors can result in significant differences in gaff penetration, visually check gaff penetration with your full weight on the climber before starting any climb.
If penetration is shallow, use extreme caution, because the gaff could "cut-out", or the increased stress on the gaff tip could cause the tip to break. To allow for proper penetration, the minimum acceptable length for the underside of a pole climber gaff is 1-7/16" (37 mm).
Avoid gaff contact with metal objects when climbing (such as pole ID tags, nails, poster staples, metal pole hardware, or any other metal on the pole).
B. When using tree climbers, remember that trees are not all alike. Different species and bark thickness affect climbability. Visually check gaff penetration in the same manner described for pole climbers before starting any climb. To allow for proper penetration: (1) Use a tree-climber gaff with a minimum underside length of 2-1/4" (57 mm). (2) When the bark thickness measures more than 2-1/2" (64 mm), make sure the gaff is long enough to properly penetrate the wood under the bark. Avoid gaff contact with metal objects when climbing (such as nails, poster staples, or any other metal on the tree).
5. Wear the climbers properly.
Put on the properly adjusted climbers with gaffs positioned inside the legs. The climbers should be fastened securely and comfortably using the calf and ankle straps. The leg iron stirrups are marked "L" for left foot and "R" for right foot.
6. Protect the gaffs between climbs.
Remove pole or tree climbers between climbs. Gaffs can be damaged if they strike rocks or other hard surfaces, or if they strike against each other while you are walking. Between uses, use gaff guards to protect gaff tips.
How to Use Klein Pole and Tree Climbers (continued)
7. Use additional fall protection.
Always use fall protection if there is a risk of a fall. Although OSHA regulations generally require workers to use fall protection when exposed to a fall of six feet or more, Klein strongly recommends using fall-arrest protection when working at any elevated position. Know the appropriate OSHA regulations. If you have any questions or any doubt as to what regulations apply to you or what safety equipment is required, contact your regional OSHA office.
Note regarding additional Klein fall protection equipment: For full information on Klein protective harnesses or connecting devices, refer to the warning tags or labels attached to those products or to the instruction booklets packed with them.
⚠ WARNING: For your protection, Klein recommends that climbers be replaced when original gaff and two replacement gaffs have been used on the climbers.
⚠ WARNING: Pole and tree climbing equipment is to be used only by individuals who are qualified and properly trained to use this equipment. Improper use of climbing equipment can cause serious injury or death. OSHA mandates that the employer is responsible for user competence and safe work practice.
General Inspection Procedures
1. Check for wear and deterioration.
Before each use, carefully inspect the complete system for signs of wear or deterioration, or evidence of impact loading.
Visually inspect for loose threads, pulled rivets, cuts, abrasions, or other evidence of chemical or physical deterioration that may have weakened the material or assembly.
2. Inspect hardware for malfunctions or cracks.
Check all hardware, including rivets and buckles.
3. Destroy and replace all worn or damaged equipment.
Immediately destroy and replace any component which does not pass inspection.
⚠ WARNING: Inspect leather straps for any deterioration before each use: that is, cracking, wearing thin, tearing, weakening, or chemical attack. Maintain with Neat's-foot oil or equivalent. Remove from service, destroy and discard strap if it does not pass inspection.
Procedures for Inspecting Climbers and Gaffs
Carefully inspect the entire climber and gaff before each use.
1. Check straps and pads.
Make sure straps and pads are free of tears, burns, broken stitches, or excessive wear. Carefully check leather for cracking, wearing thin, tearing, weakening, chemical attack, or other signs of deterioration (see Figure 7).
natural_image
Illustration of two hands holding a curved object over a striped band, labeled 'Figure 7' (no text or symbols on the diagram itself)2. Check rivets, buckles and other metal parts.
Check that rivets are not bent, loose, or missing. Check that buckles are not distorted or cracked, tongue does not bind on buckle, and buckle holes are not damaged. Also check split ring, leg iron, and steel sleeve for signs of excessive wear or damage (see Figure 8).
natural_image
Illustration of hands using a measuring tool to measure a mechanical component (no text or symbols visible)3. Check gaffs.
Check that gaffs are free of dents, gouges, or scratches.
Procedures for Inspecting Climbers and Gaffs (continued)
4. Check gaff thickness with Klein Gaff Gauge.
For pole gaffs only, insert the gaff as far as possible through the large opening in the gauge marked "TH" (Figure 9). Make sure the top ridge is flush against the gauge base. The point of the gaff should fall within the limits formed by the last line and the edge of the gauge as shown. If it does, the gaff is the proper thickness, as measured approximately 1" (25.4 mm) from the point.
For pole and tree gaffs, insert the gaff as far as possible through the small opening in the gauge marked "TH" (Figure 10). Make sure the top ridge is flush against the gauge base. The point should fall within the center two lines, as shown. If it does, the gaff is the proper thickness, as measured approximately 1/2" (12.7 mm) from the point.
Figure 9
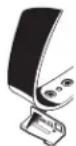
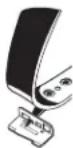
Figure 10
5. Check gaff width with Klein Gaff Gauge.
For pole gaffs only, insert gaff as far as possible through the large square opening in the gauge marked "W" (Figure 11). Make sure the top ridge is flush against the gauge base. The point should fall within the limits formed by the last line and the edge of the gauge as shown. If it does, the gaff is the proper width, as measured approximately 1" (25.4 mm) from the point.
For pole and tree gaffs, insert gaff as far as possible through small opening in the gauge marked "W" (Figure 12). Make sure the top ridge is flush against the gauge base. The point should fall within the center two lines as shown. If it does, the gaff is the proper width, as measured approximately 1/2" (12.7 mm) from the point.
Figure 11
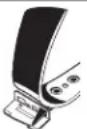
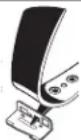
6. Check gaff profile/contour with Klein Gaff Gauge.
For pole and tree gaffs, place the side of the gaff along the front edge of the gauge with the gaff point resting in the notch. The point should follow the configuration of the gauge to assure the proper "rounding off" of the tip within 1/4" (6.4 mm) of the point (see Figure 13).
Minimum safe length for a pole-climbing gaff is 1-7/16" (37.5 mm), measured on the underside of gaff. Minimum safe length for a tree-climbing gaff is the greater of the
following: (a) 2-1/4" (57 mm), measured on the underside of the gaff, or (b) long enough to penetrate the core of the tree. Before climbing, always test the penetration of tree gaffs at the base of the tree to be sure gaffs extend through the bark and properly penetrate the wood.
natural_image
Diagram of a cable connector with labeled Figure 13 (no text or symbols on the diagram itself)7. Check gaff sharpness with the "plane test".
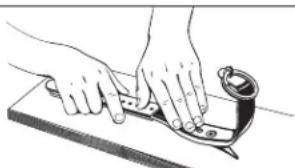
Step 1: Place climber with gaff pointing downward and upper strap loop resting against a horizontal board or pole. Hold the leg iron parallel to the wood surface, with the stirrup vertical. Push the climber horizontally in the direction of the gaff without any downward pressure except the weight of the climber (see Figure 14).
Figure 14
natural_image
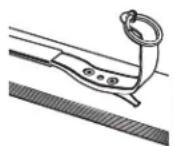
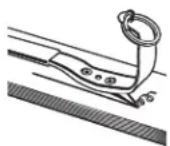
Illustration of hands using a tool on a wooden board with a curved object nearby (no text or symbols)Step 2: The gaff is properly sharpened if it buries itself in the wood within a few inches of its starting position and can no longer be moved forward (see Figure 15). The gaff is not properly sharpened if it merely slips, slides, or plows a shallow groove in the wood (see Figure 16). In this case, either replace the gaff following the "Gaff Assembly and Ordering Instructions" or resharpen the gaff following the "Gaff Sharpening Instructions", both contained in this booklet. A resharpened gaff must be tested for proper width, thickness, and point profile, and it must also pass the "plane test" before use.
Figure 15 - Right Figure
16 - Wrong
The “plane test” reveals possible penetration problems not noticeable to the naked eye. Figure 17 shows how a properly sharpened gaff cuts its way into the pole for proper support. Figure 18 shows how an improperly sharpened gaff can “cut-out”.
Figure 17 - Right
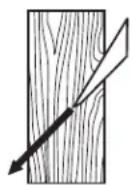
Figure 18 - Wrong
Procedures for Inspecting Climbers and Gaffs (continued)
8. Destroy and replace all worn or damaged OPE equipment.
If evidence of excessive wear, deterioration, or mechanical malfunction is observed, replace the equipment immediately. Never work with worn or damaged OPE equipment. Using damaged or worn equipment can cause serious injury or death.
9. The inspector is the most important part of the inspection.
Check all equipment thoroughly and follow all safety procedures and guidelines. Do not take any shortcuts.
⚠ WARNING: OSHA specifies that all employers covered by the Occupational Safety and Health Act are responsible for inspecting and maintaining all tools and equipment used by employees — whether owned by the employees or by the company. Personal-protective equipment should be inspected before each use and removed from service if signs of wear or damage are found.
⚠ WARNING: Should any unusual conditions be noted during inspection that are not specified here, do not use the suspect equipment until an individual considered by OSHA to be qualified makes a decision on its usability.
Maintenance Procedures
Clean and maintain equipment as recommended.
1. Nylon straps.
Wash nylon only in warm water and mild detergent. Avoid harsh chemical agents such as degreasing compounds, turpentine, paint thinner, gasoline, and other solvents. Allow nylon objects to dry naturally. Do not use heat to speed up the process.
2. Leather components.
Maintain all leather with Neat's-foot oil or equivalent to prolong life. Clean with saddle soap or other mild soap. Allow leather to dry naturally. Do not use heat to speed up the process.
3. Leg iron, steel sleeve, stirrup, gaff, and other metal parts.
A. Make sure all metal parts are clean and free of foreign material.
B. Wipe metal parts dry with a clean cloth.
C. Maintain or replace gaffs as explained in this booklet to preserve proper width, thickness, point profile, and sharpness.
4. Reinspect all equipment after maintenance.
It is mandatory to reinspect the equipment after all maintenance procedures to determine if the maintenance was done properly and effectively.
Gaff Sharpening Instructions
1. Always use a fine-tooth file.
Never grind on a wheel, as you will create heat, which will alter the temper of the gaff and make it dangerous to use. A proper file is contained in the Klein KG-2 kit.
2. File gaff from heel to point.
Place the climber in a smooth-jaw vise with the gaff as shown in Figure 19, so that you can file from the heel to the point of the gaff as shown by the arrow in Figure 20. Remove only enough material to make a good point. Never cross file. Cross-filing weakens the point, and under load it may cause tip breakage.
natural_image
Illustration of a hand holding a tool with a curved handle, labeled 'Figure 19' (no text or symbols on the diagram itself)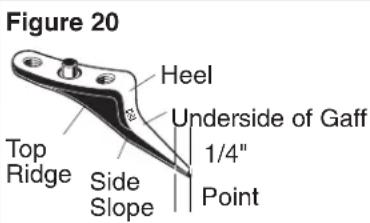
text_image
Figure 20 Heel Underside of Gaff 1/4" Top Ridge Side Slope Point3. Remove any file marks by honing.
Work the honing stone in the same direction as the file (as shown by the arrow in Figure 19.) A compatible honing stone is included in the KG-2 kit.
(continued on next page)
Gaff Sharpening Instructions (continued)
4. Do not make a needle point.
In order to not make a needle point (see Figure 21), file both side slopes to obtain straight edges. The top ridge of the gaff (see Figure 20) must be perfectly straight from the tip back at least 1" (25.4 mm) and should not be altered. Deep nicks, dents, or scratches along the top ridge require gaff replacement. The final point must always be in the top ridge of the gaff.
Wrong
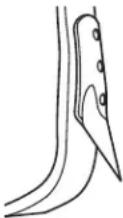
Figure 21
Right
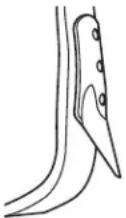
Figure 22
Sharp Cutting Edges
text_image
1/16" - 3/32" Cross Section View of Point5. Maintain proper shape on underside of gaff.
The underside of the gaff should be perfectly straight (flat) to within 1/4" (6.35 mm) of the point, then rounded slightly toward the top ridge of the gaff on a radius of 1/4" (6.35 mm) (see Figure 19). At a distance of 1/16" (1.59 mm)
back from the point, the width should be a minimum of 3/32" (2.38 mm) measured on the underside of the gaff (see Figure 22). The remainder of the underside should be kept perfectly straight (see Figure 20).
6. Replace gaffs when necessary.
Pole climbers should not be used after the underside of the gaffs are worn or filed to 1-7/16" (37 mm) long. Tree climbers should not be used after the underside of gaffs are worn or filed to 2-1/4" (57 mm) long. When bark thickness measures more than 2-1/2" (64 mm), make sure the gaff has adequate length to properly penetrate the wood under the bark.
When climber gaffs measure less than the above limits, they should be replaced with a new pair. For your protection, Klein recommends that climbers be replaced when original gaff and two replacement gaffs have been used on the climbers.
7. Check final result after sharpening.
Use the KG-1 gauge when inspecting the gaff. Replace the gaff if it fails the gauge tests.
Gaff Assembly and Ordering Instructions
Gaff Assembly
- Attach gaff with locator pin (B) to middle hole of leg iron.
- Thread longer screw (C) into bottom hole (nearest gaff point). Do not seat screw.
- Thread shorter screw (A) through flat portion of gaff.
- Alternate tightening of both screws until seated. Do not exceed 24 ft.-lb. torque on screw.
Gaff Ordering. Gaffs are supplied in pairs with TORX ^® screws and wrench. No. 72 gaffs, No. 86 gaffs, and No. 07 gaffs are interchangeable and fit all Klein replaceable-gaff climbers.
Cat. No. Description
72 Pair of 1-1/2" (38 mm) gaffs. For pole climbers only.
86 Pair of 1-9/16" (40 mm) gaffs. For pole climbers only.
07 Pair of 2-3/4" (70 mm) gaffs. For tree climbers only.

text_image
72 86 07Cautions: Pole & Tree Climbers
- Climbing equipment is for use by properly trained professionals only.
- Use climbing equipment only for the specific purpose for which it was designed and intended.
- Klein Tools recommends a combined body, clothing and tool weight of 300 pounds or less for use with our pole and/or tree climbers.
- Always visually check that all buckles are properly closed before use.
- Before each use check that: (1) gaffs are free of dents, gouges, or scratches, (2) gaffs have proper width, thickness, point profile, and sharpness. Only evaluate gaffs with Klein KG-1 gaff gauge. (3) If gaffs fail inspection, resharpen them, or discard and replace them.
- Before each use check that: (1) climber straps and pads are free of burns, cuts, broken stitches, or excessive wear, (2) rivets are not bent, loose, or missing, (3) buckles are not distorted or cracked, tongue does not bind on buckle and buckle holes are not damaged. (4) Remove from service, destroy and discard item if it fails inspection, and replace it immediately.
- Never punch holes in or alter a strap or climber.
- For leather components: Leather is subject to deterioration by cracking, wearing thin, tearing, weakening, and chemical attack. Carefully maintain with Neat's-foot oil or equivalent. Inspect straps before each use. Remove from service, destroy and discard strap if it shows any signs of deterioration and replace immediately.
- While climbing, avoid gaff contact with metal, such as pole hardware, tags, nails, poster staples, etc.
- Poles are not all alike. Different wood species, climate, pole age, and preservative treatments (Creosote, Penta, CCA) affect climbability, resulting in significant differences in gaff penetration. Visually check gaff penetration with your full weight on the climber before any climb. If penetration is shallow, use extreme caution. The gaff could "cut-out", or the increased stress could lead to tip breakage. For proper penetration, the minimum underside length of a pole climber gaff is 1-7/16" (37 mm).
- Trees are not all alike. Different species and bark thickness affect climbability. Visually check gaff penetration as described for pole climbers before any climb. For proper penetration: (1) Use a tree climber gaff with a minimum underside length of 2-1/4" (57 mm). (2) When bark thickness measures more than 2-1/2" (64 mm), make sure gaff has enough length to properly penetrate the wood under the bark.
- After climbs, remove climbers to avoid gaff damage from hard surfaces or from gaffs striking together when walking.
- Use gaff guards to protect gaffs between uses.
-
Limiting gaff replacement on climbers to two times is highly recommended.
-
Employer — instruct employee as to proper use and warnings before use of equipment.
- Read, understand and follow all information provided with climber before use.

WARNING: OSHA states that any OPE equipment actually subjected to in-service loading, as distinguished from static load testing, shall be immediately removed from service and shall not be used again to safeguard employees. If any equipment has arrested a fall, immediately destroy and discard it so it can never be used again.

WARNING: The use of occupational protective equipment without proper instructional materials and training could result in serious injury or death. Klein Tools will supply additional instructional materials, warnings tags, or will answer questions on any piece of Klein occupational protective equipment free of charge. Call Klein Tools, Inc. at 1-800-553-4676.
WARRANTY
For Professionals... Since 1857® USA
natural_image
Black-and-white photo of a pair of boots with black straps, one lying on a mesh net beside a textured wall (no text or symbols visible)KLEIN TOOLS®

For Professionals... Since 1857® USA
natural_image
Line drawing of a worker in safety gear climbing a rope, holding a device (no text or symbols present)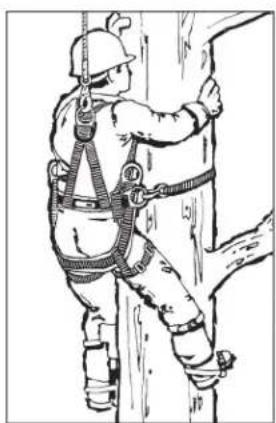
natural_image
Illustration of a worker in full gear climbing a rope (no text or symbols)natural_image
Simple black silhouette of a human figure in mid-air, no text or symbols present
ADVERTENCIA:
text_image
Technical diagram of a mechanical clamp or measuring device with labeled parts A through Itext_image
A B C D F E G W Enatural_image
Illustration of two hands holding a curved object over a striped band, labeled 'Figura 7' (no text or symbols on the diagram itself)natural_image
Illustration of hands using a cutting tool on a wooden board (no text or symbols)For Professionals... Since 1857® USA
natural_image
Black-and-white photo of a pair of boots with black straps, one climbing against a textured wall (no text or symbols visible)KLEIN TOOLS®

For Professionals... Since 1857® USA
natural_image
Line drawing of a worker in safety gear climbing a vertical pole (no text or symbols)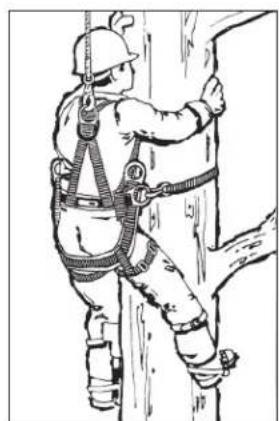
natural_image
Line drawing of a worker in full gear climbing a rope (no text or symbols)natural_image
Simple black silhouette of a human figure in mid-air, no text or symbols present⚠ AVERTISSEMENT:
text_image
Technical diagram of a mechanical device with labeled parts A through I, showing assembly or assembly details.text_image
A B C D F E G W Enatural_image
Illustration of two hands holding a curved object over a striped band, labeled 'Figure 7' (no text or symbols on the diagram itself)natural_image
Diagram of a cable connector labeled Figure 13, showing a connector inserted into a cable (no text or symbols on the diagram itself)natural_image
Illustration of hands using a tool on a cutting board (no text or symbols)Figure 15 - Correct Figure
16 - Incorrect
natural_image
Illustration of a hand using a tool to lift a curved object, labeled 'Figure 19' (no text or symbols on the diagram itself)