MagicComfort MSH100 - Auxiliary heating WAECO - Free user manual and instructions
Find the device manual for free MagicComfort MSH100 WAECO in PDF.

User questions about MagicComfort MSH100 WAECO
0 question about this device. Answer the ones you know or ask your own.
Ask a new question about this device
Download the instructions for your Auxiliary heating in PDF format for free! Find your manual MagicComfort MSH100 - WAECO and take your electronic device back in hand. On this page are published all the documents necessary for the use of your device. MagicComfort MSH100 by WAECO.
USER MANUAL MagicComfort MSH100 WAECO
natural_image
Diagram of a person sitting in a car seat with motion arrows indicating movement (no text or symbols)MagicComfort MSH100
Installation and Operating Instructions
text_image
Technical diagram showing three labeled mechanical components: a multi-junction tool, a multi-junction ruler, and a hanger.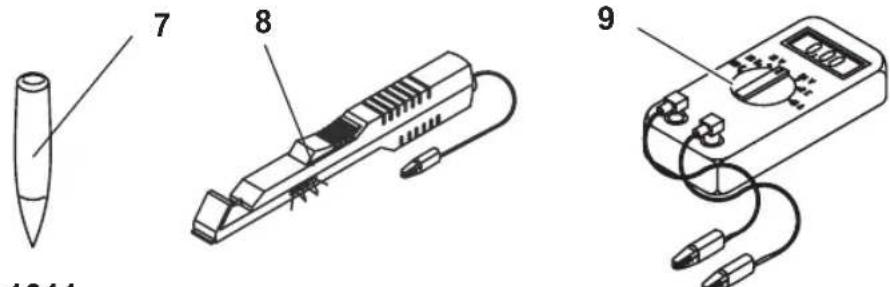
text_image
7 8 9 1014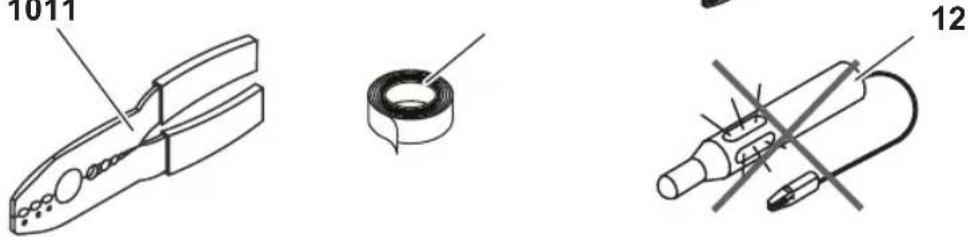
text_image
1011 12
natural_image
Technical line drawings of three different electrical components: a 1314-inch bulb, a soldering iron plug, and a coiled wire (no text or symbols present)MagicComfort MSH100
natural_image
Technical diagram showing a mechanical assembly with intersecting lines and arrows indicating motion (no text or symbols)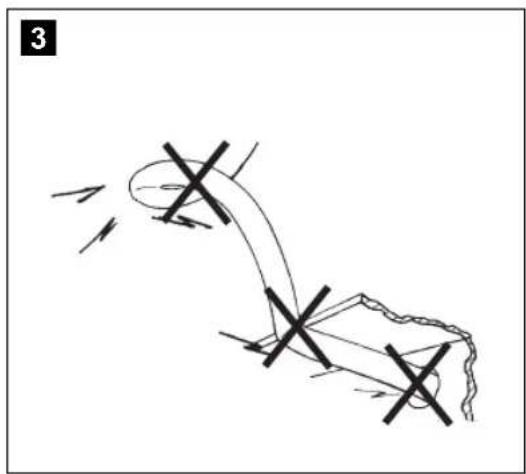
natural_image
Diagram of a mechanical or electrical component with directional arrows and cross marks (no text or symbols)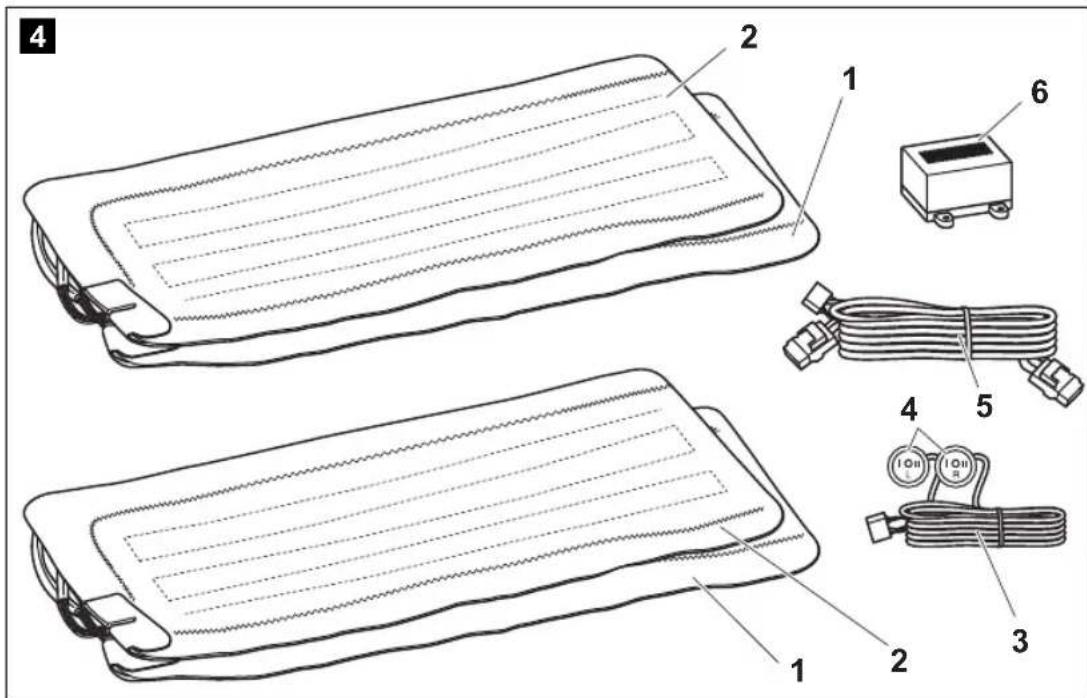
text_image
4 1 2 6 4 5 3 2 1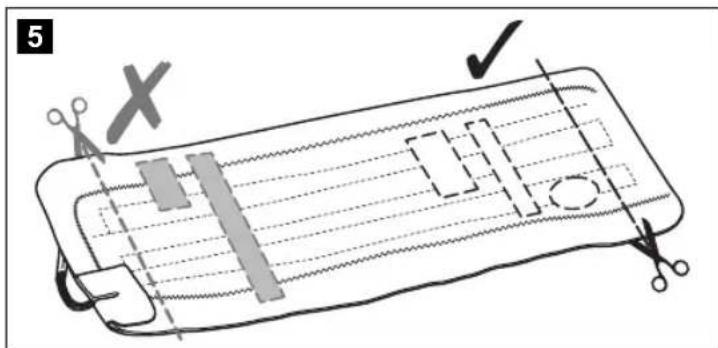
text_image
5 X ✓
text_image
6 30 - 35 cmMagicComfort MSH100
natural_image
Line drawing of a car backrest panel with no text or symbols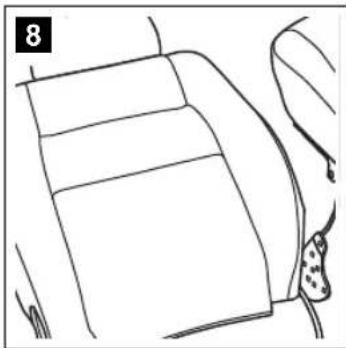
natural_image
Line drawing of a car interior showing seat, arm, and seatbelt (no text or symbols)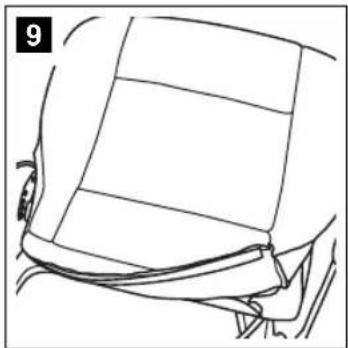
natural_image
Line drawing of a car's front and side panels showing structural lines (no text or symbols)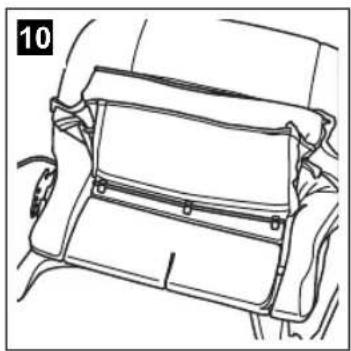
natural_image
Line drawing of a car interior compartment showing handle and seat (no text or symbols)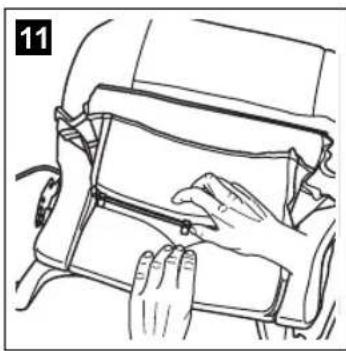
natural_image
Line drawing of hands operating a vehicle door panel (no text or symbols)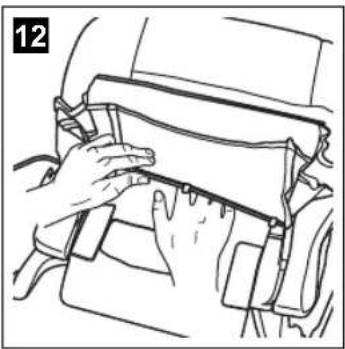
natural_image
Line drawing of hands installing or adjusting a component on a vehicle (no text or symbols visible)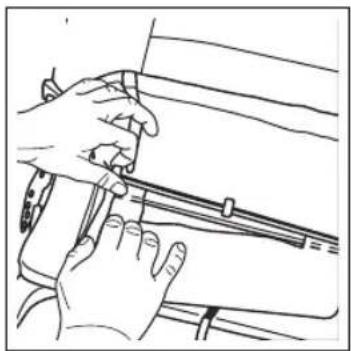
natural_image
Line drawing of hands performing a medical procedure on a patient's arm (no text or symbols present)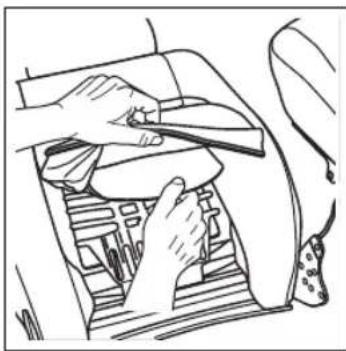
natural_image
Line drawing of hands operating a vehicle gear shift lever (no text or symbols)
text_image
15 14 13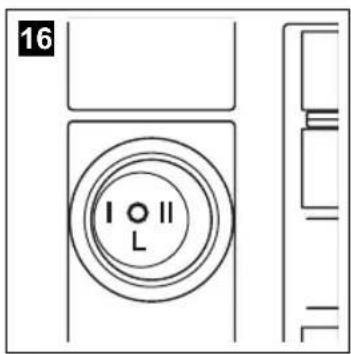
text_image
16 I O II L
natural_image
Line drawing of a car interior showing a cable, seatbelt, and camera (no text or symbols)


MagicComfort MSH100
18
text_image
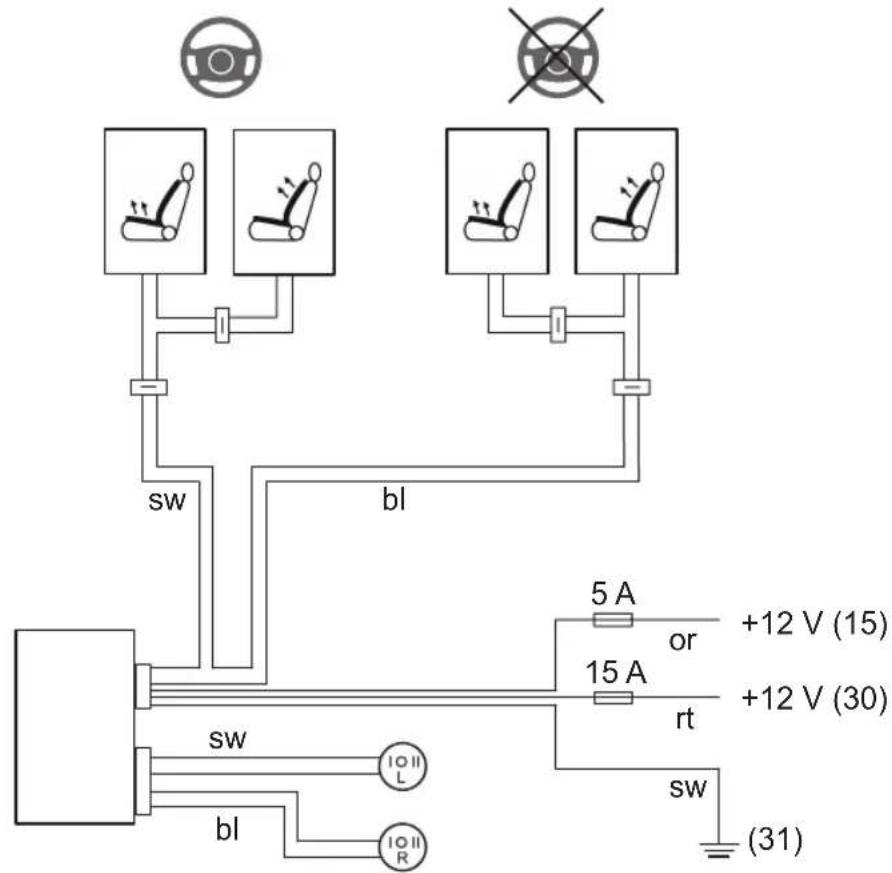
SW bl 5 A or +12 V (15) 15 A rt +12 V (30) SW (31) SW bl 10 II L 10 II R| DE EN FR ES | IT NL DA SV NO FI | |||||||||
| BL Blau Blue B | Ileu Azul | Blu Blauw | Blå Blå Blå | ä Sininen | ||||||
| OR | Orange | Orange | Orange | Naranja | Arancione | Oranje | Orange | Orange | Oransje | Oranssi |
| RT | Rot | Red | Rouge | Rojo | Rosso | Rood | Rød | Rød | Rød | Punainen |
| SW | Schwarz | Black | Noir | Negro | Nero | Zwart | Sort | Svart | Svart | Musta |


MagicComfort MSH100
19
natural_image
Line drawing of a car interior showing dashboard, steering wheel, and dashboard controls (no text or symbols)20
text_image
ca. 20 mm
natural_image
Pure geometric diagram with crosshair and circular shapes without any text or symbols
natural_image
Pure geometric diagram with concentric circles and radial lines, no text or symbols presentPlease read this operating manual carefully before starting the device. Keep it in a safe place for future reference. If the device is handed over to another person, this operating manual must be handed over along with the device.
Contents
1 Notes on using the manual 16
2 Safety and installation instructions. 17
3 Scope of delivery 19
4 Intended use 20
5 Technical description 20
6 Installing the seat heater 20
7 Using the seat heater....24
8 Guarantee 24
9 Disposal 24
10 Technical data 24
1 Notes on using the manual

WARNING!
Safety instruction: Failure to observe this instruction can cause fatal or serious injury.

NOTICE!
Failure to observe this instruction can cause material damage and impair the function of the product.

NOTE
Supplementary information for operating the product.
▶ Action: This symbol indicates that action is required on your part. The required action is described step-by-step.
√This symbol describes the result of an action.
fig. 1 5, page 3: This refers to an element in an illustration. In this case, item 5 in figure 1 on page 3.


MagicComfort MSH100 Safety and installation instructions
Please observe the following safety instructions.
2 Safety and installation instructions
Please observe the prescribed safety instructions and stipulations from the vehicle manufacturer and service workshops.
The manufacturer will not be held liable for claims for damage resulting from the following:
● Faulty assembly or connection
● Damage to the product resulting from mechanical influences and excess voltage
● Alterations to the product without express permission from the manufacturer
● Use for purposes other than those described in the operating manual

NOTICE!
To prevent the risk of short circuits, always disconnect the negative terminal of the vehicle's electrical system before working on it. If the vehicle has an additional battery, its negative terminal should also be disconnected.

WARNING!
Inadequate supply cable connections could result in short circuits, which could have as a consequence that:
- Cable fires occur
- The airbag is triggered
- Electronic control devices are damaged
- Electric functions fail (indicators, brake light, horn, ignition, lights)
Please observe the following instructions:
- When working on the following cables, only use insulated cable lugs, plugs and flat push-on receptacles:
- 30 (direct supply from positive battery terminal)
- 15 (connected positive terminal, behind the battery)
- 31 (return cable from the battery, earth)
Do not use terminal strips.
- The safest type of connection is to solder the ends of the cables together and then insulate them.
Safety and installation instructions MagicComfort MSH100
Only use insulated cable terminals, plugs and flat sockets for releasable connections. Do not use crimp terminals (cable connectors) or terminal strips.
- Use a crimping tool (fig. 1 10, page 2) to connect the cables.
- When connecting to cable 31 (earth), screw the cable - To the vehicle's earth bolt with a cable lug and a gear disc or - To the sheet-metal bodywork with a cable lug and a self-tapping screw.
Ensure that there is a good earth connection.
If you disconnect the negative terminal of the battery, all data stored in the volatile memories will be lost.
- The following data must be set again, depending on the vehicle equipment options:
- Radio code
- Vehicle clock
- Timer
- On-board computer
- Seat position
You can find instructions for making these settings in the appropriate operating instructions.
Observe the following installation instructions:
- Secure the parts installed in the vehicle in such a way that they cannot become loose under any circumstances (sudden braking, accidents) and cause injuries to the occupants of the vehicle.
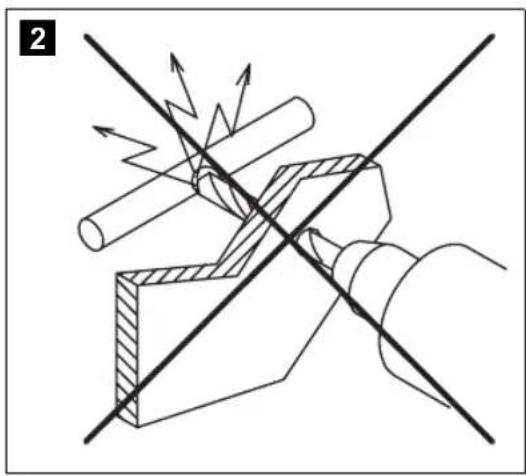
- To prevent damage, when drilling ensure that there is sufficient space on the other side for the drill head to come out (fig. 2, page 3).
● Deburr all drill holes and treat them with a rust-protection agent.
Observe the following instructions when working with electrical parts:
- When testing the voltage in electrical cables, only use a diode test lamp (fig. 1 8, page 2) or a voltmeter (fig. 1 9, page 2).
Test lamps with an illuminant (fig. 1 12, page 2) take up voltages which are too high and which can damage the vehicle's electronic system.
- When making electrical connections (fig. 3, page 3), ensure that
– They are not kinked or twisted
– They do not rub on edges
– They are not laid in sharp-edged ducts without protection.


natural_image
Pure geometric diagram with crosshair and circular shapes without any text or symbolsMagicComfort MSH100 Scope of delivery
● Insulate all connections.
- Secure the cables against mechanical wear with cable binders or insulating tape, for example to existing cables.
Observe the following instructions when using the seat heater:
- Do not place any sharp or heavy objects on the seat, as the seat heater could otherwise be damaged.
- Persons with an impaired sensitivity to heat should only operate the seat heater at level I.
- Do not place any heat insulating objects, such as blankets or coats, on the seat when the seat heater is switched on.
● The seat heater can be damaged by fluids spilt on the seat.
● Never switch the seat heater on when it is wet.
3 Scope of delivery
No. in fig. 4, page 3 Quantity Designation Item no.
1 2 Seat surface heating element 9101700011
2 2 Backrest heating element 9101700012
3 2 Switch connection cable
4 2 Switch
Left 9101700001
Right 9101700002
5 1 Heating element connection cable – switchbox
6 1 Switchbox 9101700013
- 1 Drill template
- 12 Double-sided adhesive tape
- 12 Insulating material
- 1 Operating manual


Intended use MagicComfort MSH100
4 Intended use
The MagicComfort MSH100 (item no. 9101700010) seat heater is suitable for fitting in the front vehicle seats.

NOTICE!
For vehicles equipped with side airbags in the seat backrests, seat occupancy detection or child seat detection, observe the vehicle manufacturer's specifications.
5 Technical description
The heating elements for the MagicComfort MSH100 seat heater can be installed in the driver's seat and the passenger seat.
The shape of the seat is not altered by the heating elements.
The seat heater is operated using a switch.
6 Installing the seat heater
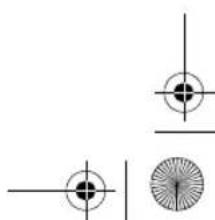
6.1 Tools required (fig. 1, page 2)
For installation and assembly you will need the following tools:
z Drill bit set (1)
z Drill (2)
z Screwdriver (3)
z Set of ring or open-ended spanners (4)
z Measuring ruler (5)
z Hammer (6)
z Centre punch (7)
To make and test the electrical connection, the following tools are required:
z Diode test lamp (8) or voltmeter (9)
z Crimping tool (10)
z Insulating tape (11)
z Hot air blower (13)
z Soldering iron (14)
z Solder (15)
z Cable bushing sleeves (if necessary)


natural_image
Pure geometric diagram with crosshair and circular shapes without any text or symbolsMagicComfort MSH100 Installing the seat heater
To fasten the cables you may require additional cable binders.
6.2 Installing the seat heater
Removing the seat
▶Secure the vehicle against rolling away.

NOTICE!
For vehicles with side air bags in the seat backrest, observe the manufacturer's instructions on removing the seats and the upholstery.
▶ Check the suitability for installation using these installation instructions and the manufacturer's information.
▶Remove the fastening screws from the vehicle seat.
▶Lift the seat out of the vehicle.
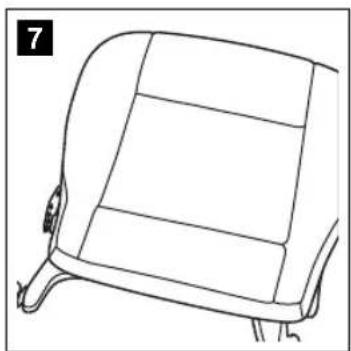
Preparing the seat
Remove all plastic panelling from the seat to ensure the fastening of the cover fabric can be reached.
Separate the backrest from the seat (fig. 7, page 4 and fig. 8, page 4).
▶Open the seat cover on the seat surface.
The cover fabric is usually tucked into a seam on the frame with a wide cardboard strip or metal wire.
Remove the fasteners using a screwdriver and pliers (fig. 9, page 4 and fig. 10, page 4).
Remove any upholstery staples or cross braces (fig. 11, page 4).
▶Open the cover of the backrest in the same way.


Installing the seat heater MagicComfort MSH100
Preparing the heating elements

NOTICE!
Insulate all the trimmed ends with the insulating material supplied to prevent a short circuit.

NOTE
- You can cut the heating elements to the required length and shorten the lengths of the two conductor paths.
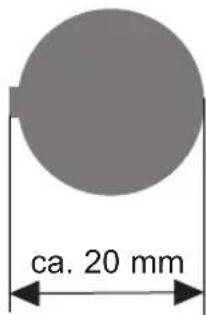
- You can cut out a section of the heating element in the area of the anchoring grooves on the seat or the backrest. Make sure the cut-out sections are only made between the two conductor paths (fig. 5, page 3).
- The heating surface on the backrest only needs to extend approx. 30 – 35 cm above the seat, as the driver only leans against this area when sitting normally (fig. 6, page 3).
▶Place the heating elements on the seat and backrest.
▶If there are anchoring grooves in the seat or the backrest, mark these areas on the heating elements.
Mark the required lengths. Take into account the depth of the anchoring grooves, if present. The heating element is inserted in these anchoring grooves.
▶Trim the heating element to the required length.
▶Customise the cut-out sections as required.
▶ Insulate all the trimmed ends with the insulating material.
Installing the heating element for the seat surface
▶Insert the heating element for the seat surface between the cover fabric and the foam core of the seat (fig. 12, page 4).
If anchoring grooves are present, make sure that the cut-out sections are positioned over the anchoring grooves (fig. 13, page 4) and place the heating elements in the anchoring grooves.
▶Fasten the heating element using double-sided adhesive tape to prevent it sliding on the foam core.
Ensure that no creases or kinks form.


natural_image
Pure geometric diagram with crosshair and circular shapes without any text or symbols
MagicComfort MSH100 Installing the seat heater
Installing the heating element for the backrest

NOTICE!
If the seats are equipped with side airbags, then there is a predetermined breaking point in the cover fabric. The seat cover must therefore not be pulled tightly or slip out of place.
▶ Open the lower area of the backrest cover (fig. 14, page 4).
▶Push the heating element into the gap between the seat cover and the seat cushion (fig. 15, page 4).
▶Fasten the heating element using double-sided adhesive tape to prevent creases.
Installing the seat
▶Reassemble the backrest and seat.
▶Lift the seat into the vehicle.
▶Secure the vehicle seat with the fastening screws.
Electrical connection
The complete circuit diagram can be found in fig. 18, page 5.

NOTICE!
Ensure it has been securely fitted, particularly in the area of the seat rails.
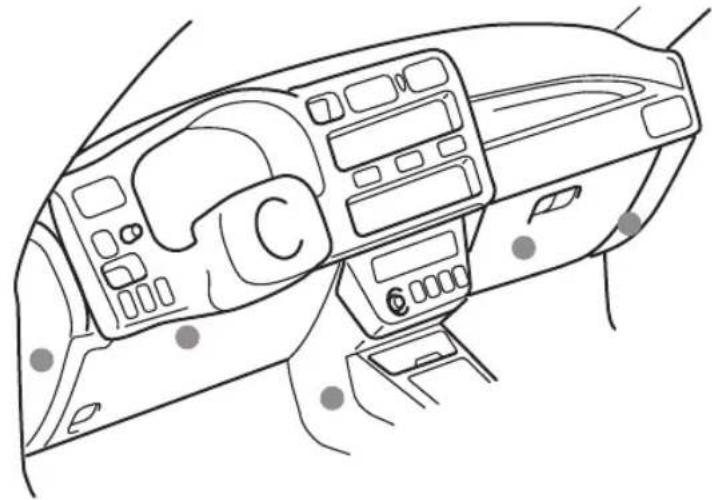
▶ Attach the switchbox to a suitable location in the vicinity of the dashboard (fig. 19, page 6).
▶ Find a suitable place for installing the seat heater switch.
If possible, use the blanking plugs provided for this purpose.
Ensure that there is enough room behind the panel for the installation of the switch.
▶ Mark the switch cut-out using the template provided (fig. 20, page 6).
▶Cut out the marked area with an appropriate tool.
▶ Install the switch into the cut-out (fig. 16, page 4).
▶ Install the ready-made wiring harness so that the cables cannot bend or fray (fig. 17, page 4).


Using the seat heater MagicComfort MSH100
7 Using the seat heater
▶ Switch the seat heater on using the corresponding switch (level I or level II).
▶ To switch the seat heater off: Turn the corresponding switch to position 0.
8 Guarantee
The statutory warranty period applies. If the product is defective, please contact the manufacturer's branch in your country (see the back of the instruction manual for the addresses) or your retailer.
For repair and guarantee processing, please include the following documents when you send in the device:
● A copy of the receipt with purchasing date
● A reason for the claim or description of the fault
9 Disposal
▶Place the packaging material in the appropriate recycling waste bins wherever possible.
If you wish to finally dispose of the product, ask your local recycling centre or specialist dealer for details about how to do this in accordance with the applicable disposal regulations.
10 Technical data
| MagicComfort MSH100 | |
| Item no. 9101700010 | |
| Operating voltage: 12 V--- | |
| Power: Level I: 40 W per seat | Level II: 80 W per seat |
| Max. power consumption: 12 A | |
| Dimensions: Seat element: 600 x 280 mmBackrest element: 600 x 280 mm | |
Versions, technical improvements and delivery options reserved.


natural_image
Pure geometric diagram with concentric circles and radial lines, no text or symbols presentMagicComfort MSH100 Remarques concernant l'application des instructions
natural_image
Pure geometric diagram with crosshair and circular shapes without any text or symbolsMagicComfort MSH100
natural_image
Pure geometric diagram with crosshair and circular shapes (no text or symbols)5 Description technique
natural_image
Pure geometric diagram with crosshair and circular shapes (no text or symbols)natural_image
Pure geometric diagram with crosshair and circular shapes without any text or symbolsnatural_image
Pure geometric diagram with crosshair and circular shapes (no text or symbols)natural_image
Pure geometric diagram with crosshair and circular shapes (no text or symbols)natural_image
Pure geometric diagram with crosshair and circular shapes without any text or symbolsMagicComfort MSH100 Volumen de entrega
natural_image
Pure geometric diagram with concentric circles and radial lines, no text or symbols presentnatural_image
Pure geometric diagram with crosshair and circular shapes without any text or symbolsnatural_image
Pure geometric diagram with crosshair and circular shapes without any text or symbolsnatural_image
Pure geometric diagram with concentric circles and radial lines, no text or symbols presentnatural_image
Pure geometric diagram with crosshair and circular shapes without any text or symbolsnatural_image
Pure geometric diagram with concentric circles and radial lines, no text or symbols presentnatural_image
Pure geometric diagram with crosshair and circular shapes without any text or symbolsMagicComfort MSH100 Stoelverwarming monteren

INSTRUCTIE
natural_image
Pure geometric diagram with crosshair and circular shapes (no text or symbols)natural_image
Pure geometric diagram with concentric circles and radial lines, no text or symbols presentMagicComfort MSH100 Leveringsomfang
natural_image
Pure geometric diagram with crosshair and circular shapes without any text or symbolsnatural_image
Pure geometric diagram with crosshair and circular shapes without any text or symbolsnatural_image
Pure geometric diagram with crosshair and circular shapes without any text or symbolsnatural_image
Pure geometric diagram with crosshair and circular shapes without any text or symbolsMagicComfort MSH100 Garanti
8 Garanti
natural_image
Pure geometric diagram with crosshair and circular shapes (no text or symbols)MagicComfort MSH100 Leveringsomfang
natural_image
Pure geometric diagram with concentric circles and radial lines, no text or symbols presentMagicComfort MSH100 Montere setevarme
6.2 Montere setevarme
Demonter sete
natural_image
Pure geometric diagram with crosshair and circular shapes without any text or symbolsnatural_image
Pure geometric diagram with crosshair and circular shapes without any text or symbolsnatural_image
Pure geometric diagram with crosshair and circular shapes without any text or symbolsnatural_image
Pure geometric diagram with concentric circles and radial lines, no text or symbols present①Dometic Italy S.p.A.
Via Virgilio, 3
I-47100 Forlì
+39 0543 754901
+39 0543 756631
Mail: info@dometic.it
Overseas + Middle East
AUS Dometic Australia
1 John Duncan Court
Varsity Lakes QLD 4227
+61 7 55076000
+61 7 55076001
Mail: sales@dometic-waeco.com.au
CH Dometic Switzerland AG
Riedackerstrasse 7a
CH-8153 Rümlang (Zürich)
+41 44 8187171
吕 +41 44 8187191
Mail: info@dometic-waeco.ch
N Dometic Norway AS
Skolmar 24
N-3232 Sandefjord
+47 33428450
+47 33428459
Mail: firmapost@waeco.no
(HK) WAECO Impex Ltd.
Suites 2207-2211 · 22/F · Tower 1
The Gateway · 25 Canton Road,
Tsim Sha Tsui · Kowloon
Hong Kong
+852 24611386
+852 24665553
Mail: info@dometic-waeco.com.hk
DK Dometic Denmark A/S
Nordensvej 15, Taulov
DK-7000 Fredericia
+45 75585966
吕 +45 75586307
Mail: info@waeco.dk
NL Dometic Benelux B.V.
Ecustraat 3
NL-4879 NP Etten-Leur
+31 76 5029000
吕 +31 76 5029090
Mail: info@dometic.nl
ROC WAECO Impex Ltd.
Taipei Office
2 FL-3 · No. 56 Tunhua South Rd, Sec 2
Taipei 106, Taiwan
+886 2 27014090
+886 2 27060119
Mail: marketing@dometic-waeco.com.tw
E Dometic Spain S.L.
Avda. Sierra del Guadarrama, 16
E-28691 Villanueva de la Cañada
Madrid
+34 902 111 042
+34 900 100 245
Mail: info@dometic.es
s Dometic Scandinavia AB
Gustaf Melins gata 7
Regional Office Middle East
P O Box 74775
Dubai, United Arab Emirates
+971 4 321 2160
+971 4 321 2170
Mail: info@dometic.ae
Dometic House · The Brewery
Blandford St. Mary
Dorset DT11 9LS
+44 844 626 0133
+44 844 626 0143
Mail: sales@dometic.co.uk
FIN Dometic Finland OY
Mestarintie 4
FIN-01730 Vantaa
+358 20 7413220
吕 +358 9 7593700
Mail: info@dometic.fi
www.dometic-waeco.com