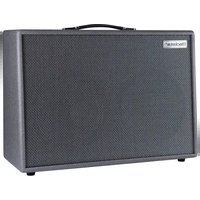
Silverline - Guitar amp BLACKSTAR - Free user manual and instructions
Find the device manual for free Silverline BLACKSTAR in PDF.


| Product type | Guitar amplifier |
| Brand | Blackstar |
| Model | Silverline (Deluxe, Stereo Deluxe, Deluxe Head) |
| Dimensions (Stereo Deluxe) | 685 x 505 x 259 mm |
| Weight (Deluxe) | 17.4 kg |
| Weight (Stereo Deluxe) | 24.0 kg |
| Weight (Head) | 9.6 kg |
| Power Supply | 220-240V AC, 50-60 Hz |
| Power (Deluxe/Head) | 100 W |
| Power (Stereo Deluxe) | 2 x 100 W (stereo) |
| Speakers (Stereo Deluxe) | 2 x 12" Celestion V-Type, 4 ohms |
| Voicing | 6 voicings (Clean Warm, Clean Bright, Crunch, Super Crunch, OD 1, OD 2) |
| TVP Technology | 6 power valve responses (EL84, 6V6, EL34, KT66, 6L6, KT88) |
| Equalization | Bass, Middle, Treble + ISF (patented) |
| Built-in Effects | Modulation (Phaser, Flanger, Chorus, Tremolo), Delay (3 types + Multi), Reverb (Room, Hall, Spring, Plate) |
| Patches | 12 factory patches (3 banks x 4 channels) |
| Connectivity | USB, MIDI In, Emulated Output, MP3/Line In, Footcontroller, speaker outputs |
| Effects Loop | Yes (switchable via INSIDER software) |
| Built-in Tuner | Yes (hold Manual for 3s) |
| Maintenance | Clean with a dry cloth. Do not open the casing. |
| Safety | Internal high voltages. Do not expose to moisture. Use the supplied power cord. |
| Spare Parts | Fuses of the correct type and rating |
| General Information | Manufactured by Blackstar Amplification plc, Northampton, United Kingdom |
Frequently Asked Questions - Silverline BLACKSTAR
User questions about Silverline BLACKSTAR
0 question about this device. Answer the ones you know or ask your own.
Ask a new question about this device
Download the instructions for your Guitar amp in PDF format for free! Find your manual Silverline - BLACKSTAR and take your electronic device back in hand. On this page are published all the documents necessary for the use of your device. Silverline by BLACKSTAR.
USER MANUAL Silverline BLACKSTAR
Blackstar ^
AMPLIFICATION

SILVERLINESII
DELUXE / STEREO DELUXE
Owner's Manual
the sound in your head
IMPORTANT SAFETY INSTRUCTIONS
- Read these instructions.
- Keep these instructions.
- Heed all warnings.
- Follow all instructions.
- Do not use this apparatus near water.
- Clean only with dry cloth.
- Do not block any ventilation openings.
- Install in accordance with the manufacturer's instructions.
- Do not install near any heat sources such as radiators, heat registers, stoves, or other apparatus (including amplifiers) that produce heat.
- Do not defeat the safety purpose of the polarized or grounding-type plug. A polarized plug has two blades with one wider than the other. A grounding type plug has two blades and a third grounding prong. The wide blade or the third prong are provided for your safety. If the provided plug does not fit into your outlet, consult an electrician for replacement of the obsolete outlet.
- Protect the power cord from being walked on or pinched particularly at plugs, convenience receptacles, and the point where they exit from the apparatus.
- Only use attachments/accessories specified by the manufacturer.
- Unplug this apparatus during lightning storms or when unused for long periods of time.
- Refer all servicing to qualified service personnel. Servicing is required when the apparatus has been damaged in any way, such as power-supply cord or plug is damaged, liquid has been spilled or objects have fallen into the apparatus, the apparatus has been exposed to rain or moisture, does not operate normally, or has been dropped.
"TO COMPLETELY DISCONNECT THIS APPARATUS FROM THE AC MAINS, DISCONNECT THE POWER SUPPLY CORD PLUG FROM THE AC RECEPTACLE". "WARNING: TO REDUCE THE RISK OF FIRE OR ELECTRIC SHOCK, DO NOT EXPOSE THIS APPARATUS TO RAIN OR MOISTURE AND OBJECTS FILLED WITH LIQUIDS, SUCH AS VASES, SHOULD NOT BE PLACED ON THIS APPARATUS".

This symbol is intended to alert the user to the presence of important operation and maintenance (servicing) instructions in the literature accompanying the appliance.

This symbol is intended to alert the user to the presence of uninsulated "dangerous voltage" within the product's enclosure that may be of sufficient magnitude to constitute a risk of electric shock to persons.
BLACK ★
Warning!
Important safety information!
READ THE FOLLOWING INFORMATION CAREFULLY. SAVE ALL INSTRUCTIONS FOR FUTURE REFERENCE!
Follow all warnings and instructions marked on the product!
Danger! High internal operating voltages.
Do not open the equipment case. There are no user serviceable parts in this equipment. Refer all servicing to qualified service personnel.
Clean only with a dry cloth.
Condensation can form on the inside of an amplifier if it is moved from a cold environment to a warmer location. Before switching the unit on, it is recommended that the unit be allowed to reach room temperature.
Unauthorised modification of this equipment is expressly forbidden by Blackstar Amplification Ltd.
Never push objects of any kind into ventilation slots on the equipment casing.
Do not expose this apparatus to rain, liquids or moisture of any type.
Do not place this product on an unstable trolley, stand or table. The product may fall, causing serious damage to the product or to persons!
Do not cover or block ventilation slots or openings. This unit must only be used in a well ventilated area and never switched on when it is within a poorly ventilated space, such as a bookcase.
This product should not be placed near a source of heat such as a stove, radiator, or another heat producing amplifier.
Use only the supplied power cord which is compatible with the mains voltage supply in your area.
Power supply cords should always be handled carefully and should be replaced if damaged in any way.
Never break off the earth (ground) pin on the power supply cord.
The power supply cord should be unplugged when the unit is to be unused for long periods of time.
An apparatus with Class I construction should be connected to a mains socket outlet with a protective earthing connection.
The mains plug of the power supply cord should remain readily accessible.
Before the unit is switched on, the loudspeaker should be connected as described in the handbook using the lead recommended by the manufacturer.
Always replace damaged fuses with the correct rating and type.
Never disconnect the protective mains earth connection.
High loudspeaker levels can cause permanent hearing damage. You should therefore avoid the direct vicinity of loudspeakers operating at high levels. Wear hearing protection if continuously exposed to high levels.
If the product does not operate normally when the operating instructions are followed, then refer the product to a qualified service engineer.
The U.S. Government's Occupational Safety and Health Administration (OSHA) has specified the following permissible noise level exposures:
Duration Per Day In Hours Sound Level dBA, Slow Response
8 90
6 92
4 95
3 97
2 100
112 102
1 105
½ 110
¼ or less 115
According to OSHA, any exposure in excess of the above permissible limits could result in some hearing loss.
Ear plug protectors in the ear canals or over the ears must be worn when operating this amplification system in order to prevent a permanent hearing loss if exposure is in excess of the limits as set forth above. To ensure against potentially dangerous exposure to high sound pressure levels, it is recommended that all persons exposed to equipment capable of producing high sound pressure levels such as this amplification system be protected by hearing protectors while this unit is in operation.

All electrical and electronic products should be disposed of separately from the municipal waste stream via designated collection facilities appointed by the government or the local authorities.

Introduction
Thank you for purchasing this Blackstar Silverline Series amplifier. Like all our products, this amp is the result of countless hours of painstaking Research and Development by our world-class design team. Based in Northampton (UK), the Blackstar team are all experienced musicians themselves and the sole aim of the development process is to provide guitarists with products which are the ultimate tools for self-expression.
All Blackstar products are subjected to extensive laboratory and road testing to ensure that they are truly uncompromising in terms of reliability, quality and above all TONE.
The Silverline Series represents a truly ground-breaking achievement, combining unique innovations, an intuitive, traditional control set and the versatility of programmability.
Please read through this handbook carefully to ensure you get the maximum benefit from your new Blackstar product.
If you like what you hear and want to find out more about the Blackstar range of products please visit our website at www.blackstaramps.com.
Thanks!
The Blackstar Team
Features
Since our launch in 2007, Blackstar has led the way in the innovation of guitar amplification. The Silverline Series represents the culmination of more than eleven years' technical research and development. These amps have an intuitive control set like a traditional amp, but have the versatility of programmability and Pro Digital Technology. The unique controls allow you, the guitarist, to custom design your own sound, store it and then have the confidence that the amp will perform in a live environment.
The Response control utilises Blackstar's patented True Valve Power technology to offer six distinctly different power valve responses – EL84, 6V8, EL34, KT66, 6L6, KT88. It delivers the response, dynamics, sag and break up characteristics of a valve amp and uniquely delivers the same acoustic power output as an equivalent valve power amp. This means these amps deliver live without compromise.
Utilising a high-performance Analog Devices inc. SHARC (Super Harvard Architecture) floating point processor to perform all the numerical signal processing in each of the units, these amplifiers bring you the ultimate in tonal performance and flexibility.
The Voice control has six different settings – Clean Warm, Clean Bright, Crunch, Super Crunch, OD 1, OD 2. When used together with Blackstar's patented ISF control you can get the exact tone you're thinking of.
The effects section delivers studio quality Super Wide Stereo modulation, delay and reverb effects simultaneously that you can store with your sound.
Deep editing and storing of patches is simple using the Blackstar INSIDER software. Patches can be shared, uploaded and downloaded via the online community. The USB connector also allows you to record from your amp directly to your computer.
An emulated output, MP3/line input, selectable effects loop, MIDI and advanced footswitching complete the package.
By using the unique Voice control, the patented ISF and TVP technology through the Response control, Silverline Series amplifiers deliver unparalleled flexibility and ease of use, enabling you to, in effect, design the sound in your head and deliver it live as LOUD as valve ^™ .
Factory Reset
The default factory patches and settings can be restored to your amplifier at any time. Simply hold down the MOD, DLY and REV switches simultaneously, whilst switching on the amplifier. The bank LED will illuminate, and change from green, to orange, to red, to indicate that a factory reset is imminent. This process will take a total of two seconds. If any of the MOD, DLY and REV switches are released before the bank LED has cycled through all colours and switched off, then the operation is cancelled and the amplifier will remain unaffected.
IMPORTANT NOTE: This process will overwrite any user content.
Front Panel
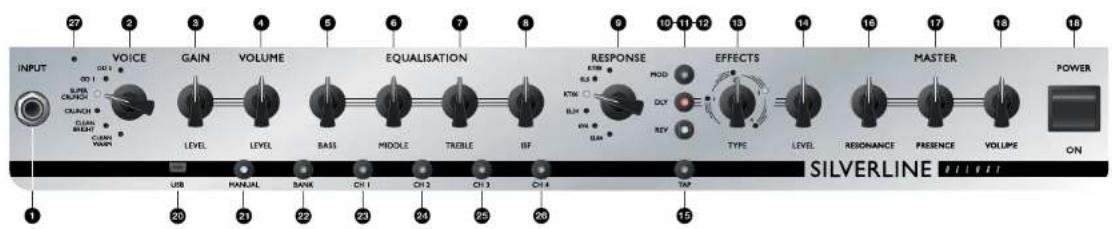
1. Input
Plug your guitar in here. Always use a good quality screened guitar lead.
2. Voice
The Voice control changes the preamp voicing, ranging from ultra clean to extremely overdriven.
■ Clean Warm – Classic clean, dynamic
■ Clean Bright – 'Boutique', will break up when pushed hard
■ Crunch – Classic medium gain overdrive
■ Super Crunch – More gain and punch than Crunch
■ OD 1 – Hot-rodded Master Volume overdrive
■ OD 2 - Mid boosted overdrive
This setting is saved when you store a patch.
3. Gain
The Gain control adjusts the amount of overdrive or distortion. Low settings, counter clockwise, will deliver a clean sound on the edge of break-up. As the Gain control is turned clockwise the sound will become more overdriven, moving through beautiful crunch tones until, at its maximum position, a full distorted tone is achieved. This setting is saved when you store a patch.
4. Volume
This controls the preamp volume. Turning it clockwise increases the volume. High levels of volume will introduce the effect of valve power amp distortion and compression, depending on the Response (9) setting you have selected. This setting is saved when you store a patch.
5. Bass
The bass control adjusts the amount of low-end frequencies in your tone. This amp has an advanced tone shaping circuit which allows the tone to be tight and cutting (counter clockwise) to warm and thumping (clockwise). This setting is saved when you store a patch.
6. Middle
The middle control adjusts the amount of middle frequencies in your tone. The middle frequencies are particularly important in setting the amount of 'body' your tone has. With the middle control set to its minimum position (fully counter clockwise) the sound will be aggressive and scooped, a tone ideal for aggressive rhythm playing. As the middle control is increased (clockwise) the amount of 'body' is increased, which is more suitable for sustained lead guitar tones. This setting is saved when you store a patch.
7. Treble
The treble control allows exact adjustment of the treble frequencies within the sound. At low settings (counter clockwise) the sound will be warm and dark in character. As the treble control is increased (clockwise) the sound will become brighter. At the maximum settings the sound will be aggressive and cutting. This setting is saved when you store a patch.
8. ISF
The patented ISF control works in conjunction with the Bass, Middle and Treble controls. It allows you to choose the exact tonal signature you prefer. Fully counter clockwise has a more American characteristic with a tight bottom-end and more aggressive middle, and fully clockwise has a British characteristic which is more 'woody' and less aggressive.

ISF
Unlike conventional 'contour' controls and parametric equalisation systems, the Bass, Middle and Treble controls remain interactive with each other just like in a traditional guitar amplifier tone stack. This leads to a very familiar, musical response. This setting is saved when you store a patch.
9. Response
The Response control delivers Blackstar's patented True Valve Power technology, offering six distinctly different power valve responses – EL84, 6V6, EL34, KT66, 6L6 and KT88. Each setting delivers the response, dynamics, sag and break-up characteristics of the selected valve power amp. This means that these amps deliver live without compromise.
Blackstar's TVP technology changes the characteristics of the sound from compressed and spongy to dynamic and tight.
EL84 Bell-like full boiled Class A with lots of compression
| 8M6 Crisp Class A with high compression and light mids | |
| EL34 | Classic British Class A/B crunch with full boiled soft break-up |
| KT88 Rich and warm vintage British hot bissad Class A/B | |
| 8L6 | Tight dynamic Class A/B with extended high and lows |
KT99 Tight, bold and dynamic Glass A/B with strong low end
As you move from EL84 to KT88 the amount of compression and overdrive available from each valve response is reduced. Additionally, when either of the two clean voices are selected, the output compression and overdrive are affected by the gain control.
This setting is saved when you store a patch.
Effects
Up to three studio quality effects can be switched on at any time.

All Silverline Series amplifiers feature Super Wide Stereo affects via the Emulated Output and Stereo USB audio output. This Blackstar enhanced stereo feature can be controlled via the free Blackstar INSIDER software.
NOTE: Silverline Stereo Deluxe produces a stereo sound from its two loudspeakers, and so will produce a Super Wide Stereo live sound when this feature is enabled. Silverline Deluxe produces a mono live sounds from its single loudspeaker.
10. MOD (Modulation)
Press this switch to turn the modulation effect on, off, or focus the effect for editing. This setting is saved when you store a patch.
11. DLY (Delay)
Press this switch to turn the delay effect on, off, or focus the effect for editing. This setting is saved when you store a patch.
12. REV (Reverb)
Press this switch to turn the reverb effect on, off, or focus the effect for editing. This setting is saved when you store a patch.
With all three of the effect switches the LED will show what state it is in:
LED Effect State Description
| LED off Effect off Effect not active | ||
| LED white | Effect on but not 'focused' for editing | Effect is active, but not affected by the front panel effect controls |
| LED orange | Effect on and 'focused' for editing | Effect active and affected by the front panel effect controls |
| Repeatedly pressing each effect switch on the front panel has the following effect: | ||
| Effect off Turns the effect on and 'focuses' the effect. Any previously focused effect reverts to an 'on' state | ||
| Effect on but not 'focused' Focuses the effect. Any previously focused effect reverts to an 'on' state | ||
| Effect on and 'focused' | Turns the effect of. If any other effect(s) are on, the previously 'focused' effect resumes being focuses? | |
NOTE: Only one effect may be 'focused' at any time
13. Effect Type
This changes the effect type and edits a parameter of the currently 'focused' effect (modulation, delay, or reverb).
Each segment represents a different effect (four for each type of effect). An LED shows which effect type is currently active. The distance travelled through the 'segment' modifies an effect parameter. The Effects Table below shows the modifiable parameters:
This setting is saved when you store a patch.

14. Effect Level
This modifies an effect parameter. For modulation and delay effects, turning the Level control while holding down the Tap switch (15) modifies the rate/time of the effect.
The Effects Table below shows the modifiable parameters:
This setting is saved when you store a patch.
15. Tap
The Tap switch is used to set the rate/time of the current 'focused' effect. The time between each press of the tap switch defines the rate set.
Once set, the Tap LED will flash in time with the set rate of the currently 'focused' effect.
The Effects Table below shows the modifiable parameters:
Effects Table
Effect Segment Parameter Level Parameter Tap Parameter
| MODULATION | |||
| Phaser Mix Depth Speed | |||
| Hanger Feedback Depth Speed | |||
| Chorus Mix Depth Speed | |||
| Tremolo Frequency modulation depth Amplitude modulation depth Speed | |||
| DELAY | |||
| Linear Feedback Delay level Time | |||
| Analogus | Feedback Delay level | Time | |
| Tapin | Feedback Delay level | Time | |
| Mult | Feedback Delay level | Time | |
| REVERB | |||
| Room Size | Reverb level | - | |
| Hall | Size | Reverb level | - |
| Spring | Size | Reverb level | - |
| Plate | Size | Reverb level | - |
This setting is saved when you store a patch.
Master
16. Resonance
The Resonance control sets the overall bass response. At lower settings the cleans will be tight and lunky and overdrives will be focused in their bass response. At
increased settings the clean sounds will be become full and warm, whilst the crunch and overdrive tones will be more bass heavy and resonant.
This is a global setting and not saved when storing a patch.
17. Presence
The Presence control sets the overall treble response. Percussive high-end can be accentuated on clean sounds and the amount of aggressive treble controlled with crunch and overdrive settings.
This is a global setting and not saved when storing a patch.
18. Master Volume
This controls the overall volume of your amplifier. Turning it clockwise increases the volume. This is a global setting and not saved when storing a patch.
If the master volume is at zero this allows for silent recording via the emulated output or USB. The emulated level is controlled via the preamp volume.
19. Power Switch
This switch is used to turn the amplifier on and off.
20. USB
Plug a USB cable in here to connect the amplifier to a Windows PC or Mac. Blackstar's INSIDER software offers a host of features and can be downloaded from:
www.blackstarinsider.co.uk
See the USB Audio section on page 20 for more information.
NOTE: The amplifier will appear on a personal computer as an audio capture device within recording software.
21. Manual
Press this switch to toggle between Manual Mode and the current patch. When the amplifier is in Manual Mode, the sound will reflect the current physical position of the knobs. This is applicable to the Voice, Gain, Volume, Bass, Middle, Treble, ISF and Response knobs. Any effects that are active when switching to Manual Mode will initially be turned off.
Whilst in Manual Mode, any of the controls can still be modified by an external source (Blackstar INSIDER software, footcontroller, MIDI controller), but this means that the sound will not represent the positions of the knobs on the front panel.
Tuner Mode
Holding the Manual switch (21) for three seconds will engage the tuner. The Recall Indicator LED (27) will flash continuously to indicate the amplifier is in Tuner Mode. The amplifier output will be muted whilst in Tuner Mode.
The Manual, Bank and Channel LEDs will indicate the closest note to the note being played.
Bank LED E String (low/high)
CH1 LED A String
CH2 LED D String
CH3 LED G String
CH4 LED B String
The MOD, DLY and REV LEDs act as indicators to show how close the played note is to the tuned note.
MOD LED while Note is sharp (above pitch)
DLY LED orange Note is in tune
REV LED white Note is flat (below pitch)
All other LEDs on the front panel will be off in Tuner Mode.
Pressing any switch will exit Tuner Mode.
22. Bank
Press this switch to scroll through the first three banks of patches.
Bank 1 → 2
Bank 2 → 3
Bank 3 → 1
The green LED indicates Bank 1 is active, the orange LED indicates Bank 2 is active, and the red LED indicates Bank 3 is active.
NOTE: The first three banks can be selected from the front panel. When you activate Bank 4 and higher from an external controller (e.g. Blackstar INSIDER software, footcontroller, MIDI), the Bank LED will be off but the channel LEDs will continue to show you the patch location.
For example:
Patch 11 - Bank LED red, Channel 3 LED on.
Selecting Bank 15 from an external controller will switch you to patch 15 – Bank LED off, Channel 3 lit.
When the amplifier is in Manual Mode, the Bank LED will be off.
The channel will be remembered, therefore the corresponding patch within the current bank will be loaded when scrolling through the banks.
23 - 26. Channels 1-4
Channel 1 activates the first patch within the currently active bank.
Channel 2 activates the second patch within the currently active bank.
Channel 3 activates the third patch within the currently active bank.
Channel 4 activates the fourth patch within the currently active bank.
27. Recall Indicator
The Recall Indicator shows if there is a mismatch between the current value of a parameter within the amplifier and the corresponding physical front panel control. For example, when you change to a different patch the controls on the front panel may not always reflect the setting you are hearing.
To prevent unexpected level jumps in the control you are adjusting, the front panel knobs will have no effect on the sound until the knob reaches the current parameter value. Once reached, the Recall Indicator flashes twice and the knob 'takes control' of the value and can increase or decrease the value.
The recall indicator will flash twice each time the physical knob 'passes through' the valued currently stored in the current patch.
Recall is only active for Gain, Volume, Bass, Middle, Treble and ISF.
When the Tuner is active the Recall Indicator will flash continuously.
Programmability
Storing Patches
To store the current sound as a patch:
- Press and hold any of the four Channel switches for one second. All four Channel LEDs will begin to flash.
- Press the Bank switch to scroll through the three banks (green, orange, red) to choose the store location.
- Press any of the four Channel switches once to store the patch in the chosen location.
The LED corresponding to the chosen store location will illuminate and the new patch will be active.
Green bank = Patches 1-4
Orange bank = Patches 5-8
Red bank = Patches 9-12
The amplifier controls can be used to edit the patch at any stage of the store process.
Press the Manual switch at any stage to cancel the store process and return the amplifier to the last state.
Storing a patch will overwrite any previous patch in that location.
Patches can also be stored via Blackstar's INSIDER software or a connected Blackstar FS-10 footcontroller.
Recalling Patches
Press any Channel switch to load that patch.
Pressing the Bank switch will cycle through the three banks – green-orange-red. The Channel will be preserved, therefore the corresponding patch within the current Bank will be loaded when scrolling through the Banks.
Alternatively, patches can be recalled via Blackstar's INSIDER software or any connected footcontroller.
Factory Patches Table
Green Bank - Live Rig 1
Channel Patch Name Voice Response Effect(s) Description
| CH1 | LR1 - Clean | Clean Warm | 6U6 | Spring Reverb | US clean with high headroom, perfect as a platform for your petals |
| CH2 | LR1 - Crunch | Crunch | LL34 | Hall Reverb | British ow gan crunch with natural reverb |
| CH3 LR1- Rhythm Super Crunch BL34 Tape Delay, Hall | Reverb | British classic rock crunch, ideal for gutters with humbuckers | |||
| CH4 | LR1 - Lead | 00.1 | KT86 | Analogue Delay | Full sounding dynamic lead |
Orange Bank - Live Rig 2
Channel Patch Name Voice Response Effect(s) Description
| CH1 LR2 - Clean Clean Warm 6V0 Plate Reverb | US low wattage 'sag' clean tone with natural reverb | ||||
| CH2 | LR2 - Crunch | Clean Bright | K166 | Hall Reverb | Rhythm tone with breakup, great for a classic Indic sound |
| CH3 | LR2- Rhythm | OO 1 | EL84 | Hall Reverb | Smooth drive with a slight mid burst |
| CH4 LR2 - Lead Super Crunch 6L5 | Analogue Delay, Hall Reverb | Balanced lead tone with delay, perfect for soos | |||
Red Bank - Live Rig 3
| Channel | Patch Name | Voice | Response | Effect(s) | Description |
| CH1 LR3 - Clean Clean Bright KT88 Fanger, | Analoguan Delay, Hall Ravaro | Modulated clean tone, ideal for appaglated chords | |||
| CH2 | LR3 - Crunch | Crunch | EL94 | Plate Ravaro | Dynamic crunch, perfect for big open chords |
| CH3 LR3- Rhythm Super Crunch 0v6 | Analogue Delay, Plate Ravaro | Compressed crunch, great for rhythm playing | |||
| CH4 LR3 - Lead OD 2 | KT88 Analogue Delay, | Hall Ravaro | Smooth high gain tone, ideal for legato whilst maintaining pale definition | ||
MIDI
Silverline Deluxe and Stereo Deluxe amplifiers are able to recall patches via MIDI Program Change messages and to dynamically modify amplifier values via MIDI Control Change messages.
To set-up MIDI control, simply connect your MIDI controller's MIDI Out socket (30) to the MIDI in socket on the rear of the amplifier.
From new, or after a Factory Reset, the amplifier is set to OMNI mode and responds to MIDI messages on all MIDI channels.
NOTE: You may wish to set the amplifier to respond to MIDI messages on just a single MIDI channel. This can be done using the Blackstar INSIDER software to specify which of the 16 MIDI channels to use, or to return the amplifier to OMNI mode.
Recalling Patches
To recall a patch, the MIDI controller should be set to transmit Program Change messages (this is usually the case for footcontrollers). Changing patches on the MIDI controller will activate the corresponding patch stored within the amplifier.
Modifying Patch Values
Many patch values (e.g. Gain, Volume, ISF – see MIDI Implementation Chart on page 100) can be adjusted via MIDI Control Change messages in real-time. The MIDI controller should be set to send the Control Change messages as defined in the MIDI Implementation Chart.
Rear Panel
28. Mains Input
The supplied detachable mains lead is connected here. The lead should only be connected to a power outlet that is compatible with the voltage, power and frequency requirements stated on the rear panel. If in doubt, seek advice from a qualified technician.
29. Speaker Outputs
Silverline Deluxe Head
There are two parallel speaker outputs for connecting external speaker cabinets. The total should be 4 Ohms for full output power.
WARNING: The combined impedance must never be less than 4 Ohms (e.g. 1 x 4 Ohm cabinet, or 2 x 8Ohm cabinets). Failure to correctly match the impedance of the amplifier and speakers will damage the amplifier.
NOTE: 2 x 4 Ohm cabinets cannot be used together.
Silverline Stereo Deluxe
There are two speaker outputs (1x left channel, 1x right channel) for connecting the internal speakers or external speaker cabinets.
The internal speakers are directly plugged into these outputs and must be unplugged before external cabinets can be connected.
The minimum load is 4 Ohms per speaker output.
WARNING: The impedance of each output must never be less than 4 Ohms. Failure to correctly match the impedance of the amplifier and speakers will damage the amplifier.
Silverline Deluxe
The speaker output is for connecting the internal speaker or external speaker cabinets.
The internal speaker is directly plugged into this output and must be unplugged before an external cabinet can be connected.
The minimum load is 4 Ohms.
WARNING: The impedance must never be less than 4 Ohms. Failure to correctly match the impedance of the amplifier and speakers will damage the amplifier.
30. MIDI In
If MIDI is required, connect the MIDI device here. Refer to the MIDI section for more details. Always use a good quality MIDI lead.
31. Footcontroller
Connect one of the following supported footcontrollers here.
1-Button Footswitch
Use any latching footswitch (e.g. a Blackstar FS-4) to switch between Channels 1 and 2 of the currently selected Bank.
Footcontroller latched OFF (e.g. LED extinguished on the FS-4) activates Channel 1 Footcontroller latched ON (e.g. LED illuminated on the FS-4) activates Channel 2
Blackstar FS-10 Footcontroller
This multi function footcontroller allows you to access all patches, toggle effects, activate the tuner and program patches.
MIDI footcontrollers
Functionality will depend on your footcontroller.
32. MP3/Line In
Connect the output of your MP3 or audio playback device here. Adjust the player's volume to match that of your guitar to enable you to play along.
NOTE: The connection is summed into mono.
The MP3/Line In socket can be reconfigured via the Blackstar INSIDER software to operate as a mono effects loop Return ('Power Amp In') – see below.
33. Emulated Output
This output emulates the tonal characteristics of a guitar speaker cabinet and provides a natural tone for connection to a recording device or mixing desk
To make full use of the stereo effects, use a stereo jack to two mono jacks splitter able to feed two channels of the recording device or mixer. The output will also function into a mono guitar-type lead. Always use a good quality screened cable.
Turning the Volume knob (4) will control the Emulated Output level. The Master Volume only affects any connected speaker(s)/cabinet(s).
NOTE: To "silently" record, set the Master Volume to zero. You may also record from this output without a loudspeaker connected, but ensure that no loudspeaker leads are connected to any of the loudspeaker output jack sockets of the amplifier, as this will defeat the load protection circuit and will cause damage to the amplifier.
The Emulated Output socket can be reconfigured via the Blackstar INSIDER software to operate as an effects loop Send ('Preamp Out') – see below.
34. Mono Effects Loop
Switching on the Effects Loop via the free Blackstar INSIDER software transforms the Emulated Output and MP3/Line Input sockets into 'Preamp Out' (for sending a signal to your external effects) and 'Power Amp In' (for returning the effected signal to your amp). This means that in addition to using the studio quality effects within your amp, you can place your own external effects and stomp boxes 'in the loop' for the best sonic performance.
When the Effects Loop is activated, you may still use the USB audio interface as a line in/out.
USB Audio
Standard device drivers are used to connect the amplifier to a PC or Mac, therefore no additional device drivers are required. If your computer's audio latency is found to be too high a generic ASIO driver can be downloaded and associated with your amplifier, for example ASIO4ALL - www.asio4all.com. For a guide on low-latency USB recording visit:
www.blackstaramps.com/usbrecording
NOTE: Always connect the amplifier via a main USB port, often found on the rear of the computer.
The output of the audio over USB can be changed via the Blackstar INSIDER software, and can be one of the following:
■ Speaker emulated stereo effected audio channels
■ 2 x mono audio channels
- Left - effected amplifier signal
- Right – unprocessed guitar signal
■ Reamping Mode
Reamping
The amplifier can be switched into Reamping Mode via Blackstar INSIDER software. This is a non-storable setting and will be switched off either when the USB cable is removed, or when the amplifier power is switched off.
When activated, Reamping Mode allows the amplifier to accept a pre-recorded, dry guitar signal via USB and return a fully processed audio signal. This return signal can then be captured using recording software on the connected PC or Mac.
Firmware Update
Firmware updates are initiated via the Blackstar INSIDER software. A new version of the Blackstar INSIDER software will be released whenever an update is available. Each update will take approximately 60-120 seconds.
When the amplifier is connected (via USB) to a version of the Blackstar INSIDER software containing newer firmware, a message will be displayed, prompting you to install the latest files. Whilst updating, the amplifier controls will be unresponsive. The Tap LED will flash to indicate data activity during the update process.
The amplifier power should not be switched off during a firmware update. If the amplifier is switched off during an update, the controls will be unresponsive after the power is reapplied and the amplifier will produce no sound. The Tap LED will flash to indicate that the amplifier contains no valid firmware.
The amplifier must be connected to the Blackstar INSIDER software to reinstall valid firmware. The update process will start automatically if the Blackstar INSIDER software detects that the amplifier is in this state.
Technical Specification
Silverline Deluxe
Power: 100 Watts
Weight (kg): 17.4
Dimensions (mm): 583 (W) x 480 (H) x 259 (D)
Speaker: 1 x 12" Celestion V-Type, 4 Ohms
Footcontroller (not supplied): FS-4 latching footcontroller, FS-10 footcontroller, MD-1 MIDI footcontroller
Silverline Stereo Deluxe
Power: 2 x 100 Watts (Stereo)
Weight (kg): 24.0
Dimensions (mm): 685 (W) × 505 (H) × 259 (D)
Speaker: 2 x 12" Celestion V-Type, 4 Ohms
Footcontroller (not supplied): FS-4 latching footcontroller, FS-10 footcontroller, MD-1 MIDI footcontroller
Silverline Deluxe Head
Power: 100 Watts
Weight (kg): 9.6
Dimensions (mm): 583 (W) × 240 (H) × 222 (D)
Footcontroller (not supplied): FS-4 latching footcontroller, FS-10 footcontroller, MD-1 MIDI footcontroller
All electrical and electronic products should be disposed of separately from the municipal waste stream via designated collection facilities appointed by the government or the local authorities.

BLACK
Einleitung
10. MOD (Modulation)
| CH1-LED A-Sate |
| CH2-LED D-Sate |
| CH3-LED G-Sate |
CHA-LED H-Sate
Orange Bank = Patches 5-8
Rote Bank = Patches 9-12
34. Mono Effect Loop
www.blackstaramps.com/usbrecording
All electrical and electronic products should be disposed of separately from the municipal waste stream via designated collection facilities appointed by the government or the local authorities.

Introduction
10. MOD (Modulation)
Banque verte = Patches 1-4
Banque orange = Patches 5-8
Banque rouge = Patches 9-12
www.blackstaramps.com/usbrecording
Dimensions (mm): 583 (L) x 480 (H) x 259 (P)
Haut-parleur: 1 x 12" Celestion V-Type, 4 ohms
Dimensions (mm): 583 (L) x 240 (H) x 222 (P)
All electrical and electronic products should be disposed of separately from the municipal waste stream via designated collection facilities appointed by the government or the local authorities.


6362 6:
Introducción
Bank Verde = Patches 1-4
Bank Naranja = Patches 5-8
Bank Rojo = Patches 9-12
www.blackstaramps.com/usbrecording
All electrical and electronic products should be disposed of separately from the municipal waste stream via designated collection facilities appointed by the government or the local authorities.

注意
www.blackstaramps.com/usbrecording
MIDI
www.blackstaramps.com/usbrecording
| Function | Control No. | Transmitted? | Recognised? | Remarks | Value |
| Basic Channel - Default | - No Yes In coming | message channel. Receiving messages on ALL channels can be set via the CUIL | - | ||
| Basic Channel - Changed | - No No - - | ||||
| Program Change - True | TRUE No Yes Patch Recall | (Patches 1-126) | 0-127 | ||
| Control Change 5 | No Yes Voice 0 = Clean Warm | 1 = Clean Bright2 = Crunch3 = Super Crunch4 = CD 15 = CD 2 | |||
| 5 No Yes Gain 0-127 | |||||
| 7 No Yes Volume 0-127 | |||||
| 8 | No | Yes | Bsss | 0-127 | |
| 9 No Yes | Mode | 0-127 | |||
| 10 | No | Yes | Table | 0-127 | |
| 11 | No | Yes | ISF | 0-127 | |
| 12 | No | Yes | Responsee | 0 = EL911 = BA62 = EL043 = K1564 = BL65 = KT88 | |
| 13 | No Yes | Modulation | Sound Effect | 0 = Praser1 = Fanger2 = Chorus3 = Tremolo | |
| 14 | No Yes | Modulation | Adjust 1 | 0-127 | |
| 15 | No Yes | Modulation | Adjust 2 | 0-127 | |
| 16 | No | Yes | Modulation Level | 0-127 | |
| 17 | No | Yes | Modulation Rate | 0-127 | |
| 18 | No | Yes | Delay Effect Select | 0 = Linear1 = Anislogue2 = Tape3 = Multi | |
| 19 | No | Yes | Delay Adjust 1 | 0-127 | |
BLACK
| Function | Control No. | Transmitted? | Recognised? | Remarks | Value |
| 20 | No | Yes | Delay Adjust 2 | 0-127 | |
| 21 | No | Yes | Delay Level | 0-127 | |
| 22 | No | Yes | Reverb Effect Select | 0 = Room1 = Hall2 = Spring3 = Plate | |
| 23 | No | Yes | Reverb Adjust 1 | 0-127 | |
| 24 | No | Yes | Reverb Adjust 2 | 0-127 | |
| 25 | No | Yes | Reverb Level | 0-127 | |
| 64 | No Yes | Modulation | On/Off | 0-83 = OFF64-127 = ON | |
| 65 | No | Yes | Delay On/Off | 0-83 = OFF64-127 = ON | |
| 66 | No | Yes | Reverb On/Off | 0-83 = OFF64-127 = ON | |
| 66 | No | Yes | Delay Top Duration | DATA IGNOREDIncomingmessage usedas the trigger | |
| 69 | No Yes Effects Loop | Mode On/Off | 0-60 = OFF64-127 = ON | ||
| 70 | No | Yes | Super WideStempo On/Off | 0-60 = OFF64-127 = ON | |
| 119 | No | Yes | Save CurrentPatch | DATA IGNOREDIncomingmessage usedas the trigger | |
BLACK ★
119118
SILVERLINE DELUXE Front Panel
SILVERLINE DELUXE HEAD Front Panel

SILVERLINE STEREO DELUXE Front Panel

SILVERLINE DELUXE Rear Panel

SILVERLINE DELUXE HEAD Rear Panel

SILVERLINE STEREO DELUXE Rear Panel

Blackstar Amplification Ltd, Beckett House, 14 Billing Road, Northampton, NN1 5AW, UK For the latest information go to: www.blackstaramps.com
Whilst the information contained herein is correct at the time of publication, due to our policy of constant improvement and development, Blackstar Amplification Ltd reserves the right to alter specifications without prior notice.
- Blackstar ^
- AMPLIFICATION
- SILVERLINESII
- IMPORTANT SAFETY INSTRUCTIONS
- Warning!
- Introduction
- Features
- Factory Reset
- Front Panel
- Input
- Voice
- Gain
- Volume
- Bass
- Middle
- Treble
- ISF
- Response
- Effects
- MOD (Modulation)
- DLY (Delay)
- REV (Reverb)
- Effect Type
- Effect Level
- Tap
- Effects Table
- Master
- Resonance
- Presence
- Master Volume
- Power Switch
- USB
- www.blackstarinsider.co.uk
- Manual
- Tuner Mode
- Bank
- - 26. Channels 1-4
- Recall Indicator
- Programmability
- Storing Patches
- Recalling Patches
- Factory Patches Table
- MIDI
- Modifying Patch Values
- Rear Panel
- Mains Input
- Speaker Outputs
- Silverline Deluxe Head
- Silverline Stereo Deluxe
- Silverline Deluxe
- MIDI In
- Footcontroller
- 1-Button Footswitch
- Blackstar FS-10 Footcontroller
- MIDI footcontrollers
- MP3/Line In
- Emulated Output
- Mono Effects Loop
- USB Audio
- www.blackstaramps.com/usbrecording
- Reamping
- Firmware Update
- Technical Specification
- Einleitung
- Mono Effect Loop
- Introducción
- 注意
Brand : BLACKSTAR
Model : Silverline
Category : Guitar amp