
Sonicare DiamondClean Smart 9350 HX9902 - Toothbrush PHILIPS - Free user manual and instructions
Find the device manual for free Sonicare DiamondClean Smart 9350 HX9902 PHILIPS in PDF.

User questions about Sonicare DiamondClean Smart 9350 HX9902 PHILIPS
0 question about this device. Answer the ones you know or ask your own.
Ask a new question about this device
Download the instructions for your Toothbrush in PDF format for free! Find your manual Sonicare DiamondClean Smart 9350 HX9902 - PHILIPS and take your electronic device back in hand. On this page are published all the documents necessary for the use of your device. Sonicare DiamondClean Smart 9350 HX9902 by PHILIPS.
USER MANUAL Sonicare DiamondClean Smart 9350 HX9902 PHILIPS
natural_image
Electric toothbrush with digital display showing a 1:30 speed limit, next to a smartphone and bowl of food (no visible text or symbols on main subject)PHILIPS
sonicare
natural_image
Illustration of an open book with a grid and an arrow indicating rotation (no text or symbols)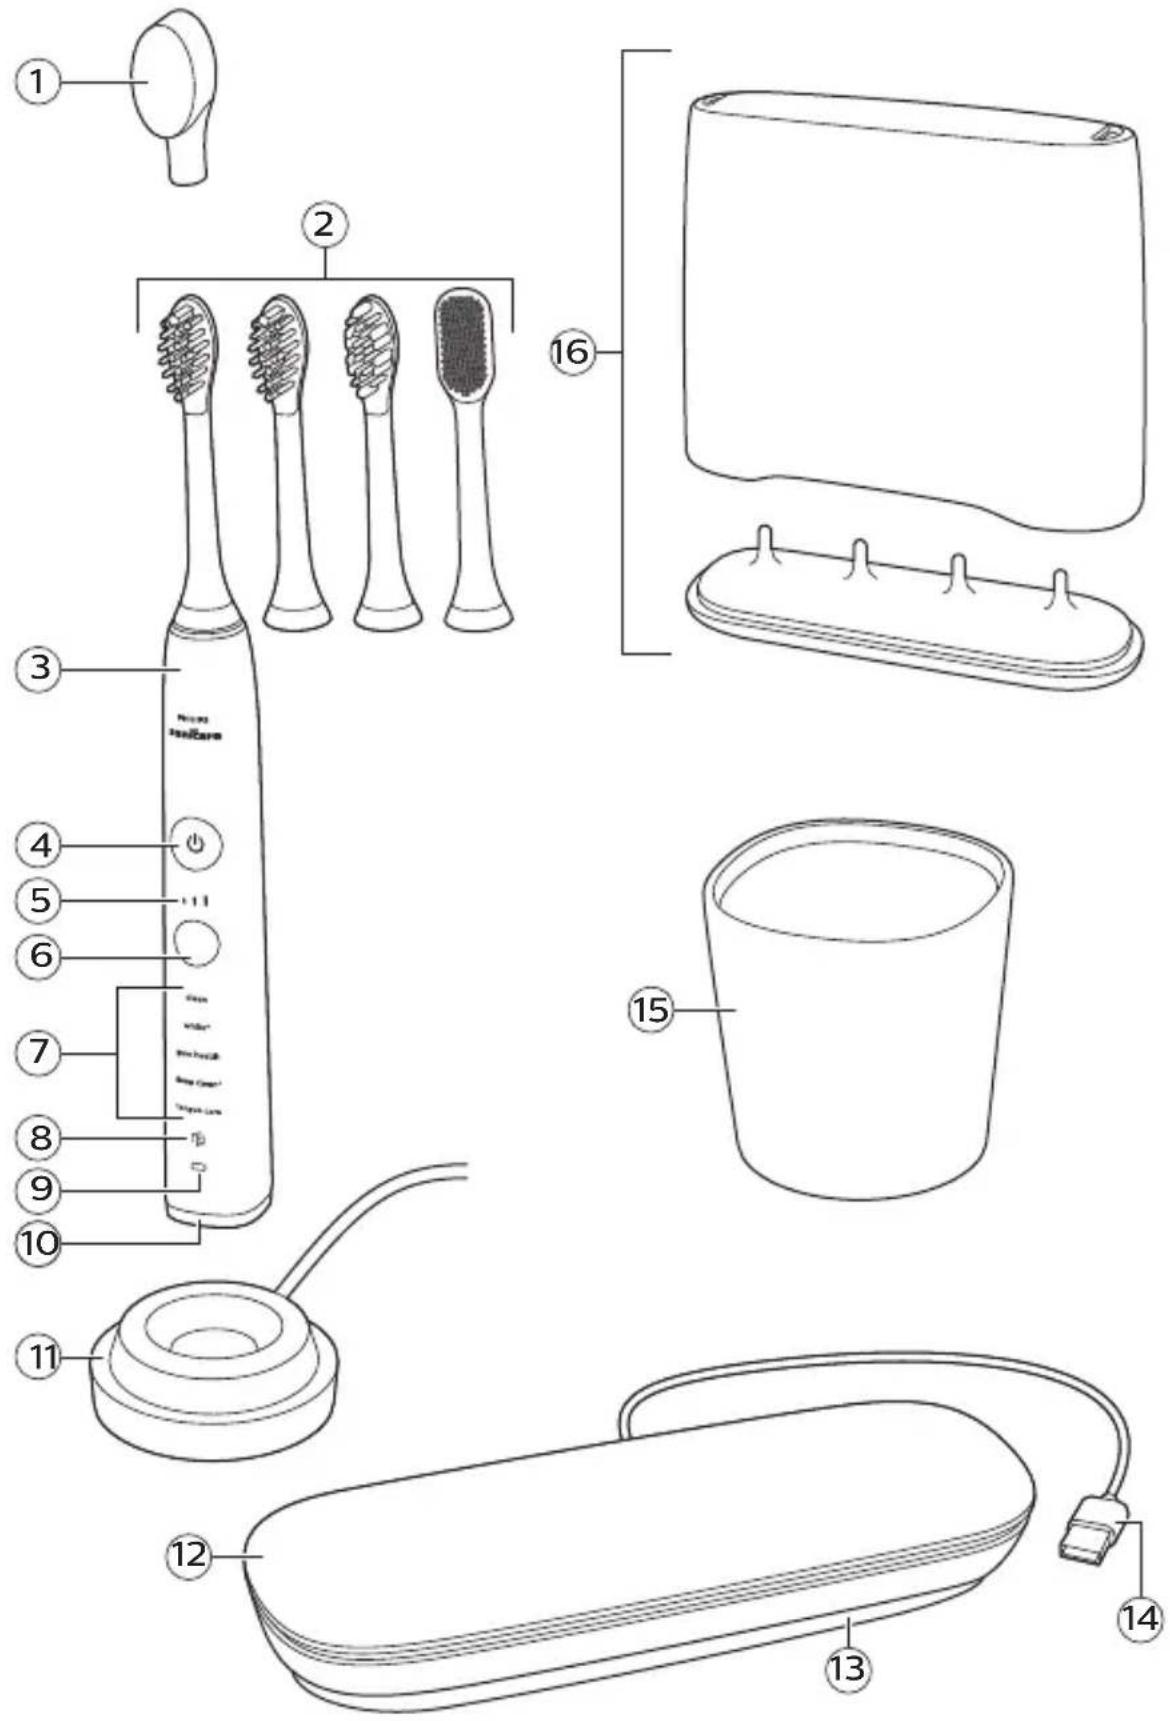
text_image
Diagram of various household appliances and accessories with numbered labels for identificationEnglish 6
Deutsch 27
Español 52
Français 75
Italiano 100
Nederlands 124
Português 148
Ελληνικα 171
Introduction
Congratulations on your purchase and welcome to Philips! To fully benefit from the support that Philips offers, register your product at www.philips.com/welcome or via the Philips Sonicare app.
Important
Read this user manual carefully before you use the appliance and save it for future reference.
Danger
- Keep the charger away from water. Do not place or store it over or near water contained in a bathtub, washbasin, sink etc. Do not immerse the charger in water or any other liquid. After cleaning, make sure the charger is completely dry before you connect it to the mains.
Warning
- The main cord cannot be replaced. If the main cord is damaged, discard the charger.
- Always have the charger replaced with one of the original type in order to avoid a hazard.
- Do not use the charger outdoors or near heated surfaces.
- If the appliance is damaged in any way (brush head, toothbrush handle or charger), stop using it. This appliance contains no serviceable parts. If the appliance is damaged, contact the Consumer Care Center in your country (see 'Warranty and support').
- This appliance can be used by children aged from 8 years and above and by persons with reduced physical, sensory or mental capabilities or lack of experience and knowledge if they have been given supervision or instruction concerning use of the appliance in a safe way and if they understand the hazards involved. Children should not play with the appliance. Cleaning and user maintenance shall not be made by children unless they are older than 8 and supervised.
- In order to effectively charge your Philips Sonicare handle do not place your charger base on a magnetic metal surface.
Caution
- Do not clean the brush head, the handle or the charger in the dishwasher.
English
- If you have had oral or gum surgery in the previous 2 months, consult your dentist before you use the toothbrush.
- Consult your dentist if excessive bleeding occurs after using this toothbrush or if bleeding continues to occur after 1 week of use. Also consult your dentist if you experience discomfort or pain when you use the Philips Sonicare.
- The Philips Sonicare toothbrush complies with the safety standards for electromagnetic devices. If you have a pacemaker or other implanted device, contact your physician or the device manufacturer of the implanted device prior to use.
- If you have medical concerns, consult your doctor before you use the Philips Sonicare.
- This appliance has only been designed for cleaning teeth, gums and tongue. Do not use it for any other purpose. Stop using the appliance and contact your doctor if you experience any discomfort or pain.
- The Philips Sonicare toothbrush is a personal care device and is not intended for use on multiple patients in a dental practice or institution.
- Stop using a brush head with crushed or bent bristles. Replace the brush head every 3 months or sooner if signs of wear appear. Do not use other brush heads than the ones recommended by the manufacturer.
- If your toothpaste contains peroxide, baking soda or bicarbonate (common in whitening toothpastes), thoroughly clean the brush head with soap and water after each use. This prevents possible cracking of the plastic.
Electromagnetic fields (EMF)
This Philips appliance complies with all applicable standards and regulations regarding exposure to electromagnetic fields.
Radio Equipment Directive
- Radio Equipment in this product operates between 2402 – 2480 MHz
- Maximum RF power transmitted by the Radio Equipment is +3 dBm
Your Philips Sonicare (Fig. 1)
1 Hygienic travel cap
2 Brush heads
3 Handle
4 Power on/off button
5 Intensity light
6 Mode/intensity button
7 Mode light
8 Brush head replacement reminder light
9 Battery indication
10 Light ring
11 Charging base
12 Travel case
13 Cord storage compartment
14 USB cord (integrated)
15 Charging glass
16 Brush head holder
Note: The content of the box may vary based on the model purchased.
Brush heads
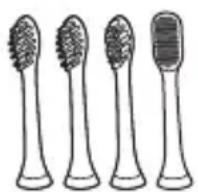
Your Philips Sonicare comes with a range of brush heads which are designed to deliver superior results for your oral care needs.
The number and type of brush heads might change according to the toothbrush type you purchased.
1 Premium Plaque Defense brush head
2 Premium Gum Care brush head
3 Premium White brush head
4 Tongue Care+ brush head (specific types only)
Smart brush head recognition
Premium Plaque Defense, Premium Gum Care, Premium White and Tongue Care+ brush heads are enabled with smart brush head recognition technology.
A micro-chip inside the brush head communicates with the toothbrush handle. So when you attach a brush head, the handle automatically recognizes
the brush head and selects the recommended mode and intensity level to optimize your brushing performance.
Thanks to this feature the toothbrush also tracks your usage and gives a personalized reminder when you need to replace your brush head for the best oral care results.
Brushing modes
Your power toothbrush is equipped with 5 different modes to accommodate all your oral care needs (some models come with 4 brushing modes only). The following modes are available:
Clean mode
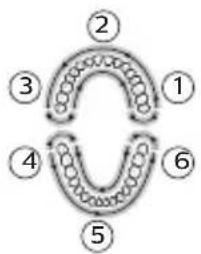
Clean is a 2-minute mode, recommended to be used with intensity level 3. It gives you a thorough and complete clean and is recommended to be used with the Premium Plaque Defense brush head. In order to reach optimal results, follow the instructions below.
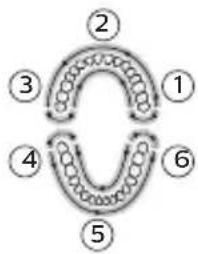
1 Begin brushing the upper right teeth (segment 1) and brush for 20 seconds, on both the outer and inner surfaces, before you move to the upper front teeth (segment 2). Continue doing this for segments 3 to 6 to ensure even brushing in all 6 segments of the mouth. You will hear a beep after each 20-second interval, to indicate that you should move to the next segment.
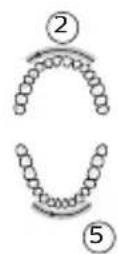
White+ mode
White+ is a 2-minute 40-seconds mode, recommended to be used with intensity level 3 and the Premium White brush head. In order to reach optimal results, follow the instructions below.
flowchart
graph TD
    A["①"] --> B["②"]
    B --> C["③"]
    C --> D["④"]
    D --> E["⑤"]
    E --> F["⑥"]
    F --> A
12 English

flowchart
graph TD
    A["①"] --> B["②"]
    B --> C["③"]
    C --> D["④"]
    D --> E["⑤"]
    E --> F["⑥"]
    F --> A
flowchart
graph TD
    1 --> 2
    2 --> 3
    3 --> 4
    4 --> 5
    5 --> 6
    6 --> 1
1 Begin brushing the upper right teeth (segment 1) and brush for 20 seconds before you move to the upper front teeth (segment 2). Continue doing this for segments 3 to 6 to ensure even brushing in all 6 sections of the mouth.
2 After completing all 6 of these segments, the toothbrush switches to polishing mode automatically.
3 To polish your teeth, brush the outer surface of your upper teeth for 20 seconds (segment 2) and then brush the outer surface of your lower teeth for 20 seconds (segment 5). The polishing motion used in this part of the mode will feel and sound different from the first two minutes of the mode.
Gum Health mode
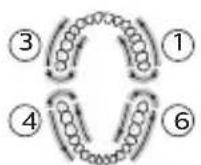
Gum Health is a 3-minute 20-seconds mode, recommended to be used with intensity level 3 and the Premium Gum Care brush head. In order to reach optimal results, follow the instructions below:
1 Begin brushing the upper right teeth (segment 1) and brush for 20 seconds, on both the outer and inner surfaces, before you move to the upper front teeth (segment 2). Continue doing this for section 3 to 6 to ensure even brushing in all 6 segments of the mouth.
2 Next, to take optimal care for your gums, brush the outer and inner surfaces of your upper right back teeth for 20 seconds (segment 1), then brush the outer and inner surfaces of your upper left back teeth for 20 seconds (segment 3).
Continue brushing the outer and inner surfaces of your lower right back teeth for 20 seconds (segment 4), followed by another 20 seconds on the outer and inner surfaces of your lower left back teeth (segment 6). The brushing motion used in this part of the mode will feel and sound different from the first two minutes of the mode.
DeepClean+ mode
DeepClean+ mode length depends on whether or not the handle is connected to the app. In connected mode DeepClean+ runs for two minutes and provides BrushPacer feedback every 20 seconds. In non-connected mode DeepClean+ runs for three minutes and provides BrushPacer feedback every 30 seconds. In order to reach optimal results, follow the instructions below when brushing non-connected.
- Begin brushing in the upper right teeth (segment 1) and brush for 30 seconds, on both the outer and inner surfaces, before you move to the upper front teeth (segment 2). Continue doing this for segments 3 to 6 to ensure even brushing in all 6 segments of the mouth.
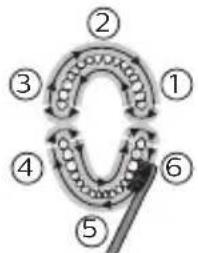
Tongue Care mode (specific types only)
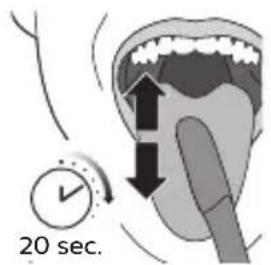
Tongue Care is a 20-second mode, recommended to be used with intensity level 1 and the Tongue Care+ brush head. In order to reach optimal results, follow the instructions below:
text_image
20 sec.1 Wet the micro bristles and brush your tongue with a back and forth motion. Clean as far back as comfortable.
2 Rinse your mouth and repeat the procedure two more times.
14 English
Based on the brush head you attach, the mode will be selected automatically. If you want to adjust the mode or intensity manually, you can do this by using the mode/intensity button. Press the mode/intensity button before brushing to change the mode, and press it while brushing to adjust the intensity level. Your selection will be remembered next time you attached the same brush head. If you want to go back to the initial recommended settings for your brush head, manually change it to the recommended setting described above.
Note: When the Philips Sonicare is used in clinical studies, it must be used at high intensity in the Clean mode, in White+ mode, in GumHealth mode, or in unconnected DeepClean+ mode to achieve the efficacy in plaque removal, stain removal, gum health or superiority (respectively).
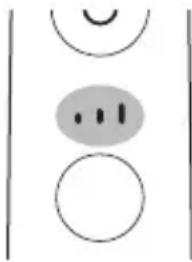
Intensity settings
natural_image
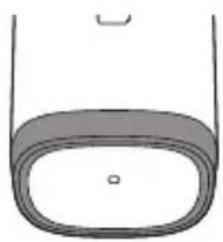
Simple diagram with three circles and a shaded oval, no text or symbols presentYour power toothbrush gives you the option to choose between 3 different intensity levels: low, medium and high. Based on the brush head you attach, the intensity will be selected automatically. If you wish to change to a different intensity, you can do so by pressing the mode/intensity button while brushing. For optimal results it is recommended to use the automatically selected intensity. The intensity cannot be changed as long as the handle is powered off or paused.
Using your Philips Sonicare
Brushing instructions
natural_image
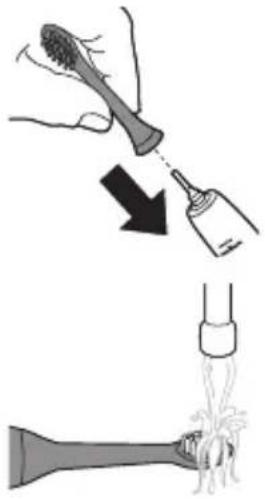
Illustration showing a hand using a tool to remove a tooth from a bottle, with a magnified view of the tooth being held (no text or symbols present)1 Attach your desired brush head. Align the brush head so the bristles point in the same direction as the front of the handle.
2 Wet the bristles.
natural_image
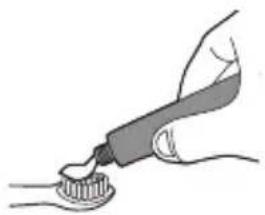
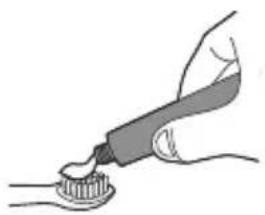
Illustration of a hand using a tool to apply a toothbrush to a tooth (no text or symbols present)3 Apply a small amount of toothpaste on the bristles.
text_image
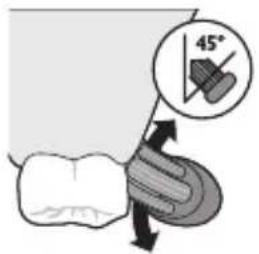
45°4 Place the toothbrush bristles against the teeth at a slight angle (45 degrees), pressing firmly to make the bristles reach the gumline or slightly beneath the gumline. A change in vibration (and a slight change in sound) and activation of the light ring alert you when you apply too much pressure while brushing.
Note: Keep the center of the brush in contact with the teeth at all times.
text_image
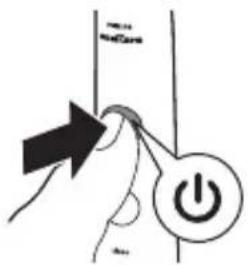
Diagram showing a hand pressing a button labeled 'Power' with an arrow indicating direction, next to a vertical line labeled 'MILK'5 Press the power on/off button to switch on the Philips Sonicare.
natural_image
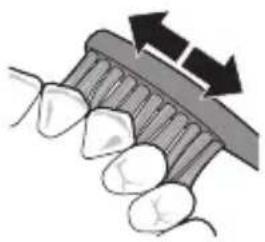
Illustration of dental tool manipulation with arrows indicating direction (no text or symbols)6 Apply light pressure to maximize Philips Sonicare's effectiveness. Brush your teeth with a small back and forth motion so the bristles reach between the teeth. Continue this motion throughout the brushing cycle.
natural_image
Diagram of a mechanical tool interacting with a textured surface, showing motion arrows (no text or symbols)Note: The bristles should flare slightly. Do not scrub.
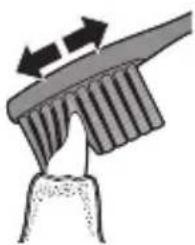
7 To clean the inside surfaces of the front teeth, tilt the brush handle semi-upright and make several vertical overlapping brushing strokes on each tooth.
Your Philips Sonicare is safe to use on:
- Braces (brush heads wear out sooner when used on braces).
- Dental restorations (fillings, crowns, veneers).
Features and accessories
a App b Pressure sensor c Brush head replacement reminder d BrushPacer e Easy-start f Travel case (specific types only) g Brush head holder (specific types only)
a. App
Your Philips Sonicare is Bluetooth enabled and allows you to achieve superior oral health care with the Philips Sonicare app.
Using the Philips Sonicare app will help you to improve your oral health care habits. It gives you real-time feedback while brushing, informs you if you missed any spots when brushing, tracks your brushing behavior over time and provides useful tips and tricks for your healthiest mouth ever. In order to fully benefit from your Philips Sonicare, we advise you to follow these steps:
Connecting your toothbrush
1 Download the Philips Sonicare app from the Apple App Store or Google Play Store.
2 Confirm Bluetooth is switched on on your mobile device before you open the app. Check the settings on your mobile device to switch on Bluetooth.
3 Open the Sonicare app.
4 To connect the toothbrush to the app, remove the handle from the charger and press the mode/intensity button.
5 Follow the Sonicare app instructions displayed on your mobile device. The app automatically connects with the toothbrush. If the toothbrush does not connect, follow the troubleshooting steps provided in the app.
Note: For optimal data capture, keep your mobile device close during brushing.
b. Pressure sensor
Your Philips Sonicare is equipped with an advanced sensor that measures the pressure you apply while brushing. If you apply too much pressure, the toothbrush will provide immediate feedback to indicate that you need to reduce the pressure. The feedback is given in two different ways:
natural_image
Simple line drawing of a container with a lid and a small hole at the bottom (no text or symbols)1 You experience a change in vibration and therefore brushing sensation.
2 The pressure warning light of the light ring will light up purple.
If you receive a warning, reduce the pressure. The light will turn off and the brushing sensation will adjust to the original sensation.
Activating or deactivating the pressure sensor
1 Place the handle, with a brush head attached, in the plugged-in charger.
2 Pressure sensor is enabled by holding the mode/intensity button and by pressing the power button twice while on a charger. The handle will beep twice to confirm it is enabled.
3 Pressure sensor is disabled by holding the mode/intensity button and by pressing the power button twice while on a charger. The handle will beep once to confirm it is disabled.
c. Brush head replacement reminder
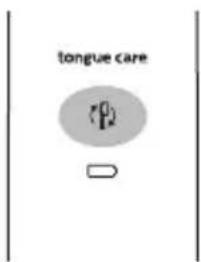
text_image
tongue careYour Philips Sonicare is equipped with a smart feature that tracks the wear of your brush head. Depending on the pressure you apply and the amount of time used, the brush head replacement reminder light reminds you to change your brush head. It is important to change your brush head in time in order to guarantee the best cleaning & care of your teeth.
When the amber brush head replacement light starts blinking, you should replace your brush head.
Activating or deactivating the brush head replacement reminder
1 Place the handle in the plugged-in charger.
2 Brush head replacement reminder is enabled by holding the mode/intensity button and by pressing the power button three times while on the charger. The handle will beep twice to confirm it is enabled.
3 Brush head replacement reminder is disabled by holding the mode/intensity button and by pressing the power button three times while on the charger. The handle will beep once to confirm it is disabled.
d. BrushPacer
flowchart
graph TD
    1 --> 2
    2 --> 3
    3 --> 4
    4 --> 5
    5 --> 6
    6 --> ①
    ① --> ②
    ② --> ③
    ③ --> ④
    ④ --> ⑤
The BrushPacer is an interval timer that has a short beep and pause to remind you to brush the different sections of your mouth. Depending on the brushing mode you have selected (see 'Brushing modes'), the BrushPacer beeps at different intervals during the brushing cycle.
e. Easy-start
The Easy-start feature gently increases the power over the first 14 brushings to help you get used to the brushing with the Philips Sonicare. The Easy-start feature works in all modes other than TongueCare+ mode. This Philips Sonicare model comes with the Easy-start feature deactivated.
Activating or deactivating the Easy-start feature
1 Place the handle in the plugged-in charger.
2 Easy-start is enabled by holding the mode/intensity button and by pressing the power button once while on the charger. The handle will beep twice to confirm it is enabled.
3 Easy start is disabled by holding the mode/intensity button and by pressing the power button once while on the charger. The handle will beep once to confirm it is disabled.
Note: Using the Easy-start feature beyond the initial ramp-up period is not recommended and reduces Philips Sonicare effectiveness in removing plaque.
Note: Each of the first 14 brushings must be at least 1 minute in length to properly move through the Easy-start ramp-up cycle.
Note: To achieve clinical efficacy, Easy-start needs to be deactivated.
f. Travel case (specific types only)
Your Philips Sonicare comes with a travel case to make traveling with your power toothbrush more convenient. It is designed to accommodate the power toothbrush handle and two brush heads. Some models come with a USB charging travel case which connects to your laptop via USB –this allows you to charge your Philips Sonicare when traveling. For information about charging your Philips Sonicare with the travel case, see 'Battery status and charging'.
g. Brush head holder (specific types only)
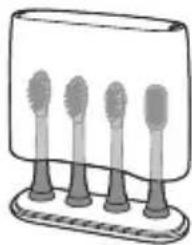
natural_image
Illustration of four toothbrushes mounted on a base (no text or symbols)The brush head holder is designed to keep and store your brush heads.
Battery status and charging
Charging with glass (specific types only)
1 Plug the charging base into a wall socket.
2 Place the charging glass on top of the charging base and place the handle in the glass.
The charging indicator flashes white until your toothbrush is fully charged.
Charging with travel case (specific types only)
1 Place the handle in the charging travel case.
2 Connect the charging travel case to a laptop, a wall-mounted USB socket or a suitable wall adapter. The USB cord is attached to the travel case and stored in the cord storage compartment.
3 The battery indication flashes white until your toothbrush is fully charged.
Important: The wall adapter must be a safe extra low voltage source, compatible with the electrical ratings marked on the device.
Important: Only toothbrush models HX993W, HX993B, HX993P, HX993S, HX993L can be charged in the travel case. Other products and batteries are not compatible with the travel case.
Note: It takes at least 24 hours to fully charge your Philips Sonicare. You do not have to fully charge your handle before first use, as the handle is pre-charged for first use. However, it is recommended to fully charge it after first use.
Note: This charger is designed to properly charge only one handle at a time. This charger is not compatible with other models of Philips Sonicare.
Note: Do not place metallic objects in the travel case, as handle charging may be affected and may cause the charger to overheat.
Cleaning
Note: Do not clean the brush head, handle or travel case in the dishwasher.
Toothbrush handle
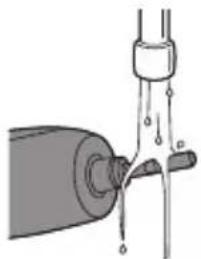
natural_image
Diagram of a mechanical device with liquid flowing through a pipe (no text or symbols)1 Remove the brush head and rinse the metal shaft area with warm water. Make sure you remove any residual toothpaste.
Caution: Do not push on the rubber seal on the metal shaft with sharp objects, as this may cause damage.
2 Wipe the entire surface of the handle with a damp cloth.
Note: Do not use isopropyl rubbing alcohol, vinegar or bleach to clean handle as this may cause discoloration.
Brush head

natural_image
Diagram of mechanical linkage or lifting mechanism with no visible text or symbols1 Rinse the brush head and bristles after each use.
2 Remove the brush head from the handle and rinse the brush head connection with warm water at least once a week.
Charger and travel case
1 Unplug the charger and travel case before you clean it.
2 Use a damp cloth to wipe the surface of the charger and travel case.
Glass and brush head holder
1 Clean the glass and the brush head holder with water and some mild soap.
2 Dry them with a soft towel.
The glass and the brush head holder are dishwasher-safe.
Storage
If you are not going to use your Philips Sonicare for an extended period of time, unplug the charger from the wall socket, clean it and store it in a cool and dry place away from direct sunlight.
Locating the model number
Look on the bottom of the Philips Sonicare toothbrush handle for the model number (HX992W, HX992B, HX992P, HX992S, HX992L, HX993W, HX993B, HX993P, HX993S, HX993L).
Recycling
- This symbol means that this product shall not be disposed of with normal household waste (2012/19/EU).
- This symbol means that this product contains a built-in rechargeable battery which shall not be disposed of with normal household waste (2006/66/EC). We strongly advise you to take your product to an official collection point or a Philips service center to have a professional remove the rechargeable battery.
- Follow your country's rules for the separate collection of electrical and electronic products and rechargeable batteries. Correct disposal helps prevent negative consequences for the environment and human health.
Removing the rechargeable battery
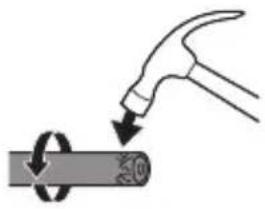
Warning: Only remove the rechargeable battery when you discard the appliance. Make sure the battery is completely empty when you remove it. To remove the rechargeable battery, you need a towel or cloth, a hammer and a flat-head (standard) screwdriver. Observe basic safety precautions when you follow the procedure outlined below. Be sure to protect your eyes, hands, fingers, and the surface on which you work.
1 To deplete the rechargeable battery of any charge, remove the handle from the charger, turn on the Philips Sonicare and let it run until it stops. Repeat this step until you can no longer turn on the Philips Sonicare.
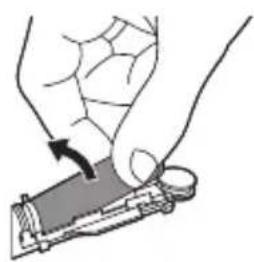
2 Remove and discard the brush head. Cover the entire handle with a towel or cloth.

natural_image
Illustration of a medical procedure on a patient's arm, showing a needle inserted into the ear area (no text or symbols present)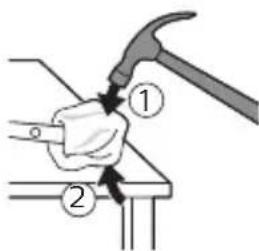
text_image
Diagram showing a hand using a hammer to press or install a component, labeled with parts 1 and 2.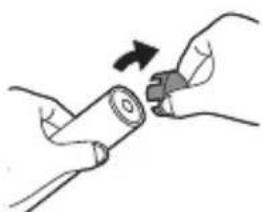
natural_image
Illustration of hands holding a cylindrical object with a knob, no text or symbols present3 Hold the top of the handle with one hand and strike the handle housing 0.5 inch above the bottom end. Strike firmly with a hammer on all 4 sides to eject the end cap.
Note: You may have to hit on the end several times to break the internal snap connections.
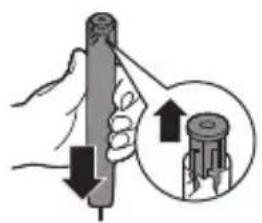
4 Remove the end cap from the toothbrush handle. If the end cap does not release easily from the housing, repeat step 3 until the end cap is released.
natural_image
Illustration of a hand using a hammer to tighten a cylindrical object with a circular arrow (no text or symbols)5 Holding the handle upside down, press the shaft down on a hard surface. If the internal components do not easily release from the housing, repeat step 3 until the internal components are released.
natural_image
Illustration of a hand holding a cylindrical tool with an arrow indicating force or direction, and a magnified inset showing the same tool (no text or symbols present)6 Remove the rubber battery cover.
natural_image
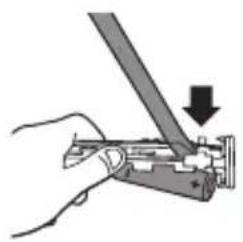
Illustration of a hand using a tool to adjust or install a mechanical component, with no visible text or symbols.7 Wedge the screwdriver between the battery and the black frame at the bottom of the internal components. Then pry the screwdriver away from the battery to break the bottom of the black frame.
natural_image
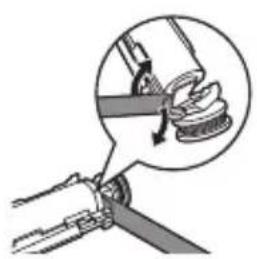
Illustration of a mechanical clamp or bracket with a magnified inset showing a curved component (no text or symbols)8 Insert the screwdriver between the bottom of the battery and the black frame to break the metal tab connecting the battery to the green printed circuit board. This will release the bottom end of the battery from the frame.
natural_image
Illustration of a hand holding a tool with a circular component, no text or symbols present9 Grab the battery and pull it away from the internal components to break the second metal battery tab.
Caution: Be aware of the sharp edges of the battery tabs so as to avoid injury to your fingers.
text_image
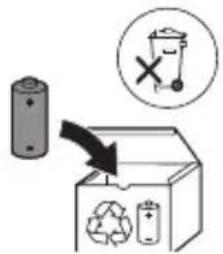
Diagram illustrating a recycling process with a battery, recycling symbol, and labeled waste bin10 Cover the battery contacts with tape to prevent any electrical short from residual battery charge. The rechargeable battery can now be recycled and the rest of the product discarded appropriately.
Warranty and support
If you need information or support, please visit www.philips.com/support or read the international warranty leaflet.
Warranty restrictions
The terms of the international warranty do not cover the following:
- Brush heads.
- Damage caused by use of unauthorized replacement parts.
- Damage caused by misuse, abuse, neglect, alterations or unauthorized repair.
- Normal wear and tear, including chips, scratches, abrasions, discoloration or fading.
Einführung
natural_image
Simple diagram with three circles and a shaded oval, no text or symbols presentnatural_image
Illustration showing a hand pouring liquid into a bottle and a plug, with an arrow indicating the process (no text or symbols present)natural_image
Illustration of a hand using a tool to apply toothpaste (no text or symbols present)text_image
Diagram showing a hand pressing a button labeled 'Power' with an arrow indicating direction, likely illustrating a control or operation step.natural_image
Illustration of dental tool manipulation with arrows indicating direction (no text or symbols)natural_image
Diagram of a mechanical component with arrows indicating direction (no text or symbols)natural_image
Simple line drawing of a container with an oval shape and a small protrusion at the top (no text or symbols)text_image
tongue carenatural_image
Illustration of four toothbrushes arranged on a base (no text or symbols)natural_image
Diagram of a mechanical device with a shaft and lever, showing internal components (no text or symbols)natural_image
Diagram of a mechanical or electrical component with no visible text, numbers, or symbolsnatural_image
Simple line drawing of a mechanical component or tool with no visible text or symbols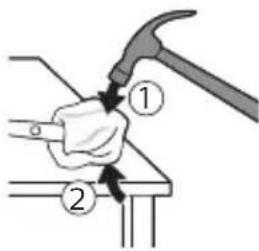
text_image
Diagram showing a hand using a hammer to press or install a piece of wood, labeled with parts ① and ②.natural_image
Illustration of hands holding a battery with a switch, no text or symbols present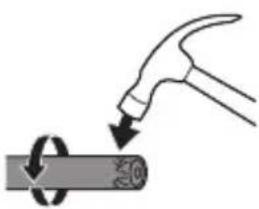
natural_image
Illustration of a hammer striking a cylindrical object with a circular arrow indicating rotation (no text or symbols)natural_image
Illustration of a hand holding a cylindrical object with arrows indicating force or movement, and a magnified inset showing a cylindrical object inserted into it (no text or symbols present)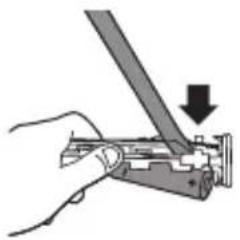
natural_image
Hand holding a mechanical component with a downward arrow indicating force or direction (no text or symbols)natural_image
Mechanical assembly diagram showing a lever mechanism with a magnified inset (no text or symbols)natural_image
Illustration of a hand holding a small electronic device with an arrow indicating rotation (no text or symbols)text_image
Diagram showing a battery and recycling bin with a 'X' symbol indicating no waste or disposal.natural_image
Simple diagram with three circles and a vertical line, no text or symbols presentnatural_image
Illustration showing a hand pouring liquid into a bottle and a plug, with an arrow indicating the process (no text or symbols present)natural_image
Illustration of a hand using a tool to apply a substance onto a surface (no text or symbols present)text_image
Diagram showing a hand pressing a button labeled 'Power' with an arrow indicating direction, likely illustrating a control or operation step.natural_image
Illustration of dental tool positioning on a tooth (no text or symbols)natural_image
Diagram of a mechanical component with arrows indicating direction (no text or symbols)natural_image
Simple line drawing of a container with an oval shape and a small protrusion (no text or symbols)text_image
tongue care ptext_image
Diagram of a mechanical or electrical component with numbered parts and directional arrows indicating motion or flow.natural_image
Illustration of four toothbrushes arranged on a base (no text or symbols)natural_image
Diagram of a mechanical device with a lever and pivot, showing fluid flow direction (no text or labels)natural_image
Diagram of a mechanical or electrical component with no visible text, numbers, or symbolsnatural_image
Diagram of a mechanical component with a curved arrow indicating rotation (no text or symbols)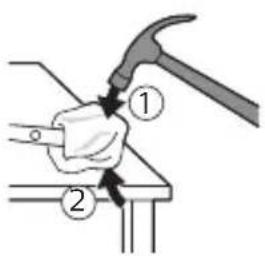
text_image
Diagram showing a hand using a hammer to press or install a component, labeled with parts 1 and 2.natural_image
Illustration of hands holding a cylindrical object with a knob, no text or symbols presentnatural_image
Illustration of a hammer striking a cylindrical object with a circular arrow indicating rotation (no text or symbols)natural_image
Illustration of a hand holding a cylindrical tool with an arrow indicating force or direction, and a magnified inset showing the tool tip (no text or symbols)natural_image
Hand holding a tool with a downward arrow indicating a process (no text or symbols present)natural_image
Diagram showing a mechanical joint with a magnified inset highlighting a specific component (no text or symbols present)natural_image
Illustration of a hand holding a small electronic device with a scroll wheel (no text or symbols visible)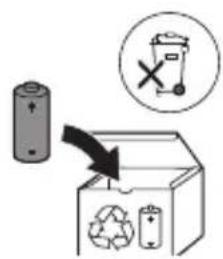
text_image
Diagram illustrating a recycling process with a battery, recycling symbol, and labeled components including a 'X' indicating no disposal.natural_image
Simple diagram with three circles and a dot, no text or symbols presentnatural_image
Illustration of a hand using a toothbrush to apply a toothbrush to a toothpaste bottle (no text or symbols present)natural_image
Diagram of a funnel pouring liquid into a bulb (no text or symbols)natural_image
Illustration of a hand using a toothbrush to apply or brush (no text or symbols present)text_image
Diagram showing a hand pressing a button with an arrow and a power symbol, indicating left-hand rule or control instruction.natural_image
Illustration of a dental tool with teeth and jawbone, showing tooth alignment (no text or symbols)natural_image
Diagram of a mechanical component with arrows indicating motion or force direction (no text or symbols)natural_image
Simple line drawing of a rounded rectangular object with a small circular mark at the center (no text or symbols)natural_image
Illustration of four toothbrushes arranged on a base (no text or symbols)natural_image
Diagram of a mechanical device with a cylindrical component inserted into a pipe, showing fluid flow (no text or symbols)natural_image
Diagram of a mechanical or electrical component with no visible text, numbers, or symbolsnatural_image
Simple line drawing of a mechanical component or tool with a curved handle and base, no text or symbols present.
text_image
Diagram showing a hand using a hammer to press or install a piece, labeled with parts ① and ②.natural_image
Illustration of hands holding a battery with an arrow indicating rotation (no text or symbols)natural_image
Illustration of a hammer striking a cylindrical object with a circular arrow indicating rotation (no text or symbols)natural_image
Illustration of a hand holding a pen with arrows indicating force direction, and a magnified inset showing a cylindrical object (no text or symbols)natural_image
Hand holding a mechanical component with a downward arrow indicating force or direction (no text or symbols)natural_image
Mechanical assembly diagram showing a lever mechanism with a magnified inset view of the lever (no text or symbols)natural_image
Illustration of a hand holding a small electronic device with a circular component, no text or symbols presenttext_image
Diagram illustrating a recycling process with a battery, recycling symbol, and labeled components including a trash bin and recycling bin.natural_image
Simple diagram with three circles and a dot, no text or symbols presentnatural_image
Illustration of a hand using a tool to apply a brush to a bottle, with a downward arrow indicating action (no text or symbols present)natural_image
Diagram of a funnel pouring liquid into a bulb (no text or symbols)2 Bagnate le setole.
natural_image
Illustration of a hand using a toothbrush to apply or brush (no text or symbols present)text_image
Diagram showing a hand pressing a button with an arrow and a power symbol, likely illustrating a control or operation step.natural_image
Illustration of dental arching with arrows indicating direction (no text or symbols)natural_image
Diagram of a mechanical component with arrows indicating motion or force direction (no text or symbols)natural_image
Simple line drawing of a container with an oval shape inside, no text or symbols present.text_image
tongue carenatural_image
Illustration of four toothbrushes mounted on a base (no text or symbols)natural_image
Diagram of a mechanical or fluidic device with a pipe and valve, showing fluid flow direction (no text or symbols)natural_image
Diagram of a mechanical or electrical component with no visible text, numbers, or symbolsnatural_image
Simple line drawing of a mechanical component or tool with a curved handle and base, no text or symbols present.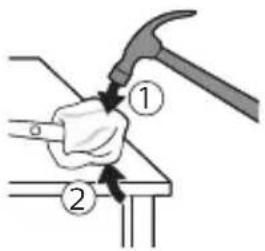
text_image
Diagram showing a hand using a hammer to press or install a piece, labeled with parts ① and ②.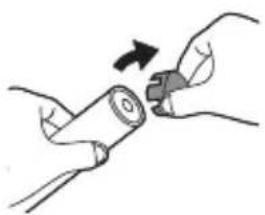
natural_image
Illustration of hands holding a battery with a switch, no text or symbols present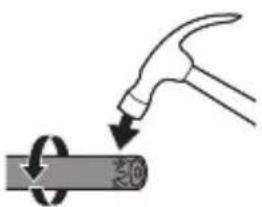
natural_image
Illustration of a hammer striking a circular object with a textured surface (no text or symbols)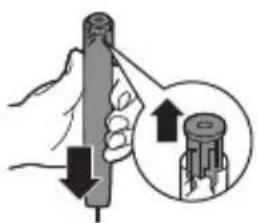
natural_image
Illustration of a hand holding a cylindrical tool with a magnified inset showing the tip of a mechanical component (no text or symbols)natural_image
Hand holding a mechanical component with a downward arrow indicating a process (no text or symbols present)natural_image
Mechanical assembly diagram showing a lever mechanism with a magnified inset (no text or symbols)natural_image
Illustration of a hand holding a small electronic device with an arrow indicating motion (no text or symbols)text_image
Diagram showing a battery, recycling symbol, and trash bin with a 'X' indicating no waste or disposal.De Philips Sonicare (afb. 1)
natural_image
Simple diagram with three circles and a dot, no text or symbols presentnatural_image
Illustration showing a hand brushing teeth with a magnified view of the tooth being dissolved from a bottle (no text or symbols)natural_image
Illustration of a hand using a toothbrush to apply material (no text or symbols visible)text_image
Diagram showing a hand pressing a button labeled 'Power' with an arrow indicating direction, likely illustrating a control or operation step.natural_image
Illustration of dental arching with arrows indicating direction (no text or symbols)natural_image
Diagram of a mechanical component with arrows indicating direction (no text or symbols)natural_image
Simple line drawing of a container with an oval shape at the bottom (no text or symbols)text_image
tongue carenatural_image
Illustration of four toothbrushes mounted on a base (no text or symbols)natural_image
Diagram of a mechanical device with a lever and pipe, showing fluid flow direction (no text or labels)natural_image
Diagram of a mechanical or electrical component with no visible text, numbers, or symbolsnatural_image
Simple line drawing of a tool interacting with a mechanical component (no text or symbols)
text_image
Diagram showing a hand turning a tool with labeled parts, including a hammer and a base with arrows indicating direction.natural_image
Illustration of hands holding a cylindrical object with an arrow indicating rotation (no text or symbols)
natural_image
Illustration of a hammer striking a cylindrical object with a circular motion arrow (no text or symbols)natural_image
Illustration of a hand holding a cylindrical object with arrows indicating force direction, and an inset showing a magnified view of the object (no text or symbols)natural_image
Hand holding a tool with a downward arrow indicating a process (no text or symbols present)natural_image
Diagram of a mechanical clamp or fastener being inserted into a bracket, with no visible text or symbols.natural_image
Illustration of a hand holding a small electronic device with a scroll wheel (no text or symbols visible)text_image
Diagram illustrating a battery recycling process with a magnified inset showing a trash bin and recycling symbol.natural_image
Simple diagram with three circles and a shaded oval, no text or symbols presentnatural_image
Illustration of a dental tool being inserted into a toothbrush, showing the process from being inserted (no text or symbols present)natural_image
Illustration of a hand brushing teeth with a toothbrush (no text or symbols)text_image
Diagram showing a hand holding a power button with an arrow, indicating left-hand rule for switching to a switch.natural_image
Illustration of a dental tool with teeth and jawbone, showing tooth movement (no text or symbols)natural_image
Diagram of a mechanical component with arrows indicating motion or force direction (no text or symbols)natural_image
Simple line drawing of a container with an oval shape and a small circular mark inside (no text or symbols)text_image
tongue care P2natural_image
Illustration of four toothbrushes arranged on a base (no text or symbols)natural_image
Diagram of a mechanical device with a lever and shaft, showing no text or symbolsnatural_image
Diagram of a mechanical or electrical component with no visible text, numbers, or symbolsnatural_image
Illustration of a mechanical tool interacting with a surface (no text or symbols)
text_image
Diagram showing a hand using a hammer to press or install a component, labeled with parts ① and ②.natural_image
Illustration of hands holding a battery with a switch, no text or symbols presentnatural_image
Illustration of a hand hammering a cylindrical object with a circular arrow indicating rotation (no text or symbols)natural_image
Illustration of a hand holding a cylindrical tool with an arrow indicating force or direction, and a magnified inset showing the same tool (no text or symbols present)natural_image
Hand holding a tool with a downward arrow indicating a process (no text or symbols present)natural_image
Illustration showing a hand holding a tool with a magnified inset of the tool's handle (no text or symbols present)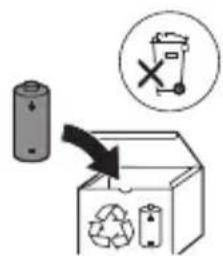
text_image
Diagram illustrating a recycling process with a battery, recycling symbol, and labeled components including a 'X' symbol.natural_image
Simple diagram with three circles and a dot, no text or symbols presentnatural_image
Illustration showing a hand using a toothbrush to dispense material into a toothbrush (no text or symbols present)natural_image
Illustration of a hand brushing teeth with a toothbrush (no text or symbols)text_image
Diagram showing a hand pressing a button with an arrow and a power button icon, indicating action or operation.natural_image
Illustration of dental tool positioning on a tooth (no text or symbols)natural_image
Diagram of a mechanical component with arrows indicating motion or force direction (no text or symbols)natural_image
Simple line drawing of a container with an oval shape and a small circular mark inside (no text or symbols)text_image
tongue carenatural_image
Illustration of four toothbrushes arranged on a base (no text or symbols)natural_image
Diagram of a mechanical device with a cylindrical component and connecting rods (no text or symbols)natural_image
Diagram of a mechanical or electrical component with no visible text, numbers, or symbolsnatural_image
Simple line drawing of a mechanical component or tool interacting with a surface (no text or symbols)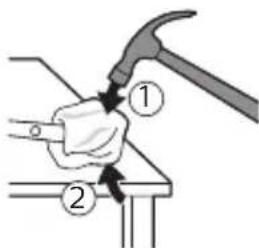
text_image
Diagram showing a hand using a hammer to press or install a component, labeled with parts ① and ②.
natural_image
Illustration of hands holding a battery with a magnifying glass, no text or symbols present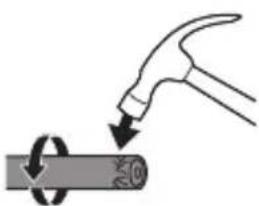
natural_image
Illustration of a hammer striking a cylindrical object with a circular motion arrow (no text or symbols)natural_image
Illustration of a hand holding a cylindrical object with arrows indicating force or movement, and a magnified inset showing a mechanical component (no text or symbols)natural_image
Hand holding a tool with a downward arrow indicating a process (no text or symbols present)natural_image
Mechanical diagram showing a hand gripping a spring with a magnified inset highlighting the spring's mechanism (no text or symbols present)natural_image
Illustration of a hand holding a small object with a curved arrow indicating motion (no text or symbols)text_image
Diagram illustrating a recycling process with a battery, recycling symbol, and trash bin, accompanied by an instructional arrow.www.philips.com/Sonicare
©2017 Koninklijke Philips N.V. (KPNV). All rights reserved. Philips and the Philips shield are trademarks of KPNV. Sonicare and the
Sonicare logo are trademarks of Philips Oral Healthcare, LLC and/or KPNV.
4235.021.2500.1 (20/3/2017)

75% recycled paper
75% papier recyclé
