WCC1080G - Coffee machine Witt - Free user manual and instructions
Find the device manual for free WCC1080G Witt in PDF.


| Product type | Drip coffee maker |
| Brand | Witt |
| Model | WCC1080G |
| Dimensions (approx.) | 250 x 200 x 350 mm |
| Weight (approx.) | 2.5 kg |
| Power supply | 220-240 V, 50/60 Hz |
| Power (approx.) | 1000 W |
| Capacity | 12 cups (max), water tank with MIN/MAX marks |
| Materials | Plastic body, glass carafe |
| Main functions | Delay timer (0-24 h), automatic shut-off after 40 min, keep warm, clock |
| Safety | Automatic shut-off, hot heating surface, do not immerse, use by children >8 years under supervision |
| Cleaning and maintenance | Clean with a damp cloth, carafe and filter basket washable in warm soapy water, regular descaling with vinegar |
| Spare parts | Carafe, filter basket, filter holder, coffee filter size 1x4 |
| Warranty | 2 years on manufacturing and material defects (domestic use) |
Frequently Asked Questions - WCC1080G Witt
User questions about WCC1080G Witt
0 question about this device. Answer the ones you know or ask your own.
Ask a new question about this device
Download the instructions for your Coffee machine in PDF format for free! Find your manual WCC1080G - Witt and take your electronic device back in hand. On this page are published all the documents necessary for the use of your device. WCC1080G by Witt.
USER MANUAL WCC1080G Witt
natural_image
Modern black coffee maker with digital display and glass control panel (no visible text or symbols)220-240V 50/60Hz 915-1080W
Brugsanvisning DK: 2-10
Bruksanvisning SE: 11-19
- Låg
- Vandtank
- Filterkurv
- Kande
- Tragt
- Vandvindue
- Betjeningspanel
Før første brug
WILT U DIRECT MEER KOFFIE ZETTEN?
IMPORTANT SAFETY INSTRUCTIONS....48
OVERVIEW OF THE DEVICE 49
BEFORE USING IT FOR THE FIRST TIME....50
BREWING COFFEE 50
HOW TO OPERATE 51
WARRANTY 54
SERVICE....55
SAFETY INSTRUCTIONS
- The device may be used by children above the age of eight if they are taught how to use the device properly and if at first they are supervised by someone who is responsible for their safety. Keep an eye on children to ensure that they do not play with the device. Children over the age of eight may clean or maintain the device, but only if they are being supervised. Keep the device and the power cord away from children under the age of eight.
- Individuals who, because of limited physical, sensory or mental capacity or who because of lack of experience or knowledge are incapable of using the device safely may only use the device when someone who is responsible for their safety has taught them how to properly use the device and follow the safety instructions.
• Children may not play with the device.
- Making repairs or alterations to the device and changing power cords may only be done by professionals trained in this kind of work or customer service staff.
- This device is intended for household use and similar applications, such as:
- Being used by kitchen staff in stores, offices and other working environments
- Being used at agricultural enterprises
- Being used by hotel/motel guests and in other kinds of residential environments, including
- Bed & breakfasts.
- Never lower the device in water or other fluids.
- The surface of the heating plate may still be warm after use.
- Only use the device as specified in these instructions. If you do not operate the device correctly, there is the risk of getting an electric shock.
- Ensure that the electricity in your home (voltage and frequency) is a perfect match the with the information on the device's type plate. If there is no match, please contact your retailer and do not use the device.
- Do not place the device on hot surfaces.
- Do not use the device outdoors.
- Remove the plug from the socket:
- if there are problems when coffee is brewing
- before cleaning the device.
- Ensure that the power cord does not come into contact with hot surfaces.
- Keep the device out of reach of children. Ensure that children do not pull the power cord or push the device.
- Do not fill the water tank with water before the device is turned on.
- The heating plate is warm when the device is being used. Do not touch the heating plate - you may get burns!
- Only use fresh, cold water to fill the water tank.
Overview of the device
EN
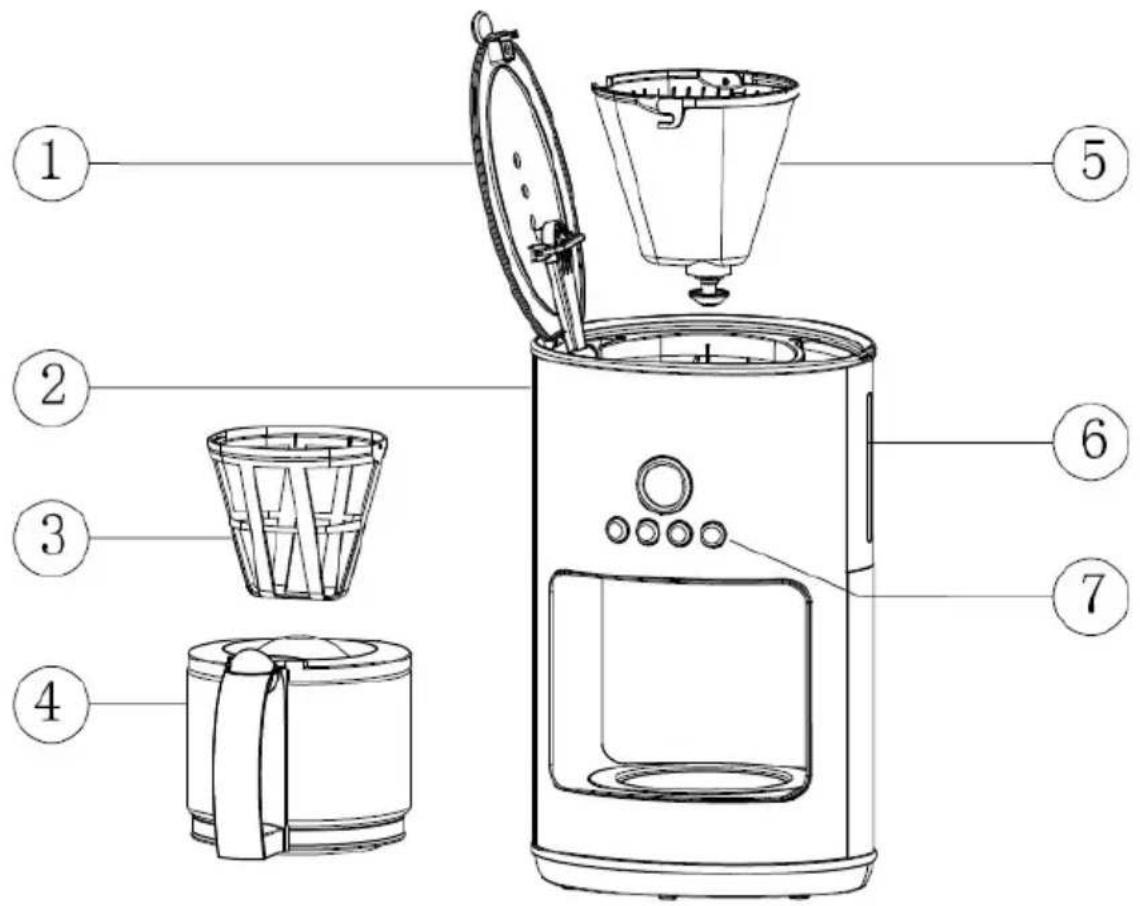
- Lid
- Water tank
- Filter holder
- Pot
- Funnel
- Water window
- Operating panel
Before using it for the first time
In order to get the optimal taste, it is recommended to use the coffee machine with clean water 2-3 times before brewing your first pot of coffee. Turn off the device when the water has run through and let the device cool down for five minutes. Then repeat the procedure with fresh water.
Brewing coffee
- Fill the water tank with water. Ensure that the water level is not below the minimum or above the “MAX” markers. Only use fresh, cold water. The number of cups that will be brewed can be seen on the water tank.
- Insert a new size 1x4 coffee filter and add the desired amount of coffee to the filter.
- Turn on the device. Wait until the coffee has finished brewing and there is no more water left in the filter basket.
- For large cups: Use 5-6g of ground coffee per cup.
If you have brewed a single cup of coffee and want to make more right away, then turn off the coffee machine and let it cool down for at least five minutes. After that, you can refill the water tank.
CLEANING AND MAINTENANCE
- Always remove the plug from the socket before cleaning the device.
- Never lower the device into water or other kinds of fluid.
- Clean the device with a moist rag.
- The carafe and filter basket can be washed in hot soapy water.
DESCALING
- Descale your coffee machine on a regular basis.
- Operate the device as described above, but now fill the water tank with regular vinegar and do not put coffee in the filter basket.
- After the descaling process is completed, run clean water through the device a few times in order to remove any residual vinegar or chalk.
How to operate


1. Main functions
(1) Delayed Start (0-24 hours) and immediate heating. Delayed Start requires that the time is properly configured. When the timer matches the pre-set time, the device will begin heating up and will turn off automatically after 40 minutes. For immediate heating, press the ON/OFF button - the device will then begin heating up or go into standby mode.
(2) Auto shutdown: once the device has been turned on for more than 40 minutes without being operated, it will automatically turn off.
2. Instructions for the operating panel
(1) ON/OFF When the device is connected to a power source, the display will blink and show "0000". Press the ON/OFF button, the device will then go into standby mode and the screen will stop blinking ("0000" will still be displayed). When the ON/OFF button is pressed again, the device will start the heating process. If you press the button again, the device will go back into standby mode.
(2) “HOUR” (H) (Configure hours: 0-23): Each time you press the H button when the device is in standby mode, an hour will be added. If you hold down the H button, the hours will progress faster.
(3) “MIN” (min) (Configure minutes: 0-59): Every time you press the MIN button, a minute will be added. If you hold down the MIN button, the minutes will progress faster.
(4) Delayed start/pre-setting (SET): Once the hours and minutes are specified, you can then configure the Delayed Start on the device.
a) Press the SET button to access the Delayed Start menu. The icon will now blink
on the screen. You can pre-set the time by using the H or MIN button.
b) Then quickly press the SET button again to confirm the setting. If you do not make a preset, the device will automatically return to standby mode.
c) Press the SET button to see what has been programmed.

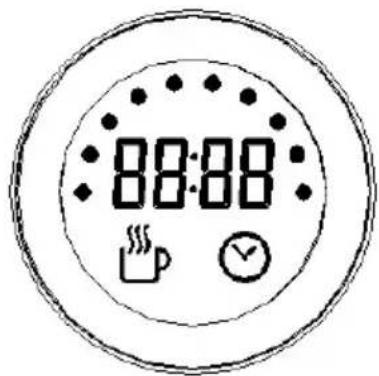
3. Display
1) Add power: The screen will now blink "0000" without configuring a time. The device will return to standby mode when pressing the ON/OFF button.
2) Standby: The screen will display “0000” constantly or show the time of day. If there has been configured a Delayed Start, this will be shown. If no settings are configured and the device has been inactive for two minutes, the screen will shut off.
(3) Heating: The screen will display the ☐. Now the letter “n” will rotate clockwise on the left side and the number on the right side will show the operational time. If no settings are configure and the device is inactive for two minutes, the screen brightness will be reduced by 50%. When the device has been inactive for 40 minutes, the pre-heating will stop and the screen will shut off.
(4) Delayed start/pre-setting (SET): The screen will display the icon ^8888 . Now it will show 88:00 the real time and the countdown.
The dots will blink one by one in a clockwise direction. If the timer is more than 10 minutes away from the pre-set time/Delayed Start, the dots will grow bigger from left to right with one per minute for at least 10 minutes. If there is no activity for two minutes, the display brightness will be reduced by 50%. When the real time reaches the pre-set time, the device will begin the heating process and the screen will turn off.
(5) If any button is pushed, the screen display will light up again.
4. How to operate
(1) Starting up phase: Connect the device to a power source and then the screen will blink and display "0000". Press the ON/OFF button to enter standby mode. If you press the ON/OFF button again, the device will immediately start the heating process. The screen will display the icon
If the device is not used or 40 minutes, it will automatically stop the heating process and return to standby mode.
(2) Configure real time/hours and minutes: Press the H or MIN button and configure the clock. If you hold down the buttons, the hours and minutes will progress faster.
(3) Delayed Start: Press the SET button (in standby mode) to access the Delayed Start setting. Then press the H and MIN buttons to specify the time you want. You can hold down the buttons to make the hours and minutes progress faster. Press the SET button again to confirm Delayed Start or hold the button down for more than five seconds to exit the menu. The clock needs to be set first, otherwise you cannot pre-set the device. The heating process automatically starts once the Delayed Start begins. After 40 minutes, the device will shut down automatically.
(4) Press the SET button to see what has been programmed.
(5) Immediate heating up:
a) Press the ON/OFF button during the starting up phase to make the device go into standby mode. Press the ON/OFF button again to make the device start the heating process.
b) If you press the ON/OFF button again, the device will turn off.
5. Lock function
(1) Connect the device to a power source. Except for the ON/OFF button, the buttons will not be active.
(2): If the device is in standby mode and the time on the clock is not configured, the SET button will not work.
(3) When the device is being used, it is only the ON/OFF button that works.
(4): If Delayed Start is active, the H and MIN buttons will not work.
6. Safety functions
Once the device has been turned on for more than 40 minutes without being operated, it will automatically turn off.
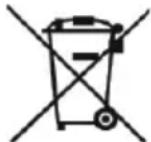
The symbol means that the product should not be thrown out together with regular household waste. Instead, it should be disposed of at an authorised recycling station which is suitable for this purpose or returned to a retailer that offers disposal services. Contact your local municipality if you need more information.

WARRANTY AND SERVICE
There is a 2-year warranty period if your new product stops working due to manufacturing or material faults which begins from the documented date of purchase. The warranty covers materials and the cost of labour. When inquiring about service, please state the product name and serial number. You can find this information on the type plate. You can write down the information here in these instructions so that you have them at hand. This makes it easier for the service technician to find the correct spare parts.
The warranty does not cover:
- Faults and damage that are not due to manufacturing or material issues
- Damage caused by failure to properly maintain the device - including failing to clean it
- Fire and/or water damage or moisture damage on the product
- Damage caused during transport if the product was transported without proper packaging
- Damage caused by the use of unoriginal spare parts
- Damage resulting from failing to follow the instructions on how to use the device
- If the device has not been set up/assembled as specified in the instructions
- If non-professionals have installed or repaired the product
- Batteries or any other parts subject to normal wear and tear
Damage during transport
If the product is damaged during transport and this is discovered when the retailer delivers the product to the customer, this is exclusively a matter between the customer and the retailer. In cases where customers have handled the transport of the product themselves, the supplier shall not be liable for any potential damage during transport. Any damage caused during transport must be reported immediately and no later than 24 hours after the product has been delivered. If not, the customer's claim will be rejected.
Unnecessary service
If the product is sent in to be serviced and it turns out that the fault could have been fixed independently by following the product's instruction manual, the customer will need to pay the service fee.
Commercial purchases
Commercial purchases are all purchases of devices that are not intended to be used in private households but instead intended to be used for commercial purposes (in restaurants, cafés, canteens, etc.) or intended to be rented out or otherwise used by multiple users in turn.
There is no warranty offered for commercial purchases, as this product is only intended for regular household use.
SERVICE
For service and spare parts in England and Ireland please call below-mentioned number and you will be directed accordingly or send us an email.
Witt UK & Ireland Ltd.
(44) 148 351 6633 / info@witt.dk
If you want to use a service technician or get spare parts in Denmark, please contact the store that you bought the product from.
You can also claim warranty at witt.dk under the 'Service' tab.
We accept no liability for printing errors.
The manufacturer/distributor cannot be held liable for damage to products or individuals if the safety instructions were not followed. The warranty shall not cover cases where the instructions have not been followed.
VIKTIGE SIKKERHETSANVISNINGER 57
OVERSIKT OVER APPARATET 58
F∅R F∅RSTE GANGS BRUK....59
KAFFE-BRYGGING 59
BETJENING....60
REKLAMASJONSRETT 63
SERVICE....64
SIKKERHETSANVISNINGER
- Lokk
- Vanntank
- Filterholder
- Kanne
- Trakt
- Vann-vindu
- Betjeningspanel


- Før første brug
- WILT U DIRECT MEER KOFFIE ZETTEN?
- SAFETY INSTRUCTIONS
- Overview of the device
- Before using it for the first time
- Brewing coffee
- CLEANING AND MAINTENANCE
- DESCALING
- How to operate
- Main functions
- Instructions for the operating panel
- Display
- How to operate
- Lock function
- Safety functions
- WARRANTY AND SERVICE
- The warranty does not cover:
- Damage during transport
- Unnecessary service
- Commercial purchases
- SERVICE
- SIKKERHETSANVISNINGER
Brand : Witt
Model : WCC1080G
Category : Coffee machine