
HMWB6SBK13 - Hand blender WestBend - Free user manual and instructions
Find the device manual for free HMWB6SBK13 WestBend in PDF.


| Product type | Immersion blender / hand mixer |
| Brand | WestBend |
| Model | HMWB6SBK13 |
| Power supply | 120 V, 60 Hz |
| Power | 300 W (estimated) |
| Speeds | 6 speeds + Turbo |
| Body material | Plastic |
| Weight | Approx. 1 kg (estimated) |
| Dimensions (L x W x H) | 20 x 10 x 15 cm (estimated) |
| Main functions | Beat, mix, whisk, knead, blend with immersion attachment |
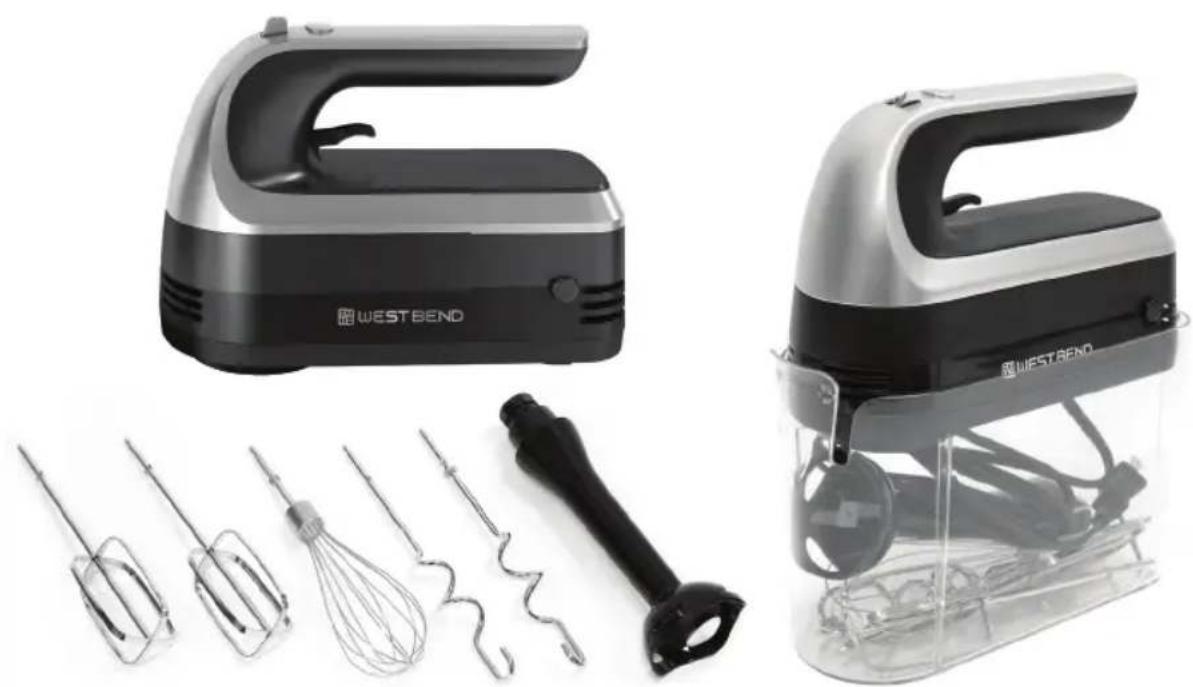
| Included accessories | 2 beaters, 1 whisk, 2 dough hooks, 1 immersion blending rod, 1 storage case |
| Cleaning | Body: damp cloth; accessories (except rod): dishwasher (top rack) or soapy water; rod: rinse under water |
| Safety | Polarized plug, automatic shut-off in OFF position, accessory release via lever |
| Warranty | 1 year limited (parts and labor) |
| Spare parts and repairability | No user-repairable parts; contact customer service via westbend.com |
| Usage | Household use only, on stable, horizontal surface |
Frequently Asked Questions - HMWB6SBK13 WestBend
User questions about HMWB6SBK13 WestBend
0 question about this device. Answer the ones you know or ask your own.
Ask a new question about this device
Download the instructions for your Hand blender in PDF format for free! Find your manual HMWB6SBK13 - WestBend and take your electronic device back in hand. On this page are published all the documents necessary for the use of your device. HMWB6SBK13 by WestBend.
USER MANUAL HMWB6SBK13 WestBend
Register this and other West Bend products through our website:
http://registerproducts.online
Product registration is not required to activate warranty.
Important Safeguards 2
Polarized Plug 3
Product Diagram 4
Before Use 5
Using Your Hand Mixer 5
Helpful Hints 6
Cleaning & Storage 6-7
Warranty 7
SAVE THIS INSTRUCTION MANUAL FOR FUTURE REFERENCE
IMPORTANT SAFEGUARDS
When using electrical appliances, basic safety precautions should always be followed to reduce the risk of fire, electric shock, and/or injury to persons including the following:
- Read all instructions before using this product.
- To protect against electric shock, do not place or immerse cord, plugs, or appliance in water or other liquid.
-
This appliance is not intended for use by children or by persons with reduced physical, sensory, or mental capabilities, or lack of experience and knowledge. Close supervision is necessary when any appliance is used near children. Children should be supervised to ensure that they do not play with the appliance. Keep the appliance and its cord out of reach of children.
-
Never leave appliance unattended when in use.
-
Turn any control to OFF, then unplug from outlet when not in use, before putting on or taking off parts and before cleaning. To unplug, grasp the plug and pull from the outlet. Never pull from the power cord. Allow to cool before putting on or taking off parts, and before cleaning.
-
Avoid any contact with moving parts. Keep hands, hair, clothing, as well as spatulas and other utensils away from beaters during operation to reduce the risk of injury to persons or damage to the mixer.
-
Remove beaters from mixer before washing.
-
Do not operate any appliance with a damaged cord or plug or after the appliance malfunctions, or has been damaged in any manner. Do not attempt to replace or splice a damaged cord. Return appliance to the manufacturer (see warranty) for examination, repair or adjustment.
-
For appliances with markings on plug blade: This appliance has important markings on the plug blade. The attachment plug or entire cord set (if plug is molded onto cord) is not suitable for replacement. If damaged, the appliance shall be replaced.
-
The use of attachments not recommended or sold by the manufacturer may cause fire, electric shock or injury.
-
Do not use outdoors or for commercial purposes.
-
Do not let cord hang over edge of table or counter, or touch hot surfaces, including the stove.
-
Do not use appliance for other than intended use. Misuse can cause injuries. Always use appliance on a dry, stable, level surface.
-
Do not place appliance on or near a hot burner or in a heated oven.
-
If equipped with the immersion blender attachment.
a. When mixing liquids, especially hot liquids, use a tall container or make small quantities at a time to reduce spillage.
b. Keep hands and utensils out of the container while blending to prevent the possibility of severe injury to personals or damage to the unit. A scraper may be used but must be used only when the unit is not running.
c. Blades are sharp. Handle carefully.
SAVE THESE INSTRUCTIONS HOUSEHOLD USE ONLY
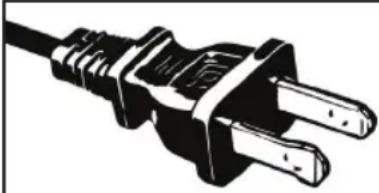
POLARIZED PLUG
North American models with polarized plugs:
natural_image
Illustration of a black and white electrical outlet plug with two leads (no text or symbols)POLARIZED PLUG
This appliance has a polarized plug, (one blade is wider than the other). As a safety feature to reduce the risk of electrical shock, this plug is intended to fi t in a polarized outlet only one way. If the plug does not fi t fully in the outlet, reverse the plug. If it still does not fi t, contact a qualifi ed electrician. Do not attempt to defeat this safety feature or modify the plug in any way. If the plug fi ts loosely into the AC outlet or if the AC outlet feels warm do not use that outlet.
POWER CORD INSTRUCTIONS:
A short power-supply cord or detachable power-supply cord is provided to reduce risks resulting from becoming entangled in or tripping over a longer cord. Longer detachable power-supply cords or extension cords are available and may be used if care is exercised in their use. If a long detachable power-supply cord or extension cord is used:
a. The marked electrical rating of the detachable power-supply cord or extension cord should be at least as great as the electrical rating of the appliance;
b. If the appliance is of the grounded type, the extension cord should be a grounding type 3wire cord; and
c. The longer cord should be arranged so that it will not drape over the counter top or table top where it can be pulled on by children or tripped over unintentionally.
Do not pull, twist or otherwise abuse the power cord.
Do not wrap the power cord around the main body of the appliance during or after use.
Congratulations on your purchase of a West Bend® Hand Mixer!
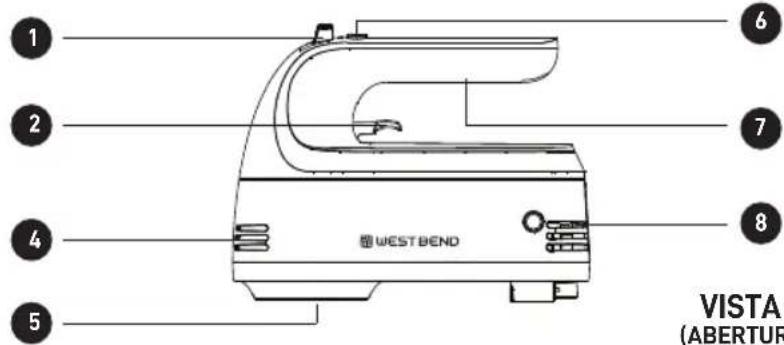
PRODUCT DIAGRAM
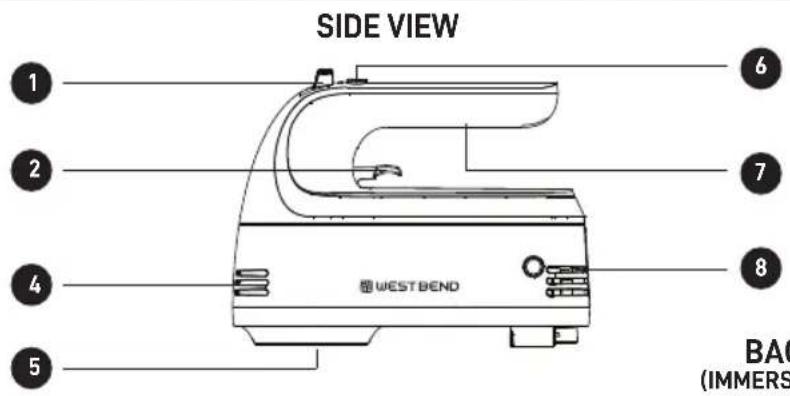
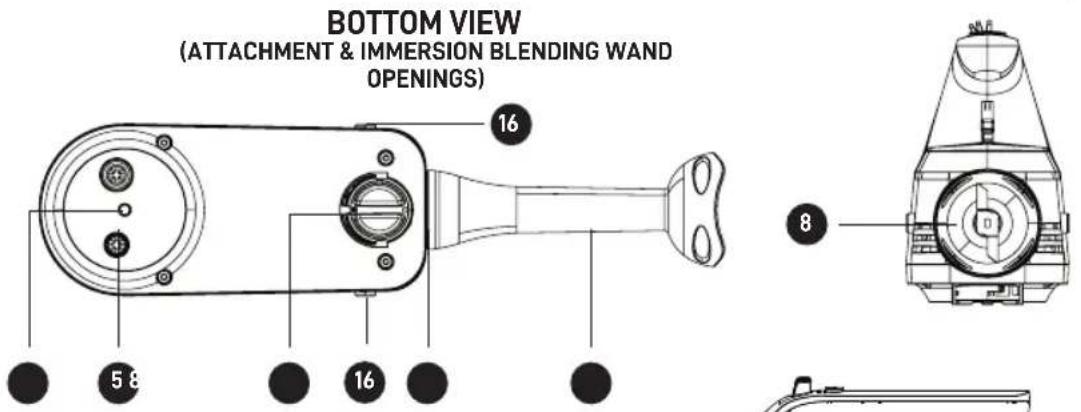
BACK VIEW (IMMERSION BLENDING WAND OPENING)
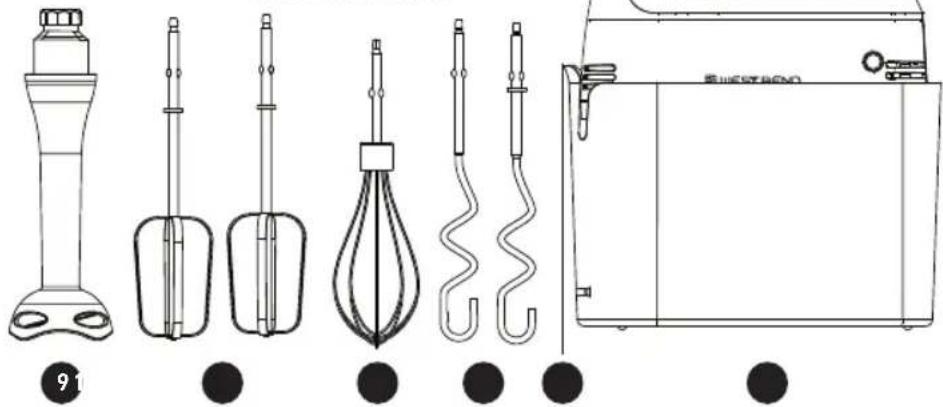
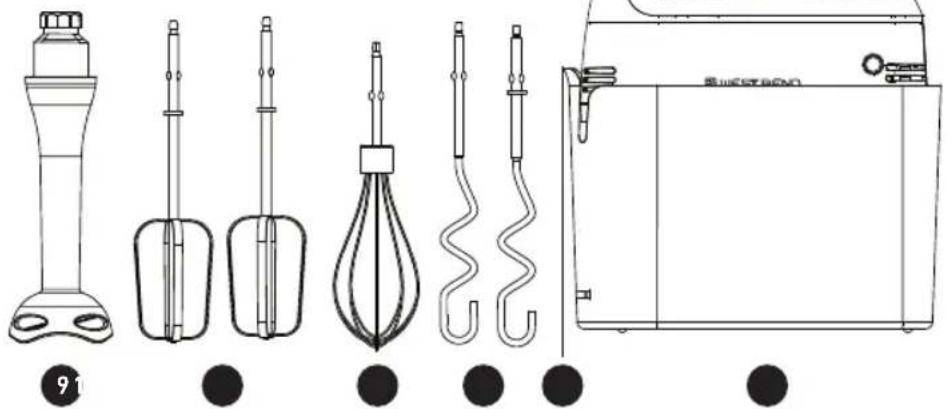
ATTACHMENTS
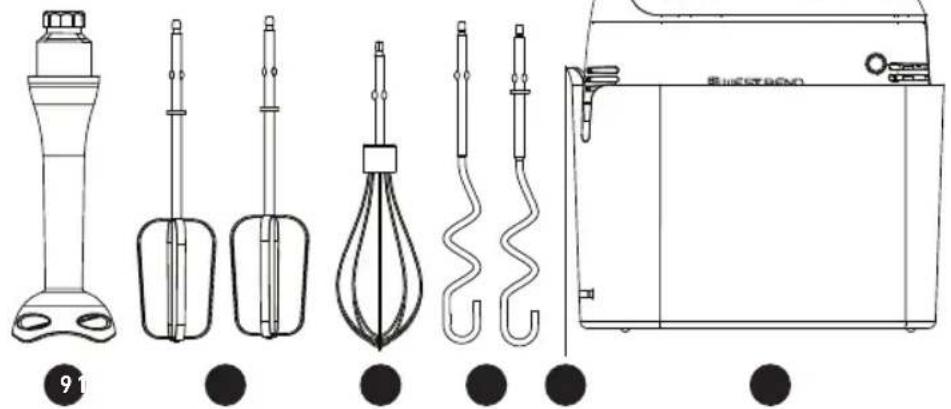
natural_image
Technical line drawings of various kitchen appliances including a blender, stirrer, and blender (no text or labels present)- Speed Selector
- Easy-Release Lever
- LED Light
- Ribs
- Opening for Beaters, Whisk and Dough Hooks
- Turbo Button
- Ergonomic Handle
-
Immersion Blending Wand Opening
-
Immersion Blending Wand
- (2) Beaters
- (1) Whisk
- (2) Dough Hooks
- Storage Case Lip
- (1) Snap-On Storage Case
- Cap Holder
- Release Buttons
BEFORE USE
- Remove any packaging materials.
Warning: Blades are very sharp, handle with care. - Wash all accessories in hot soapy water. Rinse and dry thoroughly.
- Before assembling the mixer, ensure the power cord is unplugged from the power outlet and the speed selector is at the "0" position.
USING YOUR HAND MIXER
WARNING: Do not put metal utensils (knives, spoons, forks, etc.) into the bowl while operating the mixer.
NOTE: Do not let the unit come into contact with acidic foods.
-
Insert the correct attachment(s) based on mixing/blending needs.
-
The beaters are identical and can be inserted into either drive hole.
-
Unlike the beaters, the dough hooks are not interchangeable. When using the dough hooks, insert the one with the washer into the larger drive hole, and the one without the washer into the smaller drive hole.
-
With the correct accessory attached, turn the speed selector to the "0" OFF position, then plug the power cord into the wall outlet.
- When mixing, to avoid splatters, start the unit on the lowest speed and slowly increase to the desired speed setting.
- Slowly guide the mixer around the sides and through the center of the bowl, going in the same direction. Be careful not to overbeat the mixture. Overbeating tends to make some mixtures tough.
- To increase power during heavy mixing tasks, press the turbo button to drive through the mixture with ease.
- When mixing is complete, turn the speed selector to the "0" setting, and unplug the cord from the power outlet.
- If necessary, scrape excess food from the attachment using a rubber spatula.
- To remove dough hooks, beaters or whisk, hold the stems of the attachments firmly, then press the Easy-Release Lever. Attachments will come off.
To use the immersion blender wand:
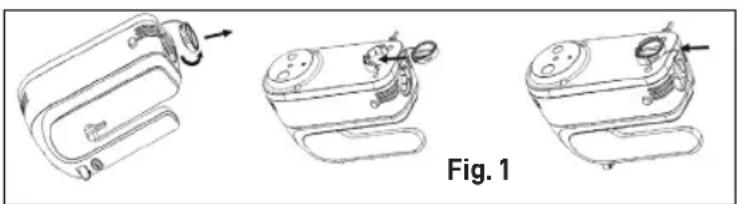
- Remove the cap from the base of unit, then place it into the cap holder. (See Fig. 1)
- Hold the hand mixer in the upright position, then insert the immersion blender wand. Push firmly until you hear the click indicating the wand has been securely inserted.
- Always ensure the speed selector is set to the "0" position.
- Press and hold the Turbo button to blend.
- To stop, simply release the Turbo button.
- To remove the immersion blender wand, push the release buttons on both sides of the unit at the same time. The immersion blender wand will come off. (See Fig. 2)
natural_image
Line drawings of three different household appliances with arrows indicating motion, labeled as Fig. 1 (no text or symbols on the devices themselves)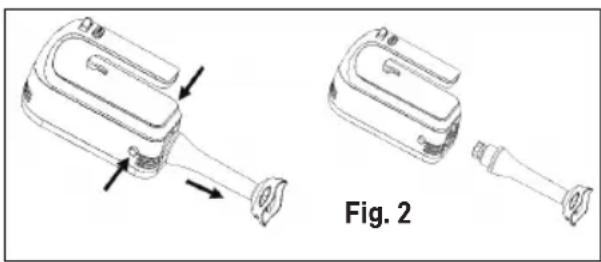
natural_image
Technical line drawing of a handheld device with two views: one showing internal components and arrows indicating motion, the other showing a plug inserted into a terminal block (no text or symbols)HELPFUL HINTS
- Refrigerated ingredients, such as butter and eggs, should be at room temperature before mixing begins. Set these ingredients out ahead of time.
- To eliminate the possibility of shells or rotten eggs in your recipe, break eggs into a separate container first, then add them to the mixture.
- Always start mixing at a lower speed, and gradually increase to the recommended speed as stated in the recipe.
- Do not over-mix. Only mix / blend for the maximum time recommended in your recipe. Fold into dry ingredients only until just combined. Always use the low speed.
- Seasonal temperature changes and the temperature and texture of ingredients may vary from area to area. These factors play a part in the required mixing time and the results achieved.
NOTES:
- When kneading yeast dough, set the speed to a lower setting to achieve the best results.
- If using the mixer at high speed, do not exceed 1 minute of continuous operation, and allow 1 minute idle between two continuous cycles.
- If running the mixer with clean blades (i.e., no batter on the blades), do not exceed 15 seconds of continuous operation.
- The maximum continuous operating time per normal use should be less than 5 minutes, and you should allow the mixer to remain idle for a minimum of 20 minutes between two continuous cycles.
CLEANING & STORAGE
CLEANING
CAUTION: Do not immerse the mixer in water or other liquid.
- Unplug the appliance and let it cool down completely before cleaning.
- Remove the attachment.
- Wash the attachment in warm soapy water, without the use of abrasive cleaner or detergents.
- The beaters and dough hooks can also be washed in the top rack of your dishwasher.
- Wipe the outside surface of the hand mixer with a damped cloth and dry thoroughly. Never immerse it in water for cleaning as electric shock may occur.
- Wipe any food particles from the power cord.
QUICK CLEANING
Between blending tasks, hold the immersion blender wand in the cup half filled with water and turn on for a few seconds. (See Fig. 3)
STORAGE
The storage case allows you to conveniently store your hand mixer and accessories together for easy access.
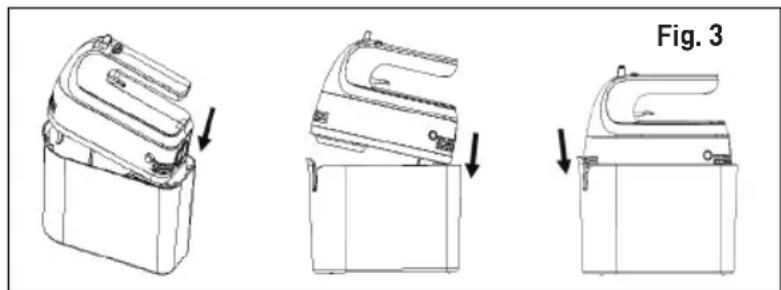
- Place all the accessories in the storage case.
- Then align the ribs at the back hand mixer with the 2 rear snaps on the storage case.
- Gradually push the hand mixer from the rear to the front while pulling the front lip until the front snaps have been securely engaged.
- To remove the storage case, pull the lip at the front of the storage case to disengage the snaps and pull out the hand mixer.
This appliance has no user serviceable parts. Any servicing beyond that described in the Cleaning Section should be performed by an Authorized Service Representative only.
See warranty available online.
PRODUCT WARRANTY
Appliance 1 Year Limited Warranty
West Bend ^® ("the Company") warrants this appliance from failures in the material and workmanship for one (1) year from the date of original purchase with proof of purchase, provided that the appliance is operated and maintained in conformity with the Instruction Manual. Any failed part of the appliance will be repaired or replaced without charge at the Company's discretion. This warranty applies to indoor household use only.
This warranty does not cover any damage, including discoloration, to any non-stick surface of the appliance. This warranty is null and void, as determined solely by the Company, if the appliance is damaged through accident, misuse, abuse, negligence, scratching, or if the appliance is altered in any way.
THIS WARRANTY IS IN LIEU OF ALL IMPLIED WARRANTIES, INCLUDING WARRANTIES OF MERCHANTABILITY, FITNESS FOR A PARTICULAR PURPOSE, PERFORMANCE, OR OTHERWISE, WHICH ARE HEREBY EXCLUDED. IN NO EVENT SHALL THE COMPANY BE LIABLE FOR ANY DAMAGES, WHETHER DIRECT, INDIRECT, INCIDENTAL, FORESEEABLE, CONSEQUENTIAL, OR SPECIAL ARISING OUT OF OR IN CONNECTION WITH THIS APPLIANCE.
If you think the appliance has failed or requires service within its warranty period, please contact the Customer Care Department through our website at www.westbend.com
"Support" -> "Contact Us". A receipt proving the original purchase date will be required for all warranty claims, hand written receipts are not accepted. You may also be required to return the appliance for inspection and evaluation. Return shipping costs are not refundable. The Company is not responsible for returns lost in transit.
Valid only in USA and Canada
REPLACEMENT PARTS
Replacement parts, if available, may be ordered online at www.westbend.com.
This manual contains important and helpful information regarding the safe use and care of your product. For future reference, attach dated sales receipt for warranty proof of purchase and record the following information:
Date purchased or received as gift: ____
Where purchased and price, if known: ____
Item number and Date Code (shown bottom/back of product): ____
WEST BEND®
KIT DE PRÉPARATION HANDMIXERPLUS™ 2-EN-1
Mode d'emploi
natural_image
Illustration of a black and white electrical outlet plug with two leads (no text or symbols)FICHE POLARISÉE
natural_image
Technical line drawing of a mechanical device with no visible text or symbolsACCESSOIRES
natural_image
Technical line drawings of various kitchen appliances and equipment (no text or symbols)natural_image
Line drawings of three different devices with arrows indicating motion, labeled as Fig. 1 (no text or symbols on the devices themselves)Français - 5
natural_image
Technical line drawing of two mechanical components with arrows indicating motion, labeled Fig. 2 (no text or symbols on the diagrams)CONSEILS UTILES
natural_image
Line drawings of a mechanical device with three views showing internal components and adjustment arrows (no text or symbols)ENTREPOSAGE
natural_image
Product display of West Bend kitchen appliances including a hand mixer and whisker (no text or symbols visible on main objects)natural_image
Illustration of a black and white electrical outlet plug with two leads (no text or symbols)ENCHUFE POLARIZADO
DIAGRAMA DEL PRODUCTO
VISTA LATERAL
natural_image
Technical line drawing of a mechanical device with no visible text or symbolsACCESORIOS
natural_image
Technical line drawings of various kitchen appliances including a blender, stirrer, and blender (no text or labels present)natural_image
Line drawings of three different household appliances with arrows indicating motion, labeled as Fig. 1 (no text or symbols on the devices themselves)natural_image
Technical line drawing of a handheld device with two views (Fig. 2), showing internal components and connectors (no text or symbols)CONSEJOS ÚTILES
natural_image
Three technical line drawings of a device with arrows indicating assembly or adjustment, labeled 'Fig. 3' (no text or symbols on the devices themselves)ALMACENAMIENTO.
Prop. 65 Warning for California Residents

WARNING: CANCER AND REPRODUCTIVE HARM - www.P65Warnings.ca.gov
- SAVE THIS INSTRUCTION MANUAL FOR FUTURE REFERENCE
- IMPORTANT SAFEGUARDS
- When using electrical appliances, basic safety precautions should always be followed to reduce the risk of fire, electric shock, and/or injury to persons including the following:
- SAVE THESE INSTRUCTIONS HOUSEHOLD USE ONLY
- POLARIZED PLUG
- POWER CORD INSTRUCTIONS:
- BEFORE USE
- USING YOUR HAND MIXER
- To use the immersion blender wand:
- HELPFUL HINTS
- NOTES:
- CLEANING & STORAGE
- CLEANING
- CAUTION: Do not immerse the mixer in water or other liquid.
- QUICK CLEANING
- STORAGE
- PRODUCT WARRANTY
- Appliance 1 Year Limited Warranty
- REPLACEMENT PARTS
- WEST BEND®
- KIT DE PRÉPARATION HANDMIXERPLUS™ 2-EN-1
- FICHE POLARISÉE
- CONSEILS UTILES
- ENTREPOSAGE
- ENCHUFE POLARIZADO
- DIAGRAMA DEL PRODUCTO
- CONSEJOS ÚTILES
- ALMACENAMIENTO.
Brand : WestBend
Model : HMWB6SBK13
Category : Hand blender