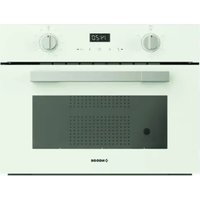
NorChef MW 4800 DB - Microwave Oven NODOR - Free user manual and instructions
Find the device manual for free NorChef MW 4800 DB NODOR in PDF.

User questions about NorChef MW 4800 DB NODOR
0 question about this device. Answer the ones you know or ask your own.
Ask a new question about this device
Download the instructions for your Microwave Oven in PDF format for free! Find your manual NorChef MW 4800 DB - NODOR and take your electronic device back in hand. On this page are published all the documents necessary for the use of your device. NorChef MW 4800 DB by NODOR.
USER MANUAL NorChef MW 4800 DB NODOR
text_image
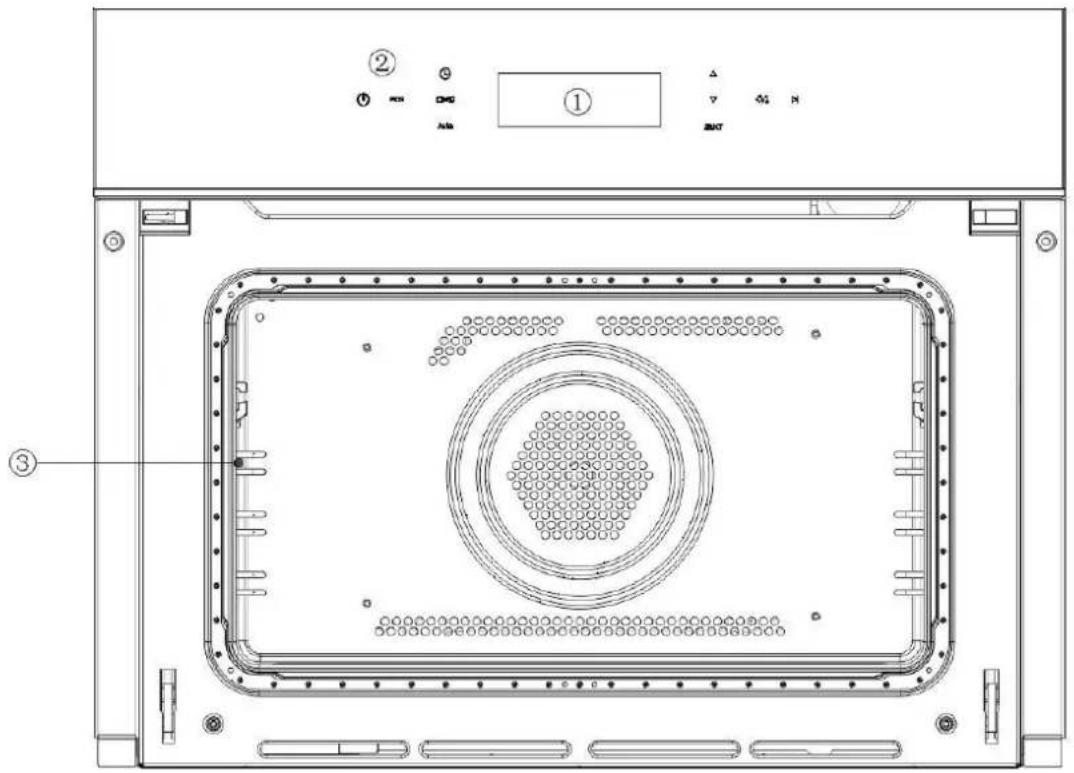
Technical diagram of a device casing with labeled components and internal circular pattern, including control panel indicators.① Display
② Panel de control
③ Raí les de bandejas
text_image
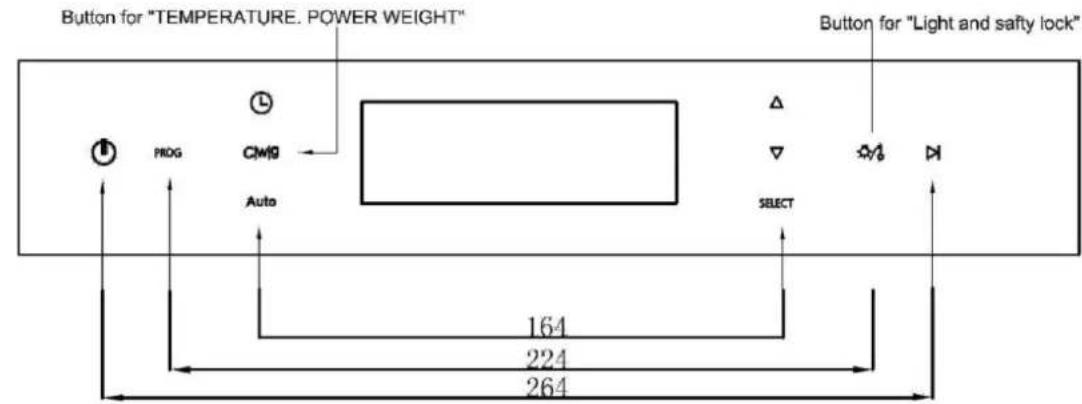
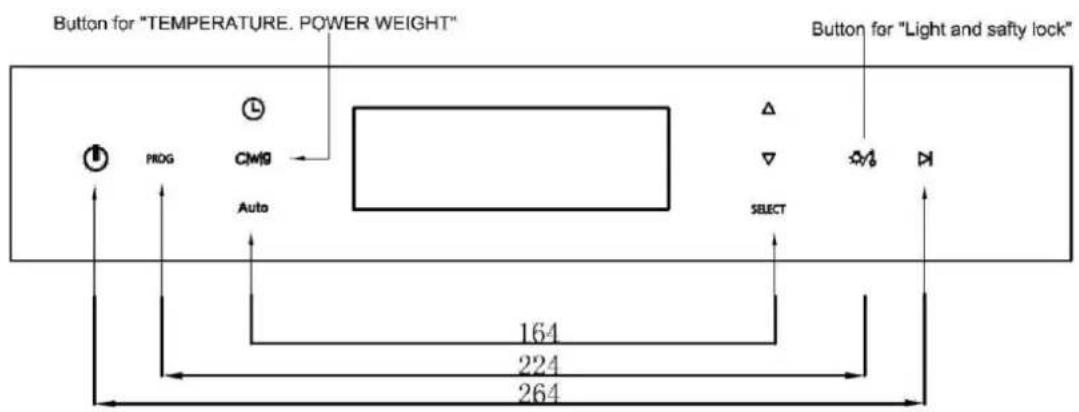
Button for "TEMPERATURE. POWER WEIGHT" Button for "Light and safty lock" PROG CM9 Auto SELECT 164 224 264
text_image
Diagram of a device control panel with labeled buttons, indicators, and function icons for status or operation.natural_image
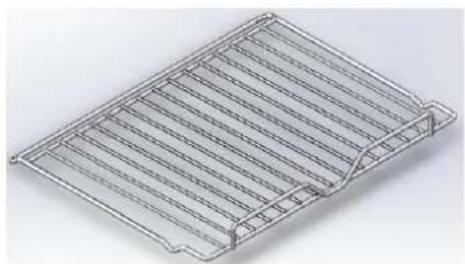
3D wireframe model of a rectangular metal grate or rack structure (no text or symbols)Fig.1
natural_image
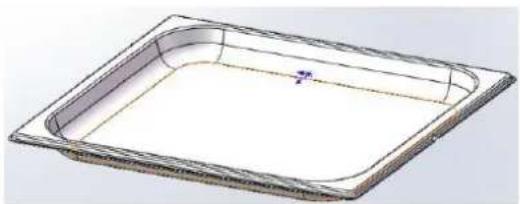
3D CAD model of a rectangular tray or container with rounded edges and a small purple mark on the inner edge (no text or symbols)Fig.2
natural_image
Technical diagram of a vehicle interior showing structural components and a circular component (no text or symbols)Fig.3
- Ajuste de alarma △
“:” keeps flashing during working
Manu
| Symbol | Peso por defecto | Pesos Alternativos (g) | Función | Duración (Minutos) |
| 250 | Microondas | 2 | ||
| Leche | 250g | 500 | Microondas | 4 |
| 500g | 500 | Microondas | 19 | |
| Sopa | 800 | Microondas | 22 | |
 | 300 | 300 | Microondas | 5 |
| 600 | Microondas | 8 | ||
 | 200g | 100 | Microondas | 2 |
| 200 | Microondas | 4 | ||
| 300 | Microondas | 5 | ||
| 400 | Microondas | 6 | ||
| 500 | Microondas | 7 | ||
| 600 | Microondas | 8 | ||
 | 200g | 100 | Microondas | 1 |
| 200 | Microondas | 2 | ||
| 300 | Microondas | 3 | ||
 | 500g | 100 | Microondas | 3 |
| 200 | Microondas | 5 | ||
| 300 | Microondas | 6 | ||
| 400 | Microondas | 7 | ||
| 500 | Microondas | 8 | ||
| 600 | Microondas | 9 | ||
| 700 | Microondas | 10 | ||
| 800 | Microondas | 11 | ||
| 900 | Microondas | 12 | ||
| 1000 | Microondas | 13 | ||
 | 500g | 200 | Microondas | 7 |
| 300 | Microondas | 8 | ||
| 400 | Microondas | 10 | ||
| 500 | Microondas | 12 | ||
| 600 | Microondas | 14 | ||
| 800 | Microondas | 16 | ||
| 1000 | Microondas | 19 | ||
 | 1000g | 200 | Microondas + Grill | 15 |
| 400 | 20 | |||
| 600 | 25 | |||
| 800 | 30 | |||
| 1000 | 32 | |||
| 1200 | 35 | |||
| 1400 | 40 | |||
| 1600 | 46 | |||
| 1800 | 52 | |||
| 2000 | 56 |
Instruction Manual
Combi Oven
GENERAL WARNINGS
Read carefully all the instructions contained in this booklet. It provides you with important information regarding the safe installation, use and maintenance of the appliance as well as useful advice for getting the best out of your oven. Keep this booklet in a safe place for future reference. After removing the packing, check that the appliance is not damaged in any way.
Be careful not to leave the packing materials (plastic sheeting, expanded polystyrene etc.) where children can get at them, as they can be dangerous.
IMPORTANT: do not use the oven door handle to move the appliance, such as to remove it from the packaging
ATTENTION
The oven is an appliance which, for its nature, becomes hot, especially in correspondence of the glass door.
It is therefore a good rule that children do not approach the oven when it is functioning, particularly when the grill in used.
The first time you switch the oven on, acrid smelling smoke may appear. This is caused by the heating of the adhesive used on the insulation panels surrounding the oven. There is nothing unusual about this. If it happens, simply wait until the smoke disappears before putting any food in the oven. Never roast or bake on the oven base.
Safety is a good habit to get into
© This appliance is designed for non-professional, household use and its functions must not be changed.
The electrical system of this appliance may be used safely only when it is correctly connected to an efficient earthing system in compliance with the safety standards currently in effect.
The manufacturer will not be held liable for any damages that might arise out of incorrect installation or improper, incorrect or unreasonable use of the appliance.
The following items are potentially dangerous, and therefore, appropriate measures must be taken to prevent children and the disabled from coming into contact with them:
- Controls and the appliance in general;
- Packaging (bags, polystyrene, nails, etc.);
- The appliance immediately after use of the oven or grill due to the heat generated;
- The appliance when no longer in use (potentially dangerous parts must be made safe).
Avoid the following:
- Touching the appliance with wet parts of the body;
- Using the appliance when barefoot;
- Pulling on the appliance or the supply cord to unplug it from the electrical outlet;
- Obstructing the ventilation or heat dissipation slots;
- Allowing power supply cords for small appliances to come into contact with the hot parts of the appliance;
- Exposing the appliance to atmospheric agents (rain, sun);
- Using the oven for storage purposes;
-
Using flammable liquids near the appliance;
-
Using adaptors, multiple sockets and/or extension cords;
- Attempting to install or repair the appliance without the assistance of qualified personnel.
WARNING- Accessible parts will become hot when in use. To avoid burns and scalds children should be kept away
During use the appliance becomes hot, Care should be taken to avoid touching heating elements inside the oven.
Qualified personnel must be contacted in the following cases:
- Installation (following the manufacture's instructions);
- When in doubt about operating the appliance;
- Replacing the electrical outlet when it is not compatible with the plug for the appliance.
Service Centres authorized by the manufacturer must be contacted in the following cases:
- If in doubt about the soundness of the appliance after removing it from the packaging;
- If the power supply cord has been damaged or needs to be replaced;
- If the appliance breaks down or functions poorly; ask for original spare parts.
It is a good idea to do as the following:
- Only use the appliance to cook food, nothing else;
- Check the soundness of the appliance after it has been unpacked;
- Unplugged the appliance from the electrical mains if it is not functioning properly and before cleaning or performing maintenance;
- When the appliance is not used for an extended period of time, unplugged the appliance and close the gas cock (it present);
- Use cooking gloves to place cookware in the oven or when removing it;
- Always grasp the oven door in the centre because the ends may be hot due to the escape of hot air;
- Make sure that the control knobs are on the "o" setting when the appliance is not in use;
- Unplug the appliance when you decide not to use the appliance any longer.
The manufacturer may not be held responsible for any damage due to: incorrect installation, improper, incorrect and irrational use.
IMPORTANT SAFETY INSTRUCTIONS READ CAREFULLY
AND KEEP FOR FUTURE REFERENCE
- WARNING: If the door or door seals are damaged, the oven must not be operated until it has been repaired by a competent person.
- WARNING: It is hazardous for anyone other than a competent person to carry out any service or repair operation that involves the removal of a cover which gives protection against exposure to microwave energy.
- WARNING: Liquids and other foods must not be heated in sealed containers since they are liable to explode.
- Only use utensils that are suitable for use in microwave ovens.
- When heating food in plastic or paper containers, keep an eye on the oven due to the possibility of ignition.
- The microwave oven is intended for heating food and beverages. Drying of food or clothing and heating of warming pads, slippers, sponges, damp cloth and similar may lead to risk of injury, ignition or fire
- The oven should be cleaned regularly and any food deposits removed
- Failure to maintain the oven in a clean condition could lead to deterioration of the surface that could adversely affect the life of the appliance and possibly result in a hazardous situation.
The appliance must not be placed in a cabinet.
When using electrical appliance basic safety precautions should be followed, including the following:
WARNING: To reduce the risk of burns, electric shock, fire, injury to persons or exposure to excessive microwave energy:
- Make sure that all the packing materials are removed from the inside of the door.
- WARNING: Check the oven for any damage, such as misaligned or bent door, damaged door seals and sealing surface, broken or loose door hinges and latches and dents inside the cavity or on the door. If there is any damage, do not operate the oven and contact qualified service personnel.
- This microwave oven must be placed on a flat, stable surface to hold its weight and the heaviest food likely to be cooked in the oven.
-
Do not place the oven where heat, moisture, or high humidity are generated, or near combustible materials.
-
Do not operate the oven when empty.
-
Do not operate this appliance if it has a damaged cord or plug, if it is not working properly or if it has been damaged or dropped. If the supply cord is damaged, it must be replaced by the manufacturer or its service agent or a similarly qualified person in order to avoid a hazard.
-
WARNING: Liquid or other food must not be heated in sealed containers since they liable to explode.
-
Microwave heating of beverage can result in delayed eruptive boiling, therefore care has to be taken when handle the container.
-
Do not fry food in the oven. Hot oil can damage oven parts and utensils and even result in skin burns.
- Eggs in their shell and whole hard-boiled eggs should not be heated in microwave ovens since they may explode even after microwave heating has ended.
- Pierce foods with heavy skins such as potatoes, whole squashes, apples and chestnuts before cooking.
- The contents of feeding bottles and baby jars should be stirred or shaken and the temperature should be checked before serving in order to avoid burns.
- Utensils should be checked to ensure that they are suitable for use in microwave oven..
- WARNING: It is hazardous for anyone other a trained person to carry out any service or repair operation which involves the removal of any cover which gives protection against exposure to microwave energy.
- This appliance is not intended for use by persons (including children) with reduced physical, sensory or mental capabilities, or lack of experience and knowledge, unless the have been given supervision or instruction concerning use of the appliance by a person responsible for their safety.
- Children should be supervised to ensure that they do not play with the appliance.
- To reduce the risk of fire in the oven cavity:
- When heating food in plastic or paper container, check the oven frequently to the possibility of ignition.
Remove wire twist-ties from paper or plastic bags before placing bag in oven.
If smoke is observed. Switch off or unplug the appliance and keep the door closed in order to stifle any flames.
not use the cavity for storage purposes. Do not leave paper products, cooking utensils or food in the cavity when not in use.
- MW 4800: Please use the rated current of 15A or more separate outlet. There must
be grounded.. Do not use loose or poor contact power outlet, otherwise easily lead to electric shock, short circuit ,fire; If an outlet shared with other appliances, there may be abnormal heat caused the fire.
WARNING: The appliance and its accessible parts become hot during use.
Care should be taken to avoid touching heating elements.
Children less than 8 years of age shall be kept away unless continuously supervised. This appliance can be used by children aged from 8 years and above and persons with reduced physical, sensory or mental capabilities or lack of experience and knowledge if they have been given supervision or instruction concerning use of the appliance in a safe way and understand the hazards involved. Children shall not play with the appliance. Cleaning and user maintenance shall not be made by children without supervision.
During use the appliance becomes hot. Care should be taken to avoid touching heating elements inside the oven.
WARNING: Accessible parts may become hot during use. Young children should be kept away.
Do not use harsh abrasive cleaners or sharp metal scrapers to clean the oven door glass since they can scratch the surface, which may result in shattering of the glass.
Steam cleaner is not to be used.
WARNING: Ensure that the appliance is switched off before replacing the lamp to avoid the possibility of electric shock.
This appliance is for house hold use only.
INSTALLING THE APPLIANCE
Important: Unplug your oven before performing installation or maintenance!
Installation should be carried out according to the instructions by a professionally qualified person.
The manufacturer declines all responsibility for any damage to persons, animals or things due to a wrong installation.
text_image
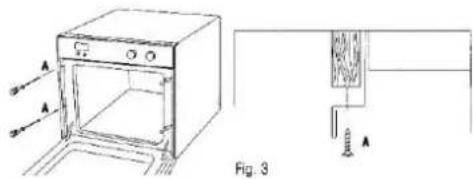
Fig. 3FITTING THE APPLIANCE
Fit the appliance into its surround (beneath a
work-top or above another appliance) by inserting screws into the 4 holes that can be seen in the frame of the oven when the door is open.
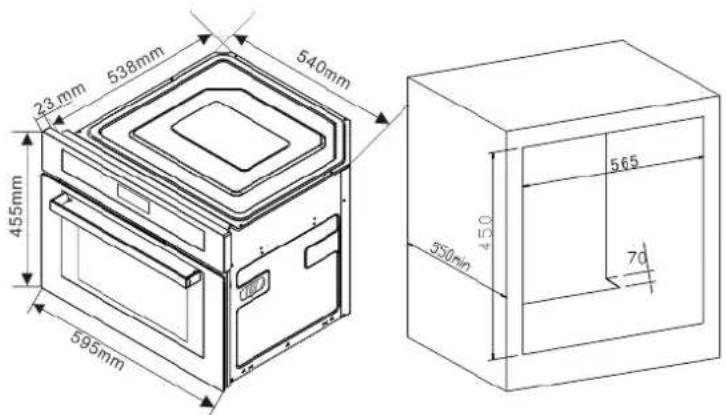
For the most efficient air circulation, the oven should be fitted according to the dimensions shown in fig. 1-2.
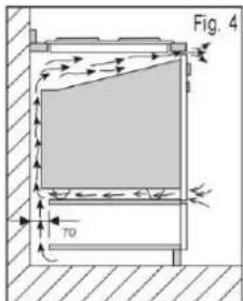
The rear panel of the cabinet must be removed so that air can circulate freely. The panel to which the oven is fitted should have a gap of at least 70 mm at the rear.
NB: where ovens are to be matched with hobs, it is essential to follow the instructions contained in the booklet supplied with the other appliance. IMPROTANT
During use the appliance becomes hot, Care should be taken to avoid touching heating elements inside the oven.
Accessible parts may become hot during use. Yong children should be kept away.
Do not use harsh abrasive cleaners or sharp metal scrapers to clean the oven door glass since they can scratch the surface, which may result in shattering of the glass.
For a built-in oven to work well the cabinet must be of the right type.
The panels of the adjoining furniture should be heat resistant. Particularly when the adjoining furniture is made of veneered wood, the adhesives should be able to withstand a temperature of 120^ . Plastic materials or adhesive which cannot withstand this temperature will become deformed or unstuck.
To comply with safety regulations, once the appliance has been fitted it should not be possible to make contact with the electrical parts.
All parts which offer protection should be fixed in such a way that they cannot be removed
without the use of a tool.
text_image
Fig. 4 70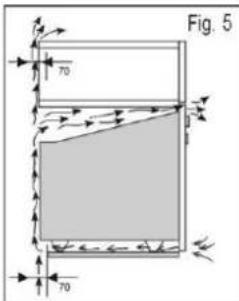
text_image
Fig. 5 70 70ELECTRICAL CONNECTION
The appliance must be fitted correctly to guarantee electrical safety. During fitting and maintenance operations, the appliance must be unplugged from the electrical grid; fuses must be switched off or removed.
The electrical connections are made before the appliance is installed in its housing.
Ensure that:
- the electrical installation has sufficient voltage,
- the electrical wires are in good condition,
- the diameter of the wires complies with the installation requirements.
The oven must be connected with a power cable (standardized)with 3 1.5mm^2 conductors (1 ph + 1N + ground) that must be connected to a mono phase 220 - 240V network via a CEI 60083 standardized receptacle 1ph + 1 neutral + ground lead or an all pole cut-off device in accordance with installation rules.
WARNING
The safety wire (green-yellow) is connected to the appliance's terminal and must be connected to the earth terminal of the electrical set-up.
You must enable the appliance to be disconnected from the supply network after installation.
Disconnection can be enabled by ensuring that there is an accessible power plug or by incorporating a switch into the fixed wiring in compliance with the installation rules. The fuse in your set-up must be 16 amperes. If the power cable is damaged, it should be replaced by the manufacturer, its after-sales service department or a similarly qualified person to avoid danger.
WARNING
We cannot be held responsible for any accident resulting from non-existent, defective or incorrect earthing. If the electrical installation in your residence requires any changes in order to hook up your appliance, call upon a professional electrician.
If the oven malfunctions in any way, unplug the appliance or remove the fuse corresponding to the sector where the oven is hooked up.
Microwave oven cleaning and maintenance:
SWITCHING OFF THE POWER
Before any cleaning or maintenance operation, disconnect the oven's power suppl.
CLEANING THE OUTER SUREACES
To clean both the electronic programr window and the oven door, use a window cleaning product applied with a soft cloth.
Do not use abrasive creams or scouring pads.
CLEANING THE INSIDE OF THE OVEN
We recommend that you clean the oven regularly and remove any deposits of food from the inside and outside of the appliance.
Use a damp, soapy sponge. If the appliance is not cleaned regularly, its surface could become damaged, permanently affecting the appliance's lifespan and possibly causing a safety hazard.
WARNING: If the door or door seal are damaged, the oven should not be used until it has been repaired by a competent person.
Do not use a steam cleaner.
The use of abrasive products, alcohol or thinner is not recommended; the may damage the appliance.
In the event of odor or caked-on dirt, boil water with lemon juice or vinegar in a cup for two minutes and clean the insides with a little dishwashing liquid.
text_image
23 mm 538mm 540mm 455mm 595mm 565 7d 450 550mmfig. 1-2.
Technical Data:
| Name | Built-in Combination Microwave |
| Model | MW 4800 |
| Rated voltage | 220-240V~ |
| Rated frequency | 50Hz |
| Rated Grill power | 2550W |
| Rated Micro Input power | 1500W |
| Combination Power | 2550W |
| Microwave rated output power | 1000W |
| Volume | 40L |
Description of the appliance
text_image
Technical diagram of a device interior with labeled components and control panel indicators① Programmer ②
Control panel
③ Wire shelf supports
Programming selection
text_image
Button for "TEMPERATURE. POWER WEIGHT" Button for "Light and safty lock" PROG CW10 Auto SELECT 164 224 264
text_image
Diagram of a device control panel with labeled buttons, indicators, and function icons for status or operation.① Ordinary Microwave Function; ② Grill function (Can be combined with different functions);
④Microwave defrost; ⑥Temperature/Power/Weight;⑦Time setting symbol; ⑧Working time;
⑨ Heating Time; ⑩ 8 different manuals; (11) Duration time/Working Temperature/Alarm Time
display(12)Alarm Symbol; (13)Temperature up; (14)Light; (15)End Time; (16)Lack of water; (17)
Boost; (18)Child lock
.ACCESSORIES
.Wire shelf (Fig.1)
The wire shelf allows you to brown or grill food. The shelf should not, under any circumstances, be used with other metal cookware when using the microwave, grill + microwave or fan + microwave settings. However, you can heat food in an aluminum tray providing it is separated from the shelf by a plate.
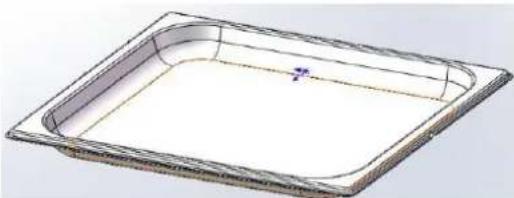
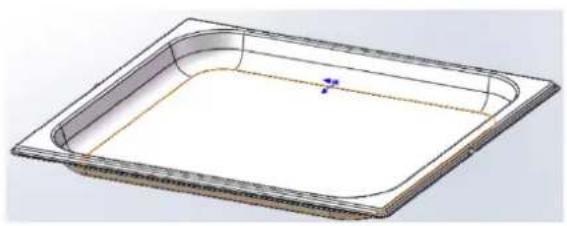
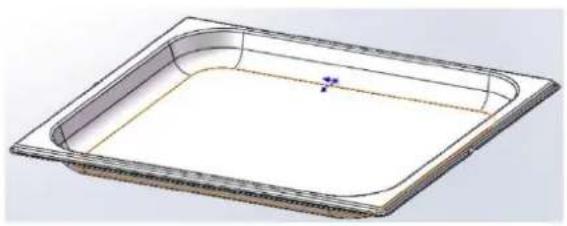
.Enameled tray (Fig.2)
It can be used for bain-marie cooking when filled with water to mid-height. It can also be used as a cooking dish
Comments:
★Be careful never to use the enamel dish with the micro-wave function. You could damage your oven.
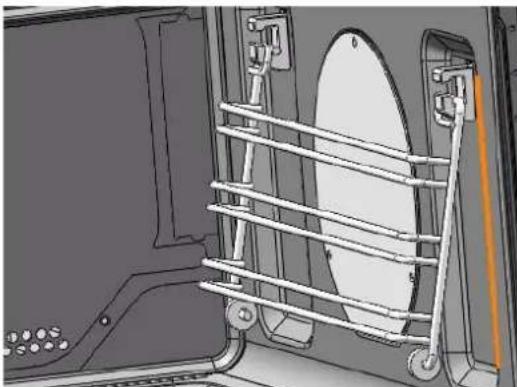
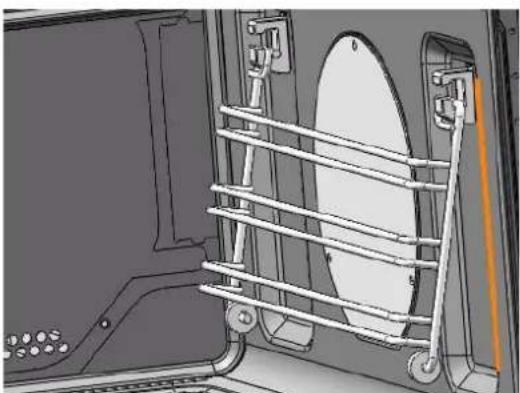
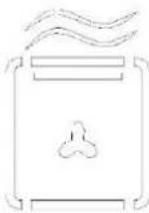
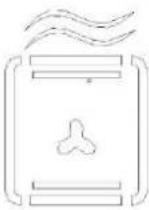
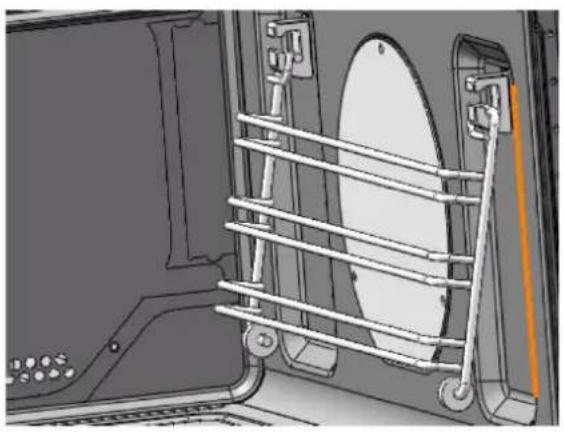
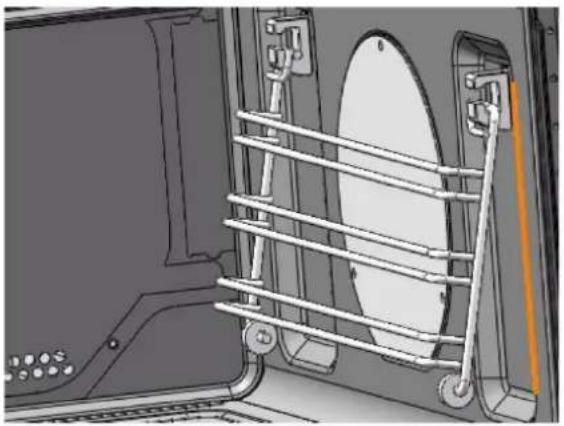
•The side shelf supports (Fig.3)
2 hook-on shelf supports allow you to use the accessories on three levels.
Three cooking levels are available, depending on the method used and the type of food.
With the Grill or Grill + Micro-wave setting, the accessories (shelf or glass dish) are placed on the first level for thick foods like roasts and on the third level for thinner foods like chops and sausages
In the cooking wither or without micro-wave position, you can put the shelf or glass dish on the first or second levels depending on the item being cooked.
natural_image
Isometric view of a metal grate or rack structure with slats and a small protrusion (no text or symbols)Fig.1
natural_image
3D CAD model of a rectangular tray or container with rounded edges and a small blue mark on the side (no text or symbols)Fig.2
natural_image
Technical diagram of a vehicle front view showing structural components including a circular component and metal railings (no text or symbols)Fig.3
1. Alarm setting

Press 1 time in any state or 3 times in any cooking mode, then and "00:00" signal keep flashing, press / to set alarm, then press "SELECT" to confirm (the display will back to time or cooking time display without confirm selection in 3 seconds). If you want to cancel alarm, set it to "0:00" and confirm.
When times up, the buzzer will sound for 1 minute. The buzzer can be stopped by press any key.
2. Time setting
Time setting can be operated by press
for 2 second in any on-cooking mode.

flowchart
graph TD
    A["Time"] --> B["Duration time"]
    B --> C["End of cooking time"]
    C --> A
    A --> D["Alarm"]
All time setting can be operated by pressing /, "SELECT", and

3. Temperature/Power/Weight

In function selecting or function mode, press to the corresponding setting.
Microwave - Power, press / for adjusting and press "SELECT" to confirm.
Grill - Temperature, press / for adjusting and press "SELECT" to confirm.
Menu/Defrost - Weight, press / for adjusting and press "SELECT" to confirm.
Microwave + grill - 1. Power 2. Temperature, press / for adjusting and press "SELECT" to confirm.
(Refer to the function list)
When activate this function, the data keep flashing when setting, press / to adjust the data, then press “SELECT” to confirm(the selection will be canceled without confirmation in 3 seconds)
4. Light/Children safety lock

4.1 Press in any mode, the light on, and light out when press one more time or
3 minutes without pressing this button.
4.2 Press

for 1.5 second in any mode, the children safety lock is on, and only

can be operating. Press for 1.5 second to cancel the lock.
- Cooking time (range 0:00\~9:59)
Press ☐ to select cooking time, “Duration” signal keep flashing, press / to set and then press “SELECT” to confirm.
If you want to cancel cooking time, set it to "0: 00" and then press "SELECT" to confirm.
- End of cooking time →(range 0:00\~23:59)
Must set “cooking time” before “setting end of cooking time”. press flashing, time zone will show current time + duration time. press press “SELECT” to confirm.
2 times, -rep
/ to select and
When display showing , cannot set the end of cooking time.
If you want to cancel the end of cooking time, set it to "current time + duration time".
Please note: Start cooking time = end of cooking time - duration time.
- Start/Pause

8. Function list
Table 1: Press PROG to select the following function.
| Symbol | Description | Display(Setting) | Display(Working) |
| Program 1: Microwave, Default displayP100(100% Power), Press △▽ /to adjust the power, range P100-P10.Default cooking time: 1 min.Press △ /▽ to adjust the power, range 0:00h-1:00h. | 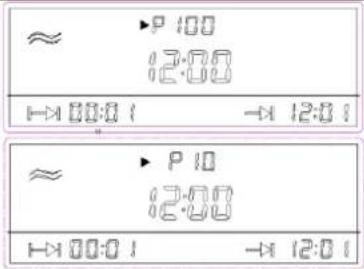 | 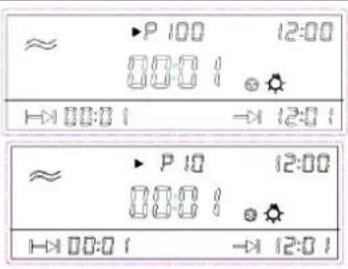 | |
 | Program 2: Defrost, Default Weight1000g, Range 100-2000g, Press △▽ to adjust the weight(100g/press).Default time will be adjusted according to different weight. | 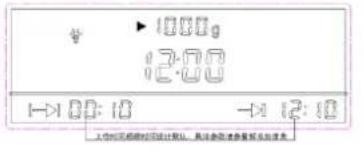 |  |
  | Program 3: Fan heating.Default temperature: 200°C, Default cooking time: 1:00 h, range 0:00-9:59 hProgram 4: Top heating +FanDefault Temperature 200^ , Range :50-220° ;Defaulting cooking time 1:00hRange: 0:00-9:59h | 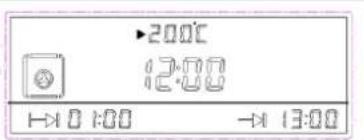 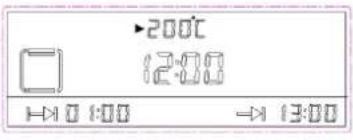 | 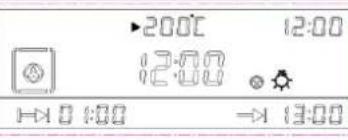 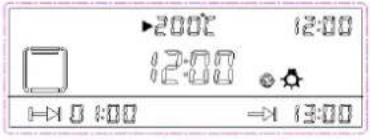 |
 | Program 6: Top Heating+ Bottom heating+ Fan:Default temperature: 200^ C;Temperature range :50-220° Default working time 1:00 h;Time range: 0:00-9:59 |  | 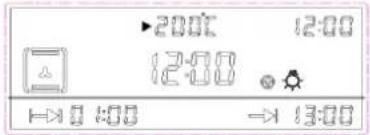 |
 | Program 7: Microwave + fan heating.Microwave default power P50 range:P10-P50;heating+ Fan:Default temperature: 200^ C;Temperature range :50-220° Default working time 1:00 h;Time range: 0:00-9:59 |  |  |
 | Program 8: Microwave + Top heating + Fan;Microwave default power P50 range:P10-P50;heating+ Fan:Default temperature: 200^ C;Temperature range :50-220° Default working time 1:00 h;Time range: 0:00-9:59 | 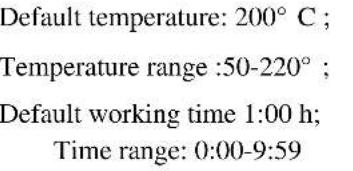 |  |
 | Program 9: Microwave + conventional heating + Fan;Microwave default power P50 range:P10-P50;heating+ Fan:Default temperature: 200^ C;Temperature range :50-220° Default working time 1:00 h;Time range: 0:00-9:59 | 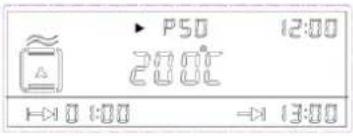 | 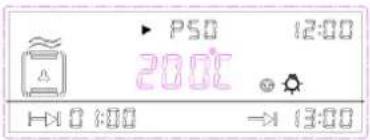 |
Table 2: Defrost
The maximum weight for defrost is 2000g. The default defrost time will be adjusted according to different weight.
| Weight | Time(minutes) | Weight | Time(minutes) |
| 100 | 3 | 1100 | 22 |
| 200 | 5 | 1200 | 24 |
| 300 | 6 | 1300 | 26 |
| 400 | 8 | 1400 | 28 |
| 500 | 10 | 1500 | 30 |
| 600 | 12 | 1600 | 32 |
| 700 | 14 | 1700 | 34 |
| 800 | 16 | 1800 | 36 |
| 900 | 18 | 1900 | 38 |
| 1000 | 20 | 2000 | 40 |
Table 3: Optional Menu
Sample
| Symbol of function | Description | Display(Setting) | Display(Working) |
 | The default time will be adjusted according to different menu and weight | 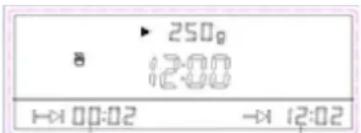 | 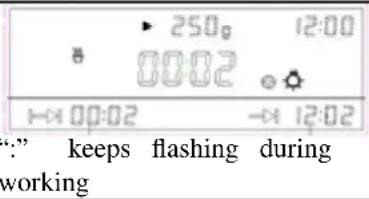 |
Manu
| Symbol | Defa ult weigh t | Weight Alternatives (g) | Function | Duration (Minutes) |
 Milk Milk | 默认 250g | 250 | Microwave | 2 |
| 500 | Microwave | 4 | ||
 Soup Soup | 500g | 500 | Microwave | 19 |
| 800 | Microwave | 22 | ||
 | 300 | 300 | Microwave | 5 |
| 600 | Microwave | 8 | ||
 | 200g | 100 | Microwave | 2 |
| 200 | Microwave | 4 | ||
| 300 | Microwave | 5 | ||
| 400 | Microwave | 6 | ||
| 500 | Microwave | 7 | ||
| 600 | Microwave | 8 | ||
 | 200g | 100 | Microwave | 1 |
| 200 | Microwave | 2 | ||
| 300 | Microwave | 3 | ||
 | 500g | 100 | Microwave | 3 |
| 200 | Microwave | 5 | ||
| 300 | Microwave | 6 | ||
| 400 | Microwave | 7 | ||
| 500 | Microwave | 8 | ||
| 600 | Microwave | 9 | ||
| 700 | Microwave | 10 | ||
| 800 | Microwave | 11 | ||
| 900 | Microwave | 12 | ||
| 1000 | Microwave | 13 | ||
 | 500g | 200 | Microwave | 7 |
| 300 | Microwave | 8 | ||
| 400 | Microwave | 10 | ||
| 500 | Microwave | 12 | ||
| 600 | Microwave | 14 | ||
| 800 | Microwave | 16 | ||
| 1000 | Microwave | 19 | ||
 | 1000g | 200 | Microwave + Grill | 15 |
| 400 | 20 | |||
| 600 | 25 | |||
| 800 | 30 | |||
| 1000 | 32 | |||
| 1200 | 35 | |||
| 1400 | 40 | |||
| 1600 | 46 | |||
| 1800 | 52 | |||
| 2000 | 56 |
text_image
Technical diagram of a device interior with labeled components and control panel indicatorstext_image
Diagram of a device control panel with labeled buttons, icons, and numeric display indicatorsnatural_image
3D wire mesh plate with slats and mounting brackets (no text or symbols)Fig. 1
natural_image
3D CAD model of a rectangular tray with rounded corners and a small blue mark on the side (no text or symbols)Fig. 2
natural_image
Technical diagram of a mechanical assembly with a circular component and metal frame (no text or symbols)Fig. 3
| Name | Built-in Combination Microwave |
| Model | MW 4800 |
| Rated voltage | 220-240V~ |
| Rated frequency | 50Hz |
| Rated Grill power | 2550W |
| Rated Micro Input power | 1500W |
| Combination Power | 2550W |
| Microwave rated output power | 1000W |
| Volume | 40L |
text_image
Technical diagram of a device interior with labeled components and numbered parts① Programador
② Painel de controle
③ Suporte de prateleira de
arame Seleç ã o de programacã o
text_image
Button for "TEMPERATURE. POWER WEIGHT" Button for "Light and safety lock" PROG CM19 Auto SELECT 164 224 264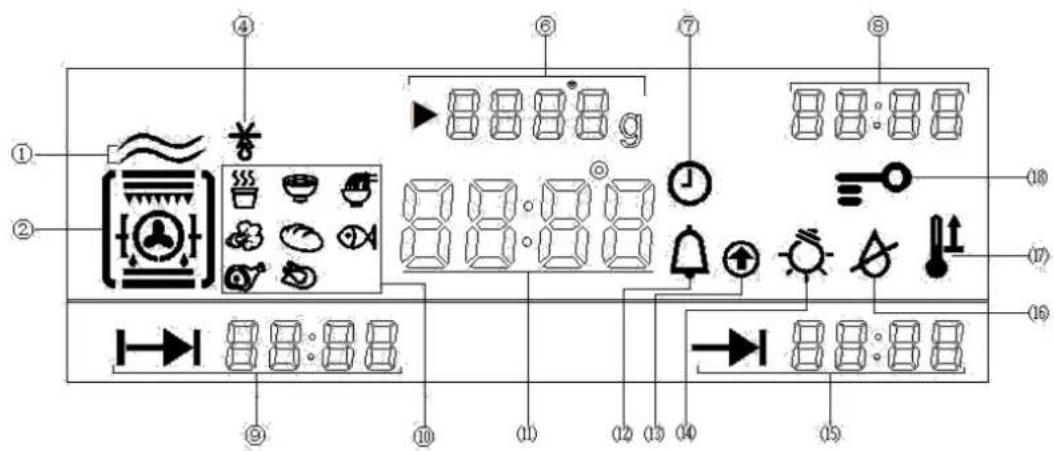
text_image
Diagram of a device control panel with labeled buttons, indicators, and function icons for status or operation.① Ordinary Microwave Function; ② Grill function (Can be combined with different functions);
④Microwave defrost; ⑥Temperature/Power/Weight;⑦Time setting symbol; ⑧Working time;
⑨ Heating Time; ⑩ 8 different manuals; (11) Duration time/Working Temperature/Alarm Time
display(12)Alarm Symbol; (13)Temperature up; (14)Light; (15)End Time; (16)Lack of water; (17)
Boost; (18)Child lock
- ACESSÓRIOS
- Prateleira de arame (fig.1)
natural_image
Isometric view of a metal grate or rack structure with slats and a handle (no text or symbols)Fig.1

natural_image
3D CAD model of a rectangular tray or container with rounded edges and a small blue mark on the side (no text or symbols)Fig.2

natural_image
Technical diagram of a vehicle's front compartment showing structural components and a circular component (no text or symbols)Fig.3
text_image
Technical diagram of a device interior with labeled components and control panel indicatorstext_image
Diagram of a device control panel with labeled buttons, indicators, and function icons for status or operation.natural_image
Isometric view of a metal grid-like structure with no text or symbolsAbb. 1
natural_image
3D CAD model of a rectangular tray or container with rounded corners and a small central feature (no text or symbols)Abb. 2
natural_image
Technical diagram of a mechanical assembly with ladder and circular component (no text or symbols)Abb. 3