
HRX 537 VY - Lawn mower Honda - Free user manual and instructions
Find the device manual for free HRX 537 VY Honda in PDF.


| Product type | Walk-behind lawn mower |
| Brand | Honda |
| Model | HRX 537 VY |
| Engine | GCV200, 4-stroke, single-cylinder, 201 cc |
| Rated power | 3.7 kW |
| Cutting width | 530 mm |
| Cutting height | 19 to 101 mm (7 positions) |
| Grass bag capacity | 76 L |
| Weight | 43.5 kg |
| Dimensions (L x W x H) | 1 610 mm x 588 mm x 1 073 mm |
| Transmission type | Continuously variable transmission (Select Drive) |
| Forward speed | 0 to 1.64 m/s |
| Ignition system | Transistorized magneto |
| Spark plug | NGK BPR5ES, gap 0.7-0.8 mm |
| Fuel | Unleaded petrol, octane rating ≥ 91 |
| Fuel tank capacity | 0.91 L |
| Engine oil | SAE 10W-30, API SJ, capacity 0.35-0.40 L |
| Sound level (guaranteed acoustic power) | 98 dB(A) |
| Transmitted vibrations | 5.4 m/s² |
| Cutting system | Double mulching blade (MicroCut) |
| Functions | Rear collection, mulching, rear discharge |
| Safety | Roto-Stop blade stop, discharge guard, blade brake |
| Maintenance | Dry air filter, oil drain, deck cleaning |
| Warranty | 2 years (parts and labor) |
Frequently Asked Questions - HRX 537 VY Honda
User questions about HRX 537 VY Honda
0 question about this device. Answer the ones you know or ask your own.
Ask a new question about this device
Download the instructions for your Lawn mower in PDF format for free! Find your manual HRX 537 VY - Honda and take your electronic device back in hand. On this page are published all the documents necessary for the use of your device. HRX 537 VY by Honda.
USER MANUAL HRX 537 VY Honda
Thank you for purchasing a Honda lawnmower!
This manual covers the operation and maintenance of the Honda HRX537VYE lawnmower.
We want to help you get the best results from your new mower and to operate it safely. This manual contains the information on how to do that; please read it carefully.
This manual should be considered a permanent part of the lawnmower and should remain with it if it is resold.
If you have a problem or questions concerning the mower, contact your supplying dealer.
We recommend that you read the warranty policy to fully understand your rights and responsibilities. The warranty policy is a separate document provided by your dealer.
Honda Power Equipment Mfg., Inc. reserves the right to make changes at any time without notice and without incurring any obligation.
No part of this publication may be reproduced without written permission.
SAFETY MESSAGES
Pay special attention to statements preceded by the following words:

DANGER
You WILL be KILLED or SERIOUSLY HURT if you don't follow instructions.

WARNING
You CAN be KILLED or SERIOUSLY HURT if you don't follow instructions.

CAUTION
You CAN be HURT if you don't follow instructions.
Each message tells you what the hazard is, what can happen, and what you can do to avoid or reduce injury.
DAMAGE PREVENTION MESSAGES
You will also see other important messages that are preceded by the following word:
NOTICE
Your lawnmower, other property, or the environment can be damaged if you don't follow instructions.
The purpose of these messages is to help prevent damage to your lawnmower, other property, or the environment.

00X39VH7 V464
HONDA
OWNER'S MANUAL
(Original instructions)
HRX537VYE
PEDESTRIAN CONTROLLED
LAWNMOWER
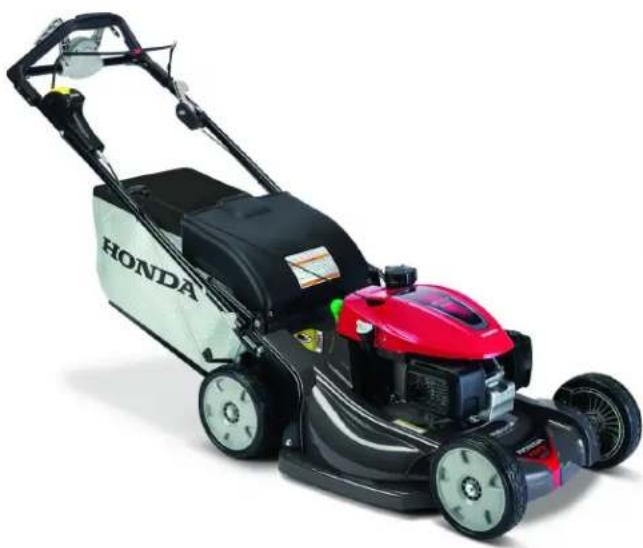
natural_image
Exterior view of a Honda lawn mower with red and black body (no signage or text visible)CONTENTS
INTRODUCTION....1 MAINTENANCE....12
SAFETY MESSAGES ....1 The Importance of
SAFETY INSTRUCTIONS .....2 Maintenance.....12
Safety Label Location .....3 Maintenance Schedule.....13
Product Identification Plate....3 Engine Maintenance .....13
COMPONENT Control Cable Adjustments...15
IDENTIFICATION ....3 Cutting means Removal and SETUP ....4 Installation ....15
5 Grass catcher Cleaning and CONTROLS Replacement 16
PRE-OPERATION CHECKS. . . .6 TRANSPORTING 16
Cutting Means ....6 STORAGE 17
Engine Oil Level .6 TROUBLESHOOTING 18
Grass Catcher 7 SPECIFICATIONS 19
Cutting Height 8 Honda Warranty Conditions,
Clip Director....8 EC Declaration of Conformity,
Rear Discharge....9 Honda Distributor Locations PERATION....10 ....Last page
Mowing Precautions .....10
Starting the Engine .....10
Stopping the Engine .....10
Safe Mowing Practices .....11
Mowing Tips ....11
© 2020 American Honda Motor Co., Inc.—All Rights Reserved
C5
HPE.2020.01
PRINTED IN U.S.A.
SAFETY INSTRUCTIONS
WARNING
To ensure safe operation –

- Honda lawnmowers are designed to give safe and dependable service if operated according to instructions. Read and understand the Owner's Manual before operating the mower. Failure to do so could result in personal injury or equipment damage.
Tampering and Altering
Never attempt to tamper with or alter the emission control system. Among those acts that constitute tampering are:
- Removal or alteration of any part of the intake, fuel, or exhaust systems.
- Altering or defeating the governor linkage or speed-adjusting mechanism to cause the engine to operate outside its design parameters.
- Read instructions carefully, and become familiar with controls and proper use of equipment.
- Use the lawnmower for the purpose it is intended for, that is mowing and collecting grass. Any other use could be dangerous or damage the equipment.
- Never allow children or people unfamiliar with these instructions to use the lawnmower. Local regulations may restrict the age of the operator.
- Never mow when:
- People, especially children, or pets are nearby.
- User is under medication or has swallowed substance known to affect judgment or reactions.
- There is a risk of adverse weather such as lightning or a storm.
- Keep in mind that the operator or user is responsible for injuries or hazards occurring to other people or their property.
- While mowing, always wear substantial footwear and long trousers. Do not operate the equipment when barefoot or wearing sandals.
- Thoroughly inspect the area where the equipment is to be used, and remove all objects which may be thrown by the machine (stones, branches, wires, toys, bones, etc...).
- WARNING - Petrol is highly flammable:
- Store fuel in containers specifically designed for this purpose.
- Refuel outdoors only, before starting the engine, and do not smoke while refueling or handling fuel.
- Never remove the cap of the fuel tank or add petrol while the engine is running or when the engine is hot.
- If petrol is spilled, do not attempt to start the engine, but move the machine away from the area of spillage, and avoid creating any source of ignition until the petrol vapors have dissipated.
- Install fuel caps securely.
-
Before tipping the lawnmower to maintain the cutting means or drain oil, remove fuel from the tank.
-
Replace faulty mufflers.
- Before using, always visually inspect to see that the cutting means, cutting-means bolts, and cutting-means enclosure are not worn or damaged. Replace worn or damaged cutting means and cutting-means bolts in sets to preserve balance.
- Do not operate the engine in a confined space where dangerous carbon monoxide fumes can collect.
- Mow only in daylight or good artificial light. Do not mow if visibility is impaired.
- If there is a risk of adverse weather such as lightning or a storm, stop operation.
- Avoid operating the equipment in wet grass, where possible.
- While mowing, always keep the safety distance to the cutting means, which is provided by the handle length.
- Walk, never run. Do not let yourself be pulled by the lawnmower.
• Always be sure of your footing on slopes. Mow across the face of slopes, never up and down.
• Exercise extreme caution when changing direction on slopes. - Do not mow slopes of more than 20^ .
- Use extreme caution when pulling the lawnmower toward you.
- Stop the cutting means if the lawnmower has to be tilted for transporting, when crossing surfaces other than grass, and when transporting the lawnmower to and from the area to be mowed.
- Do not attempt to tamper with or disable safety systems.
- Never operate the lawnmower with defective guards or shields, or without safety devices such as discharge guard and/or grass catcher.
- Do not change the engine governor setting or over-speed the engine.
- Disengage the cutting-means control and drive clutch control before starting the machine.
- Start the engine carefully according to the instructions and with feet well away from the cutting means.
- Do not tilt the lawnmower when starting the engine.
Start the lawnmower on a level surface, free of high grass or obstacles.
- Keep hands and feet away from rotating parts.
Do not start the engine when standing in front of the discharge opening.
- Never pick up or carry a lawnmower while the engine is running.
- Stop the engine and disconnect the spark plug cap:
– Before any operation under the cutting-means enclosure or the discharge chute.
– Before checking, cleaning, or working on the lawnmower.
- After striking a foreign object. Inspect the lawnmower for damage and make repairs before restarting and operating the lawnmower.
- If lawnmower starts to vibrate abnormally, Check immediately the cause of the vibration and perform the necessary repair.
- Stop the engine in the following cases:
- Whenever you leave the lawnmower.
– Before refueling the lawnmower.
- Stop the cutting means in the following cases:
- When installing or removing the grass catcher.
– Before adjusting the cutting height.
- Reduce the throttle setting during engine shut-down, and turn the fuel valve off at the conclusion of mowing.
- Using any attachments other than those recommended in this manual may cause damage to your lawnmower and such damage will not be covered by your guarantee.
- Keep all nuts, bolts, and screws tight to be sure the equipment is in safe working condition. Regular maintenance is an essential aid to user's safety and retaining a high level of performance.
- Never store the equipment with petrol in the tank inside a building where fumes may reach an open flame, spark or high temperature source.
- Allow the engine to cool before storing in any enclosure.
- To reduce the fire hazard, keep the lawnmower, especially the engine and silencer, the petrol storage area, and battery compartment (if applicable) free of grass, leaves, or excessive grease.
Do not leave container of grass cuttings in or near a building.
- If the fuel tank has to be drained, this should be done outdoors with a cold engine.
- Check the grass catcher frequently for wear or deterioration.
- Do not use the machine with worn or damaged parts.
Part must be replaced, not repaired. Replace worn or damaged parts with Honda genuine parts.
Cutting means must always must always bear the mark Honda and the reference number. Non equivalent quality parts may damage the machine and be prejudicial to your safety.
- Wear thick gloves when removing or installing the cutting means or when cleaning the cutting-means enclosure.
When tightening or loosening the cutting-means bolts, use a wooden block to prevent the cutting means from rotating. - Always make sure the correct balance of the cutting means when sharpening.
- Wear eye protection.
- Never use the machine in cases of fatigue or illness of the user, or after consumption of medications, drugs, alcohol or dangerous substances which might interfere with his ability regarding reflexes and concentration.
- When using the machine, always wear safety shoes that are strong and non-slip and long trousers. Do not use the machine with bare feet or wearing open shoes. Avoid wearing chains, bracelets or baggy clothes with loose parts or with lacing or neck ties. Long hair must be tied back. Always wear an anti-noise helmet.
- Please remember that the operator or user is responsible for any accidents or unexpected events that may occur to other persons or their property. The user is responsible for checking on possible risks due to the ground to be worked on, and for taking all precautions necessary for ensuring his own safety and that of others, in particular on sloping ground, rough, slippery or unstable terrain, or near holes, ditches or banks.
- CAUTION – The levels for noise and vibration Indicated in this information sheet are the maximum values for using the machine. The use of an unbalanced cutting device, an excessive speed of movement and a lack of maintenance have a significant effect on sound emissions and vibration. It is therefore necessary to take preventive measures to eliminate all possible damage due to high noise levels, and stresses due to vibrations; please ensure that the machine is well maintained, wear an anti-noise helmet. Take breaks during the work.
Disposal
To protect the environment, do not dispose of this product, battery, engine oil, etc. carelessly by leaving them in the waste. Observe the local laws and regulations or consult your authorized Honda dealer for disposal.
This label warns you of potential hazards that can cause serious injury. Carefully read meaning. If label comes off or becomes hard to read, contact your dealer for a replacement.
Letter Meaning
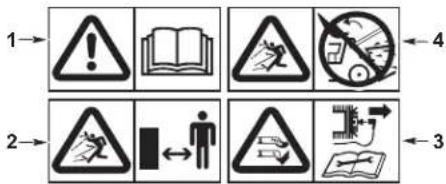
A
- Read the owner's manual before using the mower.
- Risk of projections: Keep third persons away from the area during use.
- Risk of cuts. Rotating cutting means: Do not put hands or feet inside the cutting means enclosure. Disconnect the spark plug cap before performing any operation of maintenance or repairs.
- Do not operate without either discharge guard or grass catcher in place.
| B | 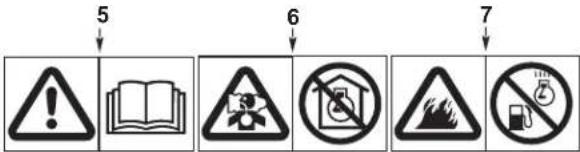 |
| 5. Read the owner's manual before using the mower.6. The engine emits toxic carbon monoxide. Do not run in an enclosed area.7. Petrol is highly flammable. Stop the engine before refueling. |
PRODUCT IDENTIFICATION PLATE
Letter Meaning
| c | 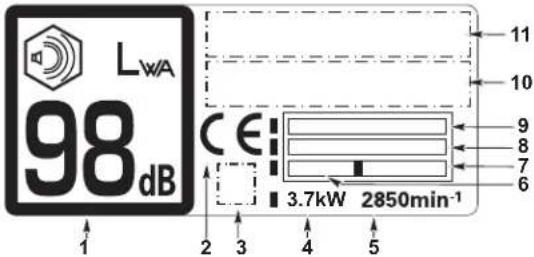 |
-
Sound power level guaranteed according to directive 2000/14/EC
-
Production date
- Weight in kilograms
- Serial number
- Model
- Name and address of authorized representative
- Name and address of Manufacturer
Name and address of manufacturer and authorized representative are written in the "EC Declaration of Conformity" CONTENT OUTLINE in this Owner's Manual.
Record the frame and engine serial numbers in the space below. you will need these numbers when ordering parts and when making technical or warranty inquires.
Frame serial number: ____ - ____
Engine serial number: ____ -
Date of purchase: ____/____/____
COMPONENT IDENTIFICATION
![[1] [2] [3] A (LABEL) [4] [5] [6] [7] [8] (2) [9] [10] [11] HONDA](/content/2026/04/668916/images/61bb9291b0c08b354a3a271f99fcfba51e892234d6269e3180212a29659bb45d.jpg)
![[12] [20] C (LABEL) [13] [14] [15] [16] [17] B (LABEL) [18] [19] [8]](/content/2026/04/668916/images/b7e444d3fb428f8d4ab42dc6ad7b0923743f57f2f2af600be79002ea2dc5769f.jpg)
| 1 | Cutting means control (Starts and stops the cutting means) |
| 2 | Handlebar 12 Select Drive control |
| 3 | Fuel tank cap |
| 4 | Cutting-means enclosure |
| 5 | Muffler 15 Fuel valve |
| 6 | Oil filler cap |
| 7 | Clip Director knob 17 Air cleaner |
| 8 | Cutting height adjuster (4) |
| 9 | Grass catcher |
| 10 | Recoil starter |
| 11 | Roto-Stop button (Activates the cutting-means control lever) |
| 13 | Throttle lever |
| 14 | Handlebar adjust knob (2) |
| 16 | Engine serial number |
| 18 | Carburetor |
| 19 | Spark plug cap |
| 20 | Discharge guard |
SETUP
UNPACKING
Remove all the cardboard from around the handlebar.
HANDLEBAR SETUP
- Turn the handlebar adjust knobs [1] 90 degrees into the unlock position [2].
- Move the handlebar into the mowing position so that the locating pins align with either the upper, middle, or lower holes on the handlebar mounting brackets.
- Turn the adjust knobs 90 degrees into the lock position [3] and the pins will snap into the holes and lock into position.
![[1] (2) HONDA [2] [3]](/content/2026/04/668916/images/a062926626d322396084b976bae36f3e04b3fdae3bdae07428310bf6239a89ce.jpg)
GRASS CATCHER ASSEMBLY
- Slide the grass catcher frame [1] into the grass catcher [2] and install the plastic clips [3] as shown.
![[1] [2] HONDA HONDA [3]](/content/2026/04/668916/images/f16e58d09c63b83b38b19f3b505b2623f849a16b0bef3ecb06661d041a195b60.jpg)
- Lift the discharge guard [4] and install the grass catcher [2].
![[2] [4]](/content/2026/04/668916/images/e0fd3aefbc709999e8703e8d0d7ca8a8fb3060aedae3b47e96d8f3b0dc1756e6.jpg)
ENGINE OIL
The mower is shipped WITHOUT OIL in the engine.
Add enough SAE 10W-30 API service category SJ or later oil to bring the oil level between the upper limit [2] and lower limit [3] marks on the dipstick [1] as shown.
Refill amount: 0.35 \~ 0.40 L
Do not overfill the engine with oil. If the engine is overfilled, the excess oil may get transferred to the air cleaner housing and air filter.
![[1] [2] [3]](/content/2026/04/668916/images/964ca36ce786878b5baec746a286d3e117b4ce9b6f63611c7d09660044cfa969.jpg)
FUEL
Refer to page 7.
BEFORE USING YOUR LAWNMOWER
Before using the lawnmower, all mower operators must read the following chapters:
• SAFETY INSTRUCTIONS (page 2)
• CONTROLS (page 5)
• PRE-OPERATION CHECKS (page 6)
• OPERATION (page 10)
• MAINTENANCE SCHEDULE (page 13)
CONTROLS
FUEL VALVE
The fuel valve [1] opens and closes the connection between the fuel tank and the carburetor.
![OFF ON [1]](/content/2026/04/668916/images/f2b1140d650108d5090aa18216b7425f7c5505b611d0c3335cb72a59f05a6e3a.jpg)
THROTTLE LEVER
For best cut quality, always mow with the throttle lever in the FAST position. When the cutting means rotate at the preset fast speed, they create a strong fan action that lifts and cuts grass more efficiently.
Do not try to increase the preset FAST engine speed; the cutting means could fracture and come apart.

CUTTING MEANS CONTROL SYSTEM
To start cutting means rotation, make sure the engine is running and the throttle lever is in the FAST position.
- Push down and hold the Roto-Stop® button [1].
- Pull the cutting-means control lever [2] quickly against the handlebar allowing the engine to bring the cutting means up to full speed and then release the Roto-Stop button.
Continue to hold the cutting-means control lever against the handlebar to maintain cutting means rotation. Always keep the cutting-means control lever fully engaged while mowing. Do not partially disengage - doing so will reduce the life of the clutch system.
Release the cutting-means control lever to stop cutting means rotation. Always release the cutting means control lever before starting the engine to prevent the cutting means from rotating.
SELECT DRIVE CONTROL
With the engine running and the cutting means rotating, slowly push the Select Drive control [1] to propel the mower forward.
Normal operation is with your hand comfortably around
the handle bar and Select Drive control. Push the Select Drive control with your thumb into the indentation for boost operation (up a hill, or through thick grass).
You can reduce the ground speed by partially releasing the Select Drive control.
![[2] [1]](/content/2026/04/668916/images/d98981c2539aa5f183a44f0d3d928147946ac96afa22816ec850c8cfaee6e0c5.jpg)
![HONDA SLR CAR [1]](/content/2026/04/668916/images/dd6e2ab8e9bd67255b19257e409a14ea0b2dfa4ede916ae38bfc10f00565e113.jpg)
Ground speed varies with terrain, grass height, slope, and grass bag weight. Moving the Select Drive knob or varying how far you push the Select Drive control forward allows you to maintain the desired ground speed under constantly changing mowing conditions.
Release the Select Drive control to disengage (stop) the rear wheels.
Disengage the drive when mowing around trees and other obstacles. Push the mower around obstacles for better directional control.
Adjusting The Select Drive Control Knob
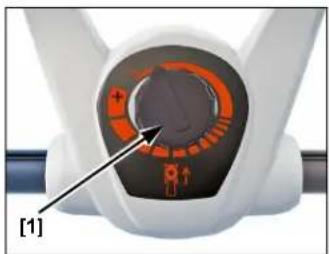
The Select Drive control knob [1] allows you to adjust the maximum ground speed when the Select Drive lever is fully engaged.
Adjustment is from MIN to MAX. With the Select Drive lever fully engaged:
MIN will propel the lawnmower at its slowest speed.
natural_image
Close-up of a white robotic arm dial with orange and black adjustment knobs, labeled [1] (no text or symbols on the dial itself)MAX will propel the lawnmower at its fastest speed.
CUTTING HEIGHT ADJUSTMENT LEVERS
There are seven adjustment settings. The cutting height figures are approximate. The actual height of cut grass will vary with lawn and soil conditions.
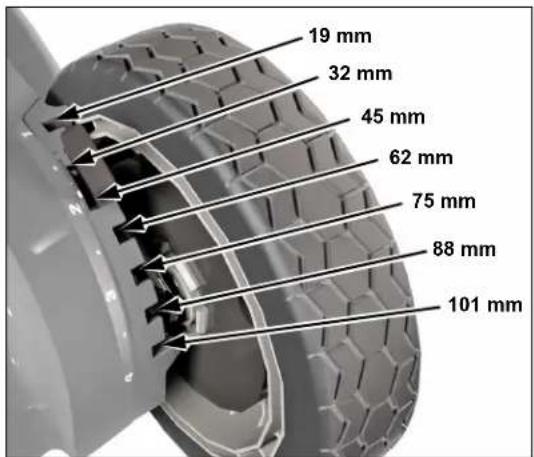
There is one adjustment lever [1] for each wheel.
natural_image
Diagram of a red lawn mower mounted on a gray lawn, with arrows indicating motion direction (no text or symbols)CLIP DIRECTOR KNOB
The Clip Director knob [1] controls grass catching, mulching, and rear discharge. The knob has ten adjustment positions.
Be sure to wear protective clothing. Long pants and eye protection can lower your risk of injury from thrown objects. Wear footwear that protects your feet and won't let you slip if you mow on slopes or uneven ground.
CHECK YOUR LAWN
For your safety and for the safety of others, always inspect the area before mowing.
Objects
Anything that can be picked up by the cutting means and thrown is a potential hazard to you and others. Look for things like stones, sticks, bones, toys, and wire. Remove them from the mowing area.
People and Pets
People and animals near the mowing area can move into your path or into a position where they could be struck by thrown objects. Clear the area of people, especially children, and pets. Their safety is your responsibility.
Lawn
Check the length and condition of the grass, so that you will know what cutting height and mowing speed to use.
Avoid mowing wet grass. Not only will wet grass clog your mower deck and collect in clumps on the lawn, it also gives poor traction, increasing your risk of losing your footing.
CHECK YOUR MOWER
Cutting Means
-
Move the throttle lever to the STOP position (page 5).
-
Move the fuel valve to the OFF position (page 5).
-
Disconnect the spark plug cap from the spark plug (page 14).
-
Tilt the mower to the right so the fuel cap [1] is up. This will help prevent fuel leakage, motor oil seeping into the air filter, and hard starting.
-
Inspect the cutting means [2] for damage, cracks, and excessive wear, rust, or corrosion.
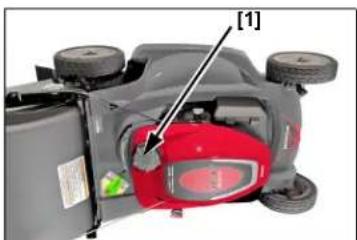
natural_image
Top-down view of a red lawn mower with visible wheels and a labeled component [1] (no text or symbols on the object itself)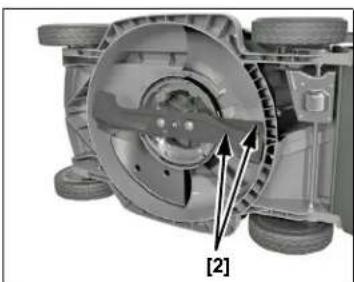
natural_image
Cutaway view of a mechanical component showing internal components and a labeled section [2] (no text or symbols beyond label)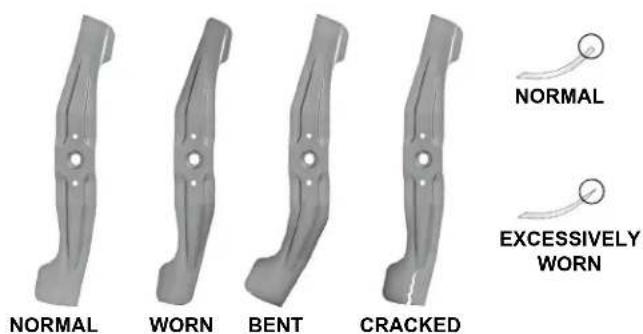
WARNING
A worn, cracked, or damaged cutting means can break, and pieces of the damaged cutting means can become dangerous projectiles.
Blades thrown from the mower could seriously hurt or kill someone.
Inspect the cutting means regularly, and do not operate the mower with a worn or damaged cutting means.
A dull cutting means can be sharpened, but a cutting means that is worn out, bent, cracked, or otherwise damaged must be replaced. A worn or damaged cutting means can break, causing cutting means pieces to be thrown from the mower.
When a cutting means needs sharpening or replacement, take the lawnmower to an authorized Honda dealer. Or, if you have a torque wrench, you can remove and install the cutting means yourself.
Check that the cutting means bolts are tight (page 15).
Engine Oil Level
Check the engine oil level with the engine stopped and the mower on a level surface.
Use 4-stroke motor oil that meets or exceeds the requirements for API service classification SJ or later. Always check the API service label on the oil container to be sure it includes the letters SJ or later.
SAE 10W-30 is recommended for general use. Other viscosities shown in the chart may be used when the average temperature in your area is within the indicated range.
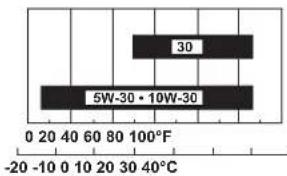
We recommend the use of Honda genuine oil to maintain the performance of the emission control system.
NOTICE
- Running the engine with a low oil level can cause engine damage.
-
Using nondetergent oil can shorten the engine's service life, and using 2-stroke oil can damage the engine.
-
Remove the oil filler cap/dipstick [1], and wipe the dipstick clean.
- Insert the dipstick into the filler neck. Do not screw it down. Remove the dipstick and check the oil level.
- If the oil level is near the low level mark [3], add the recommended oil to bring the level up to the high limit mark [2]. Do not overfill.
- Install and tighten the filler cap/dipstick [1] securely.
![[1] [2] [3]](/content/2026/04/668916/images/0ff4ff8e5fdc6f7b5a1521866f52b6b8326e27f698e4524ae04080e911bc8055.jpg)
Fuel
This engine is certified to operate on unleaded petrol with a research octane rating of 91 or higher.
We recommend refueling after each use to minimize the air present in the fuel tank.
Refuel in a well-ventilated area before starting the engine. If the engine has been running, allow it to cool. Never refuel the mower inside a building where petrol fumes may reach flames or sparks.
You may use regular unleaded petrol containing no more than 10% ethanol (E10) or 5% methanol by volume. In addition, methanol must contain cosolvents and corrosion inhibitors. Use of fuels with content of ethanol or methanol greater than shown above may cause starting and/or performance problems. It may also damage metal, rubber, and plastic parts of the fuel system. In addition, ethanol is hygroscopic, which means it attracts and retains water in the fuel system. Engine damage or performance problems that result from using a fuel with percentages of ethanol or methanol greater than shown above are not covered by warranty. Using the fuel indicated above is necessary to maintain the performance of the emission control system.
If your equipment will be used on an infrequent or intermittent basis, (more than 4 weeks before next use) please refer to the Fuel section of the STORAGE chapter (page 17) for additional information regarding fuel deterioration.
WARNING
Petrol is highly flammable and explosive.
You can be burned or seriously injured when handling fuel.
- Stop the engine and allow to cool.
- Keep heat, sparks, and flame away.
- Handle fuel only outdoors.
• Wipe up spills immediately.
Never use stale or contaminated petrol or an oil/petrol mixture. Avoid getting dirt or water in the fuel tank.
NOTICE
Fuel can damage paint and plastic. Be careful not to spill fuel when filling your fuel tank. Damage caused by spilled fuel is not covered under warranty.
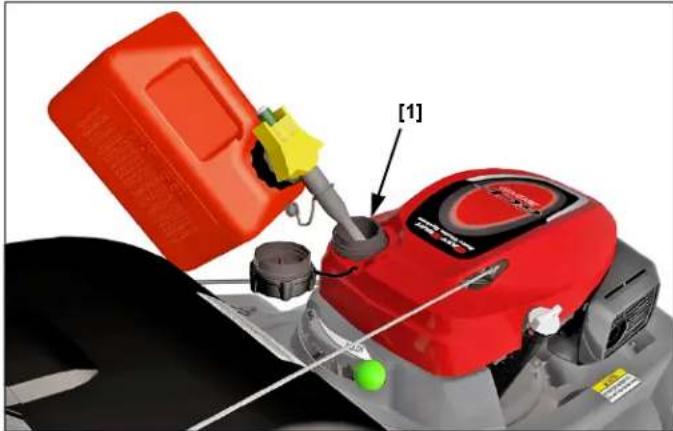
Remove the fuel tank cap and check the fuel level. Refill the tank if the fuel level is low. Refuel carefully to avoid spilling fuel. Do not overfill; there should be no fuel in the filler neck [1].
natural_image
Red and black lawn mower with a yellow bucket being inserted, no visible text or symbolsAfter refueling, tighten the fuel tank cap securely.
Move the mower at least 3 meters away from the fueling source and site before starting the engine.
Fuel Storage Container
Store your petrol in a clean, plastic, sealed container approved for fuel storage. Close the vent (if equipped) when not in use, and store the container away from direct sunlight. If it will take more than 3 months to use the fuel in the container, we suggest adding a fuel stabilizer to the fuel when you fill the container.
Air Cleaner Inspection
Remove cover [1]. Make sure the filter [2] is clean and in good condition. A dirty air filter will restrict air flow to the carburetor, reducing engine performance. Refer to page 14 for air cleaner service.
![[2] [1]](/content/2026/04/668916/images/0e65becb8783f70e50487e870a676930182a5e3e6c6df833e06968703c24a4cf.jpg)
Handlebar Height Adjustment
Adjust handlebar height to a comfortable operating position (page 4).
Grass Catcher
A lawnmower works like a vacuum cleaner; it blows air through the catcher, which traps the grass clippings. Always empty the grass catcher before it becomes filled to the limit of its capacity. Catching performance will diminish after the catcher becomes about 90% filled. Also, the catcher is easier to empty when it is not packed full.
Inspection
During normal use, the grass catcher material is subject to deterioration and wear.
NOTICE
Frequently inspect the grass catcher for tears, holes, and excessive wear.
Check for necessary replacement. Make sure the new catcher meets the original specifications.
If the grass catcher needs replacement, you can remove and install a catcher yourself (page 16).
Installation
- Raise the discharge guard [1], and use the grass catcher
handle [3] to hook the grass catcher [2] onto the mower deck as shown.
- Release the discharge guard to secure the grass catcher.
![[3] [1] [2]](/content/2026/04/668916/images/034ede8361f64201669dbb441209df244e77697a919ac32105c3228bf5121f79.jpg)
Removal
- Raise the discharge guard, grasp the grass catcher handle, and remove the grass catcher.
- Release the discharge guard.
- When the grass catcher is clear of the discharge guard, you can lift it through the handlebar opening, or you can remove it to the rear of the mower below the handlebar.
Cutting Height
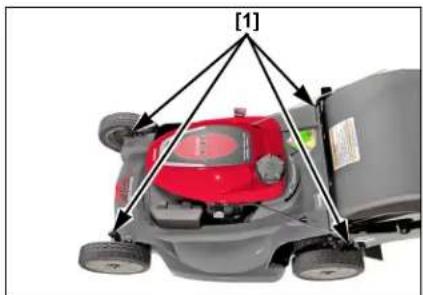
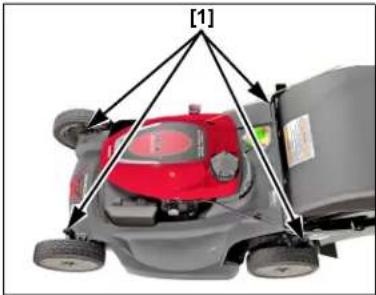
Check the mower deck cutting height settings, and be sure that all four adjustment levers [1] are set to the same cutting height position.
natural_image
Close-up of a red and gray lawn mower with attached frame structure (no text or symbols visible)To adjust cutting height, pull each adjustment lever [1] toward the wheel, and move it into another notch.
If you are not sure what cutting height to select, start with a high setting and check the appearance of the lawn after mowing a small area. Then readjust cutting height if necess
![[1] 19 mm 32 mm 45 mm 62 mm 75 mm 88 mm 101 mm](/content/2026/04/668916/images/0d3efa2e2e0ed68f51ce06dcd10e49dcf0d50c93e7acb44f0eb07cc08088e639.jpg)
Rear Shield
During normal use the rear shield [3] is subject to deterioration and wear. Remove the grass catcher [1] and raise the discharge guard [2] to check the rear shield for cracks or tears. If the rear shield is excessively worn, have it replaced by your authorized Honda servicing dealer.
![[2] HONDA [1] [3]](/content/2026/04/668916/images/7830bdc9590e3d7028b1ea813468a958b1601640ee0e27ab42e06e6bcd318ae4.jpg)
Clip Director
Clip Director Knob Adjustment
Adjust the Clip Director knob [1] in any one of the ten positions to achieve the desired mowing results.
To adjust the Clip Director knob, pull the knob downward and towards the rear of the mower. The knob adjusts a sliding door [2] from the fully open BAG position to the fully closed MULCH position (see the following page).
![[1] [2] (fully closed)](/content/2026/04/668916/images/4c4bf200d1702fe19dcb2c470f1552904bba99a54326b0bfdbc2cb303001ac65.jpg)
If a high resistance is noticed when moving the Clip Director knob from side-to-side, excessive grass may have built up on top of the sliding door.
Some grass accumulation in the discharge opening is normal when the Clip Director is fully closed. To remove this grass, close the discharge guard [3], fully open the Clip Director, start the engine, and engage the cutting means control lever several times.
Important Safety Precaution
Always turn the engine off and disconnect the spark plug cap before lifting the discharge guard to view or clean around the sliding door. This will prevent contact with the rotating cutting means and prevent objects from being thrown into the discharge area.
Some grass accumulation in the discharge opening is normal when the Clip Director is fully closed. To remove this grass, close the discharge guard, fully open the Clip Director, and start the engine.
If a high resistance is noticed when moving the Clip Director knob from side-to-side, excessive grass may have built up on top of the sliding door.
Sliding Door Position
The sliding door [2] can be positioned to produce different mowing results. If the preferred sliding door position is unknown, install a grass catcher and begin mowing with the Clip Director knob [1] all the way to the BAG position. Check the appearance of the lawn. As the knob is moved towards the MULCH position, more grass will be recycled back into the lawn. Adjust the Clip Director knob until the desired result is achieved.
![CATCHING OR REAR DISCHARGE AND SOME MULCHING [2] BAG MULCR [2] (50% open)](/content/2026/04/668916/images/acdbe782318c8f668f9ecd82101680aaea3ccf59a763270dce753659734ecf4b.jpg)
![FULL CATCHING OR REAR DISCHARGE [1] (CATCHER POSITION) [2] (fully open)](/content/2026/04/668916/images/0c38142bbef70171312eb4b2708b5e9b9e6d0a46f5f908d11b81c8ad25200aa0.jpg)
![FULL MULCHING [1] (MULCH POSITION) [2] (fully closed)](/content/2026/04/668916/images/9b70caf613728373dd80d03bf972d26e890b5826e069a3049fb63cc76d826af6.jpg)
Rear Discharge
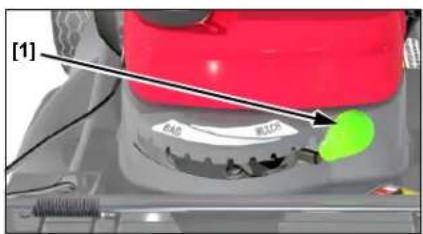
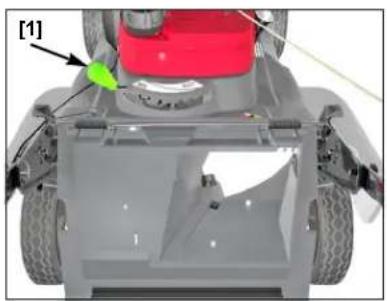
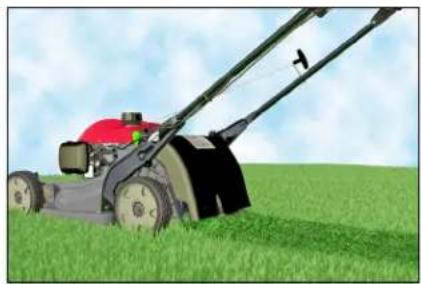
To discharge clippings to the rear, remove the grass catcher and position the Clip Director knob [1] in the BAG range.
natural_image
Top-down view of a red and gray robotic vehicle chassis with visible structural components and a green arrow pointing to a component (no text or symbols)Maximum rear discharge will occur when the Clip Director knob is all the way to the left (BAG) position. As the Clip Director knob is moved toward the right (MULCH) position, less grass will be discharged though the rear discharge guard.
natural_image
Illustration of a red lawn mower on a grassy field under a blue sky (no text or symbols)OPERATION
MOWING PRECAUTIONS
Before operating the mower for the first time, please review SAFETY INSTRUCTIONS (page 2) and PRE-OPERATION CHECKS (page 6).
Even if you have operated other mowers, take the time to become familiar with how this mower works, and practice in a safe area until you build up your skills.
For your safety, do not start or operate the engine in an enclosed area such as a garage. Your mower's exhaust contains poisonous carbon monoxide gas that can collect rapidly in an enclosed area and cause illness or death.
FREQUENCY OF USE
If your equipment will be used on an infrequent or intermittent basis, (more than 4 weeks before next use) please refer to the Fuel section of the STORAGE chapter (page 17) for additional information regarding fuel deterioration.
STARTING THE ENGINE
- Turn the fuel valve [1] to the ON position.
![ON [1]](/content/2026/04/668916/images/95dc0b6c925fb30a77082c92bdfbfed56ece9152f4a8368159613370970f1944.jpg)
-
Move the throttle lever [2] to the fast (♦) position.
-
Pull the starter grip lightly until you feel resistance, then pull briskly. Return the starter grip gently.
To keep the cutting means from turning and to prevent the mower from moving forward, always release the cutting means control lever and Select Drive control when you pull the
![FAST [2]](/content/2026/04/668916/images/4625a27ffec319a305349c4ebe5e4c715634f9e3bbd59939d1c6b09e7c2390da.jpg)
- Put the throttle lever in the FAST (♂) position to mow or to the SLOW (♀) position to idle.
To ensure easy restarting and maximum performance from the Auto Choke System, start mowing as soon as the engine starts and allow the engine to run for at least three minutes before stopping the engine.
High Altitude Operation
At high altitude, the standard carburetor air-fuel mixture will be too rich. Performance will decrease, and fuel consumption will increase. A very rich mixture will also foul the spark plug and cause hard starting.
High altitude performance can be improved by specific modifications to the carburetor. If you always operate your mower at altitudes above 610 meters, have a Honda dealer perform this carburetor modification.
Even with carburetor modification, engine power will decrease about 3.5% for each 300 meter increase in altitude. The effect of altitude on power will be greater than this if no carburetor modification is made.
NOTICE
When the carburetor has been modified for high altitude operation, the air-fuel mixture will be too lean for low altitude use. Operation at altitudes below 610 meters with a modified carburetor may cause the engine to overheat and result in serious engine damage. For use at low altitudes, have your authorized Honda dealer return the carburetor to original factory specifications.
STOPPING THE ENGINE
-
Release the cutting means control lever [1] to stop the cutting means rotation.
-
Move the throttle lever [2] to the STOP (♀) position to stop the engine.
![[1] [2] STOP](/content/2026/04/668916/images/5b39a8eeb2b5eab13e08ce36727d472eae62d490404ad790731842b6f6fabbfa.jpg)
-
When the mower is not in use, turn the fuel valve [3] to the OFF position.
-
If your equipment will not be used for 3 to 4 weeks, we recommend running the engine's carburetor out of fuel. You can do this by leaving the fuel valve OFF, restarting the engine and running it out of fuel. See "Storage" on page 17 for periods of inactivity that exceed 4 weeks.
![OFF [3]](/content/2026/04/668916/images/472dcc571912303f2fc7dee24044962e8c088240f740c66eb7057520a449d8a3.jpg)
SAFE MOWING PRACTICES
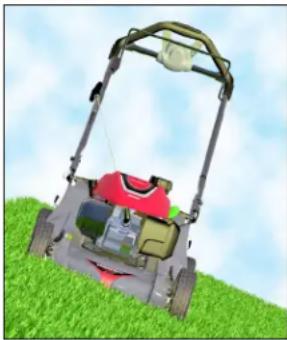
For your safety, keep all four wheels on the ground, and be careful to avoid losing your footing and your control of the mower. Keep a firm grip on the handlebar, and walk, never run, with the mower. Be very careful when mowing uneven or rough ground.
If stuck, do not kick or shove the mower with your foot. Use the handlebar to control the mower.
DANGER
The cutting means are sharp and spin at high speed.
If you come in contact with a spinning cutting means, it will cut you severely and can amputate fingers and toes.
- Wear protective footwear.
- Keep your hands and feet away from the mower deck while the engine is running.
- Stop the engine before performing any adjustment, inspection, or maintenance.
Stability
Mow across slopes, not up and down. Avoid steep slopes (more than 20^ ), and be careful when changing direction. Mowing on a slope when the grass is damp or wet could cause you to slip, fall, and lose control of the mower.
Obstacles
Use the side of the mower to cut close to large obstacles, such as fences or walls.
Release the Select Drive control to disengage the drive when mowing
around trees and other obstacles. Push the mower around obstacles for better directional control. Be careful when mowing over obstacles embedded in the lawn, such as sprinkler heads, paving, edging, etc. Avoid anything that sticks up above the surface of the lawn.
If the cutting means hits something, or if the mower starts to vibrate, stop the engine immediately and check for damage. Striking objects may damage the cutting means, bend the crankshaft, and/or break the mower deck or other components. Vibration usually indicates serious trouble.
natural_image
Illustration of a red lawn mower on a grassy hill under a blue sky (no text or symbols)WARNING
A worn, cracked, or damaged cutting means can break, and pieces of the damaged cutting means can become dangerous projectiles.
Blades thrown from the mower could seriously hurt or kill someone.
Inspect the cutting means regularly, and do not operate the mower with a worn or damaged cutting means.
The warranty does not cover parts damaged by accident or collision.
Gravel and Loose Objects
Gravel, loose stones, and landscaping material can be picked up by the mower and thrown many feet with enough force to cause serious personal injury and/or property damage. The best way to prevent potential injury from thrown objects is to release the cutting means control lever to stop the cutting means before reaching areas with gravel, loose stones, or landscaping material.
MOWING TIPS
When to Mow
Most grasses should be mowed when they have grown 12 \~ 25 mm above their recommended height.
More frequent mowing is required for mulching than for catching. For best results, you may need to mow the lawn twice a week during the growing season.
Cutting Height
Consult a local nursery or lawn and garden center for cutting height recommendations and advice about specific types of grasses and growing conditions in your area.
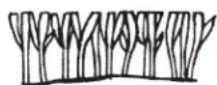
LONG ENOUGH
If you look closely, you'll see that most grass has stems and leaves. If you cut off the leaves, you'll scalp the lawn. Let the grass recover between mowings. Your mower will work better, and your lawn will look better.
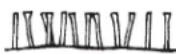
TOO SHORT
If your grass gets too tall, cut it once at the highest cutting height setting, and then mow again in 2 or 3 days. Don't take off more than one third of total grass height in any one mowing, or brown patches may develop.
Cutting height adjustment levers are explained in the CONTROLS chapter (page 5).
Cutting Width
For an even lawn finish, overlap each mowing swath by a few centimeters. If the grass is very tall or thick, use more overlap and a narrower mowing swath.
Cutting Means Speed
The cutting means must spin very fast to cut properly. Always use the fast throttle setting, and keep the engine running at maximum speed.
If engine speed drops, it could mean the engine is being overloaded by the cutting means trying to cut too much grass. Mow a narrower swath, move the mower slower, or raise the cutting height.
Cutting Means Sharpness
A sharp cutting means cuts cleanly. A dull cutting means tears the grass, leaving shredded ends that turn brown. When your cutting means doesn't cut cleanly anymore, have it sharpened or replaced.
Dry Grass
If the ground is too dry, mowing will stir up a lot of dust. Besides being unpleasant to work in, too much dust will clog the carburetor air filter.
If dust is a problem, water your lawn the day before mowing. Mow when the grass is dry to your touch, but the soil is still moist.
Wet Grass
Wet grass is slippery and can make you lose your footing. Also, wet grass clippings will clog the mower deck and collect in clumps on the lawn. Always wait for wet grass to dry before mowing.
Fallen Leaves
Your mower can be used to pick up fallen leaves for disposal. If using the mower to catch large amounts of fallen leaves, and not for mowing, set the cutting height adjustment levers so the front of the mower deck is one or two settings higher than the rear. To start, position the Clip Director knob in the #9 position (not quite full mulching). This setting will allow the leaves to be recirculated and recut until the particles are small enough to pass though the sliding door opening and into the grass catcher. Mulching when the leaves are still damp will help cut down on the amount of dust created.
Depending on the size, type, and water content of the leaves, it may be necessary to open the sliding door to allow for best catching results. Using the sliding door correctly will allow better grass catcher filling, resulting in less grass catcher emptying. Be sure there are no obstacles, including rocks, hidden under the leaves.
If you want to mulch fallen leaves into your lawn, don't let the leaf cover get too deep before you begin. For best results, start mulching while grass still shows through the leaf cover. Position the Clip Director knob in the MULCH position. In places where fallen leaves completely cover the grass, remove the leaves by raking, or use the grass catcher so your mower can pick them up for disposal.
Clogged Cutting-means Enclosure
Before clearing a clogged cutting-means enclosure, stop the engine and turn the fuel valve to the OFF position. With the spark plug cap disconnected, tilt the mower so the air cleaner side is up.
Clear a clogged cutting-means enclosure with a stick, not your hands.
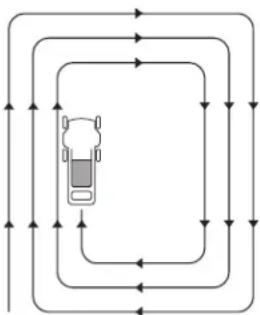
Mowing Patterns
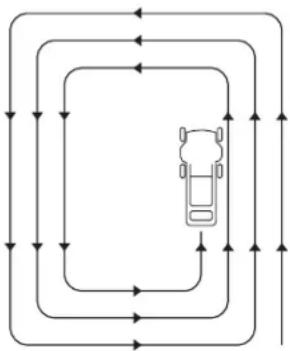
Your Honda mower will work most efficiently if you use the following mowing patterns as much as possible. Mower deck and equipment design, and the direction in which the cutting means rotate, cause these mowing patterns to give the best results.
Mulching
Use a counterclockwise mowing pattern [1] when the Clip Director knob is in the full MULCH position. If the lawn has an irregular shape, or many obstacles, divide it into sections where you can use counterclockwise mowing patterns.
flowchart
graph TD
    A["Top-Left"] --> B["Top-Right"]
    B --> C["Bottom-Left"]
    C --> D["Bottom-Right"]
    D --> E["Top-Left"]
    E --> F["Top-Right"]
    F --> G["Bottom-Left"]
    G --> H["Bottom-Right"]
    H --> I["Top-Left"]
    I --> J["Top-Right"]
    J --> K["Bottom-Left"]
    K --> L["Bottom-Right"]
    L --> M["Top-Left"]
    M --> N["Top-Right"]
[1]
Catching
Use a clockwise mowing pattern [2]. This will give the best Clip Director and catching performance, leaving the least amount of clippings on the lawn.
Rear Discharge Mowing
Remove the grass catcher and close the discharge guard. Adjust the Clip Director knob to the desired setting and begin mowing in a clockwise mowing pattern [2]. If the lawn has an irregular shape, or many obstacles, divide it into sections.
flowchart
graph TD
    A["Top Left Side"] --> B["Top Right Side"]
    B --> C["Bottom Left Side"]
    C --> D["Bottom Right Side"]
    D --> E["Bottom Right Side"]
    E --> F["Bottom Left Side"]
    F --> G["Top Left Side"]
    G --> H["Top Right Side"]
    H --> I["Top Right Side"]
    I --> J["Top Left Side"]
    J --> K["Top Right Side"]
    K --> L["Bottom Left Side"]
    L --> M["Bottom Right Side"]
    M --> N["Bottom Right Side"]
    N --> O["Bottom Left Side"]
    O --> P["Top Left Side"]
    P --> Q["Top Right Side"]
    Q --> R["Top Right Side"]
    R --> S["Bottom Left Side"]
    S --> T["Bottom Right Side"]
    T --> U["Bottom Right Side"]
    U --> V["Bottom Left Side"]
[2]
MAINTENANCE
THE IMPORTANCE OF MAINTENANCE
Good maintenance is essential for safe, economical, and trouble-free operation. It will also help reduce air pollution and ensure the emissions performance of the engine continues to be met.
To help you properly care for your mower, the following pages include a maintenance schedule, routine inspection procedures, and simple maintenance procedures using basic hand tools. Other service tasks that are more difficult, or require special tools, are best handled by professionals and are normally performed by a Honda technician or other qualified mechanic.
The maintenance schedule applies to normal operating conditions. If you operate your mower under unusual conditions, consult an authorized Honda dealer for recommendations applicable to your individual needs and use.
Remember that your Honda dealer knows your mower best and is fully equipped to maintain and repair it.
To ensure the best quality and reliability, use only new, Honda Genuine parts or their equivalents for repair and replacement.
WARNING
Improper maintenance, or failure to correct a problem before operation, can cause a malfunction in which you can be seriously hurt or killed.
Always follow the inspection and maintenance recommendations and schedules in this owner's manual.
Maintenance safety
Some of the most important safety precautions follow. However, we cannot warn you of every conceivable hazard that can arise in performing maintenance. Only you can decide whether or not you should perform a given task.
WARNING
Failure to properly follow maintenance instructions and precautions can cause you to be seriously hurt or killed.
Always follow the procedures and precautions in this owner's manual.
Safety Precautions
- Make sure the engine is off before you begin any maintenance or repairs. This will eliminate several potential hazards:
– Carbon monoxide poisoning from engine exhaust.
Be sure there is adequate ventilation whenever you operate the engine. - Burns from hot parts.
Let the engine and exhaust system cool before touching. - Injury from moving parts.
Do not run the engine unless instructed to do so. - Read the instructions before you begin, and make sure you have the tools and skills required.
- To reduce the possibility of fire or explosion, be careful when working around petrol. Use only a nonflammable solvent, not petrol, to clean parts. Keep cigarettes, sparks, and flames away from all fuel-related parts.
MAINTENANCE SCHEDULE
Perform at every indicated month/year or operating hour interval, whichever comes first.
| Regular Service Period | Item Page | |
| Before each use | Check: Grass catcherCheck: Cutting meansCheck: Operation of the cutting-means controlCheck: Engine oil levelCheck: Air filterCheck: Rear shieldCheck: Cutting-means bolts | page 4page 6page 5page 6page 7page 8page 16 |
| First month or 5 hours | Change: Engine oil ^1 Adjust: Select Drive cable | page 13page 15 |
| First 25 hours Clean | Air filter ^1 Adjust: Select Drive cable | page 14page 15 |
| Every 6 months or 50 hours | Change: Engine oil ^1 Clean: Air filter ^1 Adjust: Select Drive cable | page 13page 14page 15 |
| Every year or 100 hours | 6 month items above plus:Check-adjust: Spark plugClean: Spark arrester ^3 (if equipped)Check: Operation of the cutting-means controlGrease: Pinion gears ^2 Adjust: Throttle cable ^2 Adjust: Valve clearance ^2 Adjust: Idle speed ^2 Clean: Fuel tank ^2 | page 14page 14page 5 |
| Every 2 years or 150 hours | 1 year items above plus:Change: Engine oil ^1 Replace: Air filterInspect-grease: Rear wheel adjuster bushing ^2 | page 13page 14 |
| Every 2 years Check | Fuel lines replace if necessary ^2 |
-
Service more frequently when used in dusty areas.
-
These items should be serviced by an authorized Honda servicing dealer, unless you have the proper tools and are mechanically proficient. Refer to the Honda shop manual for service procedures.
-
In Europe and other countries where machinery directive 2006/42/EC is enforced, this cleaning should be done by your servicing dealer.
Failure to follow this maintenance schedule could result in non-warrantable failures or reduction in performance and emissions noncompliance.
ENGINE MAINTENANCE
Engine Oil Change
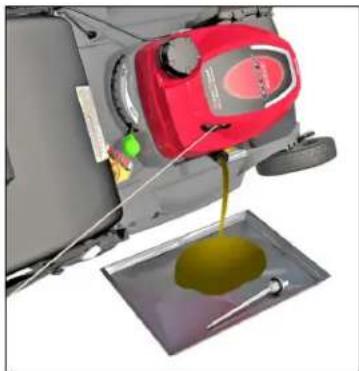
Drain the oil while the engine is warm. Warm oil drains quickly and completely.
-
Put the throttle lever in the STOP position and turn the fuel valve OFF. This will reduce the possibility of fuel leakage (page 5).
-
Wipe the oil filler area clean, and then remove the oil filler cap/dipstick.
-
Place a suitable container next to the mower to catch the used oil, and then tilt the mower on its right side. The used oil will drain through the filler neck. Allow the oil to drain completely.
Please dispose of used motor oil and the containers in a manner that is compatible with the environment. We suggest you take it in a sealed container to your local recycling center or service
natural_image
Close-up of a red industrial machine pouring yellow liquid into a metal tray (no visible text or symbols)station for reclamation. Do not throw it in the trash, pour it on the ground or pour it down a drain.
- Fill with the recommended oil (page 6).
Refill amount: 0.35 \~ 0.40 L
Do not overfill. Measure the oil level as shown below.
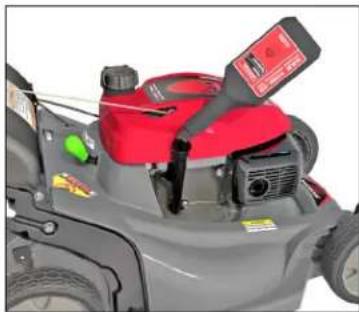
- After changing the engine oil and before starting the engine, check the oil level with the mower on a level surface:
natural_image
Close-up of a grass lawn mower with red and green components (no visible text or symbols)a. Remove the filler cap/dipstick [1].
b. Wipe the dipstick clean.
c. Insert and remove the dipstick without screwing it into the filler neck. Check the oil level shown on the dipstick.
d. If the oil level is below the low level mark [3], add oil to reach the high limit mark [2] on the dipstick. Do not overfill. If the engine is overfilled, the excess oil may get transferred to the air cleaner housing and air cleaner filter.
NOTICE
Running the engine with a low oil level can cause engine damage.
e. Screw in the filler cap/dipstick securely.
![[1] [2] [3]](/content/2026/04/668916/images/b6af99528ccba6b1aa77040f7a02ea858e0a40c9f395b10a635220b3ca2aa15b.jpg)
Air Cleaner Service
A properly maintained air filter will help prevent dirt from entering your engine. Dirt entering the carburetor can be drawn into small passages in the carburetor and cause premature engine wear. These small passages can become blocked, causing starting or running problems. Always use an air filter specified for your engine to ensure it seals and performs as designed. You will need to clean the filter more frequently if you operate the engine in very dusty conditions.
NOTICE
Operating the engine without an air filter, or with a damaged filter, will allow dirt to enter the engine, causing rapid engine wear. This type of damage is not covered by the warranty.
- Press down on the air cleaner cover [1] tabs, and then remove the cover.
- Remove the filter [2] from the air cleaner housing [3].
- Inspect the filter, and replace it if it is damaged.
- Clean the filter by tapping the filter several times on a hard surface to remove dirt, or blow compressed air (not exceeding 207 kPa) through the filter from the inside. Never try to brush off dirt; brushing will force dirt into the fibers.
- Wipe dirt from the inside of the air cleaner housing and cover, using a moist rag. Be careful to prevent dirt from entering the air duct that leads to the carburetor.
- Reinstall the filter and cover.
Spark Plug Service
Required spark plugs: NGK - BPR5ES
NOTICE
Incorrect spark plugs can cause engine damage.
For good performance, the spark plug [1] must be properly gapped and free of deposits.
- Disconnect the spark plug cap [2], and remove any dirt from around the spark plug area.
- Remove the spark plug with a spark plug wrench.
![HONDA [1] [2]](/content/2026/04/668916/images/f6e0641685d619367894f645403e1b3279a535efa488d800418db61f18d52279.jpg)
- Inspect the spark plug. Replace it if the electrodes are worn or if the insulator is cracked or chipped. Clean the spark plug with a wire brush if you are going to reuse it.
- Measure the spark plug electrode gap with a suitable gauge. The gap should be 0.7 \~ 0.8 mm. Correct the gap, if necessary, by carefully bending the side electrode.
- Install the spark plug carefully, by hand, to avoid cross-threading.
- After the spark plug seats, tighten with a spark plug wrench to compress the washer.
If reinstalling the old spark plug, tighten 1/8 to 1/4 turn after the spark plug seats.
If installing a new spark plug, tighten 1/2 turn after the spark plug seats to compress the washer [3].
TORQUE: 20 N·m
NOTICE
A loose spark plug can overheat and damage the engine. Overtightening the spark plug can damage the threads in the cylinder head.
- Install the spark plug cap on the spark plug.
Spark Arrester Service
In Europe and other countries where machinery directive 2006/42/EC is enforced, this cleaning should be done by your servicing dealer.
The spark arrester must be serviced every 100 hours to keep it functioning as designed.
- Allow the engine to cool.
- Unclip the two red top cover tabs [6] on the muffler side of the engine, and then slightly lift the red top cover up to expose the upper muffler shield bolt [1].
- Remove the three bolts [1] from the muffler shield [2] using a 10 mm socket wrench.
- Remove the muffler shield [2].
- Remove the set screw [4].
- Remove the spark arrester [3] from the muffler [5].
- Check for carbon deposits on the spark arrester and the exhaust port. Brush carbon deposits away. Be careful to avoid damaging the spark arrester screen.
- Install the spark arrester into the muffler.
- Install the muffler components on the engine, and tighten the three bolts securely.
![[1] (3) [2] [3] [4] [5] [6] (red cover shown removed)](/content/2026/04/668916/images/b111bb9c7adaafb9b04358b13ea68bae32d85a28f3125b4443a14ca9906f4e7a.jpg)
CONTROL CABLE ADJUSTMENTS
Select Drive Cable Adjustment
With the engine off, loosen the jam nut [1] one revolution.
With the Select Drive control released, TIGHTEN [4] the adjuster by turning clockwise 1 revolution by hand, and then pull the lawnmower rearward to check resistance.
If no wheel resistance exists, repeat the above procedure until the wheels lock when pulling rearward. It will usually take more than 8 turns for the wheels to lock up.
Next, use the adjuster mark [3] and LOOSEN [2] the adjuster counterclockwise 8 complete revolutions.
![[1] [4] [2] [3] FONDA](/content/2026/04/668916/images/9c86b58e8780f3c6bd4844a125ee61ea3e38ee939a8a300503a426dbc5af6968.jpg)
Hold the adjuster and tighten the lock nut against the adjuster. Push the lawnmower forward and pull backward and check for little or no resistance.
Start the engine to ensure the lawnmower does not move forward without pushing the Select Drive control.
CUTTING MEANS REMOVAL AND INSTALLATION
If you remove the cutting means for sharpening or replacement, you will need a torque wrench for installation. Wear heavy gloves to protect your hands.
CUTTING MEANS SHARPENING: To avoid weakening the cutting means, or causing imbalance or poor cutting, the cutting means should be sharpened by trained staff at an authorized Honda dealer.
CUTTING MEANS REPLACEMENT: Use Honda Genuine replacement cutting means or their equivalent.
Cutting Means Removal
- Put the throttle lever in the STOP position.
- Disconnect the spark plug cap. Tilt the mower to the right so the fuel cap is up. This will help prevent fuel leakage, motor oil seeping into the air filter, and hard starting.
![[3] [4] [1] (2) [2] (2) [5]](/content/2026/04/668916/images/fd939f4df2cb981aa064da455f4596e23e2f614f62ee81be182283f6d91218bb.jpg)
- Use a 14 mm (6 point) socket wrench and remove the two cutting means bolts [1] and special washers [2] from the cutting means control assembly [5]. Use a wooden block to prevent the cutting means from turning when removing the bolts.
- Remove the upper [4] and lower cutting means [3].
Cutting Means Installation
- Clean dirt and grass from around the cutting means mounting area.
- Install the cutting means [3] and [4] using the two cutting means bolts [1] and special washers [2] as shown.
WARNING
Operating this mower with only one cutting means will result in an improperly seated cutting means.
Blades thrown from the mower could seriously hurt or kill someone.
Always use both cutting means as a set.
Be sure to install the special washers with the concave side toward the cutting means and the convex side toward the head of the bolt
The cutting means bolts are specially designed for this application and must not be replaced with other bolts.
![[3] [4] [2] (2) [1] (2)](/content/2026/04/668916/images/eef7b177f4366baed8c0e46428a5d5df09299db6d397ca987732994fa0b26042.jpg)
- Tighten the cutting means bolts with a torque wrench [7]. Use a wooden block [6] to prevent the cutting means from turning.
![[3] [4] [7] 49 ~ 59 N·m [6]](/content/2026/04/668916/images/75f9d439d95c73455782c17d9c85eafb48d2ce67ca10aa6e2561f9f2f7535057.jpg)
Cutting means bolt torque: 49 \~ 59 N·m
If you do not have a torque wrench, have an authorized Honda dealer tighten the cutting means bolts before you use the mower. If the cutting means bolts are overtightened, they could break. If the cutting means bolts are not tightened enough, they could loosen or come out. In either case, it would be possible for the cutting means to fly off while you are operating the mower.
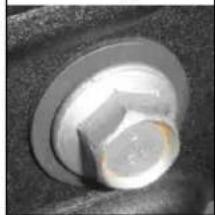
Cutting-means Mounting Bolt Inspection
Inspect the cutting-means bolts for any signs of damage or looseness. If they are damaged, they must be replaced.
If they appear loose, a torque wrench must be used to accurately tighten the cutting-means bolts to the required torque. If you do not have a torque wrench, take your lawnmower to an authorized dealer to have the bolts replaced or tightened.
Use only Honda Genuine cutting-means bolts and special washers, since they are specifically designed for this purpose. Replacement part numbers are on page 18.
Inspect washers and bolt heads for looseness and damage.
natural_image
Close-up of a metallic bolt head with a hexagonal nut, no visible text or symbolsGRASS CATCHER CLEANING AND REPLACEMENT
Cleaning
Wash the catcher with a garden hose, and allow it to dry completely before use; a wet catcher will clog quickly.
Replacement
Replace a worn or damaged catcher with a Honda replacement catcher or its equivalent.
Removal
-
Unclip the plastic edges [1] of the catcher [2] from the frame [3].
-
Remove the catcher from the frame.
![[3] HONDA [1] [2]](/content/2026/04/668916/images/ec640e91c314f9bfd34d304a8a8fef5de67a57d1a7c78e83d0382d3577e7ffaa.jpg)
Installation
-
Insert the catcher frame [3] into the catcher [2], as shown above.
-
Clip the plastic edges [1] of the catcher onto the frame.
![[1] [3] [2]](/content/2026/04/668916/images/594edbc92772a754e4307e049ad6eb1c076f3687f9a0b38f206a60a9838ffe4c.jpg)
TRANSPORTING
Before Loading
If the engine has been running, allow it to cool for at least 15 minutes before loading the mower on the transport vehicle. A hot engine and exhaust system can burn you and can ignite some materials.
Turn the fuel valve to the OFF position. This will prevent carburetor flooding and reduce the possibility of fuel leakage.
![OFF [1]](/content/2026/04/668916/images/d6cb2e6ba94982b0199a5e9645fc82bde25561d8d7a6a92787853c9ab337dcb2.jpg)
Handlebar Folding
-
Remove the grass catcher. You can place it on top of the engine, with the catcher opening to the front.
-
Turn the handlebar adjust knobs [1] 90° into the unlock position.
-
Fold handlebar [2] over mower. Ensure the blade control lever clears the engine when folding the handlebar.
When folding the handlebar, be careful to avoid kinking or pinching the control cables.
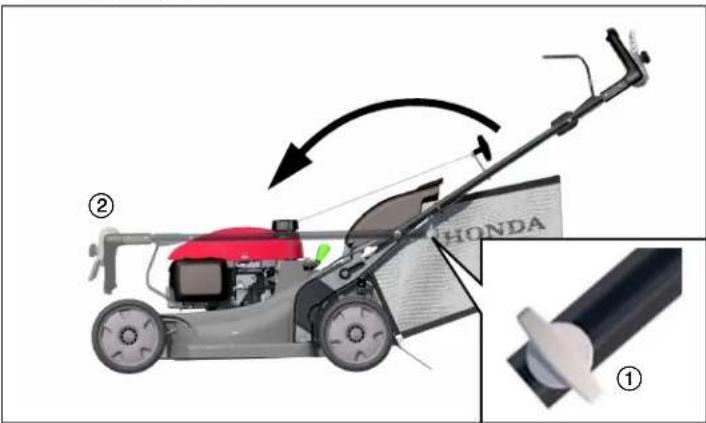
Loading and Unloading
Position the mower so all four wheels are on the bed of the transport vehicle. Tie the mower down with rope or straps, and block the wheels. Keep the tie-down rope or straps away from the controls, adjustment levers, cables, and the carburetor.
NOTICE
To prevent losing control of or damaging the mower, do not use the drive system when going up or down a loading ramp. To prevent damaging the drive system, do not engage the clutch when the mower is rolling backwards.
-
Turn the fuel valve to the OFF position.
-
Use a suitable loading ramp. Adjust the loading ramp so that it is inclined at an angle of less than 15^ . If a loading ramp is not available, two people should lift the mower on and off the transport vehicle while keeping the mower level.
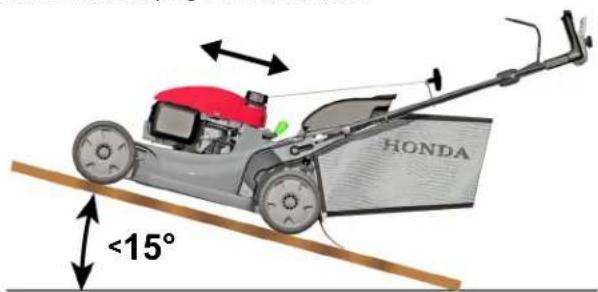
STORAGE
Proper storage is essential for keeping your lawnmower troublefree and looking good. The following steps will help protect the mower from rust and corrosion, and make the engine easier to start when you use the lawnmower again.
Cleaning
- Wash the lawnmower, including the underside of the mower deck.
Engine
Wash the engine by hand, and be careful to prevent water from entering the air cleaner.
NOTICE
Using a garden hose or pressure washing equipment can force water into the air cleaner. Water in the air cleaner will soak the filters and can enter the carburetor or engine cylinder, causing damage.
Water contacting a hot engine can cause damage. If the engine has been running, allow it to cool for at least a half hour before washing.
Mower Deck
If using a garden hose or pressure washing equipment to clean the mower deck, be careful to avoid getting water into controls and cables, or anywhere near the engine air cleaner or muffler opening.
Before washing the underside of the mower deck, be sure the throttle lever is in the STOP position and the fuel valve is in the OFF position. Tilt the mower to the right so the fuel cap is up. This will help to prevent fuel leakage and hard starting due to carburetor flooding. Wear heavy gloves to protect your hands from the cutting means.
Grass Catcher
Remove the catcher from the mower, and wash it with a garden hose or pressure washing equipment. Allow the catcher to dry completely before storage.
- After washing the lawnmower, wipe dry all accessible surfaces.
- With the mower in an upright position, start the engine outdoors, and let it run until it reaches normal operating temperature to evaporate any water remaining on the engine.
- Stop the engine and allow it to cool.
- After the lawnmower is clean and dry, touch up any damaged paint, and coat other areas that may rust with a light film of oil.
Fuel
NOTICE
Depending on the region where you operate your equipment, fuel formulations may deteriorate and oxidize rapidly. Fuel deterioration and oxidation can occur in as little as 30 days and may cause damage to the carburetor and/or fuel system. Please check with your servicing dealer for local storage recommendations.
Petrol will oxidize and deteriorate in storage. Old petrol will cause hard starting, and it leaves gum deposits that clog the fuel system. If the petrol in your mower deteriorates during storage, you may need to have the carburetor and other fuel system components serviced or replaced.
The length of time that petrol can be left in your fuel tank and carburetor without causing functional problems will vary with such factors as blend, your storage temperatures, and whether the fuel tank is partially or completely filled. The air in a partially filled fuel tank promotes fuel deterioration. Very warm storage temperatures accelerate fuel deterioration. Fuel deterioration problems may occur within a few months, or even less if the petrol was not fresh when you filled the fuel tank.
Short Term Storage (30-90 days)
If your equipment will not be used for 30 to 90 days, we recommend the following to prevent fuel-related problems:
- Add fuel stabilizer following the manufacturer's instructions.
When adding a fuel stabilizer, fill the fuel tank with fresh petrol. If only partially filled, air in the tank will promote fuel deterioration during storage. If you keep a container of petrol for refueling, be sure that it contains only fresh petrol.
If it will take more than 3 months to use the fuel in your storage container, we suggest adding a fuel stabilizer to the fuel when you fill the container.
- After adding a fuel stabilizer, run the engine outdoors for 10 minutes to be sure that treated petrol has replaced the untreated petrol in the carburetor.
- Turn the fuel valve to the OFF position.
-
Continue to run the engine until it stops from the lack of fuel in the carburetor fuel bowl. Running time should be less than 3 minutes. Note:
-
All stabilizers have a shelf life and their performance will deteriorate over time.
– Fuel stabilizers will not reconstitute stale fuel.
Long Term or Seasonal Storage (greater than 90 days)
Start the engine and allow it to run long enough to empty all the petrol from the entire fuel system (including the fuel tank). Do not allow petrol to remain in your engine for more than 90 days of inactivity.
Fuel system damage or engine performance problems resulting from neglected storage preparation are not covered under the Distributor's Warranty.
Engine Oil
Change the engine oil (page 13).
Engine Cylinder
If the mower is to be stored for more than 3 months, remove the spark plug (page 14). Pour 5 \~ 10 cm ^3 of clean engine oil into the cylinder [1]. Pull the starter rope several times to distribute the oil in the cylinder. Reinstall the spark plug.
Pull the starter rope slowly until resistance is felt, then return the starter grip gently. This will close the valves so moisture cannot enter the engine cylinder.
![HONDA [1]](/content/2026/04/668916/images/4aecff939a507757e1f9a5f36a29141e3af681a73f692c9bde84bebae6ef7f82.jpg)
Placing in Storage
Since your mower will be stored with petrol in the fuel tank and carburetor, it is important to reduce the hazard of petrol vapor ignition. Select a well-ventilated storage area away from any appliance that operates with a flame, such as a furnace, water heater, or clothes dryer. Also avoid any area with a spark-producing electric motor, or where power tools are operated.
If possible, avoid storage areas with high humidity, because that promotes rust and corrosion.
Place the mower with its wheels on a level surface. Tilting can cause fuel or oil leakage.
The handlebar can be folded for compact storage (page 16).
With the engine and exhaust system cool, cover the mower to keep out dust. A hot engine and exhaust system can ignite or melt some materials. Do not use sheet plastic as a dust cover. A nonporous cover will trap moisture around the mower, promoting rust and corrosion.
Removing from Storage
Check your mower as described in PRE-OPERATION CHECKS.
If the cylinder was coated with oil during storage preparation, the engine will smoke briefly at startup. This is normal.
TROUBLESHOOTING
ENGINE WILL NOT START
| Possible Cause Correction | |
| Fuel valve OFF | Turn the fuel valve ON (page 5). |
| Throttle lever in the wrong position | Move the throttle lever to the FAST position (page 5). |
| Out of fuel | Refuel (page 4). |
| Bad fuel; mower stored without treating the petrol, or refueled with bad petrol | Refuel with fresh petrol (page 4). |
| Spark plug faulty, fouled, or improperly gapped | Gap or replace the spark plug (page 14). |
| Spark plug wet with fuel (flooded engine) | Dry and reinstall the spark plug. |
| Fuel filter clogged, carburetor malfunction, ignition malfunction, valves stuck, etc. | Take the mower to an authorized Honda servicing dealer or refer to the shop manual for repair. |
LOSS OF POWER
| Possible Cause Correction | |
| Throttle not set to FAST Move the | throttle lever to the FAST position (page 5). |
| Grass is too tall to cut | Raise the cutting height (page 8), cut a narrower swath, use a slower ground speed, or cut more frequently. |
| Mower deck is clogged | Clean out the mower deck (page 12). |
| Air cleaner is clogged Clean or replace the air cleaner (page 14). | |
| Bad fuel; mower stored without treating petrol, or refueled with bad petrol | Refuel with fresh petrol (page 4). |
| Fuel filter clogged, carburetor malfunction, ignition malfunction, valves stuck, etc. | Take the mower to an authorized Honda servicing dealer or refer to the shop manual for repair. |
VIBRATION
| Possible Cause Correction | |
| Grass and debris lodged under the mower deck | Clean out the mower deck (page 12). |
| Cutting means loose, bent, damaged, or unbalanced by improper sharpening | Tighten loose cutting means bolts (page 15).If cutting means are found to be bent or damaged, take the lawnmower to an authorized Honda servicing dealer for inspection. |
| Mechanical damage, such as a bent crankshaft | Take the mower to an authorized Honda servicing dealer or refer to the shop manual for repair. |
MOWING AND GRASS CATCHING PROBLEMS
| Possible Cause Correction | |
| Engine speed is too slow to cut well | Move the throttle lever to the FAST position (page 5). |
| Mower is moving too fast for lawn conditions | Adjust Select Drive to a slower speed (page 5), push the Select Drive control less, or push slower. |
| Cutting height adjustment levers set at different positions | Set all levers at the same cutting height position (page 5). |
| Grass catcher overfilled or clogged | Empty the grass catcher. Wash the grass catcher if it is clogged with dirt (page 16). |
| Mower deck is clogged | Clean out the mower deck (page 12). |
| Cutting means dull, worn, or damaged | Sharpen or replace the cutting means if necessary (page 15). |
| Wrong cutting means installed | Install correct cutting means (page 15). |
PARTS
| Item Part Number | |
| Air Cleaner | 17211-Z8B-901 |
| Spark Plug | 98079-55846 |
| Cutting Means | 72531-VH7-000 (upper)72511-VH7-000 (lower) |
| Cutting Means Bolt (2) | 90105-960-710 |
| Bolt Washer (2) | 90502-VG3-000 |
SPECIFICATIONS
| MODEL HRX537C5 | |
| TYPE VYE | |
| DESCRIPTION CODE MAMA | |
GENERAL
| Length | 1,610 mm |
| Height | 1,073 mm |
| Mass (ISO5395) | 43,5 kg |
| Width | 588 mm |
| Cut width | 530 mm |
| Cut height adjustments | 19 mm, 32 mm, 46 mm, 62 mm, 75 mm, 88 mm, 101 mm |
| Grass catcher capacity | 76 L |
| Sound pressure level at operator's ears (According to EN ISO 5395-1:2013) | 85 dB(A) |
| Uncertainty | 1 dB(A) |
| Sound power level measured (According to 2000/14/EC directive) | 96 dB(A) |
| Uncertainty | 1 dB(A) |
| Sound power level guaranteed (According to 2000/14/EC directive) | 98 dB(A) |
| Vibration transmitted (According to EN ISO 5395-1:2013) | 5.4 m/s^2 |
| Uncertainty | 2.1 m/s^2 |
ENGINE
| Model | GCV200 |
| Type | 4-stroke, single cylinder, vertical shaft |
| Displacement | 201 cc |
| Bore and stroke | 66 x 59 mm |
| Cooling | Forced air |
| Lubrication | Splash and spray |
| Compression ratio | 8,0:1 |
| Maximum speed | 2,850 ^+0_-1 min ^-1 |
| Nominal power | 3.7 kW |
| Idle speed | 1,700 ± 150 min ^-1 |
| Ignition system | Transistorized magneto |
| Spark plug | NGK: BPR5ES |
| Spark plug gap | 0.7 ~ 0.8 mm |
| Air cleaner | Dry element type |
| Recommended fuel | Unleaded petrol with a research octane number (RON) of 91 or higher |
| Fuel tank capacity | 0.91 L |
| Recommended oil | SAE 10W-30, API SJ or later |
| Engine oil capacity | 0.40 L* Refill amount: 0.35 ~ 0.40 L |
| Carbon dioxide (CO2) emissions ** | Please refer to the CO2 values of the Honda engine atwww.honda-engines-eu.com/co2 |
* Actual amount will vary due to residual oil in the engine. Always use the dipstick to confirm the actual level (see page 4).
** This CO2 measurement results from testing over a fixed test cycle under laboratory conditions of a(n) (parent) engine representative of the engine type (engine family) and shall not imply or express any guarantee of the performance of a particular engine.
DRIVE
| Type | Variable speed Select Drive |
| Engine to transmission | V-belt |
| Main clutch | Slipping friction |
| Mower speed | 0 ~ 1.64 m/s |
| Recommended fluid | 10W-30 |
INTRODUCTION
Madame, Monsieur,
natural_image
Exterior view of a Honda lawn mower with red and black body (no signage or text visible)TABLE DES MATIERES
INTRODUCTION....1 ENTRETIEN....12
MESSAGES DE SECURITE ..... 1 Importance De L'entretien ... 12
CONSIGNES DE SECURITE.....2 Calendrier D'entretien.....13
INSTALLATION DU SAC DE RAMASSAGE
ESSENCE
natural_image
Close-up of a white robotic arm dial with orange and black adjustment knobs, labeled [1] (no text or symbols on the dial itself)natural_image
Diagram of a red and gray lawn mower with attached mechanical components (no text or symbols)![[1] BAR WLED](/content/2026/04/668916/images/17621b0cc1e7efb50739d1d2d9132ec6b4611114fd1cb2c01baa8f9ccfdbfcaf.jpg)
VERIFICATIONS AVANT UTILISATION
ÊTES-VOUS PRÊT À TONDRE?
natural_image
Cross-sectional diagram of a mechanical assembly with labeled component [2], showing internal components and no readable text or symbols.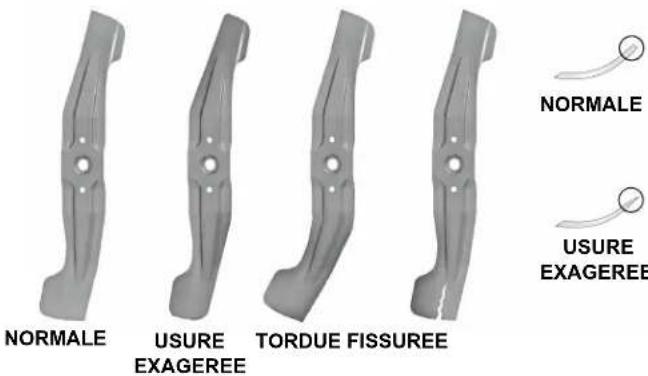
AVERTISSEMENT
Hauteur de coupe
natural_image
Top-down view of a grass lawn mower with red headrest and attached frame, no visible text or symbolsDirection de la tonte
natural_image
Top-down view of a vehicle chassis frame with visible wheels and a red component, no text or symbols presentnatural_image
Illustration of a red and black lawn mower on a grassy field under a blue sky (no text or symbols)FONCTIONNMENT
PRECAUTIONS A PRENDRE POUR LA TONTE
natural_image
Illustration of a grass lawn mower with a red and beige body, set against a blue sky (no text or symbols)Obstacles
natural_image
Close-up of a red agricultural machine pouring oil into a yellow liquid on a metal tray (no text or symbols visible)natural_image
Close-up of a red and gray lawn mower with visible blades and control panel (no text or symbols)AVIS
Installation du sac
TRANSPORT
natural_image
R displayed on a Honda motor lawn mower, no visible text or symbols on the device itself.INDICE
MONTAJE DEL SACO PARA CÉSPED
COMBUSTIBLE
natural_image
Close-up of a mechanical component with orange and black markings, no visible text or symbolsnatural_image
Top-down view of a lawn mower with visible tire, headlight, and camera (no text or symbols)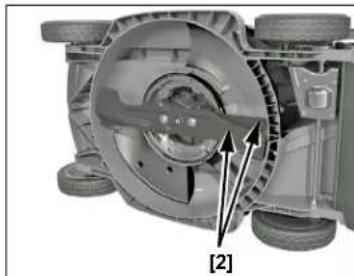
natural_image
Mechanical component diagram showing a wheel assembly with labeled parts [2] (no text or symbols beyond label)AVISO
natural_image
Top-down view of a grass lawn mower with red head and gray body, no visible text or symbolsDirección del corte
natural_image
Top-down view of a robotic vehicle chassis with visible frame, wheels, and a highlighted green component (no text or symbols)natural_image
Illustration of a red lawn mower on a grassy field under a blue sky (no text or symbols)natural_image
Mowing machine on a grassy hill under a blue sky (no text or symbols visible)Obstáculos
natural_image
Close-up of a red and gray industrial machine pouring liquid into a yellow liquid on a metal tray (no visible text or symbols)natural_image
Close-up of a red and gray lawn mower with visible mechanical components and a green indicator light (no text or symbols)AVISO
MONTAJE Y DESMONTAJE DE LA CUCHILLA
![[1] [3] [2]](/content/2026/04/668916/images/362b0da57cb881f958be974ec717ffd07ea764e223df1fab9b62bbc40914e1f5.jpg)
![HONDA CERRADO [1]](/content/2026/04/668916/images/90bade4ec2f51e5537ccca01541650363abd36566a3b1da9666b2772032ac580.jpg)
natural_image
R displayed in a Honda motor lawn kit, featuring black and red body with 'HONDA' branding (no additional text or symbols visible)INHALTSVERZEICHNIS
EINLEITUNG 1
BENZIN
Siehe Seite 7.
VOR DEM BETRIEB
GASHEBEL
natural_image
Close-up of a white mechanical component with orange and red circular indicators, labeled [1] with an arrow pointing to a specific area (no readable text or symbols beyond labels)natural_image
Diagram of a red lawn mower with attached components, labeled [1] (no text or symbols on the diagram itself)natural_image
Top-down view of a red and gray robotic car with visible wheels and headrest (no text or symbols)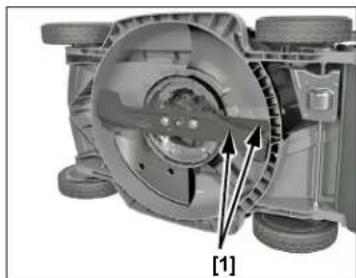
natural_image
Mechanical assembly diagram showing a motor or gearbox with labeled component [1] (no text or symbols beyond label)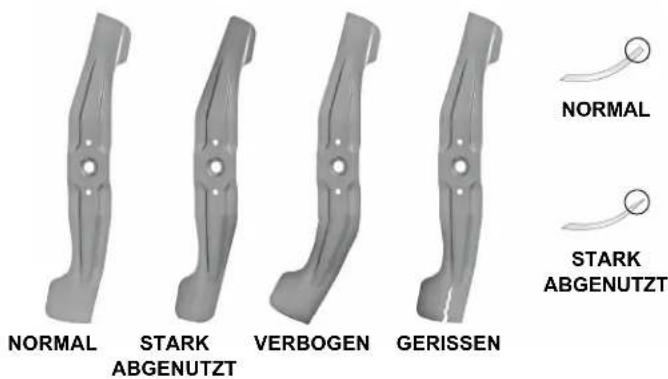
WARNING
natural_image
Red and black lawn mower with a yellow bucket being inserted, no visible text or symbolsnatural_image
Diagram of a red lawn mower mounted on a gray vehicle, with arrows indicating motion direction (no text or symbols)Schnittrichtung
natural_image
Top-down view of a vehicle chassis frame with visible tire, wheels, and a red component (no text or symbols)natural_image
Illustration of a red lawn mower on a grassy field under a blue sky (no text or symbols)BETRIEB
![ZU [2]](/content/2026/04/668916/images/4ad05f3ea31e3daf48b85291605e1ee049f1bb399b5a848c1b6b82d2329784db.jpg)
SICHERES MÄHEN
natural_image
Mowing machine on a grassy hill under a blue sky (no text or symbols visible)natural_image
Close-up of a red industrial machine pouring liquid into a yellow liquid on a metal tray (no visible text or symbols)natural_image
Close-up of a red and gray lawn mower with visible components and mounting bracket (no text or symbols)ZUR BEACHTUNG
Anbringen
TRANSPORT
Vor dem Aufladen
natural_image
Close-up of a metallic bolt head with a hexagonal nut, resting on a textured surface (no text or symbols visible)
natural_image
Exterior view of a Honda lawn mower with red and gray casing (no text or symbols visible)![ZU [1]](/content/2026/04/668916/images/828c66545f490500c8c5365ea91ff7bf5bf0cd04028b05068a5ad63a4977b003.jpg)
Auf- und Abladen
natural_image
Exterior view of a Honda lawn mower with red and black body (no signage or text visible)INDICE
INTRODUZIONE ....1 MANUTENZIONE ....12
ASSEMBLAGGIO DEL SACCO RACCOGLIERBA
CARBURANTE
LEVETTA DEL GAS
natural_image
Top-down view of a red and gray lawn mower with attached equipment (no text or symbols visible)natural_image
Top-down view of a red and gray lawn mower with visible wheels and headlight (no text or symbols)natural_image
Mechanical component diagram showing internal gear and housing structure (no text or symbols)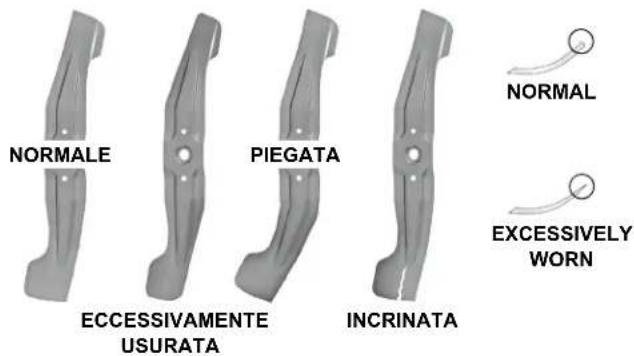
Carburante
natural_image
Red and black photo of a red agricultural machine with a yellow fuel nozzle, showing mechanical components (no text or symbols visible)Altezza di tosatura
natural_image
Top-down view of a grass lawn mower with red head and attached frame, no visible text or symbolsnatural_image
3D rendering of a vehicle chassis with visible structural components and no text or symbolsnatural_image
Top-down view of a grassy vehicle chassis with visible wheels and a red component, no text or symbols present.natural_image
Illustration of a red and beige lawn mower on a grassy field under a blue sky (no text or symbols)USO
![VELOCE [2]](/content/2026/04/668916/images/8f7a2a2b08cb6f10a24fb3123862a150eee7bf8e2d0a17d253256af57298e3f5.jpg)
natural_image
M lawnmower on a grassy hill under a blue sky (no text or symbols visible)natural_image
Industrial machine pouring liquid into a metal tray (no visible text or symbols)natural_image
Close-up of a grass lawn mower with red and green components (no visible text or symbols)NOTA
Candele consigliate: NGK - BPR5ES
NOTA
natural_image
Close-up of a metallic bolt head with a hexagonal nut (no text or symbols visible)Montaggio del sacco
TRASPORTO
Prima di caricare
Carico e scarico
natural_image
Close-up of a red Honda HTR car being processed with a tool, showing no visible text or symbols.natural_image
Exterior view of a Honda lawn mower with red and black body (no signage or text visible)INHOUD
INLEIDING 1
WAARSCHUWINGEN
BETREFFENDE DE
VEILIGHEID 1
VEILIGHEIDSVOOR-
SCHRIFTEN....2
VOORDAT U GAAT MAAIEN ... 6
Oliepeil....6
Benzine 7
DE MAAIER GEBRUIKEN ..... 9
WAARSCHUWINGSSTICKER
GRASOPVANGEENHEID
Til de afvoerbeschermkap omhoog [1] en monteer de graszak [2].
![[2] [1]](/content/2026/04/668916/images/8c420d0caf392daae59021720641df4a347a5b0a03229d68b573dcc586cf6ca8.jpg)
MOTOROLIE
VÓÓR HET IN BEDRIJF NEMEN
GASHENDEL
natural_image
Close-up of a white mechanical component with orange circular dial and directional arrows, labeled [1] (no readable text or symbols)natural_image
Diagram of a red and gray lawn mower with labeled components, showing structural alignment (no text or symbols beyond labels)MAAISELRICHTERKNOP
VOORDAT U GAAT MAAIEN
BENT U KLAAR OM TE MAAIEN?
natural_image
Top-down view of a red lawn mower on the roof, showing wheels and a camera (no text or symbols visible)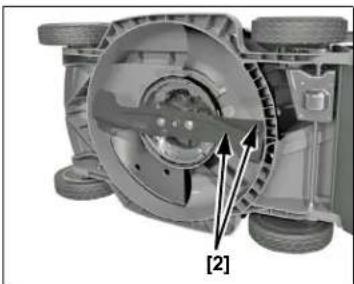
natural_image
Cutaway view of a mechanical component showing internal components and a labeled section [2] (no text or symbols beyond label)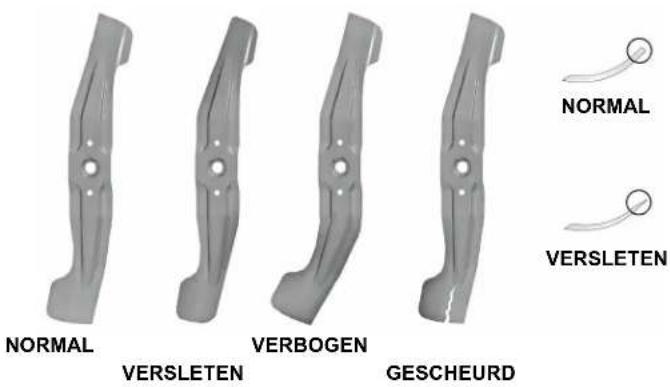
⚠ WAARSCHUWING
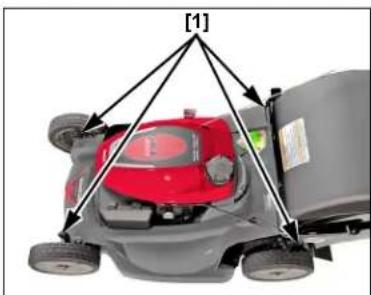
natural_image
Diagram of a red lawn mower mounted on a gray vehicle, with arrows indicating motion direction (no text or symbols)Maaiselrichting
Knopafstelling maaiselrichter
![ALLES IN ZAK OPVANGEN OF AFVOEREN NAAR ACHTEREN [1] (stand BAG) [2] (volledig geopend)](/content/2026/04/668916/images/be2e74436f073b3af540b88e7e4f8b6241ba610c0ce6e41d3cfc269939815f7d.jpg)
![VOLLEDIG MULCHEN [1] (stand MULCH) [2] (volledig gesloten)](/content/2026/04/668916/images/aa2e562a78cf272ba5e0f8380c2b160df0e451d2b2487760f615b925e72f3250.jpg)
natural_image
Top-down view of a vehicle chassis frame with visible structural components and a highlighted green component (no text or symbols)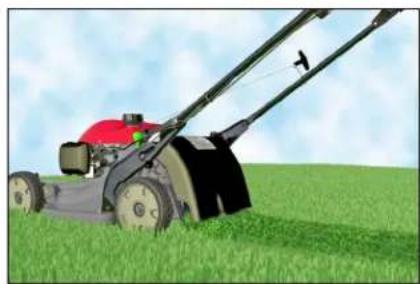
natural_image
Red and beige lawn mower on a grassy field under a blue sky (no text or symbols visible)DE MAAIER GEBRUIKEN
VOORZORGSMAATREGELEN
TIPS VOOR VEILIG MAAIEN
natural_image
Mowing machine on a grassy hill under a blue sky (no text or symbols visible)flowchart
graph TD
    A["Top Left Vehicle"] --> B["Top Right Vehicle"]
    B --> C["Bottom Left Vehicle"]
    C --> D["Bottom Right Vehicle"]
    D --> E["Bottom Left Vehicle"]
    E --> F["Bottom Right Vehicle"]
    F --> G["Bottom Left Vehicle"]
    G --> H["Bottom Right Vehicle"]
    H --> I["Bottom Left Vehicle"]
    I --> J["Bottom Right Vehicle"]
    J --> K["Bottom Left Vehicle"]
    K --> L["Bottom Right Vehicle"]
    L --> M["Bottom Left Vehicle"]
    M --> N["Bottom Right Vehicle"]
    N --> O["Bottom Left Vehicle"]
    O --> P["Bottom Right Vehicle"]
    P --> Q["Bottom Left Vehicle"]
    Q --> R["Bottom Right Vehicle"]
    R --> S["Bottom Left Vehicle"]
    S --> T["Bottom Right Vehicle"]
    T --> U["Bottom Left Vehicle"]
    U --> V["Bottom Right Vehicle"]
    V --> W["Bottom Left Vehicle"]
    W --> X["Bottom Right Vehicle"]
    X --> Y["Bottom Left Vehicle"]
    Y --> Z["Bottom Right Vehicle"]
PATROON IN ZAK OPVANGEN EN ACHTER ONTLADEN
ONDERHOUD
HET BELANG VAN ONDERHOUD
natural_image
3D rendering of a red industrial machine pouring liquid into a yellow liquid on a metal tray (no text or symbols visible)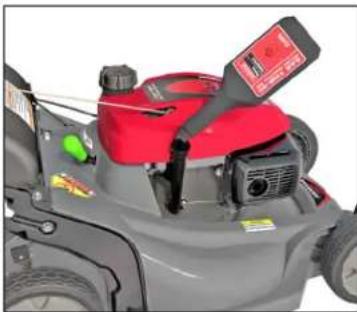
natural_image
Close-up of a red and gray lawn mower with visible mechanical components (no text or symbols)![[1] [2] [3]](/content/2026/04/668916/images/07580fc413279bc36e87c5f5b44163b0b8a57c81e6bc12384d7d26a07654e855.jpg)
OPMERKING
![0,7 ~ 0,8 mm [3]](/content/2026/04/668916/images/0aa92325f1f90f9b956fa0c4303dd0a9e6708a67894105a724c0e16eb0442b37.jpg)
TRANSPORT
Alvorens in te laden
In- en uitladen
Honda Warranty Conditions
Thank you for purchasing your Honda lawn mower.
Honda warrants your new mower to be free of defects in materials or workmanship for a period of 2 years from the date of purchase (3 months for commercial use). This warranty is in addition to your statutory rights.
However, in the unlikely event that you encounter a problem with your mower, please contact your original retailer. Should your machine require repair under warranty, you will need to take it to an authorised Honda dealer with either the warranty card or your proof of purchase.
There are, of course, some Terms and Conditions that apply to the Honda warranty. Listed here are items that are not covered:
- Any damage resulting from neglect of the periodic maintenance specified by Honda.
- Any damage resulting from repair or maintenance performed by non-authorized Honda service points.
- Any damage resulting from operating methods other than those indicated in the owner's manual of the product.
- Any damage resulting from the use of non-genuine Honda parts, other than recommended lubricants and fluids, and accessories other than those approved by Honda.
- Any damage or deterioration due to natural wear and tear (natural fading of painted or plated surfaces, sheet peeling and other natural deterioration).
- Consumable parts: Honda does not warrant parts deterioration due to natural wear and tear. The parts listed below are not covered by warranty (unless they are needed as a part of another warranty repair):
- Spark plug, fuel filter, air cleaner element, brake pad, clutch disc, tyre, wheel, wheel bearing, recoil starter rope, cable, belt, cutter blade.
- Lubricant: oil and grease.
-
Cleaning, adjustment, and normal periodic maintenance work (carburetor cleaning, engine oil draining, blade sharpening, belt and cables adjustment).
-
Expenses incidental to the warranty claim, including:
- Compensation for loss of time, commercial loss or rental costs for a substitute product.
- Costs incurred for transportation to and from the dealership.
- Any damage resulting from exposure of the product to soot and smoke, chemical agents, bird droppings, sea water, sea breeze, salt or other environmental phenomena.
Conditions D'application De La Garantie Honda
EC Declaration of Conformity
| 1. The undersigned, Peter Neckebroeck, on behalf of the authorized representative, herewith declares that the machinery described below fulfils all the relevant provisions of: • Directive 2006/42/EC on machinery • Directive 2014/30/EU on electromagnetic compatibility • Directive 2000/14/EC - 2005/88/EC on outdoor noise • Directive 2011/65/EU - (EU) 2015/863 on the restriction of the use of certain hazardous substances in electrical and electronic equipment | |
| 2. Description of the machinery a) Product: Lawnmower b) Function: cutting of grass c) Model d) Type e) Serial numbe r HRS536C5 MZBZ 6600961 - 9999999 HRX537C5 MAMA 1122650 - 9999999 | |
| 3. Manufacturer Honda Power Equipment Mfg., Inc. PO Box 37 Honda Drive, NC Hwy 119 Sweepsonville, NC 27359 USA | |
| 4. Authorized representative and able to compile the technical documentation Honda Motor Europe Ltd - Aalst Office Wijngaardveld 1 (Noord V), 9300 Aalst - BELGIUM | |
| 5. References to applied standards EN ISO 14982:2009 EN ISO 5395-1:2013+A1:2018 EN ISO 5395-2:2013+A1:2016+A2:2017 | |
| 6. Outdoor Noise Directive a) Measured sound power dB(A): 94 (MZBZ), 97 (MAMA) b) Guaranteed sound power dB(A): 98 (MZBZ, MAMA) c) Noise parameter (L, min-1): 53cm, 2850 (MZBZ, MAMA) d) Conformity assessment procedure: Annex VI e) Notified body: SNCH 2a, Kalchesbruck L - 1852 Luxembourg | |
| 7. Done at: Aalst , BELGIUM | |
| 8. Date: 17 May 2019 |
| Lietovu kaliba (Lithuanlan)EB aktivkles deklarsojia1. Igalotyo zistova vardu pasirajkoz Peter Neckebrock patalirina, kad Zemlau sprayla mašina atlikna vlas zvedrniu direktyog nusstatas:* Mechanziny direktya 2008/42/EB* Ekskringentino sutananamna direktya 2010/03/ES* Trukāmo lauke direktya 2002/14/EB-2005/88/EB* direktya 2011/85/ES - (ES) 2015/863 sel torn itiŋ pavojing medlegi ududjimo elektras e elektroninjs prajoje apibojimo2. Protoso oprajmyna a) Ganijns - Zoliapove b) Prudlaja - Zoloa povimas c) Modola d) Tipas e) Sonjos numeris 3. Gamintoje 4. Igalotasa attovas ir galiniti sudanyli techning dokumenelacija 5. Nudovsk i lakyus standztus 6. Triukāmo lauke direktya a) Imetunates garso galingumo lygis b) Garantouamas garso galingumo lygis c) Triukāmo paramtras d) Tipas e) Registriota etalga 7. Veta 8. Data | Blygrarski (Kubarian)EO devirsarima za covegetatne1. Degyulatisnianet: Peter Neckebrock, st inicto na uylhomomeningi predahtener, c načstvojo deteknariums, che maiminite, oplisanio no donju, ottoarat na vozima covebeta na pašorodbe na*Därakstva 2002/42/ECO istosno mašinita*Därakstva 2011/85/ECO istosno elektroniniha tana bavimistnost*Därakstva 2002/42/ECO-2005/88/EC istosno wuhuvinte emiosni na covrjornima, predvalnacnaya za upotreba izvem stračine*Därakstva 2011/85/EC - (EC) 2015/863 romlna istnosno organinomeno za upreterbata na apreselenni obrana materieme aleprirnico do sbrednlae2. Ovisenie na maiminete a) Produt 1: Kosama b) Funuzija: koone na treva c) Model d) Tni c) Sopion niorer 4. Provascriter 5. Utytnomocian predominant and ottovorink za covebene na tekničeska dokumentaion 5. Proporate imu priplomnite standardi 6. Direktirega istosno wuhuvite emiosni na covrjornima, predvalnacnaya za upotreba izvem stračine a) Utytnomocian zhuovu moandoi a) Garantihrane zhuovu moust 9) Paramektryat tuyd 10. Pducejura ta za ozena na covebetstveno a) Notifiuniuran orran 7. Maesto na urotantna. | Norsk (Norwegian)CF - Samsversenkiering1. Undertegnede Peter Neckebrock på vegne av autorient representant herved erklareti st maskineni beskrevet nødenfor nimfir relevant informasjon fra fatigende forskfitter* Maksinnodust 2006/42/EF * Direktiv EMC 2014/30/EU Elektronmagnetisk kompeblitet * Direktiv om stay utenders 2004/14/EF 2005/88/EF * Direktiv 2011/85/EE - (EU) 2015/863 om restriksoner av bruk av visse latige matrider i elektisk og elektronik utsy. 2. Besknivelse av produkt a) Produkt, crosskipper b) Funksson - Kippe gross c) Modell d) Tyac e) Serlennummer 3. Produsent 4. Autorent representant og i stand lili a utarbede den teknisko dokumentasponci 5. Hervisning til brukle standarder 6. Utenders direkty far stay:a) Mall stey b) Maks stay c) Konslan stey d) Verdi vurderings prosedyre e) Geldere kjeretekroppstammelskrog 7. Sied 8. Datu |
| Türk (Turkish)A) Uglyank ve Beyani1. Apadala incassi bulunan Peter Neckebrock, yeskili tosatici adina, bu yarvila inkito agasjakaki makina ile ilgit lum fuhkulinükerlin yerine belilidgini beyan etmalsidit: * Makina Emniyet Yöncenligt 2006/42/AT* * Elektronnyestk Dyumuluk Yonemrigli 2014/30/AB* Aex Alena Kulitanan Tachizat Tarahadan Otupatanen Covedere Gärnta Emysonu lic ilgili Yönteluk 2000/41/AT-2003/88/AT* 2011/85/AB - (AG) 2015/863 elektrikli ve elektronik aktivmentena bez tehnikali maddeitarı kulanmanın yarasikannmasa ilgkin yonelnelik 2. Matkineni tali: a) Uran : Çim bipne makines b) Ilew : Çiminer kestimes c) Model : d) Tip e) Set numara: 3. Inalatgi 4. Teknik doesyaı hazirismakla yetkili olan Topulukta yasląskiy yetkili tenatski 5. Uygulanan standetaria istindaren 6. Atk alan pūdūlu Yönelmigiä a) Ogälen ses gosa b) Garanti adien sesa gioo c) Gunulu paramesi d) Uygunkul dejendlemme procedurd c) Onzylanimg kuralug 7. Seyanini yali : 8. Bayenan tali: | Islenska (Icelandic)EB - Sanrolootjing 1. Unisirli pati Perke Neckebrock studišetir hér met lyrin fond bilgitra abile upljisner um vehlunab hér að neđen era landi tvava vardar alla ütheyrenda malafokka, svo sam * Leibfeiningar fyrir velbunab 2006/42/EB* Leibfeiningar fyrir ratagusivu 2014/30/EU* Leibfeiningar um havodamengun 2000/41/EB-2005/88/EB* Tiliskun 2011/85/EU (EU) 2015/863 vardandi labbeingar um nottur à haltulegum atrum i rat og rajeindia būnač 2. Lysing a velbunab a) Okutlaki : Slituvud b) Virkni : Gras legdo c) Sonb : d) Tagund e) Serial núne 3. Framiodandi 4. Logpidir aðler og fær un að leka sanan tekniskjónl 5. Tilvun til vibejendi stola 6. Leobelingrar uhaobamengun a) Maldur havoda styrkur b) Stadlestrar havoda styrkur c) Stadebre styrkur 7. Stadlesing a gebostatlum e) Merkingar 8. Gert hijs : 8. Dagsetning : | Hrvatski(Croatian)EX spara su akvistnosti 1. Polpisami, Peter Neckebrock, u inne ovlasitenog prastavnika ovima prjevjige da strojovi navodeni un nastavku ispunjavaju sve važede odredibe:* Propisa za strojevi 2006/42/EK* Propisa o elektronmagnetskoj kompatibilncsti 2014/30/EU* Propisa o buči na otvorenome 2000/14/EK* 2005/88/EB* Direktiva 2011/85/EU - (EU) 2015/863 o ograničenju odredjanih opasnih suplasted i elektronski opreni 2. Opis strogev a) Prizvod Kosilica za travu b) Funcoronalnost: rezanje tave c) Model d) Tip e) Setijski (EU) 3. Prizvodat 4. Ovasljeni predstavnik i celoba za sastavljanje tabnitke documenteje 5. Referencia na strinijenije standande 6. Propis o buči na otvornenone a) Imersana jačne zvuka b) Zajendene jačne zvuka c) Paramiscar bake d) Postupak za ocjenu sukadruroli e) Obavljateno tiplo 7.U 8. Datum |
| Portugüis (Portuguese)Declastacja CE de Conformidade1. O abako zasinado. Peter Neckebrocek, Declara deste modo, em nome o mandalario, que e maquira abako descento cumpre todas as estupuções relevantes da:• Direktiva 2000/4CE relativa às máquinas• Direktiva 2014/30UE relativa a compatibilidade elektronmagnóstica• Direktiva 2000/4CE/2005/88CE relativa às emissões sonores para o mate ambiente dos equipamentos para utilização no exterior• Direktiva 2011/65UE - (UE) 2015/663 relativa à restrição do uso de determinadas subsistricias potiglase em equipamentos eléctrica e electronicos2. Descapção de macaquesa) Produto - Coris reivab) Função : corte de reivac) Modelo (d) Tipoe) Número de série3. Fabricante4. Mandatálio com capacidade para compilar documentação étonica5. Referência da normas aplicadas6. Dredova realizada os internizores sonoras para o meio amantato dos equipamentos para utilização no exteriora) Potência sonora medidab) Potência sonora garantiaec) Parametro de nulid) Procedimento de exalição de conformidadec) Organismo notificando7. Pelo in 8. Data | Polski (Polish)Deklarschia gopodnosci WE1. Noje podpansy, Peter Neckebrocek, w imenu upovazionnego przedstavliciele, niniejszym elektruje, že urządzenie opisane porize spohla wszystkie odpowiedne postanowania:• Dyrektywa Maszynowe 2000/42/WE• Dyrektywy Kompatybnosci Elektronmagnetycznej 2014/30UE• Dyrektywa Halasowa 2000/44WE 2005/88WE• Dyrektywy 2011/55UE - (UE) 2015/663 w spreste ograniczeni slocowania miedkonych niebezpracnych substancij w sprzęcia elektrycznym i elektronicznym2. Opis urządzeniaa) Produkte • Kodakka b) Funkça: Sonano trevyc) Model (d) Typc) Numery sorvnie3. Producent4. Upowazniony Przedstaviciel oraz osoba upowazniona do przypotowania dokumentacji technicznej5. Omicianice do zastosovaných norm6. Dyrektywa Halasowa7. Zmarzny poztom mogy akustycznej8. Deviantovanaya poztom mocy akustycznej9. Wartość halasu10. Procedura oseny goprodovicia) Jednotatna rotytkowana7. Miesce 8. Data | Somni i Suomen kieli (Finnish) EY-VAATIMUSTENMUKAUSU/SVAKUUTUS1. Allekpontanut, Peter Neckebrock vallustetu vanmistajen edustaja, vakuitas fäten että alla mainitu konsthatu taytta kaliki szaruvaya mutaryksis:• Koneeditvi 2006/42/EY• Direktiva 2001/42/EY-2005/88/EY ynparistön melu• direktivi 2011/65/EU - (EU) 2015/663 itelyjen veerallisten amoiden képtön rajottaniasta sählo-ja elektronikalskeitsiessa• TUOTTEN KLUVAUSa) Tuzoe - Ratoniteklinkui b) Tominto - ristob svikausc) Malli c) TYPPIEe) SARJANUMERO3. VALMISTA34. Valmistajen edustaja ja teknisten dokumeflien isletis5. Vilitaus szeveletihün standardehin6. Yunparision meludireklivi a) Mibatu malutaso b) Totennukainen melutasc c) Malu paramoiti d) Viedetim anden avionnin menetelinac) Tiedonabatolin7. TEHTY 8. PAVAMARA |
| Magyar (Hungarian)EK-mogfoločskogi nylatkozate1. Aulártú Peter Neckebrocek, a gyaró oeg törvenyes kopvisiejakéjak nylatkozom, hogy az altseem gyerbőt meg péglelef sz desses, slább felschról direktivansk.• 2000/42/EK Direktivkanak boronizásokra• 2014/30/EU Direktivkanak elektronmagrises megfeleidőszgre• 2000/42/EK 2005/88/EK Direktivkanak klárén zajzaininte Term 2011/65/EU - (EU) 2015/663 sages vaszelyes anyagok elektronmos és elektronikus berendezsekben valo elkamazásnek korlotozasáról2. A pép eirasaa) Tarmák Filinyró b) Funkció d) levágása c) Modell (d) Tipuse Sorsatzsim9. Gyarít4. Moghalmatrazot kopvisášlja os kápes ósszostállitani a műszeni dokumentárátl5. Referencia az alkalmazott szatványokhoz6. Külleri zajzajint Direktiva a) Márt hangerő b) Szavolti hangerő c) Zaisztí paratenel6. Megdełódógi becalési elárás e) Kléklát szervezet7. Kellezas helye9. Kellezas deje | Cestina (Czech)ES - Prohlaton o shodě1. Podepsyný Peter Neckebrocek, jako autorizovaná osoba zte potružuje, že stry popasny niže spíňuje požadavky přístušných opatiření:* Směrnocs 2006/42/E8 pro strojni zařízení* Směrnice 2014/30/EU stanovující technické požadavky na výrobky z hodiska elektronmagnetické kompatility* Směrnice 2000/41/E6 2005/88/E9 stanovující technické potavky na výrobky z hodiska arnáh híku zařízení pro vonkovní použti*Rady 2011/65/EU - (EU) 2015/663 o omezení používání něktrých nebezpeřných tlak v elektrických a elektronických zel'zorichn6. Popis zařízenía) Výrobek, Sekszká na tváru b) Funkice: Sodání trávyc) Model (d) Typc) Výrovní číslo3. Výrobce4. Zelnomoczný zástupca a osoba povělorna komplataci technikcie dokumentace5. Odkaz na platné standardyb) Směrnice pro hluk pro venikovní použíd3. Naněření akustický výkon b) Garantovaný akustický výkon c) Paratenel hluku4. Zpazni poszužení shodye) Někškovania celota7. Podopsátno v8. Datum | Latviešu (Latván)EK obitiditas dekaracija1. Peter Neckebrock za suva oprasklu zem šť dokumenta, autorizta pārstiva várde’ paziņio, ka zernak sprakstilie našina, albist visami zernak notábitlo direktivu sadajón:• Direktiva 2006/42/EK par masinārin• Direktiva 2014/30/ES atzichba uz elektronmagnetsko saviešojarnibu• Direktiva 2001/42/EK-2005/88/EK par trokára omsiju vidlo• Direktiva 2011/65/E6 - (ES) 2015/663 par dažu bistanu vielu izranizidanas izrodožedanu elektriskas un elektronikás ekkátsa2. Iekkárás sprakstsai:• Produktie: Žires plávjeis b) Funkcija: zales pladzana c) Modelis d) Tipsc) Strijas numurs3. Režolijs4. Autorizotas pozástavis, kas spoj sastodit technisko dokumentádu4. Atsausa uz pandrotajiam standteriem6. Avevo trokéju Direktivaa: Iznerifiča trokéjni telums b) Pleisujamais trokára telums c) Trokára parateni4) Ablasturas verseljuna procedurae: Informelis restálice7. Vieta8. Datums |
| Slovenčina (Slovak)E5 vyhlasele na mode1. Dolupopilsany. Peter Neckebrock, ako autorizovaný zástupca výrobou, týtno výhlasejú. Ze uvedeny strovové je z vhode s nastledovynmi smernicami:* Smernica 2000/42/E5 (Šmirný zanadenia)* Smernica 2014/30/EU (Elektronmagrész konsoliditstila)* Smernica 2000/41/E6 2005/68/E6 (Emisie hluku)* Rady 2011/65/EU - (EU) 2015/663 o obmostrení použivania určilych nebezpečných tlak v elektrických a elektronických zariadonach2. Popis strojaa) Produkt: Kosačka na trávu b) Funkica: Koszano trávyc) Model (d) Typc) Výrobné číslo3. Výrobnoa4. Autorizovaný zástupca schopný zostavič’technickú dokumentáciu5. Referencia na použíté norny6. Sinernica ore emise hluku vo voľnom priestranstive a) namaraná hladina eluktického výkon b) Zarčená hladina akustického výkon c) Rozmor d) Procedura pseudzovania zhodye) Notifikovaná osoba7. Miesto 8. Dátum | Esti (Estonian)EU vastavuoklaratsvson1. Kaszolevaga innnitab allakrijatanu, Peter Neckebrock, vollstaud esindaja nimel, el stipolu kirjelstad ušimna vastab kotikitele aljargnevate direktivlide steletec:* Masinate artedict 2006/42/EU• Elektronmagnetilica ohdlawasie artedict 2014/30/EV• Valandrma elektruk 2000/41/E6 2005/68/EU• Grieze 2011/65/EU - (EU) 2015/663 televašte ohtlíka siniete kasutanie pirimise koha elektrí-ja elektronikaseadmetea2. Seastinele křejidelasa) Tooto: Murunituk b) Funkstoson muru nitrinec) Mudel a) 810tp) Torantanimber.4. Volatulad osindaja, kos on padev talina technilist dokumentatsonii5. Viide kohaldatud standarditele6. Villainiura direktivai) Mördend holvčimise tase b) Lubakul helvivomius tase c) Móra parameater6. Vastavushintanismeriellus6. Taxivitud asztus 7.Kohl 8. Kuupávy | Slovensčina (Slovenian)E5 tijava o oklanost1. Spodaj podpisani, Peter Neckebrock, ki je podoščena osbeva in všinmu prolizvajica izljavlje, da spodaj oslasna stroj ustrazva vesem navesenim direktvam:* Direktiva 2000/42/E5 o strojih• Direktiva 2016/35/EU o elektronagni zdržičivosti• Direktiva 2000/42/E5 2005/68/E5 o hitponosti• Direktiva 2011/65/EU - (EU) 2015/663 o omejevanju upozane nekstorn navavnih saov v elektróni in elektronski opereni2. Opis naprava• Prstovd: Vrina koslinca b) Funktje košenja trava c) Modal d) Typc) Srljeka Švirálka3. Prozvajatec4. Podloščeni prestavnik ki lahko pradoži tehnimo dokumentació5. Škíc na uporabljene standarde6. Direktiva c hupnostia) Izomejena zvočina tase b) Garantirana zutra mučc) Parameterc6. Postopokeje@postpolek upravi7. Krej 8. Datum |
- SAFETY MESSAGES
- DAMAGE PREVENTION MESSAGES
- HONDA
- OWNER'S MANUAL
- PEDESTRIAN CONTROLLED
- CONTENTS
- SAFETY INSTRUCTIONS
- WARNING
- Tampering and Altering
- Disposal
- A
- PRODUCT IDENTIFICATION PLATE
- COMPONENT IDENTIFICATION
- SETUP
- UNPACKING
- HANDLEBAR SETUP
- GRASS CATCHER ASSEMBLY
- ENGINE OIL
- FUEL
- BEFORE USING YOUR LAWNMOWER
- CONTROLS
- FUEL VALVE
- THROTTLE LEVER
- CUTTING MEANS CONTROL SYSTEM
- SELECT DRIVE CONTROL
- Adjusting The Select Drive Control Knob
- CUTTING HEIGHT ADJUSTMENT LEVERS
- CLIP DIRECTOR KNOB
- CHECK YOUR LAWN
- Objects
- People and Pets
- Lawn
- CHECK YOUR MOWER
- Cutting Means
- Engine Oil Level
- NOTICE
- Fuel Storage Container
- Air Cleaner Inspection
- Handlebar Height Adjustment
- Grass Catcher
- Inspection
- Installation
- Removal
- Cutting Height
- Rear Shield
- Clip Director
- Clip Director Knob Adjustment
- Important Safety Precaution
- Sliding Door Position
- Rear Discharge
- OPERATION
- MOWING PRECAUTIONS
- FREQUENCY OF USE
- STARTING THE ENGINE
- High Altitude Operation
- STOPPING THE ENGINE
- SAFE MOWING PRACTICES
- DANGER
- Stability
- Obstacles
- Gravel and Loose Objects
- MOWING TIPS
- When to Mow
- Cutting Width
- Cutting Means Speed
- Cutting Means Sharpness
- Dry Grass
- Wet Grass
- Fallen Leaves
- Clogged Cutting-means Enclosure
- Mowing Patterns
- Mulching
- Catching
- Rear Discharge Mowing
- MAINTENANCE
- THE IMPORTANCE OF MAINTENANCE
- Maintenance safety
- Safety Precautions
- MAINTENANCE SCHEDULE
- ENGINE MAINTENANCE
- Engine Oil Change
- Air Cleaner Service
- Spark Plug Service
- Spark Arrester Service
- CONTROL CABLE ADJUSTMENTS
- Select Drive Cable Adjustment
- CUTTING MEANS REMOVAL AND INSTALLATION
- Cutting Means Removal
- Cutting Means Installation
- Cutting means bolt torque: 49 \~ 59 N·m
- Cutting-means Mounting Bolt Inspection
- GRASS CATCHER CLEANING AND REPLACEMENT
- Cleaning
- Replacement
- TRANSPORTING
- Before Loading
- Handlebar Folding
- Loading and Unloading
- STORAGE
- Engine
- Mower Deck
- Short Term Storage (30-90 days)
- Long Term or Seasonal Storage (greater than 90 days)
- Engine Cylinder
- Placing in Storage
- Removing from Storage
- TROUBLESHOOTING
- INTRODUCTION
- TABLE DES MATIERES
- INSTALLATION DU SAC DE RAMASSAGE
- ESSENCE
- VERIFICATIONS AVANT UTILISATION
- ÊTES-VOUS PRÊT À TONDRE?
- AVERTISSEMENT
- Hauteur de coupe
- Direction de la tonte
- FONCTIONNMENT
- PRECAUTIONS A PRENDRE POUR LA TONTE
- AVIS
- Installation du sac
- TRANSPORT
- INDICE
- MONTAJE DEL SACO PARA CÉSPED
- COMBUSTIBLE
- AVISO
- Dirección del corte
- Obstáculos
- MONTAJE Y DESMONTAJE DE LA CUCHILLA
- INHALTSVERZEICHNIS
- BENZIN
- VOR DEM BETRIEB
- GASHEBEL
- Schnittrichtung
- BETRIEB
- SICHERES MÄHEN
- ZUR BEACHTUNG
- Anbringen
- Vor dem Aufladen
- Auf- und Abladen
- ASSEMBLAGGIO DEL SACCO RACCOGLIERBA
- CARBURANTE
- LEVETTA DEL GAS
- Altezza di tosatura
- USO
- NOTA
- Montaggio del sacco
- TRASPORTO
- Prima di caricare
- Carico e scarico
- INHOUD
- WAARSCHUWINGSSTICKER
- GRASOPVANGEENHEID
- MOTOROLIE
- VÓÓR HET IN BEDRIJF NEMEN
- GASHENDEL
- MAAISELRICHTERKNOP
- VOORDAT U GAAT MAAIEN
- BENT U KLAAR OM TE MAAIEN?
- ⚠ WAARSCHUWING
- Maaiselrichting
- Knopafstelling maaiselrichter
- DE MAAIER GEBRUIKEN
- VOORZORGSMAATREGELEN
- TIPS VOOR VEILIG MAAIEN
- ONDERHOUD
- HET BELANG VAN ONDERHOUD
- OPMERKING
- Alvorens in te laden
- In- en uitladen
- Honda Warranty Conditions
- Conditions D'application De La Garantie Honda
Brand : Honda
Model : HRX 537 VY
Category : Lawn mower