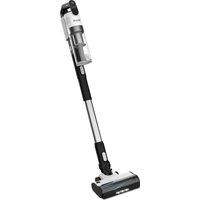
LVAC-200 - Vacuum Cleaner Levoit - Free user manual and instructions
Find the device manual for free LVAC-200 Levoit in PDF.


User questions about LVAC-200 Levoit
0 question about this device. Answer the ones you know or ask your own.
Ask a new question about this device
Download the instructions for your Vacuum Cleaner in PDF format for free! Find your manual LVAC-200 - Levoit and take your electronic device back in hand. On this page are published all the documents necessary for the use of your device. LVAC-200 by Levoit.
USER MANUAL LVAC-200 Levoit
LVAC-200 Cordless Stick Vacuum
natural_image
Line drawing of a Lévoit vacuum cleaner with attached base (no text or symbols on the device body)Questions or Concerns?
Please contact us Mon–Fri, 9:00 am–5:00 pm PST/PDT at support@levoit.com or at 1-888-726-8520.
| Model | LSV-V201-WUS, LSV-V201-WCA | |
| Battery Input | 22.2V=2200mAh Li-ion battery | |
| Rated Power | 180W* | |
| Charging Input | 100-240V~ 50/60Hz 0.8A | |
| Dimensions | 9.8 x 7.7 x 43.3 in / 25.0 x 19.5 x 110.0 cm | |
| Battery Operating Conditions | Charging Temperature: 39.2°-104°F / 4°-40°C Storage Temperature: 32°-77°F / 0°-25°C Storage Humidity: 65%±20% | |
| Runtime** (Using Crevice Tool or Pet Tool) | Eco Mode 50 | minutes |
| Mid Mode 20 | minutes | |
| Turbo Mode 12 | minutes | |
| Runtime** (Using Vacuum Head) | Eco Mode 30 | minutes |
| Mid Mode 20 | minutes | |
| Turbo Mode 12 | minutes | |
| Charging Time | 3-4 hours | |
*Note: May vary +/- 10%
**Note: Runtime is the result of testing at room temperature.
IMPORTANT SAFETY INSTRUCTIONS
When using this vacuum, basic precautions should always be followed, including the following:
READ ALL INSTRUCTIONS BEFORE USING THIS APPLIANCE
WARNING – To reduce the risk of fire, electric shock, or injury:
- CAUTION: Risk of injury. Roller brush may start unexpectedly. Remove battery pack before cleaning or servicing.
- Do not leave the vacuum unattended while it is on. Unplug from outlet when not charging and before servicing.
- Do not use outdoors or on wet surfaces.
• Children should be supervised to ensure that they do not play with the vacuum. - Do not allow to be used as a toy. Close attention is necessary when used by or near children.
- This vacuum is not to be used by persons (including children) with reduced physical, sensory, or mental capacities, or lack of experience and knowledge, unless they have been given supervision or instruction concerning the use of the appliance by a person responsible for their safety.
- Children should not clean or perform maintenance on the vacuum without supervision.
- Only use the vacuum as described in this manual.
- Use only manufacturer's recommended attachments.
- Do not use your vacuum if it is damaged or not working correctly, or if the charger or plug is damaged. Do not try to repair it yourself. Contact Customer Support (see page 20).
- Do not handle the charger or vacuum with wet hands.
-
Do not put any object into any opening. Do not use the vacuum with any opening blocked. Keep free of dust, lint, hair, or anything that may reduce airflow.
-
Keep hair, loose clothing, fingers, and all body parts away from openings and moving parts.
- Use extra care when cleaning on stairs.
-
Do not vacuum the following (or use where they may be present):
-
Sharp objects such as glass shards, metallic nails, metal paper clips, or pins;
- Ultrafine particles such as lime, cement, sawdust, gypsum powder, or ashes;
-
Hazardous materials or chemicals such as solvents, drain cleaner, strong acids, or strong alkalis.
-
Always turn the vacuum off before connecting or disconnecting the stick, nozzles, brushes, or vacuum head.
- Do not vacuum water or any liquids.
- Do not vacuum anything that is burning or smoking, such as cigarettes, matches, or hot ashes.
- Do not use without dust bin and filters in place.
- Do not point the vacuum at any person or animal while it is on.
- Store the vacuum on a small stand or hang it from the wall.
- Do not use the vacuum in temperatures above 104^ (40°C) or below 39.2^ (4°C).
SAFETY INSTRUCTIONS (CONT.)
Battery & Charger
WARNING: Read all safety warnings and instructions. Failure to follow the warnings and instructions may result in electric shock, fire, and/or serious injury.
- Do not pull or carry the vacuum by the charging cable, use the cable as a handle, close a door on the cable, or pull the cable around sharp edges or corners. Do not run any appliance over the cable.
- Prevent unintentional starting. Ensure the switch is in the off-position before connecting to battery pack, picking up or carrying the appliance. Carrying the appliance with your finger on the switch or energizing appliance that have the switch on invites accidents.
- Disconnect the battery pack from the appliance before making any adjustments, changing accessories, or storing appliance. Such preventive safety measures reduce the risk of starting the appliance accidentally.
- Do not unplug by pulling on cord. To unplug, grasp the plug, not the cord. Turn off all controls before unplugging.
- Never place the charger or its cable near any heat source.
- Keep the charging cable out of areas where people walk often. Place the cable where it will not be tripped over.
- Do not use the charger to charge other appliances besides this vacuum.
-
Only recharge the vacuum with the charger specified by Arovast Corporation. A charger that is suitable for one type of appliance may create a risk of fire when used with a different battery pack. For use only with the ZD024M260085US adapter manufactured by E-TEK Electronics Manufactory Co., LTD. For more information, please contact Customer Support (see page 20).
-
Only use the battery pack specifically designed for this vacuum. Use of any other battery packs may create a risk of injury and fire. For use only with the LSV-V201B-WUS battery pack manufactured by Suzhou Lishen Energy Science & Technology Co., Ltd. For more information, please contact Customer Support (see page 20).
- When the battery pack is not in use, keep it away from other metal objects, like paper clips, coins, keys, nails, screws, or other small metal objects that can make a connection from one terminal to another. Shorting the battery terminals together may cause burns or a fire.
- Under abusive conditions, liquid may be ejected from the battery. Avoid contact. If contact occurs, flush with water. If liquid contacts eyes, immediately flush with water and seek medical help. Liquid ejected from the battery may cause irritation or burns.
- Do not use the battery pack or vacuum if they are damaged or modified. Damaged or modified batteries may exhibit unpredictable behavior resulting in fire, explosions, or risk of injury.
- Have servicing performed only by a qualified repair person using identical replacement parts. This will ensure that the safety of the vacuum is maintained.
- Do not modify or attempt to repair the vacuum or the battery pack except as indicated in the manual.
- Do not expose the battery pack or vacuum to fire or excessive temperatures. The battery used in this device may present a risk of fire or chemical burn if mistreated. Do not disassemble, short contacts, heat above 140°F (60°C), or incinerate. Exposure to fire or temperatures above 266°F (130°C) may cause an explosion.
- Follow all charging instructions and do not charge the battery pack or vacuum outside of the temperature range specified in the instructions. Charging improperly or at temperatures outside of the specified range may damage the battery and increase the risk of fire.
- WARNING: Do not use with non-rechargeable batteries.
SAVE THESE INSTRUCTIONS
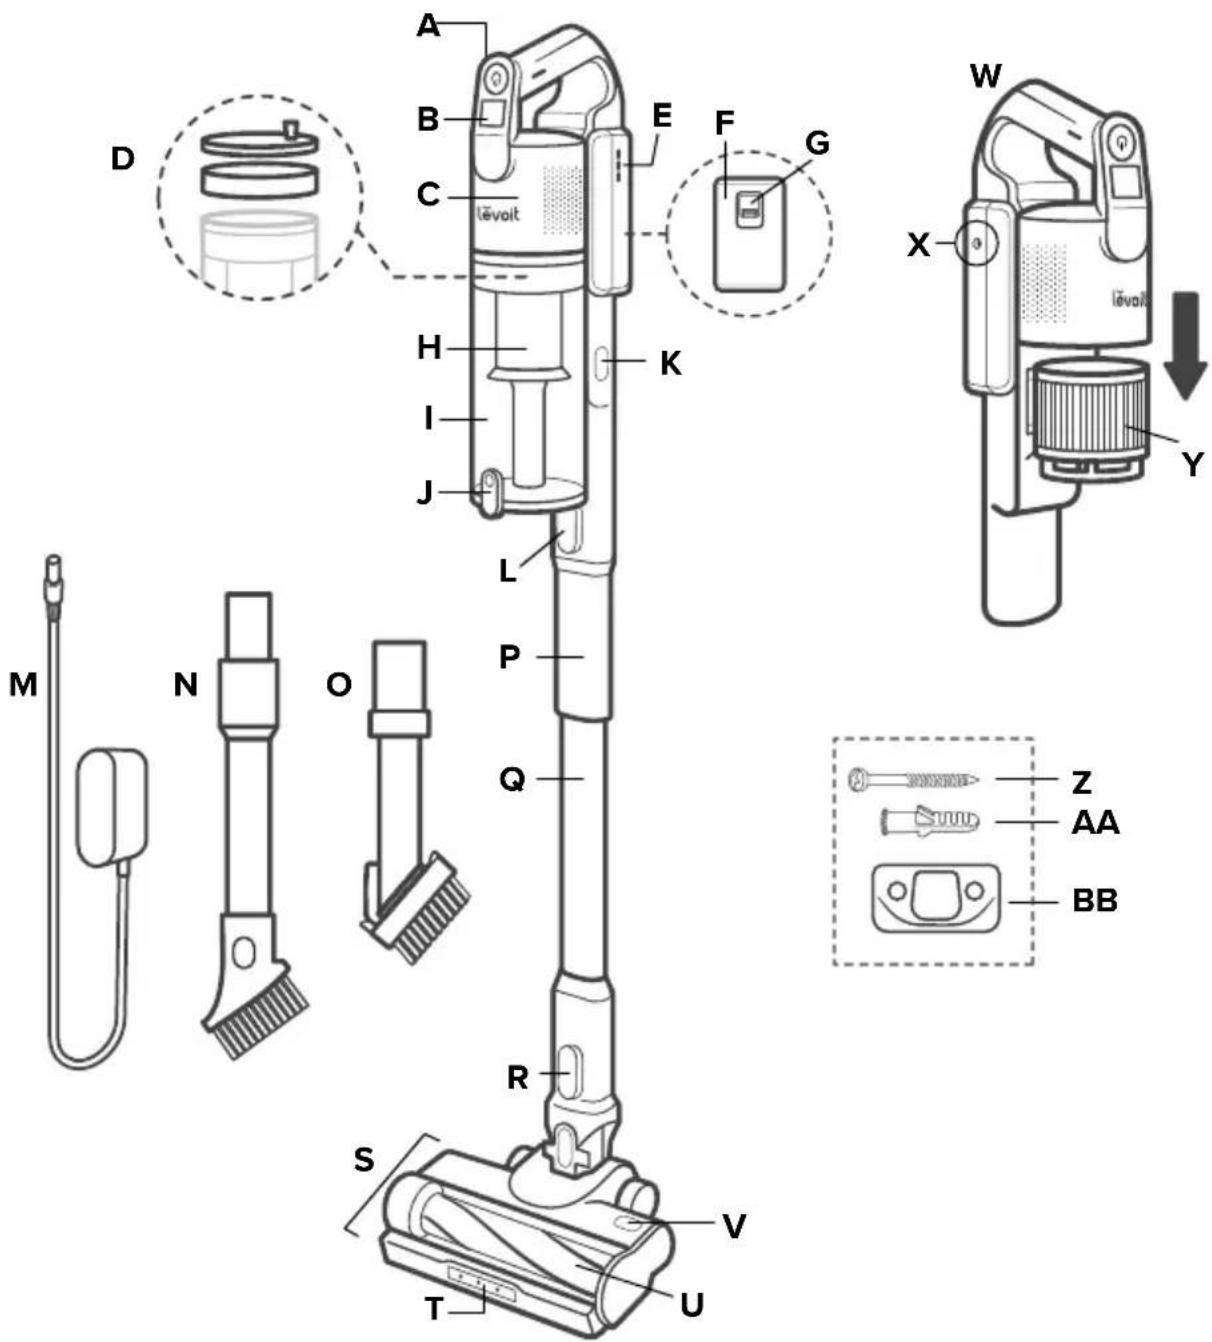
A. On/Off Button
B. Suction Mode Button
C. Vacuum Body
D. Pre-Motor Filters
E. Battery Indicator Lights
F. Battery
G. Battery Release Button
H. Metal Filter
I. Dust Bin
J. Lid Release Button
K. Dust Bin Release Button
L. Vacuum Body Release Button
M. Charger
N. 2-in-1 Crevice Tool
O. 2-in-1 Pet Tool
P. Short Stick
Q. Long Stick
R. Vacuum Head Release Button
S. Vacuum Head
T. LED Lights
U. Roller Brush
V. Roller Brush Release Button
W. Vacuum Handle
X. Charging Port (on the battery)
Y. Post-Motor Filter
Z. Screws
AA. Wall Anchors
BB. Wall Mount
text_image
A B C lèvoit E F G H I J K L P Q R S T V U M N O W X Y Z AA BBCONTROLS USING YOUR VACUUM
On/Off Button
• Turns on/off the vacuum.
Suction Mode Button
- Cycles through Eco Mode, Mid Mode and Turbo Mode.
- The vacuum will default to Eco Mode. Press once for Mid Mode. Press again for Turbo Mode. Press again to switch back to Eco Mode.
- Eco Mode is suitable for daily cleaning.
- Mid Mode is suitable for strong cleaning.
- Turbo Mode is suitable for deep cleaning.
Battery Indicator Lights
- Indicate the battery level when you are using the vacuum.
Battery Indicator Light Chart (During Use)
| Battery Level Battery Indicators | |
| 70–100% | |
| 35–70% | |
| 10–35% | |
| 0–10% | |
natural_image
Diagram of a device being inserted into a cylindrical component with an arrow indicating direction (no text or symbols present)Figure 1.1 Figure 1.2
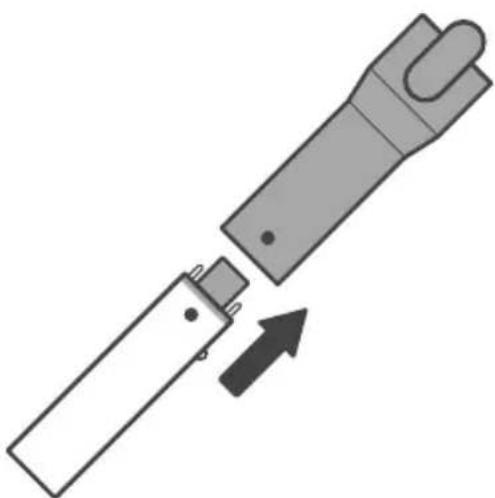
- Build the vacuum stick by aligning the dots on the long stick and short stick, then push together until they lock in place. [Figure 1.1]
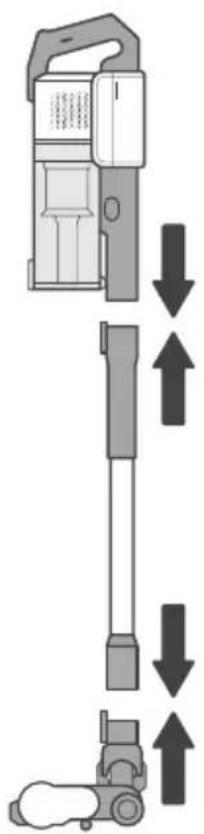
- Attach the vacuum head or a nozzle attachment to the bottom of the stick, then attach the vacuum body to the top of the stick. [Figure 1.2]
Note: There is a clicking sound when the parts are properly joined together.
- Charge the vacuum (see page 9).
Note: Fully charge the battery before first use.
- Press the On/Off Button to turn the vacuum on. The vacuum will default to Eco Mode.
- Press the Suction Mode Button to switch between Eco Mode, Mid Mode and Turbo Mode.
- Press the On/Off Button to turn the vacuum off.
natural_image
Diagram of a vacuum cleaner with directional arrows indicating motion (no text or symbols)Nozzle Attachments
Your vacuum comes with nozzle attachments to help you tackle daily or weekly cleanup job.
2-in-1 Crevice Tool
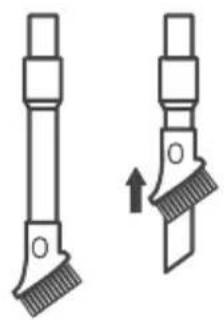
- Press button to slide bristles up/down and switch between crevice tool and dusting brush. [Figure 1.3]
- Use the crevice tool to clean hard-to-reach places like crevices in furniture and corners of a room or car.
- Use the dusting brush to clean dust and hard surfaces like mantels or baseboards.
natural_image
Two mechanical tool tips with textured surfaces, one showing a downward arrow (no text or symbols)Figure 1.3
2-in-1 Pet Tool
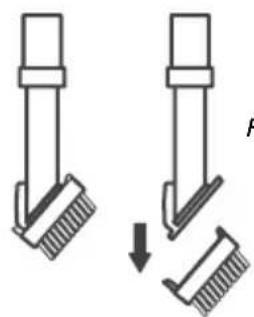
- Use the brush head to clean fur off soft upholstery or pets.
- Remove the brush head to use the fur removal tool which loosens hair on fabric and carpet. [Figure 1.4]
natural_image
Diagram showing two mechanical components with a downward arrow indicating motion or change (no text or symbols)Figure 1.4
To use a nozzle attachment:
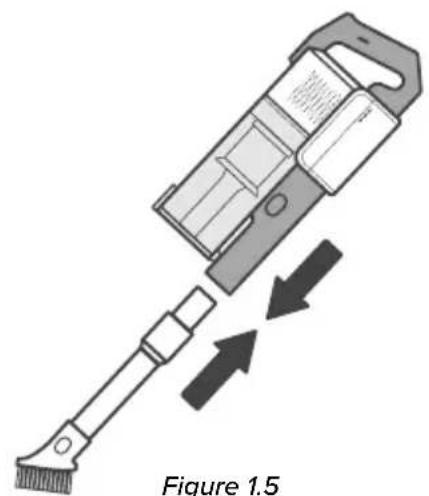
- Press and hold the Vacuum Body Release Button and gently pull the vacuum body from the stick.
-
Slide the nozzle attachment onto the vacuum body. [Figure 1.5]
-
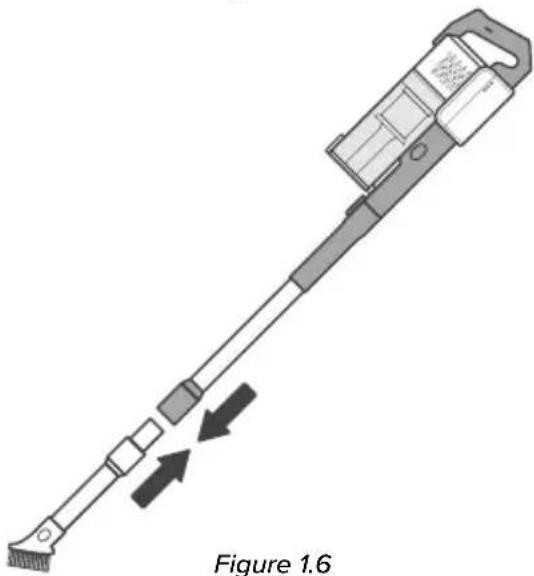
Optionally, leave the stick attached to the vacuum body and press the Vacuum Head Release Button to remove the vacuum head. Then, attach the nozzle attachment to the end of the stick. [Figure 1.6]
Note: You can also attach the vacuum body directly to the vacuum head.
[Figure 1.7]
natural_image
Diagram of a handheld device with arrows indicating motion or force, labeled Figure 1.5 (no text or symbols on the device itself)Figure 1.5
natural_image
Diagram of a handheld device with directional arrows indicating movement or force, labeled Figure 1.6 (no text or symbols on the device itself)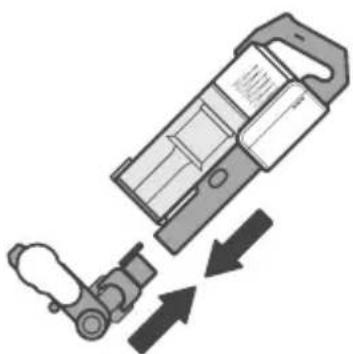
natural_image
Diagram of a device with internal components and directional arrows indicating flow or movement (no text or symbols)Figure 1.7
CARE & MAINTENANCE
Battery Installation
-
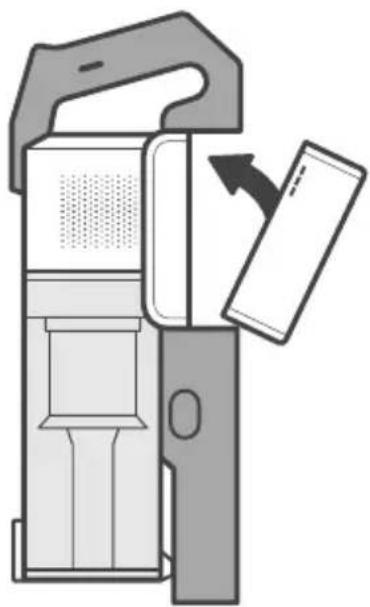
Turn the vacuum off. Press the Battery Release Button and remove the battery.
-
To reinstall, slide the battery into the slot in the vacuum body. [Figure 2.1] There will be a clicking sound when the battery is properly installed.
Note:
• To maintain the life of the battery, store the vacuum in a cool, dry place.
- Store the battery in a semi-charged state (at least 2 battery indicator lights) and maintain this by charging the battery every 3 months.
natural_image
Diagram of a device with a door handle and internal components, showing a right-hand rule for opening the door (no text or symbols present)Figure 2.1
Charging the Vacuum
Your vacuum uses a 2200mAh Li-ion battery. Use the included charger to charge the vacuum.
Note:
• Make sure the vacuum is turned off before charging.
- Please charge your vacuum after each use.
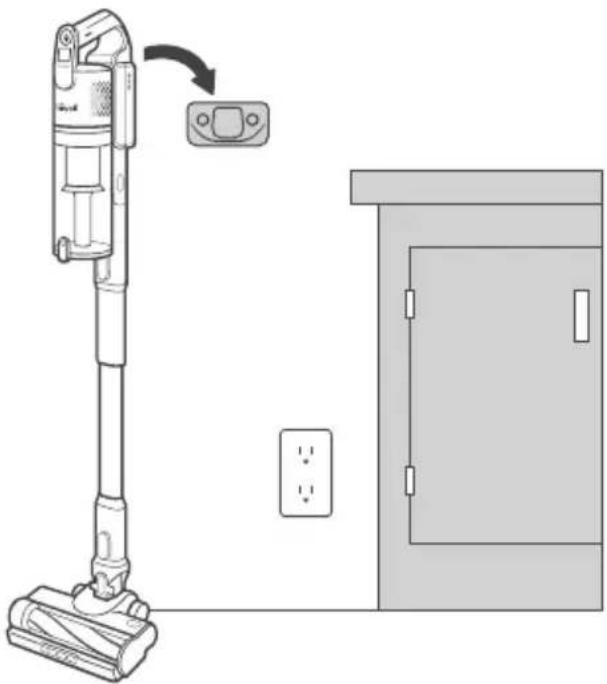
- Install the wall mount by screwing it into the wall near a power outlet. [Figure 2.2]
Note:
• The wall mount must be high enough on the wall to allow the vacuum to stand up.
• Make sure that the wall is free of gas pipes, water pipes, electrical cables, and wires.
natural_image
Diagram of a vacuum cleaner next to an open door with a wall-mounted switch (no text or symbols)Figure 2.2
CARE & MAINTENANCE (CONT.)
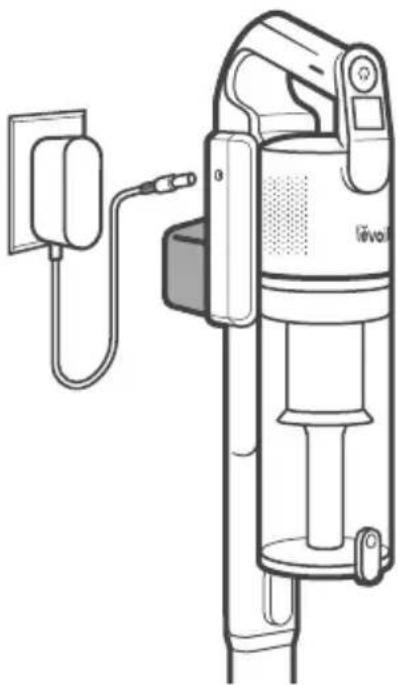
- Hang the vacuum on the wall mount. [Figure 2.3]
- Insert the charger into the charging port on the battery. [Figure 2.3]
- Plug the charger into the outlet. The battery lights will blink while charging. [Figure 2.3]
- When the vacuum is fully charged, the 3 battery indicator lights will turn solid for 5 minutes, then turn off.
Alternatively, the battery can be charged separate from the vacuum body.
- Press the Battery Release Button to remove the battery.
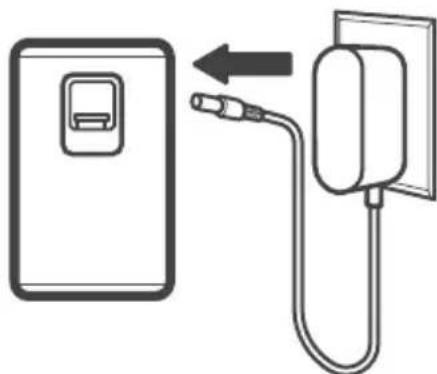
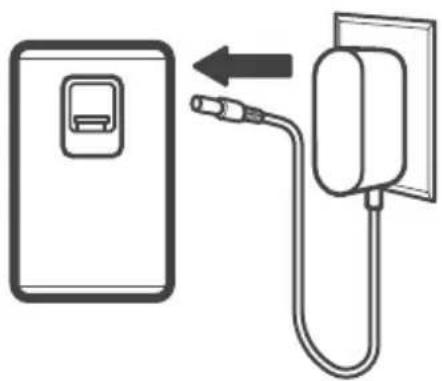
- Insert the charger into the charging port on the battery. [Figure 2.4]
- Plug the charger into an outlet. The battery indicator lights will blink while charging.
- When the vacuum is fully charged, the 3 battery indicator lights will turn solid for 5 minutes, then turn off.
natural_image
Line drawing of a vacuum cleaner with attached power outlet and cable (no text or symbols)Figure 2.3
natural_image
Diagram showing a device connected to a wall-mounted cable, with an arrow indicating the connection (no text or symbols present)Figure 2.4
Battery Indicator Light Chart (While Charging)
| Battery Level Battery Indicators | |
| 0–35% |  |
| 35–70% |  |
| 70–100% |  |
| 100% |  |
Warning:
- Only charge the battery with the charger specified by Levoit.
- If you are not using the battery for an extended period, store it in a cool, dry place.
- Store the battery in a semi-charged state (at least 2 battery indicator lights) and maintain this by charging the battery every 3 months.
• For more information, please contact Customer Support (see page 20).
Emptying the Dust Bin
When dust in the dust bin reaches the MAX line, empty the dust bin.
Warning: Do not overfill the dust bin. If the dust bin is too full, it may affect the performance of the vacuum.
- Turn the vacuum off. Remove the dust bin by pressing the Dust Bin Release Button.
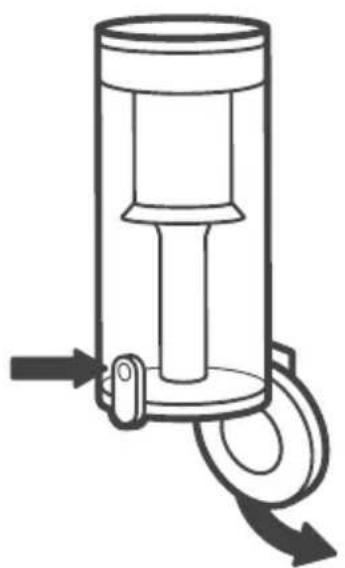
- Hold the dust bin over a trash can and press the Lid Release Button. [Figure 2.5] Use caution, as the lid will open when the release button is pushed.
Note: Holding the dust bin inside a trash can prevents dust from spilling out.
- Empty out debris and dirt, then close the lid.
Alternatively, you can remove the vacuum body to empty the dust bin.
-
Remove the vacuum body by pressing the Vacuum Body Release Button.
-
Hold the dust bin over a trash can and press the Lid Release Button.
[Figure 2.5]
natural_image
Diagram of a cylindrical mechanical device with rotating wheels and a central shaft (no text or symbols)Figure 2.5
CLEANING
Cleaning the Vacuum Body
- Turn the vacuum off.
- Wipe the outside of the vacuum down with a damp cloth.
- Allow the vacuum to completely dry before using.
Warning: Do not allow water to enter the internal parts or motor of the vacuum.
Cleaning the Dust Bin & Metal Filter
- Make sure the vacuum is off and the dust bin is completely empty before cleaning (see Emptying the Dust Bin, page 11).
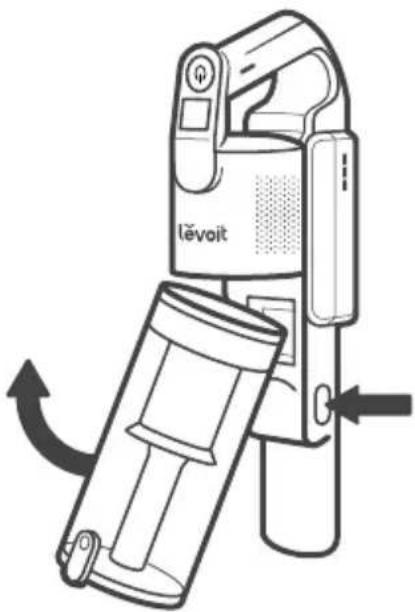
- Press the Dust Bin Release Button and pull the dust bin to remove it. [Figure 3.1] Empty out any remaining dust and debris, and remove any hair tangled around the metal filter.
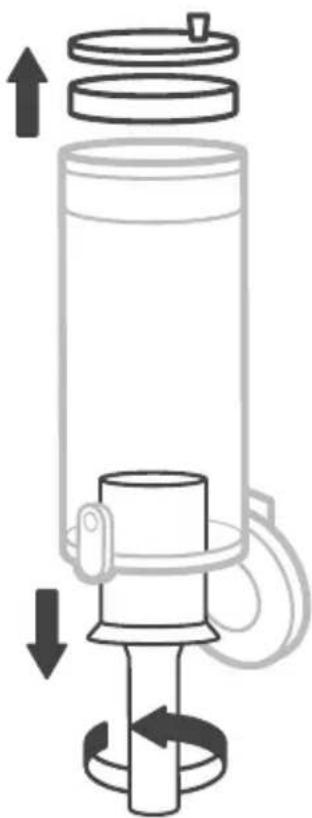
- Remove the pre-motor filters from the top of the dust bin. Set aside or wash the pre-motor filters (see Cleaning the Pre-Motor & Post-Motor Filters, page 13).
- Rotate the metal filter counterclockwise to remove it. [Figure 3.2]
- Rinse the dust bin and metal filter with water and allow them to dry. Make sure the parts are completely dry before using.
- Reattach the metal filter and replace the pre-motor filters. Attach the dust bin to the vacuum body.
Warning: Do not allow water to enter the internal parts or motor of the vacuum.
text_image
lévoitFigure 3.1
natural_image
Diagram of a cylindrical device with internal components and directional arrows indicating flow or movement (no text or symbols)Figure 3.2
CLEANING (CONT.)
Cleaning the Pre-Motor & Post-Motor Filters
To maintain the performance of your filters, they should be routinely washed and replaced.
- If you notice decreased suction power, or the filter is visibly dirty, clean the filter immediately.
- The pre-motor filters (foam filter and felt filter) should be washed at least once a month and replaced every 3 months.
- The post-motor filter should be washed at least once a year.
- Do not put filters in a dishwasher, washing machine, tumble dryer, oven, or microwave, or place near an open flame.
- Never operate the vacuum without the dust bin or filters properly installed.
- Frequent use may require cleaning the filters more often. Cleaning the filters regularly helps maintain your vacuum's cleaning performance.
- You may need to replace the filters more frequently depending on your use and environment.
- If the surrounding humidity is high, please allow the filters to air-dry for a longer period of time before reinstalling them back into the vacuum.
Replacement Filters:
- To maintain the performance of your vacuum, only use official Levoit filters. For more information, contact Customer Support (see page 20).
Pre-Motor Filters
To maintain the performance of your filters, they should be routinely washed and replaced.
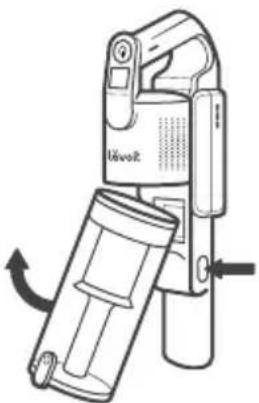
- Press the Dust Bin Release Button to remove the dust bin. [Figure 3.3]
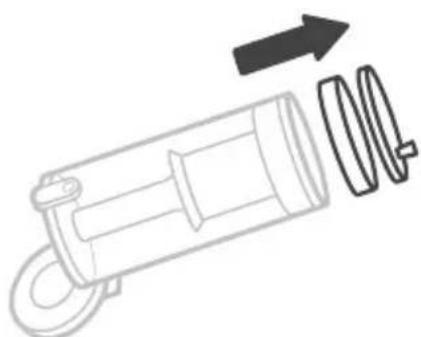
- Remove the two pre-motor filters (foam filter and felt filter). [Figure 3.4]
- Clean the pre-motor filters with water. Allow the filters to air-dry completely under the sun or in a dry, ventilated place before reinstallation.
- Replace the foam filter, followed by the felt filter.
Note: Make sure the felt filter has the ribbon-handle side facing outward when you insert the filter.
- Place the dust bin back onto the vacuum body.
natural_image
Line drawing of a handheld device resembling a Ubo2 device with a scroll wheel (no text or symbols)Figure 3.3
natural_image
Diagram of a mechanical device with internal components and directional arrow (no text or symbols)Figure 3.4
CLEANING (CONT.)
Post-Motor Filter Cleaning the Roller Brush
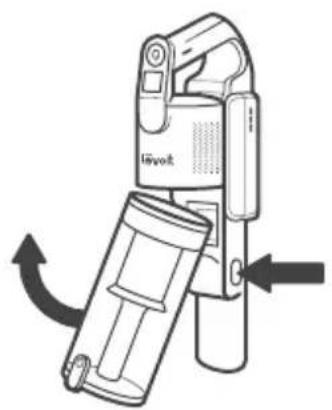
- Press the Dust Bin Release Button to remove the dust bin. [Figure 3.5]
- Pull out the post-motor filter (high-efficiency paper) from the vacuum body. [Figure 3.6]
- If necessary, run post-motor filter under running water to wash it. [Figure 3.7] Allow the filter to air-dry completely under the sun or in a dry, ventilated place before reinstallation.
- Push the post-motor filter back in the vacuum body until you hear a click, then replace the dust bin.
natural_image
Line drawing of a handheld device labeled 'Hi-volt' with directional arrows indicating motion (no text or symbols beyond label)Figure 3.5
Periodically check the roller brush for hair or debris. The roller brush will automatically shut off if it is blocked or jammed.
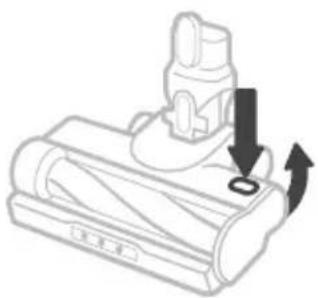
- Turn the vacuum off. Detach the vacuum head from the stick by pressing the Vacuum Head Release Button.
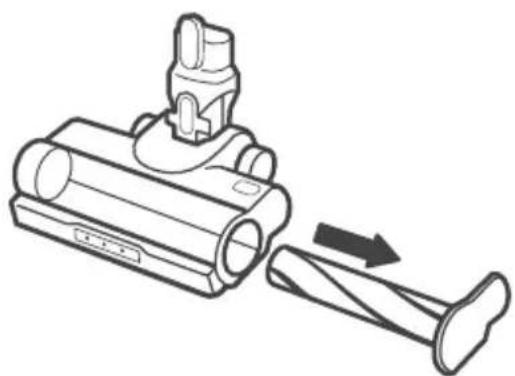
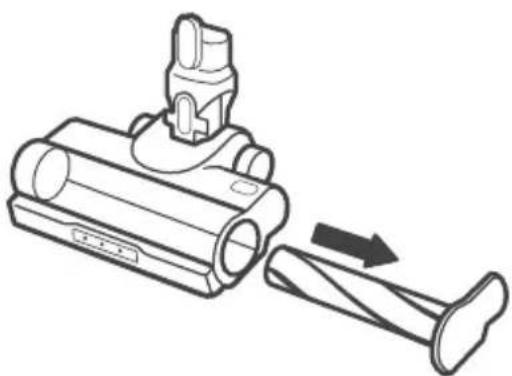
- Press the Roller Brush Release Button, slide the side panel up to open, then pull out the roller brush. [Figure 3.8]
- If the roller brush is jammed, carefully use a pair of scissors or a sharp knife to remove any hair or debris tangled around the roller brush.
- Insert the roller brush back into the vacuum head. Slide the side panel down to lock it in place.
natural_image
Diagram of a battery with a plug and arrow indicating rotation (no text or symbols)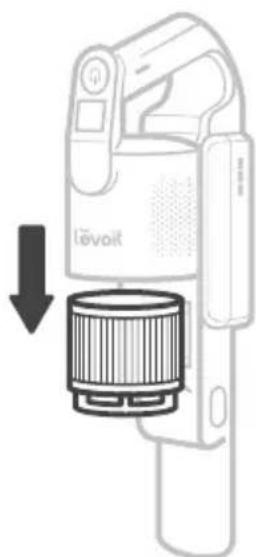
natural_image
Diagram of a Lièvoit device with a cylindrical sensor and downward arrow indicating motion (no text or symbols)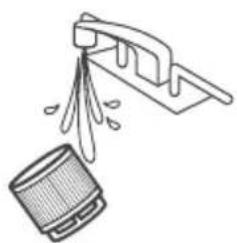
natural_image
Illustration of a kitchen tool spraying water onto a surface, with a container nearby (no text or symbols)Figure 3.7
natural_image
Technical line drawing of a vacuum cleaner with a directional arrow indicating motion (no text or symbols)Figure 3.8
Figure 3.6
STORAGE
When the vacuum is not in use, store it on the wall mount:
- Screw the wall mount into the wall near a power outlet (see Charging the Vacuum, page 9).
- Hang the vacuum on the wall mount.
Note:
• Always store the vacuum on the wall mount.
- If storing for long periods of time, periodically charge the battery to preserve the life of the battery.
Disposing of the Battery
- The battery contains materials that are harmful to the environment and must be removed from the vacuum before it is discarded.
- When removing the battery, the vacuum must be turned off.
- Discarded batteries should be handled properly. Do not put batteries into fire, water, or soil.
- If battery leakage touches skin or clothing, flush with water immediately to avoid skin injury and seek medical help.
TROUBLESHOOTING
| Problem Possible Solution | |
| Vacuum will not turn on. | The battery is not installed correctly (seeBattery Installation, page 9). |
| Recharge the vacuum (seeCharging the Vacuum, page 9). | |
| The vacuum motor overheated. Empty the dust bin and check for blockage inside the vacuum head and stick. Remove any blockage and clean the filters (seeCleaning, page 12). Allow the vacuum to cool for 1 hour before turning it back on. | |
| Vacuum is not charging. | The charger is not properly plugged in or you are using the wrong charger. Use the provided Levoit chargeronly(seeCharging the Vacuum, page 9). |
| Roller brush is not turning (LED lights flash). | Clean the roller brush and remove any debris blocking the brush (seeCleaning the Roller Brush, page 14). |
| Vacuum makes an abnormal noise. | Clean the roller brush and remove any debris blocking the brush (seeCleaning the Roller Brush, page 14). |
| Check for blockage inside the vacuum body, vacuum head, and stick. Remove any blockage (seeCleaning, page 12). | |
| Vacuum has low suction power. | Battery may be low. Recharge the battery to full charge (seeCharging the Vacuum, page 9). |
| Clean the roller brush and remove any debris blocking the brush (seeCleaning the Roller Brush, page 14). | |
| The dust bin and filters may be full. Empty the dust bin and clean the filters (seeCleaning, page 12). | |
| Check for blockage inside the vacuum body, vacuum head, and stick. Remove any blockage (seeCleaning, page 12). | |
| The LED lights and battery indicator lights flash. | The dust bin and filters may be full. Empty the dust bin and clean the filters (seeCleaning, page 12). |
| Check for blockage inside the vacuum body, vacuum head, and stick. Remove any blockage (seeCleaning, page 12). | |
| Battery indicator lights flash red lights. | The battery may be overheating. Remove the battery and place in a room-temperature environment to cool down. If it still flashes red, contactCustomer Support(see page 20). |
| Vacuum releases a bad or unusual smell. | The environment's relative humidity may be high or the vacuum may have absorbed water and caused the filter to grow mold. Replace the filters (contact Customer Support, page 20). |
| The filters may be dirty. Clean the filters (see Cleaning, page 12). | |
| The dust bin may be dirty. Empty and clean the dust bin (see Cleaning, page 12). |
If your problem is not listed, please contact Customer Support (see page 20).
FEDERAL COMMUNICATION COMMISSION INTERFERENCE STATEMENT - PART 15
This device complies with Part 15 of the FCC Rules. Operation is subject to the following two conditions:
- This device may not cause harmful interference, and
- This device must accept any interference received, including interference that may cause undesired operation.
NOTE: This equipment has been tested and found to comply with the limits for a Class B digital device, pursuant to Part 15 of the FCC Rules. These limits are designed to provide reasonable protection against harmful interference in a residential installation. This equipment generates, uses and can radiate radio frequency energy and, if not installed and used in accordance with the instructions, may cause harmful interference to radio communications. However, there is no guarantee that interference will not occur in a particular installation. If this equipment does cause harmful interference to radio or television reception, which can be determined by turning the equipment off and on, the user is encouraged to try to correct the interference by one or more of the following measures:
- Reorient or relocate the receiving antenna.
- Increase the separation between the equipment and receiver.
- Connect the equipment into an outlet on a circuit different from that to which the receiver is connected.
- Consult the dealer or an experienced radio/TV technician for help.
FCC Caution: Any changes or modifications not expressly approved by the party responsible for compliance could void the user's authority to operate this equipment.
FCC SDOC SUPPLIER'S DECLARATION OF CONFORMITY
Arovast Corporation hereby declares that this equipment is in compliance with FCC requirements. The declaration of conformity may be consulted in the support section of our website, accessible from www.levoit.com
CAN ICES-003 (B) / NMB-003 (B)
WARRANTY INFORMATION
| Product Name | Levoit LVAC-200 Cordless Stick Vacuum |
| Model | LSV-V201-WUS, LSV-V201-WCA |
| For your own reference, we strongly recommend that you record your order ID and date of purchase. | |
| Order ID | |
| Date of Purchase | |
Levoit Limited Product Warranty
Register your products at https://warranty.levoit.com/warranty to stay up to date with important product information such as product updates, limited warranties, usage and maintenance recommendations, and notifications concerning safety warnings or product recalls. Registration is not required to claim your limited warranty.
Two (2) Year Limited Consumer Product Warranty
Arovast Corporation (“Arovast”) warrants that the product shall be free from defects in material and workmanship for a period of 2 years from the date of original purchase (“Limited Warranty Period”), provided the product was used in accordance with its use and care instructions (e.g., in the intended environment and under normal circumstances).
Your Limited Warranty Benefits
During the Limited Warranty Period and subject to this limited Warranty Policy, Arovast will, in its sole and exclusive discretion, either (i) refund the purchase price if the purchase was made directly from the online Levoit store, (ii) repair any defects in material or workmanship, (iii) replace the product with another product of equal or greater value, or (iv) provide store credit in the amount of the purchase price.
Who is Covered?
This limited warranty extends only to the original consumer purchaser of the product and is not transferable to any subsequent owner of the product, regardless of whether the product transferred ownership during the specified term of the limited warranty. The original consumer purchaser must provide verification of the defect or malfunction and proof of the date of purchase to claim the Limited Warranty Benefits.
Be Aware of Unauthorized Dealers or Sellers
This limited warranty does not extend to products purchased from unauthorized dealers or sellers. Arovast's limited warranty only extends to products purchased from authorized dealers or sellers that are subject to Arovast's quality controls and have agreed to follow its quality controls. Please be aware, products purchased from an unauthorized website or dealer may be counterfeit, used, defective, or may not be designed for use in your country. You can protect yourself and your products by making sure you only purchase from Arovast or its authorized dealers.
If you have any questions about a specific seller, or if you think you may have purchased your product from an unauthorized seller, please contact our Customer Support Team via support@levoit.com
What's Not Covered?
- Normal wear and tear, including normal wearing parts, such as dust bin, filter, roller brush, battery, and power cord, or carpet or floor damage due to misuse.
- If the proof-of-purchase has been altered in any way or is made illegible.
- If the model number, serial number or production date code on the product has been altered, removed or made illegible.
- If the product has been modified from its original condition.
- If the product has not been used in accordance with directions and instructions in the user manual.
- Damages caused by connecting peripherals, additional equipment or accessories other than those recommended in the user manual.
- Damages or defects caused by accident, abuse, misuse, or improper or inadequate maintenance.
- Damages or defects caused by service or repair of the product performed by an unauthorized service provider or by anyone other than Arovast.
- Damages or defects occurring during commercial use, rental use, or any use for which the product is not intended.
- If the unit has been damaged, including but not limited to damage by animals, lightning, abnormal voltage, fire, natural disaster, transportation, dishwasher, or water (unless the user manual expressly states that the product is dishwasher-safe).
• Incidental and consequential damages. - Damages or defects exceeding the cost of the product.
Claiming Your Limited Warranty Service in 5 Simple Steps:
- Make sure your product is within the specified limited warranty period.
- Make sure you have a copy of the invoice and order ID or proof-of-purchase.
- Make sure you have your product. DO NOT dispose of your product before contacting us.
- Contact our Customer Support Team via support@levoit.com
- Once our Customer Support Team has approved your request, please return the product with a copy of the invoice and order ID.
Sole and Exclusive Remedy
THE FOREGOING LIMITED WARRANTY CONSTITUTES AROVAST CORPORATION'S EXCLUSIVE LIABILITY, AND YOUR SOLE AND EXCLUSIVE REMEDY, FOR ANY BREACH OF ANY WARRANTY OR OTHER NONCONFORMITY OF THE PRODUCT COVERED BY THIS LIMITED PRODUCT WARRANTY STATEMENT. THIS LIMITED WARRANTY IS EXCLUSIVE, AND IN LIEU OF ALL OTHER WARRANTIES, NO EMPLOYEE OF AROVAST CORPORATION OR ANY OTHER PARTY IS AUTHORIZED TO MAKE ANY WARRANTY IN ADDITION TO THE LIMITED WARRANTY IN THIS LIMITED PRODUCT WARRANTY STATEMENT.
Disclaimer of Limited Warranties
TO THE FULLEST EXTENT PROVIDED BY APPLICABLE LAW, EXCEPT AS WARRANTED IN THIS LIMITED PRODUCT WARRANTY POLICY, AROVAST CORPORATION PROVIDES THE PRODUCTS YOU PURCHASE FROM AROVAST CORPORATION "AS IS" AND AROVAST CORPORATION HEREBY DISCLAIMS ALL WARRANTIES OF ANY KIND, WHETHER EXPRESS OR IMPLIED, STATUTORY, OR OTHERWISE, INCLUDING BUT NOT LIMITED TO ANY WARRANTIES OF MERCHANTABILITY, NON-INFRINGEMENT, AND FITNESS FOR PARTICULAR PURPOSE.
Limitations of Liability
TO THE FULLEST EXTENT PROVIDED BY APPLICABLE LAW, IN NO EVENT WILL AROVAST CORPORATION, ITS AFFILIATES, OR THEIR LICENSORS, SERVICE PROVIDERS, EMPLOYEES, AGENTS, OFFICERS, OR DIRECTORS BE LIABLE FOR:
(a) DAMAGES OF ANY KIND ARISING OUT OF OR IN CONNECTION WITH PRODUCTS PURCHASED FROM AROVAST CORPORATION IN EXCESS OF THE PURCHASE PRICE PAID BY THE PURCHASER FOR SUCH PRODUCTS, OR
(b) INDIRECT, SPECIAL, INCIDENTAL, CONSEQUENTIAL, OR PUNITIVE DAMAGES EVEN IF AROVAST CORPORATION OR ONE OF ITS SUPPLIERS HAS BEEN ADVISED OF THE POSSIBILITY OR LIKELIHOOD OF SUCH DAMAGES.
AND REGARDLESS OF WHETHER CAUSED BY TORT (INCLUDING NEGLIGENCE), BREACH OF CONTRACT, OR OTHERWISE. OUR LIABILITY SHALL UNDER NO CIRCUMSTANCES EXCEED THE ACTUAL AMOUNT PAID BY YOU FOR THE DEFECTIVE PRODUCT, NOR SHALL WE UNDER ANY CIRCUMSTANCES BE LIABLE FOR ANY CONSEQUENTIAL, INCIDENTAL, SPECIAL OR PUNITIVE DAMAGES OR LOSSES, WHETHER DIRECT OR INDIRECT.
EXCEPT AS COVERED BY THIS LIMITED PRODUCT WARRANTY STATEMENT, AROVAST CORPORATION SHALL NOT BE LIABLE FOR COSTS ASSOCIATED WITH THE REPLACEMENT OR REPAIR OF PRODUCTS PURCHASED FROM IT, INCLUDING, BUT NOT LIMITED TO, LABOR, INSTALLATION, OR OTHER COSTS INCURRED BY THE USER AND, IN PARTICULAR, ANY COSTS RELATING TO THE REMOVAL OR REPLACEMENT OF ANY PRODUCT.
OTHER RIGHTS YOU MAY HAVE
SOME JURISDICTIONS DO NOT ALLOW FOR: (1) EXCLUSION OF IMPLIED WARRANTIES; (2) LIMITATION ON THE DURATION OF IMPLIED WARRANTIES; AND/OR (3) EXCLUSION OR LIMITATION OF INCIDENTAL OR CONSEQUENTIAL DAMAGES; SO THE DISCLAIMERS IN THIS POLICY MAY NOT APPLY TO YOU. IN THESE JURISDICTIONS YOU HAVE ONLY THE IMPLIED WARRANTIES THAT ARE EXPRESSLY REQUIRED TO BE PROVIDED IN ACCORDANCE WITH APPLICABLE LAW. THE LIMITATIONS OF WARRANTIES, LIABILITY, AND REMEDIES APPLY TO THE MAXIMUM EXTENT PERMITTED BY LAW.
ALTHOUGH THIS LIMITED WARRANTY GIVES YOU SPECIFIC LEGAL RIGHTS, YOU MAY HAVE OTHER RIGHTS IN YOUR JURISDICTION. THIS STATEMENT OF LIMITED WARRANTY IS SUBJECT TO APPLICABLE LAWS THAT APPLY TO YOU AND THE PRODUCT. PLEASE REVIEW THE LAWS IN YOUR JURISDICTION TO UNDERSTAND YOUR RIGHTS FULLY.
CHANGES TO THIS POLICY
We may change the terms and availability of this limited warranty at our discretion, but any changes will not be retroactive.
This warranty is made by:
AROVAST CORPORATION
1202 N. Miller St., Suite A
Anaheim, CA 92806
USA
CUSTOMER SUPPORT
If you have any questions or concerns about your new product, please contact our helpful Customer Support Team.
Arovast Corporation
1202 N. Miller St., Suite A
Anaheim, CA 92806
USA
Email: support@levoit.com
Toll-Free: 1-888-726-8520
Support Hours
Mon–Fri, 9:00 am–5:00 pm PST/PDT
*Please have your order invoice PDF or screenshot(s) ready before contacting Customer Support.
text_image
A B C D E F G H I J K L P Q R S T V U M N O W X Y LEVOIT Z AA BBCOMMANDES UTILISATION DE
VOTRE ASPIRATEUR
Bouton marche/arrêt
natural_image
Diagram of a device being inserted into a cylindrical component with an arrow indicating direction (no text or symbols)Image 1.1
natural_image
Diagram of a vacuum cleaner with directional arrows indicating motion (no text or symbols)Image 1.2
Embouts de buse
natural_image
Two mechanical lever diagrams showing force application on a lever (no text or symbols)Image 1.3
natural_image
Two mechanical clamps with a downward arrow indicating compression or disassembly (no text or symbols)Image 1.4
natural_image
Diagram of a device interior showing a door handle, front panel, and internal compartments with a right-handled arrow indicating direction (no text or symbols)Image 2.1
Charger la batterie
natural_image
Diagram of a vacuum cleaner next to an open door, showing the lever mechanism and electrical outlet (no text or symbols present)Image 2.2
SOINS ET ENTRETIEN (SUITE)
natural_image
Line drawing of a Level 1 vacuum cleaner connected to a power outlet (no text or symbols)Image 2.3
natural_image
Diagram showing a device connected to an electrical outlet, with no visible text or symbols.Image 2.4
natural_image
Cross-sectional diagram of a mechanical device with rotating wheels and internal components (no text or symbols)Image 2.5
NETTOYAGE
natural_image
Diagram of a cylindrical device with internal components and directional arrows indicating flow or movement (no text or symbols)Image 3.2
NETTOYAGE (SUITE)
natural_image
Diagram of a handheld device with directional arrows indicating movement or force (no text or symbols)Image 3.3

natural_image
Diagram of a mechanical device with internal components and directional arrow (no text or symbols)Image 3.4
NETTOYAGE (SUITE)
natural_image
Diagram of a Vikrok handheld device with directional arrows indicating motion (no text or symbols)Image 3.5
natural_image
Diagram of a battery pack with a switch and directional arrows indicating motion (no text or symbols)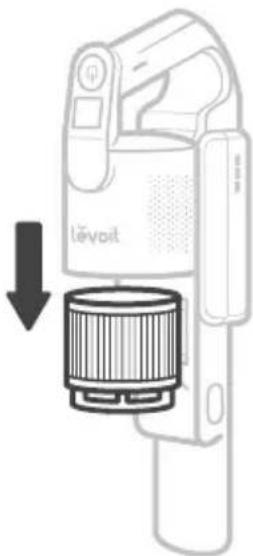
text_image
Lévoit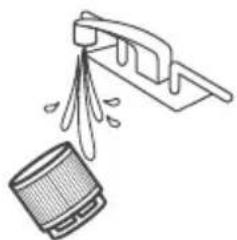
natural_image
Illustration of a kitchen cleaning tool and a trash bin (no text or symbols)Image 3.7
natural_image
Technical line drawing of a mechanical device with a lever and shaft, showing a directional arrow (no text or symbols)Image 3.8