KBSN702MPS - Fridge KITCHENAID - Free user manual and instructions
Find the device manual for free KBSN702MPS KITCHENAID in PDF.

User questions about KBSN702MPS KITCHENAID
0 question about this device. Answer the ones you know or ask your own.
Ask a new question about this device
Download the instructions for your Fridge in PDF format for free! Find your manual KBSN702MPS - KITCHENAID and take your electronic device back in hand. On this page are published all the documents necessary for the use of your device. KBSN702MPS by KITCHENAID.
USER MANUAL KBSN702MPS KITCHENAID
BUILT-IN SIDE-BY-SIDE OWNER'S MANUAL
MANUEL D'UTILISATION DU RÉFRIGÉRATEUR CÔTE
À CÔTE ENCASTRÉ
Table of Contents/Table des matières
REFRIGERATOR SAFETY....2
Refrigerator Safety 2
MODEL 4
Models 4
MAINTENANCE AND CARE 5
Cleaning 5
Changing LED Module....5
Refrigeration Shelves and Door Bins....5
Sabbath and Vacation Care....7
INSTALLATION REQUIREMENTS....8
Tools and Parts 8
Location Requirements 8
Electrical Requirements 9
Water Supply Requirements....9
Tipping Radius 10
Product Dimensions 10
Door Swing Dimensions 12
Overlay Series Door Panel and Cabinetry Clearance 13
Overlay Series Custom Panels and Handle Kits.... 15
Stainless Series Custom Side Panels.... 16
INSTALLATION INSTRUCTIONS 17
Unpack the Refrigerator 17
Connect the Water Supply 18
Plug in Refrigerator 20
Move Refrigerator to Final Location 20
Level and Align Refrigerator 21
Install Overlay Series Custom Panels.... 21
Adjust Doors 22
Install Side Panel 23
Install Base Grille 23
Install Odor Absorber (on some models) 23
Complete Installation 24
Water System Preparation 24
REFRIGERATOR FEATURES.... 25
Water and Ice Dispensers 25
Ice Maker and Storage Bin.... 27
Setting Liters and Ounces.... 28
Measured Fill 28
Water Filtration System 28
Freezer Shelves 30
PERFORMANCE DATA SHEET 31
Performance Data Sheet 31
SÉCURITÉ DU RÉFRIGÉRATEUR 33
Your safety and the safety of others are very important.
We have provided many important safety messages in this manual and on your appliance. Always read and obey all safety messages.

This is the safety alert symbol.
This symbol alerts you to potential hazards that can kill or hurt you and others.
All safety messages will follow the safety alert symbol and either the word "DANGER" or "WARNING." These words mean:
DANGER
WARNING
You can be killed or seriously injured if you don't immediately follow instructions.
You can be killed or seriously injured if you don't follow instructions.
All safety messages will tell you what the potential hazard is, tell you how to reduce the chance of injury, and tell you what can happen if the instructions are not followed.
IMPORTANT SAFETY INSTRUCTIONS
WARNING: To reduce the risk of fire, electric shock, or injury to persons when using your appliance, follow basic precautions, including the following:
■ Children should be supervised to ensure that they do not play with the appliance.
■ This appliance is not intended for use by persons (including children) with reduced physical, sensory, or mental capabilities, or lack of experience and knowledge, unless they have been given supervision or instruction concerning use of the appliance by a person responsible for their safety.
■ Do not use an extension cord.
If power supply cord is damaged, it must be replaced by the manufacturer, its service agent, or a similarly qualified person in order to avoid a hazard.
■ Connect to potable water supply only.
■ This appliance is intended to be used in household and similar applications such as: staff kitchen areas in shops, offices, and other working environments; farm houses and by clients in hotels, motels, and other residential-type environments; bed and breakfast-type environments; and catering and similar non-retail applications.
■ Do not store explosive substances such as aerosol cans with a flammable propellant in this appliance.
■ Do not use replacement parts that have not been recommended by the manufacturer (e.g., parts made at home using a 3D printer).
- Keep ventilation openings, in the appliance enclosure or in the built-in structure, clear of obstruction.
■ Do not use mechanical devices or other means to accelerate the defrosting process, other than those recommended by the manufacturer.
■ Do not damage the refrigerant circuit.
■ Do not use electrical appliances inside the food storage compartments of the appliance, unless they are of the type recommended by the manufacturer.
■ Ice maker kit can be added to some models. See serial tag inside the food compartment of appliance for ice maker kit model information.
■ A qualified service technician must install the water line and ice maker. See installation instructions supplied with ice maker kit for complete details.
SAVE THESE INSTRUCTIONS
WARNING
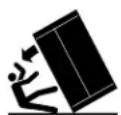
Tip Over Hazard
Refrigerator is top heavy and tips easily when not completely installed.
Keep doors taped closed until refrigerator is completely installed.
Use two or more people to move and install refrigerator.
Failure to do so can result in death or serious injury.
Proper Disposal of Your Old Refrigerator
WARNING: Risk of child entrapment. Before you throw IMPORTANT: Child entrapment and suffocation away your old refrigerator or freezer: are not problems of the past. Junked or
■ Take off the doors.
■ Leave the shelves in place so that children may not easily climb inside.
WARNING
Suffocation Hazard
Remove doors or lid from your old appliance.
Failure to do so can result in death or brain dan
IMPORTANT: Child entrapment and suffocation are not problems of the past. Junked or abandoned refrigerators are still dangerous, even if they will sit for "just a few days." If you are idd of your old refrigerator, please follow these instructions to help prevent accidents.
Important information to know about disposal of refrigerants:
Dispose of refrigerator in accordance with federal and local regulations. Refrigerants must be evacuated by a licensed, EPA-certified refrigerant technician in accordance with established age procedures.
MODEL
Models
Side by Side Non-Dispensing Refrigerators
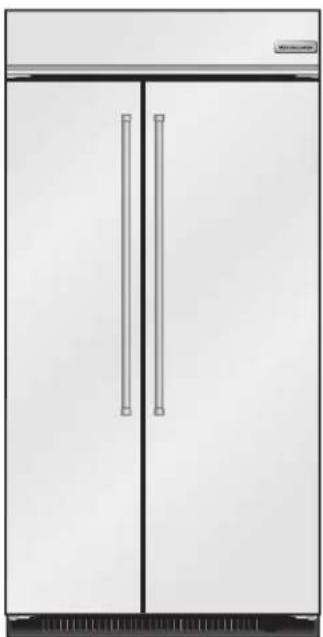
natural_image
Front view of a stainless steel double-door refrigerator with two vertical doors and horizontal handles (no visible text or symbols)Stainless Series
This series provides a warm commercial-looking built-in refrigerator.
KBSN702MPS, KBSN708MPS
Side by Side Dispensing Refrigerators
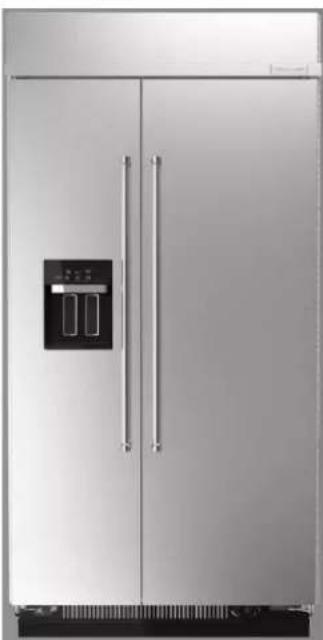
natural_image
Exterior view of a modern stainless steel double-door refrigerator with front panel and side door (no visible text or symbols)Stainless Series
This series provides a warm commercial-looking built-in refrigerator.
KBSD706MPS, KBSD702MPS, KBSD708MPS, KBSD708MBS
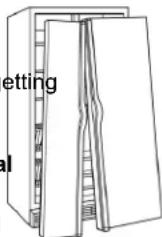
natural_image
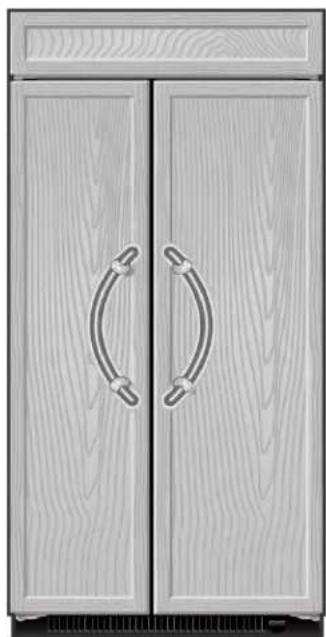
Illustration of a pair of wooden cabinets with curved handle handles (no text or symbols)Overlay Series
Features factory-installed, overlay style trim to provide a "frameless" look. This series requires the installation of custom panels, handles, and standoffs.
KBSN702MPA, KBSN708MPA
MAINTENANCE AND CARE
Cleaning
WARNING
Explosion Hazard
Risk of Fire or Explosion.
Flammable Refrigerant Used.
Do Not Use Mechanical Devices to Defrost Refrigerator.
Do Not Puncture Refrigerant Tubing.
Both the refrigerator and freezer sections defrost automatically. However, clean both sections about once a month to avoid buildup of odors. Wipe up spills immediately.
To Clean Your Refrigerator:
- Remove the top grille. See "Power On/Off Switch."
- Press the power switch to OFF.
- Remove all removable parts from inside, such as shelves, crispers, etc.
- Hand wash, rinse, and dry removable parts and interior surfaces thoroughly. Use a clean sponge or soft cloth and a mild detergent in warm water.
■ Do not use abrasive or harsh cleaners such as window sprays, scouring cleansers, flammable fluids, cleaning waxes, concentrated detergents, bleaches or cleansers containing petroleum products on plastic parts, interior and door liners or gaskets. Do not use paper towels, scouring pads, or other harsh cleaning tools. These can scratch or damage materials.
■ To help remove odors, you can wash interior walls with a mixture of warm water and baking soda (2 tbs to 1 qt [26 g to 0.95 L] of water).
- Wash stainless steel and painted metal exteriors with a clean sponge or soft cloth and a mild detergent in warm water. Do not use abrasive or harsh cleaners, or cleaners containing chlorine. Dry thoroughly with a soft cloth.
NOTE: To keep your Stainless Steel refrigerator looking like new and to remove minor scuffs or marks, it is suggested that you use the manufacturer's approved Stainless Steel Cleaner and Polish.
IMPORTANT: This cleaner is for stainless steel parts only. Do not allow the Stainless Steel Cleaner and Polish to come into contact with any plastic parts such as the trim pieces, dispenser covers or door gaskets. If unintentional contact does occur, clean plastic part with a sponge and mild detergent in warm water. Dry thoroughly with a soft cloth. To order the cleaner, see "Accessories."
- Press the power switch to ON.
- Replace the top grille. See "Power On/Off Switch."
Condenser Cleaning
WARNING
Explosion Hazard
Risk of Fire or Explosion due to Puncture of Refrigerant Tubing;
Follow Handling Instructions Carefully.
Flammable Refrigerant Used.
There is no need for routine condenser cleaning in normal home operating environments. If the environment is particularly greasy or dusty or there is significant pet traffic in the home, the condenser should be cleaned every 6 months to ensure maximum efficiency.
- Unplug refrigerator or disconnect power.
- Remove the base grille.
- Use a vacuum cleaner with a soft brush to clean the grille, the open areas behind the grille, and the front surface area of the condenser.
- Replace the base grille when finished.
- Plug in refrigerator or reconnect power.
NOTE: If you are unable to clean the condenser, please call for service.
Changing the LED Module
IMPORTANT: The lights in both the refrigerator and freezer compartments use LED technology. If the lights do not illuminate when the door or drawer is opened, call for assistance or service. Refer to the Quick Start Guide for contact information. If an LED module(s) do not illuminate when the refrigerator and/or freezer door is opened, call for assistance or service.
Refrigeration Shelves and Door Bins
Important information to know about glass shelves and covers:
Do not clean glass shelves or covers with warm water when they are cold. Shelves and covers may break if exposed to sudden temperature changes or impact, such as bumping. Tempered glass is designed to shatter into many small, pebble-size pieces. This is normal. Glass shelves and covers are heavy. Use both hands when removing them to avoid dropping.
The shelves in your refrigerator are adjustable to match your individual storage needs.
Storing similar food items together in your refrigerator and adjusting the shelves to fit different heights of items will make finding the exact item you want easier. It will also reduce the amount of time the refrigerator door is open, and save energy
Door Bins
Gallon door bin holds gallon containers, shallow bins hold 2 L bottles and small items bin holds items that can get lost on shelves. All are removable for easy cleaning.
Small Items Bin
NOTE: Proper placement of bin is on top spot of door to avoid items from falling out during opening and closing of door.
- Install the Small Items Bin in top spot of door and push down to secure.
Reach under the tray with both hands and lift gently upward until front of shelf is free. Tilt the shelf at an angle and remove the shelf from the refrigerator.
To remove and replace the small items bin:
- Remove bin by lifting it up and pulling it out.
- Replace bin by sliding it in above the desired support and pushing down until it stops.
- Install the Small Items Bin in the top spot of the door.
Shallow Door Bins
To remove and replace the shallow door bin:
- Remove bin by lifting up and pulling out.
- Replace bin by sliding in above the desired support and pushing down until it stops.
Gallon Door Bin
NOTE: The bin can only be placed on the lower door support.
- Install bin above lowest door support adjustment slot and push down to secure.
To remove and replace the gallon door bin: - Remove the bin by lifting and pulling out.
- Replace the bin by sliding in above the desired support and pushing down until it stops.
Shelves and Shelf Frames
To remove and replace a shelf/frame:
- Remove the shelf/frame by tilting it up at the front and lifting it out of the shelf supports. Pull shelf straight out.
- Replace the shelf/frame by guiding the rear shelf hooks in to the shelf supports. Tilt the front of the shelf up until the rear shelf hooks drop into the shelf supports.
- Lower the front of the shelf and check that the shelf is in position.
natural_image
Diagram showing a foot and arm with a circular inset view of the foot (no text or symbols)Pull Out Tray
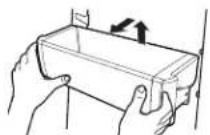
Remove and Replace:
- Remove food from tray.
- Pull drawer out about 4" (10.16 cm).
natural_image
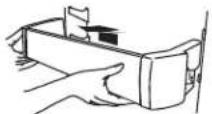
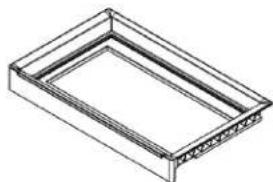
Isometric line drawing of a rectangular frame with internal structural details (no text or symbols)Marinating Pan
To remove and replace Marinating Pan:
- Remove the marinating pan by lifting it up off the brackets. Press the right-hand side of the pan inward until it is free of its bracket. Lower the right-hand side slightly and disengage the left-hand side from its bracket.
- Replace the marinating pan by inserting the left-hand side into its bracket. Press inward on the right-hand side until it will slide past the bracket edge and set it into its bracket.
NOTE: Remove everything that is below (pans/bucket) and above the Marinating Pan before removing it.
For 36"
For 42"
For 48"

natural_image
Line drawing of a tray with two handles and a rectangular tray (no text or symbols)To purchase additional bakeware please visit:
https://www.kitchenaid.com/kitchenware/bakeware.html
Remove and Replace the Top Drawer Cover
- Remove food from Top drawer cover. Pull drawer out about 4" (10.16 cm). Reach under the glass shelf with both hands and lift gently upward until back of shelf is free. Tilt the shelf at an angle and remove the shelf from the refrigerator. Be sure not to bump the glass.
- Replace the cover by holding the glass shelf firmly with both hands, tilt the shelf at an angle and position it above the support rails. Place shelf gently on support rails on side wall.
NOTE:
■ Non Dispenser products have UI just above the drawer with cooling control.
■ The UI for Dispenser products is in the door.
Meat Storage Guide
Store most meat in original wrapping as long as it is airtight and moisture-proof. Rewrap if necessary. See the following chart for storage times. When storing meat longer than the times given, freeze the meat.
Fresh fish or shellfish..... use same day as purchased
Chicken, ground beef, variety meats (liver) 1-2 da
Cold cuts, steaks/roasts 3-5 days
Cured meats.... 7-10 days
Leftovers - Cover leftovers with plastic wrap, aluminum foil, or plastic containers with tight lids.
Crisper and Covers
To remove and replace the crisper:
- Slide the crisper drawer straight out to the stop. Lift the front of the drawer with one hand while supporting the bottom with the other hand. Slide the drawer out the rest of the way. 4.
- To replace the crisper drawer, place the drawer onto slides and push the drawer back until securely in position.
- Test the crisper drawer to make sure it has been replaced properly.
To clean crisper covers:
- To clean the top crisper cover, remove the drawer located above it.
- To clean the bottom crisper cover, first remove the top crisper drawer.
Sabbath and Vacation Care
Sabbath Instructions
Your refrigerator is equipped with the Sabbath Mode feature, which is designed for those whose religious observances require turning off the lights and ice maker.
By selecting this feature:
■ The temperature set points and Deli Pan settings remain unchanged.
■ LEDs from the electronic controls will not display.
■ The Sabbath button will be the only light displaying.
■ Ice and Water will not dispense.
■ No alarm will ring.
■ Interior lights will turn off.
■ The product will not change its behavior by opening the door.
For most efficient refrigerator operation, it is recommended to exit Sabbath mode when it is no longer required.
To fully activate Sabbath Mode, you must follow the instructions below for the control panel.
IMPORTANT: If you do not activate Sabbath Mode in both ways listed below, some functions you wish to disable will remain active.
CONTROL PANEL
In Sabbath Mode, the temperature set points remain unchanged and the interior lights turn off.
- To turn ON the Sabbath Mode, Press the SABBATH button on the dispensing or internal controls and hold for 3 seconds.
- Turn OFF Ice Maker (Refer to the "Ice Maker and Storage Bin" section for further instructions on how to turn the icemaker ON or OFF).
- Press the SABBATH button again for 3 seconds to turn OFF and Sabbath Mode. Turn Ice Maker back ON.
NOTE: If a power outage occurs while in Sabbath Mode the appliance will remain in Sabbath Mode when power returns.
Vacation Care
Vacation
If You Choose to Leave the Refrigerator On While You are Away:
- Use up any perishables and freeze other items.
- If your refrigerator has an automatic ice maker, and is connected to the household water supply, turn off the water supply to the refrigerator. Property damage can occur if the water supply is not turned off.
- If you have an automatic ice maker, turn off the ice maker.
t of ■ Refer to the "Ice Maker and Storage Bin" section for further instructions on how to turn the ice maker ON or OFF.
- Empty the ice bin.
- Set Vacation Mode.
For NON-dispensing units:
- Press Vacation button to turn ON and light displays. Press again to turn OFF.
For dispensing units:
- To turn ON Vacation mode, Hold (max freeze) and (Freezer) button for 3 seconds, the Vacation indicator shows 100% bright and blinks twice and remains ON.
- To turn OFF Vacation mode, Hold (max freeze) and (Freezer) button for 3 seconds, the vacation indicator blinks twice and remains OFF.
NOTE: Activating Vacation mode does not turn off the ice maker.
If You Choose to Turn Off the Refrigerator Before You Leave
- Remove all food from the refrigerator.
- If your refrigerator has an automatic ice maker:
■ Turn off the water supply to the ice maker at least one day ahead of time.
■ When the last load of ice drops, raise the wire shutoff arm to the Off (up) position or press the switch to Off, depending on your model.
- Empty the ice bin.
- Depending on your model, turn the Thermostat Control (or Refrigerator Control) to OFF. See "Using the Controls".
- Clean refrigerator, wipe it, and dry well.
- Tape rubber or wood blocks to the tops of both doors to prop them open far enough for air to get in. This stops odor and mold from building up.
INSTALLATION REQUIREMENTS
Tools and Parts
IMPORTANT:
■ Installer: Leave Installation Instructions with the homeowner.
■ Homeowner: Keep Installation Instructions for future reference. Save these Installation Instructions for the local electrical inspector's use.
Tools Needed
Gather the required tools and parts before starting installation. Read and follow the instructions provided with any tools listed here.
■ Cordless drill ■ Torx® †T27 screwdriver
■ Drill bits ■ 11/32" nut driver
■ Adjustable wrenches (2) ■ Appliance dolly
■ Phillips screwdriver ■ 5/32" hex key
■ Small level ■ Utility knife
■ 3/8" and 1/2" open-end ■ Tape measure wrenches
■ 1/4" and 5/16" socket drivers
Parts Needed
■ #8 x 3" (7.6 cm) wood screws (longer screws may be needed) (6)
■ 2" x 4" x 32" (5 cm x 10 cm x 81 cm) wood board(s) (1 or 2)
■ Make custom panels or consult a qualified cabinetmaker or carpenter to make the panels.
Overlay Series: Make custom panels, or consult a qualified cabinetmaker or carpenter to make the panels. See "Overlay Series Custom Panels and Handle Kits" for more information. Stainless is shipped complete.
If you are connecting the water line directly to copper tubing and not to a shutoff valve, you need a ferrule, a union, and a 1/4" (6.35 mm) compression fitting.
Location Requirements
WARNING

Explosion Hazard
Keep flammable materials and vapors, such as gasoline, away from appliance.
Use nonflammable cleaner.
Failure to do so can result in death, explosion, or fire.
IMPORTANT: This refrigerator is designed for indoor, household use only.
This appliance is intended to be used in household and similar applications such as:
†TORX is a trademark of Acument Intellectual Properties, LLC.
■ Staff kitchen areas in shops, offices and other working environments.
■ Farm houses and by clients in hotels, motels and other residential type environments.
■ Bed and breakfast type environments.
■ Catering and similar non-retail applications.
■ Observe all governing codes and ordinances.
■ It is recommended that you do not install near an oven, radiator, or other heat source.
■ Do not install in a location where the temperature will fall below 55^ F ( 13^ C).
■ Floor must support the refrigerator weight, more than 600 lbs (272 kg), door panels and contents of the refrigerator. Flooring under refrigerator must be at same level as the room. Face of cabinetry must be plumb.
■ Ceiling height must allow for side tipping radius. See “Tipping Radius.”
■ Location should permit door to open fully. See "Door Swing Dimensions."
■ Location must permit top grille removal. See “Opening Dimensions.”
Opening Dimensions
■ To avoid tipping during use, the solid soffit must be within 1" (2.5 cm) maximum above the refrigerator. If the solid soffit is higher than 1" (2.5 cm) or one is not available, then the refrigerator must be braced.
If anti-tip boards are needed, they must be installed to the rear wall studs so that the bottom of the anti-tip board is
84" (213.4 cm) from the floor. See "Install Anti-Tip Boards" for more information.
IMPORTANT
■ NOTES:
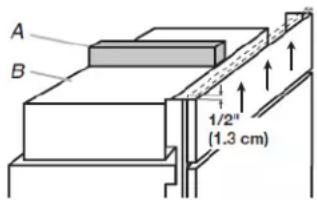
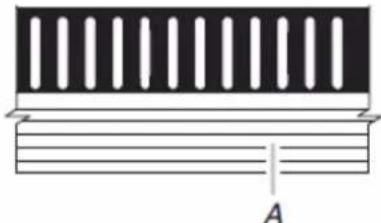
- A clearance of 1/2" (1.3 cm) must be maintained above the top grille in order for the top grille to be removed.
- Do not remove the foam gasket from the top of the compressor cover unless removal is necessary to fit the unit under a soffit. Removal of the gasket will cause loss in cooling efficiency.
- If installing under a solid soffit, after, installation raise the leveling legs so that the gasket is pressed snugly against the soffit.
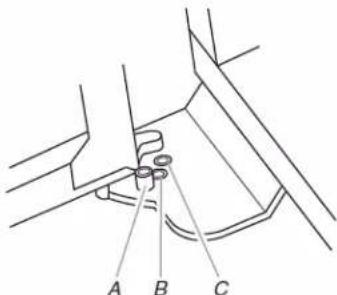
text_image
A B 1/2" (1.3 cm)A. Gasket
B. Compressor cover
A grounded 3 prong electrical outlet should be located within a specified number of inches from the right-hand side cabinets or end panel. See the chart following the graphic for the number of inches required for your model. For more information, see "Electrical Requirements."
■ The water shutoff should be located in the base cabinet on either side of the refrigerator or some other easily accessible area. If the water shutoff valve is not in the cabinets, the plumbing for the water line can come through the floor. See "Water Supply Requirements" for more information.
text_image
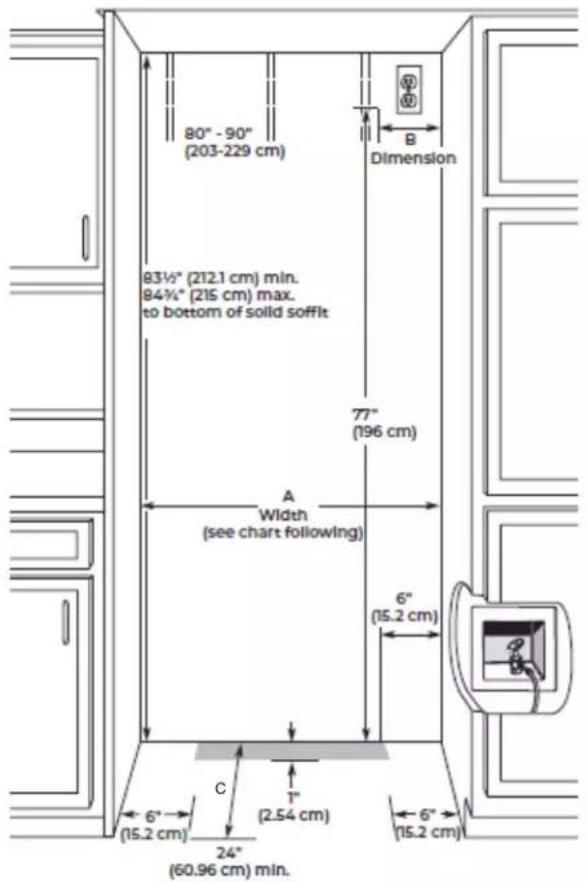
80" - 90" (203-229 cm) Dimension 83½" (212.1 cm) min. 84¾" (215 cm) max. to bottom of solid soffit 77" (196 cm) A Width (see chart following) 6" (15.2 cm) 6" (15.2 cm) C 1" (2.54 cm) 24" (60.96 cm) min.| Model Width A (as shown above) | Dimension B (as shown above) | |
| 36 | 35^1/2 " to 35^3/4" (90.2 cm to 90.8 cm) | 4" (10.2cm) |
| 42 | 411/2" to 413/4"(105.4 cm to 106.1 cm) | 7^1/2" (19.1 cm) |
| 48 | 471/2" to 473/4"(120.7 cm to 121.3 cm) | 13^1/2" (34.3 cm) |
NOTE: Flooring under appliance must be at same level as the room Face of cabinetry must be plumbed.
| Installation Type Depth C (as shown above) | |
| Standard Flush (new installation) | 25" (63.5 cm) minimum |
| Retrofit Installations 24" (60.9 cm) | minimum |
NOTE: On retrofit installations, door panels will not be flush with adjacent cabinets.
Electrical Requirements
WARNING

Electrical Shock Hazard
Plug into a grounded 3 prong outlet.
Do not remove ground prong.
Do not use an adapter.
Do not use an extension cord.
Failure to follow these instructions can result in death, fire, or electrical shock.
Before you move your refrigerator into its final location, it is important to make sure you have the proper electrical connection.
If the supply cord is damaged, it must be replaced by the manufacturer or its service agent or a similarly qualified person. Do not use a cord that shows cracks or abrasion damage along its length or at either the plug or connector end.
Recommended Grounding Method
A 115 V, 60 Hz AC only 15 A or 20 A fused, grounded electrical supply is required. It is recommended that a separate circuit serving only your refrigerator and approved accessories be provided. Use an outlet that cannot be turned off by a switch. Do not use an extension cord.
IMPORTANT: If this product is connected to a GFCI (Ground Fault Circuit Interrupter) protected outlet, nuisance tripping of the power supply may occur, resulting in loss of cooling. Food quality and flavor may be affected. If nuisance tripping has occurred, and if the condition of the food appears poor, dispose of the food.
NOTE: Before performing any type of installation or cleaning, remove the top grille and turn the master power switch to OFF or disconnect power at the circuit breaker box. When you are finished, turn ON the master power switch or reconnect power at the circuit breaker box. Then reset the control to the desired setting.
Water Supply Requirements
IMPORTANT:
■ All installations must meet local plumbing code requirements.
■ Connect to potable water supply only.
■ There is not enough clearance to achieve a flush installation if a water shutoff valve is located in the wall behind the refrigerator.
■ The water shutoff should be located in the base cabinet on either side of the refrigerator or some other easily accessible area. The right-hand side is recommended. The access hole through the cabinet must be within 1/2" (1.3 cm) of the rear
NOTE: If the water shutoff valve is in the back wall behind refrigerator, it must be at an angle so that the tube is not k when the refrigerator is pushed into its final location.
text_image
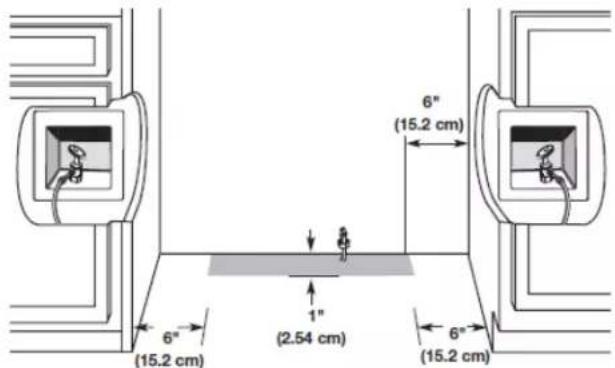
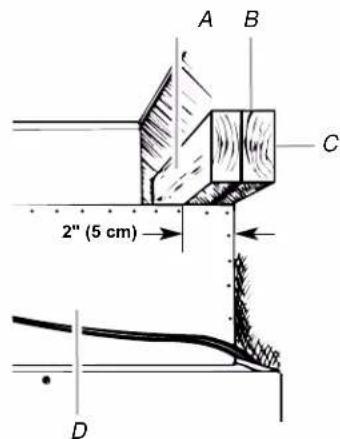
6" (15.2 cm) 6" (15.2 cm) 1" (2.54 cm) 6" (15.2 cm)If the water shutoff valve is not in the cabinets, the plumbing for the water line can come through the floor. A 1/2" (12.7 mm) hole for plumbing should be drilled at least 6" (15.2 cm) from the right-hand or left-hand side cabinet or panel. On the floor, the hole should be no more than 1" (2.54 cm) away from the back wall. See "Connect the Water Supply."
If additional tubing is needed, use copper tubing and check for leaks. Install the copper tubing only in areas where the household temperatures will remain above freezing.
If additional tubing is needed, use copper tubing and check for leaks. Install the copper tubing only in areas where the household temperatures will remain above freezing.
■ Do not use a piercing-type or 3/16" (4.76 mm) saddle valve which reduces water flow and also clogs more easily.
NOTE: Your refrigerator dealer has a kit available with a 1/4" (6.35 mm) saddle-type shutoff valve, a union, and copper tubing. Before purchasing, make sure a saddle-type valve complies with your local plumbing codes.
Water Pressure
A cold water supply with water pressure between 30 psi and 120 psi (207 kPa and 827 kPa) is required to operate the water dispenser and ice maker. If you have questions about your water pressure, call a licensed, qualified plumber.
NOTE: If the water pressure is less than what is required, the flow of water from the water dispenser could decrease or ice cubes could be hollow or irregular shaped. If you have questions about your water pressure, call a licensed, qualified plumber.
Reverse Osmosis Water Supply
IMPORTANT: The pressure of the water supply coming out of a reverse osmosis system going to the water inlet valve of the refrigerator needs to be between 30 psi and 120 psi (207 kPa and 827 kPa).
If a reverse osmosis water filtration system is connected to your cold water supply, the water pressure to the reverse osmosis system needs to be a minimum of 40 psi to 60 psi (276 kPa to 414 kPa).
If the water pressure to the reverse osmosis system is less than 40 psi to 60 psi (276 kPa to 414 kPa):
■ Check to see whether the sediment filter in the reverse osmosis system is blocked. Replace the filter if necessary.
■ Allow the storage tank on the reverse osmosis system to refill after heavy usage.
If your refrigerator has a water filter, it may further reduce the water pressure when used in conjunction with a reverse osmosis system. Remove the water filter cartridge.
If you have questions about your water pressure, call a licensed, qualified plumber.
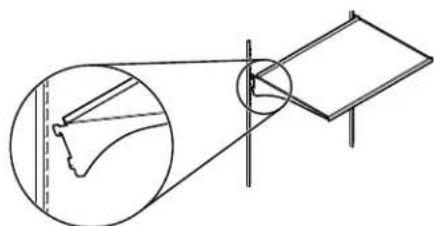
the Tipping Radius
Be sure there is adequate ceiling height to stand the refrigerator upright when it is moved into place.
■ Be sure there is adequate ceiling height to stand the refrigerator upright when it is moved into place.
■ If needed, the tipping radius can be reduced. See "Reduce Tipping Radius."
Side Tipping Radius
The side tipping radius varies depending upon the width of the model. Use the chart provided to determine the side tipping radius.
NOTE: Tip on side only.

natural_image
Diagram showing a curved dashed arc and a rectangular block with labeled distance 'A' (no text or symbols beyond labels)| Model | Tipping | Radius |
| 36 | 90^1/2 (106 cm) | |
| 42 | 93" (236.2 cm) | |
| 48 | 96" (243.8 cm) |
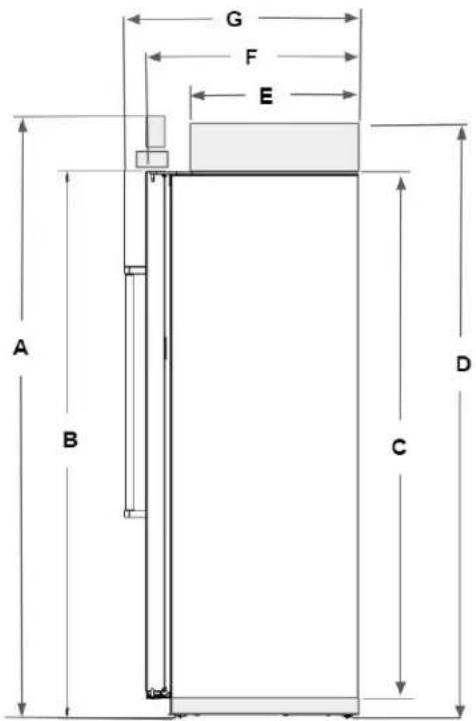
Product Dimensions
Front View
■ Width dimensions were measured from trim edge to trim edge.
■ Height dimensions are shown with leveling legs extended 1/8" (3 mm) below the rollers.
text_image
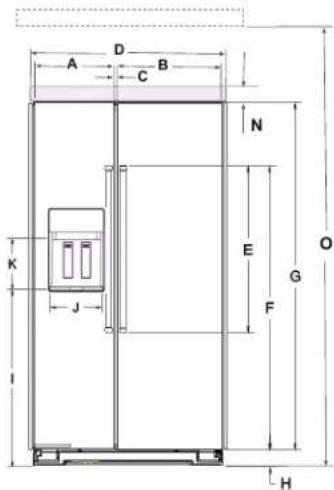
A D B C N E G O K J F H| Description | Inches | cm | |
| A | Width of FC door | ||
| 36" | 1512 | 38.1 | |
| 42" | 1712 | 44.4 | |
| 48" | 20 | 50.8 | |
| B | Width of RC door | ||
| 36" | 20 | 50.8 | |
| 42" | 23 | 59.7 | |
| 48" | 27 | 68.6 | |
| C | Space between doors | 1/4 0.65 | |
| D | Overall width with band | ||
| 36" | 36316 | 91.9 | |
| 42" | 42316 | 107.2 | |
| 48" | 48316 | 122.4 | |
| F | Height of door handles | 39116 | 99.3 |
| E | Height to top of door handles | 60916 | 153.8 |
| G | Height of doors | 701516 | 180.2 |
| H | Height of grille | 3916 | 9.0 |
| I | Height to bottom of the dispenser | 38516 | 97.3 |
| J | Width of Dispenser | 9316 | 23.3 |
| K | Height of Dispenser | 71116 | 19.5 |
| L | Water line location distance from side | 1734 | 45.0 |
| M | Water line location distance from front | 314 | 8.2 |
| N | Height of grille (top) | 818 | 22.6 |
| O | To bottom of solid soffit (minimum & maximum) | 8312 8458 | 212.1215 |
When leveling legs are fully extended to 1¼" (3.2 cm) below rollers, add 1½" (2.9 cm) to the height dimensions.
Side View
■ The depth from the front of the top grille to the back of the refrigerator cabinet is 2538 " (64.5 cm).
■ The power cord is 84" (213 cm) long.
■ Height dimensions are shown with leveling legs extended 1/8" (3 mm) below the rollers.
text_image
G F E A B C D| Description Inches | cm | ||
| A | Total height | 83^3/_8 | 211.8 |
| B | Height to top of doors | 74^1/_2 | 189.2 |
| C | Height of Cabinet | 71 180.4 | |
| D | Height to top of machine compartment cover | 83^3/_16 | 211.3 |
| E | Depth to machine compartment cover | 19^15/_16 | 50.6 |
| F | Depth with doors | 25 63.5 | |
| G | Depth with handles | 27^11/_16 | 70.4 |
| Interior dimensions | Width Height | |||
| Inches | cm | Inches | cm | |
| Refrigerator Compartment | ||||
| 36" 17 | 5/_16 | 44.0 | ||
| 13/_16 | 52.9 | 67^1/_16 | 170.442" 20 | |
| 48" 24 | 5/_16 | 61.8 | ||
| Freezer Compartment | ||||
| 36" 11 | 13/_16 | 30.0 | ||
| 5/_16 | 36.4 | 66^3/_4 | 169.642" 14 | |
| 48" 16 | 13/_16 | 42.7 | ||
When leveling legs are fully extended to 1¼" (3.2 cm) below rollers, add 1½" (2.9 cm) to the height dimensions.
Door Swing Dimensions
The location must permit both doors to open to a minimum of 90°. Allow 5" (12.7 cm) minimum space between the side of the refrigerator and a corner wall.
NOTE: More clearance may be required if you are using overlay panels, custom handles, or extended handles on a Classic model.
To adjust the door swing, see "Adjust Doors."
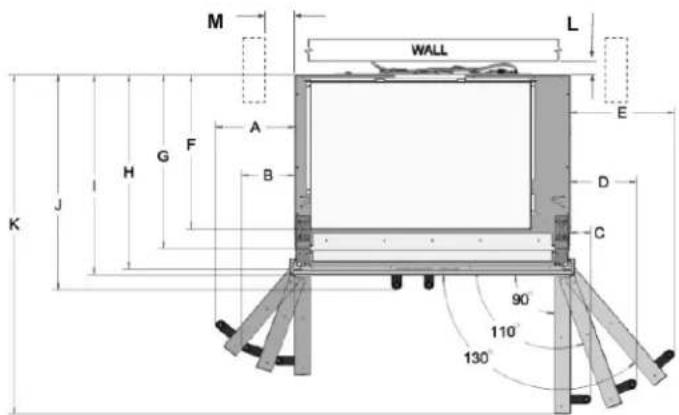
text_image
M WALL L A B H G F J K E D C 90° 110° 130°| Description | Inches | cm | |
| A | Width from FC side of refrigerator to handle - door open 130° | 10 | 25.4 |
| 11^5/_8 | 29.5 | ||
| 13^1/_4 | 33.6 | ||
| B | Width from FC side of refrigerator to handle - door open 110° | 6^3/_4 | 17.1 |
| 7^5/_8 | 19.3 | ||
| 8^7/_16 | 21.5 | ||
| C | Width from FC side of refrigerator to handle - door open 90° | 2^11/_16 | 6.8 |
| D | Width from RC side of refrigerator to handle - door open 110° | 8^7/_16 | 21.5 |
| 9^5/_8 | 24.5 | ||
| 10^7/_8 | 27.6 | ||
| E | Width from RC side of refrigerator to handle - door open 130° | 13^1/_4 | 33.6 |
| 15^1/_2 | 39.3 | ||
| 17^3/_4 | 45.1 | ||
| F | Depth to machine compartment cover | 19^15/_16 | 50.6 |
| G | Depth without doors | 22^3/_8 | 56.8 |
| H | Depth with doors | 25 63.5 | |
| I | Depth with top grill | 25^13/_16 | 65.5 |
| J | Depth with handles | 27^11/_16 | 70.4 |
| K | Depth with RC door open 90° | 43^3/_4 | 111.1 |
| 47^3/_16 | 119.9 | ||
| 50^11/_16 | 128.8 | ||
| L | Space required for water lines and power chord | 1 2.54 | |
| M | Space required for side cabinet | 6 15.24 |
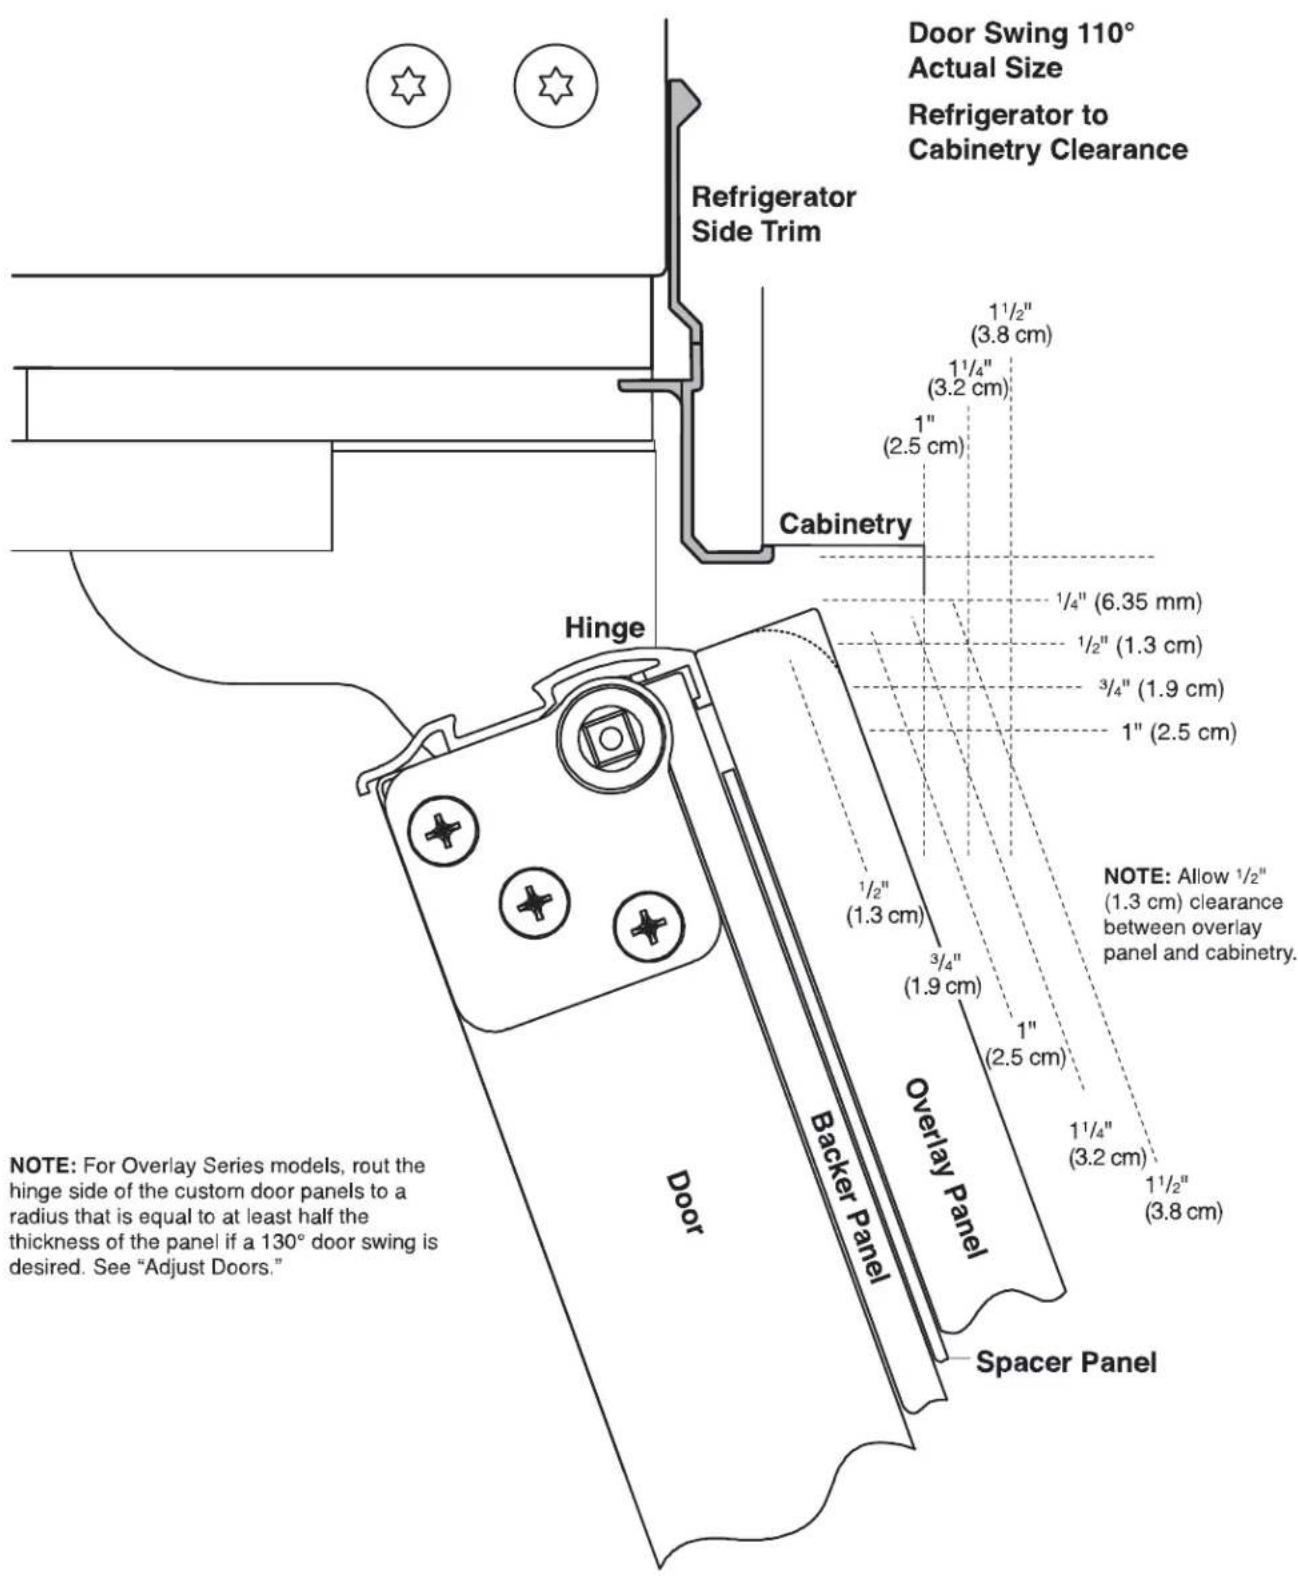
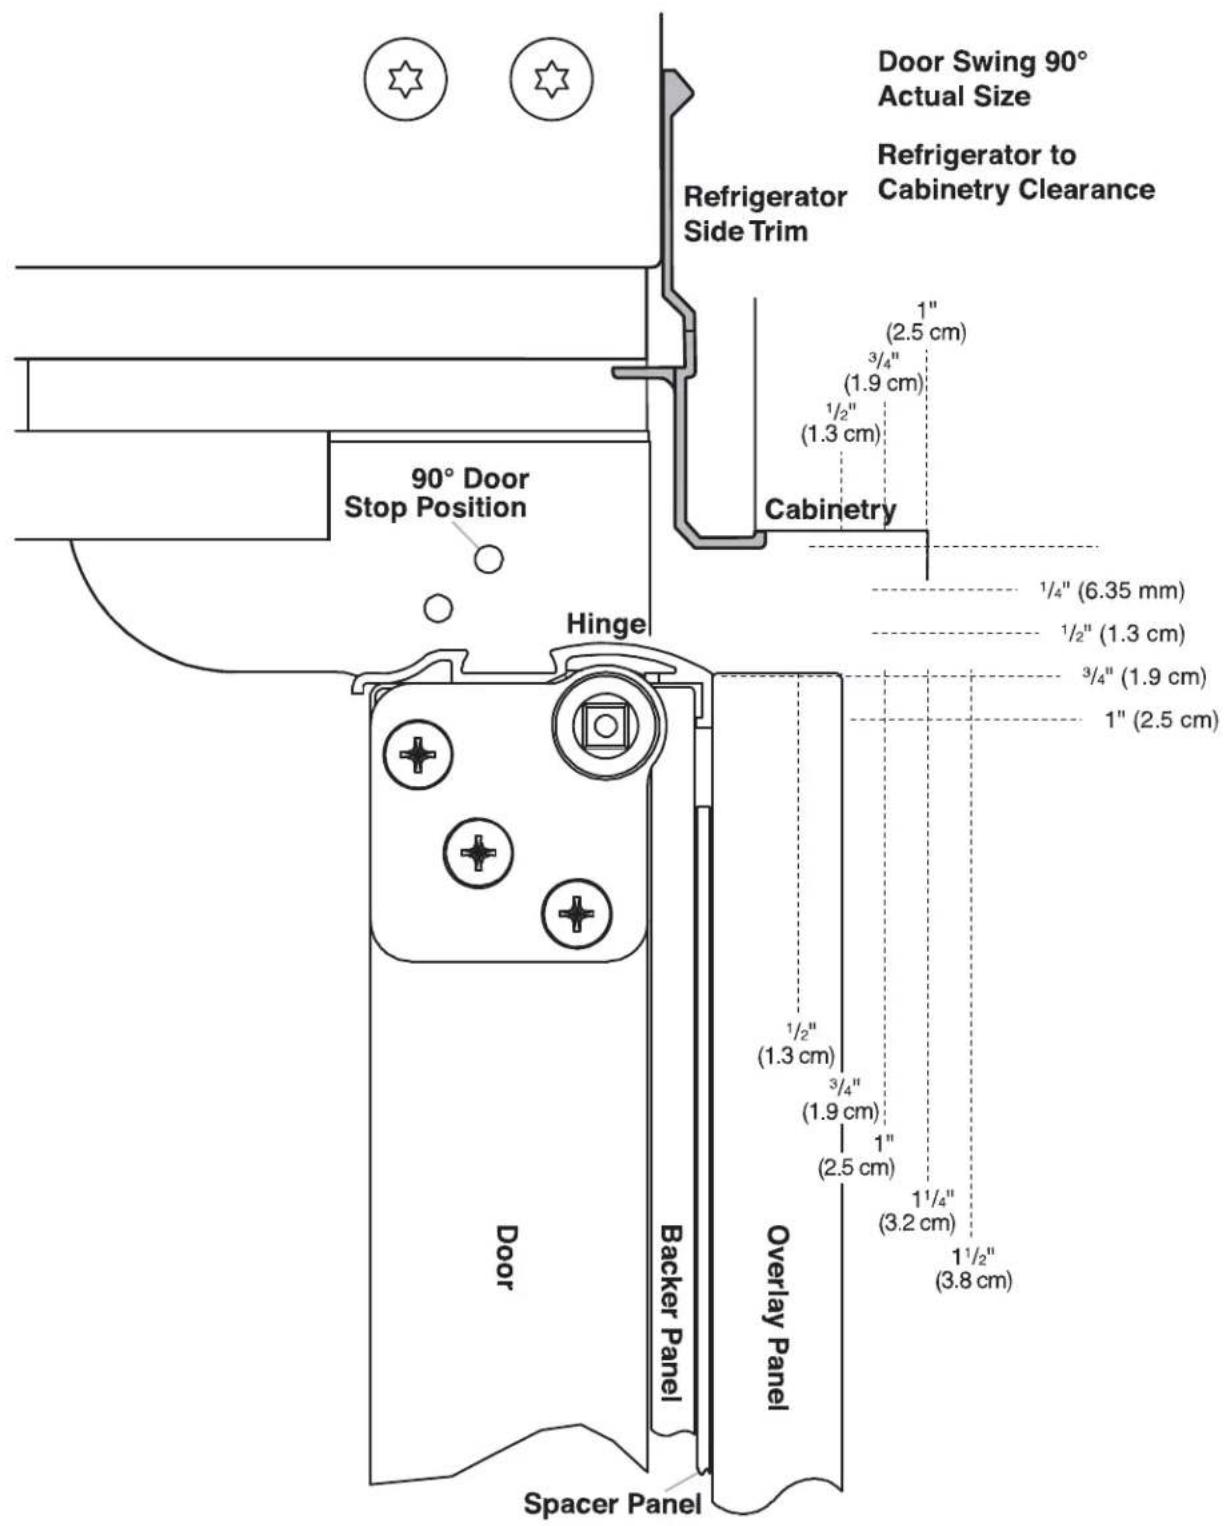
Overlay Series Door Panel and Cabinetry Clearance
The custom door panels and adjacent cabinetry must be designed so that there is sufficient clearance for the doors to swing open. If the refrigerator is to be installed close to the wall, see "Door Swing 90°" on next page.
text_image
Door Swing 110° Actual Size Refrigerator to Cabinetry Clearance Refrigerator Side Trim Cabinetry Hinge 1½" (3.8 cm) 1¼" (3.2 cm) 1" (2.5 cm) 1/4" (6.35 mm) 1/2" (1.3 cm) 3/4" (1.9 cm) 1" (2.5 cm) NOTE: Allow ½" (1.3 cm) clearance between overlay panel and cabinetry. 1/2" (1.3 cm) 3/4" (1.9 cm) 1" (2.5 cm) 1¼" (3.2 cm) 1½" (3.8 cm) Backer Panel Overlay Panel Spacer Panel Door NOTE: For Overlay Series models, rout the hinge side of the custom door panels to a radius that is equal to at least half the thickness of the panel if a 130° door swing is desired. See "Adjust Doors."When the doors are closed the refrigerator will extend beyond the face of the adjacent cabinetry to some degree.
text_image
Door Swing 90° Actual Size Refrigerator to Cabinetry Clearance Refrigerator Side Trim 1" (2.5 cm) 3/4" (1.9 cm) 1/2" (1.3 cm) Cabinetry 90° Door Stop Position Hinge 1/4" (6.35 mm) 1/2" (1.3 cm) 3/4" (1.9 cm) 1" (2.5 cm) 1/2" (1.3 cm) 3/4" (1.9 cm) 1" (2.5 cm) 1/4" (3.2 cm) 1/2" (3.8 cm) Door Backer Panel Overlay Panel Spacer PanelAllow a minimum of 5" (12.7 cm) of space between the side of the refrigerator and a corner wall. More clearance may be needed if thicker custom panels or custom handles are used. Do not overlook baseboards.
Overlay Series Custom Panels and Decorative Overlay Panel Handle Kits
Custom overlay panels allow you to blend the exterior of your refrigerator into the overall kitchen décor, and to use custom handles for additional design flexibility.
The custom panels must have backer panels attached in order to mount them to the refrigerator. It is most common to work with three panels, as shown in the following graphic: a decorative overlay panel, a 1/8" (3.18 mm) spacer panel or spacer strips and a 1/4" (6.35 mm) backer panel.
In some cases, your cabinet manufacturer may choose to work with one panel routed for the different dimensions. Follow these panel dimension and placement instructions to be sure that the custom overlay panels will fit properly.
IMPORTANT:
■ The weight of the refrigerator door overlay panel cannot exceed 50 lbs (23 kg).
■ The weight of the freezer door overlay panel cannot exceed 40 lbs (18.1 kg).
■ The weight of the top grille overlay panel cannot exceed 10 lbs (4.5 kg).
To minimize panel weight, you may use 2" (5.08 cm) spacer strips around the perimeter in place of full-sheet solid spacer panels. The spacer strips must be set in at least 1" (2.54 cm) from the top, bottom and sides edges of the backer panel. If you use spacer strips, it is also recommended that you use two 2" (5.08 cm) strips horizontally centered for added support.

text_image
7 1/4" (18.4 cm) Grille Panel A B 72 1/4" (183.5 cm) Freezer Door Panel (Non-Dispenser) Refrigerator Door Panel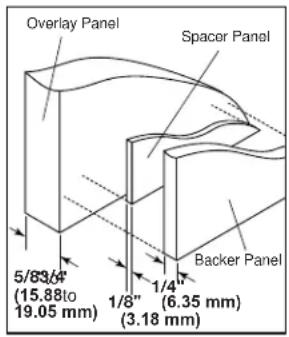
text_image
Overlay Panel Spacer Panel 5/83/4" (15.88 to 19.05 mm) 1/4" (6.35 mm) 1/8" (3.18 mm) Backer Panel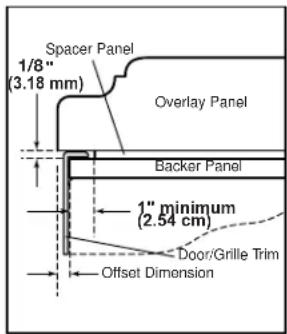
text_image
Spacer Panel 1/8" (3.18 mm) Overlay Panel Backer Panel 1" minimum (2.54 cm) Door/Grille Trim Offset Dimension| Model A B C | |||
| 42 | 17^1/4" (43.82 cm) | 23^1/4" (59.06 cm) | 40^3/4" (103.51 cm) |
| 48 | 19^3/4" (50.17 cm) | 26^3/4" (67.95 cm) | 46^3/4" (118.75 cm) |
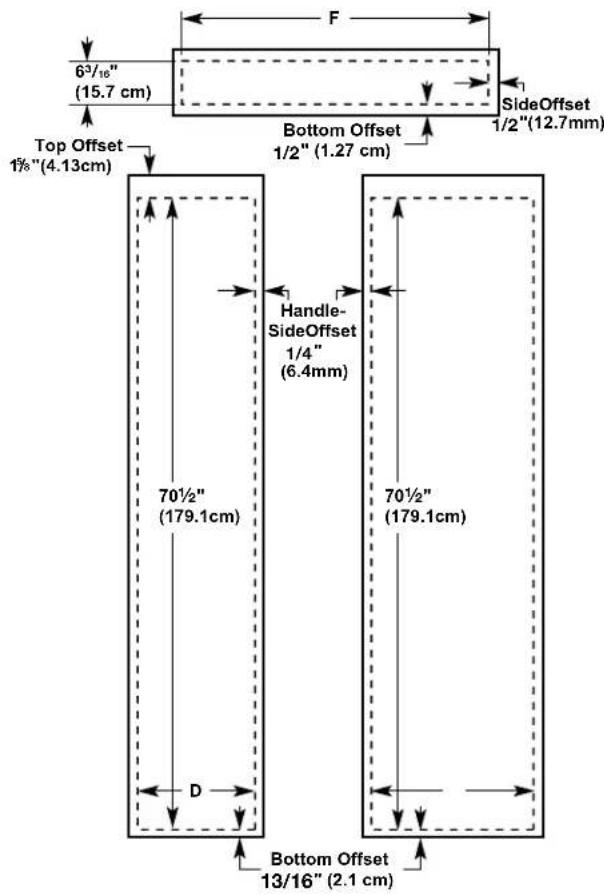
Backer Panels
NOTE:
■ Dashed lines represent placement of backer panels on overlay panels.
■ Illustration shows backer panels placed on decorative overlays.
text_image
6³/₁₆" (15.7 cm) F SideOffset 1/2"(12.7mm) Top Offset 1½"(4.13cm) Bottom Offset 1/2"(1.27 cm) Handle-SideOffset 1/4" (6.4mm) 70½" (179.1cm) 70½" (179.1cm) D Bottom Offset 13/16" (2.1 cm)E
| Model D E F | |||
| 42 | 16^3/_4" (42.55 cm) | 22^3/_4" (57.79 cm) | 39^3/_4" (100.97 cm) |
| 48 | 19^1/_4" (48.90 cm) | 26^1/_4" (66.68 cm) | 45^3/_4" (116.21 cm) |
Overlay Series Door Handle Kits
The following handle style is available. Contact your KitchenAid dealer or KitchenAid Parts and Accessories at 1-800-442-9991. In Canada, call 1-800-807-6777.
Knurl grip handle with chrome endcaps - W10782873
Stainless Series Custom Side Panels
Custom side panels may be needed when not enough space is available to have cabinets on both sides of the refrigerator or when the refrigerator is placed at the end of a cabinet run. You may choose an Inset, Flush, or Recessed Inset panel installation.
Refrigerator and Side Trim Dimensions
The width and height of a side panel are determined by the type of installation you are planning.
NOTE:
■ The dimensions shown are actual product dimensions and may not reflect the needed panel installation dimensions.
■ The side panel should be a minimum of 1/2" (1.27 cm) thick to avoid warping.
■ If the opening depth is 25" (63.5 cm) or more, you may want to install a support board on rear wall.
Refrigerator
text_image
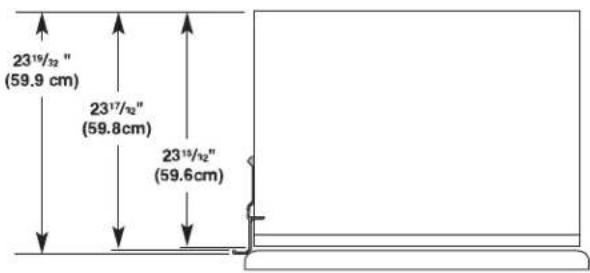
23¹⁹/³²" (59.9 cm) 23¹⁷/³²" (59.8 cm) 23¹⁵/³²" (59.6 cm)
text_image
11/16" (18.0 mm) 1/2" (12.2 mm) 9/16" (13.9 mm) 5/8" (15.7 mm)Inset Installation Dimensions
- Measure the distance from point A (as shown) to the back wall. Add 1/16" (1.6 mm) to this measurement to allow the side panel to fit into the trim.
- If the panel is more than 11/32" (8.7 mm) thick, route the edge to allow the side panel to fit into the trim.
natural_image
Technical line drawing of a wooden bracket joint with labeled section A (no text or symbols beyond label)Recessed Inset Installation Dimensions
- Measure the distance from point A (as shown) to back wall.
- Route the front edge of the support board or attach a 3/8" (9.5 mm) board to hold the panel in the cabinet side trim.
natural_image
Technical line drawing of a wooden plank and bracket assembly (no text or symbols)INSTALLATION INSTRUCTIONS
Unpack the Refrigerator
WARNING

Tip Over Hazard
Refrigerator is top heavy and tips easily when not completely installed.
Keep doors taped closed until refrigerator is completely installed.
Use two or more people to move and install refrigerator.
Failure to do so can result in death or serious injury.
IMPORTANT:
■ Do not remove the film covering until the refrigerator is in its operating location.
■ All four leveling legs must contact the floor to support and stabilize the full weight of the refrigerator.
- Keep the cardboard shipping piece or plywood under the refrigerator until it is installed in the operating location.
- Remove and save the literature package bag taped to the side of the refrigerator and the parts bag behind the grille. Remove the four brackets (two on each side) that attach the shipping base to the refrigerator bottom.
NOTE Do not remove tape and door bracing until the refrigerator is in its final location. - If necessary, reduce the tipping radius. See "Tipping Radius" for ceiling height requirements or "Reduce Tipping Radius" for step-by-step instructions. If you do not need to reduce the tipping radius, proceed to "Move the Refrigerator into House."
Reduce Tipping Radius (If Required)
Before bringing the refrigerator into the home, be sure there is adequate ceiling height to stand the refrigerator upright. See "Tipping Radius" in the "Installation Requirements" section for more information.
If you do not have adequate ceiling height to stand the refrigerator upright, the tipping radius can be reduced by removing the top grille and side trims (see the following chart).
| Model Reduced Tipping Radius | |
| 36 89" (225.9 cm) | |
| 42 90 | ^1/_2 " (229.9 cm) |
| 48 91 | ^1/_4 " (231.8 cm) |
-
Grasp both ends of the top grille.
-
Push the top grille straight up; then pull straight out. Lay grille on a soft surface.
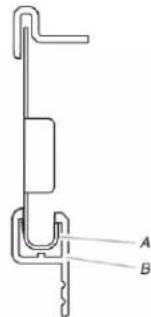
text_image
B A BA. Top grille
B. Cabinet side trim
- Remove the 6 screws attaching each cabinet side trim to the refrigerator and remove the side trims.
Move the Refrigerator into House
WARNING

Tip Over Hazard
Refrigerator is top heavy and tips easily when not completely installed.
Keep doors taped closed until refrigerator is completely installed.
Use two or more people to move and install refrigerator.
Failure to do so can result in death or serious injury.
- Place an appliance dolly under the left side of the refrigerator as shown. Place the corner posts from the packing materials over the trims as appropriate. Slowly tighten the strap. NOTE: Pass the dolly strap under the handles for the Stainless Series.

natural_image
Technical line drawings of two mechanical device assemblies (no text or symbols)-
Place pieces of the shipping carton on the floor when rolling the dolly and refrigerator into the house. Move the refrigerator close to the built-in opening.
-
Place top of cardboard carton or plywood under refrigerator.
-
Stand the refrigerator up. First, place the left bottom edge of the refrigerator on the floor, stand the refrigerator upright and then lower the right-hand side of the refrigerator to the floor.
-
Reassemble the trim and top grille after the dolly has been removed from the refrigerator.
Install Anti-Tip Boards
IMPORTANT:
■ If a solid soffit is not available, anti-tip boards must be installed.
■ It is recommended that boards be installed before the refrigerator is installed.
■ Boards must be long enough to fully cover the width of the compressor cover.
■ Place the boards so that the bottom surfaces of the boards are 84" (213 cm) from the floor.
■ During installation, raise the refrigerator up until the top of the refrigerator is making contact with the bottom of the anti-tip boards. Do not crush the compressor cover when raising the rear leveling legs.
NOTE: The foam gasket, on top of the compressor cover, will compress to fit under the anti-tip board(s). There is no need to trim the gasket.
To Install Anti-tip Boards
- Mark the stud locations on rear wall.
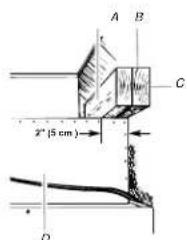
- Securely attach two 2" x 4" x 32" (5 cm x 10 cm x 81 cm) boards to wall studs behind refrigerator. Use six #8 x 3" (7.6 cm) (or longer) wood screws. The wood screws must be screwed into the studs at least 1½" (3.8 cm). The boards must overlap the compressor cover.
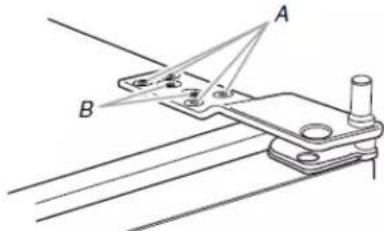
text_image
A B C 2" (5 cm) DA. Center board 1/4" (6.35 mm) max. above refrigerator
B. Two 2" x 4" x 32" (5 cm x 10 cm x 81 cm) boards
C. Attach to studs with six #8 x 3" (7.6 cm) screws
D. Compressor cover
Connect the Water Supply
Read all directions before you begin.
IMPORTANT:
■ If you turn the refrigerator on before the water line is connected, turn the ice maker OFF.
■ Connect to potable water supply only.
Do not use with water that is microbiologically unsafe or of unknown quality without adequate disinfection before or after the system. Systems certified for cyst reduction may be used on disinfected waters that may contain filterable cysts.
Connect to Water Line Parts Needed
■ Minimum 7 ft (2.13 m) flexible, codes-approved water supply line.
Style 1 – Shutoff Valve Connection
NOTE: If your water line connection does not look like Style 1, see "Style 2 — Copper Line Connection."
- Unplug refrigerator or disconnect power supply.
IMPORTANT:
■ There is not enough clearance to achieve a flush installation if a water shutoff valve is located in the wall behind the refrigerator. The water shutoff should be located in the base cabinet on either side of the refrigerator.
■ Before attaching the tubing to shutoff valve, flush the main water supply line to remove particles and air in the water6 line. Allow enough flow so that water becomes clear. Flushing the water line may help avoid filters and/or water valves from becoming clogged.
- Connect the flexible, codes-approved water supply line to the water shutoff valve by threading the provided nut onto the shutoff valve as shown.
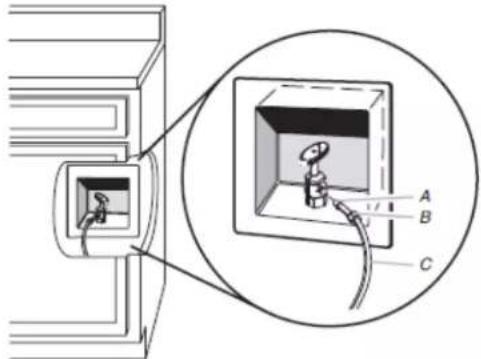
text_image
Diagram showing a device with labeled components A, B, and C, including an inset view of the internal structure.A. Bulb
B. Nut
C. Water tubing
-
Place the end of the tubing into a bucket, and turn shutoff valve ON.
-
Check for leaks. Tighten any nuts or connections (including connections at the valve) that leak.
Style 2 — Copper Line Connection
NOTE: If there is a water supply line that meets the specifications in "Water Supply Requirements," proceed to "Connecting to Refrigerator." If not, use the following instructions to connect to the household cold water supply.
-
Unplug refrigerator or disconnect power.
-
Turn OFF main water supply. Turn ON nearest faucet long enough to clear line of water.
-
Locate a 1/2" to1/4" (1.3 cm to 3.18 cm) vertical cold water pipe near the refrigerator.
IMPORTANT:
■ Make sure it is a cold water pipe.
■ Horizontal pipe will work, but drill on the top side of the NOTE: The flexible, codes-approved water supply line should pipe, not the bottom. This will help keep water away from connect to the supply valve through the floor. the drill and keep normal sediment from collecting in the valve.
-
Determine the length of copper tubing you need. Measure from the connection on the refrigerator to the water pipe. Add 7 ft (2.1 m) to allow for cleaning. Use 1/4" (6.35 mm) O.D. (outside diameter) copper tubing. Be sure both ends of copper tubing are cut square.
-
Using a cordless drill, drill a 1/4" (6.35 mm) hole in the cold water pipe you have selected.
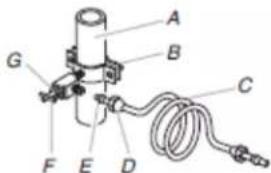
text_image
Labeled diagram of a mechanical device with components A through G and a coiled cableA. Cold water pipe
E. Compression sleeve
B. Pipe clamp
F. Shutoff valve
C. Copper tubing
G. Packing nut
D. Compression nut
Fasten the shutoff valve to the cold water pipe with the pipe clamp. Be sure the outlet end is solidly in the 1/4" (6.35 mm) drilled hole in the water pipe and that the washer is under the pipe clamp. Tighten the packing nut. Tighten the pipe clamp screws slowly and evenly so washer makes a watertight seal.
IMPORTANT: Before attaching the tubing to shutoff valve, flush the main water supply line to remove particles and air in the water line. Allow enough flow so that water becomes clear. Flushing the water line may help avoid filters and/or water valves from becoming clogged.
- Slip the compression sleeve and compression nut on the copper tubing as shown. Insert the end of the tubing into the outlet end squarely as far as it will go. Screw compression nut onto outlet end with adjustable wrench. Do not overtighten the clamp or the sleeve. This will crush the copper tubing.
- Turn off the shutoff valve on the water pipe. Coil the copper tubing.
- Connect the flexible, codes-approved water supply line to the water shutoff valve by threading the provided nut onto the shutoff valve.
- Place the end of the tubing into a bucket, and turn shutoff valve ON.
- Check for leaks around the saddle valve. Tighten any nuts or connections (including connections at the valve) that leak.
Connect to Refrigerator
Parts Supplied
■ 1/4" to 1/4" (6.35 mm to 6.35 mm) male-to-male coupling
text_image
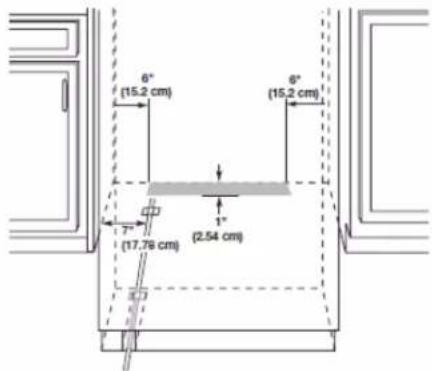
6° (15.2 cm) 6° (15.2 cm) 7° (17.78 cm) (2.54 cm)NOTE: The flexible, codes-approved water supply line should connect to the supply valve through the floor.
- Unplug the refrigerator or disconnect power.
- Connect the 7 ft (2.13 m) flexible codes-approved water tube to the water supply valve.
- Flush the main water supply line to remove particles and air in the water line. Allow enough flow so that water becomes clear.
-
Tape the 7 ft (2.13 m) flexible codes-approved water supply line to the floor, 7" (17.78 cm) from the left side of the refrigerator. Tape along the length of the tubing, which will allow it to pass beneath the refrigerator without interference.
NOTE: Allow a minimum of 26" (66.04 cm) of flexible codes-approved water supply line to be loose at the front of the refrigerator for connecting to the refrigerator. -
Connect the 7 ft (2.13 m) flexible codes-approved water supply line to the refrigerator.
NOTE: If the main water shutoff valve is behind the refrigerator, a secondary water shutoff valve may be installed in line with the water supply line at the front of the product.
Overmould Coupling (on some models)
text_image
Technical diagram showing a mechanical assembly with labeled components A, B, and C, including an inset magnified view of a connector detail.A. Household water line
B. Nut (purchased)
C. Ferrule (purchased)
Discrete Coupling (on some models)
text_image
Technical diagram of a mechanical assembly with labeled components A through G, showing a circular component layout.A. Household water line
E. Bulb
B. Nut (purchased)
F. Nut
C. Ferrule (purchased)
G. Refrigerator water tubing
D. Coupling
- Turn on the water supply valve and check all connections to leaks.
Plug in Refrigerator
WARNING

Electrical Shock Hazard
Plug into a grounded 3 prong outlet.
Do not remove ground prong.
Do not use an adapter.
Do not use an extension cord.
Failure to follow these instructions can result in death, fire, or electrical shock.
If the supply cord is damaged, it must be replaced by the manufacturer or its service agent or a similar qualified person. Do not use a cord that shows cracks or abrasion damage along its length or at either the plug or connection end.
-
Set control switch at top of cabinet to the OFF position.
-
Plug into a grounded 3 prong outlet.
-
Set control switch at top of cabinet to the OFF position.
- Plug into a grounded 3 prong outlet.
Move Refrigerator to Final Location
WARNING
Tip Over Hazard
Refrigerator is top heavy and tips easily when not completely installed.
Keep doors taped closed until refrigerator is completely installed.
Use two or more people to move and install refrigerator.
Failure to do so can result in death or serious injury.
IMPORTANT: To avoid floor damage, make sure levelers are raised (not touching floor) and refrigerator is on rollers before moving.
- Place top of cardboard carton or plywood under refrigerator. Remove dolly.
- Do not remove film or cover.
- Move the refrigerator straight back and evenly into the opening. Be sure that the refrigerator side trims are not interfering with the door opening. Also, be sure that the water tubing is not kinked and the power supply cord is on top of the refrigerator.
Level and Align Refrigerator
WARNING
Tip Over Hazard
Refrigerator is top heavy and tips easily when not completely installed.
Keep doors taped closed until refrigerator is completely installed.
Use two or more people to move and install refrigerator.
Failure to do so can result in death or serious injury.
IMPORTANT: All four leveling legs must contact the floor to support and stabilize the full weight of refrigerator. Rollers are for moving the refrigerator, not for permanent support.
After moving the refrigerator to its final location:
- Use a 5/16" socket driver to turn the leveling bolts clockwise extend the legs to the floor as shown. The rollers should be the floor.
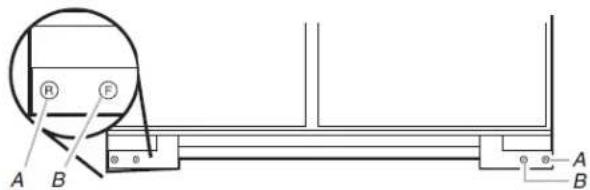
text_image
R F A B A BA. Rear leveling bolt
B. Front leveling bolt
- Adjust the leveling legs to level and align the refrigerator from left to right and front to back so that the refrigerator is level and aligned with the cabinetry. The cabinetry surface must be plumb for the ideal fit of the refrigerator side trim.
- Continue adjusting all of the leveling legs to raise the refrigerator until the top is within at least 1" (2.54 cm) of the top soffit.
NOTE: If an anti-tip board has been used, adjust the leveling legs until the top of the refrigerator is within 1/4" (6.35 mm) of the bottom of the anti-tip board as shown. Do not crush the compressor cover.
text_image
A B C 2" (5 cm) DA. Two 2" x 4" x 32" (5 cm x 10 cm x 81 cm) boards
B. Attach to studs with six #8 x 3" (7.6 cm) screws
C. Compressor cover
D. Distance from bottom of anti-tip board to floor
- After leveling the refrigerator, again use a straight edge or 4 ft level across the front of the refrigerator installation blocks to the cabinets to check that the refrigerator is still flush.
Install Overlay Series Custom Panels
WARNING
Excessive Weight Hazard
Use two or more people to move and install panels Failure to do so can result in back or other injury.
IMPORTANT:
■ Install the custom handles prior to installing the panels on the refrigerator. For more information on KitchenAid custom handle selection, refer to the KitchenAid Catalog, visit www.kitchenaid.com, or call 1-800-442-9991. In Canada, visit www.KitchenAid.ca, or call 1-800-807-6777.
■ Create custom door overlay panels according to the specifications in the "Overlay Series Custom Panels" section.
■ KitchenAid is not responsible for the removal or addition of molding or decorative panels that would not allow access to the refrigerator for service.
Door Panel Installation
1p Remove all tape and door bracing from the refrigerator and off freezer doors.
- Open the refrigerator and freezer compartment doors.
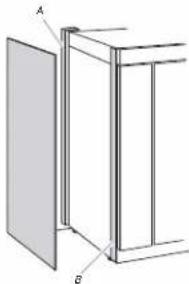
- Remove the handle-side and top trims.
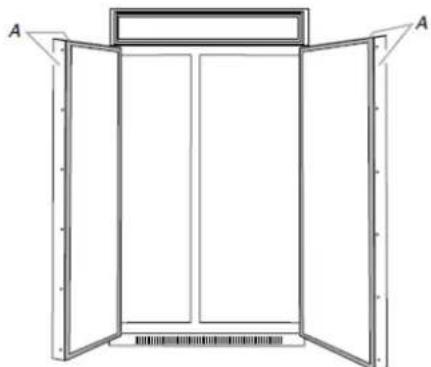
natural_image
Line drawing of a double-framed window with open doors and a back panel, no text or symbols presentA. Trims
- Slide the custom panels into the bottom and hinge side trims on the refrigerator compartment and freezer compartment doors, making sure that the backer panel fits into the hinge side trims.
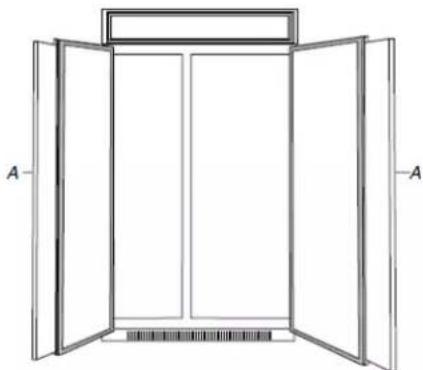
natural_image
Line drawing of an open double door with a backrest, showing structural details (no text or symbols)A. Panels
-
Reinstall the handle-side and top trims.
-
Remove the skin from the screw covers. Slide or snap the 2. Remove the locking plate as shown. screw covers into the handle trim section.
natural_image
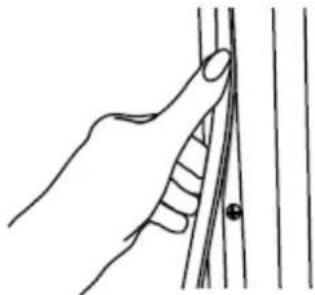
Line drawing of a hand gripping a vertical line with a small dot at the end (no text or symbols)- Check refrigerator level and alignment. Adjust if needed.
Adjust Doors
Door Height Adjustment
Use the following steps to adjust the door height, up or down, after the doors have been leveled.
- Open the freezer or refrigerator door. Locate the bottom hinge and remove the door stop screw.
Stainless Models
Remove the door stop screw from the bottom side of the hinge with a 3/8" open end wrench.
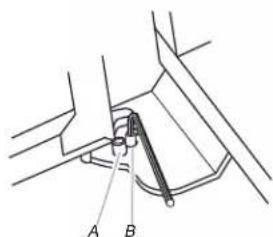
text_image
A B CA. Bushing
B. Door stop screw
C. Locking plate
Overlay Models
Remove the 2 door stop screws: one from the bottom side using a 3/8" open end wrench and one from the top side using a 5/32" hex key.
text_image
Technical diagram showing a mechanical assembly with labeled parts A and BA. Door stop screw from bottom
B. Door stop screw from top (110°)
natural_image
Technical line drawing of a mechanical component with arrows indicating motion or force (no text or symbols)- Turn the bushing located underneath the bottom of the hinge using a 1/2" open end wrench. Turning the bushing to the left will lower the door. Turning the bushing right will raise the door.
-
After adjusting, check the doors to make sure they are even at the top and bottom. If the doors are not even, continue to turn the bushing to adjust the door height.
-
Replace the locking plate.
-
Turn the bushing slightly to align the hinge and locking plate screw holes.
- Replace the door stop screw or screws and tighten.
IMPORTANT: Do not place the door stop screw in the 130° position on Overlay Series models unless the custom panels have been routed on the hinge side. See "Overlay Series Door Panel and Cabinetry Clearance."
- Recheck to make sure the doors are aligned and even.
Door Swing Adjustment
- Check that the refrigerator door can open freely. If the door opens too wide, remove the door stop screw or screws (depending on your model) from the bottom hinge. See "Door Height Adjustment" earlier in this section.
- Hold the door open to a position that is less than 90°.
- Replace the door stop screw or screws in the bottom hinge and tighten.
text_image
A B CA. 130^
B. 110°
C. 90^
Door-to-Door or Door-to-Refrigerator Trim Adjustment
- Loosen, but do not remove, the four Torx®† 27 flat-head mounting screws. Remove and discard the two 1/4" hex-head mounting screws
-
Adjust the top hinge of either door to align it with the other door or the refrigerator trim.
-
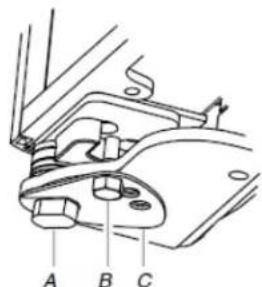
Tighten the four Torx®† 27 flat-head mounting screws to a 3. Snap the skirt onto the base grille. torque of approximately 100 inch-pounds (11.3 Nm).
text_image
Technical diagram showing a mechanical linkage or mounting bracket with labeled points A and BA. Torx® 27 flat-head mounting screws
B. 1/4" hex-head mounting screws
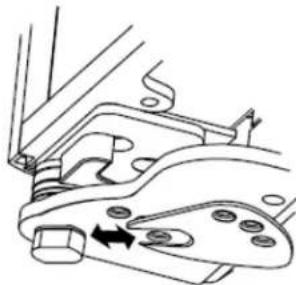
text_image
Technical diagram of a mechanical component with labeled parts A and BA. Base grille B. Skirt
Install Side Panel
If the built-in area depth is 25" (63.5 cm) or more, the side panels can be installed inside the side trim or attached to the outside of the side trim.
IMPORTANT: KitchenAid is not responsible for the removal or addition of molding or decorative panels that would not allow access to the refrigerator for service.
- For the inside side trim piece, slide the front edge of the routed side panel into the trim piece.
- Nail the rear edge of the panel to the support board.
natural_image
Technical line drawing of a two-panel cabinet or enclosure with labeled components A and B (no text or symbols beyond labels)A. Support board (mounted to back wall) B. Cab side trim
Install Base Grille
There are two pieces to the base grille to allow for a custom fit: the base grille itself and the skirt. The skirt can be added to the base grille in order to extend it all the way to the floor.
- To see whether the skirt is needed, place the base grille int position. Do not attach the base grille to the refrigerator. Measure the distance between the bottom of the base grille and the floor. The gap must be a minimum of 1/2" (1.27 cm) order to add the skirt.
NOTE: If the gap measures less than1/2" (1.27 cm), skip steps 3 and 4 of the instructions, and install the base grille only.
-
Remove the film from the base grille.
-
Trim the skirt by scoring the proper "V" groove with a utility knife. Break the skirt at the score line.
natural_image
Pure diagram of a rectangular structure with vertical slots and horizontal lines, no text or symbols present.A. "V" groove
- Using the 2 screws, attach the base grille assembly to the refrigerator as shown.
NOTE: Drive in the right side screw first.

natural_image
Technical diagram of a mechanical component with a grating and mounting bracket (no text or symbols)A. Screws (2)
Install Odor Absorber (on some models)
On some models, your refrigerator's accessory packet includes an odor absorber, which must be installed prior to use. On some models, the odor absorber is already installed at the factory.
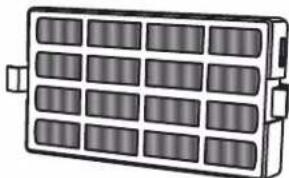
natural_image
Illustration of a rectangular battery pack with 16 compartments and two connectors (no text or symbols)The odor absorber reduces the buildup of odors. This helps to maintain a cleaner environment inside the refrigerator.
Installing the Odor Absorber (on some models)
The absorber should be installed behind the vented door, which located (depending on your model) along either the rear or left interior wall near the top of the refrigerator compartment.
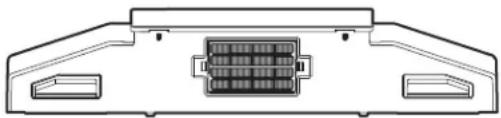
natural_image
Technical line drawing of a mechanical component with internal grid structure (no text or symbols)- Remove the odor absorber from its packaging.
- Snap the absorber in to place.
- Pinch the tabs on the odor absorber to remove the absorber.
Replacing the Odor Absorber
The disposable odor absorber should be replaced every 6 months, when the status indicator has completely changed from white to red.
To order a replacement odor absorber, see "Accessories" in the User Instructions or User Guide.
■ Remove the old odor absorber by squeezing in on the side tabs.
■ Remove the old status indicator.
■ Install the new odor absorber and status indicator using the instructions in the previous sections.
Complete Installation
- Turn the water supply line valve to the "Open" position.
- Turn the refrigerator switch to the ON position. See "Power On/Off Switch" in the Use & Care Guide for instructions. Wait a few minutes. Check the water line connections for leaks.
- Remove all boxes, parts packages and packing materials from the interior of the refrigerator. See the "Cleaning" section in the Use & Care Guide for instructions. Remove the film and cardboard from the grille and doors or door frame, depending on your model.
- Install the shelves and bins in the refrigerator and freezer compartments.
- The controls are preset at the factory to the midpoint setting. Make sure the compressor is operating properly and that all the lights are working.
- Flush the water system before use. See "Water System Preparation."
To get the most efficient use from your new built-in refrigerator, read the Use & Care Guide. Keep Installation Instructions and Use & Care Guide near the built-in refrigerator for easy reference.
Water System Preparation
Please read before using the water system. Follow the directions specific to your model.
Style 1 (Dispenser Models)
IMPORTANT: After connecting the refrigerator to a water source or replacing the water filter, follow the steps below to make sure that the water system is properly cleaned. This will flush air from the filter and water dispensing system, and prepare the water filter for use.
Do not use with water that is microbiologically unsafe or of unknown quality without adequate disinfection before or after the system. Systems certified for cyst reduction may be used on disinfected waters that may contain filterable cysts.
NOTE: If your model has a base grille filter system, make sure the base grille filter is properly installed and the cap is in the horizontal position.
- Open the freezer door and turn off the ice maker. The On/Off switch is located on the top right side of the freezer compartment. Move the switch to the OFF (right) setting as shown.
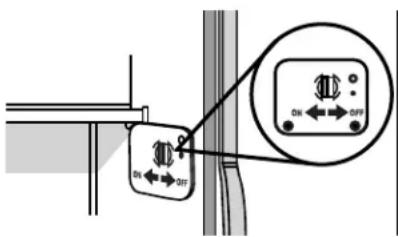
- Use a sturdy container to depress and hold the water dispenser lever for 5 seconds, then release it for 5 seconds. Repeat until water begins to flow. Once water begins to flow, continue depressing and releasing the dispenser lever (5 seconds on, 5 seconds off) until a total of 3 gallons (12 L) has been dispensed. This will flush air from the filter and water dispensing system, and prepare the water filter for use. Additional flushing may be required in some households. NOTE: As air is cleared from the system, water may spurt out of the dispenser.
- Open the freezer door and turn on the ice maker. Move the switch to the ON (left) position.
NOTE:
■ Allow 24 hours to produce the first batch of ice.
■ Discard the first three batches of ice produced.
■ Allow 3 days to completely fill ice container.
■ Depending on your model, you may want to select the maximum ice feature to increase the production of ice.
Style 2 (Non-Dispenser Models)
IMPORTANT: After connecting the refrigerator to a water source or replacing the water filter, fill and discard two full containers of ice to prepare the water filter for use, before using the ice.
Do not use with water that is microbiologically unsafe or of unknown quality without adequate disinfection before or after the system. Systems certified for cyst reduction may be used on disinfected waters that may contain filterable cysts.
NOTE: If your model has a base grille filter system, make sure the base grille filter is properly installed and the cap is in the horizontal position.
- Turn on the ice maker. Lower the wire shutoff arm as shown3. Please refer to "Ice Maker and Storage Bin" for further instructions on the operation of your ice maker.
NOTE:
■ Allow 24 hours to produce the first batch of ice.
■ Allow 3 days to completely fill ice container.
■ Depending on your model, you may want to select the maximum ice feature to increase the production of ice.
REFRIGERATOR FEATURES
Water and Ice Dispensers
Please read before using the water system. Follow the directions specific to your model.
Style 1 (Dispenser Models)
IMPORTANT:
■ After connecting the refrigerator to a water source or replacing the water filter, follow the steps below to make sure that the water system is properly cleaned. This will flush air from the filter and water dispensing system, and prepare the water filter for use.
■ Connect to potable water supply only.
Do not use with water that is microbiologically unsafe or of unknown quality without adequate disinfection before or after the system. Systems certified for cyst reduction may be used on disinfected waters that may contain filterable cysts.
NOTE: If your model has a base grille filter system, make sure the base grille filter is properly installed and the cap is in the horizontal position.
- Open the freezer door and turn off the ice maker. The ON/O switch is located on the top right side of the freezer compartment. Move the switch to the OFF (right) setting as shown.
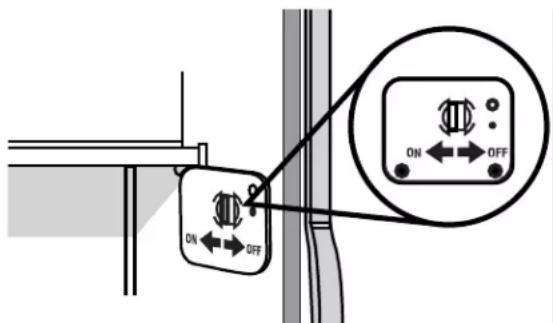
text_image
ON OFF- Use a sturdy container to depress and hold the water dispenser lever for 5 seconds, then release it for 5 seconds. Repeat until water begins to flow. Once water begins to flow, continue depressing and releasing the dispenser lever (5 seconds on, 5 seconds off) until a total of 3 gallons (12 L) has been dispensed. This will flush air from the filter and water dispensing system and prepare the water filter for use. Additional flushing may be required in some households.
NOTE: As air is cleared from the system, water may spurt out of the dispenser.
Open the freezer door and turn on the ice maker. Move the switch to the ON (left) position.
Notes:
■ Allow 24 hours to produce the first batch of ice.
■ Discard the first three batches of ice produced.
■ Allow 3 days to completely fill ice container.
Style 2 (Non-Dispenser Models)
IMPORTANT: After connecting the refrigerator to a water source or replacing the water filter, fill and discard two full containers of ice to prepare the water filter for use, before using the ice.
Do not use with water that is microbiologically unsafe or of unknown quality without adequate disinfection before or after the system. Systems certified for cyst reduction may be used on disinfected waters that may contain filterable cysts.
NOTE: If your model has a base grille filter system, make sure the base grille filter is properly installed and the cap is in the horizontal position.
- For icemakers with a switch, use the switch to turn ON or Off the icemaker.
natural_image
Illustration showing a hand inserting a device into a drawer with an arrow indicating the process (no text or symbols present)Without switch With switch
Notes:
■ Allow 24 hours to produce the first batch of ice.
■ Allow 3 days to completely fill ice container.
■ Depending on your model, you may want to select the maximum ice feature to increase the production of ice.
IMPORTANT:
■ After connecting the refrigerator to a water source or replacing the water filter, flush the water system. Use a sturdy container to depress and hold the water dispenser lever for 5 seconds, then release it for 5 seconds. Repeat until water begins to flow. Once water begins to flow, continue depressing and releasing the dispenser lever (5 seconds on, 5 seconds off) until a total of 3 gallons (12 L) has been dispensed. This will flush air from the filter and water dispensing system, and prepare the water filter for use. Additional flushing may be required in some households.
NOTE: As air is cleared from the system, water may spurt out of the dispenser.
- Allow 24 hours for the refrigerator to cool down and chill water.
- Allow 24 hours to produce the first batch of ice. Discard the first three batches of ice produced.
■ The dispensing system will not operate when the freezer door is open.
■ Depending on your model, your water and ice dispensers may have one or more of the following features: A dispenser tray, a special light that turns on when you use the dispenser, or a lock option to avoid unintentional dispensing.
Water Dispenser
To Dispense Water:
- Press a sturdy glass against the water dispenser pad.
natural_image
Simple line drawing of a rectangular device with two vertical slots, no text or symbols present.Notes:
■ Water will only dispense when left door is closed and will stop dispensing when door is opened.
■ It is NOT possible to dispense both water and ice at the 2. same time. The paddle that is pressed first will be the one that dispenses.
- Remove the glass to stop dispensing.
NOTE: Water may have an off-flavor if you do not use the dispenser periodically. Dispense enough water every week to maintain a fresh supply.
Ice Dispenser
Ice dispenses from the ice maker storage bin in the freezer when the dispenser pad is pressed. The dispensing system will not operate when the freezer door is open. To turn off the ice maker, see "Ice Maker and Storage Bin."
Your ice maker can produce both crushed and cubed ice. The display screen reads "CRUSHED" or "CUBED," indicating which type is selected. To change the setting, press the ICE button before dispensing ice.
For crushed ice, cubes are crushed before being dispensed. This may cause a slight delay when dispensing crushed ice. Noise from the ice crusher is normal, and pieces of ice may vary in size. When changing from crushed to cubed, a few ounces of crushed ice will be dispensed along with the first cubes.
To Dispense Ice:
- Press the button to select the desired type of ice.
WARNING

Cut Hazard
Use a sturdy glass when dispensing ice. Failure to do so can result in cuts.
- Press a sturdy glass against the ice dispenser pad. Hold the glass close to the dispenser opening so ice does not fall outside of the glass.
natural_image
Line drawing of a hand holding a cup inside a refrigerator with a control panel, next to an open shelf (no text or symbols)IMPORTANT: You do not need to apply a lot of pressure to the pad in order to activate the ice dispenser. Pressing hard will not make the ice dispense faster or in greater quantities.
- Remove the glass to stop dispensing.
NOTE: Ice may continue to dispense for up to 10 seconds after removing the glass from the pad. The dispenser may continue to make noise for a few seconds after dispensing.
Dispenser Tray (on some models)
Some models have a tray at the bottom of the dispenser area. The tray is designed to catch small spills and is removable for easy emptying and cleaning.
NOTE: There is no drain in the tray.
Ice Maker and Storage Bin
IMPORTANT: Flush the water system before turning on the ice maker. See "Water and Ice Dispensers." Allow 24 hours to produce the first batch of ice. Discard the first three batches of ice produced. Allow 3 days to completely fill the ice container.
Style 1
To Turn the Ice Maker On/Off:
The On/Off switch for the ice maker is a wire shutoff arm located on the side of the ice maker.
- To turn the ice maker ON, simply lower the wire shutoff arm.
NOTE: Your ice maker has an automatic shutoff. As ice is made, the ice cubes will fill the ice storage bin and the ice cubes will raise the wire shutoff arm to the OFF (arm up) position.
- To manually turn the ice maker off, lift the wire shutoff arm to the OFF (arm up) position and listen for the click to make sure the ice maker will not continue to operate.
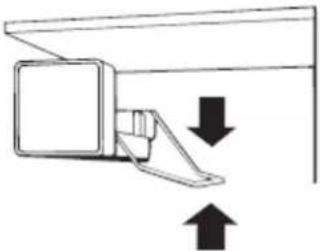
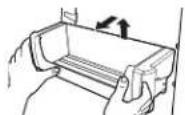
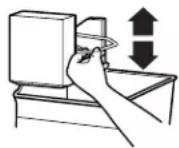
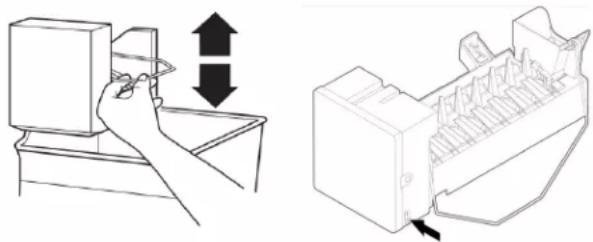
natural_image
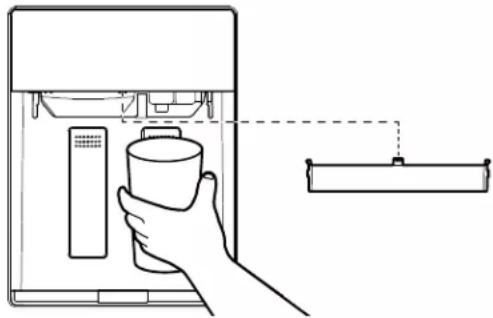
Simple line drawing of a mechanical device with two arrows indicating upward and downward motion (no text or symbols)To Remove and Replace the Ice Bin:
- Flip up the covering panel.
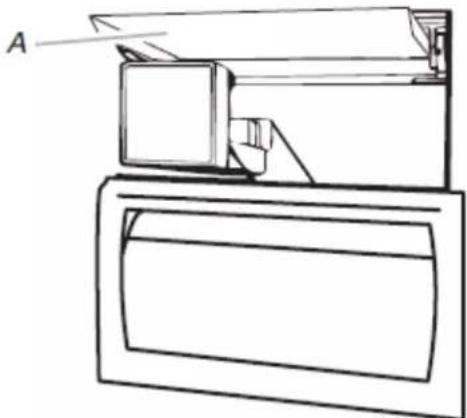
natural_image
Line drawing of a computer monitor with an open screen and a paper tray, no text or symbols presentA. Ice maker cover
- Lift the wire shutoff arm so it clicks into the OFF (up) position. Ice can still be dispensed, but no more can be made.
- Lift up the front of the storage bin and pull the ice bin forward
- Replace the bin by pushing it in all the way or the dispenser will not work. Push the wire shutoff arm down to the ON position to restart ice production. Make sure the door is closed tightly.
Style 2
To Turn the Ice Maker On/Off:
The On/Off switch is located on the top right side of the freezer compartment.
- To turn the ice maker on, slide the control to the ON (left) position.
NOTE: Your ice maker has an automatic shutoff. The ice maker sensors will automatically stop ice production, but the control will remain in the ON (left) position.
- To manually turn the ice maker off, slide the control to the OFF (right) position.
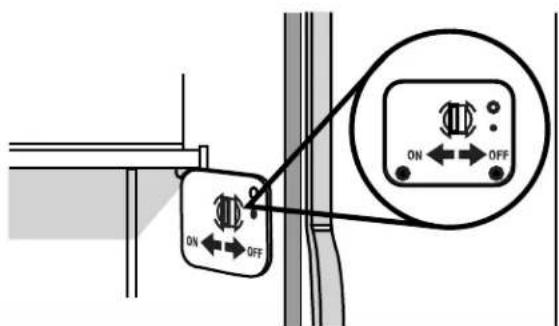
text_image
ON OFFTo Remove and Replace the Ice Storage Bin:
-
Hold the base of the storage bin with both hands and press the release button to lift the storage bin up and out.
NOTE: It is not necessary to turn the ice maker control to the OFF (right) position when removing the storage bin. The sensor cover ("flipper door") on the left wall of the freezer stops the ice maker from producing ice if the door is open or the storage bin is removed. -
Replace the storage bin on the door and push down to make sure it is securely in place.
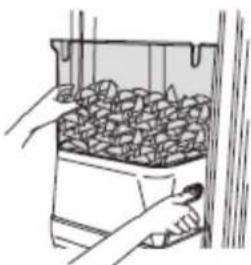
natural_image
Illustration of hands handling a container filled with granular material (no text or symbols visible)Clean the Ice Storage Bin
NOTE: It is normal for ice to stick together in the ice bin. Ice may be dispensed or used more frequently which will break up the ice. It is recommended that the ice container be emptied and cleaned as needed.
To clean the ice storage bin:
- Empty the ice container. Use warm water to melt the ice if necessary.
NOTE: Do not use anything sharp to break up the ice in the bin or bucket. This can cause damage to the ice container and the dispenser mechanism.
- Wash ice bin with a mild detergent, rinse well and dry thoroughly. Do not use harsh or abrasive cleaners or solvents.
Remember
■ Allow 24 hours to produce the first batch of ice. Allow 3 days to completely fill ice container.
■ Discard the first three batches of ice produced to avoid impurities that may be flushed out of the system.
■ The quality of your ice will be only as good as the quality of water supplied to your ice maker.
■ Avoid connecting the ice maker to a softened water supply.
■ Water softener chemicals (such as salt) can damage parts of the ice maker and lead to poor quality ice. If a softened water supply cannot be avoided, make sure the water softener is operating properly and is well maintained.
■ It is normal for the ice cubes to be attached at the corners. They will break apart easily.
■ For Style 1 ice maker, do not force the wire shutoff arm up down.
■ Do not store anything on top of the ice maker or in the ice storage bin/bucket.
Setting Liters and Ounces
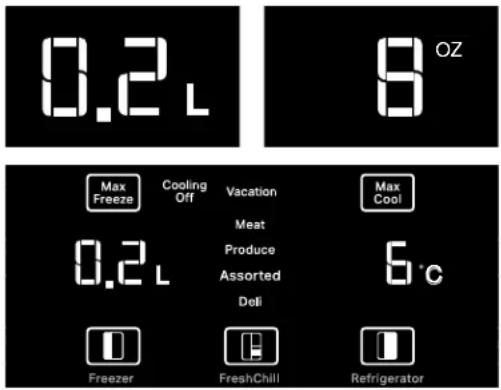
Hold [Max Freezer] + [FreshChill] buttons to switch between L and OZ.
When activated, the corresponding point LED is lit at FULL brightness. The LED will turn off after 10 seconds if it's not in mode associated to the water amount mode.
The L/OZ only turns on when there is an interaction associated to water amount (eg, measured fill, calibration).
Measured Fill
Calibrate Measured Fill
Household water pressure may affect the accuracy of the Measured Fill feature. For optimum performance of your water dispenser, you must first calibrate Measured Fill.
Start Calibration Mode
- Press and hold the Measured Fill button for 3 seconds to enter Calibration Mode. The button will display along with the 0.2 L or 8 oz default settings.
- Pressing the water pad will dispense water (e.g. into a measuring cup) until the desired amount is dispensed. Releasing the water pad will stop water dispensing.
Save and Exiting Calibration
-
If water was dispensed, pressing the Measured Fill button will save the amount dispensed, a tone will play and the calibration amount display will blink twice.
-
If no water was dispensed, Pressing the Measured Fill button will exit Calibration mode without saving the calibration amount.
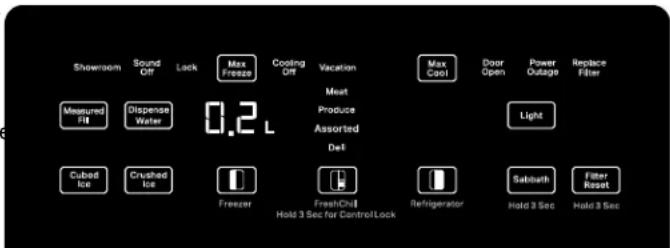
text_image
Showroom Sound Off Lock Max Freeze Cooling Off Vacation Max Cool Door Open Power Outage Replace Filter Measured Fill Dispense Water 0.2 L Meat Produce Assorted Del Light Cubed Ice Crushed Ice Freezer FreshChill Refrigerator Sabbath Filter Reset Hold 3 Sec Hold 3 Sec Hold 3 Sec for Control/LockNOTE: The amount of water you select will be dispensed. Be sure that the container is empty and can hold the entire volume. If ice is in the container, you may need to adjust your selection.
IMPORTANT: Low water pressure may affect the accuracy of this feature.
- Press MEASURED FILL to turn the feature on. When the feature is on, the Measured Fill screen appears on the display.
- To dispense water, press a sturdy glass against the water dispenser pad or place the glass below the water dispenser and press the MEASURED FILL button. Hold the glass close to the water dispenser spout to ensure that the water dispenses into the glass.
- The Measured fill button can be pressed to loop the preset amounts. Each press advances the preset amount until the end of the options are reached. Example - 8 oz to 16 oz to 24oz, END (0.2L to 0.5L to 1.0L, END).
NOTE:
■ The dispenser will automatically turn off Measured Fill after 1 minute of inactivity. When Measured Fill is turned off, any changes you have made will be lost and all defaults will be restored.
Most coffee cups are 4-6 oz (118-117 ml) and are not the same size as an 8 oz (237 ml) measuring cup. You may need to adjust the volume to avoid overfilling coffee cups.
While dispensing water, the digital display will count down how much water remains to be dispensed, according to the volume to you selected. The flow of water will automatically stop once the desired volume has been dispensed.
Water Filtration System
Do not use with water that is microbiologically unsafe or of unknown quality without adequate disinfection before or after the system. Systems certified for cyst reduction may be used on disinfected waters that may contain filterable cysts.
Water Filter Status Indicator
The water filter indicator, located on the control panel, will help you know when to change the water filter.
Replace status:
- Replace the water filter cartridge when the water filter status display changes to "Replace."
Replace Overdue status:
■ When the light turns red on the control panel, this tells you that it is time to change the water filter cartridge.
It is recommended that you replace the filter when the status light turns red or water flow to your water dispenser or ice maker decreases noticeably.
NOTE: If water flow to your water dispenser or ice maker decreases noticeably, change the filter sooner. The filter should be replaced at least every 6 months, depending on your water quality and usage.
When dispensing water after the Replace Filter icon is on, the Replace Filter icon blinks for the duration of dispensing. This applies for both the Replace Filter status and Replace Overdue status. Fourteen days after the Replace Filter indicator turns On, it shall enter "Replace Overdue" mode.
Filter Reset
After changing the filter, press and hold Filter Reset button for 3 seconds. The button will no longer display once reset.
Changing the Water Filter
The water filter is located in the base grille below the freezer compartment door. It is not necessary to remove the base grille to remove the filter.
- Remove the filter by pressing the eject button and pulling straight out on the filter cap.
NOTE:
■ Avoid twisting the cap when removing the filter because this could cause the cap to come off. If this occurs, replace the cap and pull the filter straight out.
■ There will be water in the filter. Some spilling may occur.
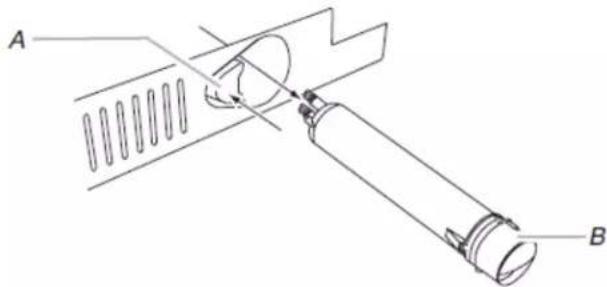
natural_image
Technical line drawing of a mechanical assembly with labeled parts A and B (no text or symbols beyond labels)A. Eject button B. Filter cap
- Remove the cap by turning it counterclockwise until it stops. IMPORTANT: Do not discard the cap. It is part of your refrigerator. Keep the cap to use with the replacement filter.
- Align the ridge on the cap with the arrow on the new filter, turn the cap until it snaps into place.
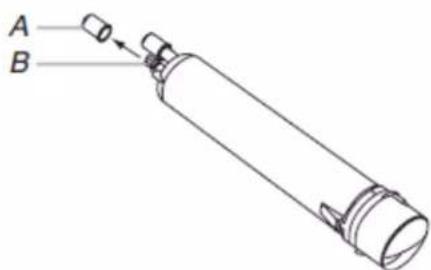
text_image
A BA. Cover B. O-rings
-
Remove the covers from the O-rings. Make sure that O-rings are still in place after the covers are removed.
-
Place the cap (removed in Step 2) on the new filter. Align the ridge on the cap with the arrow on the filter. Turn the cap clockwise until it snaps into place.
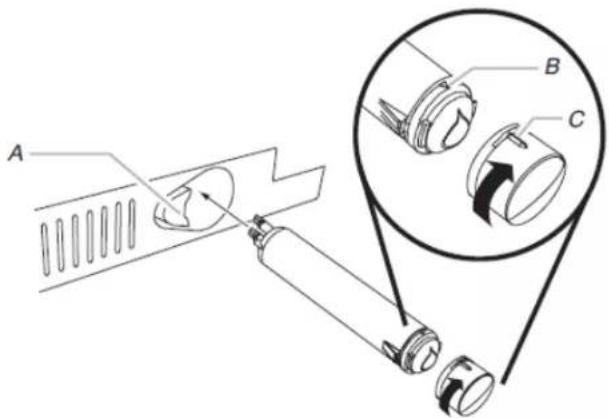
text_image
Technical diagram showing a mechanical assembly with labeled parts A, B, and C, including a magnified inset view of the component.A. Eject button
B. Arrow on filter
C. Ridge on cap
- Push the new filter into the opening in the base grille. As the filter is inserted, the eject button will depress. The eject button will pop back out when the filter is fully engaged.
- Pull gently on the cap to check that the filter is securely in place.
- Flush the water system. Depending on your model, see "Water and Ice Dispensers" or "Ice Maker and Storage Bin."
Using the Ice Maker Without a Water Filter
You can operate the ice maker without a water filter. Your ice will not be filtered.
- Remove the filter by pressing the eject button and pulling on the cap. See "Changing the Water Filter" earlier in this section.
-
Remove the cap by turning it counterclockwise until it stops. IMPORTANT: Do not discard the cap. It is part of your refrigerator.
-
With the cap in a horizontal position, insert the cap into the base grille until it stops.
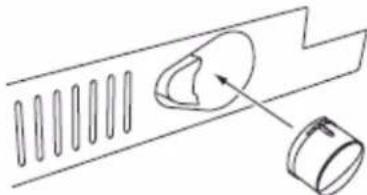
natural_image
Diagram of a mechanical component with a curved housing and a cylindrical component, no text or symbols present- Turn the cap counterclockwise until the cap slips into the attachment slot. Then, turn the cap clockwise until it is in a horizontal position.
NOTE: The cap will not be even with the base grille.
Freezer Shelves
To remove and replace the shelf:
- Remove the shelf by lifting it up and pulling it straight out.
- Replace the shelf by putting it over the supports and lowering it into place.
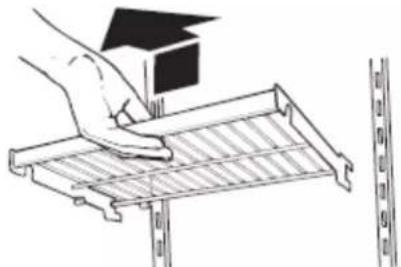
natural_image
Illustration of a hand using a tool to clean or install a metal rack with a small house on top (no text or symbols)Frozen Food Storage Guide
Storage times will vary according to the quality and type of food, the type of packaging or wrap used (should be airtight and moisture-proof), and the storage temperature. Ice crystals inside a sealed package are normal. This simply means that moisture in the food and air inside the package have condensed, creating ice crystals.
Put no more unfrozen food into the freezer than will freeze within 24 hours (no more than 2 to 3 lbs of food per cubic foot [907-1,350 g per 28 L] of freezer space). Leave enough space in the freezer for air to circulate around packages. Be sure to leave enough room for the door to close tightly.
For more information on preparing food for freezing, check a freezer guide or reliable cookbook.
Freezer Basket
The freezer basket can be used to store bags of frozen fruits and vegetables that may slide off freezer shelves.
To remove and replace the freezer basket:
- Pull the basket straight out to the stop.
- Lift the front of the basket and slide it out the rest of the way.
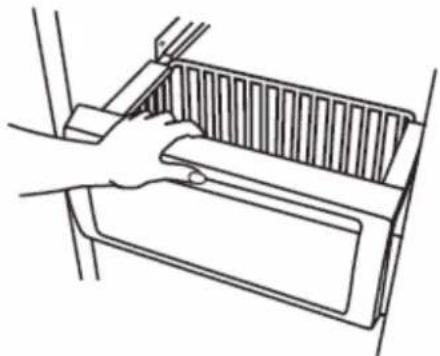
natural_image
Line drawing of a hand holding a rectangular object with ribbed internal structure (no text or symbols)- Replace the basket by positioning it on the side wall guide rails. Lift the basket front slightly while pushing it past the guide rail stops and slide basket in the rest of the way.
PERFORMANCE DATA SHEET
Water Filtration System
Model EDR3RXD1B/P1WB2 Capacity 200 Gallons (757 Liters) with PID; 100 Gallons (378 Liters) without PID
Replacement Filter EDR3RXD1, EDR3RXD1B, WHR3RXD1 and KAD3RXD1

System tested and certified by NSF International against NSF/ANSI Standard 42, 53, 401 and CSA B483.1 for the reduction of contaminants specified on the Performance Data Sheet.
This system has been tested according to NSF/ANSI Standards 42, 53, 401 and CSA B483.1 for the reduction of the substances listed below. The concentration of the indicated substances in water entering the system was reduced to a concentration less than or equal to the permissible limit for water leaving the system, as specified in NSF/ANSI Standards 42, 53, 401 and CSA B483.1.
| Substance Reduction Aesthetic Effects | Influent Challenge Concentration | Maximum Permissible Product Water Concentration | Average % Reduction |
| Chlorine Taste/Odor 2.0 mg/L | ± 10% 50% reduction >97.5% | ||
| Particulate Class I* At least 10,000 particles/mL 85% reduction | 99.2% | ||
| Contaminant Reduction Influent Challenge Concentration | Maximum Permissible Product Water Concentration | Average % Reduction | |
| Lead: @ pH 6.5 / @ pH 8.5 | 0.150 mg/L ± 10% 0.010 mg/L | >99.3% / >99.3% | |
| Mercury: @ pH 6.5 / @ pH 8.5 | 0.006 mg/L ± 10% 0.002 | mg/L >96.4% / 90.8% | |
| Asbestos | 10^7 to 10 fibers/L†† | 99% | 99% |
| Cysts† | 50,000/L min. | 99.95% | >99.99% |
| Turbidity | 11 NTU ± 10% | 0.5 NTU | >99.1% |
| Alachlor | 0.040 mg/L ± 10% 0.002 mg/L | 97.6% | |
| Atrazine | 0.009 mg/L ± 10% 0.003 mg/L | 94.50% | |
| Benzene | 0.015 mg/L ± 10% 0.005 mg/L | 96.6% | |
| Carbofuran | 0.080 mg/L ± 10% 0.040 mg/L | 91.1% | |
| Chlorobenzene | 2.000 mg/L ± 10% 0.100 mg/L | 99% | |
| Endrin | 0.006 mg/L ± 10% 0.002 mg/L | 96.6% | |
| Ethylbenzene | 2.100 mg/L ± 10% 0.700 mg/L | 99.9% | |
| Lindane | 0.002 mg/L ± 10% 0.0002 mg/L | 99% | |
| MTBE | 0.015 mg/L ± 10% 0.005 mg/L | 90.6% | |
| O-Dichlorobenzene | 1.800 mg/L ± 10% 0.600 mg/L | 99.9% | |
| Tetrachloroethylene | 0.015 mg/L ± 10% 0.005 mg/L | 96.4% | |
| Toxaphene | 0.015 mg/L ± 10% 0.003 mg/L | >93.7% | |
| TTHM | 0.045 mg/L ± 10% 0.080 mg/L | 99.5% | |
| Styrene | 2.000 mg/L ± 10% 0.100 mg/L | 99.9% | |
| VOC | 0.300 mg/L ± 10% 0.015 mg/L | 99.7% | |
| Atenolol | 200 ± 20% | 30 ng/L | 95.7% |
| Trimethoprim | 140 ng/L ± 20% 20 ng/L | 96.1% | |
| Linuron | 140 ng/L ± 20% 20 ng/L | 96.3% | |
| Estrone | 140 ng/L ± 20% 20 ng/L | 90.6% | |
| Nonylphenol 1400 ng/L ± 20% | 200 ng/L 93.7% | ||
| Meprobamate 400 ng/L ± 20% | 60 ng/L 94.9% | ||
| Carbamazepine 1400 ng/L ± 20% | 200 ng/L 98.6% | ||
| DEET 1400 ng/L ± 20% 200 | ng/L 98.6% | ||
| Metolachlor 1400 ng/L ± 20% | 200 ng/L 98.6% | ||
| TCEP 5000 ng/L ± 20% 700 | ng/L 98.1% | ||
| TCPP 5000 ng/L ± 20% 700 | ng/L 98.2% | ||
| Phenytoin 200 ng/L ± 20% 30 | ng/L 94.5% | ||
| Ibuprofen 400 ng/L ± 20% 60 | ng/L 95.6% | ||
| Naproxen 140 ng/L ± 20% 20 | ng/L 96.9% | ||
| Bisphenol A 2000 ng/L ± 20% | 300 ng/L 99.1% | ||
Test Parameters: pH = 7.5 ± 0.5 unless otherwise noted. Flow = 0.5 gpm (1.89 Lpm). Pressure = 60 psig (413.7 kPa).
Temperature = 68°F to 71.6°F (20°C to 22°C). Rated service capacity = 200 gallons (757 liters).
The compounds certified under NSF 401 have been deemed as “emerging compounds/incidental contaminants.” Emerging compounds/incidental contaminants are those compounds that have been detected in drinking water supplies at trace levels. While occurring at only trace levels, these compounds can affect the public acceptance/perception of drinking water quality.
■ For installation, operation, and maintenance instructions please refer to the Owner's Manual.
It is important that operational, maintenance, and filter replacement requirements be carried out for the product to perform as advertised. Property damage can occur if all instructions are not followed.
■ The disposable cartridge must be changed at least every 6 months.
■ Use replacement filter part #EDR3RXD1/EDR3RXD1B.
The filter monitor system measures the amount of water that passes through the filter and alerts you when it is time to replace the filter. To learn how to check the water filter status, see "Using the Controls" or "Water Filtration System" in the User Instructions or User Guide.
■ After changing the water filter, flush the water system. See "Water and Ice Dispensers" or "Water Dispenser" in the User Instructions or User Guide.
These contaminants are not necessarily in your water supply. While testing was performed under standard laboratory conditions, actual performance may vary.
For installation, operation and maintenance instructions please refer Owner's Manual.
Consumer Support 1.800.442.9991
By Whirlpool Corporation
2000 North M63
Benton Harbor, MI 49022
Made in Taiwan.
■ The product is for cold water use only.
■ The water system must be installed in compliance with state and local laws and regulations.
■ Do not use with water that is microbiologically unsafe or of unknown quality without adequate disinfection before or after the system. Systems certified for cyst reduction may be used on disinfected waters that may contain filterable cysts. EPA Est. No. 082047-TWN-001.
■ Refer to the "Warranty" section (in the User Instructions or User Guide) for the Manufacturer's limited warranty, name and telephone number.
| Application Guidelines/Water Supply Parameters | |
| Water Supply | Potable City or Well |
| Water Pressure | 30 psi - 120 psi (207 kPa - 827 kPa) |
| Water Temperature | 33°F - 100°F (0.6°C - 37.8°C) |
| Service Flow Rate | 0.5 GPM (1.89 L/min.) @ 60 psi. |
- Your water filtration system will withstand up to 120 pounds per square inch (psi) water pressure. If your water supply is higher than 80 psi, install a pressure reducing valve before installing the water filtration system.
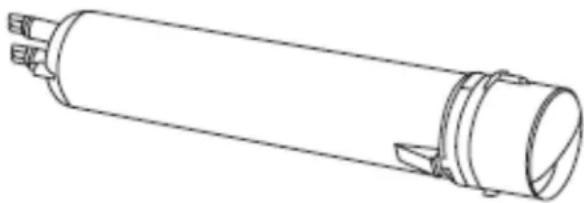
natural_image
Technical line drawing of a cylindrical mechanical component with mounting flanges (no text or symbols)*Class I particle size: >0.5 to 1 um
†Based on the use of Cryptosporidium parvum oocysts
Fibers greater than 10 um in length
^® NSF is a registered trademark of NSF International.
natural_image
Front view of a stainless steel double-door refrigerator with two vertical doors and a horizontal door (no visible text or symbols)Série Stainless
natural_image
Exterior view of a modern stainless steel double-door refrigerator with two front panels and a digital display (no visible text or symbols)Série Stainless
natural_image
Illustration of a pair of wooden cabinets with metal handles (no text or symbols)Série Overlay
Both the refrigerator and freezer sections defrost automatically. However, clean both sections about once a month to avoid buildup of odors. Wipe up spills immediately.
To Clean Your Refrigerator:
- Remove the top grille. See "Power On/Off Switch."
- Press the power switch to OFF.
- Remove all removable parts from inside, such as shelves, crispers, etc.
- Hand wash, rinse, and dry removable parts and interior surfaces thoroughly. Use a clean sponge or soft cloth and a mild detergent in warm water.
■ Do not use abrasive or harsh cleaners such as window sprays, scouring cleansers, flammable fluids, cleaning waxes, concentrated detergents, bleaches or cleansers containing petroleum products on plastic parts, interior and door liners or gaskets. Do not use paper towels, scouring pads, or other harsh cleaning tools. These can scratch or damage materials.
■ To help remove odors, you can wash interior walls with a mixture of warm water and baking soda (2 tbs to 1 qt [26 g to 0.95 L] of water).
- Wash stainless steel and painted metal exteriors with a clean sponge or soft cloth and a mild detergent in warm water. Do not use abrasive or harsh cleaners, or cleaners containing chlorine. Dry thoroughly with a soft cloth.
REMARQUE : To keep your Stainless Steel refrigerator looking like new and to remove minor scuffs or marks, it is suggested that you use the manufacturer's approved Stainless Steel Cleaner and Polish.
IMPORTANT: This cleaner is for stainless steel parts only. Do not allow the Stainless Steel Cleaner and Polish to come into contact with any plastic parts such as the trim pieces, dispenser covers or door gaskets. If unintentional contact does occur, clean plastic part with a sponge and mild detergent in warm water. Dry thoroughly with a soft cloth. To order the cleaner, see "Accessories."
- Press the power switch to ON.
- Replace the top grille. See "Power On/Off Switch."
natural_image
Diagram of a human foot and arm with an inset showing the foot's view through a circular path (no text or labels)natural_image
Isometric line drawing of a rectangular frame with internal structure (no text or symbols)Plat à marinade
natural_image
Line drawing of a tray and drawer with handles, no text or symbols presenthttps://www.kitchenaid.com/kitchenware/bakeware.html
natural_image
Simple line diagram showing a container with a dashed curved arrow labeled 'A' pointing left, no text or symbols present.text_image
A D B C N E G O K J F Htext_image
G F E A B C Dtext_image
M WALL L A H G F B E D C 90° 110° 130° K Jnatural_image
Technical line drawing of a wooden bracket joint with labeled section A (no text or symbols beyond label)natural_image
Technical line drawing of a wooden plank with visible grain patterns and a side profile (no text or symbols)INSTRUCTIONS D'INSTALLATION
natural_image
Technical line drawings of two mechanical lifting devices with no visible text or symbolstext_image
Diagram showing a device with labeled components A, B, and C, including an inset view of the internal structure.text_image
Labeled diagram of a mechanical or electrical component with points A through G and a coiled cabletext_image
Technical diagram showing a cable connector with labeled points A, B, and C, including an inset close-up of the cable assembly.text_image
Technical diagram of a mechanical assembly with labeled components A through G, showing connections between parts within a circular inset.natural_image
Line drawing of a double-framed window with open doors and a top shelf, no text or symbols presentA. Garniture
natural_image
Line drawing of an open double door with a lid, showing structural details (no text or symbols)A. Panneaux
natural_image
Line drawing of a hand holding a vertical line with a dot, no text or symbols presentnatural_image
Technical line drawing of a mechanical component with arrows indicating motion or force (no text or symbols)natural_image
Technical line drawing of a mechanical clamp or bracket assembly with labeled points A and B (no text or symbols beyond labels)natural_image
Technical line drawing of a two-panel cabinet or enclosure with labeled components A and B (no text or symbols beyond labels)natural_image
Pure diagram of a layered structure with vertical slots and horizontal lines, no text or symbols presentA. Rainure en « V »
natural_image
Technical line drawing of a mechanical component with a flat plate and a side bracket (no text or symbols)A. (2) vis
natural_image
Illustration of a rectangular solar panel with grid layout and mounting bracket (no text or symbols)natural_image
Technical line drawing of a mechanical component with internal grid structure (no text or symbols)natural_image
Illustration showing a hand inserting a device into a container with arrows indicating direction (no text or symbols)natural_image
Simple line drawing of two vertical rectangular objects inside a container (no text or symbols)Remarques :
natural_image
Line drawing of a hand holding a cup and a tray, no text or symbols presentnatural_image
Simple line drawing of a mechanical component with two arrows indicating upward and downward motion (no text or symbols)natural_image
Line drawing of a mechanical device with labeled component A (no text or symbols present)natural_image
Illustration of hands handling a container filled with granular material (no text or symbols visible)text_image
Showroom Sound Off Lock Max Freeze Cooling Off Vacation Max Cool Door Open Power Outage Replace Filter Measured Fill Dispense Water Meat Produce Assorted Del Light Cubed Ice Crushed Ice Freener FreshChill Refrigerator Sabbath Filter Reset Hold 3 Sec Hold 3 Sec 0.2 L Hold 3 Sec for Control Locknatural_image
Technical line drawing of a mechanical assembly with labeled parts A and B (no text or symbols beyond labels)text_image
Technical diagram showing a mechanical assembly with labeled parts A, B, and C, including a magnified inset view of the component.natural_image
Technical line drawing of a mechanical component with a curved cutout and a separate cylindrical part (no text or symbols)natural_image
Illustration of a hand using a tool to clean or install a metal rack with a small house on top (no text or symbols)natural_image
Line drawing of a hand holding a rectangular object with ribbed contents (no text or symbols)natural_image
Technical line drawing of a cylindrical mechanical component with flanges and a central housing (no text or symbols)NOTESNOTES
NOTES
NOTES
NOTES
NOTES
NOTES