RS2W Mini - Dimmer Renkforce - Free user manual and instructions
Find the device manual for free RS2W Mini Renkforce in PDF.


| Product type | Integrated wireless dimmer (dimmer) |
| Power supply | 230 V/AC, 50 Hz |
| Connected load (incandescent bulbs) | 5 - 150 W |
| Connected load (dimmable LED/CFL) | 5 - 20 W |
| Standby consumption | < 0.4 W |
| Radio frequency | 868.3 MHz |
| Maximum range | Up to 150 m (in free space) |
| Overload protection | Yes |
| Overheat protection | Yes |
| Number of wires required | 2 wires (no neutral required) |
| Transmitter compatibility | All transmitters of the RS2W system |
| Number of receivers per channel | Up to 5 |
| Operating temperature | -10 °C to +55 °C |
| Operating humidity | 10 % to 80 % non-condensing |
| Installation location | Indoor, flush or surface-mounted box |
| Maintenance | No maintenance required |
| Safety | Do not open, installation by qualified electrician |
| LED indicator | Yes (lamp status) |
| Operation via wall switch | Yes (on/off and dimming) |
| Operation via remote control | Yes (after pairing) |
Frequently Asked Questions - RS2W Mini Renkforce
User questions about RS2W Mini Renkforce
0 question about this device. Answer the ones you know or ask your own.
Ask a new question about this device
Download the instructions for your Dimmer in PDF format for free! Find your manual RS2W Mini - Renkforce and take your electronic device back in hand. On this page are published all the documents necessary for the use of your device. RS2W Mini by Renkforce.
USER MANUAL RS2W Mini Renkforce
GB Operating instructions
RS2W Mini wireless built dimmer, 2-wire
Item no. 1406726
Intended use
The built-in wireless built dimmer can be used to dim a connected light or switch it on and off wirelessly using a suitable radio transmitter of the RS2W system.
The built-in wireless built dimmer is intended to be installed behind a normal wall switch (no buttons!). The wall switch can still be used via two connection cables of the built-in wireless dimmer switch; these cables also enable a dimming function.
The built-in wireless dimmer switch is suitable for use only on mains voltage (230 V/AC, 50 Hz). You can connect incandescent bulbs with a total power rating of 5 - 150 W or energy-saving/LED bulbs with a total power rating of 5 - 20 W (as long as these are dimmable).
The special design does not require a neutral conductor, which makes installation in existing electric installations very easy.
Please read the operating instructions carefully and do not discard them. If you pass the product on to a third party, please hand over these operating instructions as well.
Any use other than that described above could lead to damage to this product and involves the risk of short circuits, fire, electric shock, etc. No part of the product may be modified or converted! The safety instructions must be observed at all times!
This product complies with the applicable national and European requirements. All names of companies and products are the trademarks of the respective owners. All rights reserved.
Package contents
- Wireless built dimmer
- Operating instructions
→ Up-to-date operating instructions:
- Open www.conrad.com/downloads in a browser or scan the displayed QR code.
- Select document type and language and enter the item number into the search field. After submitting the query you can download displayed records.

Explanation of symbols, labels

The lightning symbol inside a triangle is used when there is a potential risk of personal injury, such as electric shock.

This symbol points to specific risks associated with handling, function or operation.

The arrow symbol indicates special tips and operating information.

The product may be used only in dry, indoor rooms; it must not get damp or wet.

Observe the operating instructions!
Safety instructions
Read the complete operating manual carefully before using the product as it contains important information about the correct installation and operation.
Damages due to failure to follow these operating instructions will void the warranty! We do not assume any liability for any resulting damage!
We do not assume any liability for material and personal damage caused by improper use or non-compliance with the safety instructions! In such cases, the warranty will be null and void!
Warning!
This product may only be installed by a qualified technician (e.g., an electrician) who is familiar with the relevant regulations (e.g., VDE)!
Improper work carried out on the mains voltage endangers not only your own life, but also the life of others!
If you do not have the expertise required for the installation, do not install it yourself but ask a qualified technician.
a) General
- The unauthorised conversion and/or modification of the product is not permitted for safety and approval reasons (CE). Do not open/disassemble!
- The product is not a toy and does not belong in the hands of children. There is a risk of a life-threatening electric shock!
- Do not leave the packaging material unattended since this may become a dangerous plaything for children.
- Handle the product with care; it can be damaged by impacts, blows, or accidental falls, even from a low height.
b) Operating location
- The product may be used in dry, enclosed indoor areas only; it must not get damp or wet!
- Use the product only when it is securely installed and steady. Use the product e.g. in a suitable flush-mounting or surface mounting or other suitable housing, so that the required protection against contact is ensured.
- The product must not be exposed to extreme temperatures, strong vibrations or heavy mechanical stress. Keep the product away from strong magnetic fields, such as in the vicinity of machinery, electric motors or speakers.
- Do not operate the device in environments where there are high levels of dust, flammable gases, vapours or solvents. There is a danger of fire and explosion!
- Do not use this product in hospitals or medical institutions. Although the transmitter of the RS2W radio system emits only relatively weak radio signals, these may lead to malfunction of life-sustaining systems. The same may also apply to other areas.
c) Connection and operation
- This product should never be touched or operated with wet hands. There is a risk of a life-threatening electric shock!
- Carry out the installation only when all the mains cables to the built-in wireless dimmer switch are disconnected from the mains voltage. Otherwise, there is a risk of a life-threatening electric shock!
- During installation, all poles must be disconnected from the mains voltage (e.g. via RCD).
- Never connect the product to the power supply immediately after it has been transferred from a cold room into a warm one (e.g. after transport). The condensation that forms might destroy the device. Moreover, there is danger of electric shock!
Allow the device to reach room temperature before switching it on. Wait until the condensation has evaporated. This might take several hours. Only after this should it be plugged in to the mains supply and put into use.
- Never overload the product. Note the maximum permissible connected load in the chapter "Technical data".
- Do not use the product if it is damaged. There is a risk of a life-threatening electric shock! In this case, dispose of the product in an environmentally correct manner.
can be assumed that safe operation is no longer possible, the product
must be turned off and precautions must be taken to ensure that it is not used unintentionally. Do not touch the built-in wireless dimmer switch or any device connected to it.
- Disconnect the built-in wireless dimmer switch from the mains by switching off at the appropriate circuit breaker or by pulling out the fuse. Furthermore, turn off the earth leakage circuit breaker to disconnect all the poles of the mains supply.
Safe operation can no longer be assumed if:
- the product shows visible signs of damage
- the product does not work at all or works poorly (leaking smoke or a smell of burning, audible cracking noises, discolouration to the product or the adjacent surfaces)
- the product was stored under unfavourable conditions
- it was exposed to heavy loads during transport
- Use the product only in a temperate climate and not in a tropical climate.
- If you have any questions that are not answered in these operating instructions, please contact our technical department or another specialist.
Preparations for installation

Please observe the chapter "Safety instructions"!
- To use, install the wireless dimmer switch in a suitable flush- or wall-mounted box or other suitable housing.
- Install the wireless dimmer switch only when the switch is disconnected from the mains. First, switch off all poles of the mains supply by switching off at the associated circuit breaker or removing the fuse and then also switch off the associated RCD (residual current device).
Secure it against unauthorised reconnection, e.g. with a danger sign. Then check the mains connection for absence of voltage using a suitable tester.
Connection and installation

Refer to the "Preparations for installation" chapter.
In older domestic electric installation systems, there is frequently no neutral wire in the existing wall sockets. In these cases, conventional wireless systems cannot be installed without expensive upgrading of the wiring and the resulting necessary masonry work.
Thanks to the special 2-wire design of this wireless dimmer switch, you do not need the neutral wire - the two existing wires (phase "L" and switched phase "L'") are sufficient.

Because of this technology, however, the full mains voltage is not present at the light. As a rule, the difference in brightness is hardly noticeable.
The built-in wireless dimmer switch can be used as a complementary component providing an additional wireless switching and wireless dimming function for a conventional wall switch (no buttons!). This means you can keep your existing wall switch, and the light, which has previously been switched on and off at the wall switch, can now also be operated and dimmed using a radio transmitter of the RS2W system.

You can still use the wall switch to turn the light on and off as before; now a dimming function is also available.
For installation, the flush socket has to provide sufficient space to place the wireless dimmer switch behind the existing wall switch.

Therefore, ensure appropriate protection against accidental contact when connecting, installing and subsequently using the wireless dimmer switch. Otherwise, there is a risk of a life-threatening electric shock!
- Remove the cover of your existing wall switch and remove the switch from the wall socket.
- Remove the two cables (phase "L" and switched phase "L'") from the wall switch and connect them to the two screw terminal (D) on the wireless dimmer switch; see the diagram on the right.
The screw clamp labelled with "L" is the connection of phase/L; the screw terminal "×" is the output of the wireless dimmer switch to the light.
If the "L" and "L" connections are reversed or if the Neutral "N" cable is connected instead of the Phase "L", this may mean it may not be possible to program the wireless dimmer switch or LED lights might malfunction.
- Connect the two wires (C) on the wireless dimmer switch to the two switch contacts on your wall switch ("S1"; see the diagram).
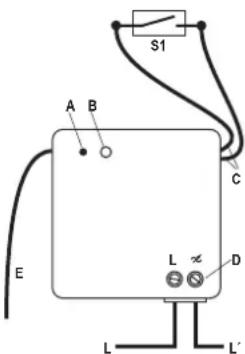
- Position the wireless dimmer switch in the flush socket so that the LED (A) and the push button (B) are pointing towards you. Lay the antenna (E) inside the flush socket so that it is not kinked/wound.

The push button is used to programme to a radio transmitter of the RS2W system (or to test whether the connected light can be switched on/off).
During installation, make sure there is enough free space around the control button and that it will not be pressed by accident (when the wall switch later sits in front of the wireless dimmer switch).
Before mounting wall switch and cover, perform first the teach-in procedure.
Now, switch on the mains voltage.

Never touch bare contacts of the connection wires during the programming process; there is a risk of fatal electrical shock!
Function test: Switching the connected light on/off & dimming the light using the control button
- Briefly press the push button on the wireless dimmer switch to switch the connected light on or off.
An LED next to the push button indicates the current switch state:
LED on: Light is switched on (with the last brightness selected)
LED off: Light is off
- To dim the light, first switch it on using the push button on the wireless dimmer switch. The LED on the wireless dimmer switch lights up.
Now press and hold the push button for longer than 3 seconds; the dimming function starts. When you have reached the desired brightness, release the button again.
Programming the wireless dimmer switch to a radio transmitter

The wireless dimmer switch can be programmed to any radio transmitter of the RS2W radio system.
Before programming, observe the operating instructions of the radio transmitter you intend to use.
During programming, maintain a minimum distance of 20 - 30 cm between the wireless dimmer switch and the transmitter. Failing to do this may result in a registration failure.
- If the wireless dimmer switch is on (LED next to the control button is on, connected light is activated), switch off the wireless dimmer switch first.
To do this, briefly press the control button; the LED next to the control button must go out as a result.

The wireless dimmer switch must be switched off (LED next to the control button is off), or else the registration process cannot be conducted.
- Start with the registration process on the radio transmitter.
Example: Both buttons "ON" and "OFF" of the desired switch channel at the 12-channel hand-held transmitter of the RS2W system must by pressed simultaneously until the red LED of the hand-held transmitter starts flashing. Release both buttons, the red LED continues to flash, the programming mode is activated.
- Press and hold the button on the wireless dimmer switch until the programming process at the transmitter is complete.
Example: The LED at the 12-channel hand-held transmitter of the RS2W system lights up blue and then goes dark. Now release the button on the built-in wireless dimmer switch.
- The built-in wireless dimmer switch switches on to indicate the end of the programming process.

Up to 5 receivers can be programmed to one switch channel of a transmitter of the RS2W system. This allows you, for example, to operate up to 5 wireless dimmer switches at the same time with the push of a button.
It is also possible to programme the wireless dimmer switch to multiple transmitters.

However, the wireless dimmer switch must not be programmed together with a wireless switch to a single switch channel!
Always register wireless dimmer switches and wireless switches on different channels of the wireless transmitter.
Deleting a programmed wireless dimmer switch from a transmitter
The procedure is exactly the same as for programming the wireless dimmer switch to the transmitter. For more information, consult the operating instructions for the radio transmitter of the RS2W radio system that will be used.
Switching the light on/off & dimming
a) Using the wall switch
- The light can be switched on or off as usual using the wall switch connected to the built-in wireless dimmer switch.
→ The light is switched on at the last selected brightness.
- If you want to dim the light, first switch the light on with the wall switch.
Then use the wall switch to switch the light off again and back on within 2 seconds. The dimming process begins.
When the desired brightness is reached, use the wall switch to turn the light off and back on. The brightness level has been saved.
b) Using a transmitter
→ You can turn the light connected to the built-in wireless dimmer switch on and off or dim it by radio only after it is registered on a wireless transmitter of the RS2W system. Follow the description above and the operating instructions of the radio transmitter that will be used.
Example for a 12-channel hand-held radio transmitter of the RS2W radio system:
- The brightness of the light connected to the wireless dimmer switch can be set to several levels (0% -> 25% -> 50% -> 75% -> 100%) by briefly pressing the corresponding "ON" button of the programmed channel.
Pause briefly between each keystroke until the blue feedback LED on the hand-held radio transmitter goes dark!
Dimming down (100% -> 75% -> 50% -> 25% -> 0%) works in the same way by using the "OFF" button on the programmed channel.
- To turn the brightness up steplessly on the connected light, hold the "ON" button of the programmed channel depressed. When you have reached the desired brightness, release the button.
- To dim the connected light down steplessly, hold the "OFF" button of the programmed channel depressed. When you have reached the desired brightness, release the button.
- Pressing the "ON" button on the hand-held wireless transmitter twice in rapid succession activates the light at 100% brightness.
- Pressing the "OFF" key twice in rapid succession turns the light off.
- With the "ALL-ON" or "ALL-OFF" button, the light connected to the built-in wireless dimmer switch is switched on or off (at the same time, all other programmed channels are likewise turned on or off). A dimming process does not occur in this case (the light is always switched on with the last selected brightness).
Maintenance
The product does not require any maintenance. You should not open/dissemble it. Repair or maintenance work must be carried out by a specialist.
Range
The transmission range of the radio signals between a transmitter of the RS2W system and the built-in wireless dimmer switch is up to 150 m under optimum conditions.
This value, however, is the so-called "open space range" (the range when transmitter and receiver are in line of sight, without any interference).
In practice, however, there may be walls, room ceilings, etc. between the transmitter and the receiver, which will reduce the range accordingly.
Due to the different influences on the wireless transmission, no specific range can be guaranteed. However, trouble-free operation is usually possible in a single family house.
Sometimes the range can be considerably reduced due to:
- Walls, reinforced concrete floors, drywall walls with metal frame construction
- Coated/metallised insulated glass
- Proximity to metallic & conductive objects (e.g., heating elements)
• Proximity to human bodies - Other devices on the same frequency (e.g. wireless headphones, wireless loudspeakers)
- Proximity to electric motors/appliances, transformers, power supplies, computers
Declaration of conformity (DOC)
We, Conrad Electronic SE, Klaus-Conrad-Straße 1, D-92240 Hirschau, hereby declare that this product conforms to the fundamental requirements and other relevant regulations of the 1999/5/EC directive.
The declaration of conformity for this product is available at: www.conrad.com
Disposal
The product must not be disposed of with the household waste. Dispose of the product at the end of its serviceable life in accordance with the current statutory requirements; e.g., return it to any suitable collection point.
Technical data
Operating voltage....230 V/AC, 50 Hz
Standby power consumption....<0.4 W
Power rating ....Incandescent bulbs: 5 - 150 W
LED/energy-saving bulbs: 5 - 20 W
→ Use only LED/energy-saving bulbs that are specially marked as dimmable. Also observe the minimum load of 5 W.
Overload protection.....yes
Excess temperature safety device.....yes
Sending/reception frequency .....868.3 MHz
Range up to 150 m (see chapter "Range")
Ambient conditions....Temperature -10 °C to +55 °C, air humidity 10% to 80% relative, not condensing
Dimensions (H x W x D)....42 x 42 x 13 mm
Weight......approx. 22 g
CE
F Mode d'emploi
Dimensions (H x L x P)....42 x 42 x 13 mm
Poids.... env. 22 g
CE



- RS2W Mini wireless built dimmer, 2-wire
- Intended use
- Package contents
- Explanation of symbols, labels
- Safety instructions
- a) General
- b) Operating location
- c) Connection and operation
- Preparations for installation
- Connection and installation
- Function test: Switching the connected light on/off & dimming the light using the control button
- Programming the wireless dimmer switch to a radio transmitter
- Deleting a programmed wireless dimmer switch from a transmitter
- Switching the light on/off & dimming
- a) Using the wall switch
- b) Using a transmitter
- Example for a 12-channel hand-held radio transmitter of the RS2W radio system:
- Maintenance
- Range
- Sometimes the range can be considerably reduced due to:
- Declaration of conformity (DOC)
- Disposal
- Technical data
Brand : Renkforce
Model : RS2W Mini
Category : Dimmer