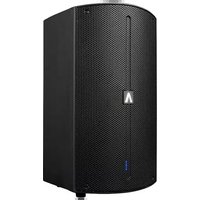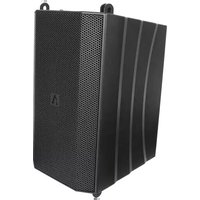
Imperio Pro IMP205 - Speaker Avante - Free user manual and instructions
Find the device manual for free Imperio Pro IMP205 Avante in PDF.


User questions about Imperio Pro IMP205 Avante
0 question about this device. Answer the ones you know or ask your own.
Ask a new question about this device
Download the instructions for your Speaker in PDF format for free! Find your manual Imperio Pro IMP205 - Avante and take your electronic device back in hand. On this page are published all the documents necessary for the use of your device. Imperio Pro IMP205 by Avante.
USER MANUAL Imperio Pro IMP205 Avante
©2023 ADJ PRODUCTS LLC all rights reserved. Information, specifications, diagrams, images, and instructions herein are subject to change without notice. ADJ logo and identifying product names and numbers herein are trademarks of ADJ PRODUCTS LLC. Copyright protection claimed includes all forms and matters of copyrightable materials and in- formation now allowed by statutory or judicial law or hereinafter granted. Product names used in this document may be trademarks or registered trademarks of their respective companies and are hereby acknowledged. All non-ADJ brands and product names are trademarks or registered trademarks of their respective companies.
ADJ PRODUCTS LLC and all affiliated companies hereby disclaim any and all liabilities for property, equipment, building, and electrical damages, injuries to any persons, and direct or indirect economic loss associated with the use or reliance of any information contained within this document, and/or as a result of the improper, unsafe, insufficient and negligent assembly, installation, rigging, and operation of this product.
AVANTE World Headquarters USA
6122 S. Eastern Ave. | Los Angeles, CA 90040 USA
323-316-9722 | Fax: 323-582-2941 | www.avanteaudio.com | info@avanteaudio.com
AVANTE NETHERLANDS
Junostraat 2 | 6468 EW Kerkrade | Netherlands
+31 45 546 85 00 | Fax: +31 45 546 85 99 | europe@avanteaudio.com
AVANTE MEXICO
Santa Ana 30 | Parque Industrial Lerma | Lerma Mexico 52000
+52 (728) 282.7070 | ventas@avanteaudio.com
Energy Saving Matters (EuP 2009/125/EC)
Saving electric energy is a key to help protecting the environment. Please turn off all electrical products when they are not in use. To avoid power consumption in idle mode, disconnect all electrical equipment from power when not in use. Thank you!
DOCUMENT VERSION

Due to additional product features and/or enhancements, an updated version of this document may be available online. Please scan the QR Code with your mobile device or visit www.elationlighting.com for the latest revision/update of this manual, before installation and/or programming.
| Date | Document Version | Notes |
| 08/01/22 1 Initial Release | ||
| 03/03/23 1.1 | Updated Dimensions, Specifications | |
CONTENTS
General Information 4
Limited Warranty (USA Only) 5
Safety Guidelines 6
Safety Guidelines (French) 8
Maintenance Guidelines & Fuse Replacement 10
Maintenance Guidelines & Fuse Replacement (French) 11
Overview 12
IMP205 Dimensions 12
Imperio Flybars 13
Connections & Controls 14
Configuration & DSP Presets 15
Installation 18
Imperio Frequency Charts 25
Specifications 29
Components and Accessories 30
GENERAL INFORMATION
INTRODUCTION
This speaker is designed for professional use only. Please read and understand all the instructions and guidelines in this manual carefully and thoroughly before attempting to operate these speakers. These instructions contain important information regarding safety, installation, and use.
UNPACKING
Every speaker has been thoroughly tested and has been shipped in perfect operating condition. Carefully check the shipping carton for damage that may have occurred during shipping. If the carton appears to be damaged, carefully inspect speaker for damage and be sure all accessories necessary to install and operate the speaker have arrived intact. In the event damage has been found or parts are missing, please contact our customer support team for further instructions. Please do not return this speaker to your dealer without first contacting customer support at the number listed below. Please do not discard the shipping carton in the trash. Please recycle whenever possible.
CUSTOMER SUPPORT
AVANTE provides a customer support line to provide set up help, answer any question should you encounter problems during your set up or initial operation, and for any service related issues. Please visit www.avanteaudio.com for up to date iinformation. You may also visit us on the web at www.avanteaudio.com for any comments or suggestions.
AVANTE SERVICE USA - Monday - Friday 8:00am to 4:30pm PST
Voice: 800-322-6337 | Fax: 323-532-2941 | support@avanteaudio.com
AVANTE SERVICE EUROPE - Monday - Friday 08:30 to 17:00 CET
Voice: +31 45 546 85 30 | Fax: +31 45 546 85 96 | europe@avanteaudio.com
WARRANTY REGISTRATION
Please register your product online: www.avanteaudio.com Online product registration is required in order to activate the third year of the 3-year warranty. All returned service items, whether under warranty or not, must be freight pre-paid and accompany a return authorization (R.A.) number. The R.A. number must be clearly written on the outside of the return package. A brief description of the problem as well as the R.A. number must also be written down on a piece of paper and included in the shipping container. If the unit is under warranty, you must provide a copy of your proof of purchase invoice and the unit must be registered online at www.avanteaudio.com to receive year 3 of the 3-year warranty. Items returned without a R.A. number clearly marked on the outside of the package will be refused and returned at customer's expense. You may obtain a R.A. number by contacting customer support.
LIMITED WARRANTY (USA ONLY)
- ADJ Products, LLC hereby warrants, to the original purchaser, AVANTE products to be free of manufacturing defects in material and workmanship for a prescribed period of up to 3-years (1,095 days) from the original purchase date. Product must be registered online at www.avanteaudio.com in order to activate year 3 of the 3-year warranty period. This warranty shall be valid only if the product is purchased within the United States of America, including possessions and territories. It is the owner's responsibility to establish the date and place of purchase by acceptable evidence at the time service is sought.
- For warranty service you must obtain a Return Authorization number (RA#) before sending the product back; please contact ADJ Products, LLC Service Department at 800-322-6337. Send the product only to the ADJ Products, LLC factory. All shipping charges must be prepaid. If the requested repairs or service (including parts replacement) are within the terms of this warranty, ADJ Products, LLC will pay return shipping charges only to a designated point within the United States. If the entire instrument is sent, it must be shipped in its original package. No accessories should be shipped with the product. If any accessories are shipped with the product, ADJ Products, LLC shall incur no liability whatsoever for loss of or damage to any such accessories, or for the safe return thereof.
- This warranty is void if the serial number has been altered or removed; if the product is modified in any manner which ADJ Products, LLC concludes, after inspection, affects the reliability of the product; if the product has been repaired or serviced by anyone other than the ADJ Products, LLC factory unless prior written authorization was issued to purchaser by ADJ Products, LLC; if the product is damaged because it was not properly maintained as set forth in the instruction manual.
- This is not a service contract, and this warranty does not include maintenance, cleaning or periodic checkup. During the period specified above, ADJ Products, LLC will replace defective parts at its expense with new or refurbished parts, and will absorb all expenses for warranty service and repair labor by reason of defects in material or workmanship. The sole responsibility of ADJ Products, LLC under this warranty shall be limited to the repair of the product, or replacement thereof, including parts, at the sole discretion of ADJ Products, LLC. All products covered by this warranty were manufactured after August 15, 2012, and bear identifying marks to that effect.
- ADJ Products, LLC reserves the right to make changes in design and/or improvements upon its products without any obligation to include these changes in any products theretofore manufactured. No warranty, whether expressed or implied, is given or made with respect to any accessory supplied with products described above. Except to the extent prohibited by applicable law, all implied warranties made by ADJ Products, LLC in connection with this product, including warranties of merchantability or fitness, are limited in duration to the warranty period set forth above. And no warranties, whether expressed or implied, including warranties of merchantability or fitness, shall apply to this product after said period has expired. The consumer's and/or Dealer's sole remedy shall be such repair or replacement as is expressly provided above; and under no circumstances shall ADJ Products, LLC be liable for any loss or damage, direct or consequential, arising out of the use of, or inability to use, this product. This warranty is the only written warranty applicable to ADJ Products, LLC Products and supersedes all prior warranties and written descriptions of warranty terms and conditions heretofore published.
- Warranty Registration: Please register your product online: www.avanteaudio.com. Online product registration is required in order to activate the third year of the 3-year warranty. All returned service items, whether under warranty or not, must be freight pre-paid and accompany a return authorization (R.A.) number. The R.A. number must be clearly written on the outside of the return package. A brief description of the problem as well as the R.A. number must also be written down on a piece of paper and included in the shipping container. If the unit is under warranty, you must provide a copy of your proof of purchase invoice and the unit must be registered online at www.avanteaudio.com to receive year 3 of the 3-year warranty. Items returned without a R.A. number clearly marked on the outside of the package will be refused and returned at customer's expense. You may obtain a R.A. number by contacting customer support.
SAFETY GUIDELINES
This speaker is a sophisticated piece of electronic equipment. To guarantee a smooth operation, it is important to follow all instructions and guidelines in this manual. AVANTE is not responsible for injury and/or damages resulting from the misuse of this speaker due to the disregard of the information printed in this manual. Only qualified and/or certified personnel should perform the installation of this speaker and all included and/or optional rigging accessories. Only the original included and/or optional rigging parts and accessories for this speaker should be used for proper installation. Any modifications to the speaker, included and/or optional rigging parts and accessories will void the original manufactures warranty and increase the risk of damage and/or personal injury.

PROTECTION CLASS 1 – SPEAKER MUST BE PROPERLY GROUNDED
TO REDUCE RISK OF ELECTRICAL SHOCK, DO NOT REMOVE ANY COVER. THERE ARE NO USER SERVICEABLE PARTS INSIDE THIS SPEAKER.

DO NOT ATTEMPT ANY REPAIRS YOURSELF; DOING SO WILL VOID YOUR MANUFACTURES WARRANTY. DAMAGES RESULTING FROM MODIFICATIONS TO THIS SPEAKER AND/OR THE DISREGARD OF SAFETY INSTRUCTIONS AND GUIDELINES IN THIS MANUAL VOID THE MANUFACTURES WARRANTY AND ARE NOT SUBJECT TO ANY WARRANTY CLAIMS AND/OR REPAIRS. NEVER OPEN THIS SPEAKER WHILE IN USE! UNPLUG POWER BEFORE SERVICING SPEAKER! KEEP FLAMMABLE MATERIALS AWAY FROM SPEAKER!

DRY LOCATIONS USE ONLY!
DO NOT EXPOSE SPEAKER TO RAIN AND/OR MOISTURE!
DO NOT SPILL WATER AND/OR LIQUIDS ON OR INTO THE SPEAKER!
This speaker is for PROFESSIONAL USE ONLY! Read all INSTRUCTIONS and follow all WARNINGS!
DO NOT use speaker near wet and/or damp locations. Speaker must be kept away from direct contact with liquids and must not be exposed to water/liquid dripping or splashing.
DO NOT attempt installation and/or operation without knowledge how to do so. Consult a professional sound equipment installer for proper and safe speaker installation. ONLY the original included, and/or optional rigging parts and accessories listed in this manual should be used for proper installation and use.
DO NOT expose any part of the speaker to open flame or smoke, or position speaker close to any flammable materials while operating. Be sure to install this speaker in an area that will allow proper ventilation. Allow approximately 6 inches (152mm) behind the speaker cabinet for proper cooling. The speaker contains an internal power amplifier that produces heat during use. Keep speaker away from heat sources such as radiators, heat registers, stoves, or other appliances (including amplifiers) that produce heat.
DO NOT operate speaker if power cord is frayed, crimped, damaged, and/or if any of the power cord connectors are damaged and do not insert into the speaker securely with ease. NEVER force a power cord connector into the speaker. If the power cord or any of its connectors are damaged, replace it immediately with a new one of similar power rating.
DO NOT disassemble speaker, there are NO user serviceable parts inside. Refer all servicing to qualified service personnel. Servicing is required when the speaker has been damaged in any way, such as power-supply cord or plug is damaged, liquid has been spilled and/or objects have fallen into the speaker, the speaker has been exposed to rain and/or moisture, does not operate normally, or has been dropped.
DO NOT defeat the safety purpose of the polarized or grounding-type plug. A polarized plug has two blades with one wider than the other. A grounding type plug has two blades and a third grounding prong. The wide blade or the third prong is provided for your safety. If the provided plug does not fit into your outlet, consult an electrician for replacement of the obsolete outlet.
SAFETY GUIDELINES
POWER SOURCES: This product must be connected to a power supply only of the type described in these operating instructions, or as marked on the unit. This product is Country Specific.
PROTECTIVE EARTHING TERMINAL: The speaker should be connected to a mains socket outlet with a protective earth-ground/earthing connection.
DISCONNECT DEVICE: The plug on the power cord is used as the disconnect device, and must remain readily available and operable.
ONLY handle power cord by the plug end, never pull the plug out by tugging the wire portion of the cord.
ALWAYS disconnect speaker from main power source before performing any servicing or cleaning procedure.
DO NOT use solvents or glass cleaner to clean speaker. Clean only with a dry cloth.
CAUTION: To avoid physical damage, read the installation instructions carefully before installation.
CAUTION: Listening to speakers at high volume for extended time or within immediate proximity may damage hearing.
CAUTION: Speakers should be installed/operated by qualified and trained professionals ONLY.
CAUTION: Always mount speakers in a safe and stable manner.
CAUTION: Wear appropriate safety equipment during speaker installation.
CAUTION: Route power and audio cables so that they are NOT likely to be walked on or pinched.
CAUTION: Unplug the speaker during lightning storms and/or when unused for long periods of time
CAUTION: The maximum environmental operating temperature is 35^ C ( 95^ F).
ONLY use the original packaging materials and/or case to transport the speaker in for service.
PLEASE recycle shipping boxes and packaging whenever possible.
LIGNES DIRECTRICES DE SÉCURITÉ
Regular maintenance is necessary to optimize the potential functional lifespan of the speakers.
- Read the installation and operation instructions for correct operation of the speakers.
- Although the speakers are rugged and designed to withstand limited impact forces when installed correctly, take care to avoid impact damage when handling or transporting speakers, especially the speaker mesh screen.
- The speakers should be serviced by a qualified service technician when:
A. Objects have fallen, or liquid has been spilled into the speaker.
B. Been exposed to rain or water conditions.
C. Does not appear to operate normally or exhibits a marked change in performance.
D. Has fallen and/or been subjected to extreme handling.
-
Check each speaker for loose screws and/or other fasteners.
-
If the speaker installation is fixed or displayed for a lengthy time, regularly inspect all rigging and installation equipment, and replace or repair it as necessary, and during long periods of non-use, disconnect the main power to the unit.
-
If while conducting an electrical test a circuit shorts, a breaker-switch trips, wires burn, and or any other abnormality appears, discontinue testing, and troubleshoot units to find the problem before continuing with any testing or operation.
-
The speakers are designed for dry locations use only.
-
When not in use, store speakers in a dry, well ventilated storage location.
FUSE REPLACEMENT
- Turn off power
- Unplug the power cable.
- Unscrew fuse holder with flathead screwdriver.
- Replace blown fuse iwth a new T4AL 250V fuse.
- Reinstall fuse holder.
- It is recommended that a spare fuse be readily available.
- If refusing the fuse fails to work, contact an amplifier repair professional.
DIRECTIVES D'ENTRETIEN
REPLACEMENT DE FUSIBLE
OVERVIEW - IMP205 DIMENSIONS
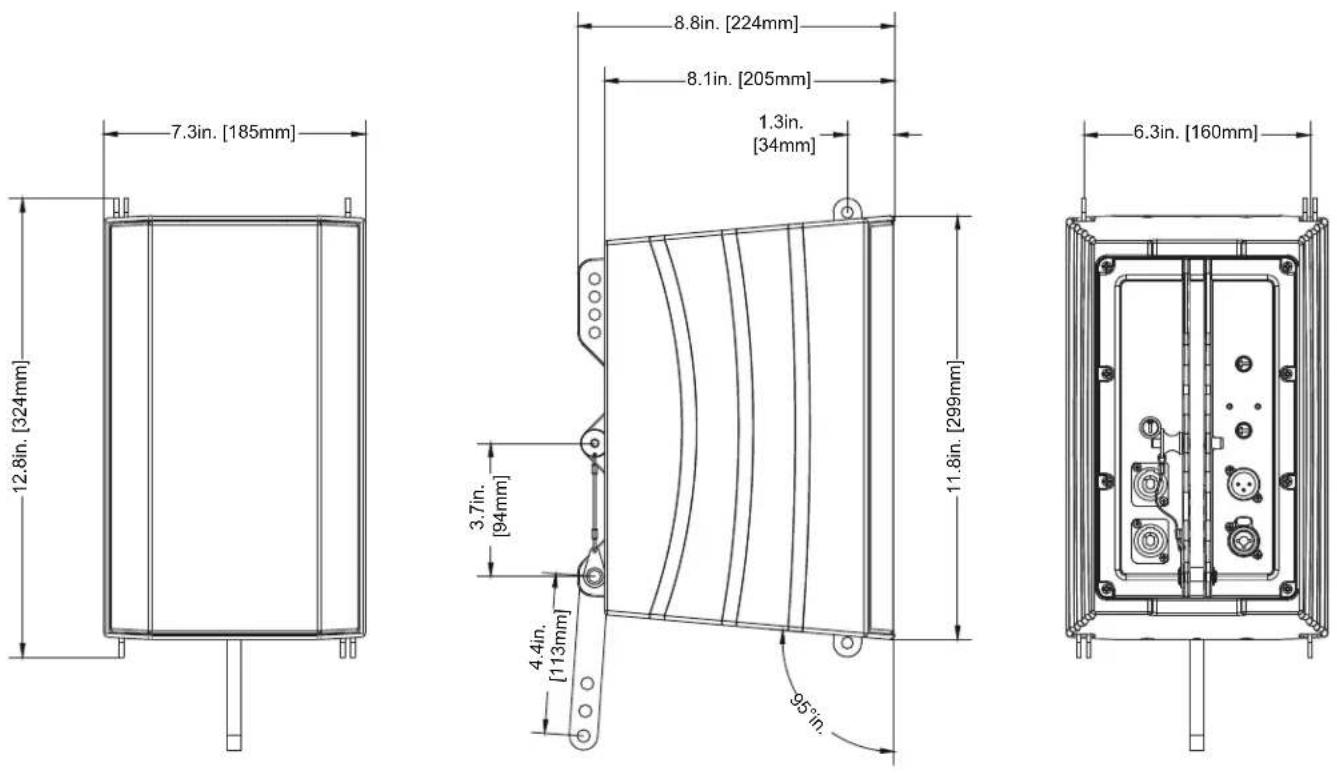
OVERVIEW - IMPERIO FLYBARS
IMPERIO FLYBAR - SMALL
Sold Separately
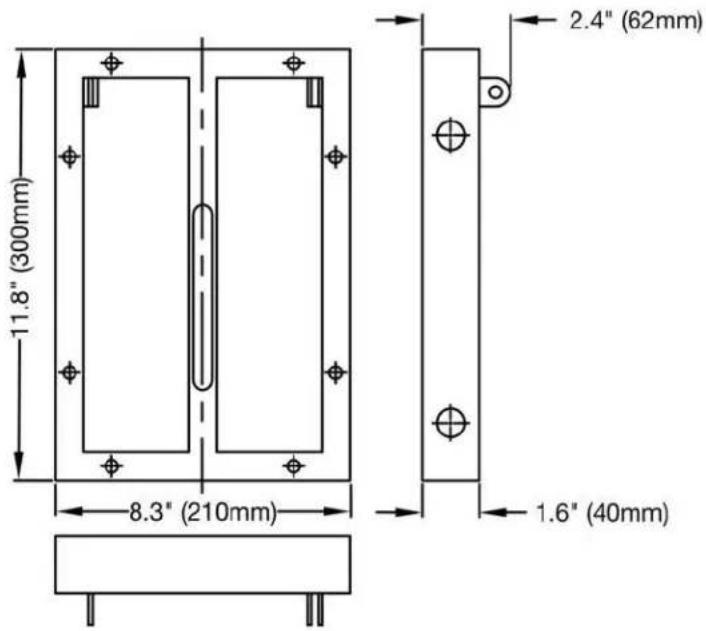
text_image
11.8" (300mm) 8.3" (210mm) 2.4" (62mm) 1.6" (40mm)IMPERIO FLYBAR - LARGE
Sold Separately
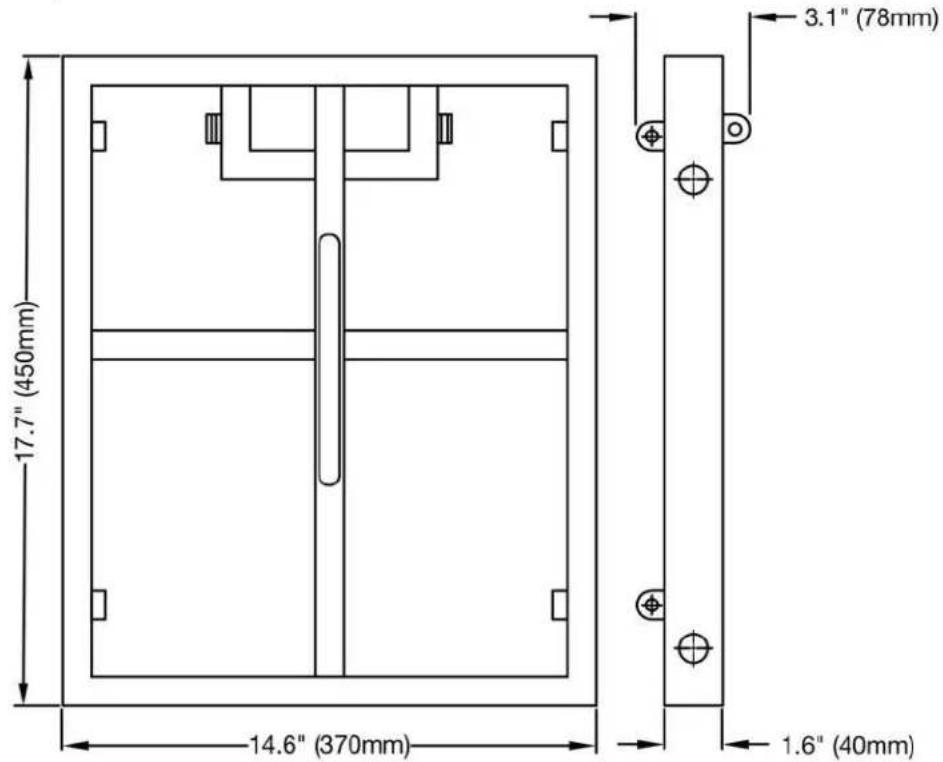
text_image
17.7" (450mm) 14.6" (370mm) 3.1" (78mm) 1.6" (40mm)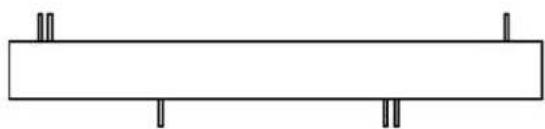
natural_image
Simple line drawing of a rectangular beam with four vertical supports at both ends (no text or symbols)OVERVIEW - CONNECTIONS & CONTROLS
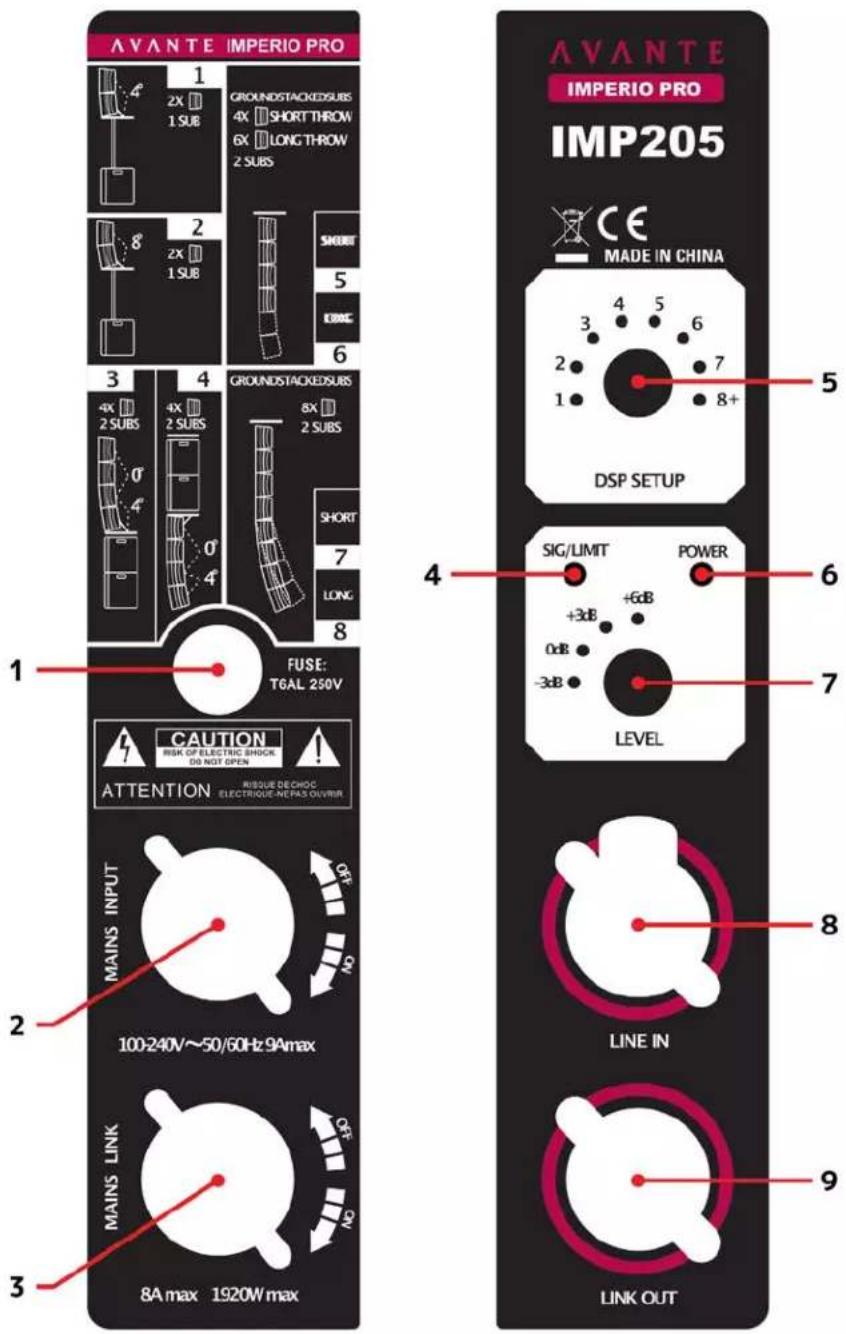
text_image
AVANTE IMPERIO PRO 1 2X 1 SUB GROUNDSTACKEDSUBS 4X SHORT THROW 6X LONG THROW 2 SUBS SHOURT 2X 1 SUB 5 LINK 6 3 4 GROUNDSSTACKEDSUBS 4X 2 SUBS 4X 2 SUBS 8X 2 SUBS SHORT 7 LONG 8 FUSE: T6AL 250V CAUTION RISK OF ELECTRIC SHOCK DO NOT OPEN ATTENTION RISQUE DE CHOC ELECTRIQUE NEPAS OLIVIR 100-240V~50/60Hz 9Amax MAINS INPUT OFF NO MAINS LINK 8A max 1920W max AVANTE IMPERIO PRO IMP205 CE MADE IN CHINA DSP SETUP SIG/LIMIT POWER +3dB +6dB 0dB -3dB LEVEL LINE IN LINK OUT 1 2 3 4 5 6 7 8 9IMP205
- FUSE: Slow-Blow 4.0 Amp 250V fuse (100-240V).
- MAINS INPUT: Power input (+).
- MAINS LINK: Power output (-). Output is connected in parallel with mains input (3) and can be used to power additional IMP205 speakers.
- SIG/LIMIT: Green indicates a signal ≥ 2 5dBu, and red indicates that the internal limiter circuit has tripped, preventing amplifier distortion and speaker overloads.
- DSP SETUP: 8-position rotary switch selects between 8 equalization curve and DSP presets.
- POWER: Blue indicates main power.
- LEVEL: Control internal speaker volume (from -3dB to +6dB).
- LINE IN: 3Pin XLR input connector (balanced line-level audio input).
- LINK OUT: 3pin XLR output connector (balanced line-level audio output).
CONFIGURATION & DSP PRESETS
The IMP205 speakers can be configured in various ways to optimize setup for crowd size and venue, whether pole-mounted on a standard speaker stand (not included), pole mounted on top of the sub, stacked on the sub, or flying attached to a rig.
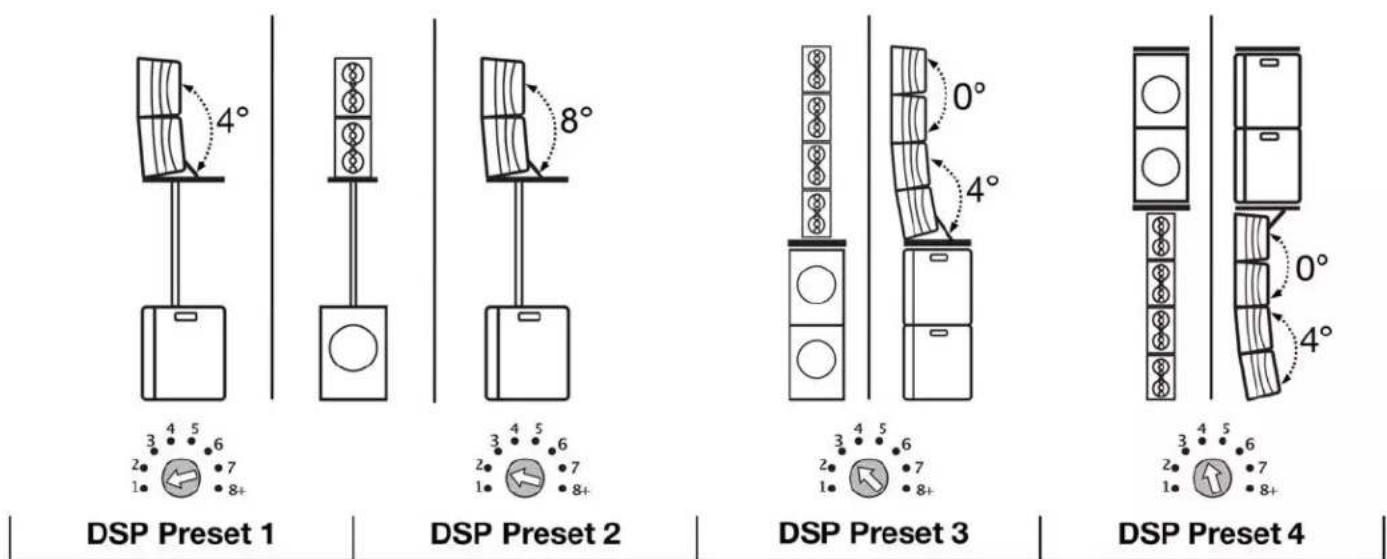
text_image
DSP Preset 1 DSP Preset 2 DSP Preset 3 DSP Preset 4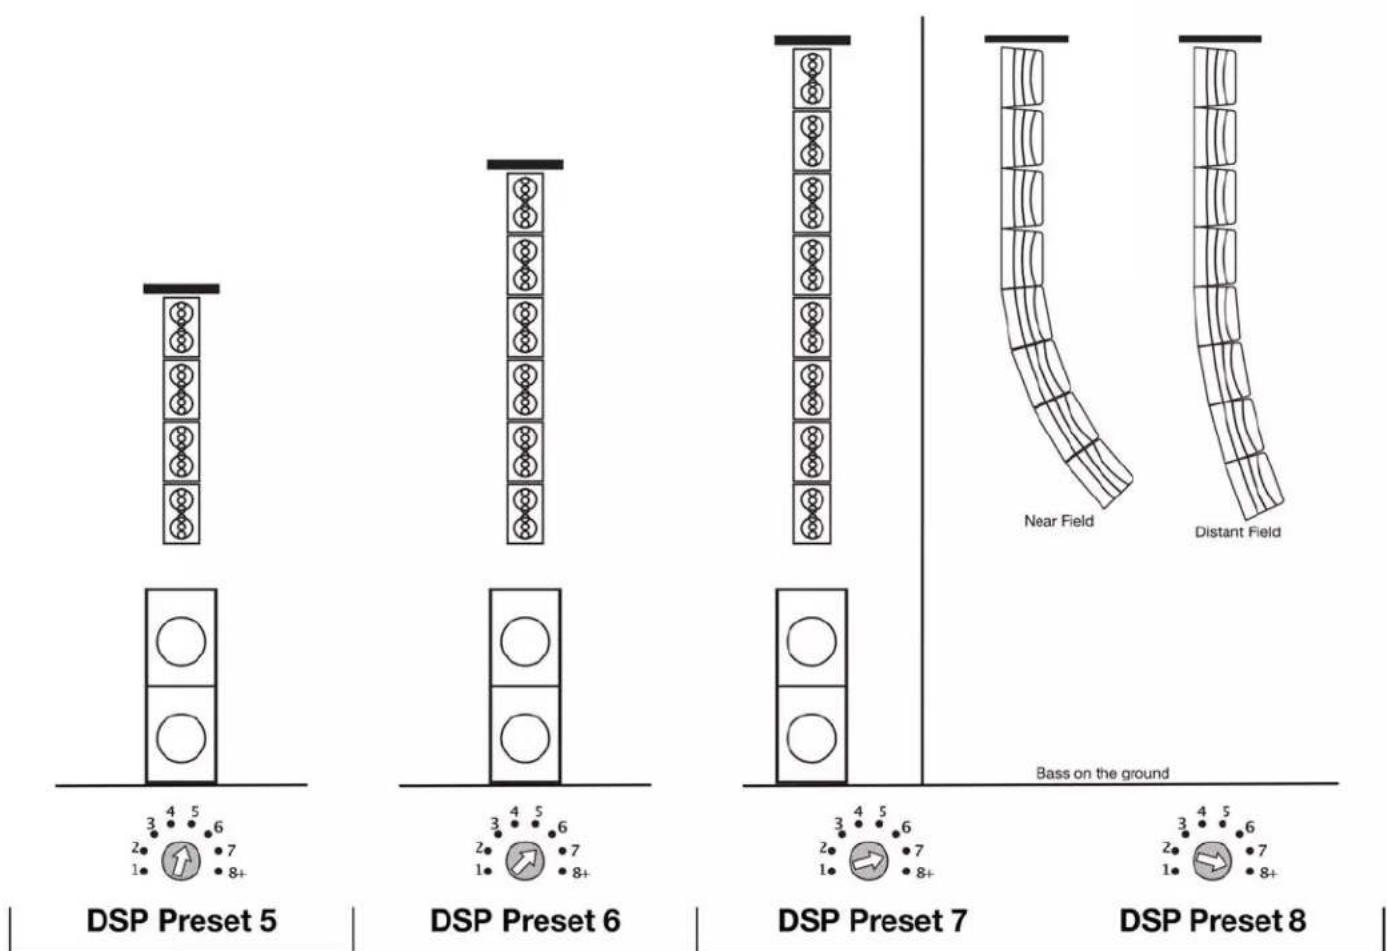
bar
| DSP Preset | Count | | ---------- | ----- | | 5 | 3 | | 5 | 4 | | 5 | 5 | | 5 | 6 | | 6 | 2 | | 6 | 1 | | 6 | 7 | | 6 | 8+ | | 7 | 2 | | 7 | 1 | | 7 | 7 | | 7 | 8+ | | 8 | 3 | | 8 | 4 | | 8 | 5 | | 8 | 6 | | Bass on the ground | 2 | | Bass on the ground | 1 | | Bass on the ground | 7 | | Bass on the ground | 8+ | | Bass on the ground | 3 | | Bass on the ground | 4 | | Bass on the ground | 5 | | Bass on the ground | 6 | | Bass on the ground | 7 | | Bass on the ground | 8+ |CONFIGURATION & DSP PRESETS 1, 2, 3, 4
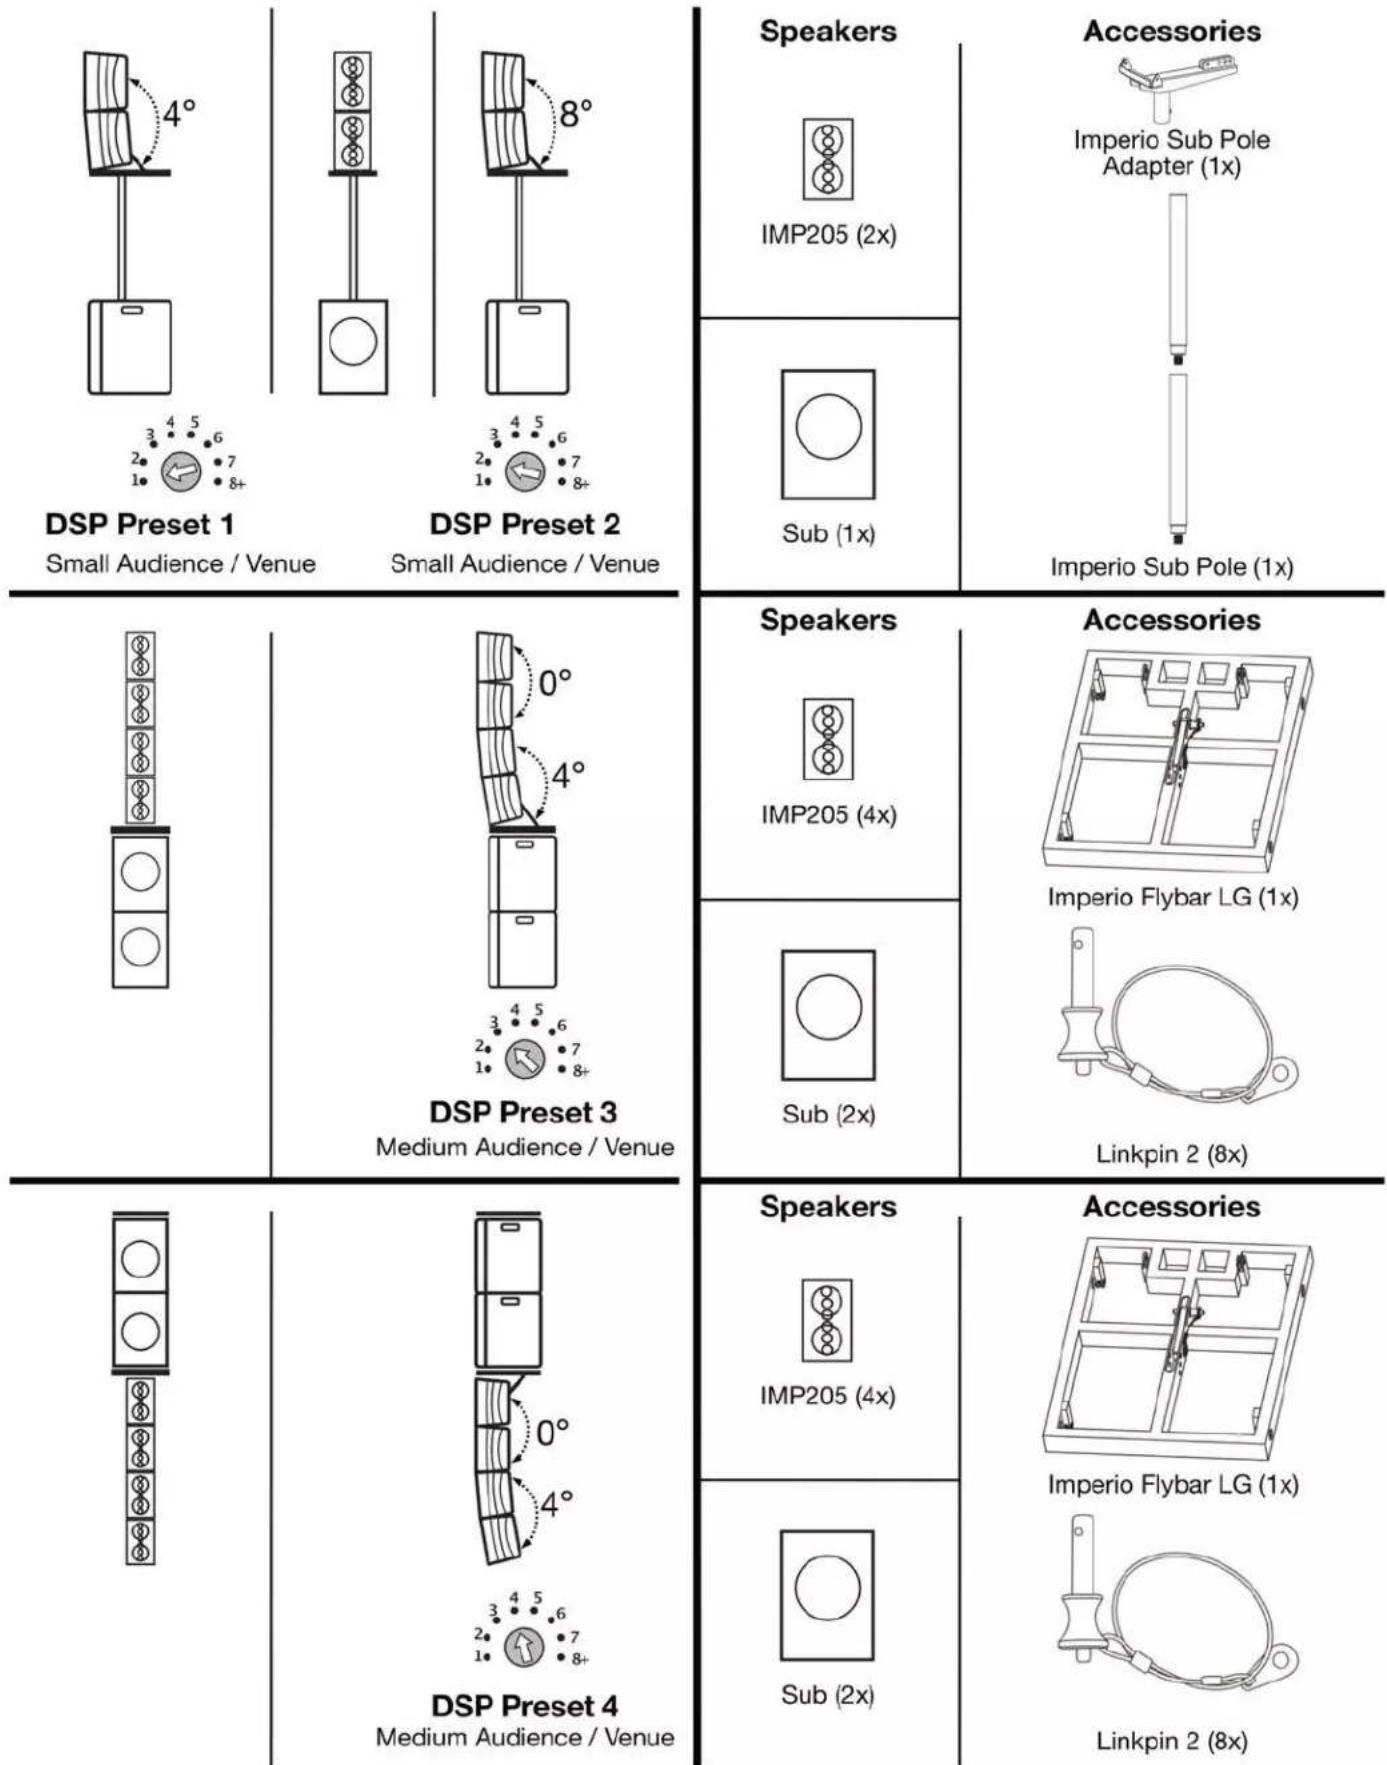
text_image
DSP Preset 1 Small Audience / Venue DSP Preset 2 Small Audience / Venue Speakers IMP205 (2x) Sub (1x) Accessories Imperio Sub Pole Adapter (1x) Imperio Sub Pole (1x) Speakers IMP205 (4x) Sub (2x) Accessories Imperio Flybar LG (1x) Linkpin 2 (8x) Speakers IMP205 (4x) Sub (2x) Accessories Imperio Flybar LG (1x) Linkpin 2 (8x)CONFIGURATION & DSP PRESETS 5, 6, 7, 8
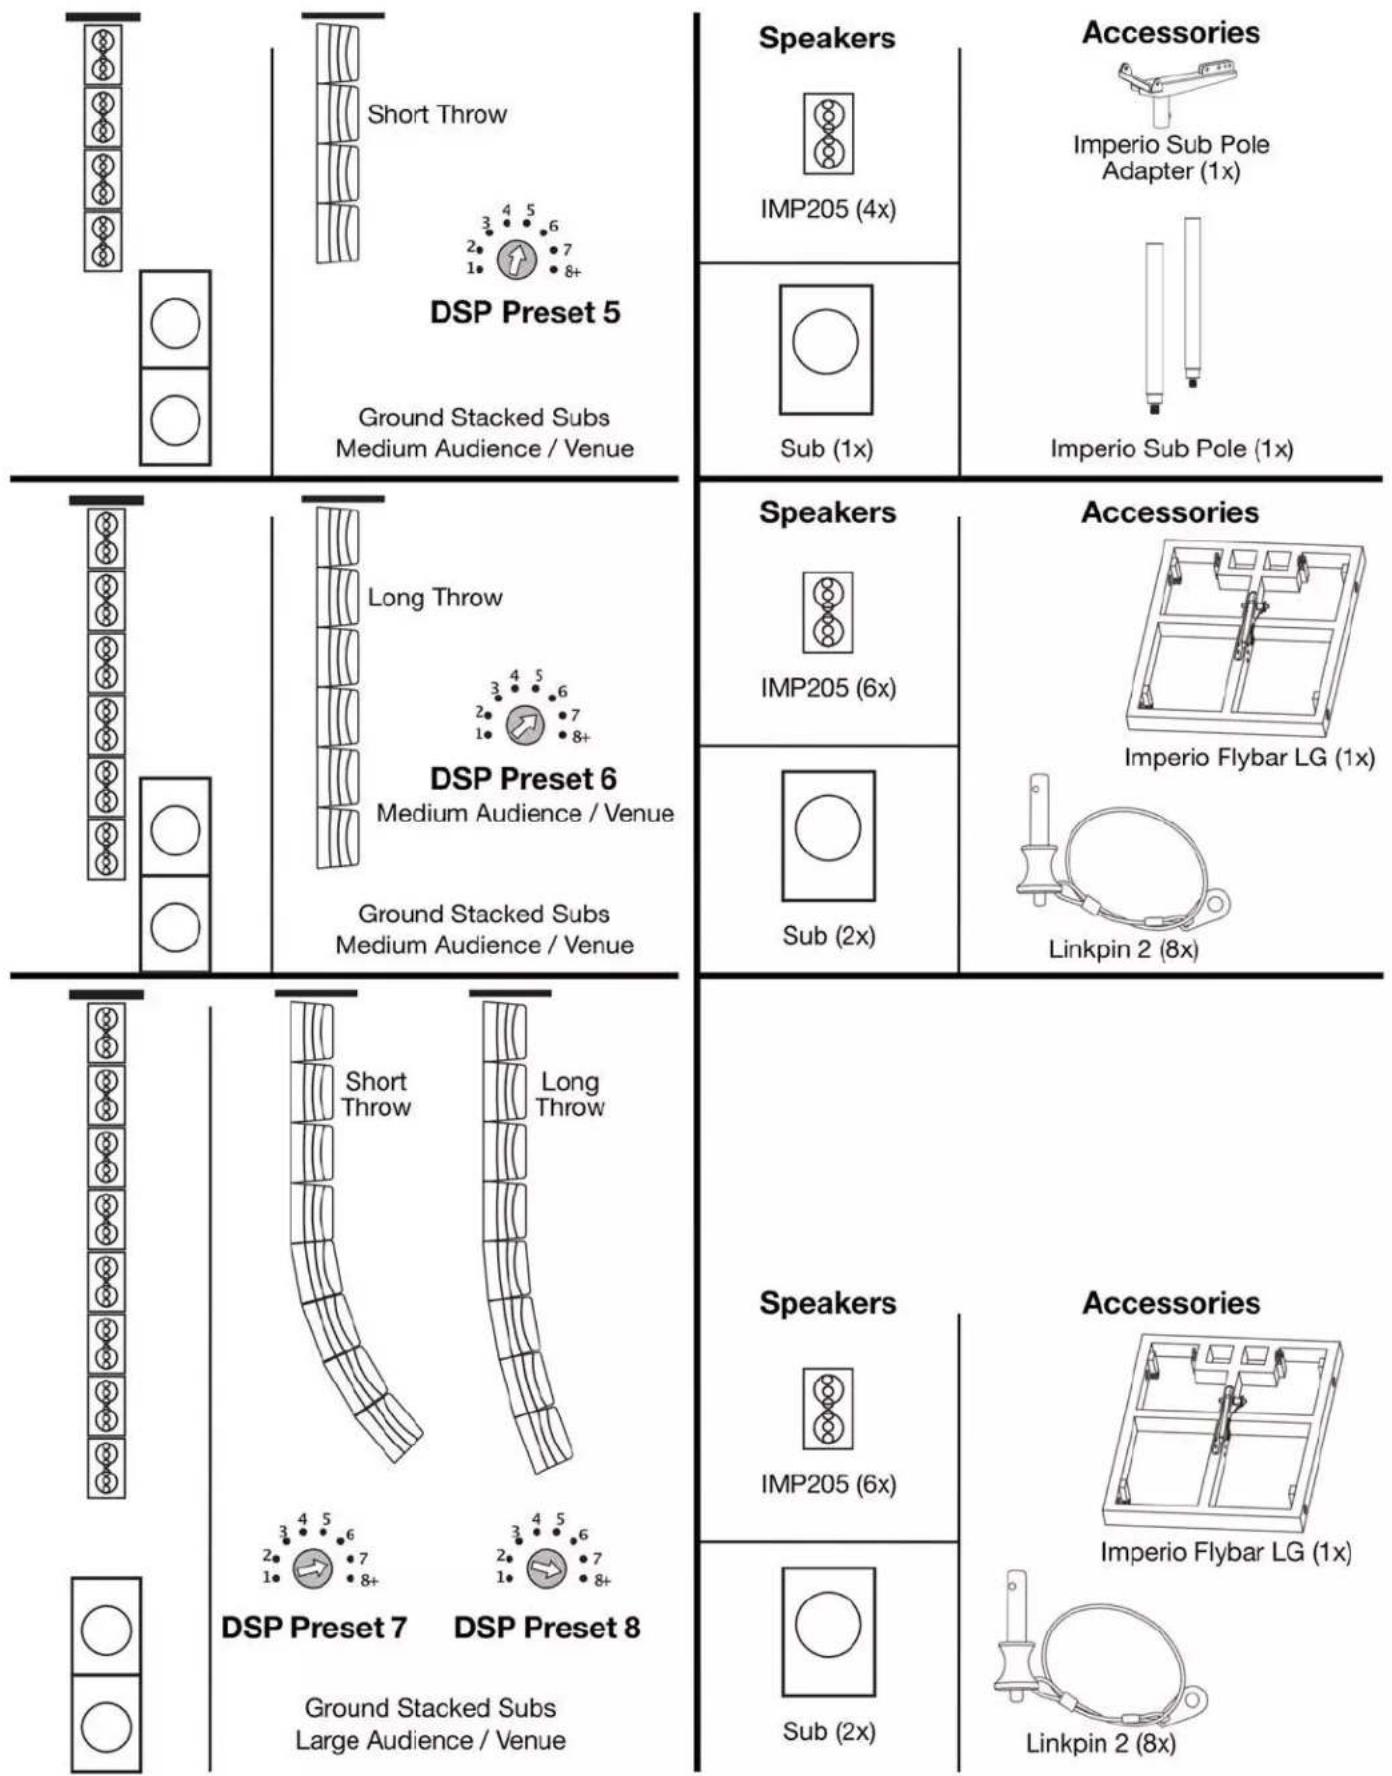
text_image
Short Throw DSP Preset 5 Ground Stacked Subs Medium Audience / Venue Speakers IMP205 (4x) Sub (1x) Accessories Imperio Sub Pole Adapter (1x) Imperio Sub Pole (1x) Long Throw DSP Preset 6 Medium Audience / Venue Ground Stacked Subs Medium Audience / Venue Speakers IMP205 (6x) Sub (2x) Accessories Imperio Flybar LG (1x) Linkpin 2 (8x) Short Throw Long Throw DSP Preset 7 DSP Preset 8 Ground Stacked Subs Large Audience / Venue Speakers IMP205 (6x) Sub (2x) Accessories Imperio Flybar LG (1x) Linkpin 2 (8x)INSTALLATION - RIGGING AND SUSPENSION

DO NOT INSTALL SPEAKERS IF YOU ARE NOT QUALIFIED TO DO SO! INSTALLATION BY QUALIFIED TECHNICIANS ONLY!

INSTALLATIONS SHOULD BE CHECKED BY A QUALIFIED PERSON ONCE A YEAR!

FLAMMABLE MATERIAL WARNING
Keep speaker a minimum of 5.0 feet (1.5m) away from flammable materials and/or pyrotechnics.

ELECTRICAL CONNECTIONS
A qualified electrician should complete all electrical connections and/or installations.

A MAXIMUM OF 12 IPERIO PRO speakers may be suspended from a SMALL FLYBAR.
A MAXIMUM OF 2 IMP205 Sub speakers may be suspended from a LARGE FLYBAR, plus A MAXIMUM OF 4 IMP205 speakers may be suspended from a LARGE FLYBAR attached to the bottom of the above mentioned 2 suspended sub speakers.

USE CAUTION WHEN POWER LINKING MULTIPLE SPEAKERS AS THE POWER CONSUMPTION OF OTHER SPEAKER MODELS MAY EXCEED THE MAX POWER OUTPUT ON THIS SPEAKER. CHECK SILK SCREEN ON SPEAKER FOR MAX AMPS.
WARNING! The safety and suitability of any lifting equipment, installation location/platform, anchoring/rigging/mounting method, hardware, and electrical installation is the sole responsibility of the installer.
Install speaker(s), all speaker accessories, and all anchoring/rigging/mounting hardware following all local, national, and country commercial, electrical, and construction codes and regulations.
Consult a professional equipment installer to determine if the metal truss/structure or surface is properly certified to safely support the combined weight of the speakers(s), clamps, cables, and all rigging hardware and accessories before rigging/mounting a single speaker or multiple interconnected speakers to any metal truss/structure.
Carefully consider item selection for rigging in unusual environmental conditions as rigging and suspension equipment could be subject to wear, misuse, overloading, corrosion, deformation, alteration, and other factors that may reduce their capacity rating.
Visually inspect metal truss/structure to ensure it does not flex and/or become deformed due to the weight of the speaker(s). Damage caused to speaker(s) through mechanical stress is not covered by warranty.
Install speakers(s) in areas outside walking paths, seating areas, or away from areas were unauthorized personnel might reach the speaker(s) by hand. Access under work area must be blocked.
INSTALLATION - RIGGING AND SUSPENSION
OVERHEAD RIGGING
Overhead rigging requires extensive experience, including amongst others, calculating working load limits, installation material being used, and periodic safety inspection of all installation material and the speaker. If you lack these qualifications, do not attempt the installation yourself. Improper installation can result in bodily injury and property damage. Regardless of local installation conditions, the following guidelines apply to all overhead rigging installations:
NEVER stand directly below the speaker(s) when rigging, removing or servicing.
To limit swinging or tipping the load when lifting the sub speaker(s) and/or Imperio speaker(s) into position when stacking, rigging, and/or suspending them using the available Imperio Flybar(s), determine the center of gravity of the overall assembly, then rig or suspend the load through a lifting point straight above the center of gravity. If using multiple rigging/anchor points and a single lifting point, ensure that all suspension load angles used are symmetrical about the lifting point with respect to the center of gravity so that load tensions are balanced between ropes, wires, chains, or cables.
Structural members, such as a truss system, must always be used to attach or suspend loads from a ceiling or to a wall. Never use a ceiling or wall surface itself to attach or suspend external loads, the catastrophic failure of which can or likely will result in potential structural/property damage, injury, or death.
Inspect/verify the structural integrity of the structural member used to suspend, hang, or support external loads by looking for hidden structural weaknesses.
Avoid using threaded fasteners in wooden structural members for suspending overhead loads (nails, screws, lag bolts, etc.). Threaded fasteners are inherently unreliable for suspending overhead loads, due in part to possible hidden structural weaknesses in the wood (cracks, knots, etc.).
Suspension points provided by the installation owner or third-party may not be adequate to lift or suspend the intended overhead loads.
You must consult an expert, such as a structural engineer or rigging specialist, if there is even the slightest question or doubt about the structural integrity of any part of the installation.
Take all appropriate precautions and safety measures when placing equipment in potentially dangerous locations, especially where public safety is a concern.
INSTALLATION - OVERVIEW
text_image
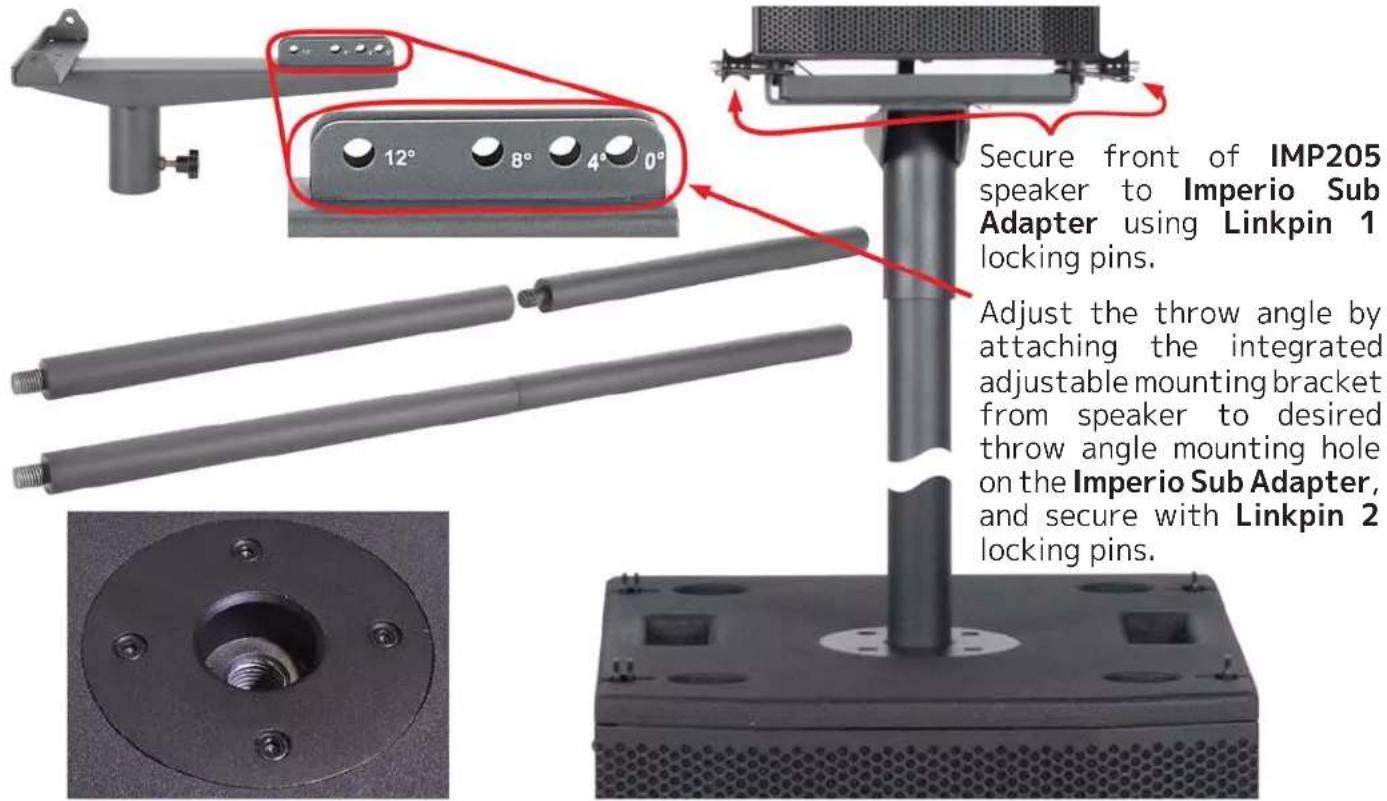
Secure front of IMP205 speaker to Imperio Sub Adapter using Linkpin 1 locking pins. Adjust the throw angle by attaching the integrated adjustable mounting bracket from speaker to desired throw angle mounting hole on the Imperio Sub Adapter, and secure with Linkpin 2 locking pins.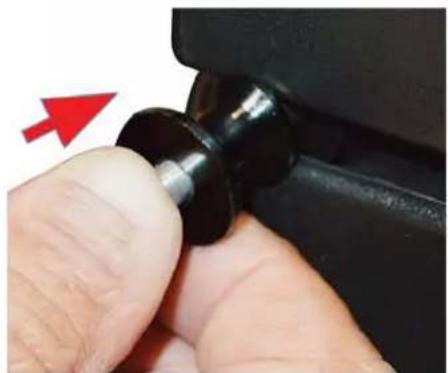
natural_image
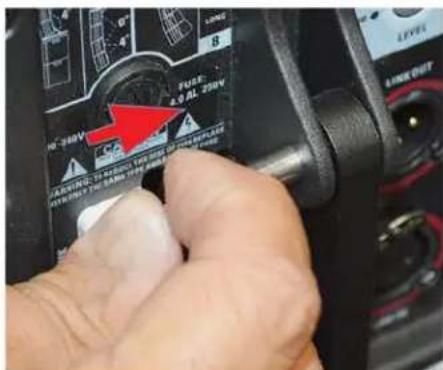
Close-up of a hand pressing a black mechanical component with a red arrow indicating direction (no text or symbols)Secure front of top IMP205 speaker to top of bottom IMP205 speaker using Linkpin 1.
text_image
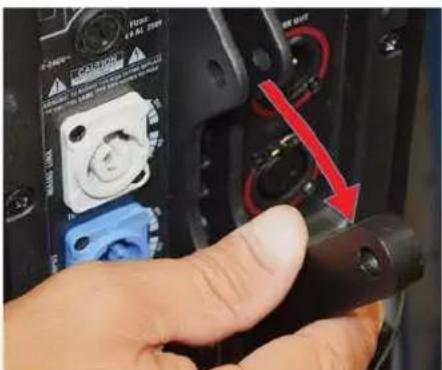
FUSE: 4.9 AL 200V WARNING: It should be done or be replaced RETURN TO THE NAME OF ALL DISESPull Linkpin 2 from integrated adjustable mounting bracket of the top IMP205 speaker.
text_image
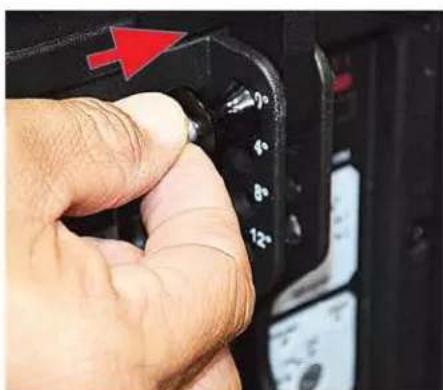
Close-up of a hand adjusting a camera module with warning labels and a red arrow indicating the process.Swing integrated adjustable mounting bracket down.
text_image
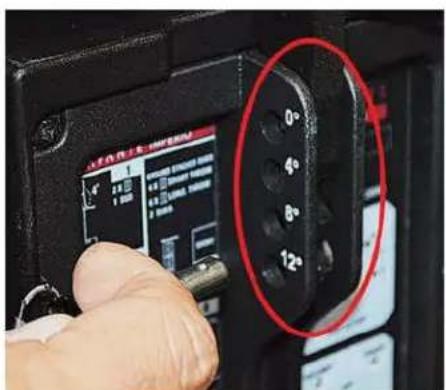
0° 4° 8° 12°Adjust throw angle by attaching integrated adjustable mounting bracket from IMP205 speaker, swinging it down to desired throw angle mounting hole on bottom IMP205 speaker or Flybar, secure with Linkpin 2.
natural_image
Close-up of a hand adjusting a camera dial with numbered buttons (no visible text or symbols)
natural_image
Close-up of a hand adjusting a camera dial with numbered buttons (no visible text or symbols)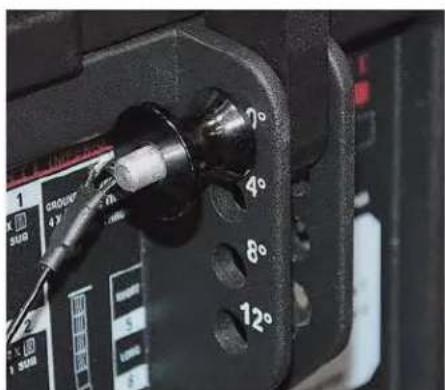
- Screw pole assembly into threaded pole socket o Sub
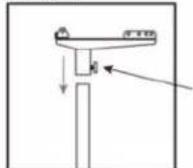
- Connect Imperio Sub Adapter to the pole assembly.
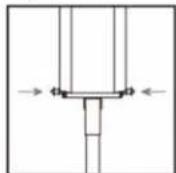
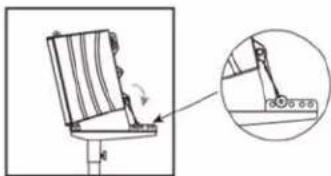
- Use Linkpin 1 to secure IMP205 Speaker and mount assembly to Imperio Sub Adapter.
natural_image
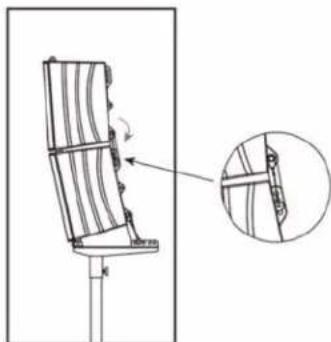
Technical diagram of a mechanical assembly with an inset close-up showing a component detail (no text or symbols present)- Flip back-bracket down and insert Linkpin 2 into desired hole of the Sub Adapter.
natural_image
Technical line drawing of a mechanical component with an inset close-up showing a detail (no text or symbols)- Stack second IMP205 speaker and secure front holes with Linkpin 1, select desired throw angle, then secure with Linkpin 2.

text_image
Locking Power Connector IN Locking Power Connector OUT Locking Power Connector IN Locking Power Connector OUT SIGNAL OUT SIGNAL IN SIGNAL IN SIGNAL OUT SIGNAL IN SIGNAL IN Locking Power Connector IN Locking Power Connector OUT Locking Power Connector OUTINSTALLATION - DSP PRESET 3
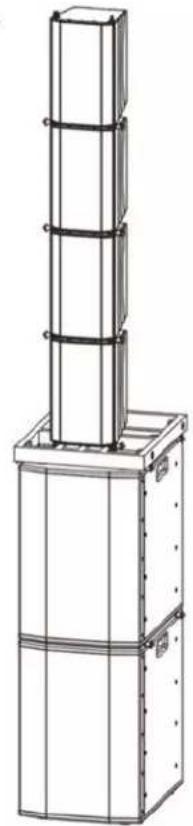
natural_image
Technical line drawing of a vertical cylindrical structure with horizontal bars, mounted on a base (no text or symbols)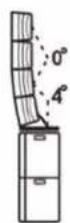
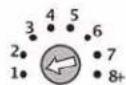
DSP SETUP
3 Subs (2x) IMP205 (4x)
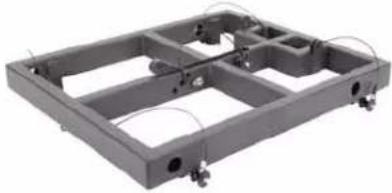
natural_image
Mechanical frame assembly with mounting holes and wiring (no text or symbols visible)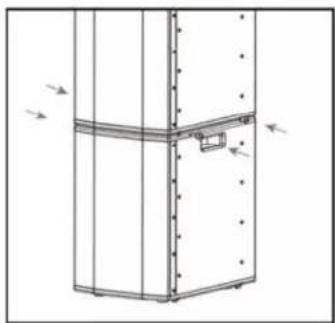
natural_image
Technical line drawing of a mechanical or architectural component with no visible text or symbols- With 2X stacked Subs, secure them with Linkpin 1 locking-pins, and connect with power and XLR cables.
natural_image
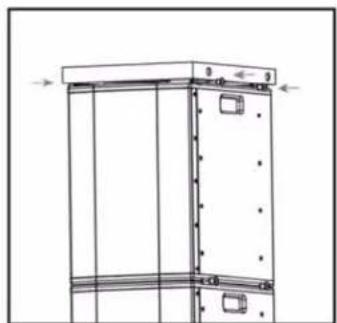
Technical line drawing of a mechanical component with dimension annotations (no readable text or symbols)- Locate Imperio Flybar LG on top stacked sub and secure with Linkpin 2 locking-pins.
natural_image
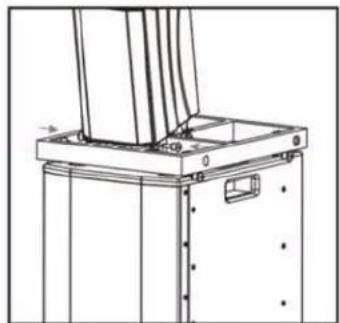
Technical line drawing of a mechanical assembly with no visible text or symbols- Position IMP205 speaker on Imperio Flybar LG and secure front holes with Linkpin 1 locking-pins.
natural_image
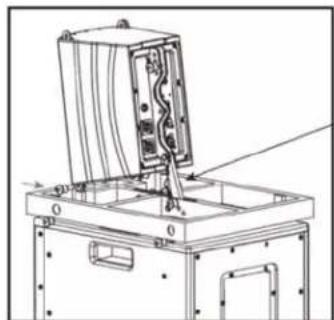
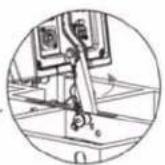
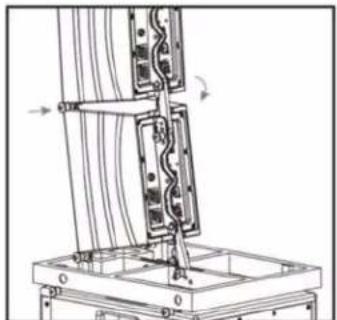
Technical line drawing of a mechanical device with no visible text or symbols- Flip back-bracket down & select desired throw angle by inserting Linkpin 2 locking-pin into corresponding hole of Imperio Flybar LG.
natural_image
Technical line drawing of a mechanical assembly with no visible text or symbols- Stack second IMP205 speaker, secure front holes with Linkpin 1 locking-pins, then select desired throw angle and secure with Linkpin 2 locking-pin.
INSTALLATION - DSP PRESET 4
natural_image
Technical line drawing of a vertical structural frame with horizontal supports and a multi-tiered vertical column (no text or symbols)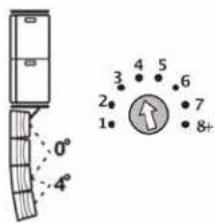
text_image
0° 4°DSP SETUP
4 Sub (2x) Imperio (4x)
natural_image
Exterior view of a gray industrial frame structure with internal compartments and mounting holes (no text or symbols visible)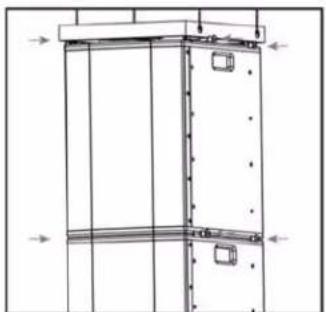
natural_image
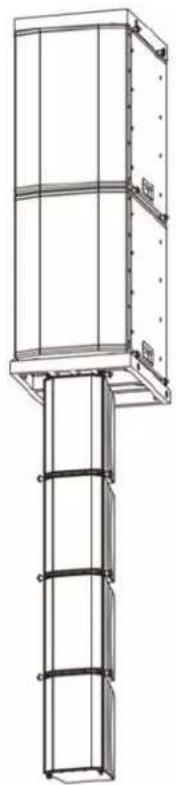
Pure technical line drawing of a vertical structural frame with internal components and arrows indicating direction (no text or symbols)- Secure top Sub to Imperio Sub Flybar with Linkpin 2 locking-pins, then secure second hanging Sub with Linkpin 1 locking-pins.
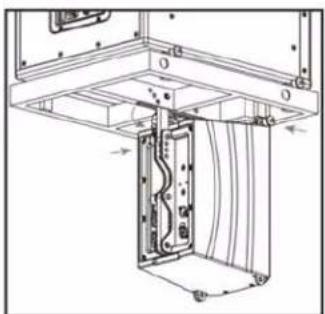
natural_image
Technical line drawing of a mechanical assembly with no visible text or symbols- Position IMP205 speaker underneath Imperio Flybar LG & secure front holes with Linkpin 1 locking-pins, and bracket with Linkpin 2 locking-pins.
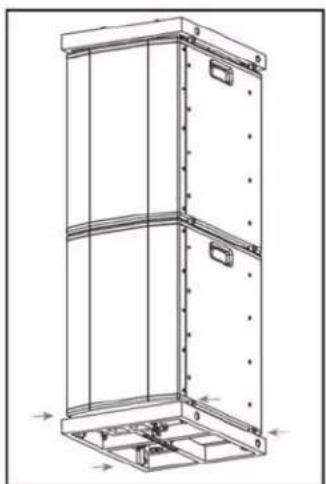
natural_image
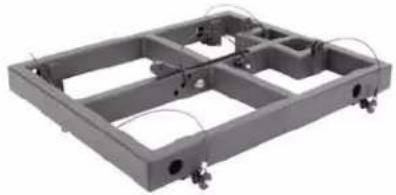
Technical line drawing of a vertical metal cabinet or enclosure with mounting holes and internal structural ribs (no text or symbols)- Secure Imperio Sub Flybar underneath bottom (hanging) sub & secure with Linkpin 2 locking-pins.
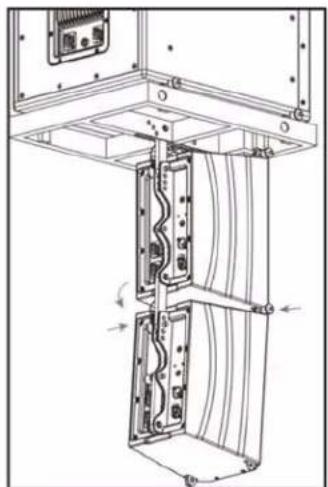
natural_image
Technical line drawing of a mechanical assembly with no visible text or symbols- Hang second IMP205 speaker and secure front holes with Linkpin 1 locking-pins & adjust throw bracket by select desired throw angle, and secure with Linkpin 2 locking-pins.
INSTALLATION - DSP PRESET 5, 6, 7, 8
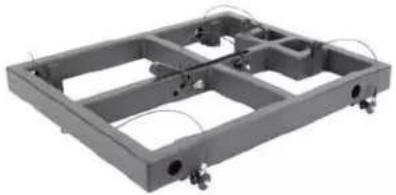
natural_image
Mechanical frame assembly with mounting holes and wiring (no text or symbols visible)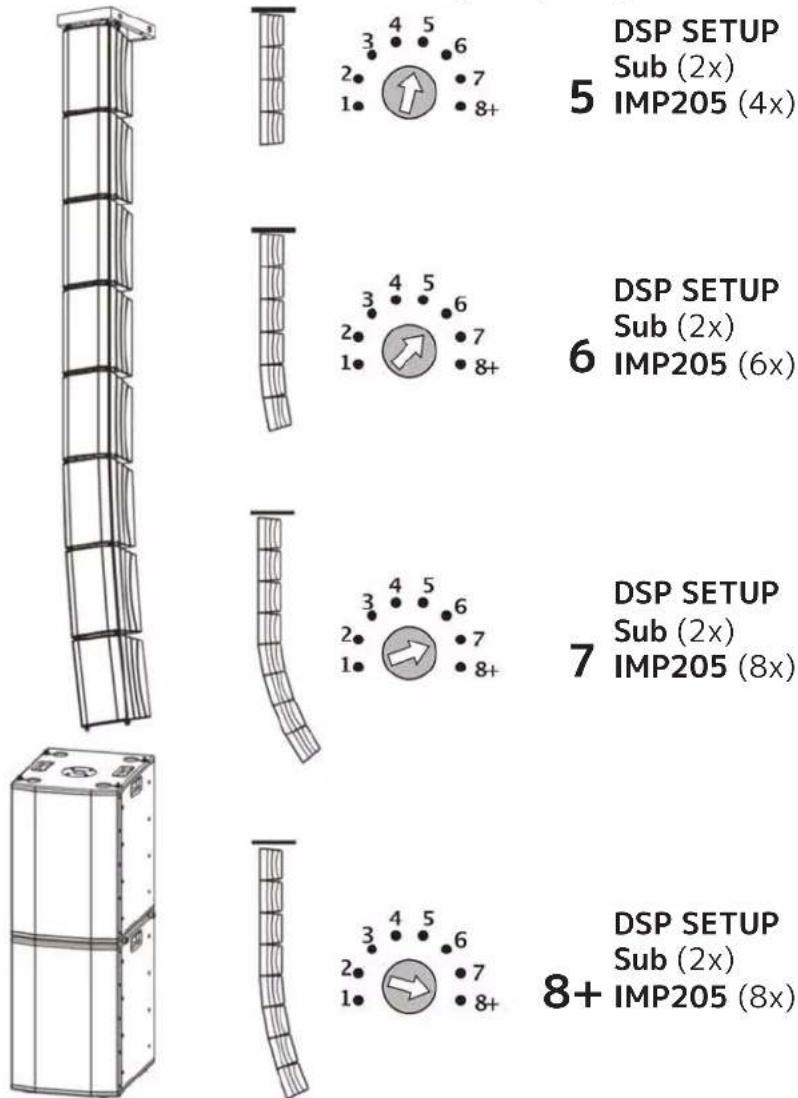
text_image
DSP SETUP Sub (2x) IMP205 (4x) 5 DSP SETUP Sub (2x) IMP205 (6x) 6 DSP SETUP Sub (2x) IMP205 (8x) 7 DSP SETUP Sub (2x) IMP205 (8x) 8+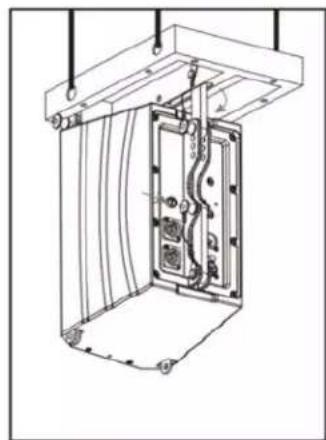
natural_image
Technical line drawing of a mechanical assembly with no visible text or symbols- Suspend & secure Imperio Flybar Small, secure top front of IMP205 speaker with Linkpin 1 locking-pins, swing adjustable mounting bracket up, select throw angle and secure with Linkpin 2 locking-pin.
natural_image
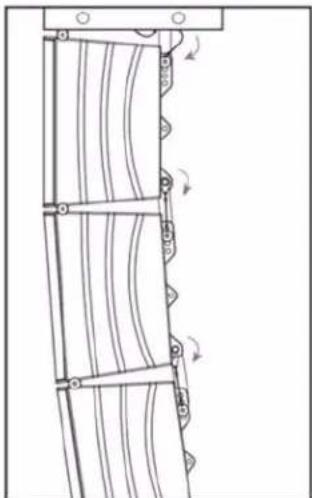
Technical line drawing of a mechanical assembly with curved components and directional arrows (no text or symbols)- Hang each successive IMP205 speaker and secure with Linkpin 1 locking-pins, select desired throw angle, & secure with Linkpin 2 locking-pin.
natural_image
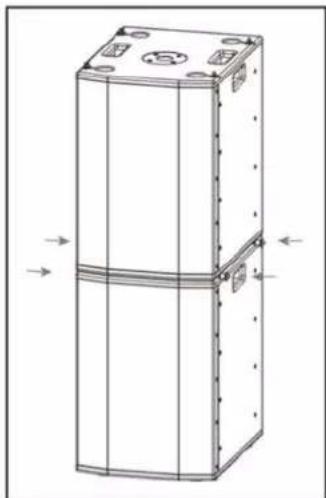
Technical line drawing of a vertical rectangular device with mounting holes and internal components, showing directional arrows (no text or symbols)- Stack (2x) Subs, connect power and signal cables, and secure with Linkpin 1 locking-pins.
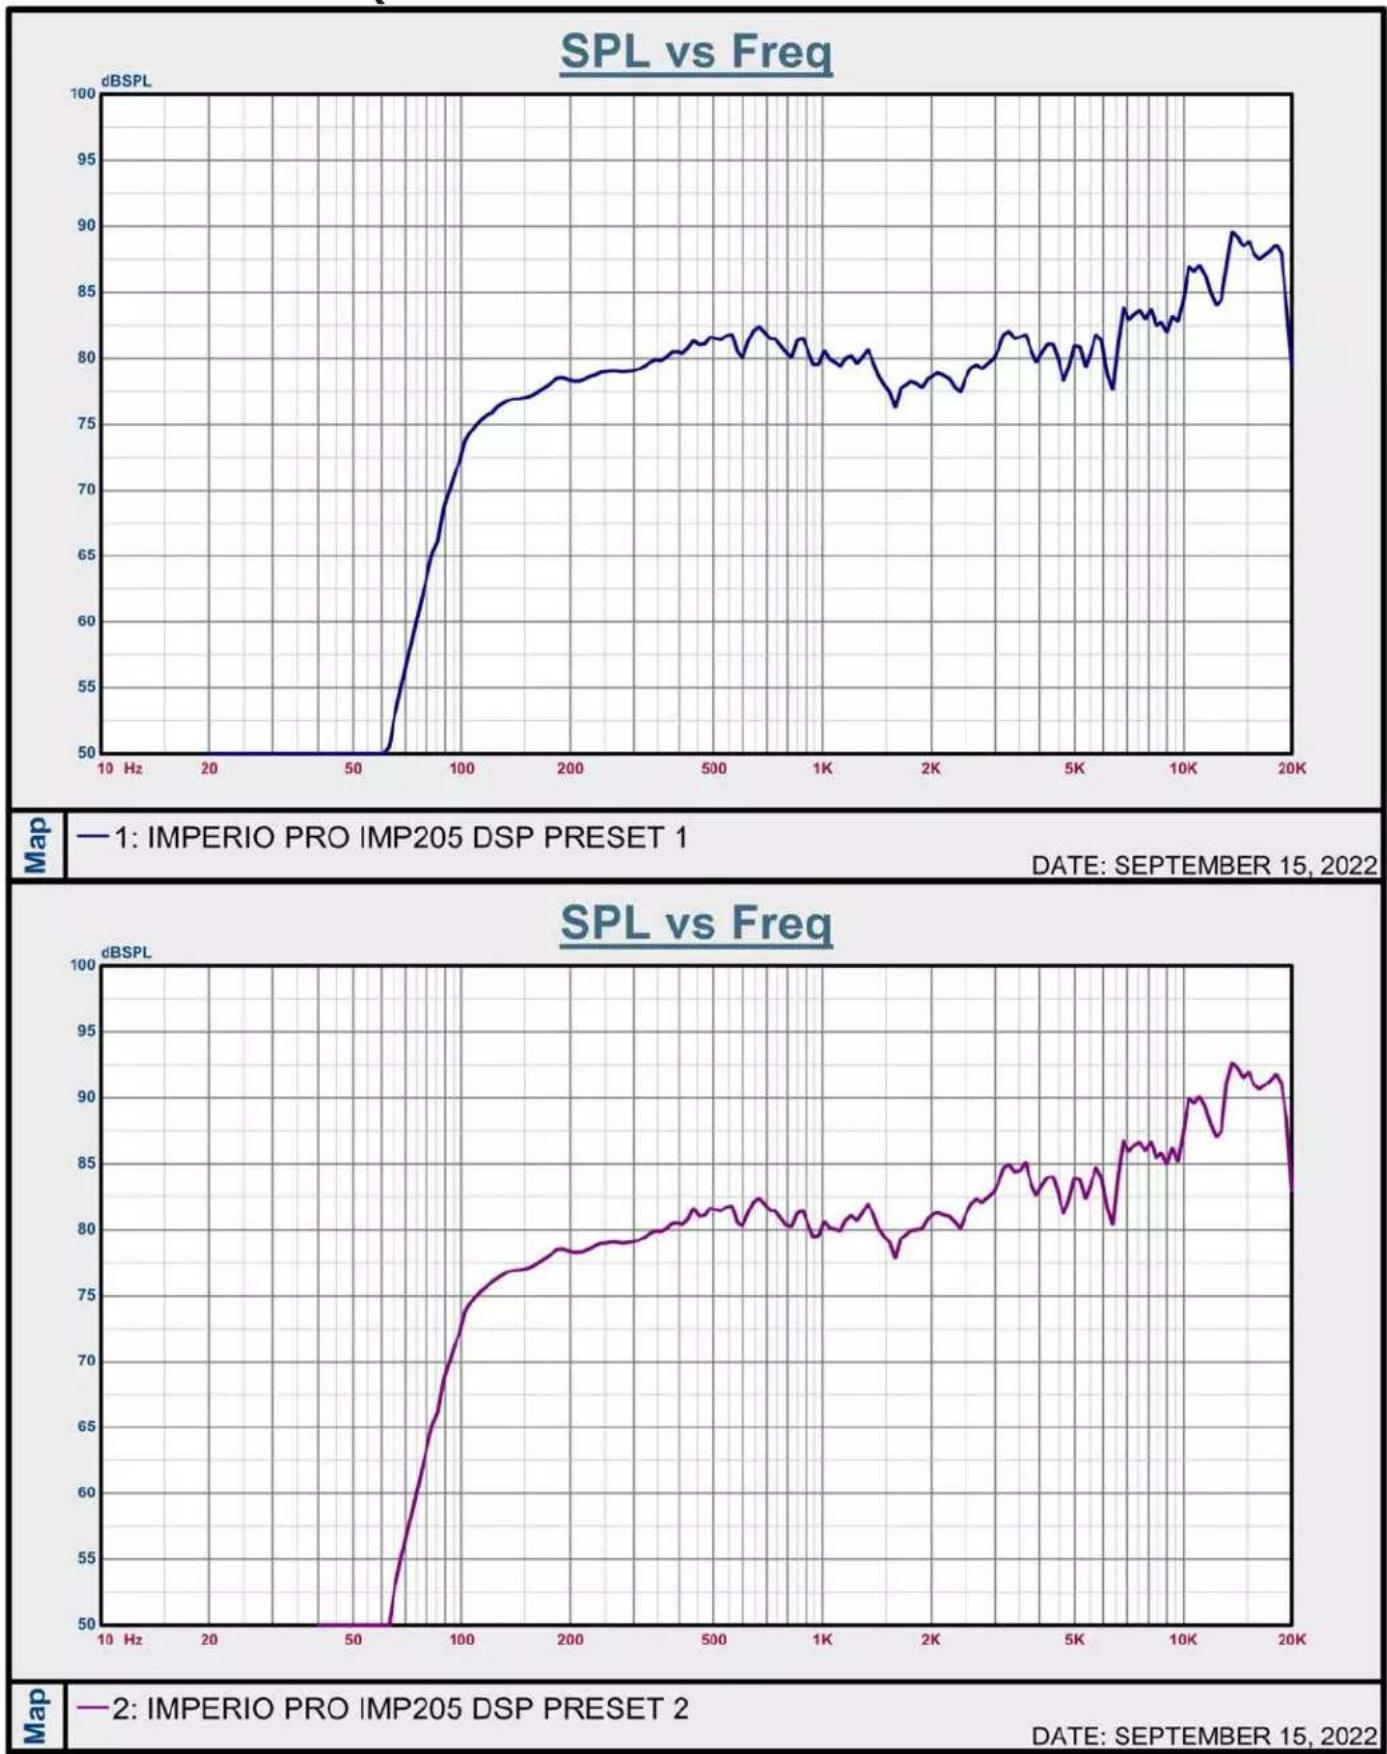
IMP205 FREQUENCY CHARTS: DSP 1 & 2
IMP205 FREQUENCY CHARTS: DSP 3 & 4
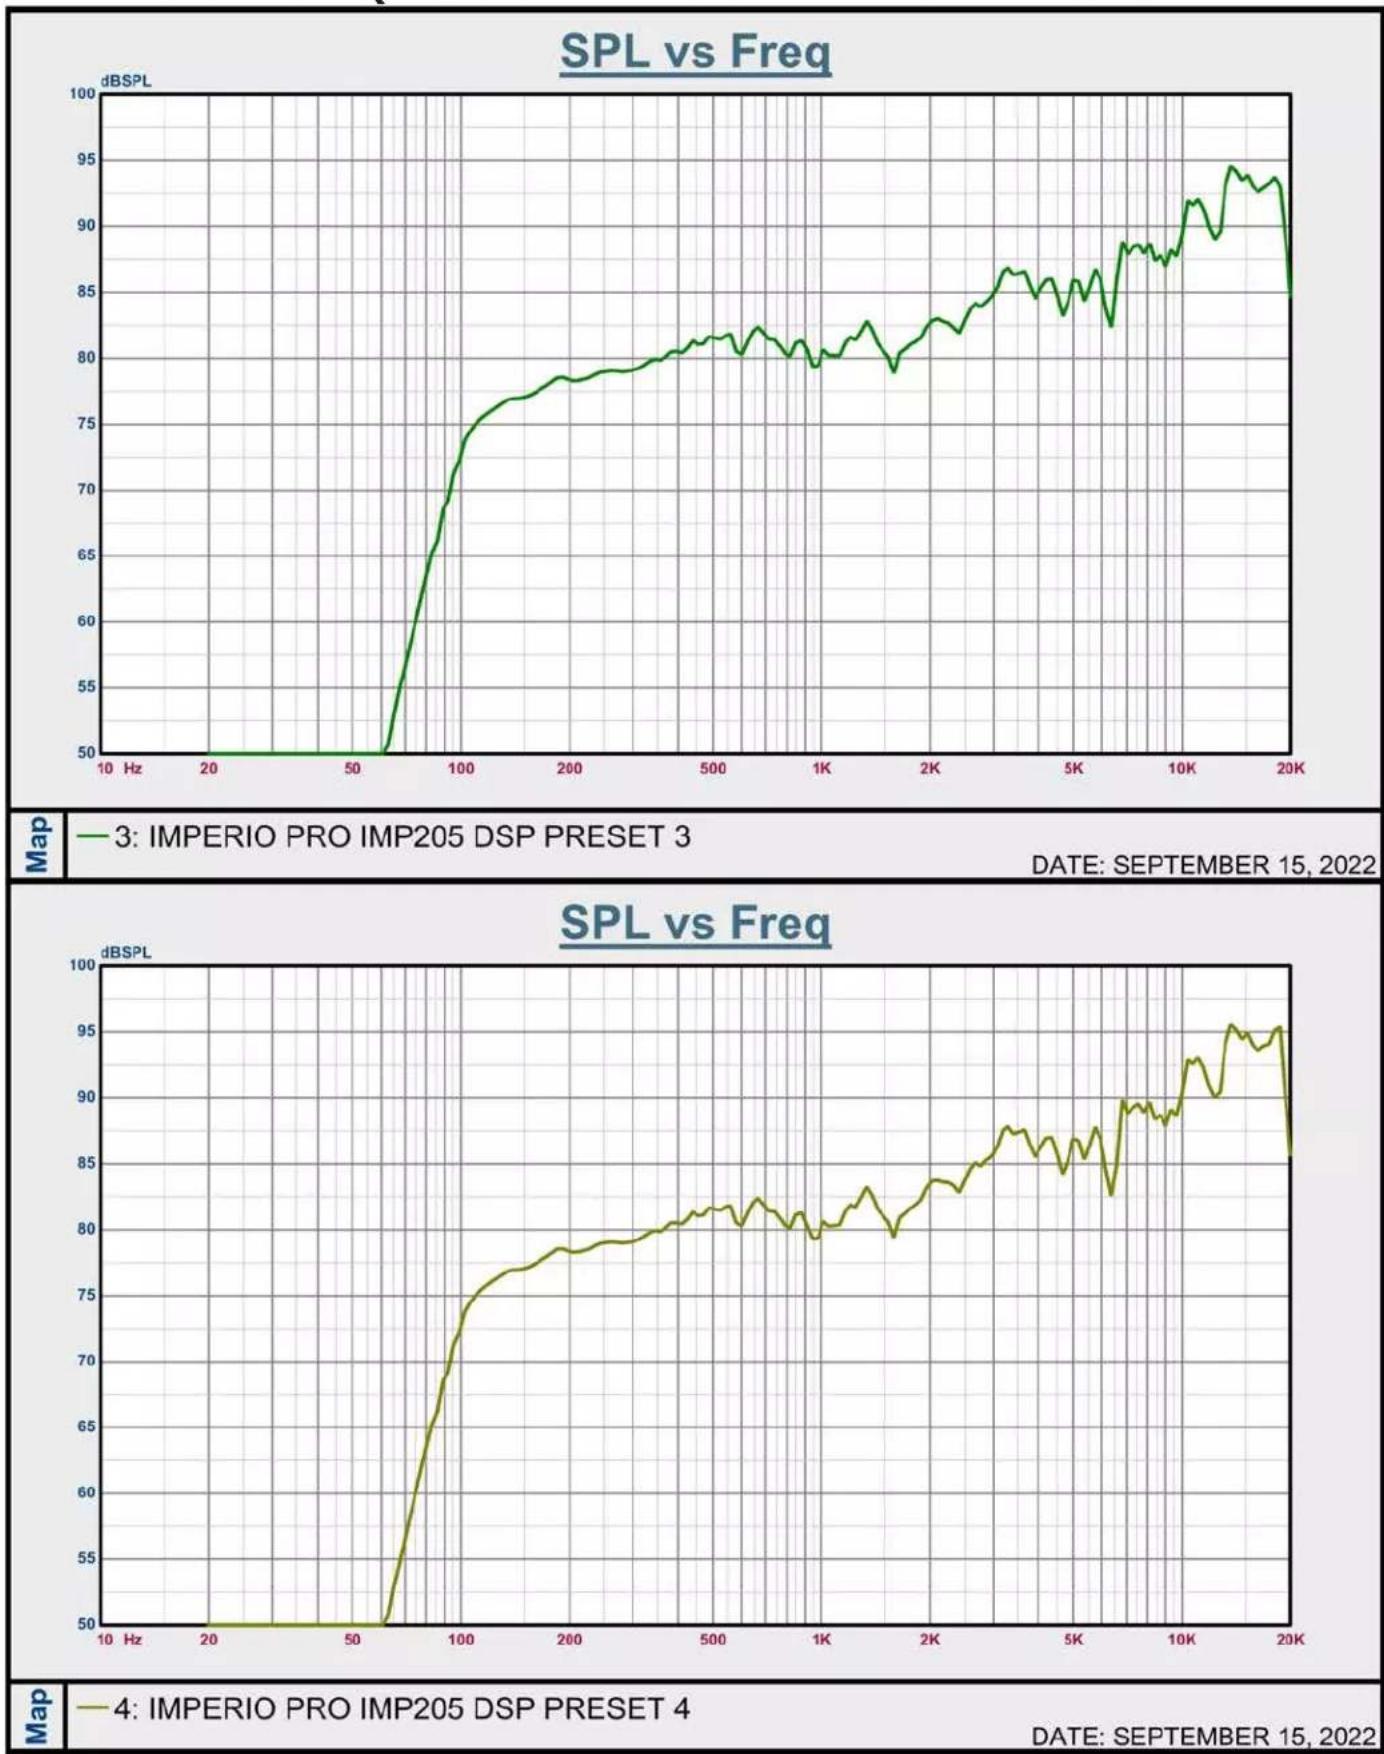
— 3: IMPERIO PRO IMP205 DSP PRESET 3
DATE: SEPTEMBER 15, 2022
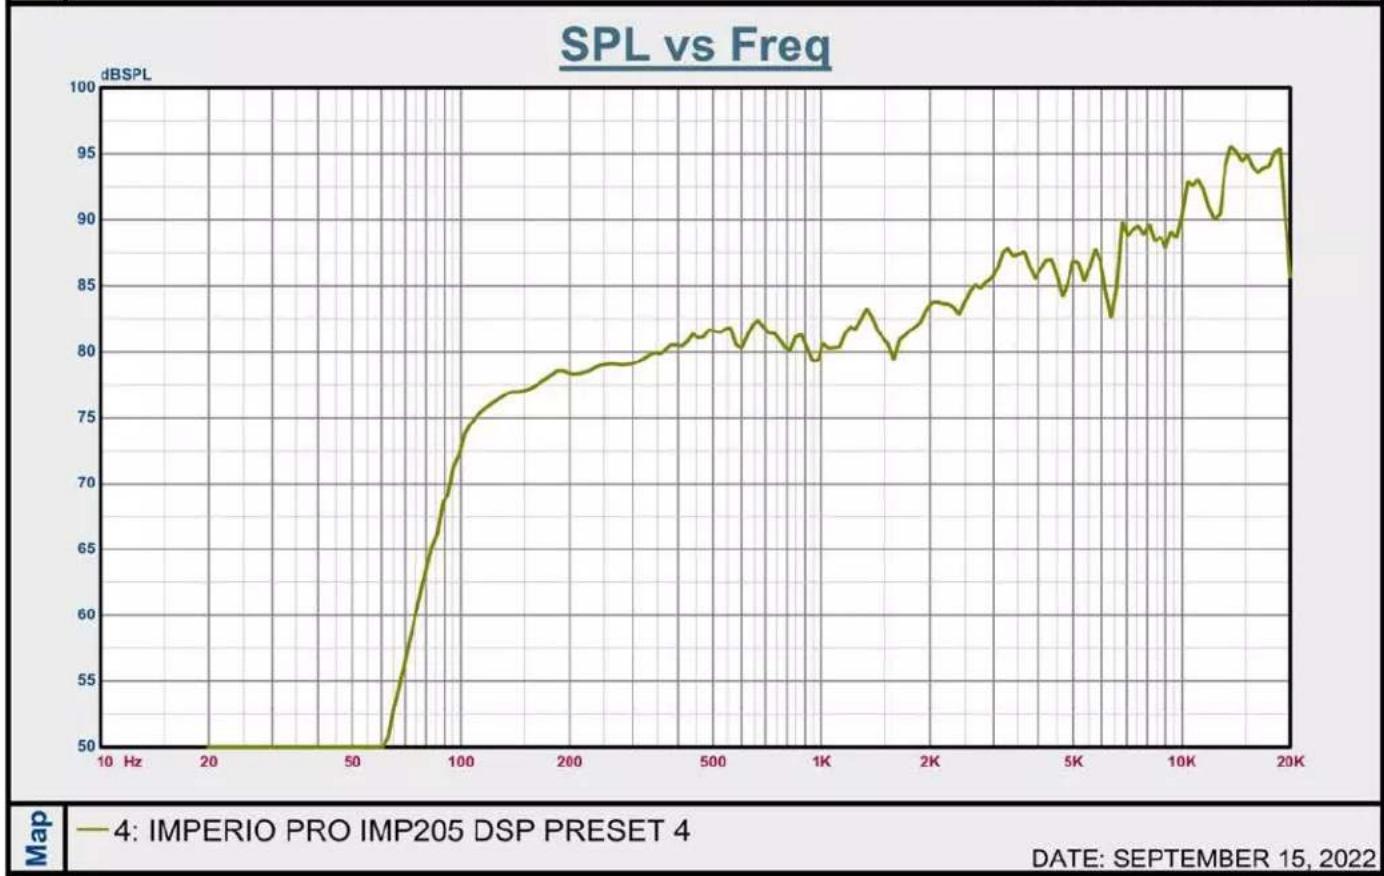
— 4: IMPERIO PRO IMP205 DSP PRESET 4
DATE: SEPTEMBER 15, 2022
IMP205 FREQUENCY CHARTS: DSP 5 & 6
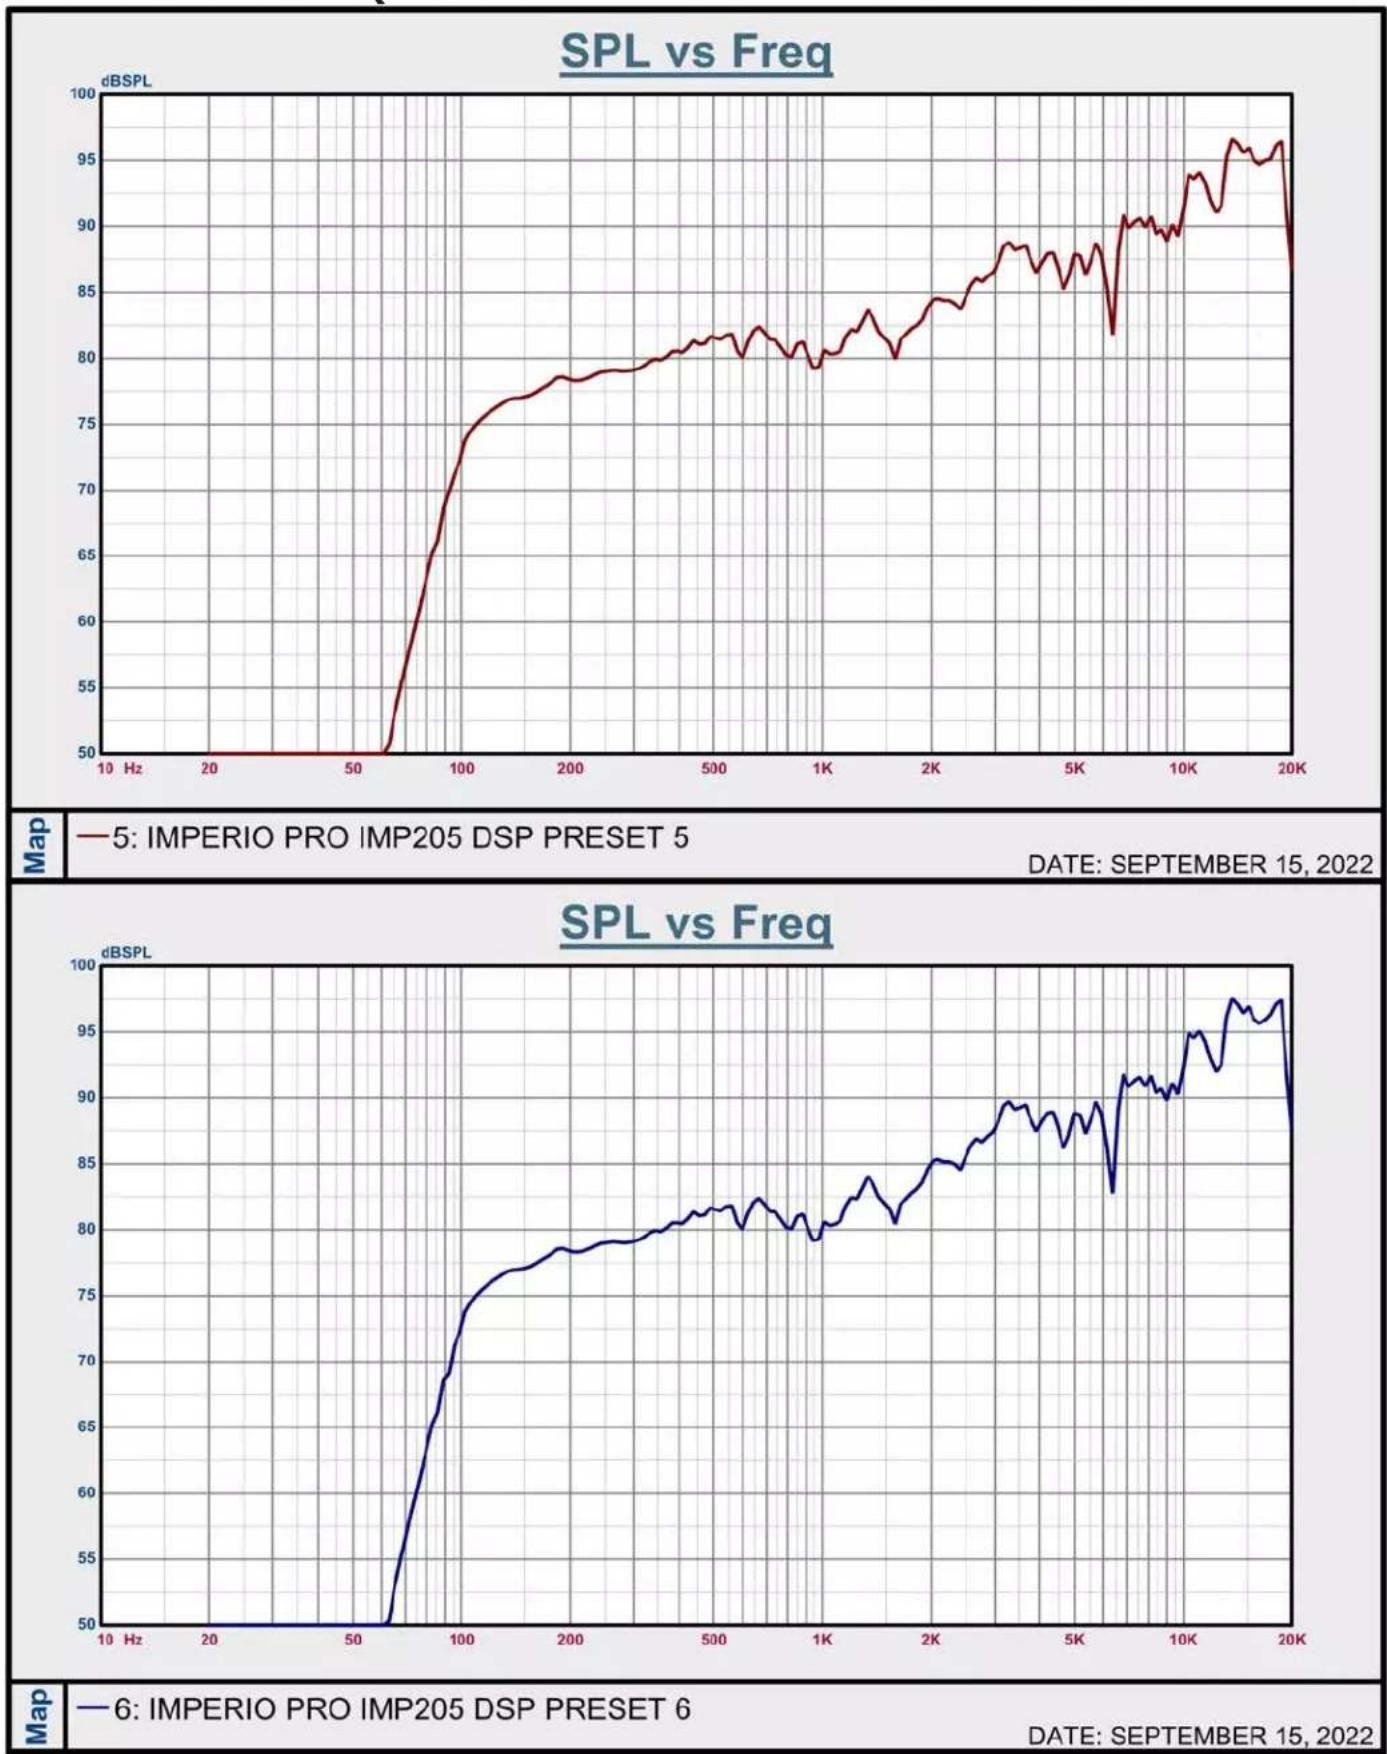
IMP205 FREQUENCY CHARTS: DSP 7 & 8
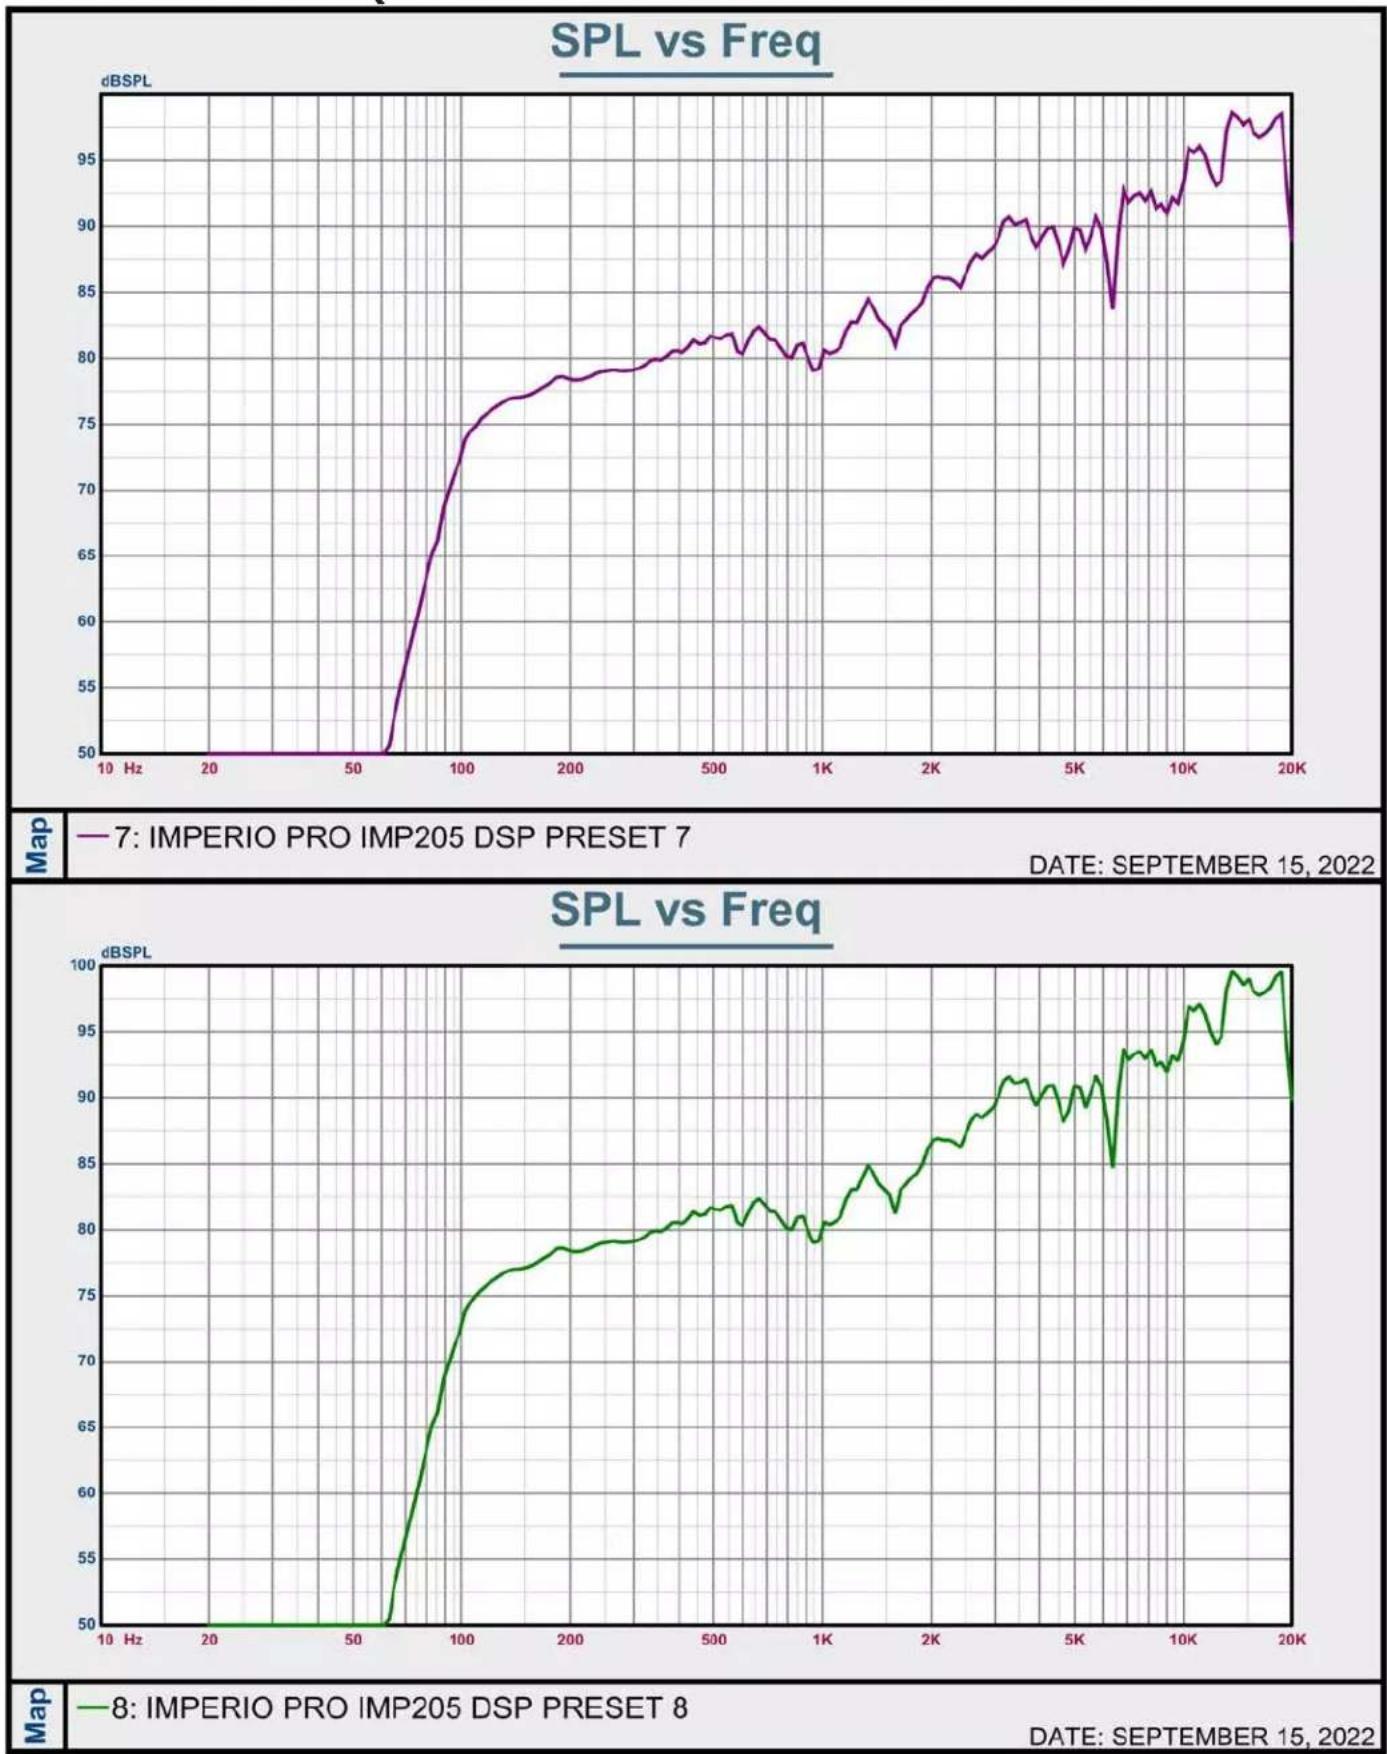
—7: IMPERIO PRO IMP205 DSP PRESET 7
DATE: SEPTEMBER 15, 2022
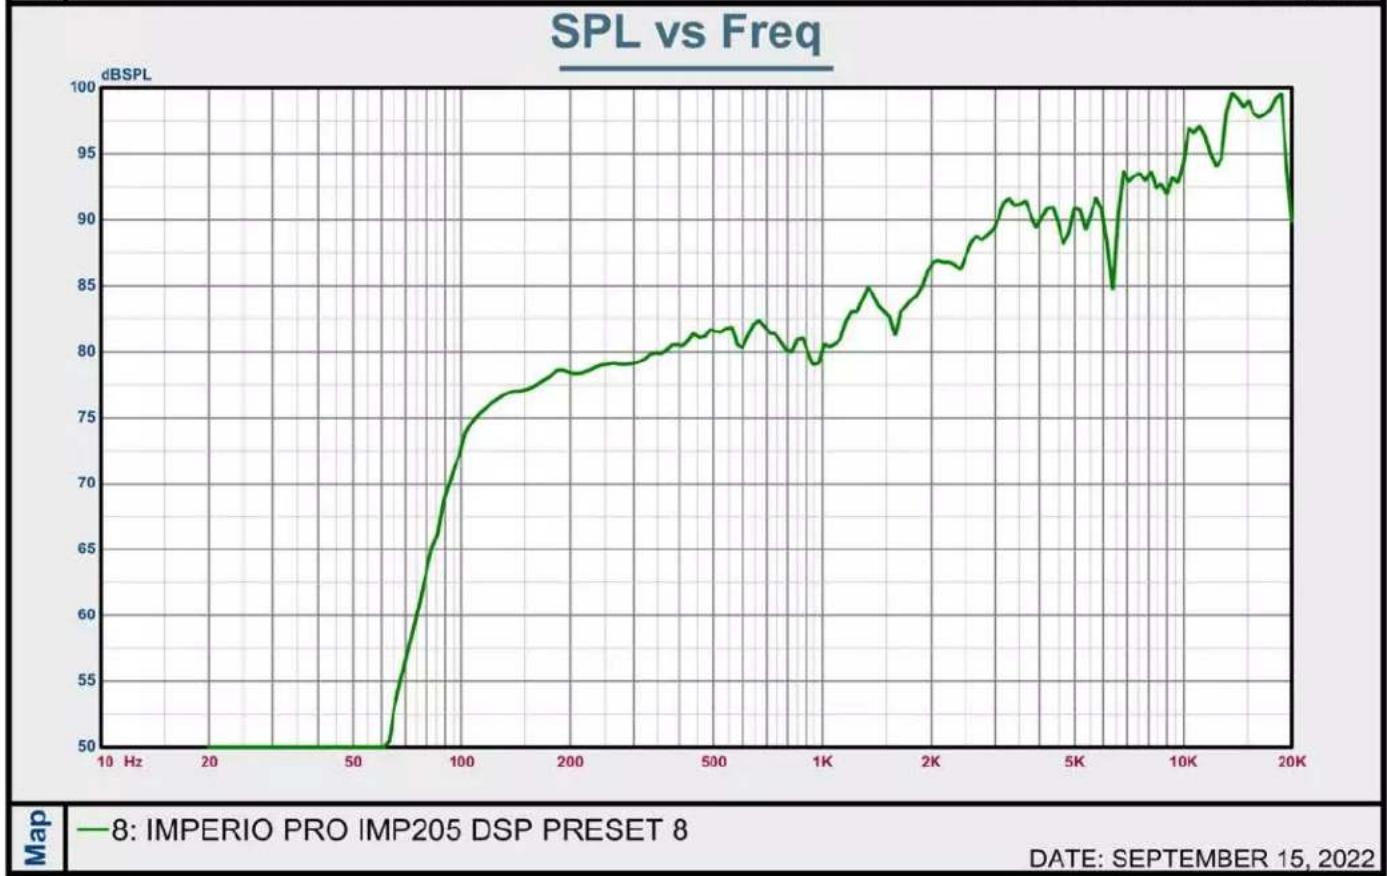
—8: IMPERIO PRO IMP205 DSP PRESET 8
DATE: SEPTEMBER 15, 2022
SPECIFICATIONS
Please visit avanteaudio.com for up to date iinformation.
AMPLIFIER:
• 440W RMS, 1700W Peak Class D Amplifier Module
- Switching Power Design
• LED Power / Signal / Clip Indicator
• 32-bit DSP with FIR digital filters
- Selectable System Configurations
- Input: 1x XLR and Locking Power Connector
• Output: 1x XLR and Locking Power Connector
• Gain: Selectable Input Sensitivity
• Power Input: 100-240V \~ 50/60Hz
SPEAKER:
- 2x 5.0" Neodymium Low-Mid transducers.
- 6x 1.75" IDVAT HF Neodymium drivers (Inverted Dome Vertical Array Technology)
• Type: 2-Way Active Closed Design
• Frequency Response: 100Hz – 20KHz - Max Output SPL: 128dB (single box measured on Axis @1m)
- Selectable Input Sensitivity: -3dB, 0dB, 3dB, 6dB
- Cabinet: ABS Plastic
- Grill: Powder coated Steel
• Splay Angles: 0, 2, 4, 6, 8, 10, & 12-degrees - Integrated Rigging: Yes
• Horizontal Dispersion Angle: 100° - Dimensions (LxWxH): 8.8" x 7.3" x 12.8" / 224mm x 185mm x 324mm
• Weight: 12.5 lbs. / 5.6 kg.
ORDERING INFORMATION
| Model # (SKU) Description | |
| IMP205 IMP205 SPEAKER | |
| SUB210 IMPERIO SUB210 (120V) | |
| SUB180 IMPERIO SUB210 WHITE (120V) | |
| IMP340 Linkpin 2 (4 Pack) | |
| IMP496 IMPERIO FLYBAR SMALL | |
| IMP178 IMPERIO FLYBAR SMALL WHITE | |
| IMP265 IMPERIO FLYBAR LG | |
| IMP369 IMPERIO FLYBAR LG WHITE | |
| IMP210 IMPERIO POLE, WHITE (with Mounting Adaptor) | |
| IMP194 IMPERIO POLE (with Mounting Adaptor) | |
| IMP211 ADJUSTABLE IMPERIO POLE (with Mounting Adaptor) |
FCC STATEMENT
This device complies with Part 15 of the FCC Rules. Operation is subject to the following two conditions: (1) this device may not cause harmful interference, and (2) this device must accept any interference received, including interference that may cause undesired operation.
FCC RADIO FREQUENCY INTERFERENCE WARNINGS & INSTRUCTIONS
This product has been tested and found to comply with the limits as per Part 15 of the FCC Rules. These limits are designed to provide reasonable protection against harmful interference in a residential installation. This device uses and can radiate radio frequency energy and, if not installed and used in accordance with the included instructions, may cause harmful interference to radio communications. However, there is no guarantee that interference will not occur in a particular installation. If this device does cause harmful interference to radio or television reception, which can be deter- mined by turning the device off and on, the user is encouraged to try to correct the interference by one or more of the following methods:
- Reorient or relocate the device.
- increase the separation between the device and the receiver.
- Connect the device to an electrical outlet on a circuit different from which the radio receiver is connected.
- Consult the dealer or an experienced radio/TV technician for help.
Energy Saving Matters (EuP 2009/125/EC)
Saving electric energy is a key to help protecting the environment. Please turn off all electrical products when they are not in use. To avoid power consumption in idle mode, disconnect all electrical equipment from power when not in use. Thank you!