AX 503A - Battery charger METRIX - Free user manual and instructions
Find the device manual for free AX 503A METRIX in PDF.


User questions about AX 503A METRIX
0 question about this device. Answer the ones you know or ask your own.
Ask a new question about this device
Download the instructions for your Battery charger in PDF format for free! Find your manual AX 503A - METRIX and take your electronic device back in hand. On this page are published all the documents necessary for the use of your device. AX 503A by METRIX.
USER MANUAL AX 503A METRIX
User's manual page 18 Chapter
text_image
I II III IV V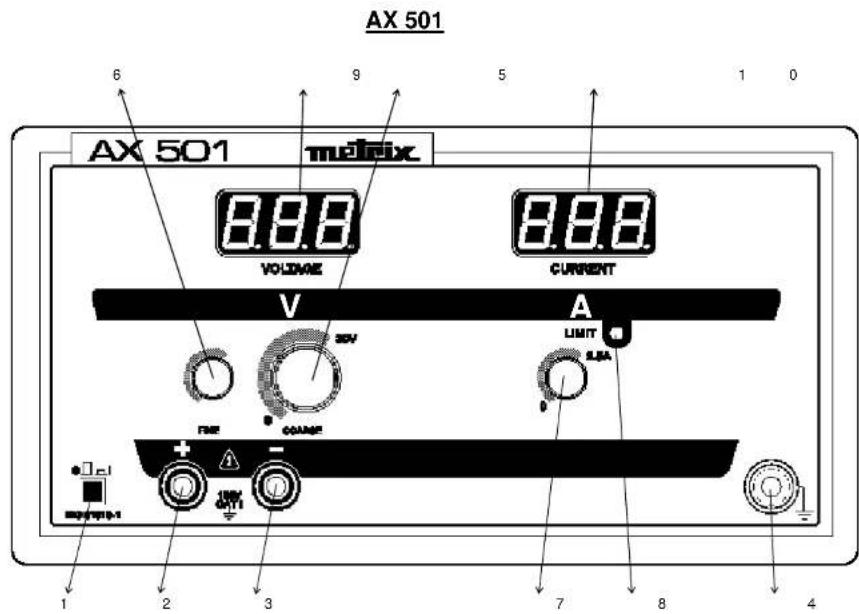
text_image
AX 501 6 9 5 1 0 AX 501 multifix 8.8.8 VOLUME 8.8.8 CURRENT V A LIMIT BBA FIRE COAMP + - 1 2 3 7 8 4AX 501
LEGENDE
| 1 | On / Off switch | 7 | Current adjustment potentiometers |
| 2 | Output terminals (+) | 8 | "LIMIT" current LEDs |
| 3 | Output terminals (-) | 9 | Voltage display |
| 4 | Earth terminal ± | 10 | Current display |
| 5 | "Coarse" current adjustment potentiometers | 11 | "TRACKING" switch |
| 6 | "Fine" current adjustment potentiometers | 12 | "TRACKING" function active LED |
BESCHREIBUNG
1.1. Precautions and safety measures 19
1.1.1. Before use.... 19
1.1.2. When using the instrument 20
1.1.3. Symbols....20
1.1.4. Instructions....20
1.2. Safety features.... 20
1.3.Warranty 21
1.4. Maintenance 21
1.4.1. Repair and metrological verification 21
1.4.2. Cleaning 21
1.4.3. Storage 21
1.5. Unpacking - Repacking....21
2. DESCRIPTION OF THE INSTRUMENT 22
2.1. Presentation.... 22
2.2.Controls.... 22
2.2.1. On / Off switch.... 22
2.2.2. Potentiometers 22
2.2.3. "LIMIT" LED 23
2.2.4. "TRACKING" switch (AX 502 and AX 503 and "F") 23
2.2.5. Digital "LED" display 23
2.2.6. "+" and "-" output terminals 23
2.2.7. "EARTH" terminal 23
2.3. Power supply 23
3. FUNCTION DESCRIPTION 24
3.1. Initial operation....24
3.2. Use 24
3.2.1. Use of the AX 501 or use of the AX 502 and AX 503 and "F" as independent outputs..... 24
3.2.2. Use of 2 power supplies in parallel (without "TRACKING" up to 5 A at 30 V max.
(AX 502 and AX 503 and "F") 24
3.2.3. Use of 2 power supplies in series (without "TRACKING") up to 60 V at 2.5 A max. (AX 502 and AX 503 and "F")....24
3.2.4. Use of 2 power supplies in series with the "TRACKING" function (symmetrical ± 30 V sources) at 2.5 A max. (AX 502 and AX 503 and "F").... 25
3.2.5. Use of the 2.7 V - 5.5 V (5 A) power supply (AX 503 and "F" only).... 25
4. TECHNICAL SPECIFICATIONS ...... 26
4.1. Voltage 26
4.2. Current 26
5. GENERAL SPECIFICATIONS.... 27
6. ACCESSORIES 27
6.1. Accessories delivered with the power supply 27
6.2. Optional accessories 27
1. GENERAL INSTRUCTIONS
Thank you for purchasing this stabilized power supply.
This instrument complies with IEC norm 61010-1, concerning electronic measuring instruments. For your own safety and to protect the instrument, you should comply with the instructions in this manual which cannot be reproduced in any form whatsoever without our agreement.
1.1. Precautions and safety measures
1.1.1. Before use
* This power supply complies with the IEC 601010 safety norm, class 1, pollution level 2. It has been designed for indoor use at altitudes below 2,000 m and at temperatures between 0°C and 50°C with a relative humidity < 80% up to 40°C.
- Power supply outputs: Overvoltage category 100 V CAT I in relation to the earth Maximum output voltage: 30.5 V dc in normal mod
DC in normal mode DC in series mode 61.0
- Mains power supply: Overvoltage category 300 V CAT II Supply current: 115 V or 230 V ± 10 %; 50-60 Hz
* Definition of installation categories (see IEC publication 664-1):
CAT1: CAT1 circuits are circuits protected by low-level transient over-voltage limiters Example: protected electronic circuits
CAT II: CAT II circuits are household or similar appliance power circuits, which may carry medium-level transient over-voltages. Example: household appliance and portable tool power supplies
CAT III: CAT III circuits are high-power appliance power circuits, which may carry high-level transient over-voltages. Example: industrial machinery or instrument power supplies
CAT IV: CAT IV circuits are circuits which can carry substantial transient over-voltage. Example: power feeders
* To use this power supply safely, users must comply with the customary safety rules in order to: - protect them from the dangers of the electric current, - to protect the power supply against incorrect use.
* For your safety, only use the lead delivered with the instrument. Before using it, always check that it is in perfect condition. It must be connected to the mains before connecting measurement or control circuits.
* Any break in the protective conductor, inside or outside the instrument, or disconnection of the protective earth terminal may make the instrument dangerous. Intentional breaking is prohibited.
* When this instrument is supplied via an autotransformer in order to reduce the external voltage, make sure that the common terminal is connected to the neutral (earthed pole) of the supply circuit.
* The plug should only be inserted into a socket equipped with an earthing contact. The safety connection must not be broken by use of an extension lead without a protective conductor.

Before connecting the power supply, check that the information on the label on the rear of the power supply corresponds to the 115 VAC ± 10 % or 230 VAC ± 10 % distribution network.
1.1.2. When using the instrument
* When the required voltage and current parameter values are not known, start by using the lowest values.
* Before disconnecting the connection leads of the circuit being tested, make sure that the power supply is switched off. This prevents the creation of break or closure extra-currents which may melt the fuse at high currents.
* Never exceed a total output of 60 V peak in relation to the earth (common mode).
* The instrument must be placed in a ventilated room. Take care not to obstruct the ventilation holes.
1.1.3. Symbols
The following symbols are used:

CAUTION: Consult the manual.
Incorrect use may damage the instrument and endanger the user.
Functional earth
1.1.4. Instructions
* Before opening the instrument, disconnect if from all sources of electric current and from the measuring circuits; make sure that you are not charged with static electricity, which could irreparably damage the instrument's internal components.
* Before opening the power supply to change the fuse, you must disconnect the leads and mains power supply cable. The fuse must be replaced by a model identical to that delivered with the instrument.

When the instrument is open, some of the internal capacitors may conserve a dangerous potential, even once the instrument has been powered down.
In the event of faults or abnormal constraints, power down the instrument and do not allow anyone to use it until it has been checked.
* Adjustments, maintenance or repair work on the instrument must only be carried out by qualified personnel.
* A "qualified person" is someone who is familiar with the installation, the construction, the application and the dangers at hand. This person is authorised to power up and power down the installation and equipment, in compliance with safety regulations.
1.2. Safety features
* The fuse protects the primary coil of the power supply transformer against mains voltage errors.

Only use a fuse of the following type:
T 6.3 A / 250 V for the 230 V version
T 10 A / 250 V for the 115 V version
* The power supply is equipped with active protection systems against short-circuits, overloads and overheating of the transformer.
1.3. Warranty
This equipment is guaranteed against any material or manufacturing defects, in accordance with the general conditions of sale.
During the warranty period (3 years), the instrument can only be repaired by the manufacturer, who reserves the right to repair the instrument or to exchange all or part of it. If the equipment is returned to the manufacturer, the outgoing transport costs are borne by the customer.
The warranty is not applicable in the following cases:
- improper use of the equipment or use of it in conjunction with incompatible equipment
- modifications to the equipment without the explicit authorisation of the manufacturer's technical department;
- work carried out on the instrument by a person not approved by the manufacturer;
- adaptation for a specific application not included in the definition of the equipment or the user's manual;
- knocks, falls or flooding.
1.4. Maintenance
1.4.1. Repair and metrological verification

Like all measuring or testing devices, a regular check is necessary.
Return your instrument to your distributor for any work to be done within or outside the guarantee.
1.4.2. Cleaning
Disconnect the instrument and then clean it with a cloth slightly moistened with soapy water; leave to dry before using. Never use abrasive products or solvents.
1.4.3. Storage
To guarantee correct operation of the power supply, after a period of storage in extreme environmental conditions, wait for the instrument to return to normal measuring conditions (see environmental specifications).

In particular, an abrupt change in the ambient temperature (cold to hot) may lead to condensation inside the instrument and cause short circuits.
1.5. Unpacking - Repacking
All the equipment has been checked both mechanically and electronically before shipment. Every precaution has been taken to ensure that you receive the instrument undamaged.
However, it is a good idea to check quickly to detect any damage that may have occurred during transport.
If there is any damage, immediately notify the transporter of the customary reservations.

Caution! If you ship this instrument on elsewhere, use preferably the original packaging and indicate the reasons for reshipment as clearly as possible in a note enclosed with the equipment.

Note Our products are patented in FRANCE and ABROAD. The logos are registered trade marks. We reserve the right to modify the characteristics and prices should technological advances make it necessary.
2. DESCRIPTION OF THE INSTRUMENT
2.1. Presentation
This comprehensive range of linear power supplies with digital displays is designed to meet the requirements of educational establishments, laboratories and maintenance departments.
It offers:
- a high level of operating safety by guaranteed insulation of the outputs from the mains when used at an extra low safety voltage,
• comprehensive protection systems,
• top-grade ergonomics.
The quality of the signal delivered, the precision of the display and the robustness of the housing make them top-level laboratory instruments.
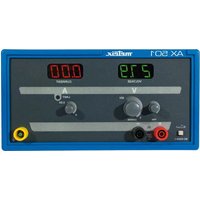
• The AX 501 is a power supply with a single output.
It enables simultaneous display of the output voltage and current, as well as providing a voltage adjustable from 0 to 30 V for a variable current of 0 to 2.5 A (75 W).
- The AX 502 is a version of the AX 501 with dual outputs.
It has the same characteristics as the AX 501 with two 0 to 30 V / 0 to 2.5 A (150 W) outputs which can be wired in series, in parallel or coupled (TRACKING function) ± 30 V.
• The AX 503 and AX 503F are a triple power supplies.
They comprise two 0 to 30 V / 0 to 2.5 A (150 W) power supplies. The coupling of the 2 main units is identical to that on the AX 502.
They also have an adjustable 2.7 to 5.5V / 5A output for supplying logic circuits at 3 or 5V. Reminder : AX 503F (fixe) : 3.3 V and 5 A.
2.2. Controls
2.2.1. On / Off switch
The On/Off switch on the front panel is used to switch the power to the power supply on and off.
2.2.2. Potentiometers
* Voltage adjustment :
- Set the regulated voltage by turning the large potentiometer (coarse adjustment) to the right (increasing values).
- Set the regulated voltage by turning the small potentiometer (fine adjustment) to the right (increasing values). The fine adjustment range represents approximately 10% of the main range.
- The value of the voltage is displayed in real time.
* Current adjustment :
- Adjust the value of the limit current by turning the potentiometer to the right (increasing values).
- The current value displayed is the value of the output current.
2.2.3. "LIMIT" LED
The current value displayed is the value of the output current.
If the value reaches the defined current limit value, the "LIMIT" LED lights up and the power supply automatically switches to "current" regulation mode; the output current is then no longer regulated.
2.2.4. "TRACKING" switch (AX 502, AX 503 and AX 503F)
2.2.4.1. "TRACKING" mode
This control enables two "0 - 30 V" sources to be controlled in series mode.
When the "TRACKING" pushbutton is set to "ON", it sets up a series connection between the "-" terminal of the "MASTER" power supply and the "+" terminal of the "SLAVE" power supply. The external terminals are used to connect the points in the circuit to be powered.
Only the voltage settings of the "MASTER" module, which cause the voltages of the "MASTER" and "SLAVE" modules to vary proportionally, are then used.
2.2.4.2. "TRACKING" LED
When the "TRACKING" LED is on, it means that the "TRACKING function has been activated.
2.2.5. Digital "LED" display
A separate display allows you to view the voltage (in green) and the current (in red) simultaneously for the 30 V units.
The displays are provided by 3-digit LED indicators with a resolution of 0.1 V for the voltage and 10 mA for the current.
2.2.6. "+" and "-" output terminals
The female two-pin "+" and "-" safety terminals ( 4 mm) are used to connect the outputs to the points of the circuit to be powered by means of safety leads only.
2.2.7. "EARTH" terminal
The terminal marked " 12 " is directly linked internally to the earth on the mains plug. It enables earthing of the circuit to be powered, if necessary.
Its male polarity and "green/yellow" colour coding will prevent any confusion in the connections.

Interruption of the protective conductor, whether inside our outside the power supply, is prohibited.
2.3. Power supply
The mains power supply is provided by the mains network at 115 or 230 V ± 10 % ; 50 - 60 Hz CAT II.
3. FUNCTION DESCRIPTION
3.1. Initial operation
- Connect the power lead to the mains once having checked on the label at the rear of the power supply, that the instrument is adapted to operate at the mains network voltage.
- No connection cables should be connected before powering up.
- Start up the power supply by setting the On/Off switch to "I".
- To power down the instrument, unplug the leads and then turn the switch to "0".
3.2. Use
3.2.1. Use of the AX 501 or use of the AX 502, AX503 and AX 503F as independent outputs
- Connect the power lead to the mains.
- Check that the voltage adjustment potentiometers and current adjustment potentiometer are turned to the left as far as they will go (minimum voltage and current).
• Make sure that the "TRACKING" button is in the "OFF" position, i.e. not pressed, except AX 501. - If necessary, connect the " 12 " terminal to the earth of the circuit to be powered (to provide protection) and the "+" and "-" terminals to the points of the circuit to be powered, using the connection cables.
Check the quality and polarity of the contacts. - Set the On/Off switch to "I". The "LIMIT" LEDs should be off.
- Set the voltage to be regulated by turning the "voltage" potentiometers to the right (increasing values): the voltage set point is displayed.
- Adjust the value of the limit current by turning the potentiometer to the right (increasing values). The current value displayed is the value of the output current. If the output current reaches the limit current value, the power supply automatically switches to "current" regulation mode, the "LIMIT" LED comes on and the voltage is not longer regulated.

Example: A short-circuited output (R = 0) leads to V = R*I = 0 and the current "I" may vary up to 2.5 A (operation with current limitation, "LIMIT" LED on).
Application connected Application
1: Measurement of the current consumed by the circuit
2: Adjustment of current limitation
3.2.2. Use of 2 power supplies in parallel (without "TRACKING") up to 5 A at 30 V max. (AX 502, AX 503 and AX 503F)
- With the "TRACKING" pushbutton released (OFF position, LED off), set the 2 power supplies ("MASTER" and "SLAVE") to the same output voltage value.
- Link the "+" terminals together and the "-" terminals together using short leads. Connect one of the two "+" terminals and one of the two "-" terminals to the circuit to be powered.
3.2.3. Use of 2 power supplies in series (without "TRACKING") up to 60 V at 2.5 A max. (AX 502, AX 503 and AX 503F)
- With the "TRACKING" pushbutton released (OFF position, LED off), set the 2 power supplies ("MASTER" and "SLAVE") to the same current limitation value.
- Use a short lead to link the "+" terminal of one power supply to the "-" terminal of the other power supply: use the two "+" and "-" terminals that remain free to make the connection with the circuit to be powered.
3.2.4. Use of 2 power supplies in series with the "TRACKING" function (symmetrical ± 30 V sources) at 2.5 A max. (AX 502, AX 503 and AX 503F)
- Press in the "TRACKING" button ("ON", LED lit).
The pushbutton is set to "ON" sets up a series connection between the "-" terminal of the "MASTER" power supply and the "+" terminal of the "SLAVE" power supply.
Procedure:
- In sequence (power supply a and then b), adjust the "current" potentiometers to define identical limit currents.
- Connect up to the circuit to be powered (external terminals of the "MASTER" and "SLAVE" power supplies).
- The "MASTER" source is on the left (a); set the required initial voltage.
• The "SLAVE" source is on the right (b). - In this function, only the voltage controls of the "MASTER" source (a) will be used from now on.
- The symmetrical "SLAVE" source (b) reacts to the "MASTER" source (a) voltage variations by proportional "tracking" variations in absolute values ("TRACKING" function).

For the use of symmetrical voltages (e.g. ± 15 V), one of the 2 terminals (MASTER "-" or SLAVE "+") will be connected to the circuit to be powered ("0" point).
V "MASTER" (a)
V "SLAVE" (b)
| Action: Δ V "MASTER" (a) | ↑ ↓ | |
| Reaction: Δ V "SLAVE" (b) (absolute value) | ↑ ↓ |
| Initial conditions | V "MASTER" / V "SLAVE" | V "MASTER" | causes | Results | |
| V "MASTER" (a) | +12 V | 1 / 1 +3 V | +3 V | +15 V | |
| V "SLAVE" (b) | -12 V | -3 V | -15 V | ||
| V "MASTER" (a) | +24 V | 2 / 1 | -4 V | -4 V | +20 V |
| V "SLAVE" (b) | -12 V | +2 V | -10 V | ||
| V "MASTER" (a) | +12 V | 1 / 2 | +2 V | +2 V | +14 V |
| V "SLAVE" (b) | -24 V | -4 V | -28 V |

If the "SLAVE" source (b) is taken outside its limits (voltage or current) by the "MASTER" source (a), the corresponding "LIMIT" LED lights up.
3.2.5. Use of the 2.7 V - 5.5 V (5 A) power supply (AX 503 only)
- If necessary, connect the " 12 " earth terminal to the circuit to be powered (*).
- Connect the "+" and "-" terminals to the points of the circuit to be powered using the connection leads (*).
- Set the required voltage between 2.7 V and 5.5 V using the adjustment potentiometer.
- For "fine" adjustment, connect these terminals to a multimeter (appropriate calibre).
- If the output current reaches the 5 A limit current value, the "LIMIT 5 A" LED comes on, the power supply automatically switches to "current" regulation mode and the voltage is not longer regulated.

Application: This output is designed to power logic circuits at 3 or 5 volts with consumption up to 5 A. AX 503F : power supply of electronic circuits, leds, Zener diodes ...

AX 503F
4. TECHNICAL SPECIFICATIONS
Only the values assigned tolerances or the declared limits constitute guaranteed values. Values without tolerances are given as indications and the measurement errors must be considered in the reference temperature conditions, i. e. 23^ C ± 5°C.
4.1. Voltage
| AX 501 AX 502 AX 503 - AX 503F | ||||
| Range available 0 - 30V | 2 x (0 - 30 V)or1 x (0 - 60 V)+ TRACKING | 2 x (0 - 30 V)or1 x (0 - 60 V)+ TRACKING | + output2.7 V to 5.5 V«AX 503F» : 3.3 V | |
| Adjustment coarse and fine by potentiometers | by potentiometer except “AX 503F” | |||
| Display | green | LEDs | ||
| Resolution | 0.1 | V | ||
| Accuracy | ± 0.5 % of reading ± 1 digit | - | ||
| Stability if variation:mains ± 10 %of the 0 to 2.5 A loadof the 0 to 5 A load | ± (0.03 % R + 2 mV)± (0.02 % R + 5 mV)- | ± 4 mV-± (0.2 % R +10mV) | ||
| Residual ripple in load <1 mVrms | ± 1 mVrms | |||
| Common mode voltage | 60 V peak | |||
| Protection againstshort-circuit | current electronic limitation | |||
| Coupling of outputs - | series or parallel | |||
| "TRACKING"(master/slave) | - | yes | - | |
C
To avoid significant drops in voltage during regulation verification measurements, the contact resistances of the connections must be very low ( ≤ 1 m ).
4.2. Current
| AX 501 | AX 502 | AX 503 - AX 503F | ||
| Range available | 0 - 2.5 A | 2 x (0 -2.5 A) or 1 x (0 - 5 A) | 2 x (0 -2.5 A) or 1 x (0 - 5 A) | + output 5 A |
| Adjustment | by potentiometer | none | ||
| Display | red LEDs | - | ||
| Resolution | 10 mA | - | ||
| Accuracy | ± 0.5 % of reading ± 1 digit | - | ||
| Output current limitation | adjustable from 0 to 2.5 A | limited to 5 A ± 5 % | ||
| Residual current | < 22.5 mA | |||
| Indication of limitation | LED | |||
| Short-circuit protection | current limitation | |||
| Protection against overheating | yes | |||
5. GENERAL SPECIFICATIONS
Safety Compliance with the safety norm: IEC 1010-1 (NF EN 61010-1)
Insulation class 1
Pollution level: 2
- Power supply outputs: Overvoltage category 100 V CAT I in relation to the earth
Maximum output voltage: 30.5 V dc in normal mode
61.0 V
- Mains power supply: Overvoltage category 300 V CAT II
Supply current: 115 V or 230 V ± 10 % ; 50-60 Hz
Guaranteed insulation of the outputs from the mains when used at extra low
safety voltage.
Mechanical features
AX 501 AX 502 AX 503 - AX 503F
| Weight | 4 kg | 4.5 kg | 6 kg |
| Dimensions | 270 mm x 225 mm x 120 mm | ||
Packaging 400 mm x 345 mm x 250 mm
Power supply For the voltage value, refer to the label on the rear of the power supply.
Two mains ranges: 115 VAC ± 10 % or 230 VAC ± 10 %.
Display 2 displays (3 digits) "VOLTAGE" in green and "CURRENT" in red
7 segments
Digit size: 14.2 mm
Environmental Use 10°C to 40°C
conditions Operating not specified for : 0°C to 10°C and 40°C to 50°C
over 40^ C : limit the operating duration to 1 hour
Storage -20°C to +70°C
Coefficient < 0.1 x accuracy / °C
Relative humidity < 80 % RH up to 40°C
Electrical field nil
Magnetic field < 40 A / m
Altitude < 2000 m
EMC • Conducted radiation emissions:
NF EN 50081-1
- Immunity:
NF EN 50082-1
6. ACCESSORIES
6.1. Accessories delivered with the power supply
1 user's manual (5 languages)
6.2. Optional accessories
20 A / 25 cm safety leads, male / male, red
20 A / 25 cm safety leads, male / male, black
20 A / 50 cm safety leads, male / male, red
20 A / 50 cm safety leads, male / male, black
Green/yellow earth safety lead, female, 2 m
BEDIENUNGSANLEITUNG
INHALT
1. ALLGEMEINE HINWEISE....29
Unit 1 Nelson Ct - Flagship Sq - Show Cross Business Pk
CEWSDUHY, West Yorkshire - WF12 7TH
Tel:01924 050 634 · Fax:01924 455 325
CHINA - Shanghai Pujiang Enerdis Instruments Co. Ltd
3 Floor, Building 1 - N° 381 Xiang De Road
Hongkou District - 20021 SHANGHAI
TEL: +68 21 65 21 51 16 - FSC: -69 21 65 21 61 07
中国
上海浦江埃纳迪斯仪表有限公司
上海市虹口区祥德路381号3号楼3楼
Tel: +86 21 65 21 51 96 - Fax: +86 21 65 21 61 07
ITALIA - Amra 5pA
Via San Andrejia, 2325-23016 MACHERIO [MB]
Tel: 030 245 75 45 - Fax: 030 481 561
ESPAÑA - Chauvin Amous Ibérica S.A.
G' Roger de Flor, 293 - 1a Planta - 08025 BARCELONA
Tel: 902 20 22 26 - Fax: 934 59 14 43