Cat Mate 355W - Pets Closer Pets - Free user manual and instructions
Find the device manual for free Cat Mate 355W Closer Pets in PDF.


User questions about Cat Mate 355W Closer Pets
0 question about this device. Answer the ones you know or ask your own.
Ask a new question about this device
Download the instructions for your Pets in PDF format for free! Find your manual Cat Mate 355W - Closer Pets and take your electronic device back in hand. On this page are published all the documents necessary for the use of your device. Cat Mate 355W by Closer Pets.
USER MANUAL Cat Mate 355W Closer Pets
Pet Mate Ltd. guarantees your product for a period of 3 years from the date of purchase, subject to the registration of your purchase details on our website www.pet-mate.com within 14 days of purchase. (If you do not have access to a computer, please send details of your purchase with copy of receipt along with your name and address.) In the event of a fault developing contact Pet Mate customer services for a returns authorisation number. The guarantee is limited to any defect arising due to faulty materials or manufacture. Any defective products that are replaced free of charge at the manufacturer's discretion, provided that the defect has not been caused by neglect, misuse or normal wear and tear, your statutory rights are not affected.
GARANTIE
Pat Mota Ltd. gavam on Iur Producia a Garantie von 3 Jenaan ab der Kautafure, uater der Vorausstellung, dass die Regelierung fre Pruduts auf den Weiswerte oual pnet al. wotn welte Pmale mthn hbarv 14 tages das Kautafure oergut (Htien: Wich an kriten corthorpmd Cnurpulizing Fzugation, sandoe Sns at the Kautafure zuuunrmiten mit einer Kone firs Etnaubadge und Angioes Frentne andier Auer Aetee) . The Gartage is an Mertal in 1970, an Mertal in 1980, an Mertal in 1990, an Mertal in 2000, an Mertal in 2010, an Mertal in 2015, an Mertal in 2018, an Mertal in 2020, an Mertal in 2025, an Mertal in 2030, an Mertal in 2035, an Mertal in 2040, an Mertal in 2045, an Mertal in 2050, an Mertal in 2060, an Mertal in 2070, an Mertal in 2080, an Mertal in 2090, an Mertal in 2095, an Mertal in 2099, an Mertal in 2100, an Mertal in 2105, an Mertal in 2110, an Mertal in 2115, an Mertal in 2120, an Mertal in 2125, an Mertal in 2130, an Mertal in 2135, an Mertal in 2140, an Mertal in 2145, an Mertal in 2150, an Mertal in 2155, an Mertal in 2160, an Mertal in 2165, an Mertal in 2170, an Mertal in 2175, an Mertal in 2180, an Mertal in 2185, an Mertal in 2190, an Mertal in 2195, an Mertal in 2200, an Mertal in 2205, an Mertal in 2210, an Mertal in 2215, an Mertal in 2219, an Mertal in 2220, an Mertal in 2225, an Mertal in 2230, an Mertal in 2235, an Mertal in 2240, an Mertal in 2245, an Mertal in 2250, an Mertal in 2255, an Mertal in 2260, an Mertal in 2265, an Mertal in 2270, an Mertal in 2275, an Mertal in 2280, an Mertal in 2285, an Mertal in 2300, an Mertal in 2305, an Mertal in 2310, an Mertal in 2315, an Mertal in 2319, an Mertal in 2320, an Mertal in 2325, an Mertal in 2330, an Mertal in 2335, an Mertal in 2340, an Mertal in 2345, an Mertal in 2349, an Mertal in 2350, an Mertal in 2355, an Mertal in 2360, an Mertal in 2365, an Mertal in 2370, an Mertal in 2375, an Mertal in 2380, an Mertal in 2385, an Mertal in 2390, an Mertal in 2400, an Mertal in 2410, an Mertal in 2415, an Mertal in 2419, an Mertal in 2430, an Mertal in 2435, an Mertal in 2440, an Mertal in 2445, an Mertal in 2450, an Mertal in 2455, an Mertal in 2460, an Mertal in 2465, an Mertal in 2470, an MertAL nI ^*4
GARANTIE
This equipment has been tested and found to comply with the limits for a Class B digital device, pursuant to Part 15 of the FCC Rules. These limits are designed to provide reasonable protection against harmful interference in a residential installation. This equipment generates uses and can radiate radio frequency energy and, if not installed and used in accordance with the instructions, may cause harmful interference to radio communications. However, there is no guarantee that interference will not occur in a particular installation. If this equipment does cause harmful interference to radio or television reception, which can be determined by turning the equipment off and on, the user is encouraged to try to correct the interference by one or more of the following measures:
Reorient or relocate the receiving antenna.
- Increase the separation between the equipment and receiver.
- Connect the equipment into an outlet on a circuit different from that to which the receiver is connected.
- Consult the dealer or an experienced radio/TV technician for help. Changes or modifications not expressly approved by the party responsible for compliance could void the user's authority to operate the equipment.
This device complies with Part 15 of the FCC Rules. Operation is subject to the following two conditions: (1) This device may not cause harmful interference. (2) This device must accept any interference received, including interference that may cause undesired operation.
Hereby, Pet Mate Ltd., declares that this product is in compliance with the essential requirements and other relevant provisions of EU Directives. All Declarations of Conformity (DOC) may be viewed at www.pet-mate.com/eudoc.
IMPORTANT: Disposc of damaged/tauty/end-of-life products in accordance with locally applicable regulations for your country. EU: Refer to Terms and Conditions section EU Waste Electrical and Electronic Equipment (WEEE) Directive on www.pet-mate.com for more information.
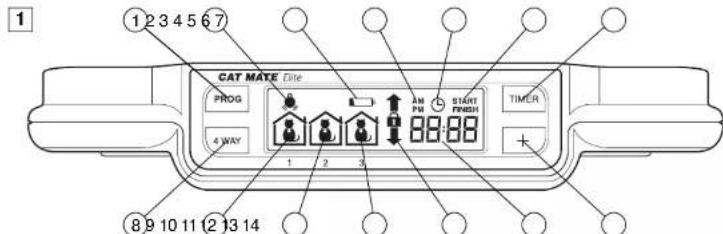
1.PROGPROGRAM) button
2. Microchip / I.D. Disc search indicator
3. Low battery indicator
4.AMPM indicators
(12Hr clock mode)
5. TIMER' function indicator
6. TIMER mode Start/Finish indicators
7. TIMER button
8.WAYburtan
9-11.CAT1-3location symbols
12.4WAYlookindicators
13. Alphanumeric display (normally
states time!
14. ADVANCE' button
IMPORTANT - READ BEFORE USE
WICHTIG-BITTEVORVERWENDUNG
Seiten 14-21
1.PROGRAMMER-Taste
2.698900000000000000000000000000000000000000000000
2.Denentzusamnserznege
4.AMPTAeAsen (TeSvynsV
i.
6. TWIF-MAK (or Strobo)
7.TWFR-Taste
9.4-WGGE-Taste
9-11.0472E-3Aerant
1.4.P536Y2005X0023882
1.1 Anaphylaxis Dismiss (anaphylaxis)
Dr. Alokshankar,
Wiley International
14.08748RTS-Tan
F IMPORTANT - A LIRE AVANT USAGE
Pages 22-29
IMPORTANT SAFETY INSTRUCTIONS
- Read all instructions before installing or using this product.
Register your purchase on-line at www.pet-mate.com (see guarantee). - Do not allow children to play with this product.
- Inspect product regularly for correct operation and damage. Do not use if in doubt.
- This product is designed for use with pets only, as described in these instructions.
The locking system of this pet door is not intended as a security device. - This pet door is not a fire resistant door and must not be used where there is a risk from fire spread.
- The installer of this pet door is responsible for complying with all relevant building regulations.
- During installation of this pet door take appropriate care. Follow safety instructions for all tools and wear appropriate personal protective equipment.
- Dispose of all packaging material properly. NOTE: Plastic bags could cause suffocation - keep away from children and animals.
SAVE THESE INSTRUCTIONS
1. Introduction
Thank you for choosing the Cat Mate Elite Microchip Cat Flap with Timer Control.
CAREFULLY READ THESE INSTRUCTIONS AND PROGRAM / TEST THE CAT FLAP BEFORE YOU INSTALL IT.
The Cat Mate Elite Microchip Cat Flap with Timer Control allows entry for up to 9 cats into your property. It also allows you to control the exit of all your pets using a timer or 4 way lock. Furthermore, it will allow you to monitor the movement of up to 3 individual cats - showing when your cat last entered or left the house, and how many hours since your cat last used the flap.
The cat flap is suitable for all popular microchips. Alternatively it may be operated by a Cat Mate I.D. Disc (available separately). You may wish to use an I.D. Disc for cats without a microchip or in the event that your cat's microchip is faulty or poorly positioned.
To ensure that your chosen settings cannot easily be tampered with, we have made the control buttons so that they need to be pressed firmly to operate.
If you wish to stop any task (except programming) at any stage, the system will time out after 60 seconds.
Settings will not be saved unless you press the 'PROG' button.
2. Fitting the Batteries
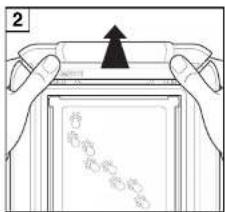
2.1 Remove the battery cover by pushing the battery cover upwards (see Fig. 2). The cover will snap off.
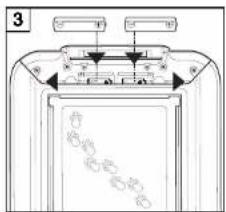
2.2 Insert 4 × AA (R6) batteries as shown (Fig. 3), by sliding the 2 end batteries in first.
2.3 The cat flap will self-check for up to 60 seconds after which only the 'IN & OUT' arrows will be visible on the LCD display. The flap is ready to program.
All popular batteries can be used including rechargeable batteries, but the low battery indicator (③, Fig. 1) will only work correctly with alkaline batteries. Good quality alkaline batteries should last approximately 12 months (depending on number of cats and usage). You MUST NOT use lithium batteries.
3. Programming
The next step is to program the microchip (or I.D. Disc) belonging to each cat.
NOTE: The programming sequence is time sensitive and the LCD will revert to the normal display if each step is not completed within approximately 15 minutes.
In order for the flap to recognise your cat(s) microchip you need to do the following:
3.1 Press and hold the 'PROG' button for 5 seconds (①, Fig. 1) until the search indicator (②, Fig. 1) appears.
3.2 'CAT 1' and the number '1' will flash - there will be lines moving around the first TWO ZEROS'.
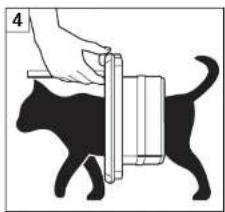
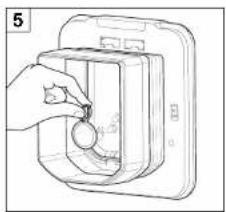
3.3 To program your cat's microchip, encourage your cat to slowly pass through the tunnel by holding the flap open as shown in Fig. 4. Alternatively, to program your cat's I.D. Disc, place the front of the I.D. Disc in the tunnel opening (Fig. 5).
3.4 When programmed, the TWO ZEROS' will disappear and 'Pr1' will flash.
3.5 Press the 'PROG' button to save the setting.
For additional cats, up to a maximum of 9, repeat steps 3.1 to 3.5.
4. Fitting Instructions (see Figs. 8a to 16, pages 4 and 5)
IMPORTANT:
- Do not cut tunnel of cat flap.
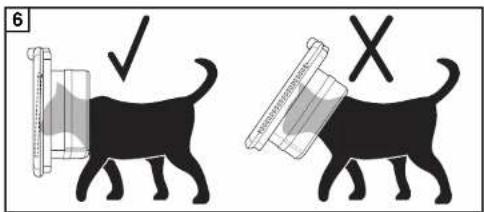
- To check that your cat's microchip is correctly positioned and functioning, we strongly recommend you program the cat flap for all your cats before installation (see Section 3). Then check the cat's microchip operates the lock when the cat's head is pushed gently against the flap as shown in Fig. 6.
4.1. Wooden Doors 0-50mm (0-2") Thick
4.1.1 Place exterior frame in desired position on door. We recommend the bottom of the aperture is approximately 150mm (6") above ground level. (Fig. 8a). If you must fit higher consider providing a step to help your cat enter.
4.1.2 Draw around the aperture (Fig. 8a), then using an electric jigsaw cut 4mm([5]x_2^n) outside of the line. (Fig. 8b).
Be careful to cut hole square to the door, particularly with thicker doors. Ensure interior frame is free fitting in hole.
4.1.3 Determine thickness of door panel, (t). (Fig. 10)
4.1.4 Holding the interior frame and the exterior frame in position, mark the 2 screw holes. (Fig. 11).
4.1.5 Remove the frames and drill screw clearance holes in panel to 6mm(_4^ ) diameter.
4.1.6 Position interior frame on inside of door and screw exterior frame to it by using appropriate screws for panel thickness, (t), as shown in Fig. 12. If necessary, cut supplied screws to length. Finally fit two screw caps.
4.2 UPVC / Metal Doors 0-50mm (0-2") Thick
Doors constructed with metal panels may reduce the range of the microchip reader. You may test for metal panels by drilling a small trial hole in the middle of the intended cat flap location.
For UPVC / metal doors it is essential to cut a larger hole than for wooden doors and to retune the cat flap as below:
4.2.1 Place exterior frame in desired position on door. We recommend the bottom of the aperture is approximately 150mm (6") above ground level. (Fig. 9a). If you must fit higher consider providing a step to help your cat enter.
4.2.2 Draw around the OUTSIDE of the frame. (Fig. 9a). Using an electric jigsaw cut 12mm( ) INSIDE the line (Fig. 9b).
4.2.3 Determine thickness of door panel, (t). (Fig. 10).
4.2.4 Position interior frame on inside of door and screw exterior frame to it by using appropriate screws for panel thickness, (t), as shown in Fig. 12. If necessary, cut supplied screws to length. DO NOT OVERLIGHTEN SCREWS which may prevent the flap from closing properly - use a manual screwdriver. Finally fit two screw caps.
4.2.5 Remove batteries for a minimum of 2 minutes after installation. This will enable the cat flap to retune itself to its new location.
4.3 Glass Panels
4.3.1 We recommend that you ask a glazier to cut a hole of 232mm ( 9^1/2 ) diameter in the position required and then install the cat flap as detailed below. Alternatively, you may prefer to replace the glass panel with a clear plastic panel and install as instructions 4.1.1 to 4.1.6.
Note: It is not possible to cut a hole in double glazed or toughened glass. You will need a new glass panel with the hole already cut from your glazier.
4.3.2 Determine thickness of panel, (t). (Fig. 10)
4.3.3 The black foam seal is not suitable for fitting to glass and should be removed. If desired, the exterior frame may be sealed to the glass panel using silicone sealant.
4.3.4 Position interior frame on inside of panel, screw exterior frame to it by using appropriate screws for panel thickness, (t), as shown in Fig. 12. If necessary, cut supplied screws to length. DO NOT OVERLIGHTEN SCREWS which may prevent the flap from closing properly - use a manual screw driver. Finally fit two screw caps.
4.4 Wall Fitting
If you are installing your cat flap in a wall, you will need to purchase Cat Mate Elite Wall Liners. You will need 1 wall liner for every 50mm (2") of wall thickness over 100mm (4").
4.4.1 Create a rectangular hole in your wall 205mm (8") high by 180mm (7") wide.
4.4.2 Remove interior frame battery cover by pushing up as shown (Fig. 2).
4.4.3 Remove interior frame cover by unscrewing 2 screws in rear of interior frame (Fig. 13). (Note: these screws may be discarded as it will be impossible to refit them). Next remove the outermost 2 screws under the battery cover and remove the interior frame by pivoting down (Fig. 14).
4.4.4 Carefully remove 2 screw clips with pliers. (Fig. 15).
4.4.5 Fit interior frame assembled with requisite number of wall liners to interior wall securing in position with 2 suitable screws as shown in Fig. 16. (Note: you will need to fit a washer (not supplied) under the head of the screws). If required, the wall liners may be glued in place, although a firm push fit will usually suffice.
4.4.6 Refit interior frame cover with 2 screws under battery cover, taking great care not to trap electrical wires. Replace the battery cover.
4.4.7 Fit exterior frame using 2 off 25mm (1") screws supplied and finally, fit 2 screw caps.
5. Training Your Cat to Use the Cat Flap (or if Your Cat Has Lost its I.D. Disc)
It may take a little time for your cat to get used to its new cat flap. To help your cat get used to entering and exiting the flap, the flap can be set to 'TRAINING MODE' by pressing and holding the 'PROG' button and within 3 seconds briefly pressing the '4 WAY' button.
After 5 seconds the lock will unlock and the 'PROG' button should then be released. The 'IN & OUT' symbol will remain flashing.
Please be aware that in 'TRAINING MODE' your cat flap will allow access for other animals.
To exit the TRAINING MODE', press and hold the 'PROG' button and within 3 seconds briefly press the '4 WAY' button. After 5 seconds the flap will re-lock and the 'PROG' button should then be released.
For very hesitant cats, whilst in the 'TRAINING MODE', use food to encourage the cat to enter and exit the flap.
NOTE: We do NOT recommend that cats, particularly kittens, are left alone to use their cat flap until you are satisfied that they are completely familiar with its operation.
6. Viewing Your Cat's Location
The LCD shows at a glance, the location of up to three cats (1-3).

The cat last went through the The cat last went through the flap, coming into the house. flap, going out of the house.
Please note this display is only a guide to your cats' location. The cat flap determines the location of your cat by recording its last movement through the cat flap. The results may be misleading if the cat has an alternative entrance/exit to the house or if the cat has followed another cat through the cat flap; if it only puts its nose out of the cat flap etc.
7. To View How Long Since the Cat(s) Last Used the Cat Flap
7.1 To view how many hours and minutes since cats 1, 2 or 3 last used the cat flap, press the ^+ button.
7.2 The display will show the symbol for 'CAT 1' and how many hours and minutes ago 'CAT 1' used the flap up to a maximum of 99 hours.
7.3 Press ^+ again for similar information on Cats 2 and 3.
7.4 Press +1 a fourth time (or leave for 20 seconds) and the normal display will be resumed.
8. Access Options
The access options available are shown below.

'In & Out' Your cat(s) can come in and out of the flap

'In Only' Your cat(s) can come in through the flap but cannot leave through the flap

'Out Only' Cat(s) can go out through the flap but cannot enter through the flap

'Locked' Cat(s) cannot use the flap
Select an access option as follows:
8.1 Press and hold the '4 WAY' button for 5 seconds until the display flashes.
8.2 Repeatedly press the '4 WAY' button to scroll through the available access options, until you come to the one you want.
8.3 Press the 'PROG' button to save the setting.
8.4 Setting Timer Control/Clock for ALL Cats
If you wish to set your cat flap to ensure that ALL cats have a particular access option, over a selected timed period, e.g. to keep your cat(s) in at night between 19:00 and 06:00, you will first need to decide:
a) Which lock setting should apply DURING the timed period, (in the above example 'IN ONLY' will apply). Outside the timed period, the lock setting made in 8.1 to 8.3 will apply.
b) When the timed period should 'START' (In the above example 19:00hrs).
c) When the timed period should FINISH' (in the above example 06:00hrs).
d) You will also need to know the current time.
Proceed as follows:
NOTE: if you do not press a button for more than 60 seconds the display will revert to normal and you will need to start again.
8.4.1 Press the 'TIMER' button for 5 seconds until the Timer function indicator flashes.
8.4.2 Repeatedly press the '4 WAY' button to select the required access options from: IN & OUT, 'IN ONLY', 'OUT ONLY', 'LOCKED' or 'OFF'.
8.4.3 Press the 'PROG' button to save the setting.
8.4.4 The display will show time with the Minute symbol flashing. Repeatedly press the +^ button until the current Minutes setting is shown (i.e. 10 if the current time is 12:10).
8.4.5 Press the 'PROG' button to save the setting.
8.4.6 The display will now show the time with the Hour symbol flashing. If you wish to change between a 24 hour clock and AM/PM setting, press the 'TIMER' button.
8.4.7 Repeatedly press the +1 until the correct Hour setting is shown (e.g. 12 if the current time is 12:10).
8.4.8 Press the 'PROG' button to save the setting.
8.4.9 The display will show the word 'START' and the minutes will flash. Press the +1 button until the desired minutes setting is shown, (in the above example '00'). Press the 'PROG' button to save the setting.
8.4.10 Then set the hours in the same way (in the above example 19:00).
8.4.11 The display will show the FINISH' time. Set in the same way as the START' time. Remember to press PROG' to save the setting.
When the Timer is set, the Timer function indicator (5, Fig. 1) will be shown on the display.
When the timed lock is active, the access option symbol chosen at 8.2 will flash slowly. To check the time settings, briefly press the 'TIMER' button and release. The display will show the timed access option selected and the 'START' time. Press the 'TIMER' button again to show 'FINISH' time. The display will revert to current time after 5 seconds.
To cancel timer control and revert back to the normal access option:
8.4.12 Press the 'TIMER' button for 5 seconds.
8.4.13 Press the '4 WAY' button and go back through the options until you come to 'OFF'.
8.4.14 Press the 'PROG' button 3 times to keep the current clock time and return to the normal display.
9. Battery Replacement
When the low battery indicator ( ③ , Fig. 1) comes on, alkaline batteries should be replaced. (See Section 2).
Please note, after fitting new batteries:
- Low battery indicator may remain on for up to 15 minutes.
- Flap will remember all microchip(s) and I.D. Disc(s), Lock Settings and Lock Times but CURRENT TIME WILL NEED RESETTING. (See section 8.4).
10. Reprogramming a Microchipped Cat or I.D Disc
10.1 Press the 'PROG' button for 5 seconds, the next unused Cat number will flash and there will be lines moving around the first TWO ZEROS'.
10.2 Press the +1 button to select the appropriate Cat number you wish to reprogram or select the next available Cat number. (A 'P' next to the Cat number indicates that it has already been programmed, although you may reprogram as follows).
10.3 To program your cat's microchip, encourage your cat to slowly pass through the tunnel by holding the flap open as shown in Fig. 4. Alternatively, to program a replacement I.D. Disc, place the front of the I.D. Disc in the tunnel opening (Fig. 5).
10.4 When programmed, the TWO ZEROS' will disappear and 'Pr' will flash.
10.5 Press the 'PROG' button to save the setting.
For additional cats, up to a maximum of 9, repeat steps 10.1 to 10.5.
11. Factory Reset
To reset the cat flap back to the setting when you first bought it, press and hold the + button for about 30 seconds until all symbols show on LCD. After a period of self checking, the IN & OUT' symbol will be all that is visible on the LCD display. This procedure will erase all I.D. Disc(s) / microchip(s) and all other settings. You will then need to re-program the I.D. Disc(s) / microchip(s) (See Section 3).
12. High Security Mode
This cat flap is supplied with high security mode disabled as this makes it easy for your cat to get used to its new flap. In this mode the flap has the quickest possible response time to the cat's microchip.
Once the cat has become accustomed to using the cat flap it is recommended that high security mode is enabled. This gives improved security against entrance by raccoons and persistent neighbourhood cats and longer battery life.
You can switch the flap to high security mode ('Eon') as follows:
12.1 Press and hold 'PROG' button and within 3 seconds briefly press the +' button. When the display shows 'EOFF' or 'Eon' release the 'PROG' button.
12.2 You may toggle between 'EOFF' and 'Eon' by pressing the '4 WAY' button. Press 'PROG' to save the desired setting.
13. Troubleshooting
13.1 Cat will not use the flap
It may take time for timid cats to learn how to use the cat flap - even if they have used another cat flap before.
- First try using 'TRAINING MODE' (See Section 5).
- Check the high security mode is disabled so your cat will find it easier to use the flap (See Section 12).
13.2 Cat's microchip will not program
- Your cat's microchip might be faulty or poorly positioned. Contact Pet Mate Customer Services or fit a Cat Mate I.D. Disc.
13.3 Flap does not open in response to programmed microchip or I.D. Disc
- Check the cat's microchip or I.D. disc operates the lock when the cat's head is pushed gently against the flap as shown in Fig. 6.
- If fitted in UPVC / metal door, ensure correct cut out size has been made (See Section 4.2).
- When fitted to UPVC / metal door check the unit has been retuned by removing batteries for a minimum of 2 minutes.
- Check '4 WAY' lock is programmed to permit access in the chosen direction (See Section 8).
- Ensure a timed lock is not activated, (evident by flashing '4 WAY' lock setting). If required, cancel the timed lock (See Sections 8.4.12 to 8.4.14).
- The high security mode may have been activated (denoted by 'Eon' on the display). Do not move the flap until 'Eon' disappears.
- Check batteries are correctly orientated (Fig. 3) and the low battery indicator (③, Fig.1) does not show.
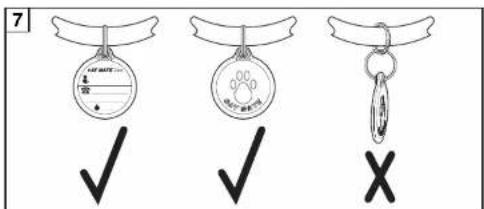
If using an I.D. Disc, check it is correctly fitted to cat's collar (Fig. 7). - If possible, try operation with another programmed I.D. Disc / microchip to ascertain if there is a fault with a particular I.D. Disc / microchip.
- Check that the cat flap is mounted at correct height (See Section 4).
- If all else fails, remove batteries and wait a minimum of 5 minutes. Refit batteries and then perform a 'FACTORY RESET' (See Section 11).
13.4 Flap has not fully closed
- Check that the cat flap frame is not overtightened with the 2 fixing screws. Try loosening screws slightly.
- Very occasionally this will be due to an unusual event in which the electronics will normally self correct within 30 minutes. If problem persists remove batteries for 30 minutes before replacing when correct lock action should be resumed.
13.5 Difficulty in setting required functions/times
- Buttons need to be pressed firmly.
- Remember to press the 'PROG' button after making any change to save the setting.
13.6 Display locks up
- Remove batteries for 5 minutes, then replace.
- If the display is still locked perform a 'FACTORY RESET' (See Section 11).
13.7 Flap does not lock
- Check flap not in 'TRAINING MODE' (slowly flashing arrows).
- Wait 30 minutes for self correction.