
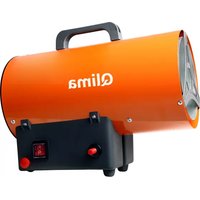
DFA 2320 - Heating QLIMA - Free user manual and instructions
Find the device manual for free DFA 2320 QLIMA in PDF.
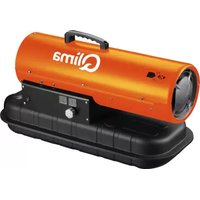


| Product type | Mobile liquid fuel heater (kerosene or diesel) |
| Brand | Qlima |
| Model | DFA 2320 |
| Thermal input | 20 kW |
| Estimated air flow | 550 m³/h |
| Fuel type | Diesel or Kerosene (do not mix) |
| Fuel consumption | 1.65 kg/h |
| Tank capacity | 22 liters |
| Autonomy | Approximately 11 hours (at full power) |
| Power supply | AC 220-240 V / 50 Hz |
| Rated current | 1.1 A |
| Electrical power | 230 W |
| Fuse rating | T10A |
| Dimensions (L × W × H) | 752 × 305 × 416 mm |
| Net weight | 13.4 kg |
| Operating ambient temperature | -20 to 40 °C |
| Air pressure setting | 0.32 bar |
| Injector size | 0.54 mm |
| Main functions | Integrated thermostat (5-45°C), ON/OFF switch, fault indicator, fuel gauge, carrying handle, wheels for mobility |
| Safety distances (minimum) | Sides: 0.6 m, Air intake: 1.0 m, Air outlet: 3.0 m, Top: 1.5 m, Floor: 0 m |
| Recommended use | Outdoor or well-ventilated indoor use (ventilation openings min. 600 cm²) |
| Maintenance | Clean the housing, air filters, nozzle, and ignition electrodes regularly; have the pressure checked by a technician |
| Warranty | 24 months (against manufacturing defects) |
| Included accessories | Screws, washers, handle, wheels (assembly required) |
Frequently Asked Questions - DFA 2320 QLIMA
User questions about DFA 2320 QLIMA
0 question about this device. Answer the ones you know or ask your own.
Ask a new question about this device
Download the instructions for your Heating in PDF format for free! Find your manual DFA 2320 - QLIMA and take your electronic device back in hand. On this page are published all the documents necessary for the use of your device. DFA 2320 by QLIMA.
USER MANUAL DFA 2320 QLIMA
guarantee
YEARS
F
MANUEL D'UTILISATION
GB
OPERATING MANUAL
NL
GEBRUIKSAANWIJZING
2
16
30
F TABLE OF CONTENTS
Assembling the heater
Installation instructions
Filling fuel
Igniting and operating the heater
Wiring diagram
Troubleshooting
Maintenance
Storage instructions
Guarantee conditions
Environmental protection
NL TABLE OF CONTENTS
Oil consumption 1.65 kg/h
Normal operation 230 W
Fuel
Diesel/Kerosene
QN 20,000 W
IP class IPX4
PVG Holding BV, Kanaalstraat 12 C, 5347 KM Oss, the Netherlands
P.O. Box 96, 5340 AB Oss, the Netherlands | Qlima.com
Made in PRC


More

SPECIFICATIONS DUAL FUEL FORCED AIR HEATER

Model DFA 2330
Pin 220-240V / 50hz / 1Ph
Oil consumption 2.5kg/h
Normal operation 230 W
Fuel
Diesel/Kerosene
QN 30,000 W
IPclassIPX4
PVG Holding BV, Kanaalstraat 12 C, 5347 KM Oss, the Netherlands
P.O. Box 96, 5340 AB Oss, the Netherlands | Qlima.com
Made in PRC



SPECIFICATIONS DUAL FUEL FORCED AIR HEATER

Model DFA 2350
Pin 220-240V / 50hz / 1Ph
Oil consumption 4kg/h
Normal operation 340 W
Fuel
Diesel/Kerosene
QN 50,000 W
IPclassIPX4
PVG Holding BV, Kanaalstraat 12 C, 5347 KM Oss, the Netherlands
P.O. Box 96, 5340 AB Oss, the Netherlands | Qlima.com
Made in PRC



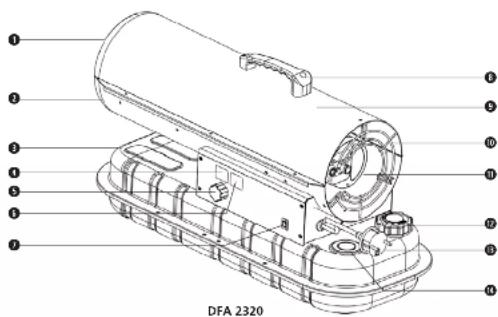
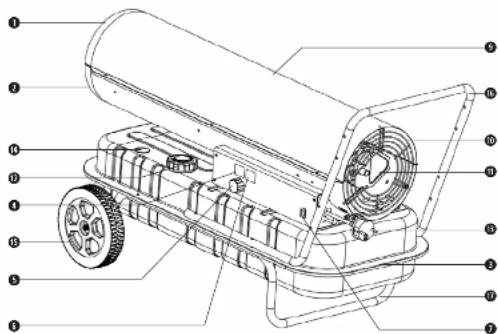
DFA 2330 DFA 2350
1 READ THE USER MANUAL FIRST.
2 IF IN DOUBT, CONTACT YOUR DEALER.
MAIN
COMPONENTS
Fig. 2
Fig. 3
WARRANTY CONDITIONS
DFA 2330 DFA 2350
1 PLEASE READ THE USER'S MANUAL FIRST.
2 IF YOU HAVE ANY DOUBTS, CONSULT YOUR DEALER.
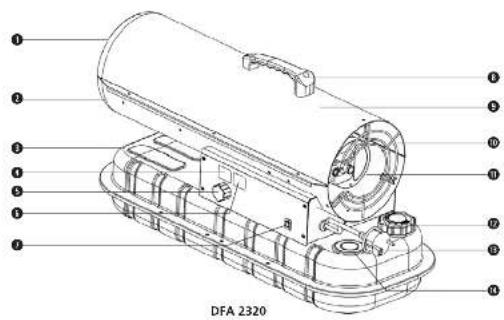
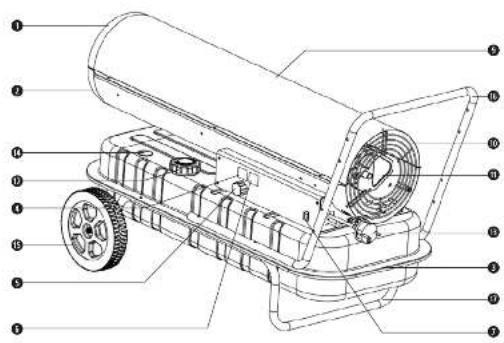
MAIN COMPONENTS
Hot air outlet, Lower shell, Fuel tank, Temperature Display, Temperature knob, LED power/reset switch, Handle, Upper shell, Fan guard, Air compressor, Fuel cap, Power cord, Oil gauge, Wheel, Upper tube, Lower Tube
GB
17
DIRECTIONS FOR USE (GB)

- Read this user manual carefully before using the appliance and keep it for future reference. Install this device only when it complies with local/national legislation, ordinances and standards.
- The heater is designed for outdoor use only. This product is intended to be used as a heater in non-residential conditions only
- After unpacking, check the appliance for any damages. When in doubt, do not use the appliance, but contact customer service at your local dealer. Keep the packaging materials (plastic bags, etc.) away from children, as they may cause hazardous situations to children.
- No modifications to the safety system are allowed.
- This heater is constructed in conformity with relevant texts in the LVD/EMC standard.

WARNINGS
- Read the Directions for Use before using the Heater. The safety of this heater is guaranteed only by its correct usage in accordance with these instructions, therefore it is recommended that they are retained for future reference.
- Only use the device for its intended purpose. Other usage may lead to short circuits, burns, electroshocks, lamp explosion, crash, etc.
- Only use the device for its intended purpose. Other usage may lead to short circuits, burns, electroshocks, lamp explosion, crash, etc. Install the heater only if it complies with local regulations, laws and standards.
- Make sure that the available voltage does not exceed the voltage stated in the specifications of this manual.
- Check if the voltage indicated on the type plate corresponds to the local mains voltage before you connect the appliance.
- The appliance is suitable for mains voltages ranging from -230 V.
- Always make sure that you actually see the appliance when you want to switch it on. Never use things like a timer, programmer or any other device (including Internet apps) that switches on the appliance automatically as this may cause fire!
- Use the heater according to the instructions as described in the installation section of the directions for use.
- This heater is manufactured according to CE safety standards. Nevertheless, as with any other heating device, care must be taken.
- RISK OF FIRE Never use the heater in places where inflammable and/or harmful Gases, products or fumes may be present (e.g. exhaust Gases, paint fumes, curtains, paper, clothes).
- If the heater is positioned too close to inflammable materials you may risk fire.
- Do not use any extension ports or multi-vacket adapters.
- For safety reasons, take care when children or animals are in the proximity of the heater, as with any other heating device, and make sure that children are always aware of the presence of a hot heater.
- This appliance is not intended for use by persons (including children) with reduced physical, sensory or mental capabilities, or lack of experience and knowledge, unless they have been given supervision or instruction concerning use of the appliance by a person responsible for their safety.
- If the supply cord is damaged, it shall be replaced by the manufacturer, its service agent or similarly qualified persons in order to avoid a hazard. Children should be supervised to ensure that they do not play with the appliance.
- In order to avoid overheating, do not cover the device.
- The device must not be located immediately below a socket outlet.
- Do not use this heater in the immediate surroundings of a bath, a shower or a swimming pool. Make sure that the power cable can never touch the heater.
- The guard of this heater is intended to prevent direct access to warm parts and must be in place when the heater is in use.
- Do not insert objects into the openings of the device.
- The guard does not give full protection for young children and infirm persons.
- This appliance can be used by children aged from 8 years and above and persons with reduced physical, sensory or mental capabilities or lack of experience and knowledge if they have been given supervision or instruction concerning use of the appliance in a safe way and understand the hazards involved.
- Cleaning and user maintenance shall not be made by children without supervision. Children of less than 3 years should be kept away from the heater.
- Children aged from 3 years and less than 8 years shall only switch on/off the appliance provided that it has been placed or installed in its intended normal operating position and they have been given supervision or instruction concerning use of the appliance in a safe way and understand the hazards involved. Children aged from 3 years and less than 8 years shall not plug in, regulate and clean the appliance or perform user maintenance.
- CAUTION - some parts of this product can become very hot and cause burns. Particular attention has to be given where children and vulnerable people are present.
- WARNING - Do not use this heater in small rooms when they are occupied by persons not capable of leaving the room on their own, unless constant supervision is provided.
- During operation and just after operation the appliance will be extremely hot. NEVER touch it during operation or just after operation. NEVER move the appliance during this time.
- Switch off the appliance when it is unattended.
- Do not cover or obstruct the heater when in use.
- Disconnect the mains during installation, cleaning, maintenance and/or transportation. Ensure it is cooled down completely before moving, cleaning or performing maintenance.
- Improper use of this heater can result in serious injury or death from burns, fire, explosion, electrical shock and/or carbon monoxide poisoning.
- Use this heater only in well ventilated areas.
- Use good quality fuel like Qlima Premium Quality fuels or similar in order to ensure that your heater can be used without problems.
- Never use other fuels than kerosene or diesel.
- Never use this heater with liquids like gasoline, benzene, paint thinners, alcohol based liquids or other oil compounds.
- Never use this heater where flammable vapours may be present.
- Never refill the heater, unless it has cooled down completely.
- Use kerosene OR diesel as a fuel only, not mixed. When you want to switch from kerosene to diesel or vice versa, first empty the fuel tank completely.
- Never use ducts or other objects to guide the air flow on air inlet or air outlet side. • Always respect the minimum clearance distances when using the heater Air inlet: 1 m air outlet: 3,00 m. Sides 0.6 m top 1,50 m.
- Never transport the heater with fuel in the tank. Make sure it is empty before moving it.
- Always ensure that the heater is standing and keeps standing on a level and firm surface. • Make sure the surface on which the heater is standing is stable, without vibrations and not moving. • Make sure that (potentially) dangerous situations cannot occur.
- Combustible objects should be stored safely according to local regulations, but never in such a way that the heater can heat or ignite them or (potentially) dangerous vapours can be generated.
- Make sure the heater is standing on a surface which cannot be harmed by using the unit.
- For optimal performance of this heater, please use Qlima Quality Fuels or other kerosene. Diesel may be used, but the performance of the heater will be influenced. Emissions might be higher and burning process will be a little more volatile (small flame tips might be visible at the exhaust of the heater).
If you fail to consult and/or follow up the rules, instructions and explanation, the warranty will no longer be valid, and the manufacturer will no longer deal with any damage to the appliance and/or your environment under the warranty.
TECHNICAL SPECIFICATIONS
| Model DFA 2320 DFA 2330 DFA 2350 | |||
| Heat Input [kW] * 20 30 50 | |||
| Air Flow Rating [m3/h] 550 750 1100 | |||
| Fuel Type Diesel - Kerosene Diesel - Kerosene Diesel - Kerosene | |||
| Fuel consumption [kg/h] 1.65 2.4 4 | |||
| Fuel Nozzle size mm | 0.54 0.88 1.24 | ||
| Voltage [V/Hz] | AC220-240/50 | AC220-240/50 | AC220-240/50 |
| Air Pressure Setting [bar] | 0.32 0.31 0.45 | ||
| Current Rating [A] | 1.1 | 1.1 | 1.5 |
| Electrical Power [W] | 230 230 340 | ||
| Fuse Rating | T10A | T10A | T10A |
| Ambient temperature | -20-40 °C | -20-40 °C | -20-40 °C |
| Dimensions | |||
| Net Weight (kg) | 13.4 19.2 23.2 | ||
| Length (mm) | 752 855 1076 | ||
| Width (mm) | 305 470 515 | ||
| Height (mm) | 416 588 585 | ||
| Tank Capacity (l) | 22 38 50 | ||
| Operating range (h) | ~11 | ~14 | ~11 |
| Standard Accessories | |||
| Fuel gauge | yes | yes | yes |
| Handle | 1 | 1 | 1 |
| Ambient thermostat | built-in | built-in | built-in |
| Malfunction detection light | built-in | built-in | built-in |
| Operating ambient temperature | -20-40 °C | -20-40 °C | -20-40 °C |
* Based on Gross Calorific Value [Hrs]
ASSEMBLING THE HEATER
The manufacturer is not responsible for any harm or damage if attention is not paid to the points described above.
The use of this product and the elements required for that purpose is entirely at the end user's own risk.
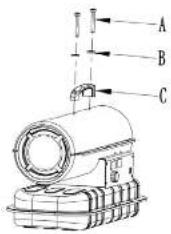
| Pos | Description | Qty DFA 2320 |
| A | Screw | 2 |
| B | Plain washer | 2 |
| C | Handle | 1 |
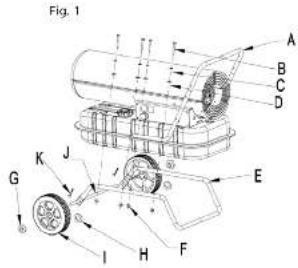
| Pos. | Description | QtyDPA 2350 | QtyDPA 2350 |
| A | Handle | 1 | 1 |
| B | Screw 8 | 6 | |
| C | Spring washer | 8 | 6 |
| D | Plain washer | 8 | 6 |
| E | Fect pipe | 1 | 1 |
| F | Nut M5 | 8 | 6 |
| G | Nut M12 | 2 | 2 |
| H | Plain washer #12 | 2 | 2 |
| I | Wheel | 2 | 2 |
| J | Wheel shaft | 1 | 1 |
| K | Cutter | 2 | 2 |
Fig. 2
To assemble the heater, proceed as follows (see Fig. 2):
1. Insert J into the corresponding hole of E, insert K into the corresponding holes; put H on the two sides of J, slide wheel I over wheel shaft J, and screw G to fix the wheel on the shaft. 2. Put the heater body on E, making sure the holes of A point towards the corresponding holes on E respectively. 3. Using B, C, D, and F, fix the feet pipe assembly and handle to the tank.
INSTALLATION INSTRUCTIONS
Make sure to use the appliance only on a firm and sturdy underground. In case of doubt, have the underground checked by an expert.
WARNING - this appliance must be connected to an earthed power socket.

Position the heater on a flat, level, non-flammable, solid surface.
Direct-fired heaters are intended for use in outdoor open areas or in indoor well-ventilated areas. For indoor use, provide permanent ventilation openings of at least 25 cm²/kW, equally distributed between floor and high level, with a minimum of 250 cm².
| DFA 2320 DFA 2330 DFA 2350 | |||
| Minimum Opening Size | 600 cm2 | 800 cm2 | 1250 cm2 |
- Keep the heater away from flammable, combustible, explosive, or corrosive materials. • Never block or restrict the air inlet and outlet for any reason. • Do not expose directly to the weather or to excessive humidity.
- Follow general and special fire safety regulations in force in all fields of application. In any case, ensure the following minimum safety clearances from materials or objects in the surroundings of the heater:
- Side: 0.6 m • Air inlet side: 1 m
- Top: 1.5 m • Hot air outlet side: 3 m • Floor: 0 m • Floors and ceilings must be made of fireproof materials in the place where the heater is operated.
Your heater has been designed for use with high-quality oil such as Qlima Premium Quality Fuels or high-quality, water-free pure diesel oil (not home-oil). Only fuels of this kind will ensure clean and proper burning.
Lower quality fuel may result in:
• Increased possibility of malfunctioning • Incomplete combustion • Reduced heater lifetime • Smoke and/or fumes • Deposits on the grid, mantle, or other objects • Increased repair costs
Using the right fuel is therefore essential for safe, efficient and comfortable use of your heater.
Damage and/or malfunctioning of the heater due to the use of other than high quality, water-free pure diesel oil (not home-oil) is not covered by the warranty. Always refer to your local dealer for the right fuel for your heater.
FILLING FUEL
Fill the fuel tank in a suitable, well ventilated area. Please avoid spillage of fuel and respect the following precautions:
• Make sure the heater is standing on a level surface. • Make sure the heater is switched off and cooled down completely. • Remove the fuel tank cap. • Ensure that the same fuel is added to the remaining fuel in the tank, unless the tank is empty. • Fill the tank just below the maximum level in order to avoid spillage; the gauge indicates the fuel level. • Replace the fuel tank cap.
IGNITING AND OPERATING THE HEATER
STARTING THE HEATER
Fill tank with clean fuel. Only use Diesel or Kerosene.
The fuel gauge on top of the tank allows you to check the fuel level.
Connect the power cord plug to an AC220-240V 50 Hz earthed electrical supply system.
Earthing is mandatory.
Models DFA 2320/DFA 2330/DFA 2350:
When the complete "start-up" above is done, the left display window shows "--", the right display window shows the ambient temperature value.
Push the power switch to "ON" (1) position.
The default temperature setting is 20°C, shown on the left display window.
If the ambient temperature is lower than the default temperature, the electrodes start sparking, and after 7 seconds, the heater starts.
If the ambient temperature is higher than the default temperature, turn the thermostat control knob to the desired temperature. The electrodes start sparking, and after 7 seconds, the heater starts.
COLD START-UP
At low temperature, keep the air vent hole (see Fig. 6) closed with a finger during ignition to make start-up easier.
ABNORMAL OPERATION: In case of malfunction (flame failure, reduced air flow, bad combustion, etc.), the heater stops and the indicator light starts FLASHING (the lock-out mode code will be shown on the display window).
STOPPING THE HEATER
Move the switch to the "OFF" (O) position. Unplug the unit when not used for a long time.
Never disconnect the heater from the mains to stop it while in operation. Always wait 5 minutes after switching off the heater to allow the cooling sequence to be completed; otherwise, residual heat could damage internal components.
RE-SET/RESTART THE HEATER
When the heater is in lock-out mode, check and remove the cause of lock-out before restarting. To reset, turn the ON/OFF switch to 0 and then back to 1. In case of repeated malfunction, call technical service. Turning the thermostat control knob will NOT reset the heater.
WIRING DIAGRAM![graph TD A["PH-photocell"] --> B["TP- temp probe"] B --> C["SW- switch"] C --> D["ST- safety thermostat"] E["LED DISPLAY"] --> F["LED DISPLAY"] G["PANEL PCI"] --> H["TEMP/CONTROL"] I["ST"] --> J["SW"] K["ONION"] --> L["AM"] M["E"] --> N["AC20V-54V 80Hz"]](/content/2026/04/662858/images/e20bd3c704e985bb2fca236f6b5adac86d3f7f328ea11351fd9025df533abc17.jpg)
Wiring diagram for DFA 2320/2330
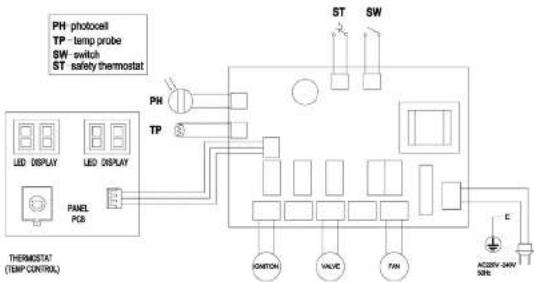
Wiring diagram for DFA 2350
TROUBLESHOOTING
| TROUBLE CAUSE REMEDY | ||
| E0 displayed on the screen 1.The | "ON/O (OFF)" switch is turned. "(ON)" when the generator is plugged. | 1.After disconnecting the generator, see that the switch is in the "O(OFF)" position, plug the generator in and turn the switch "() ON". |
| Heater ignites but MAIN PCB assembly shuts heater off after a short period of time E1 displayed on the screen | 1.Wrong pump pressure. 1.See pump pressure adjustment. | |
| 2.Dirly air output, air intake or lint filter. | 2.See air output, air intake and lint filter. | |
| 3.Dirly fuel filter. 3.See Fuel filter. | ||
| 4.Burner nozzle clogged. 4.Clean nozzle blowing compressed air, replace if necessary. | ||
| 5.Dirly photocell lens. 4.Clean photocell lens. | ||
| 6.Photocell assembly not properly installed.(Not seeing flame) | 6.Malce sure photocell boot is properly sealed in bracket. | |
| 7.Defective photocell. 7.Replace photocell. | ||
| 8.Bad electrical connection between photocell and MIAN PCB assembly. | 8.Check electrical components. | |
| Heater will not ignite but motor runs for a short period of time E1 displayed on the screen | 1.Empty fuel tank, dirty or wrong fuel. | 1.Remove wrong or dirty fuel Fill the tank with clean Diesel or kerosene. |
| 2.Wrong pump pressure. 2.See pump pressure adjustment. | ||
| 3.Dirly fuel filter. 3.See Fuel filter. | ||
| 4.Burner nozzle clogged. 4.Clean nozzle blowing compressed air, replace if necessary. | ||
| 5.Carbon deposits on spark plug and/or improper gap. | 5.See spark plug. | |
| 6.Ignition wire is not attached to spark plug. | 6.Attach ignition wire to spark plug. See spark plug. | |
| 7.Air leaks in oil line. 7.Check holes, tighten connections, if necessary replace. | ||
| 8.Fuel viscosity increased at low temperature. | 8.Mix Diesel with 10-20% kerose. | |
| 9.Bad electrical connection between photocell and MIAN PCB assembly. | 9.Check electrical components. | |
| Fan does not turn when heater is plugged in and power switch was in the "ON" position | 1.Thermostat setting is lower than room temp. | 1.Turn thermostat control knob to a higher setting. |
| 2.No electrical power. | 2. Check to insure heater cord and extension cord are plugged in. Check power supply. | |
MAINTENANCE (TO BE EXECUTED BY AUTHORIZED PERSONS ONLY)
WARNING!! : NEVER SERVICE HEATER WHILE IT IS PLUGGED IN OR WHILE HOT!
USE ORIGINAL EQUIPMENT REPLACEMENT PARTS ONLY. Use of third party or other alternate components will void warranty and may cause unsafe operating conditions.
Regularly wipe the enclosure using a soft sponge or cloth. For very dirty parts, use a sponge
wetted with lukewarm water and a mild detergent, then dry using a clean cloth.
Keep air inlet and fan free from dust and dirt. To clean inner parts, gently blow compressed air through air inlet.
Regularly inspect the power cable: if worn, cracked or damaged have it replaced by technical service.
Before storing the heater, make sure it is perfectly cool and dry. Cover the unit with a plastic bag, put it in its packing box and store it in a dry, ventilated place.
Before starting any maintenance task, shut down, unplug and let the heater cool down for at least 15 minutes. Do not attempt any electrical repair yourself. If the heater needs service or repair, contact a qualified technician. Do not use a faulty unit unless a qualified technician has inspected and repaired it. When cleaning, make sure that water does not enter the unit. Do not open the enclosure to clean the inner parts. Do not spray water into the heater. Never use solvents, gasoline, toluene and similar aggressive chemicals to clean the heater. After product maintenance, it is necessary for qualified technician to inspect and debug the product to its normal state before use Do not carry out emergency servicing under wet conditions, If unavoidable, please provision of weatherproof covers for appliances designed for outdoor installation
The following checks BY QUALIFIED PERSONNEL ONLY are recommended before every seasonal use:
Nozzle
Carefully unscrew nozzle from nozzle fitting. Blow compressed air through nozzle orifice to free it from dirt. Replace nozzle if necessary.
Air Filters
Clean air filters. Remove filter end cover (11), wash air intake filter (10) using a light detergent and dry it thoroughly before re-installing. Replace air delivery filter (9) once a year (Fig.3)

Fig.3
Ignition Electrodes
Clean, adjust and if necessary replace ignition electrode. For electrode gaps see Fig. 4-5 (dimensions in mm).
Fig. 4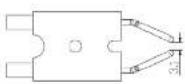
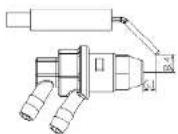
Compressor Pressure Adjustment (Fig. 6)

Compressor pressure is factory set and must be checked and adjusted by qualified technicians only. Tampering with the unit may be dangerous.
Remove pressure gauge cap. Connect a pressure gauge on the pressure measuring port on the rear guard. Start heater and read air pressure value. If necessary adjust pressure to the correct value turning the adjusting screw (the air vent hole in the adjusting screw middle) clockwise to increase, anticlockwise to decrease the pressure:
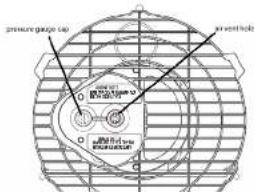
Fig. 6
Model Air Pressure (bar)
DFA 2320 0.32
DFA 2330 0.31
DFA 2350 0.45
Electrical
Inspect cables, electrical parts and connections.
STORAGE INSTRUCTIONS
Store the heater in a dry place above 10°C in the original packaging. Remove all fuel from the tank before storing.
GUARANTEE CONDITIONS
The appliance is supplied with a 24-month guarantee, commencing on the date of purchase. All material and manufacturing defects will be repaired or replaced free of charge within this period. The following rules apply: 1. We expressly refuse all further damage claims, including claims for collateral and/or consequential damage. 2. Repairs to or replacement of components within the guarantee period will not result in an extension of the guarantee. 3. The guarantee is invalidated if any modifications have been made, non-genuine parts are fitted or repairs are carried out by third parties. 4. Components subject to normal wear, such as filters, batteries, lamps and heating elements are not covered by the guarantee. 5. The guarantee is valid only when you present the original, dated purchase invoice and if no modifications have been made to it. 6. The guarantee is invalid for damage caused by neglect and/or by actions that deviate from those in this instruction booklet. 7. Transportation costs and the risks involved during the transportation of the appliance or components of the appliance shall always be for the account of the purchaser. 8. Damage caused by not using suitable spare parts is not covered by the guarantee. To prevent unnecessary expense, we recommend that you always first carefully consult the instructions for use. Take the appliance to your dealer for repairs if these instructions do not provide a solution. www.qlima.com
ENVIRONMENTAL PROTECTION
Do not dispose of electrical appliances as unsorted municipal waste, use separate collection facilities.
Contact your local government for information regarding the collection systems available.
If electrical appliances are disposed of in landfills or dumps, hazardous substances can leak into the groundwater and get into the food chain, damaging your health and well-being. When replacing old appliances with new ones, the retailer is legally obligated to take back your old appliance for disposal at least for free of charge.
DFA 2330 DFA 2350
Fig.3
Fig.6
Distributed in Europe by PVG Holding B.V.
If you need information or if you have a problem, please visit our website www.qlima.com, or contact our customer service (T: +31 412 694 694). For all further information or in case of any problems with the appliance, please refer to www.qlima.com or the local Customer Centre (T: +45 77 34 33 30). If you need information or if you have a problem, please visit our website www.qlima.es, or contact customer service (T: +34 916 113 113). If you wish to obtain additional information or if you encounter a problem, please visit our website (www.qlima.fr / www.fr.qlima.be) or contact our customer service (T: +33 2 32 96 07 47 / +32 (0)3 326 39 39). If you need service assistance, more information, or if you have problems with the device, please visit the website at www.qlima.com or ask for advice from the PVG consumer service centre (T: +45 77 34 33 30). If you need information or if you have a problem, please visit our website (www.qlima.com) or contact our sales support (T: +31 412 694 694). For information and in case of problems, visit the website www.qlima.it or contact the Customer Assistance Centre (T: +39 0571 628 500). If you need information, or if you have a problem with the product, you can go to the website www.qlima.com. Alternatively, you can contact the PVG consumer service (T: +45 77 34 33 30). If you need information or if you have a problem, please visit our website (www.qlima.nl / www.qlima.be) or contact the sales support department (T: +31 412 694 694 / +32 (0)3 326 39 39). If you need information or if you have problems, please visit the website www.qlima.es or contact the Assistance Centre (T: +34 916 113 113). In case of problems and for detailed information, visit the Qlima website at www.qlima.com or contact the Qlima Contact Centre (T: +48 48 613 00 70). If you need service or information or have problems with the appliance, you can visit www.qlima.com or contact Qlima customer service (T: +45 77 34 33 30). If you need additional information, visit the company's website at www.qlima.si or call the telephone number (T: +386 (0)41 674 139).



- F TABLE OF CONTENTS
- NL TABLE OF CONTENTS
- SPECIFICATIONS DUAL FUEL FORCED AIR HEATER
- MAIN
- COMPONENTS
- WARRANTY CONDITIONS
- MAIN COMPONENTS
- DIRECTIONS FOR USE (GB)
- WARNINGS
- ASSEMBLING THE HEATER
- INSTALLATION INSTRUCTIONS
- FILLING FUEL
- IGNITING AND OPERATING THE HEATER
- STARTING THE HEATER
- MODELS DFA 2320/DFA 2330/DFA
- COLD START-UP
- STOPPING THE HEATER
- RE-SET/RESTART THE HEATER
- MAINTENANCE (TO BE EXECUTED BY AUTHORIZED PERSONS ONLY)
- NOZZLE
- AIR FILTERS
- IGNITION ELECTRODES
- COMPRESSOR PRESSURE ADJUSTMENT (FIG. 6)
- ELECTRICAL
- STORAGE INSTRUCTIONS
- GUARANTEE CONDITIONS
- ENVIRONMENTAL PROTECTION
- DISTRIBUTED IN EUROPE BY PVG HOLDING B.V
Brand : QLIMA
Model : DFA 2320
Category : Heating