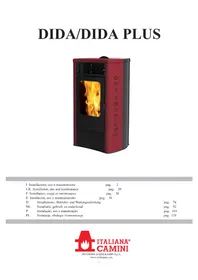
DIDA - Pellet stove EDILKAMIN - Free user manual and instructions
Find the device manual for free DIDA EDILKAMIN in PDF.


| Brand | Edilkamin |
| Model | DIDA / DIDA PLUS |
| Product Type | Pellet stove |
| Dimensions (HxWxD) | 111 cm x 55 cm x 57 cm |
| Weight (with packaging) | 190 kg (DIDA), 195 kg (DIDA PLUS) |
| Power Supply | 230 V ~ 50 Hz |
| Average Power Consumption | 120 W |
| Power at Ignition | 400 W |
| Nominal Thermal Power | 12 kW |
| Reduced Thermal Power | 3.5 kW |
| Efficiency | 90-91 % |
| Pellet Hopper Capacity | 30 kg |
| Autonomy | 10 to 34 hours |
| Indicative Heating Volume | 315 m³ |
| Flue Gas Outlet Diameter | 80 mm |
| External Air Intake Diameter | 40 mm |
| Fuel | Wood pellets, diameter 6 mm, max length 40 mm, max humidity 8% |
| Main Functions | Automatic ignition, manual/automatic modes, weekly programming, front and ducted ventilation (optional), infrared remote control (optional) |
| Safety Devices | Thermocouple, differential pressure switch, safety thermostat, fuse 2AT |
| Daily Maintenance | Clean the crucible and empty the ash drawer (when cold) |
| Weekly Maintenance | Clean the smoke baffle and the ceiling of the firebox |
| Seasonal Maintenance | To be carried out by an Edilkamin Authorized Technical Assistance Center |
| Options | Ducting kit DIDA → DIDA PLUS, kit 11/11 bis, remote control, telephone dialer |
| Warranty | Validated after commissioning by an authorized Technical Assistance Center |
| Standards | EN 14785, directives 2006/95/EC and 2004/108/EC |
Frequently Asked Questions - DIDA EDILKAMIN
User questions about DIDA EDILKAMIN
0 question about this device. Answer the ones you know or ask your own.
Ask a new question about this device
Download the instructions for your Pellet stove in PDF format for free! Find your manual DIDA - EDILKAMIN and take your electronic device back in hand. On this page are published all the documents necessary for the use of your device. DIDA by EDILKAMIN.
USER MANUAL DIDA EDILKAMIN
natural_image
Red and black portable stove with visible flame inside, no text or symbols presentUK Installation, use and maintenance
F Installation, usage et maintenance
natural_image
3D mechanical assembly diagram showing red battery casing and internal components (no text or symbols)CARATTERISTICHE
• SCHEDA ELETTRONICA
natural_image
Close-up of a mechanical component with wires and a coiled cable, no visible text or symbolsCARATTERISTICHE
CANALIZZAZIONE ARIA CALDA
KIT 11 BIS (cod. 645710)
PER CANALIZZARE L'ARIA CALDA IN UN LOCALE REMOTO OLTRE A QUELLO DI INSTALLAZIONE
Composizione:
ISTRUZIONI D'USO
natural_image
3D model of a red and black electric stove with open lid and ventilation grilles (no text or symbols visible)fig. 1
ISTRUZIONI D'USO
PANNELLO SINOTTICO
natural_image
Black handheld electronic device with control buttons and a power button (no visible text or symbols)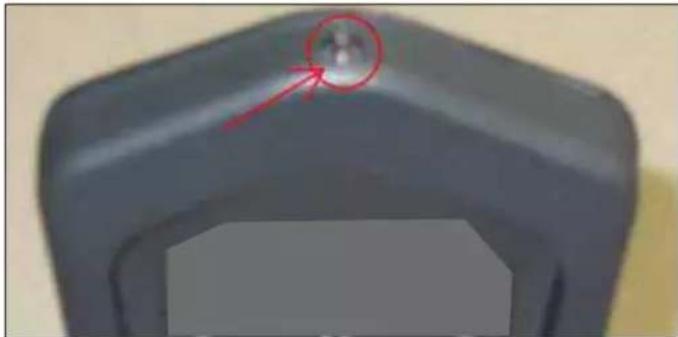
natural_image
Close-up of a dark mechanical component with a red arrow pointing to a small circular feature on top (no text or symbols visible)Foto "A"
natural_image
3D rendering of a mechanical device with open door and internal components, labeled 'fig. A' (no readable text or symbols on the device itself)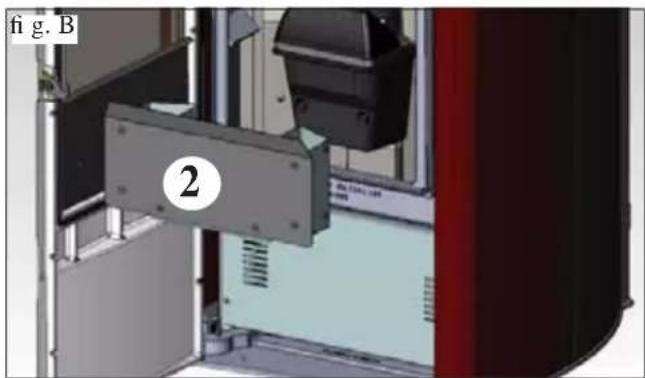
natural_image
3D mechanical assembly diagram showing a component labeled '2' and part identifier 'fig. B' (no readable text or symbols beyond labels)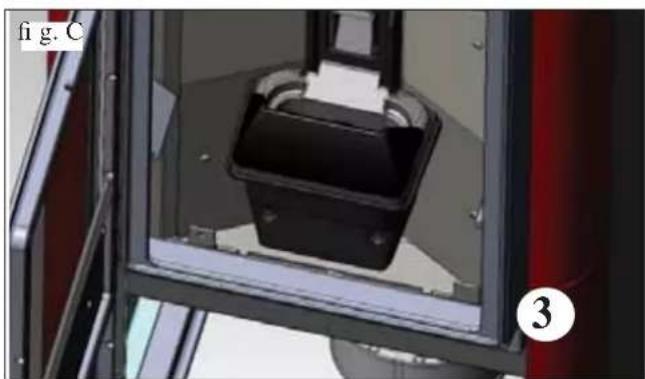
natural_image
Close-up of a mechanical device with a black housing and red components, labeled 'fig. C' and numbered '3' (no readable text or symbols on the device itself)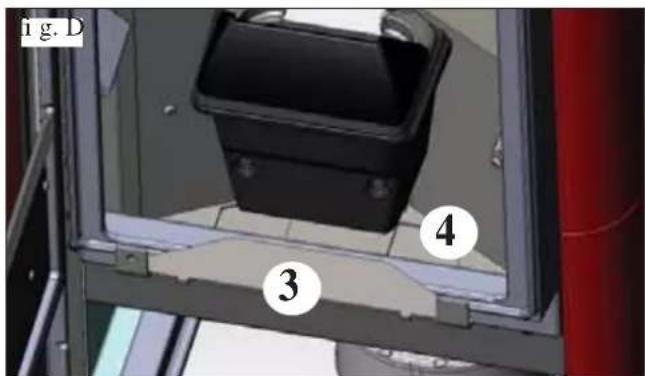
natural_image
3D mechanical assembly diagram showing a bracket with labeled part '5' (no text or symbols beyond label)MANUTENZIONE
natural_image
3D CAD model of a mechanical device with internal components and mounting holes (no text or symbols visible)fig.2
CONSIGLI PER POSSIBILI INCONVENIENTI
natural_image
Black and white photo of a LJP02 vacuum cleaner with attached hose and control panel (no visible text or symbols)Bidone aspiracenere
Congratulations and thank you for choosing our product.
Please read this document carefully before you use this product in order to obtain the best performance in complete safety.
For further details or assistance, please contact the DEALER where you purchased the product or visit our website www.edilkamin.com. and click on DEALERS.
NOTE
- After having unpacked the stove, ensure that its contents are complete and intact (“cold hand”, ceramic top insert, guarantee booklet, glove, CD/technical data sheet, spatula, dehumidifying salt, allen wrench).
In case of anomalies please contact the dealer where you purchased the product immediately.
You will need to present a copy of the warranty booklet and valid proof of purchase.
- Commissioning/ testing
Commissioning and testing must be performed by the DEALER. Failure to do so will void the warranty.
Commissioning, as specified in standard UNI 10683 consists in a series inspections to be performed with the insert installed in order to ascertain the correct operation of the system and its compliance to applicable regulations
- Incorrect installation, incorrect maintenance, or improper use of the product, shall relieve the manufacturer from any damage resulting from the use of this product.
- the proof of purchase tag, necessary for identifying the stove, is located:
-on the top of the package
- in the warranty booklet found inside the fi rebox
- on the ID plate affi xed to the back side of the unit;
This documentation must be saved for identification together with the valid proof of purchase receipt. The data contained therein must be reported when requesting information and made available should servicing be required;
- All images are for illustration purposes only; actual products may vary.
The undersigned EDILKAMIN S.p.a. with head off ce headquarters at Via Vincenzo Monti 47 - 20123 Milan - Italy - VAT T00192220192
Declares under its own responsibility as follows:
The pellet stove illustrated below conforms to Regulation EU 305/2011 (CPR) and to the harmonised European Standard EN 14785:2006
WOOD PELLET STOVES, trademark ITALIANA CAMINI, called DIDA/DIDA PLUS
Year of manufacture: Ref. Data nameplate Declaration of performance (DoP - EK 106): Ref. data tag plate
In addition, it is hereby declared that:
the wood pellet stove DIDA/DIDA PLUS is in compliance with the requirements of the European directives:
2006/95/EC - Low voltage directive
2004/108/EC - Electromagnetic compatibility directive
EDILKAMIN S.p.a. will decline all responsibility of malfunctioning or damage to the equipment in case of unauthorized substitution, assembly or modifications of any sort on the said equipment on the part of non-EDILKAMIN personnel.
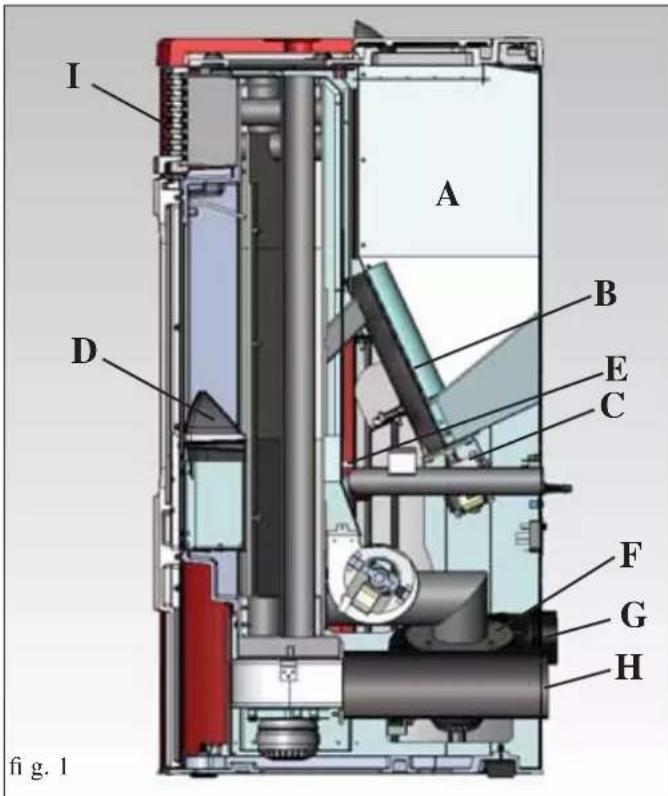
The stove produces hot air using wood pellets as fuel, with electronically controlled combustion. Hereunder is the explanation of its functions (the letters refer to figure 1). The fuel (pellets) is taken from the hopper (A) and, using a screw (B) operated by a gear motor (C), is sent to the crucible (D).
The pellets are lit by hot air produced by an electrical element (E) sucked into the crucible through a smoke extractor fan (F). The smoke produced by combustion is extracted from the combustion chamber by the same fan (F) and expelled from the vent (G) located on the lower part at the back of the stove. The DIDA/DIDA PLUS stove is designed to distribute the hot air produced only in the room where it is installed. In order to channel the hot air into other rooms of the house, it is necessary to employ the following optional kits (more details on page 26).
- DIDA TO DIDA PLUS CONVERSION KIT consisting of fan, ∅10 pipe and accessories.
- DUCTING KIT No. 11 for distributing hot air also to an adjacent room
- DUCTING KIT No. 11B for distributing hot air also to a remote room.
The combustion chamber, lined with steel/cast iron, is closed at the front by a ceramic glass door (special “cold-hand” handle to open the door).
The quantity of fuel, the extraction of the smoke and the input of air for combustion are regulated by a motherboard equipped with software, to obtain a high combustion yield and low emissions.
The main phases can be controlled via the optionally supplied remote control.
The stove has a serial socket for optional wire connection (code 640560) to remote controlled ignition devices (chrono-thermostats etc.).
The ceramic outer casing is available in two colour variants: white and bordeaux
SAFETY INFORMATION
The stove is designed to heat, through automatic pellet combustion in the hearth, the room where it is installed, both by radiation and the air that comes out of the front grille (1).
- The appliance is not designed to be used by people, including children, with reduced physical, sensorial or mental abilities. Children must be supervised to ensure they do not play with the appliance.
- The main risks that may derive from using the stove pertain to non-compliance with installation instructions, direct contact with live electrical parts (internal), contact with the fi re or hot parts (glass, pipes, hot air output), when extraneous substances or non-recommended fuel are introduced, or due to incorrect maintenance or by repeatedly pressing the ignition button without having emptied the crucible.
- Only use certified, high quality, 6 mm diameter wooden pellets for fuel.
- Should components fail, the stoves are equipped with safety devices that guarantee automatic shutdown. These are activated without any intervention required.
- In order to function correctly, the stove must be installed in accordance with the instructions given herein and the door must not be opened during operation; combustion is fully automatic and requires no intervention.
- Under no circumstances should any foreign substances be entered into the hearth or hopper.
- Do not use fl ammable products to clean the smoke channel (the fl ue section connecting the stove smoke outlet to the chimney fl ue).
- The hearth and hopper parts must only be cleaned when COLD.
- The glass can be cleaned when COLD with a suitable product (e.g. GlassKamin Edilkamin) and a cloth.
- Avoid opening the door of the combustion chamber when the stove is hot; wait until it has cooled down naturally.
- The stove must not function if the door is open, if the glass is broken or if the pellet-loading port is open.
- It must not be used as a step ladder or a base on which to rest any object.
- Do not lay laundry directly on the stove to dry. Any clothes horse or similar must be placed at a safe distance from the stove (danger of fire).
- Make sure the stove is installed and ignited the first time by Edilkamin-qualified CAT personnel (technical assistance centre) in accordance with the instructions provided here within; this is an essential requirement for the validation of the guarantee.
- When the stove is in operation, the exhaust pipes and door become very hot (do not touch without wearing the thermal glove).
- Do not place anything, which is not heat resistant near the stove.
- NEVER use liquid fuel to ignite the stove or rekindle the embers.
- Do not obstruct the ventilation apertures in the room where the stove is installed, nor the air inlets of the stove itself.
- Do not wet the stove and do not go near electrical parts with wet hands.
- Do not use reducers on the smoke exhaust pipes.
- The stove must be installed in a room that is suitable for fire prevention and equipped with all that is required (power and air supply and outlets) for the stove to function correctly and safely
• SHOULD IGNITION FAIL, DO NOT RE-IGNITE UNTIL YOU HAVE EMPTIED THE COMBUSTION CHAMBER.
FRONT BACK
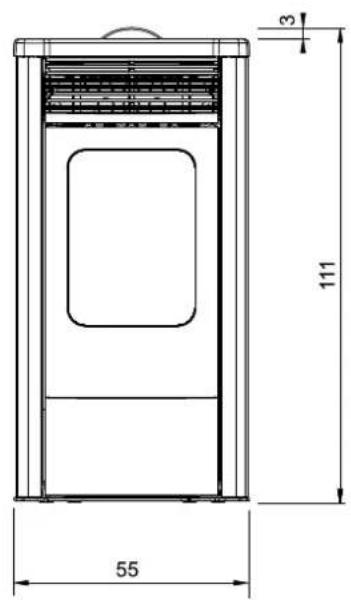
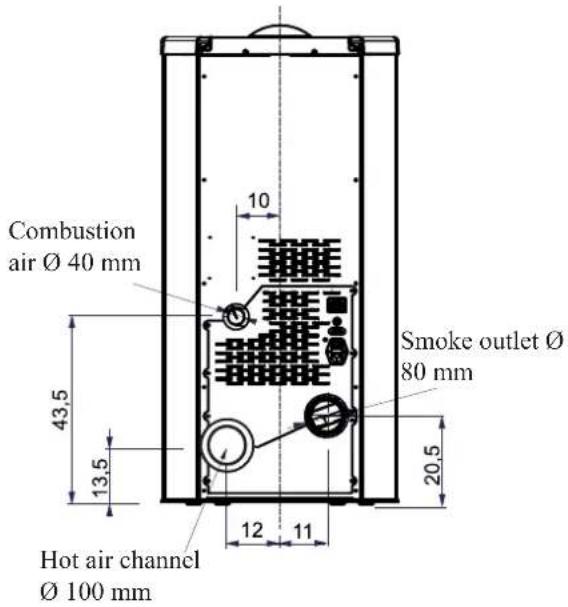
SIDE
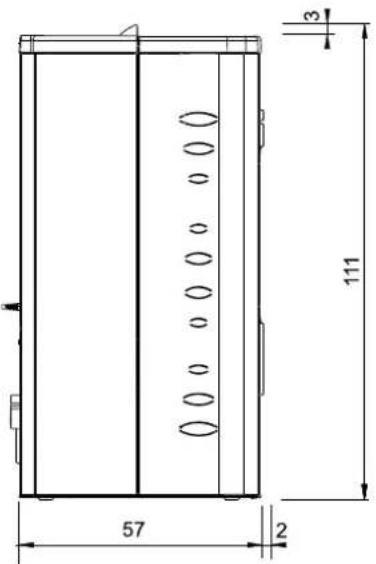
SYSTEM
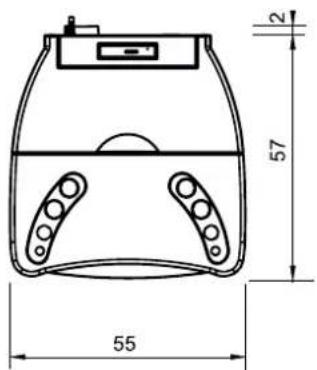
ASSEMBLY OF THE TOP
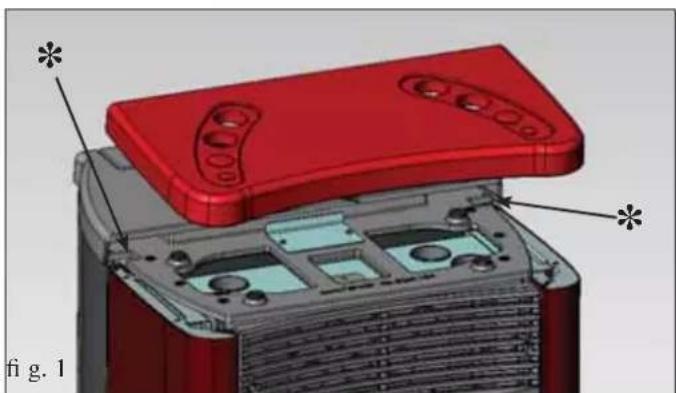
The stove is supplied with metal sides already assembled except for the ceramic top, which is packed separately (Fig. 1).
Place the ceramic top in the grooves * on the cast iron top.
The washers diam.8 are used as thickness below the rubbish supports, if it necessary to level the floor where the ceramic top is installed.
natural_image
3D mechanical assembly diagram showing red housing and internal components (no text or symbols)CHARACTERISTICS
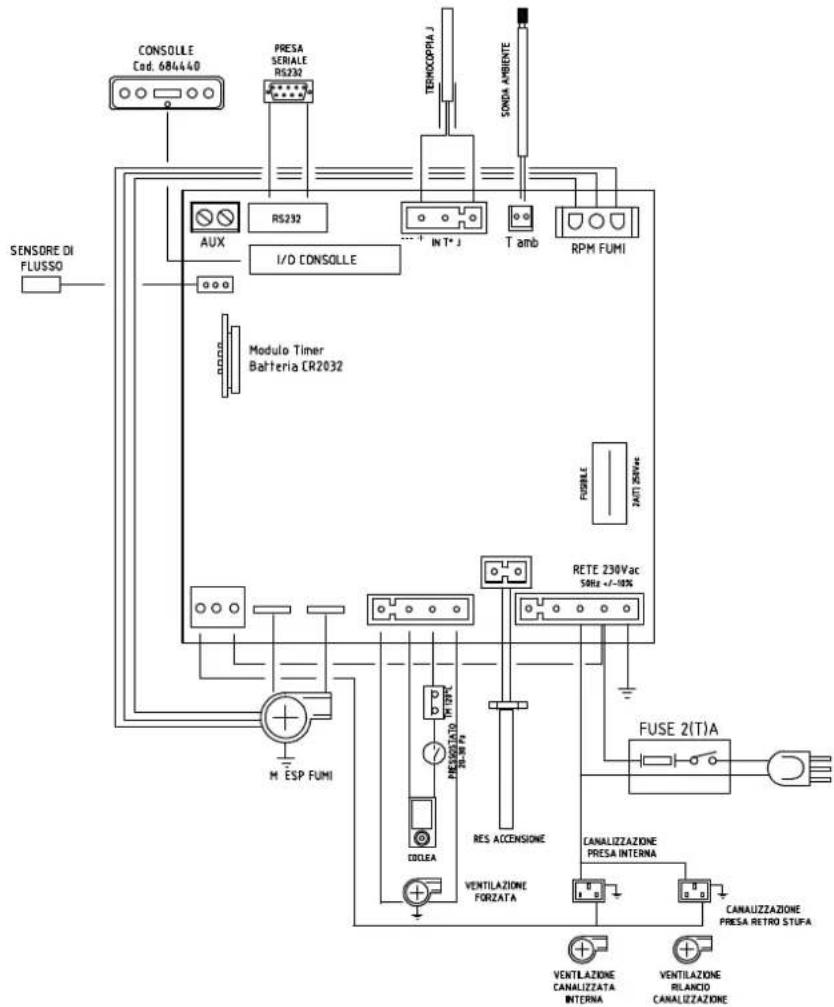
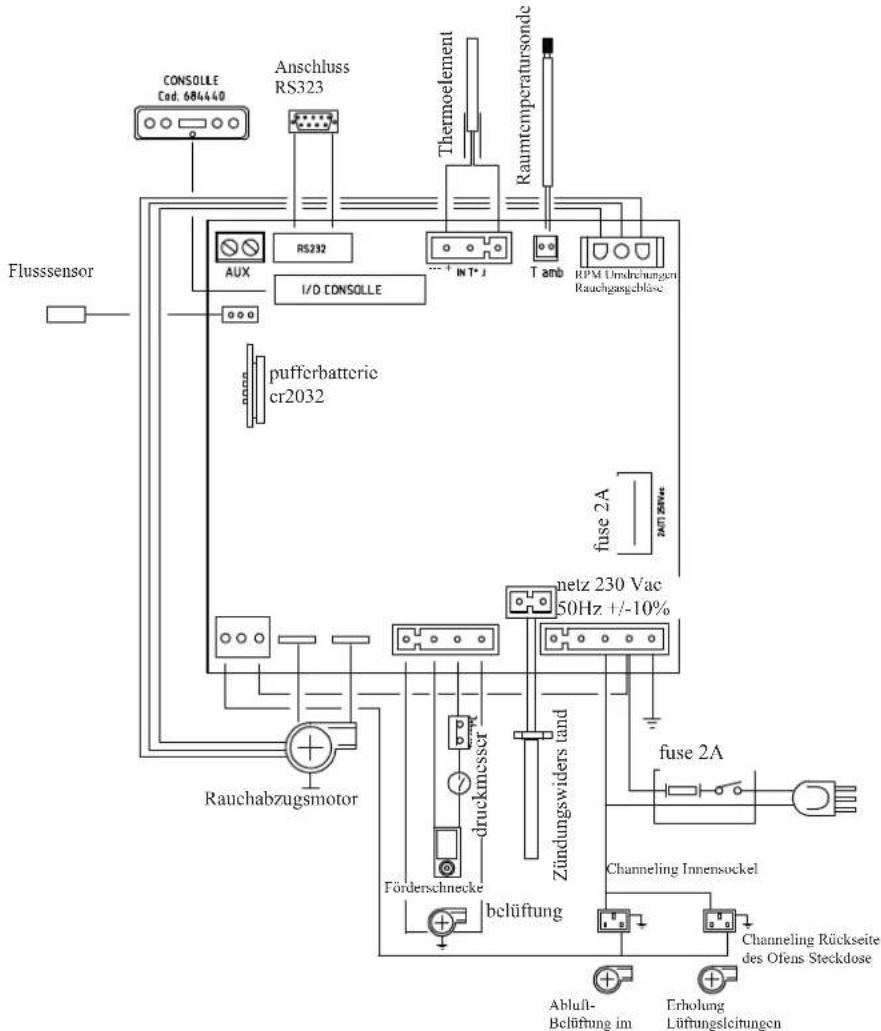
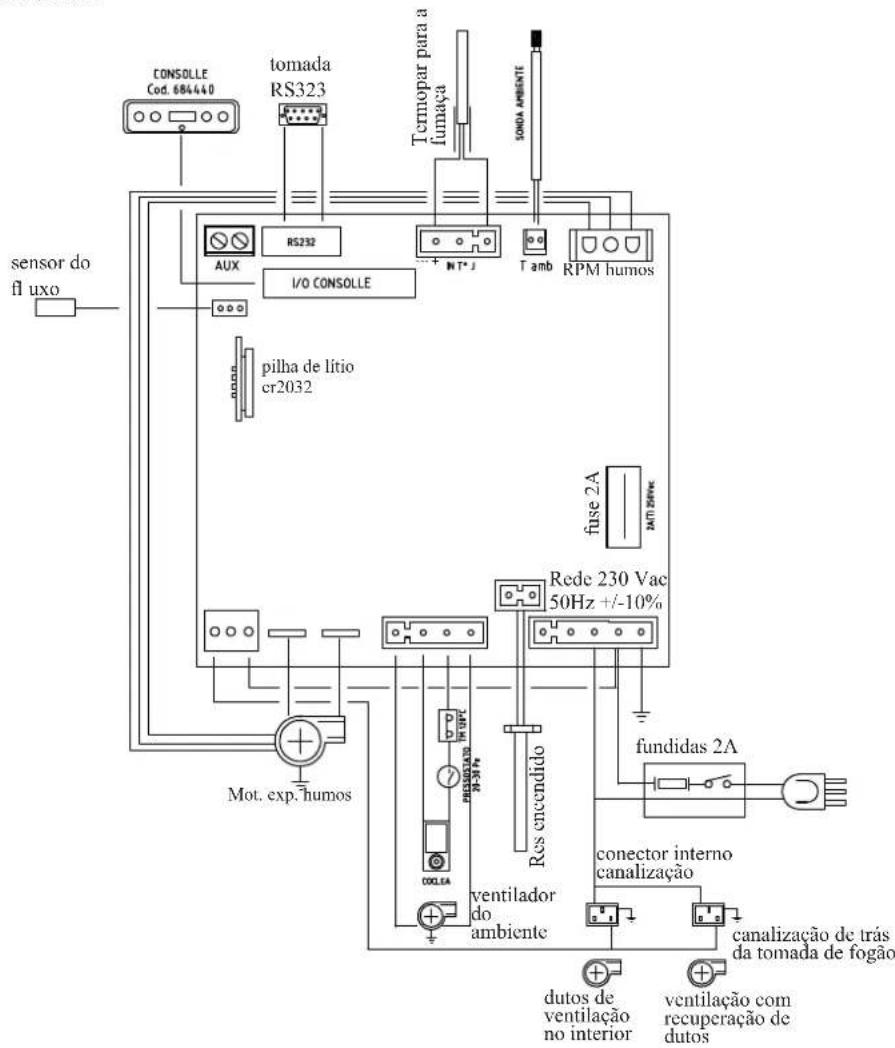
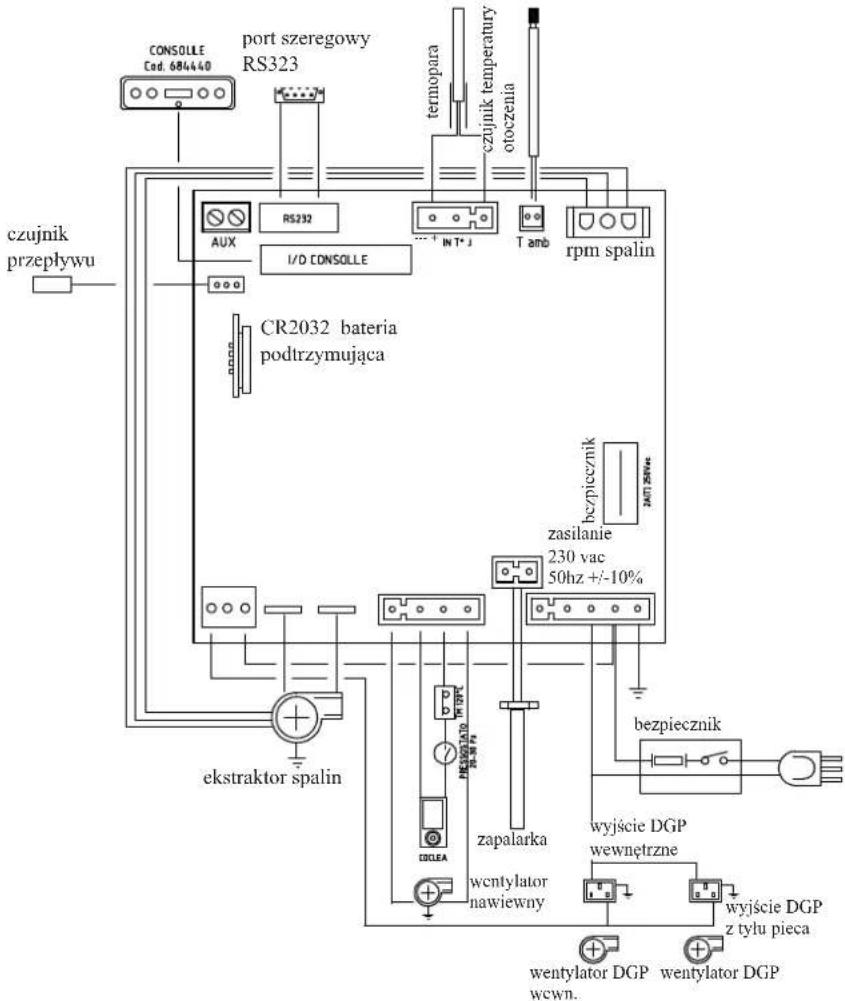
• ELECTRONIC EQUIPMENT
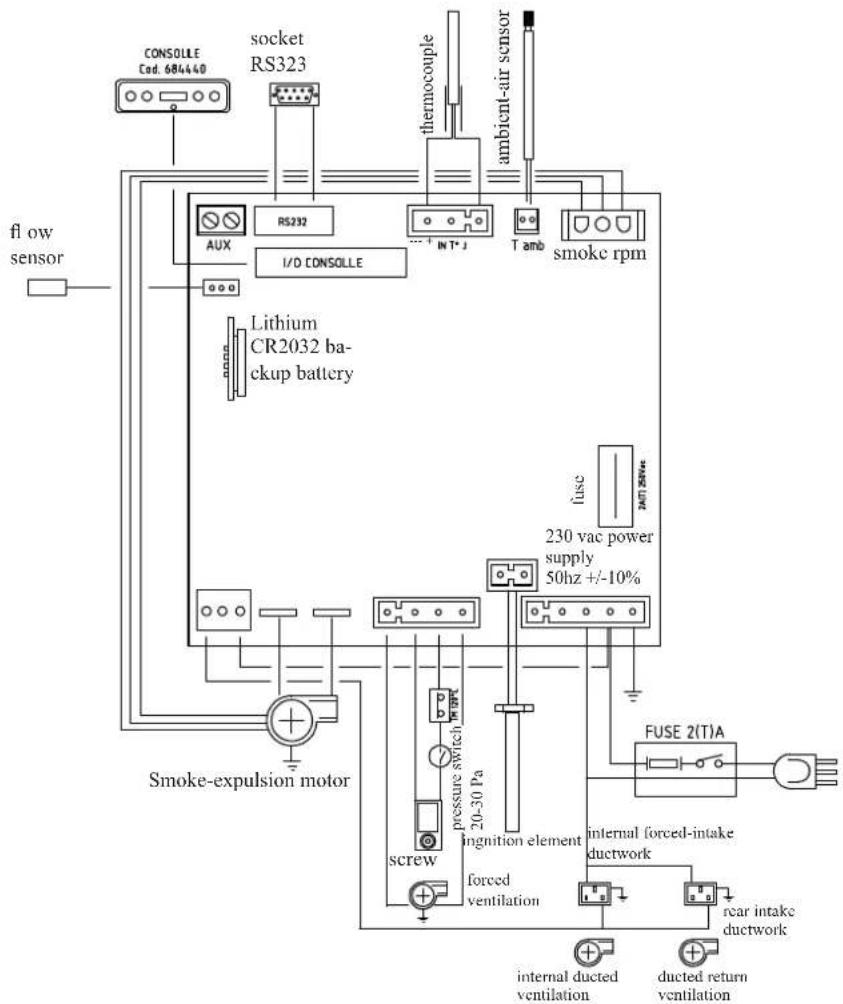
flowchart
graph TD
    A["flow sensor"] --> B["Lithium CR2032 back-up battery"]
    B --> C["CONSOLE Cod. 684440"]
    B --> D["AUX"]
    D --> E["RS232"]
    E --> F["1/D CONSOLLE"]
    F --> G["thermal couple"]
    G --> H["ambient-air sensor"]
    H --> I["T amb"]
    I --> J["smoke rpm"]
    J --> K["fuse"]
    K --> L["230 vac power supply 50hz +/-10%"]
    K --> M["FUSE 2(T)A"]
    M --> N["internal forced-intake ductwork"]
    M --> O["rear intake ductwork"]
    P["Smoke-expulsion motor"] --> Q["screw"]
    Q --> R["pressure switch 20-30 Pa"]
    R --> S["Inglition element"]
    S --> T["forced ventilation"]
    T --> U["internal ducted ventilation"]
    T --> V["ducted return ventilation"]
SAFETY DEVICES
• THERMOCOUPLE:
Placed at the smoke outlet to detect the temperature.
Turns the stove on and off and controls its operation based on defined parameters.
• PRESSURE SWITCH
Positioned in the fume-aspiration area, it is triggered in the case of a depression in the fumes circuit (e.g. obstructed flue) and interrupts the movement of the pellets.
It blocks pellet loading causing the stove to go out.
• SAFETY THERMOSTAT:
Trips when the temperature inside the stove is too high. It stops pellet loading, causing the stove to go out.
SERIAL PORT
The Dealer can install an optional on the AUX outlet for controlling the process of switching on and off (e.g. telephone remote, local thermostat), located at the rear of the stove. This can be connected via special optional trestle (code 640560).
BACKUP BATTERY
A backup battery is found on the control board (3-Volt CR 2032 battery). Its malfunction is indicated with the following messages (not considered a defect but due to normal wear-and-tear): "Battery check". For more detailed information, please contact the DEALER who performed the first 1st ignition.
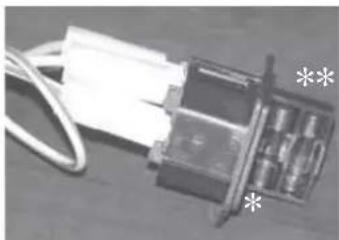
FUSE \*
Two fuses are inserted in the socket with switch, located on the back of the stove, one of which operational * and the other is held in reserve **.
natural_image
Close-up of a mechanical component with wires and a labeled section (no readable text or symbols)CHARACTERISTICS
| THERMO TECHNICAL CHARACTERISTICS according to EN 14785 | |||
| Nominal power Reduced power | |||
| Heat input (burnt) 13,3 3,7 kW | |||
| Heat output 12 3,5 kW | |||
| Yield / Efficiency | 90 | 91 | % |
| Emissions CO 13% O_2 | 0,015 | 0,028 | % |
| Fume temperature | 171 | 88 | °C |
| Fuel consumption | 2,8 | 0,8 | kg/h |
| Minimum draught | 12 - 5 | 10 - 3 | Pa |
| Hopper capacity | 30 | kg | |
| Autonomy | 10 | 34 | hours |
| Heatable volume * | 315 | m^3 | |
| Smoke outlet pipe diameter (male) 80 | mm | ||
| Air intake pipe diameter (male) | 40 | mm | |
| Weight including packaging (Dida / Dida Plus) 190/195 | kg | ||
| TECHNICAL DATA FOR THE DIMENSIONING OF THE FLUE | |||
| Nominal power Reduced power | |||
| Heat output 12 3,5 kW | |||
| Temperature of fumes on exit from the discharge pipe | 205 106 | °C | |
| Minimum draught | 0 - 5 | Pa | |
| Fume flow capacity | 8,1 | 5 | g/s |
* The heatable room dimensions are calculated on the basis of home insulation in compliance with Italian law 10/91, and subsequent changes together with an expected heat output of 33Kcal / m^3 per hour.
| ELECTRICAL CHARACTERISTICS | ||
| Power supply 230 Vac +/- 10% 50 Hz | ||
| Average power consumption 120 W | ||
| Power consumption during ignition 400 W | ||
| Protection on electronic circuit board Fusibile 2AT, 250 | Vac 5x20 | |
N.B.
1) keep in mind that external devices can cause interference to the operation of the circuit board.
2) warning: activity on live components, maintenance and/or checks must be carried out by qualified personnel.
(before carrying out any maintenance, disconnect the appliance from the mains electricity)
The above data are indicative and are those resulting during certification on the part of the notified body.
EDILKAMIN s.p.a. reserves the right to change the products at its discretion without notice.
All local and national laws and European standards must be met when installing and using the appliance. In Italy, refer to the UNI 10683 standard, as well as any regional or local health-authority regulations.
It is necessary to refer to regulations in force in each country. If installing in an apartment building, check with the management company first.
VERIFY COMPATIBILITY WITH OTHER DEVICES
In Italy the stove MUST NOT be installed in the same space as type B gas heating equipment (e.g. gas boilers, stoves, and equipment served by an extraction hood) as the stove may cause a vacuum in the space which may compromise or influence how these units work.
VERIFYTHE POWER SUPPLY CONNECTION (the plug must be accessible)
The stove is supplied with a power cable that is to be connected to a 230V 50 Hz socket, preferably fi tted with a magnetothermic switch. Voltage variations exceeding 10% can damage the stove (unless already installed, an appropriate differential switch must be fi tted). The electrical system must comply with the law; particularly verify the effi ciency of the earthing system. The power line must have a suitable cross-section for the stove's power. An inadequate earthing system can cause anomalies for which Edilkamin cannot be held liable.
FIRE PREVENTION SAFETY DISTANCES
The stove must be installed in compliance with the following safety conditions:
- minimum distance from fl ammable materials around the sides and back of the stove: 20 cm
- fl ammable materials must not be placed less than 80 cm from the front of the stove.
If it is not possible to comply with the above-mentioned distances, technical and construction-related provisions must be taken to prevent fire hazards.
If connected to wooden walls or other fl ammable materials, the smoke exhaust pipe must be insulated.
AIR INTAKE
The room where the stove is located must have an air intake with cross section of at least 80cm^2 to ensure replenishment of the air consumed by combustion.
Alternatively, the stove air may be taken directly from outside through a 4 cm steel extension of the pipe.
In this case, there may be condensation problems and it is necessary to protect the air intake with a grille, which must have a freesection of at least 12 cm^2 .
The pipe must be less than 1 metre long and have no bends.
It must end with section at 90^ facing downwards or be fitted with a wind guard. In any case all the way air intake duct must be a free section of at least 12 cm^2 .
The external terminal of the air inlet channel must be protected with an anti-insect netting that does not reduce the 12 cm^2 through passage.
SMOKE OUTLET
The stove must have its own smoke outlet (the smoke cannot be discharged into a smoke flue used by other devices).
The smoke is discharged through the 8 cm diameter outlet at the back of the stove. The smoke outlet must be connected to outside by means of suitable steel pipes EN 1856 certific ed. The pipe must be hermetically sealed.
The material used to scal and if necessary insulate the pipes, must be resistant to high temperatures (high temperature silicone or mastic). The only horizontal section allowed may be up to 2 m long up to three 90° bends (in relation to the vertical).
A vertical section of at least 1.5m and an anti-wind terminal is necessary (if the discharge outlet is not in a chimney flue-reference UNI 10683).
The vertical duct can be internal or external. If the smoke channel is outside, it must be appropriately insulated. If the smoke channel is fitted inside a chimney flue, the latter must be suitable for solid fuel. If it is wider than 150 mm in diameter it must be improved by entering a pipe that has a suitable cross-section and is made of suitable material (e.g. 80 mm diameter steel).
All sections of the smoke duct must be accessible for inspection. The chimney pots and smoke ducts connected to the solid fuel appliances must be cleaned once a year (verify whether a specific legislation exists in your country).
Failure to regularly inspect and clean the stove increases the probability of a fi re occurring in the chimney pot. In that case, proceed as follows: Do not use water to extinguish the fi re;
Empty the pellet hopper; Contact specialist personnel before reigniting the stove.
The stove is designed to work under any weather conditions. In case of particular conditions, such as strong wind, the safety system may be activated, which results in the stove being extinguished. If this happens, do not operate the stove with the safety devices disabled. If the problem persists, contact our Technical Service Department.
TYPICAL EXAMPLES
Fig. 1
Fig.
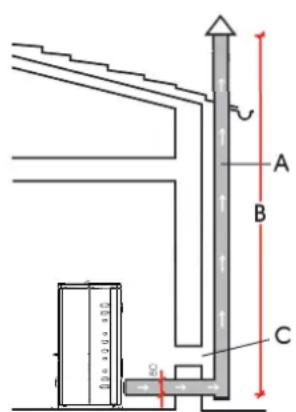
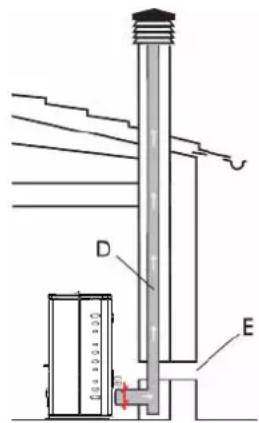
A: insulated steel fl ue
B: minimum height of 1.5 m and in any case above the height of the roof gutter
C-E: air intake from inside room (minimum internal section: 80~cm^2 )
D: steel flue, inside existing brick-built chimney.
CHIMNEY POT
The main characteristics are:
- an internal cross-section at the base, which is the same as that of the chimney fl ue
- an outlet cross-section which is no smaller than twice that of the chimney fl ue
- its position must be high enough to catch the wind and avoid downdraft areas in turbulent wind, it must be high enough to catch the wind and avoid downdraft areas in turbulent wind.
HOT-AIR DUCTWORK
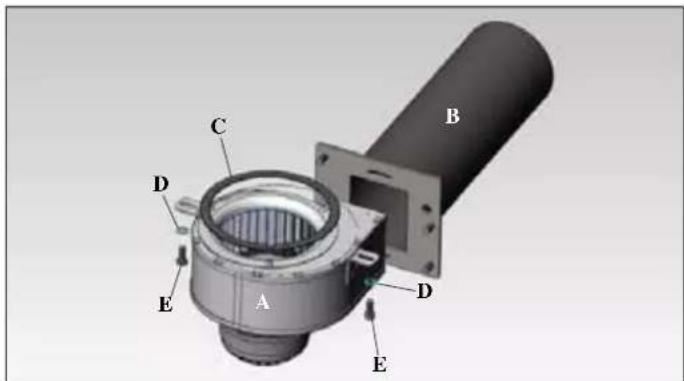
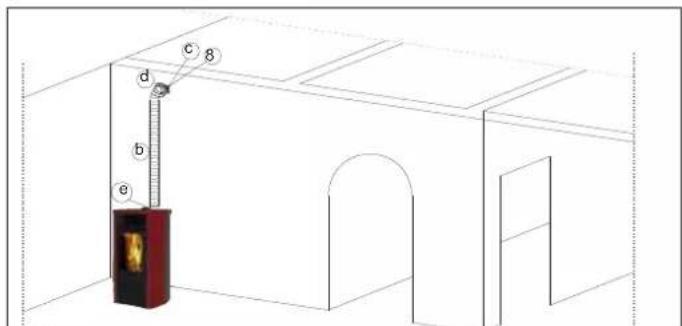
DIDA STOVE TO DIDA PLUS STOVE CONVERSION KIT (optional code 758510)
In order to distribute hot air in other rooms of the house in addition to the installation room, the following components are required.
- No. 1 centrifugal fan (A)
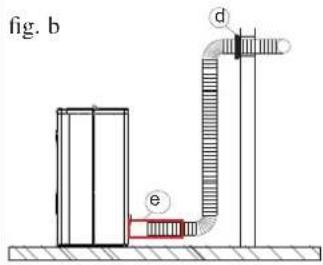
- No. 1 ductwork pipe with flange connection (B)- No. 1 10x2 adhesive gasket L=450 (C)
- No. 2 fl at washer D.6x12 (D)
- No. 2 hex-head screws 6x16 (E)
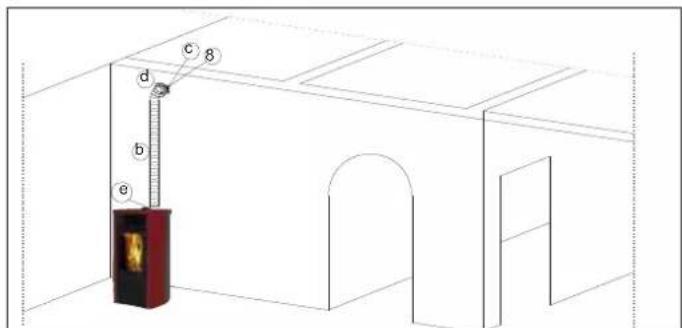
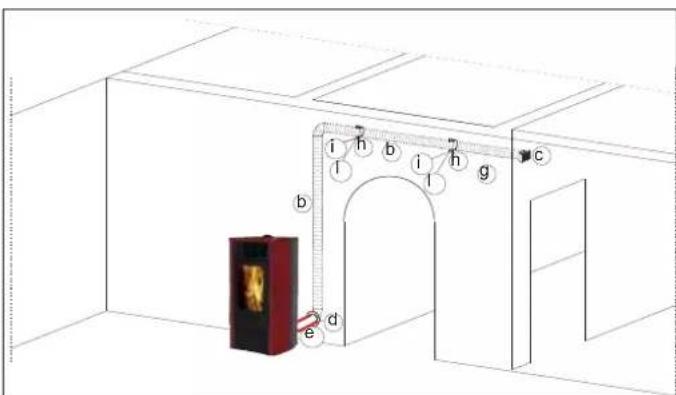
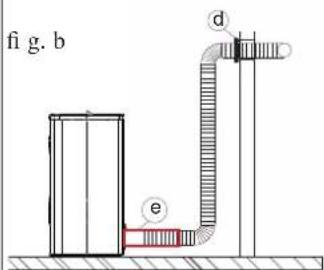
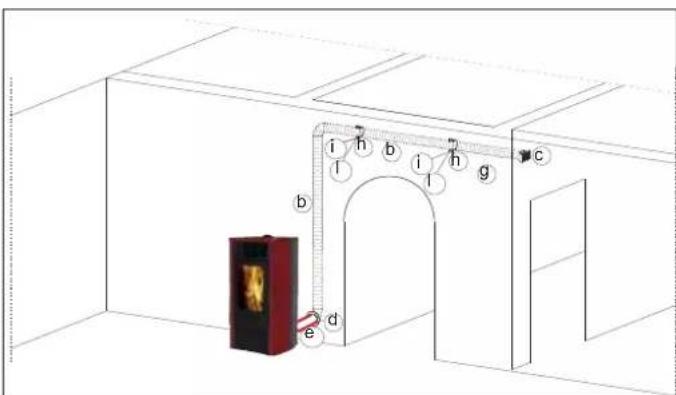
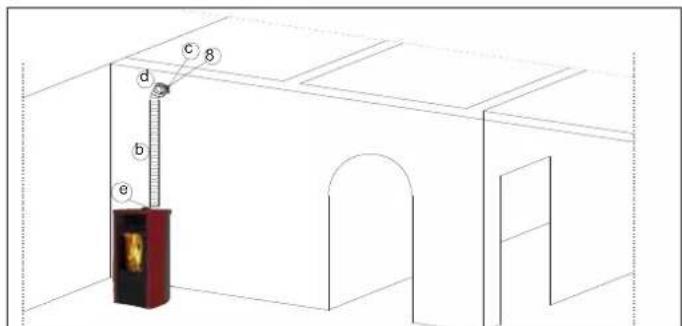
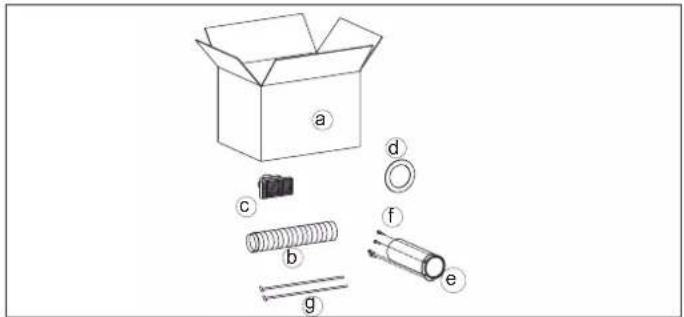
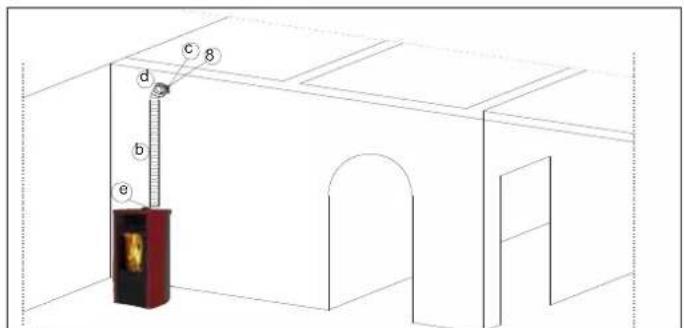
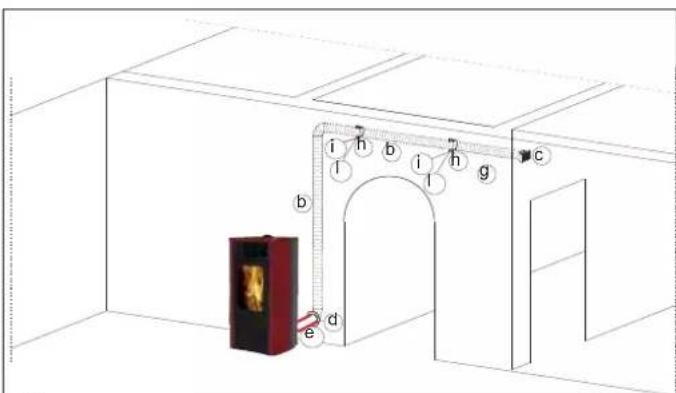
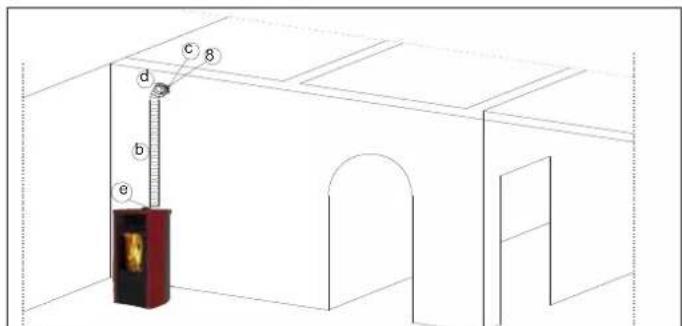
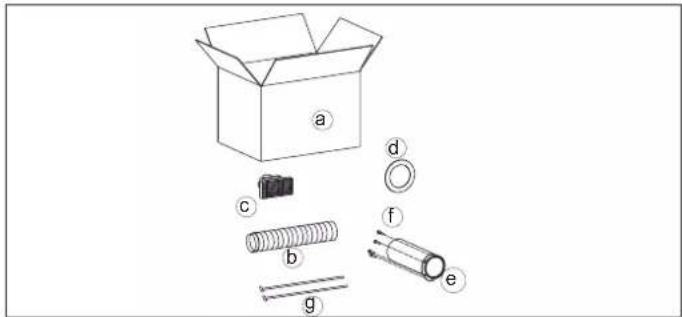
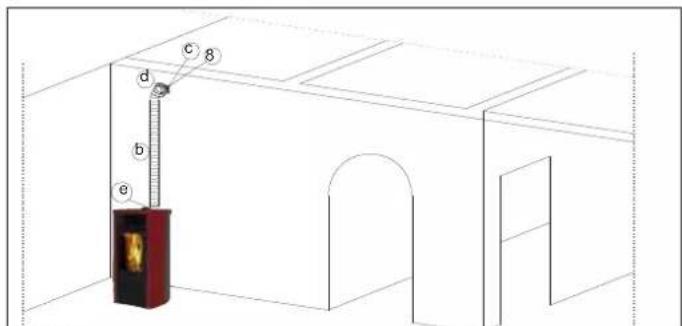
KIT 11 (code 645700)
TO CHANNEL HOT AIR INTO AN ADJACENT ROOM IN ADDITION TO THAT OF INSTALLATION
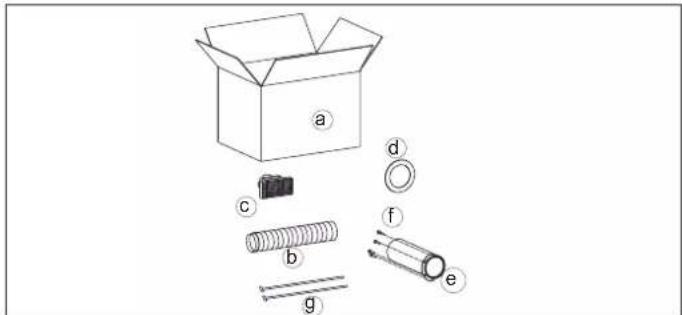
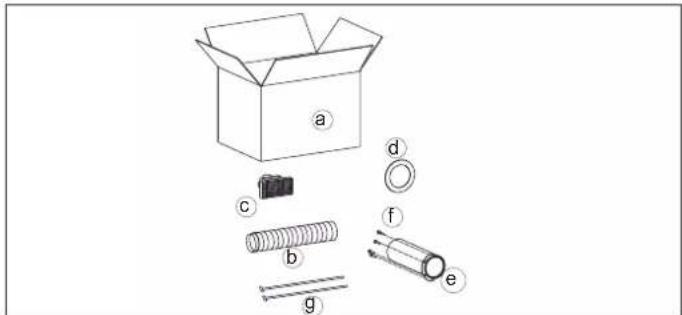
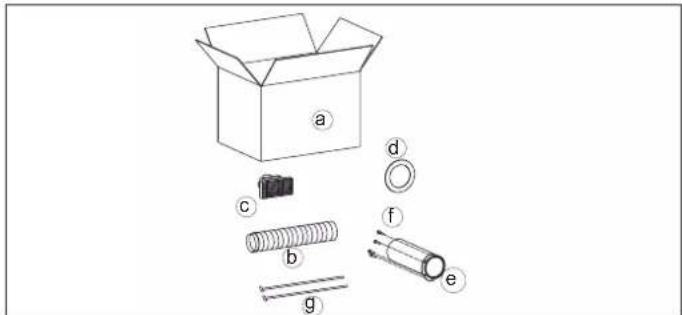
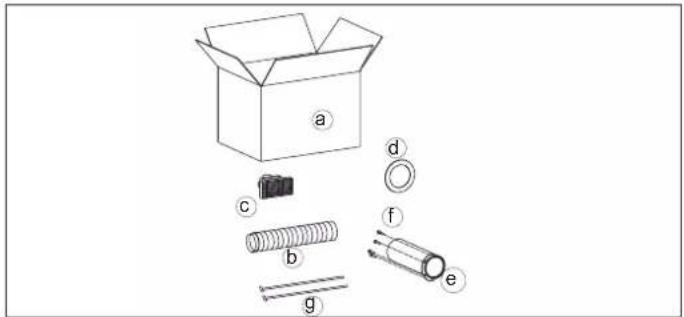
Includes:
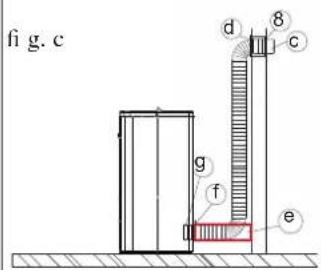
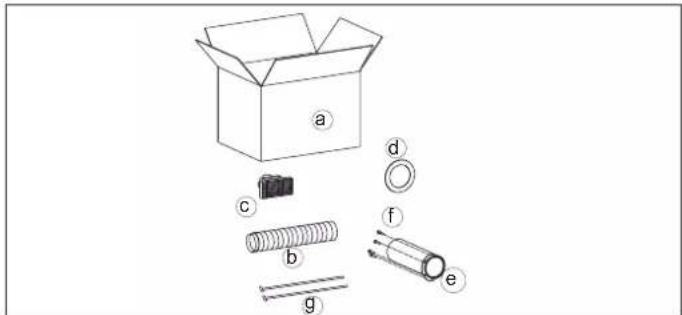
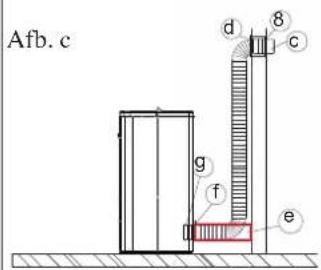
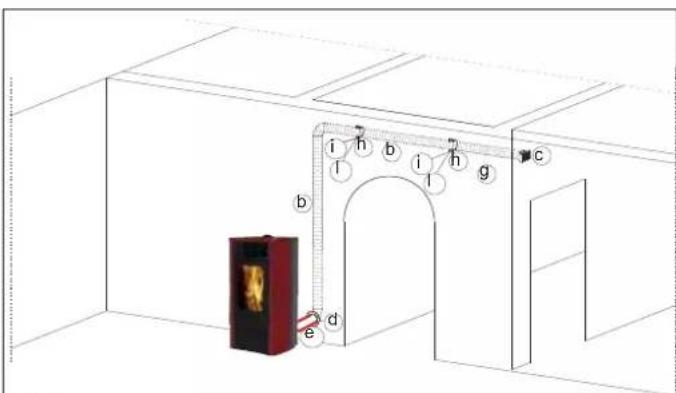
| a Box n° 1 | |
| b ∅ 10 pipe n° 1 | |
| c Smoke outlet end-piece n° 1 | |
| d Wall medallion n° 1 | |
| e Flue cover n° 1 | |
| f Flue cover fastening screws n° 4 | |
| g Pipe blocking clamp n° 2 |
NOTE:
THE FIRST PART OF THE FLEXIBLE PIPE MUST BE COMPLETELY "RELAXED" IN SUCH AWAY TO ELIMINATE CORRUGATION. IN THIS WAY, THE INTERNAL DIAMETER WILL BE SLIGHTLY ENLARGED TO FAVOUR ENTRANCE.
Procedure:
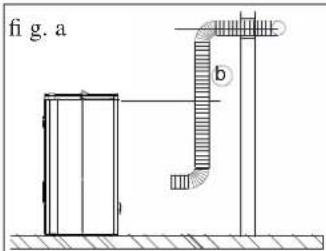
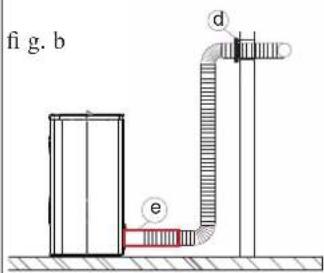
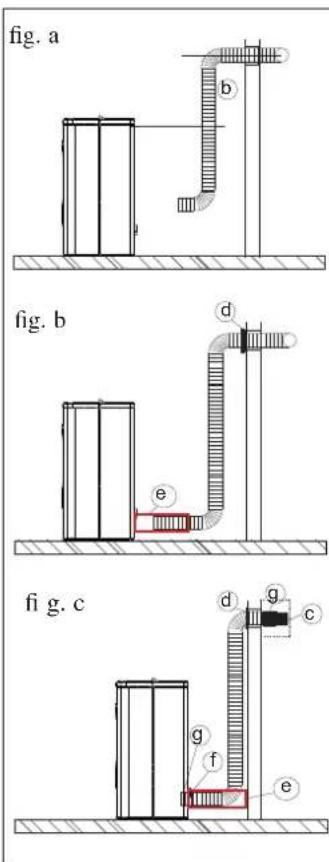
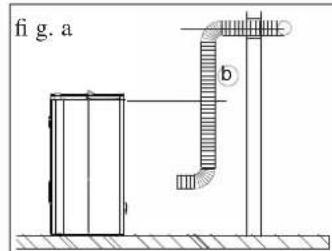
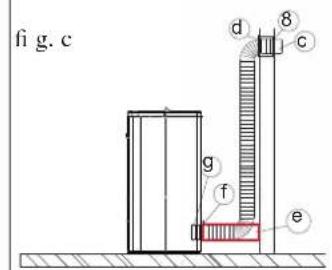
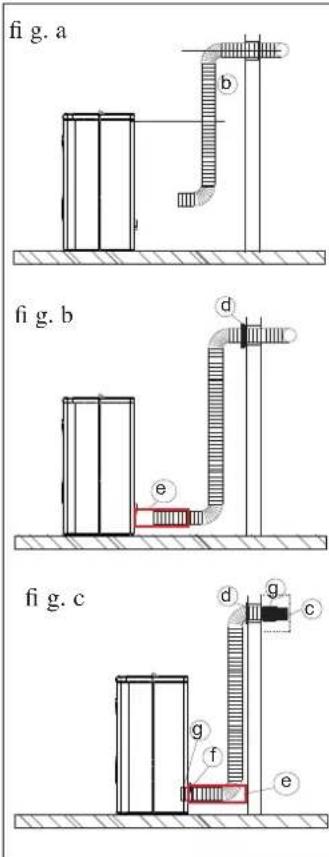
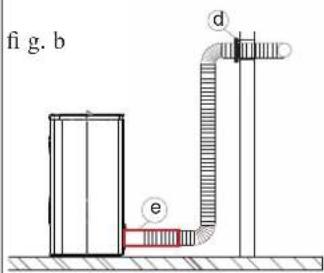
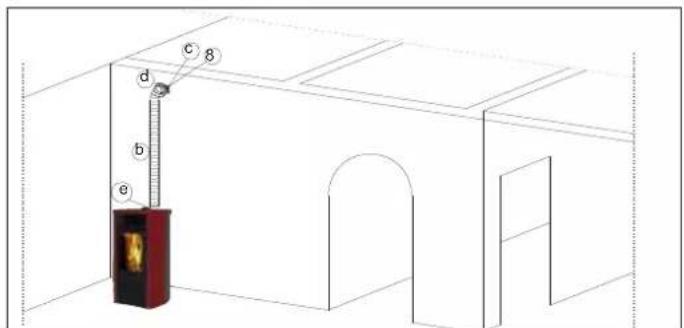
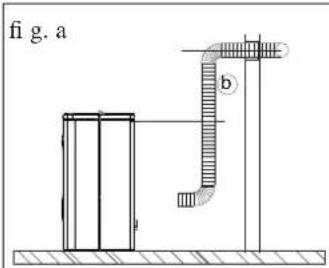
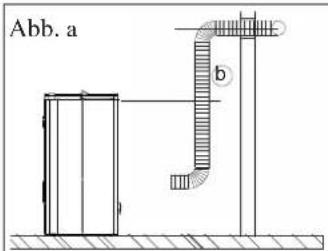
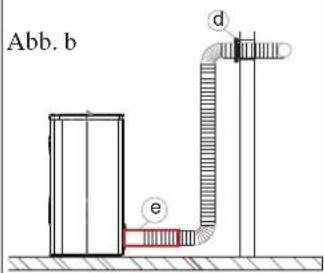
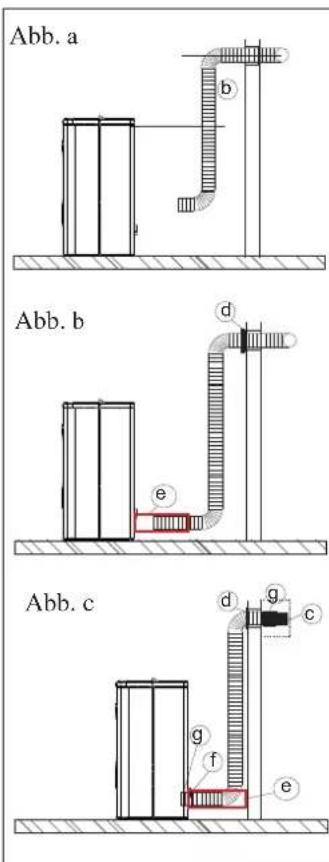
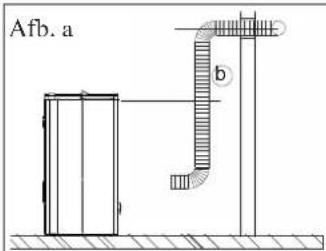
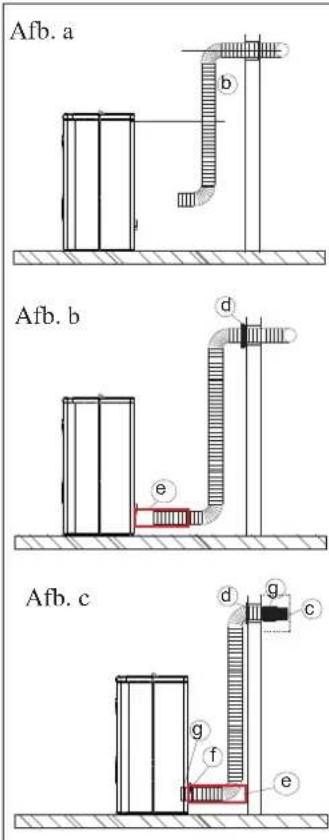
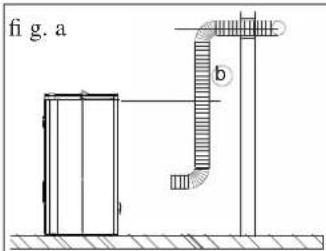
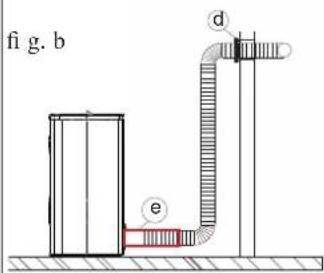
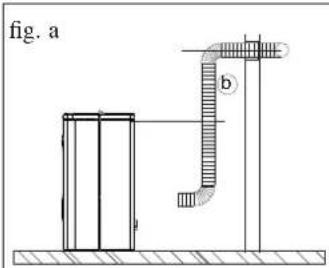
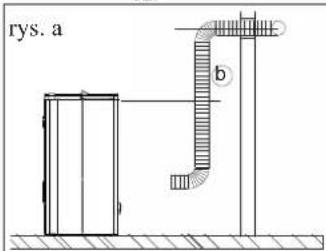
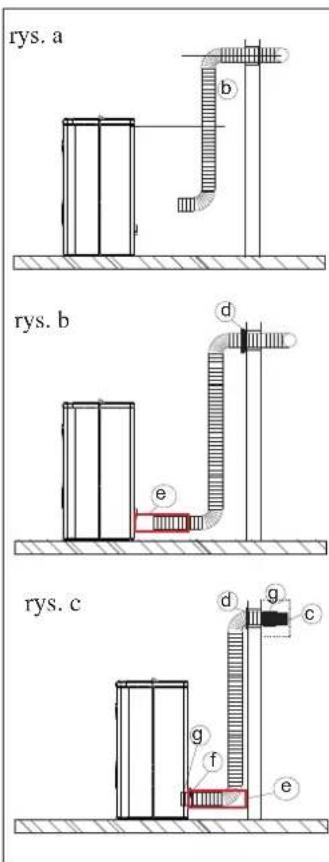
- Defi ne the position of the stove with respect to the walling (fi g. a).
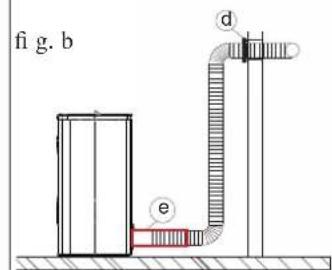
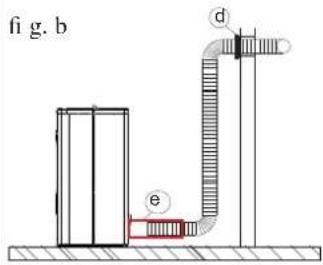
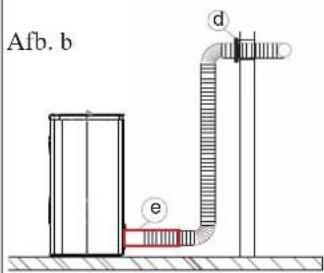
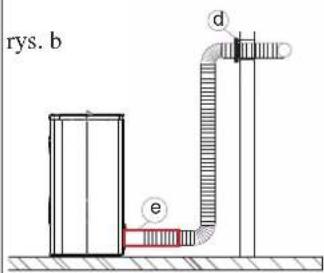
- Cut the flue cover to size (e) on the wall side (fig. b)
- Place the stove in its definite position.
- Extend the aluminium pipe (b) for hot air channelling, without connecting the stove outlet.
- Fit the medallion (d) on the aluminium pipe and the pipe cover (e) without locking it in (fi g. b).
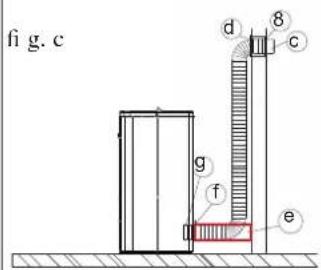
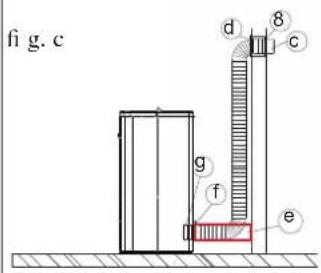
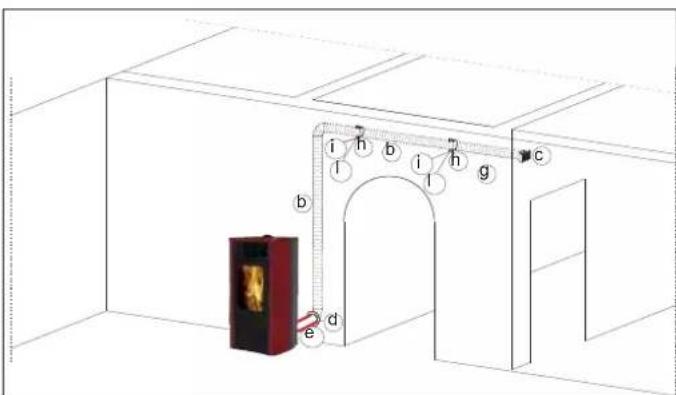
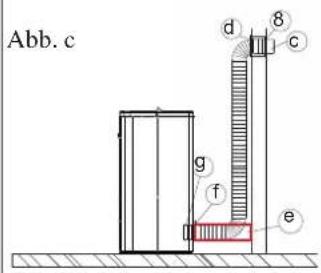
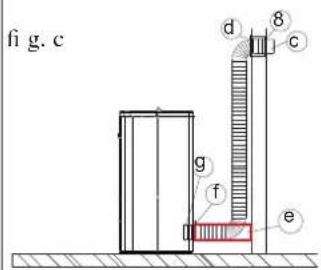
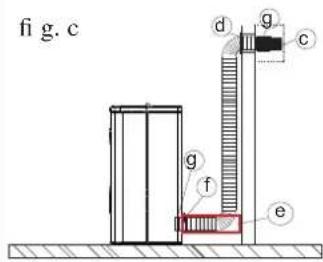
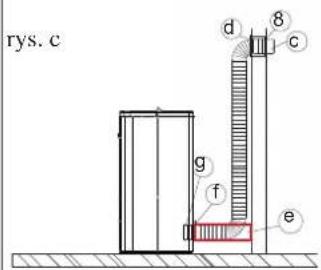
- Fit the aluminium pipe to the hot air outlet on the back of the stove (g) (fi g. c).
- Place the pipe cover (e) in the definite position and fasten it to the back of the stove with the supplied screws (f) (fi g. c).
- Install the terminal outlet (c) and its aluminium pipe (b) (fig. c).
- Fasten the wall medallion (d) with silicone (fi g c).
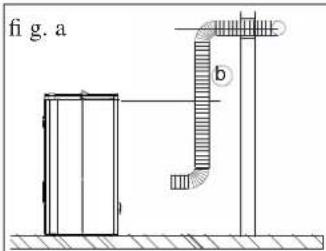

HOT-AIR DUCTWORK
KIT 11 BIS (code 645710)
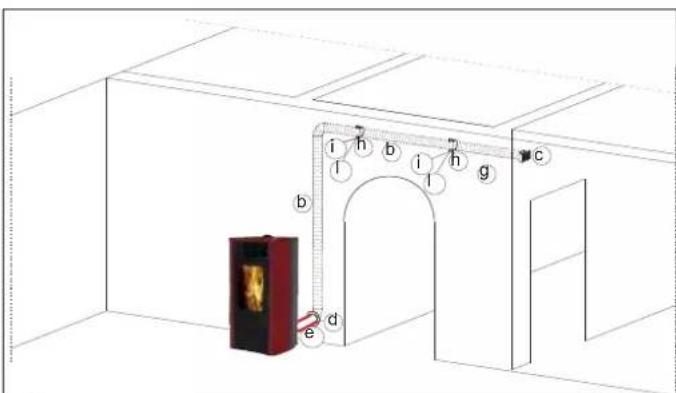
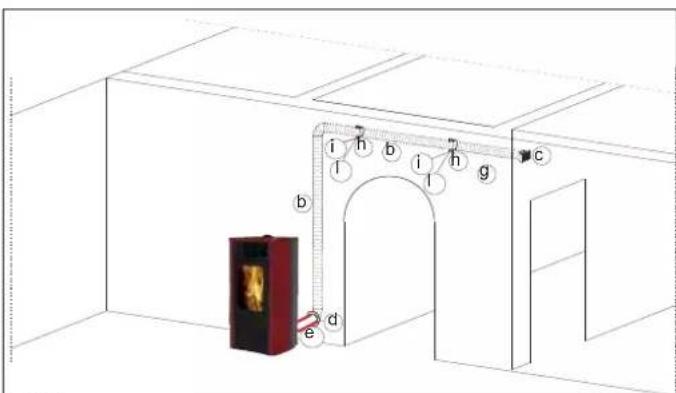
TO CHANNEL HOT AIR INTO A REMOTE ROOM IN ADDITION TO THAT OF INSTALLATION
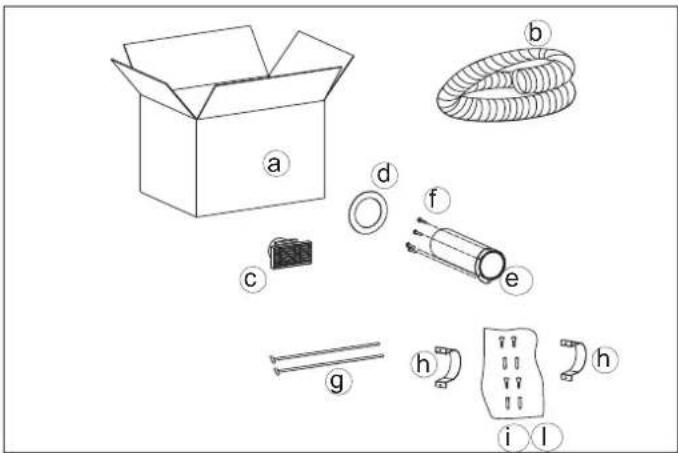
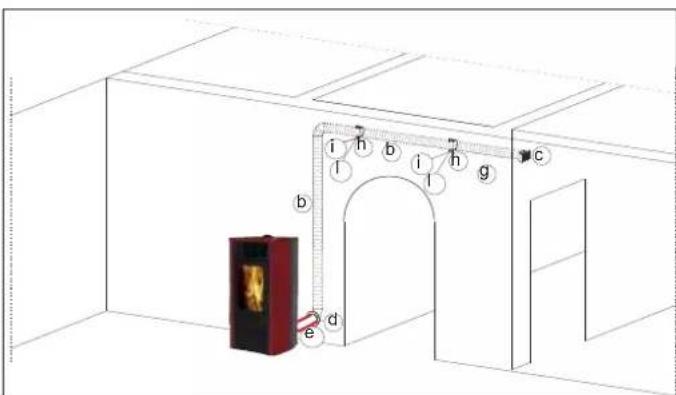
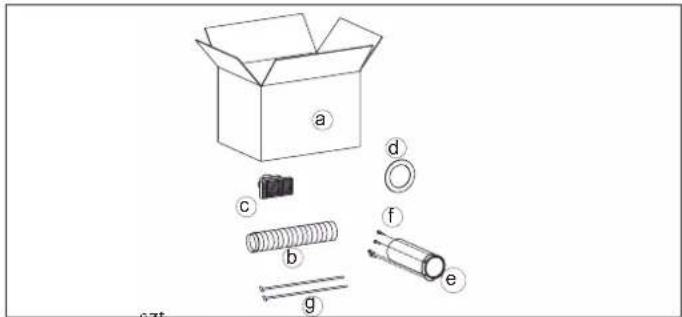
Includes:
| a Box | n° 1 | |
| b ∅ 10 pipe | n° 1 | |
| c Smoke outlet end-piece | n° 1 | |
| d Wall medallion | n° 1 | |
| e Flue cover | n° 1 | |
| f Flue cover fastening screws | n° 4 | |
| g Pipe blocking clamp | n° 2 | |
| h | Wall collar | n° 2 |
| i | Screws | n° 4 |
| l | Dowels | n° 4 |
NOTE:
THE FIRST PART OF THE FLEXIBLE PIPE MUST BE COMPLETELY "RELAXED" IN SUCH AWAY TO ELIMINATE CORRUGATION. IN THIS WAY, THE INTERNAL DIAMETER WILL BE SLIGHTLY ENLARGED TO FAVOUR ENTRANCE.
Procedure:
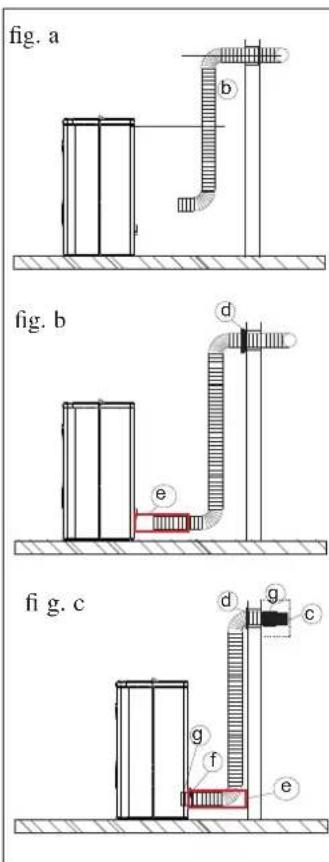
- Defi ne the position of the stove with respect to the walling (fi g. a).
- Cut the flue cover to size (e) on the wall side (fig. b)
- Place the stove in its definite position.
- Extend the aluminium pipe (b) for hot air channelling, without connecting the stove outlet.
- Fit the medallion (d) on the aluminium pipe and the pipe cover (e) without locking it in (fi g. b).
- Fit the aluminium pipe to the hot air outlet on the back of the stove (g) (fi g. c).
- Place the pipe cover (e) in the definite position and fasten it to the back of the stove with the supplied screws (f) (fi g. c).
- Install the terminal outlet (c) and its aluminium pipe (b) (fig. c).
- Fasten the wall medallion (d) with silicone (fi g c).
INSTRUCTIONS FOR USE
Commissioning must be done by a Technical Service Centre authorised by Edilkamin (CAT) prior to ignition and testing according to the UNI 10683 standard.
This standard indicates the control operations to be carried out in situ, aimed at ascertaining correct system function.
The CAT will also provide for calibrating the stove on the basis of the type of pellets and the installation conditions, thus allowing for the effectiveness of the guarantee.
Failure to have the stove ignited by an authorised C.A.T. prevents Edilkamin from guaranteeing correct functioning.
for information see the www.edilkamin.com website
There may be a slight smell of paint the first few times it is ignited, however, this will disappear quickly.
Before igniting you must check:
• that installation is correct
• the power supply
• that the door closes properly to a perfect seal
• that the combustion chamber is clean
- that the display is on standby (the date, power or temperature fl ashes).
LOADING THE PELLETS IN THE HOPPER
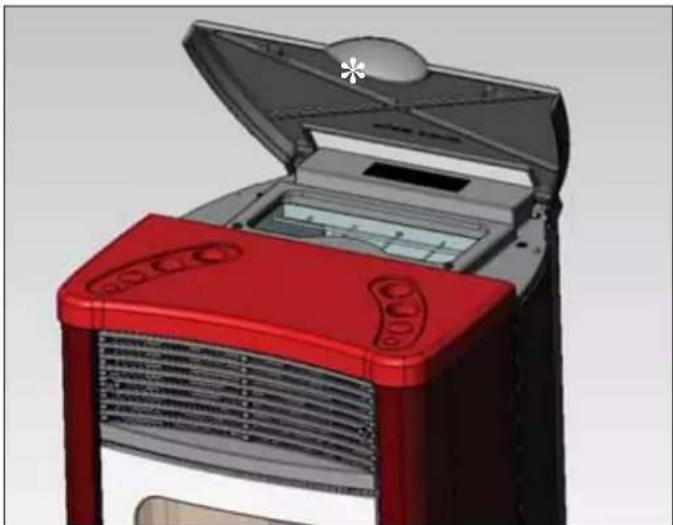
To access the hopper, open the metal cover * (Fig. 1).
ATTENTION:
use the glove supplied when filling the stove whilst it is running and therefore is hot.
natural_image
3D rendering of a red portable air conditioner unit with open lid and ventilation grilles (no text or symbols visible)fig. 1
NOTE regarding the fuel.
The stoves is designed and programmed to burn wood pellets with 6 mm diameter.
Pellets are a type of fuel in the form of little cylinders, made from compacted sawdust, compressed under high pressure with no adhesives or foreign materials.
They are sold in bags of 15 kg.
For the stove to function properly, you MUST NOT burn anything else in it. Using other materials (including wood) will render the warranty null and void. Such use is detected by laboratory analyses. Edilkamin has designed, tested and programmed their stoves to guarantee the best performance when pellets with the following characteristics are used:
diameter: 6 millimetres
maximum length: 40 mm
maximum moisture content: 8%
calorifi c value: at least 4300 kcal/kg.
If pellets with different characteristics are used, the stoves must be recalibrated a similar procedure to that carried out by the DEALER when the stove is ignited the first time.
Using unsuitable pellets may: decrease efficiency; cause malfunctions; stop the stove from functioning due to clogging, dirt on the glass, unburnt fuel, etc.
A simple, visual analysis of the pellets may be carried out:
Good quality: smooth, uniform length, not very dusty.
Poor quality: with longitudinal and transverse cracks, very dusty, various lengths and mixed with foreign matter.
INSTRUCTIONS FOR USE
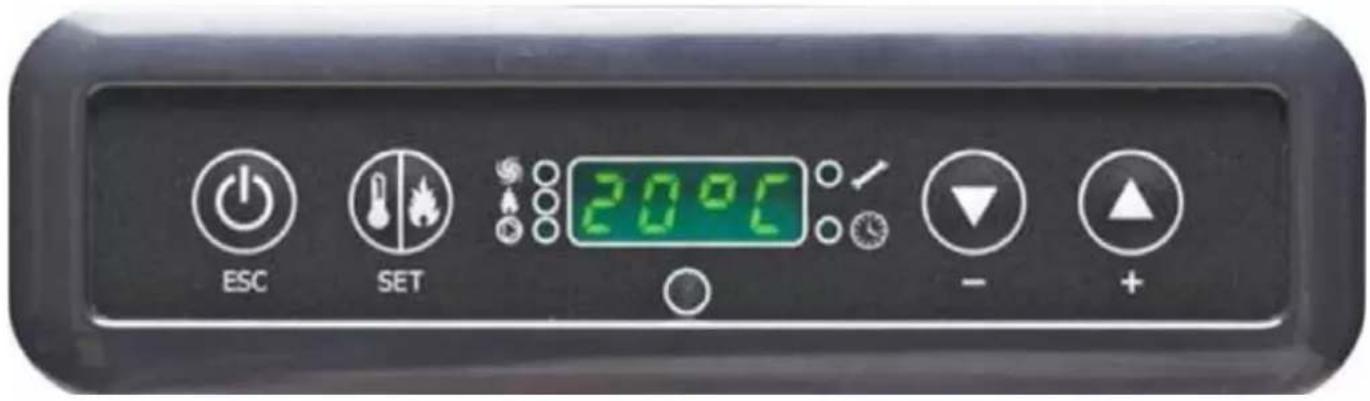
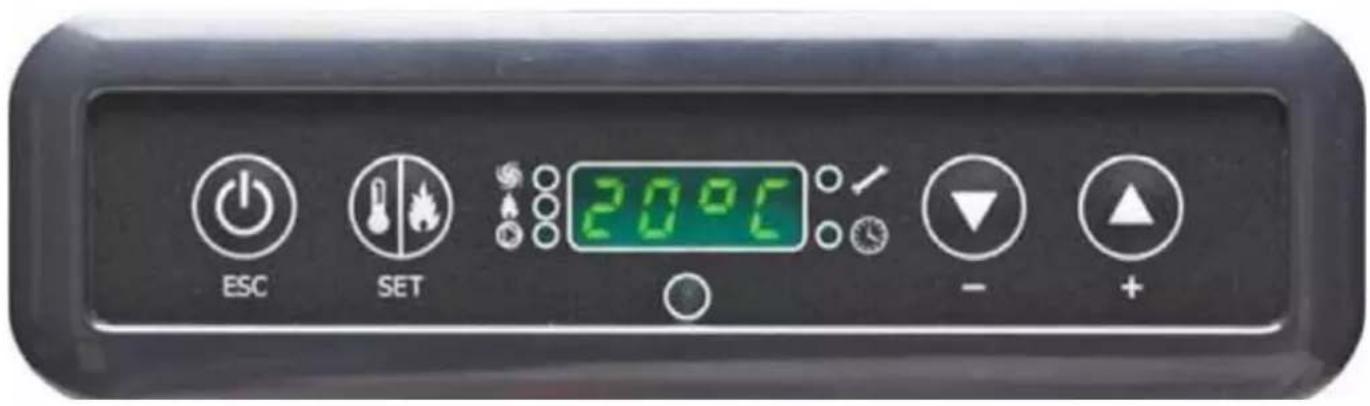
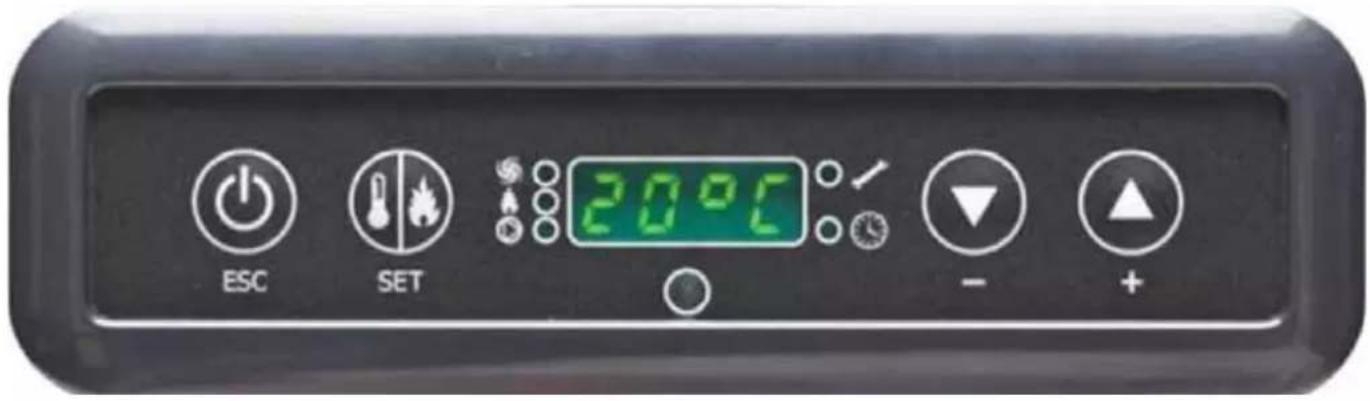
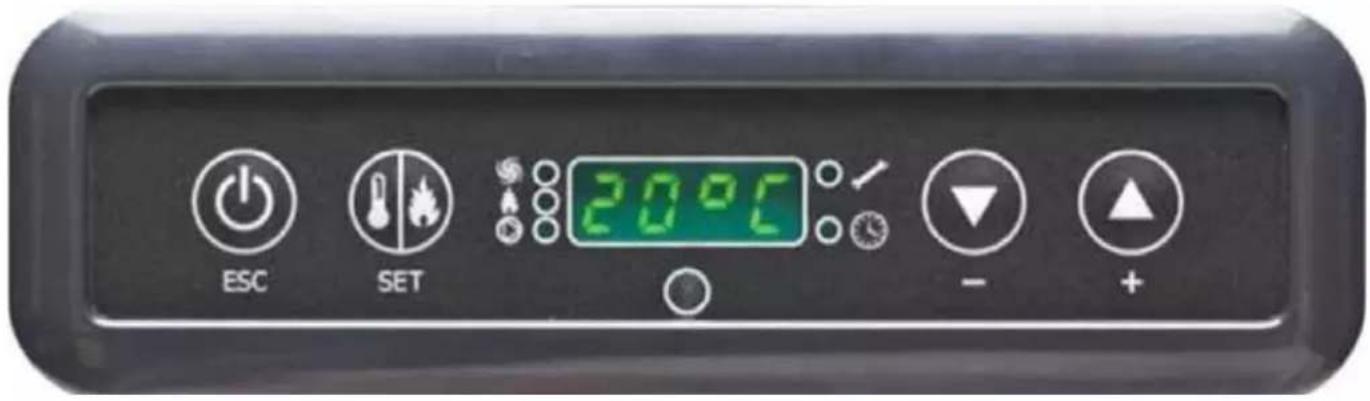
CONTROL PANEL
DISPLAY INDICATIONS
OFF Shut-off phase in progress, duration approx. 10 minutes
ON AC Stove in the first ignition phase: pellet loading and waiting for the flame to light
ON AR Stove in the second ignition phase, start normal combustion
PH Stove in air-exchanger heating phase
P1-P2-P3 Power level set
10....30°C Desired temperature level in the room where the stove is installed
Pu Automatic cleaning of chamber in progress
SF Stop Flame: stops functioning due to probable lack of pellets
CP-TS-PA Control menu available only to Technical Assistance Centres
AF Ignition Failed: stops functioning for failed ignition
H1.....H9 System in alarm, the number indicates the cause of the alarm
Bat1 Clock battery dead (type CR2032)
Fron Enable front ventilation
Cana Enable ducted ventilation
FrCa Ventilations enabled
When the stove is in standby, the display will show the word OFF together with the power set if the stove is in MANUAL, or the word OFF along with the set temperature if the stove is in AUTOMATIC.
SCREW FILLING.
The pellet transport duct (screw) has to be filled when the boiler is new (on first ignition) or if the stove has completely user all the pellets.
To activate reloading, simultaneously press the keys the display will show the wording "RI".

The reloading function stops automatically after 240" or when the
key is pressed.

This indicates the functioning of the fan

This indicates the functioning of the pellet loading motor

This indicates that the stove is functioning within the parameters of the menu (technical assistance centre only)

This indicates that the timer is active, and that an automatic time programme has been chosen

ON/OFF key this also serves to confi rm/exit

Selection key: Automatic/Manual/Settings menu

Key to DECREASE power/temperature and to scroll back from the current selection

Key to INCREASE power/temperature and to scroll forward from the current selection
INSTRUCTIONS FOR USE
IGNITION
With the stove in stand-by mode, (after having checked that

the chamber is clean), press the key ☐, and the ignition procedure will start.
On the display the wording “AC” (start combustion) will appear; after certain control cycles and after checking that the pellets are burning, the display will show the wording “AR” (heating on).
This phase will last a few minutes, to allow the ignition procedure to complete correctly and for the exchangers in the stove to heat up.
After a few minutes, the stover will enter the heating phase, indicating the wording “PH” and later, during regular functioning, the temperature of the output water, set by the user, is indicated and the power chosen by the automatic modulation system.
SWITCHING OFF

Pressing the key when the stove is on, will start the switching off phase, which involves:
- Stopping the delivery of the pellets
- Burning any pellets left in the chamber, keeping the fume fan on (usually for about 10')
- Cooling the boiler's body while the pump remains on until the shut-off temperature is reached
- The indication “OFF” on the display together with the minutes remaining until shut-off
During the switching off phase, the boiler cannot be turned on again; when the switching off phase is completed the system automatically goes into stand-by mode (the display will show the word OFF together with the power set if the stove is in MANUAL, or the word OFF along with the set temperature if the stove in AUTOMATIC).
MANUAL MODE
In MANUAL mode, you set the working power of the stove independently from the temperature of the room in which it is installed.
To select MANUAL mode, press the set key setting the display to, for example, "P2" (power 2).
It is possible to increase the power by pressing the key or

decrease it by pressing the key.
AUTOMATIC MODE
In AUTOMATIC mode, it is possible to set the desired temperature of the room where the stove is installed. The stove automatically adjusts power according to the difference between the desired temperature (set on the display) and the temperature measured by the sensor in the room; upon reaching the desired temperature, the stove will work at the minimum, going to
power-level 1.
To select AUTOMATIC mode, press the set key setting the display to 20^ C, for example.
The desired temperature can be increased by pressing the


key, or decreased by pressing the key. In AUTOMATIC mode, the display alternates between the desired temperature and the power which is automatically set by the modulating system.
COMFORT CLIMA FUNCTION
This is suitable for stove installations in small systems, where functioning at minimum power would give excessive heating in any case.
This function, managed automatically, switches off the boiler when the set output temperature is reached. The wording “CC OF” will appear on the display, indicating the minutes remaining before shut-off.
When the output temperature has fallen below the set value, the boiler will automatically switch on again. This function can be requested from the technical assistance centre when the boiler is switched on for the first time.
REMOTE ACTIVATION FUNCTION (AUX port)
By means of a special connection wire (code 640560), the stove can be switched on/off by a remote control device such as a GSM telephonic activator, an environment thermostat, a zone valve, or in any case a device with clean contact with the following logic:
Contact open = stove off
Contact closed = stove on
Activation and deactivation takes place 10" after the transfer of the last command.
If the remote activation of the door is connected, the stove can be switched on and off in any case by the control panel; the stove will always act according to the last command received, whether for switching on or off.
VENTILATION ADJUSTMENT
If you have installed the ductwork kit, the Technical Assistance Centre will activate the ventilation-mode selection menu. By pressing and holding the SET key for 2", you can access the ventilation mode selection menu where you can set the
following operating modes using the keys:
“Fron”: with this setting, only front ventilation is active
“Cana”: with this setting, only ducted ventilation is active. A special program manages ventilation based on the heating power produced by the stove.
“Fr Ca”: with this setting, both front and ducted ventilation is active.
A special program manages the operation of the ventilation based on the heating power produced by the stove.
The front fan adjusts its speed according to the working power of the stove (in both automatic and manual modes), the ducted fan is active at the maximum speed to ensure an efficient air flow to the ductwork vent of the adjacent room.
INSTRUCTIONS FOR USE
SETTING: CLOCK AND WEEKLY PROGRAMMING
Press the key SET for 2": this takes you into the programming menu and the display will show the wording "TS".
Press the keys ▼ ▲ until the wording “Prog” appears, then press SET.
By pressing the keys ▼ ▲ the following settings can be selected:
- Pr OF: This enables or completely disables the use of the timer.
To activate the timer, press the SET key and then choose "On"
with the keys 📋 🐘 set "OFF" to deactivate it, confirm the setting with the SET key, then press the ESC key to leave the programme.
- Set: this lets you set the current time and day.
To set the current time, select the wording "SET" on the display, confirm the selection with the SET key, set the current time; every
time the key is pressed the time will increase by 15', and it
will decrease by 1' every time the key is pressed.
Confir rm the setting with the SET key, set the current day of
the week by means of the keys (e.g. Monday=Day 1), confi rm the programming with the SET key, after entering the day/time, the display will show the wording 'Prog', press SET to continue programming for Pr1/Pr2/Pr3 or press 'ESC' to leave the programming.
- Pr 1: This is programme no. 1; this is for setting the 1st ignition timetable, the 1st shut-off timetable and the days on which to apply the timetable Pr 1.
To set the Pr 1 timetable, with the keys ▼ ▲ select "Pr 1", confirm the selection with the SET key the display will briefly
show "On P1", with the keys set the ignition time of the Pr 1 timetable, confirm with the SET key, the display will
briefy show "OFF P1", then with the keys set the shut-off time of the Pr 1 timetable, confirm with the SET key.
Continue to assign the same timetable to the various days of the week, with the SET key the days will scroll from day 1 to day 7,
where day 1 is Monday and day 7 is Sunday, with the keys

the programme Pr 1 is activated on the days selected on the display (e.g. On d1=active or Of d1 =not active).
After completing the programming, the display will show the wording 'Prog', to continue programming Pr 2/Pr 3 press 'set' and repeat the above described procedure, or press 'ESC' to leave the programming.
- Example of programming
Pr 1:
On 07:00 / OF 09:00: red=active green=not active
| Day 1 Day 2 Day 3 Day 4 Day 5 Day | 6 Day 7 | ||||
| On On On On On Off Off |
Pr 2:
This lets you set a second timetable; for the programming procedure, follow the same instructions as for Pr 1. Example of Pr 2 programming On 17:00 / OF 23:00: red=active green=not active
| Day 1 Day 2 Day | 3 Day 4 Day 5 Day | 6 Day 7 | ||||
| On On On On | On | Off Off |
Pr 3:
This lets you set a third timetable; for the programming procedure, follow the same instructions as for Pr 1 and Pr 2. Example of Pr 3 programming On 09:00 / OF 22:00: red=active green=not active
| Day 1 Day 2 Day 3 Day 4 Day 5 Day | 6 Day 7 | ||||
| Off Off Off Off On On |
INSTRUCTIONS FOR USE
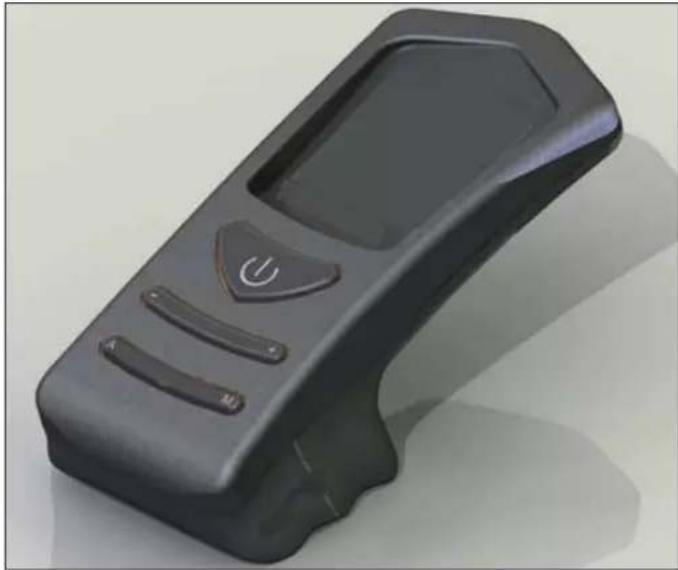
REMOTE CONTROL code 633280

: ignition / shutdown button
+ : button to increase the power/operating temperature (when inside a menu, it increases the displayed variable)
- : button to increase the power/operating temperature (when inside a menu, it decreases the displayed variable)
A : button to toggle from manual and automatic mode M : button to toggle from automatic to manual mode
- the remote control transmits by means of an infrared signal within a range of 4-5 metres. The LED transmission signal must be in line with the receiving LED of the stove for the signal to be transmitted correctly. This must also be in a free-fi eld environment, therefore, free of obstacles.
- the remote control works with 3 alkaline 1.5V AAA batteries. Their duration depends upon usage, however, the average duration is that of an entire season.
- when a button is pressed, the backlight goes on, which indicates that the remote control is transmitting the signal. The "beep" emitted by the stove confi rms its reception.
- the remote control must be cleaned with a damp cloth and no detergents or liquids must be sprayed onto it. In any case, use neutral detergents which are free from aggressive substances.
- handle the remote control with care. It could easily break if dropped, due to its size.
Moreover, all operations implemented from the synoptic panel can also be implemented from the remote control.
- The operating temperature is: 0-40°C
- The correct storage temperature is :-10/+50°C
- Operating humidity is: 20-90% R.H with no condensation
- Degree of protection is: IP 40
- Weight of remote control with batteries: 160gr
natural_image
Black remote control device with buttons and a power button (no visible text or symbols)
natural_image
Close-up of a dark blue mechanical component with a red circle highlighting a small feature, no visible text or symbols.Photo "A"
(Performed solely by the Dealer): An infrared remote control is easily identified through radio transmission as it has its transmission LED at the tip. Refer to photo "A" below.
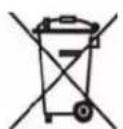
INFORMATION FOR USERS
In accordance with Art. 13 of the Legislative Decree No. 151, dated 25 July 2005, “Implementation of Directives: 2002/95/EC, 2002/96/EC and 2003/108/EC, pertaining to the reduction of hazardous substances used in electrical and electronic equipment, as well as disposal of waste”.
The crossed-out wheeled bin symbol shown on the equipment or on the packaging indicates that the product must be disposed of separately at the end of its useful life. Therefore, at the end of the equipment's useful life, the user must hand in the equipment to suitable collection facilities for electrical and electronic waste, or return it to the retailer when a new, equivalent appliance is purchased in a ratio of one to one.
MAINTENANCE
Before performing any maintenance, disconnect the appliance from the mains.
Regular maintenance is required for the stove to function correctly.
Any problems resulting from lack of maintenance will immediately void the warranty.
DAILY MAINTENANCE
Operations must be performed when the stove is off, cold and unplugged from the power supply
- Cleaning must be carried out with a vacuum cleaner.
- Open the door, extract the fire box (1 - fig. A) and tip the residue into the ash drawer (2 - fig. B).
• DO NOT EMPTY THE RESIDUE OUT INTO THE PELLET HOPPER.
- Pull the ash drawer (2 - fi g. b) out and empty it into a non-fl ammable container (the ash may still have some parts that are hot and/or embers).
• Vacuum out the inside of the fire box, fire grate, and space around the fire box, into which the ash falls.
- Remove the fire box (1 - fig. A) and remove any encrustation using the brush provided, clearing any clogging in the holes.
• Vacuum the fire box, clean the contact edges between the fire box and its seating.
- Clean the glass, if necessary (when cold).
Never vacuum hot ash, it can make the vacuum cleaner breakdown and represents a fi re risk.
WEEKLY MAINTENANCE
natural_image
3D rendering of a mechanical device with open door and internal component, labeled 'fig. A' (no readable text or symbols)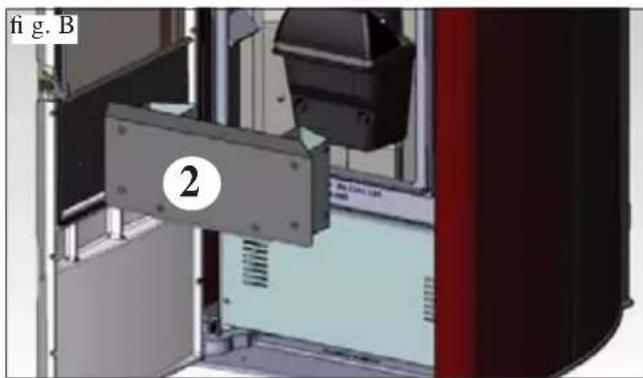
natural_image
3D mechanical assembly diagram showing a component labeled '2' and part identifier 'fig. B' (no readable text or symbols beyond labels)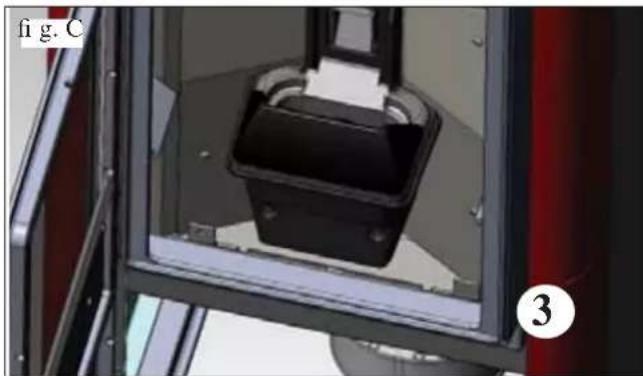
natural_image
Close-up of a mechanical device with a black housing and transparent frame, labeled 'fig. C' and circled number 3 (no readable text or symbols on the device itself)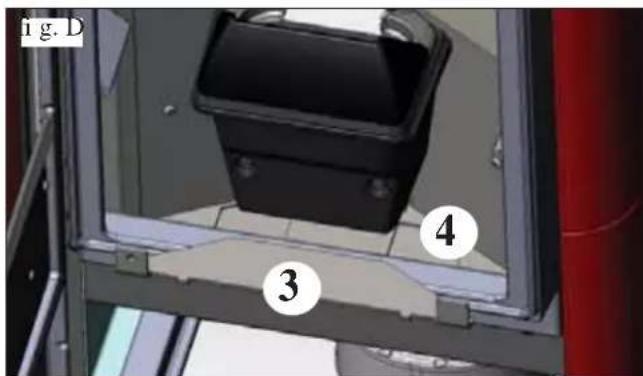
natural_image
3D mechanical assembly diagram showing a bracket with a labeled component (5), no readable text or symbols present.MAINTENANCE
(implemented by the DEALER)
Consists of:
- Clean the stove internally and externally
- Thorough cleaning of the heat exchange piping inside the hot air outlet grille located in the upper part of the front of the stove
- Carefully clean and remove dirt from the combustion chamber and the relative compartment
- Clean fans, verify mechanical and clamp loosening
- Clean smoke channel (replace seals on smoke exhaust pipe)
- Clean smoke duct especially if
- Clean/check the Synoptic Panel
- Visual check of power cables, connections and power cord.
- Clean the pellet hopper and check loosening of the feed screw - gear motor assembly
- Check the small pressure-switch pipe, and replace when necessary
- Replace the door seal
- Functionality test: load the feed screw, ignite, let it run for 10 minutes and shutdown
If the stove is used very frequently, it is advisable to clean the smoke channel and the fume duct every 3 months.
ATTENTION !!!
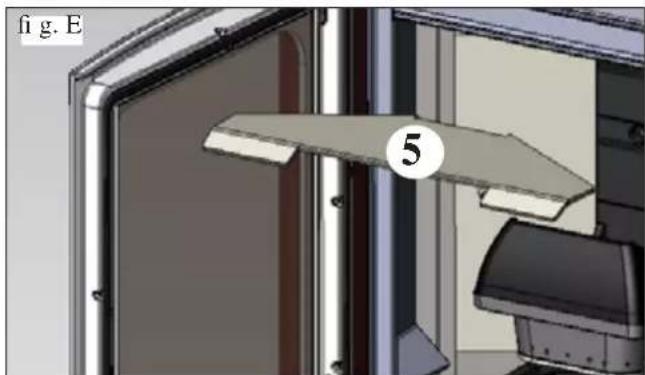
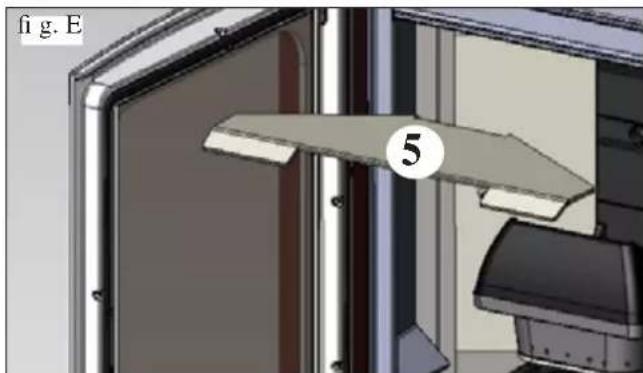
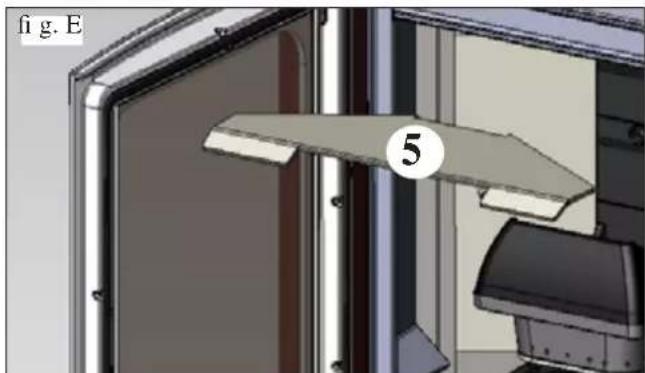
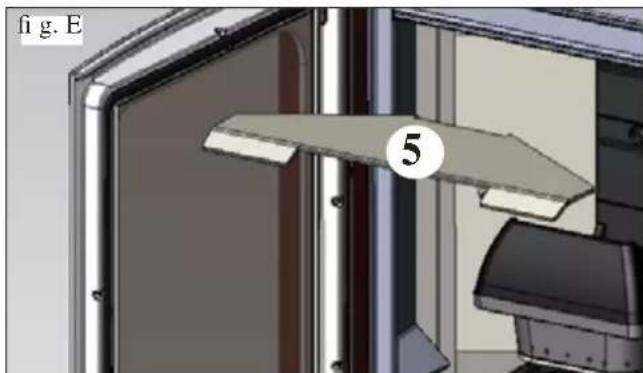
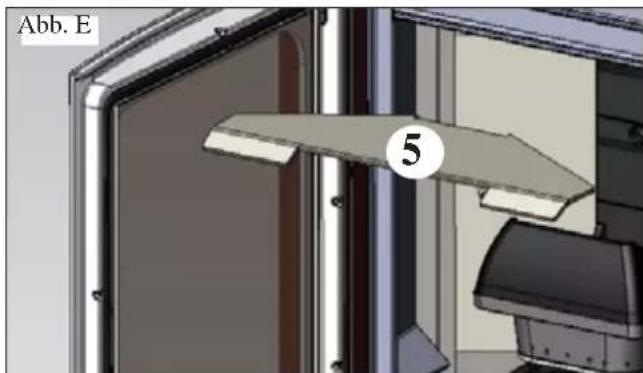
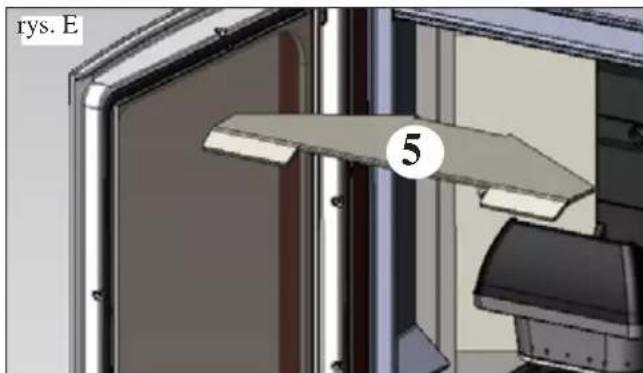
After implementing a normal cleaning procedure, INCORRECT coupling of the upper (A) (fi gura 1) and lower (B) (fi gura 1) combustion chambers can compromise the stove's performance.
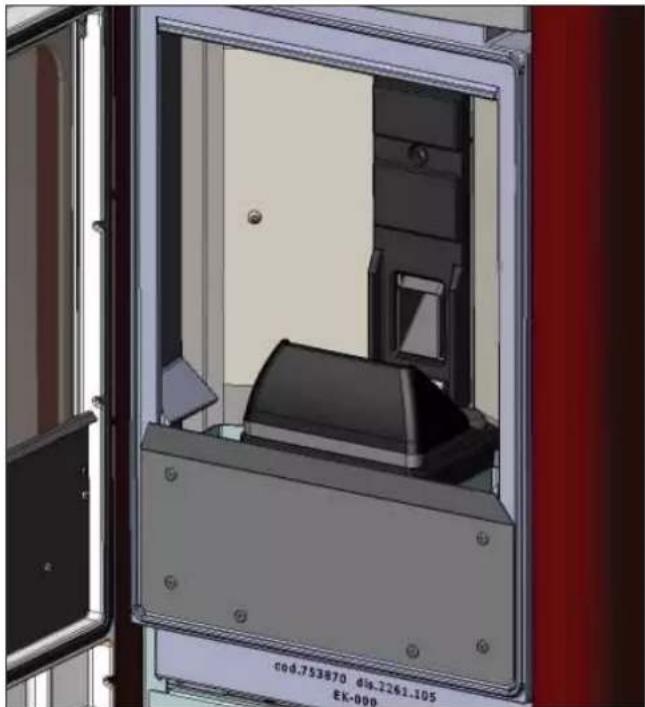
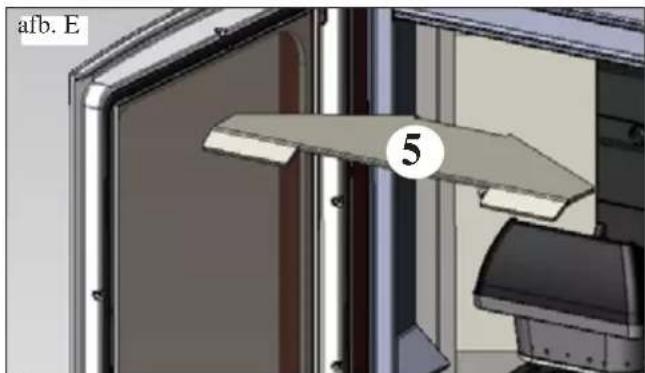
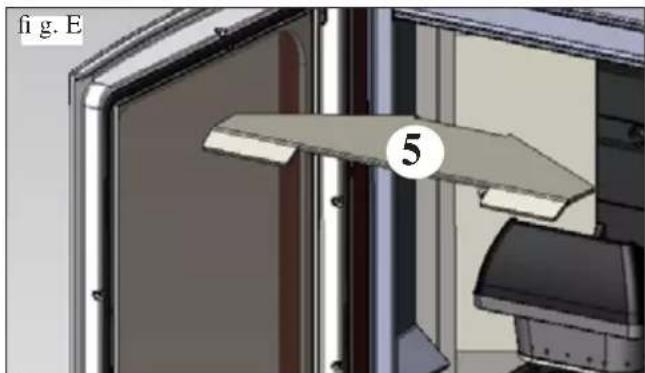
Before igniting the stove, make sure the combustion chambers are correctly paired as indicated in (fi g. E) without ash or unburnt material present on the support perimeter.
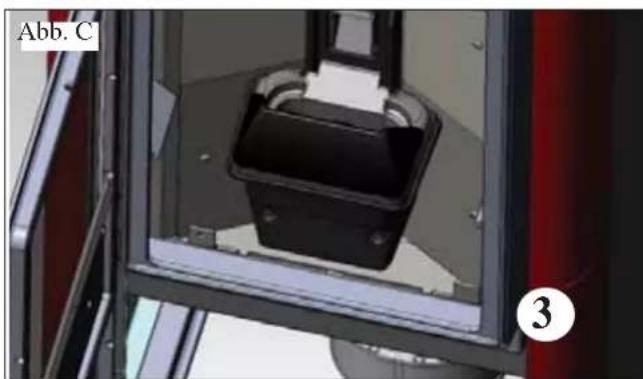
We remind you that using the stove without cleaning the melting pot, may cause a sudden ignition gas inside the combustion chamber with the consequent breaking of the glass
N.B.
- Any unauthorised modification is forbidden
- Use spare parts recommended by the manufacturer
- The use of counterfeit parts results in the guarantee becoming null and void
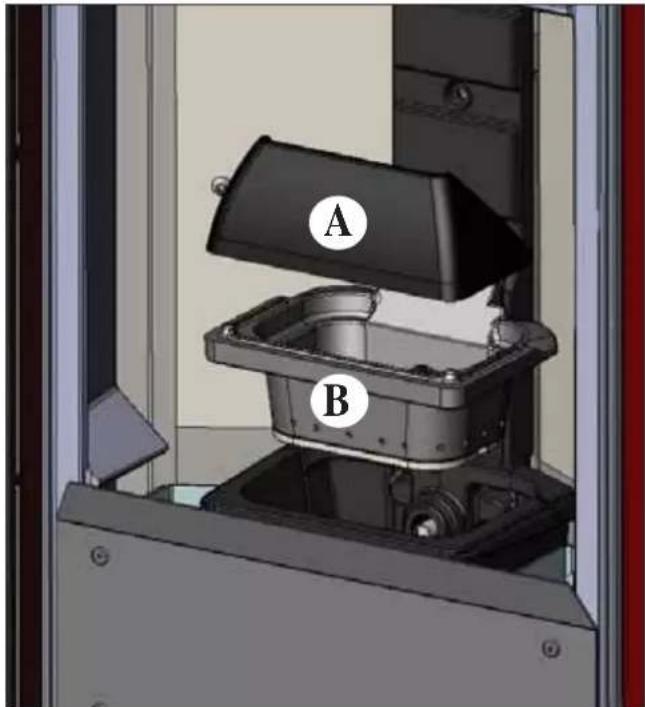
fig. 1
natural_image
3D CAD model of a mechanical device with internal components and mounting holes (no text or symbols visible)fig.2
POSSIBLE TROUBLESHOOTING
In the event of problems the stove stops automatically and runs the shutdown process and the display shows text regarding the motivation of the shutdown (see the various alarms below).
Never pull the plug during shutdown on account of malfunction.
To start the stove up again after a shutdown, let the shutdown procedure end (10 minutes marked by a beep) tand then
press the button
Do not turn the stove on again before checking the cause of the malfunction and CLEANING/ EMPTYING the crucible.
INDICATION OF POSSIBLE CAUSES OF MALFUNCTION AND INDICATIONS AND REMEDIES:
1) Signalling: H1) Verific./air flow: (intervenes if the flow sensor detects insufficient combustion).
Problem: Turns off for lack of depression
Air flow may be insufficient because the door is open, the door does not close properly (e.g. bad seal), there is an air intake or smoke extraction problem, or the combustion chamber is clogged.
Actions: Check:
• door closure;
- combustion air intake duct (clean, paying attention to the flow sensor components);
- clean the flow sensor with dry air (like that used for PC keyboards);
- stove location: it must not be installed against a wall;
- combustion chamber position and cleanliness (clean regularly according to the type of pellet);
• smoke duct (clean); - installation (if it does not comply with regulations or the smoke outlet has more than 2-3 bends);
If you suspect the sensor is malfunctioning, carry out cold tests. If the conditions are changed (for example by opening the door) and the value does not change, there is a sensor problem.
N.B.: The no depression alarm may also occur during ignition, since the flow sensor starts monitoring 90 seconds after the ignition cycle begins.
2) Signalling: H2) Failure of fume expulsion motor (this trips if the smoke extraction speed sensor detects a fault)
Problem: Shutdown for smoke extraction speed fault detection
Actions: • Check smoke extractor function (devolution sensor connection) and board (DEALER).
- Check smoke channel for dirt
- Verify the electrical system and carthing system.
- Check electronic circuit board (DEALER).
3) Signalling: SF (H3) Stop/Flame: (this trips if the thermocouple detects a smoke temperature lower than the value set, which it interprets as the absence of flames)
Problem: Turns off due to drop in smoke temperature
Flame may fail for any of the following reasons:
Actions: - lack of pellets
- too many pellets have suffocated the flame, check pellet quality (DEALER)
- Check whether the maximum thermostat has caused the problem (rare circumstance since this would correspond to over heated fumes (technical assistance centre)
- Check whether the pressure switch has cut off electricity to the gear motor because of a blocked flue or other problem.
4) Signalling: AF (H4) Failed ignition (intervenes if a flame fails to appear within a maximum of 15 minutes, or if ignition temperature is not reached).
Problem: Turns off due to incorrect smoke temperature during ignition
Distinguish either of the following cases:
Flame does NOT appear
Actions: Check: - combustion chamber position and cleanliness;
- arrival of combustion air in the combustion chamber;
- if the heating element is working (DEALER);
- room temperature (if lower than 3^ C use a firelighter) and damp.
- Try to light with a fi relighter.
Flames appear, but AF appears on the display after Ar.
Actions: Check: (only by the Dealer)
- if the thermocouple is working (DEALER);
- start-up temperature setting in the parameters (DEALER).
5) Signalling: AL 05 black out stop (not a defect of the stove).
Problem: Turns off due to lack of electricity
Actions: • Check electricity connection and drops in voltage.
POSSIBLE TROUBLESHOOTING
6) Signalling: AL 06 broken or disconnected thermocouple
Problem: Turns off due to thermo coupling failed or disconnected
Actions: • Check connection of thermo coupling to board: Check function in cold test (DEALER).
7) Signalling: AL 07 over heated fumes (turns off due to exceeding maximum smoke temperature).
Problem: Switches off because of overheated fumes.
Over heated fumes may depend on: type of pellets, anomalous fume extraction, blocked channel, incorrect installation, gear motor drift, lack of air vents in the room.
8) Signalling: "Bat. 1"
Problem: The stove does not stop but the error appears on the display.
Actions: • The buffer battery of the control board needs changing (DEALER)
9) Signalling: A LC: Activated when anomalous, insufficient current absorption is detected on the gear motor.
Actions: Check functioning (CAT): gear motor - pressure switch - tank thermostat - electrical connections and electronic board
10) Signalling: A HC: Activated when anomalous, excessive current absorption is detected on the gear motor..
Actions: Check functioning (CAT): gear motor - Electrical connections and electronic board.
N.B.:
The combustion chambers and smoke ducts connected to the solid-fuel appliances must be cleaned once a year (check if your country has specific legislation covering this).
Failure to regularly check and clean increases the likelihood of a fire in the chimney pot.
IMPORTANT!!!
In the case of a fire in the stove, in the flue or in the chimney, proceed as follows:
- Disconnect the power supply
- Use a carbon dioxide (CO _2 ) extinguisher
- Call the fi re brigade
DO NOT ATTEMPT TO PUT THE FIRE OUT WITH WATER!
After the event, have the appliance checked by an authorised Service Centre and have an authorised technician check the flue.
CHECK LIST
To be integrated with a complete reading of the technical specifications
Positioning and installing
• First ignition performed by authorised CAT who released the guarantee certificate
• Air vent in the room
• Only the stove outlet passes through the smoke channel/chimney flue
• Features of the smoke channel (stretch of duct connecting the stove to the flue/chimney):
• a maximum of 3 curves,
a maximum 2 horizontal metres
- Chimney pot that is high enough to avoid downdraft areas
- The discharge pipes are made of a suitable material (stainless steel is recommended)
- When using any flammable materials (e.g. wood), all precautions have been taken to prevent a fire hazard
Use
• Good quality, dry pellets are used
• The chimney pot and ash compartment are clean and well positioned
• The door is closed properly
- The combustion chamber is inserted properly into the relevant compartment
REMEMBER TO VACUUM THE COMBUSTION CHAMBER BEFORE EACH IGNITION Should ignition fail, DO NOT re-ignite until you have emptied the combustion chamber.
OPTIONAL
TELEPHONE DIALLER FOR REMOTE IGNITION (code 762210)
The stove can be ignited remotely by asking the DEALER to connect the telephone combiner to the serial port behind the stove via the optional cable (code 640560).
DUCTING KIT (code 758510) to be installed by the Authorised Technical Assistance Centre
KIT 11 for channelling hot air into an adjacent room, with max channelling pipe length 1.5 m (code 645700).
KIT 11 BIS for channelling hot air into a non-adjacent room, with max channelling pipe length 5 m (code 645710).
REMOTE CONTROL code 633280
CLEANING ACCESSORIES
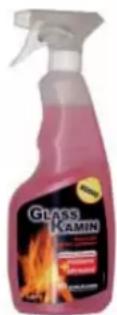
GlassKamin
Used for cleaning the ceramic glass
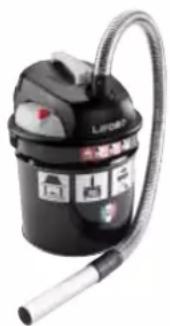
natural_image
Black and white photo of a LIP30 vacuum cleaner with attached hose and control panel (no visible text or symbols)Ash vacuum cleaner
User for cleaning the hearth
Madame / Monsieur
natural_image
3D mechanical assembly diagram showing red housing and internal components (no text or symbols)APPAREILS ÉLECTRONIQUES
natural_image
Close-up of a mechanical device with paper and wire, no visible text or symbolsCARACTÉRISTIQUES
EVACUATION DES FUMEES
CANALISATION DE L'AIR CHAUD
KIT 11 BIS (code 645710) POUR CANALISER L'AIR CHAUD DANS UNE PIÈCE ÉLOIGNÉE, OUTRE CELLE OÙ LE POÊLE EST INSTALLÉ
INSTRUCTIONS D'UTILISATION
natural_image
3D model of a red and black electronic device with open lid and ventilation slots (no text or symbols visible)fig.1
INDICATION DE L'ÉCRAN
FONCTIONNEMENT MANUEL
natural_image
Black remote control device with digital display and control buttons (no visible text or symbols)
natural_image
Close-up of a dark, curved mechanical component with a small circular feature and red arrow pointing to it (no text or symbols visible)Photo "A"
natural_image
3D rendering of a mechanical device with open door and internal component, labeled 'fig. A' (no readable text or symbols on the device itself)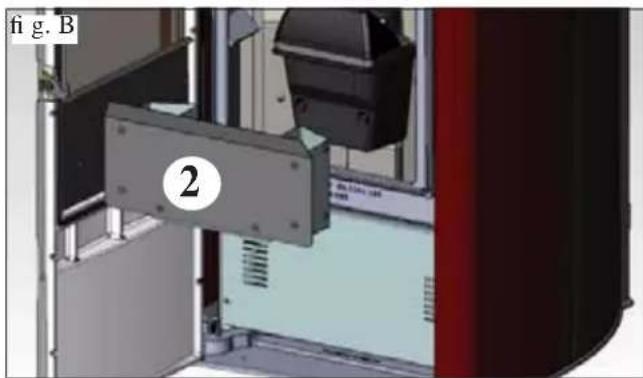
natural_image
Industrial machine component with labeled part '2' and view indicator 'fig. B' (no readable text or symbols beyond labels)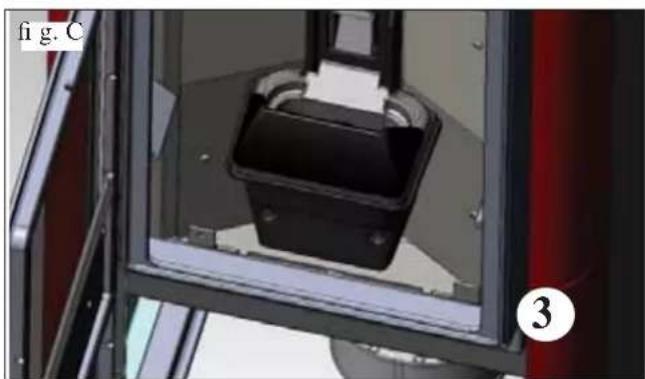
natural_image
Close-up of a mechanical device with a black housing and red components, labeled 'fig. C' and numbered '3' (no readable text or symbols on the device itself)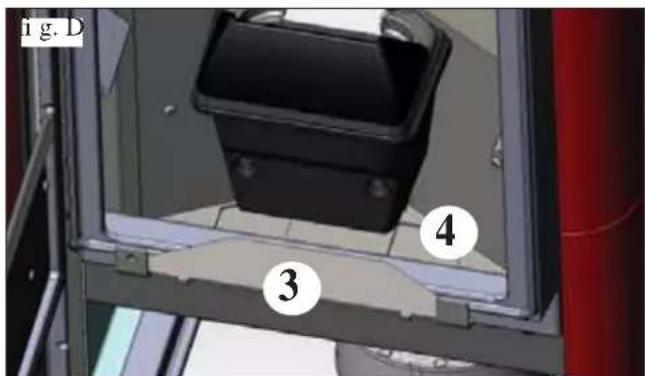
natural_image
3D mechanical assembly diagram showing a bracket with a labeled component (5), no readable text or symbols present.ENTRETIEN
natural_image
3D CAD model of a mechanical device with internal components and mounting holes (no text or symbols visible)fig.2
CONSEILS EN CAS D'ÉVENTUELS INCONVÉNIENTS
8) Signalisation: "Bat. 1"
natural_image
Black and white photo of a vacuum cleaner with attached pipe and control panel (no visible text or symbols)natural_image
3D mechanical assembly diagram showing red housing and internal components (no text or symbols)natural_image
Close-up of a mechanical component with wires and a paper sheet, no visible text or symbolsCARACTERÍSTICAS


INSTRUCCIONES DE USO
natural_image
3D rendering of a red and black portable food appliance with open lid and ventilation slots (no text or symbols visible)fig.1
INSTRUCCIONES DE USO
PANEL SINÓPTICO
INDICACIONES DEL DISPLAY
natural_image
Black handheld electronic device with control buttons and a 'HUA CHUX' logo (no visible text beyond branding)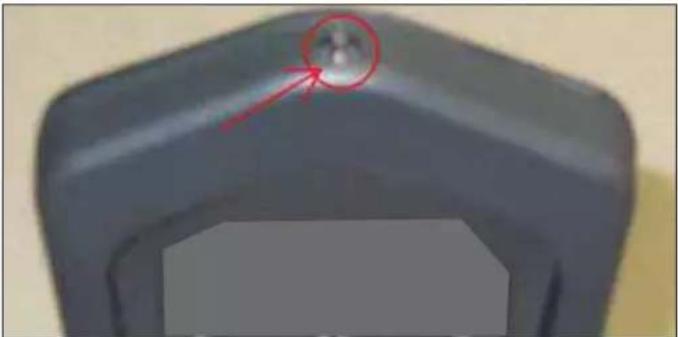
natural_image
Close-up of a dark mechanical component with a red arrow pointing to a small circular feature on top (no text or symbols visible)Foto "A"
natural_image
3D rendering of a mechanical device with open door and internal components, labeled 'fig. A' (no readable text or symbols on the device itself)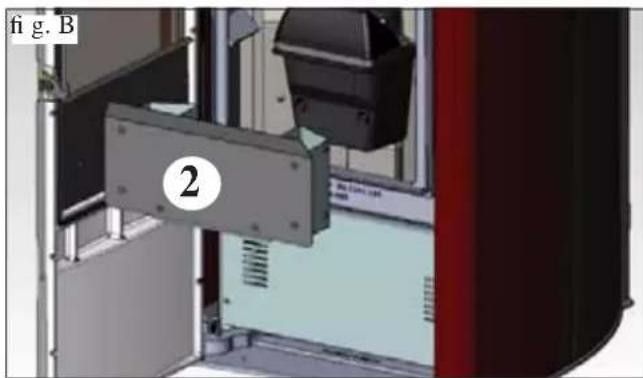
natural_image
Mechanical assembly diagram showing a component labeled '2' and part identifier 'fig. B' (no readable text or symbols beyond labels)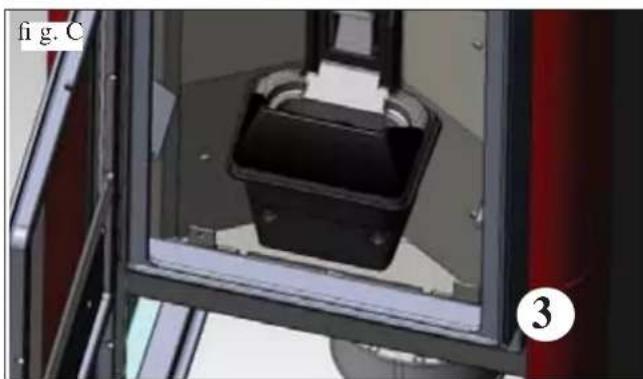
natural_image
Close-up of a mechanical device with a black housing and transparent frame, labeled 'fig. C' and circled number 3 (no readable text or symbols on the device itself)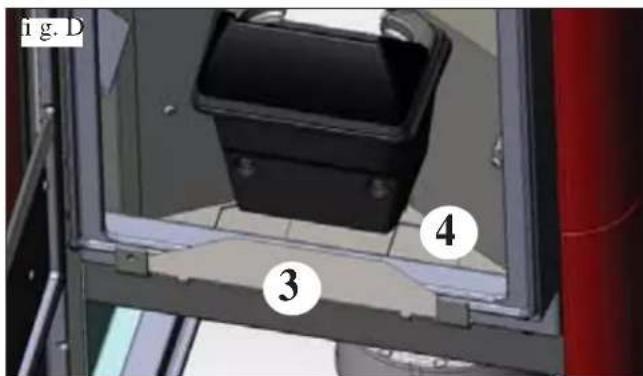
natural_image
3D mechanical assembly diagram showing a bracket with a labeled component (5), no readable text or symbols present.MANTENIMIENTO
natural_image
3D CAD model of a mechanical device with internal components and mounting holes (no visible text or symbols)fig.2
CONSEJOS PARA POSIBLES INCONVENIENTES
natural_image
Black and white photo of a vacuum cleaner with attached hose and control panel (no visible text or symbols)natural_image
3D mechanical assembly showing a red battery housing with internal components and mounting holes (no text or symbols visible)ELEKTROAPPARATE
• PLATINE
natural_image
Close-up of a mechanical component with wires and a plastic housing (no visible text or symbols)MERKMALE
KANALISIERUNG DER WARMLUFT
GEBRAUCHSANWEISUNG
natural_image
3D rendering of a red portable air conditioner unit with open lid and ventilation slots (no text or symbols visible)Abb. 1
DISPLAY ANZEIGE
natural_image
Black handheld electronic device labeled 'TECH CLNX' with control buttons and a power button (no visible text beyond branding)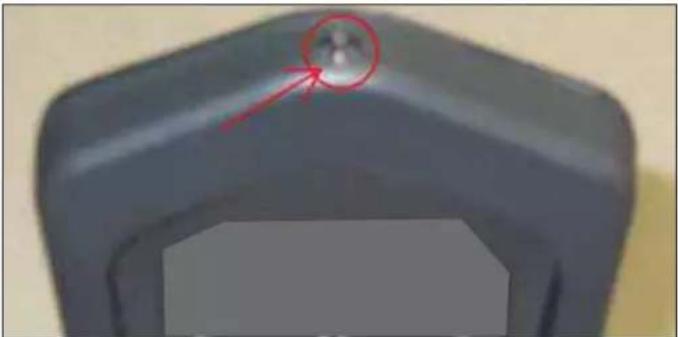
natural_image
Close-up of a dark mechanical component with a red arrow pointing to a small circular feature on top (no text or symbols visible)Foto "A"
natural_image
Exterior view of a laboratory apparatus with a labeled component (1) and open door, no readable text or symbols beyond label.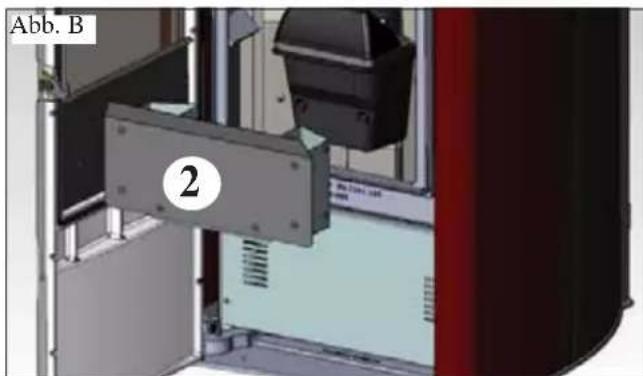
natural_image
Close-up of a mechanical device with a black housing and labeled section (3), no readable text or symbols beyond labels
natural_image
3D mechanical assembly diagram showing a bracket with labeled part '5' and label 'Abb. E' (no readable text or symbols beyond labels)WARTUNG
natural_image
3D CAD model of a mechanical device with internal components and mounting holes (no text or symbols visible)Abb. 2
TROUBLE SHOOTING
natural_image
Black and white photo of a vacuum cleaner with attached hose and control panel (no visible text or symbols)natural_image
3D mechanical assembly diagram showing red housing and internal components (no text or symbols)ELEKTRONISCHE APPARATEN
natural_image
Close-up of a mechanical component with wires and a paper sheet, no visible text or symbolsEIGENSCHAPPEN
KANALISATIE WARME LUCHT
KIT 11 BIS (code 645710) VOOR HET KANALISEREN VAN WARME LUCHT IN EEN VERDER GELEGEN RUIMTE, BOVENOP DEZE VAN INSTALLATIE
GEBRUIKSAANWIJZING
natural_image
3D model of a red portable food appliance with open lid and ventilation slots (no text or symbols visible)Afb. 1
OPMERKING over de brandstof.
AANDUIDING OP HET DISPLAY
natural_image
Black remote control device with digital display and control buttons (no visible text or symbols)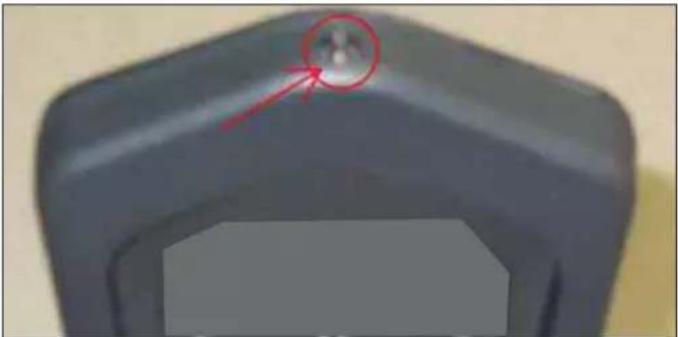
natural_image
Close-up of a dark gray plastic object with a red arrow pointing to a small circular feature on top (no text or symbols visible)Foto "A"
natural_image
3D rendering of a laboratory apparatus with open doors and a labeled component (1), no visible text or symbols beyond the label.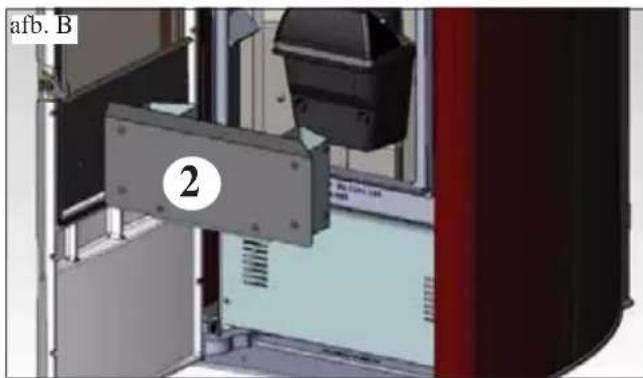
natural_image
Industrial machine component with labeled part '2' and identifier 'afb. B' (no readable text or symbols beyond labels)
natural_image
Close-up of a mechanical device with a black housing and labeled part 'afb. C' (no readable text or symbols beyond labels)
natural_image
3D mechanical assembly diagram showing a bracket with labeled component '5' and part identifier 'afb. E' (no readable text or symbols beyond labels)ONDERHOUD
SEIZOENSGEBONDEN ONDERHOUD
natural_image
3D CAD model of a mechanical device with internal components and mounting holes (no text or symbols visible)afb.2
ADVIES VOOR MOGELIJKE PROBLEMEN
natural_image
Black and white photo of a vacuum cleaner with attached tubing (no visible text or symbols)Aszuiger
natural_image
3D diagram of a red battery housing with internal components and mounting holes, labeled 'fi g. 1' (no text or symbols on the diagram itself)APARELHOS ELETRÓNICOS
• FICHA ELECTRÓNICA
natural_image
Close-up of a mechanical component with wires and a rectangular housing (no visible text or symbols)CARACTERÍSTICAS
INSTRUÇÕES DE USO
natural_image
3D rendering of a red and black electric stove with open lid and ventilation grilles (no text or symbols visible)fig.1
INSTRUÇÕES DE USO
PAINEL SINÓPTICO
INDICAÇÕES DO DISPLAY
Pressionar as teclas e pressionar SET.


natural_image
Black handheld electronic device with control buttons and a 'Hear USA' logo (no visible text or symbols on body)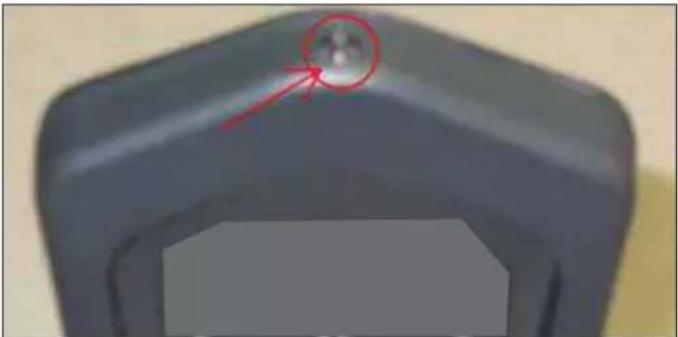
natural_image
Close-up of a dark mechanical component with a red circle highlighting a small circular feature, no visible text or symbols.Foto "A"
natural_image
3D rendering of a mechanical device with open door and internal component, labeled 'fig. A' (no readable text or symbols)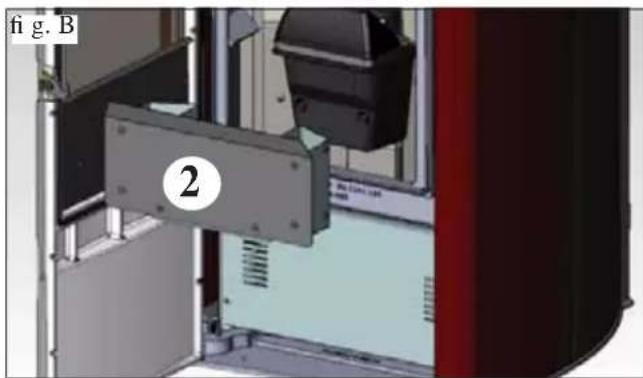
natural_image
Industrial machine component with labeled part '2' and figure marker 'fig. B' (no readable text or symbols beyond labels)
natural_image
Close-up of a mechanical device with a black component and paper inside, enclosed in a transparent frame (no visible text or symbols)
natural_image
3D mechanical assembly diagram showing a bracket with labeled part 5 (no text or symbols beyond label)MANUTENÇÃO
natural_image
3D CAD model of a mechanical device with internal components and mounting holes (no text or symbols visible)fig.2
CONSELHOS PARA POSSÍVEIS INCONVENIENTES
natural_image
Black and white photo of a vacuum cleaner with attached hose and control panel (no visible text or symbols)Balde para aspirar
natural_image
3D model of a red battery pack with internal compartments and mounting holes (no text or symbols visible)CECHY TECHNICZNE
• KARTA ELEKTRONICZNA
natural_image
Close-up of a mechanical device with wires and components, no visible text or symbolsCECHY TECHNICZNE
DYSTRYBUCJA GORĄCEGO POWIETRZA
ZESTAW KIT 11 BIS (kod 645710)
DO DOPROWADZENIA GORĄCEGO POWIETRZA DO ODLEGŁEGO POMIESZCZENIA POZA TYM, W KTÓRYM ZAINSTALOWANE JEST URZĄDZENIE
Skład
INSTRUKCJA OBSŁUGI
natural_image
3D rendering of a red portable air conditioner unit with open lid and ventilation slots (no text or symbols visible)rys. 1
WSKAZANIA NA WYŚWIETLACZU
natural_image
Black handheld electronic device with control buttons and a display screen (no visible text or symbols)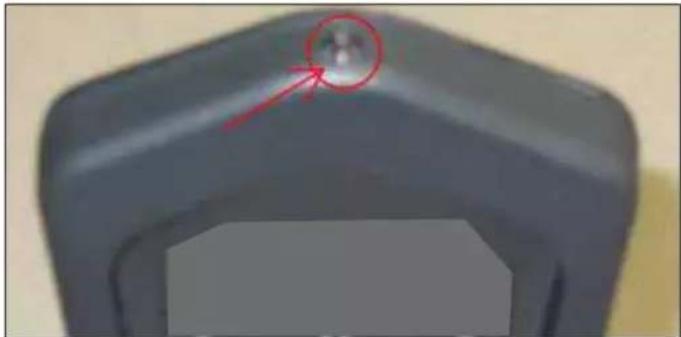
natural_image
Close-up of a dark mechanical component with a red arrow pointing to a small circular feature on top (no text or symbols visible)Foto "A"
natural_image
3D rendering of a laboratory apparatus with a labeled component (1) and 'rys. A' label, no readable text or symbols beyond the label.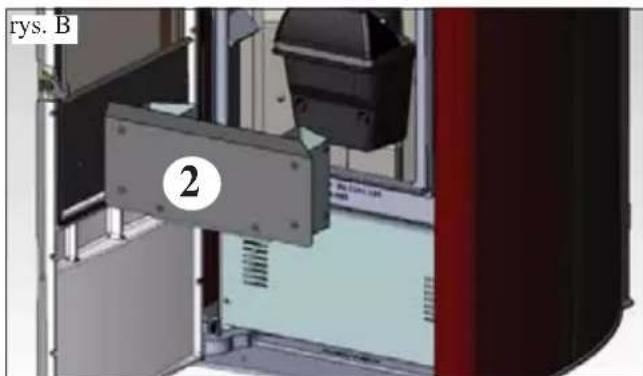
natural_image
Close-up of a mechanical device with a black housing and labeled component 'rys. C' (no readable text or symbols beyond labels)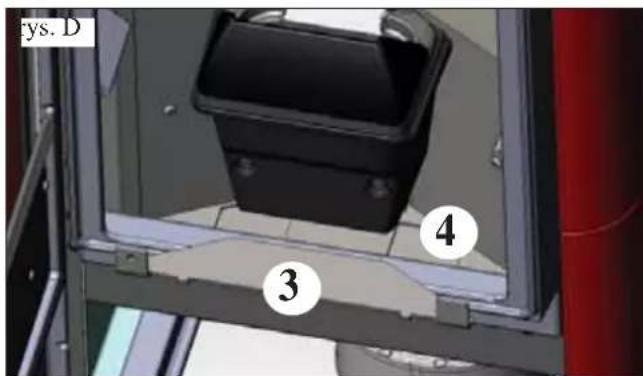
natural_image
3D mechanical assembly diagram showing a bracket with labeled part '5' and reference marker 'rys. E' (no readable text or symbols beyond labels)KONSERWACJA
KONSERWACJA SEZONOWA
natural_image
3D CAD model of a mechanical device with internal components and mounting holes (no visible text or symbols)rys. 2
PORADY W PRZYPADKU WYSTĄPIENIA NIEPRAWIDŁOWOŚCI
WYPOSAŻENIE DODATKOWE
KOMBINATOR TELEFONICZNY DO ZDALNEGO ROZPALANIA PIECYKA (kod. 762210)
natural_image
Black and white photo of a LIFO2 vacuum cleaner with attached tubing (no visible text or symbols)
- CARATTERISTICHE
- • SCHEDA ELETTRONICA
- CANALIZZAZIONE ARIA CALDA
- KIT 11 BIS (cod. 645710)
- ISTRUZIONI D'USO
- PANNELLO SINOTTICO
- MANUTENZIONE
- CONSIGLI PER POSSIBILI INCONVENIENTI
- NOTE
- - the proof of purchase tag, necessary for identifying the stove, is located:
- SAFETY INFORMATION
- ASSEMBLY OF THE TOP
- CHARACTERISTICS
- • ELECTRONIC EQUIPMENT
- SAFETY DEVICES
- • THERMOCOUPLE:
- • PRESSURE SWITCH
- • SAFETY THERMOSTAT:
- SERIAL PORT
- BACKUP BATTERY
- FUSE \*
- N.B.
- VERIFY COMPATIBILITY WITH OTHER DEVICES
- VERIFYTHE POWER SUPPLY CONNECTION (the plug must be accessible)
- FIRE PREVENTION SAFETY DISTANCES
- AIR INTAKE
- SMOKE OUTLET
- CHIMNEY POT
- HOT-AIR DUCTWORK
- DIDA STOVE TO DIDA PLUS STOVE CONVERSION KIT (optional code 758510)
- KIT 11 (code 645700)
- TO CHANNEL HOT AIR INTO AN ADJACENT ROOM IN ADDITION TO THAT OF INSTALLATION
- NOTE:
- Procedure:
- KIT 11 BIS (code 645710)
- TO CHANNEL HOT AIR INTO A REMOTE ROOM IN ADDITION TO THAT OF INSTALLATION
- INSTRUCTIONS FOR USE
- LOADING THE PELLETS IN THE HOPPER
- ATTENTION:
- NOTE regarding the fuel.
- diameter: 6 millimetres
- maximum length: 40 mm
- CONTROL PANEL
- DISPLAY INDICATIONS
- SCREW FILLING.
- IGNITION
- SWITCHING OFF
- MANUAL MODE
- AUTOMATIC MODE
- COMFORT CLIMA FUNCTION
- REMOTE ACTIVATION FUNCTION (AUX port)
- VENTILATION ADJUSTMENT
- SETTING: CLOCK AND WEEKLY PROGRAMMING
- - Example of programming
- REMOTE CONTROL code 633280
- INFORMATION FOR USERS
- MAINTENANCE
- DAILY MAINTENANCE
- WEEKLY MAINTENANCE
- (implemented by the DEALER)
- ATTENTION !!!
- POSSIBLE TROUBLESHOOTING
- INDICATION OF POSSIBLE CAUSES OF MALFUNCTION AND INDICATIONS AND REMEDIES:
- IMPORTANT!!!
- DO NOT ATTEMPT TO PUT THE FIRE OUT WITH WATER!
- CHECK LIST
- To be integrated with a complete reading of the technical specifications
- Positioning and installing
- Use
- OPTIONAL
- TELEPHONE DIALLER FOR REMOTE IGNITION (code 762210)
- CLEANING ACCESSORIES
- APPAREILS ÉLECTRONIQUES
- CARACTÉRISTIQUES
- EVACUATION DES FUMEES
- CANALISATION DE L'AIR CHAUD
- INSTRUCTIONS D'UTILISATION
- INDICATION DE L'ÉCRAN
- FONCTIONNEMENT MANUEL
- ENTRETIEN
- CONSEILS EN CAS D'ÉVENTUELS INCONVÉNIENTS
- CARACTERÍSTICAS
- INSTRUCCIONES DE USO
- PANEL SINÓPTICO
- INDICACIONES DEL DISPLAY
- MANTENIMIENTO
- CONSEJOS PARA POSIBLES INCONVENIENTES
- ELEKTROAPPARATE
- • PLATINE
- MERKMALE
- KANALISIERUNG DER WARMLUFT
- GEBRAUCHSANWEISUNG
- DISPLAY ANZEIGE
- WARTUNG
- TROUBLE SHOOTING
- ELEKTRONISCHE APPARATEN
- EIGENSCHAPPEN
- KANALISATIE WARME LUCHT
- KIT 11 BIS (code 645710) VOOR HET KANALISEREN VAN WARME LUCHT IN EEN VERDER GELEGEN RUIMTE, BOVENOP DEZE VAN INSTALLATIE
- GEBRUIKSAANWIJZING
- OPMERKING over de brandstof.
- AANDUIDING OP HET DISPLAY
- ONDERHOUD
- SEIZOENSGEBONDEN ONDERHOUD
- ADVIES VOOR MOGELIJKE PROBLEMEN
- APARELHOS ELETRÓNICOS
- • FICHA ELECTRÓNICA
- INSTRUÇÕES DE USO
- PAINEL SINÓPTICO
- INDICAÇÕES DO DISPLAY
- MANUTENÇÃO
- CONSELHOS PARA POSSÍVEIS INCONVENIENTES
- CECHY TECHNICZNE
- • KARTA ELEKTRONICZNA
- DYSTRYBUCJA GORĄCEGO POWIETRZA
- ZESTAW KIT 11 BIS (kod 645710)
- DO DOPROWADZENIA GORĄCEGO POWIETRZA DO ODLEGŁEGO POMIESZCZENIA POZA TYM, W KTÓRYM ZAINSTALOWANE JEST URZĄDZENIE
- INSTRUKCJA OBSŁUGI
- WSKAZANIA NA WYŚWIETLACZU
- KONSERWACJA
- KONSERWACJA SEZONOWA
- PORADY W PRZYPADKU WYSTĄPIENIA NIEPRAWIDŁOWOŚCI
- WYPOSAŻENIE DODATKOWE
Brand : EDILKAMIN
Model : DIDA
Category : Pellet stove