ACP1250 - Camcorder SALORA - Free user manual and instructions
Find the device manual for free ACP1250 SALORA in PDF.

User questions about ACP1250 SALORA
0 question about this device. Answer the ones you know or ask your own.
Ask a new question about this device
Download the instructions for your Camcorder in PDF format for free! Find your manual ACP1250 - SALORA and take your electronic device back in hand. On this page are published all the documents necessary for the use of your device. ACP1250 by SALORA.
USER MANUAL ACP1250 SALORA
Operational precautions
- This product is a high-precision product, pleased on to drop or hit.
- Pleasedonotplacethecameraclosetoobjectswithstrongmagneticfields, suchasmagnets andmotors, and also avoid placing the product closetoobject that temit strongradiowaves.
Strongmagneticfieldsmaycauseproductfailure,ordamageimagesandsounds. - Please select the brand's MicroSdcard, ordinary card cannot be guaranteed to work normally.
- Pleasedonot storetheMicroSdcardinornearastrongmagnettoavoidlosingthestored dataintheMicroSdcard.
- During the charging process, if there is overheating, smoke, orodor, please unplug the power immediately and stop charging to avoid fire.
- When charging, please keep the product out of reach of children. The power cord may cause accidentalsuffocationorelectric shock to children.
- Please placethe product in a cool, dry and dusty-free place.
ProductFeatures
Videoresolutionupto4K@30fps
wide-anglelens
UltraHD2.0inch+1.3inchscreen
The battery is detachable, it is easy to replace the battery and prolong the service life.
Supportforupto128GMicroSdmemorycard
Multiplevideorecordingformat:4K,2.7K,1080P,720P
Multipleshootingmodes:single,timing,auto,Burst
Multiplevideomodes:normal,loop,time-lapse,slowmotion
ProductSchematicDiagram
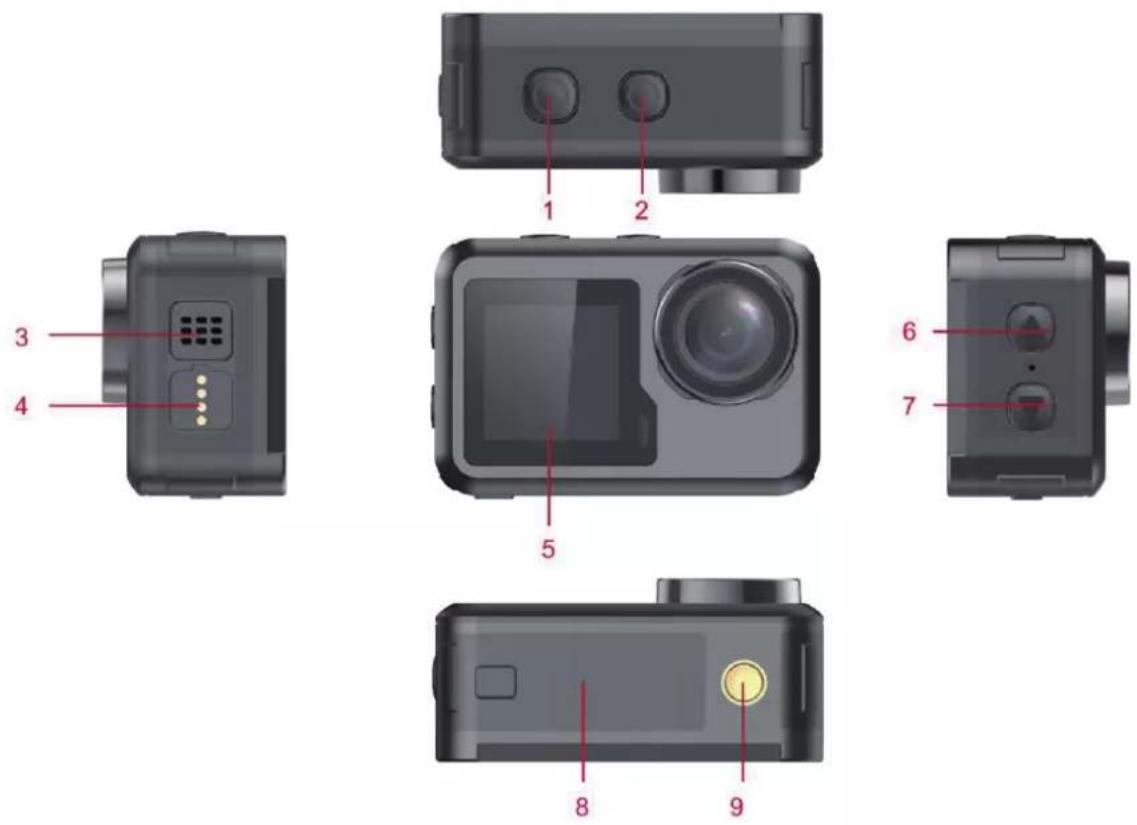
10Kbutton2Modebutton
3Speaker4Magneticcharginginterface
51.3inchscreen6Upbutton
7Downbutton8Batterycover
9Supportinterface
MicroSdmemorycardisnotincluded
FunctionDefinition
Modebutton
- Pressandholdthe "Modebutton" for 2-3 secondstopoweron/off.
2.Shortpressthiskeyafterpowerontoswitchbetweenvideo/photo/menumodes.
3.Shortpressonthemenuinterfacetoreturntothepreviousmenuorexit.
OKbutton
- Inrecordingmode, shortpressto startrecording, shortpressagaintostoprecording.
2.ShortpressOKbuttontotakephotoinphotomodel.
3.ShortpressOKbuttoninplaybackmodetoplayvideo.
4.ShortpressOKbuttonontoconfirmoptioninsettingsmenu.
5. Invideoorphotomode, pressandholdOKbuttontoopenthemulti-functionsettinginterface, andsetdifferentphotoorvideomodes.
Upbutton
- Invideorecordingmode, shortpressUPbuttontoturnonplaybackmode.
- In playback mode, short press Up button to scroll through videos or photos.
- In Menu setting mode, short press Up button to select the setting item in the menu.
Downbutton
- In playback mode, short press Down button to scroll through videos or photos.
- In Menusettingmode, shortpress Downbutton to select these setting item in the menu.
- Inphotoorvideomode, ShortpressDownbuttontoturnon/offWIFI.
- Inphotoorvideomode, longpressDownbuttontoswitchbetween2.OinchScreenand1.3 inchscreen
Magneticcharginginterface
Usetheprovidedmagneticchargingcabletochargethecamera.
MicroSDcardslot
Support16-128GcapacityMicroSDcard.(Note:C10orab ovestandardhigh-speedcardshould beused.Pleaseformatitwiththismachinebeforestartingtouse)
Indicators
Workindicator:greenlight
Chargingindicator:redlight
Productmainfunctionintroduction
Camerasettings:
Press Mode button to switch to the setting interface, press the Mode button or up and down buttontoselectthesettingitem,andpresstheOKbuttontoopenthemenu.

1.Playbackmode: :
Afterentering playback mode, press the up/down button to select video album, photo album, Delete and Exit.
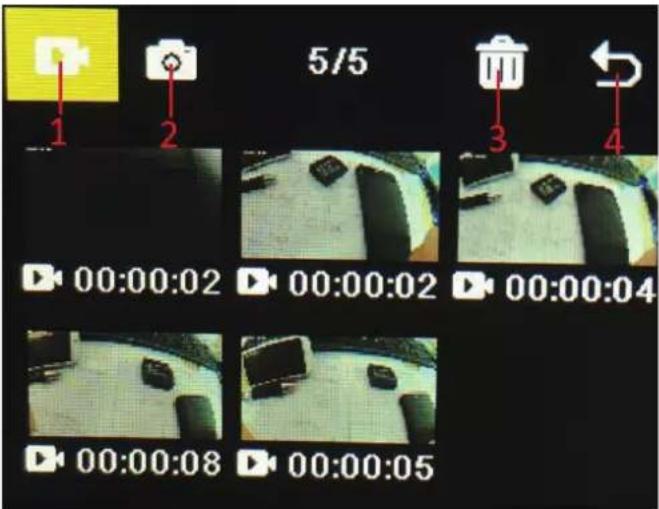
1) Video album: Select the video album icon, press Mode button to enter the video file selection, pressup/downtoselect,andpressOKbuttontoplaythevideo.Whenavideoisplaying,press theOKbuttontoplay/pauseit,andpresstheModebuttonontoexit.PresstheModebuttonto returntoalbumselection.
2) Photoalbum: Select the photoalbum icon and press OK button oopenthe album, press Mode button to enter the photofile selection, press up and downtoselect, press OK button to display photos in full screen, and press up/downtobrowse. Press the Mode button to return to album selection.
3) Delete: Afteropeningthevideoorphotoalbum, presstheup/downbuttontoselect the deletefunction, thenpressthemodebuttonontoenterthecorrespondingalbumtoselect thefile tobedeleted, presstheup/downbuttontoselect, presstheOKbutto ntoconfirm, and finally press the mode button to enter the delete operation. You can choose to delete selected and deleteall.
4) ExitplaybackMode
2.SettingsMenu
Enterthemenuinterfaceafterselectingvideosettingsorcamerasettings
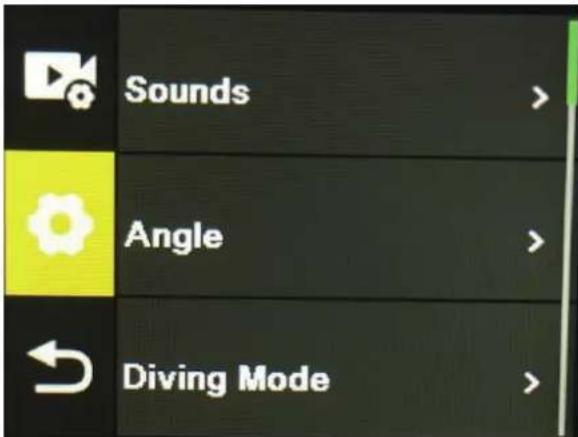
Onthemenuinterface,presstheup/downbuttontoswitchbetweendifferentsettingmenus:
Current mode setting→Camera system setting→Exit. Press OK button to enter the lower menu.
Presstheupanddownbuttonstoselectthesettingitem,presstheOKbuttonontoconfirm,press
themodebuttontorentorturntotheupperlevelorexit.
Videorecordingfunction
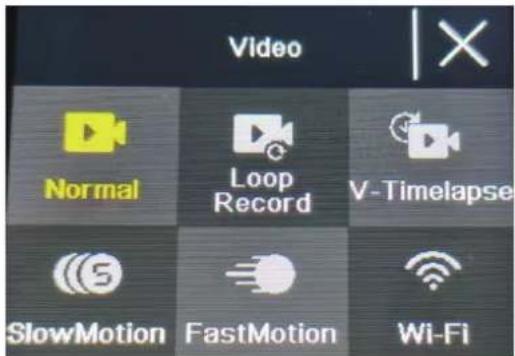
Normalrecording
In recording mode, short press OK button to start recording. At this time, the recording duration is showing. Shortpressthe"OKbutton"again, the camerastopsrecordingandsavesthefile.
Looprecording
On the photo and videomodeselection interface, select loop recording. After entering loop recording mode, the loop recording icon will be displayed in the upper left corner of the screen.
Inthelooprecordingmenu,youcansetthelength(1minute,3mi nutes,5minutes)andvideo
resolution of each video in the loop recording, press the "OK button" to start the loop recording.
Time-lapsevideo
Selecttime-lapsevideoonthephotoandvideomodeselectioninterface.Afterenteringthe time-lapse video mode, the time-lapse video icon will be displayed in the upper left corner of the screen.Time-lapserecordingparameters(1second,3seconds,5seconds,10seconds,30
seconds,1minutes)andvideoresolutioncanbesetin thetime-lapserecordingmenu,andpress
"OK"tostarttime-lapserecording.
Slowmotionvideo
Selectslowmotionvideoonvideomodeselectioninterface.Afterenteringtheslowmotionvideomode,theslowmotioniconwillbedisplayedintheupperleftcornerofthescreen,andpressthe"OKbutton"tostartrecording.
Photofunction
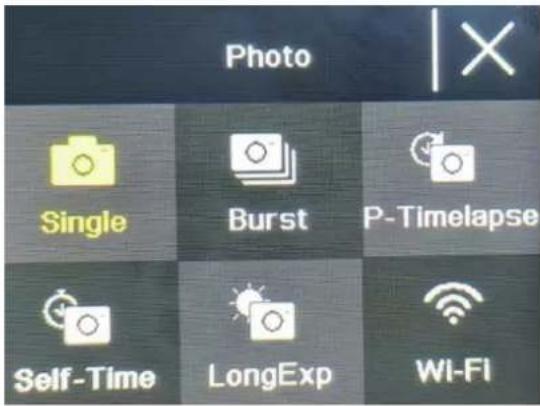
Ordinaryphoto
Select the photomode in the photo and videomodes election interface. After entering the photo mode, the photo icon will be displayed in the upper left corner of the screen. You can set the photopixels (20M, 16M, 14M, 10M, 8M, 5M, 2M) and other parameters in the photomode menu. Press "OK" to take a photo.
Self-timephoto
Selecttheself-timephotomodeonthephotoandvideomodeselectioninterface.Afterentering theself-timephotomode,theself-timephotoi conwillbedisplayedintheupperleftcornerof thescreen.Youcansetthetimertime(2s,5s,10s)intheself-timephotomodemenu.Pressthe "OKbutton"tostartthecountdownandtakeaphotowhenthetimerends.
BurstPhoto
Select the burst photo mode in the photo and video mode selection interface. After entering the burstphotomode,theburstphotoiconwillbedisplayedintheupperleftcornerofthescreen. 3p/s,7p/s,15p/s,30p/s).Pressthe"OKbutton"andthecamerac ontinuouslyemitsa"click"sound andthebluelightflashes.
(Note: The cameraneedsacertainperiodoftimetostorephotosduringburstphoto, and it cannot take another photos by pressing the "OKbutton" before the storage ends.)
TimelapsePhoto
Selectthetimelapsephotomodeinthephotoandvideomodeselectioninterface.Afterentering the timelapse photo mode, the timelapse photo icon will be displayed in the upper left corner of thescreen.Thephotointervaltime (3s,5s,10s,15s,30s,60s)canbesetinthetimelapsephoto mode menu. Press the "OK button" to start taking pictures continuously according to the set time interval,andpressthe"OKbutton"againtostop.
WiFiandAPPFunction
APPdownload
For Android system, please search "iSmart DV2" in the Google APP store to download and install. For iOS system, search "iSmartDV2" in AppleWebKit Store to download and install.
OpenWIFI
In the video mode or photo mode, press the "down button" to turn on the WIFI, the camera enters the WIFI interface, and displays the WIFI name "ActionCam-XXXX" and the WIFI password "12345678". Find the corresponding WIFI name of the camerain the phone WIFI setting to connect to WIFI.
APPOperation
After the mobile phone is connected to the camera WIFI, open the APP and enter the APP home page.
A) Click to add a new camera → WI-FI Connect to enter the APP operation interface
B) Click "Offline Album" to enter the APP offline album, the pictures and videos downloaded from thecamerasidealbumontheAPParesavedhere.
APPoperationinterfacefunctionintroduction
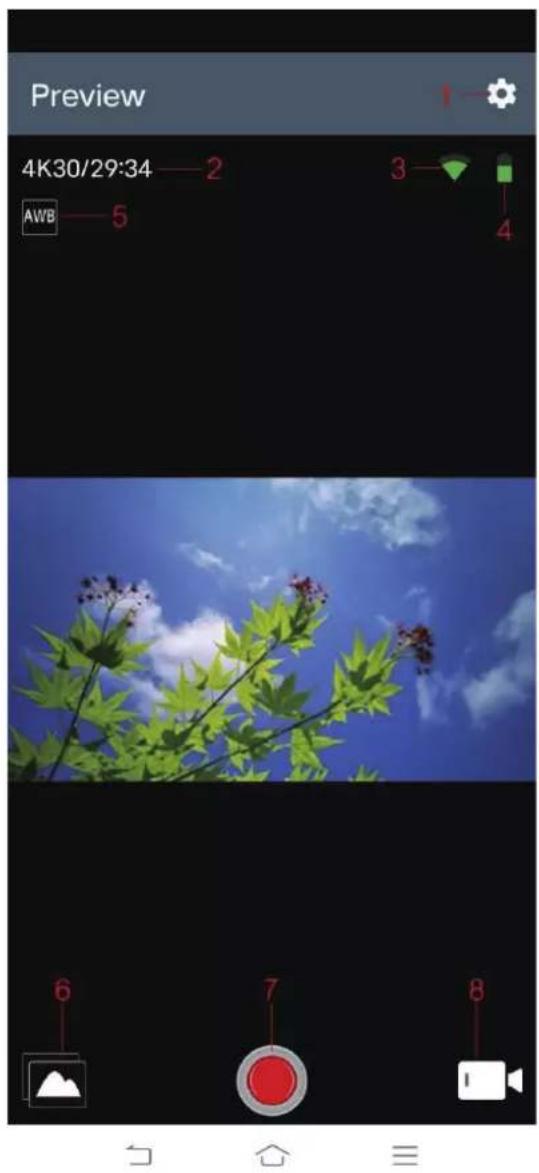
1Setting2Resolution
3WIFISignal4Batterycapacity
5Whitebalance6Album
7Shutter8Videomodeselection
Spec
| FunctionmodeRecording,photo, playback.... | |
| LCDscreen2.0inch+1.3inchScreen | |
| Picture resolution | 20M,16M,14M,10M,8M,5M,2M |
| Videoresolution4K,2.7K,1080P,720P | |
| Storage medium | Micro SD Card (Maximum supporting 128GB) |
| FileformatJPG/MOV | |
| USBPortUSB2.0 | |
| PowersupplyBuilt-in | 3.7Vrechargeablelithiumbattery |
| MenulanguageEnglish/Spanish...... | |
natural_image
Digital camera module with a underwater photo of a person swimming in the ocean, lens visible, and brand logo (SALORA ACP1150) on the right.Gewonefoto
Selecteerdefotomodusinhetfoto-envideomenu.Nahetselecterenvandefotomodus, wordthetfotopictogramweergegevenindelinkerbovenhoekvanhetscherm.Ukuntde fotoresolutie(20M,16M,14M,10M,8M,5M,2M)enandereparametersinstelleninhet fotomenu.Drukop"OK"omeenfototemaken.