
PSC5300FW - Camcorder SALORA - Free user manual and instructions
Find the device manual for free PSC5300FW SALORA in PDF.


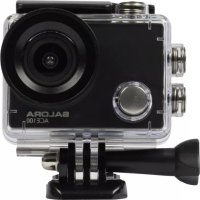
| Product Type | Camcorder (Wi-Fi DV) |
| Brand | Salora |
| Model | PSC5300FW |
| Video Resolution | FHD (1920x1080) at 30fps, 720p (1280x720) at 30fps, 720p (1280x720) at 60fps |
| Photo Resolution | 8 MP (3264x2448) and 5 MP (2592x1920) |
| Storage Medium | Micro SD/SDHC card (Class 4 or higher; Class 10 recommended for professional mode) |
| Display | LCD screen |
| Battery | Removable rechargeable lithium battery; charges via USB when device is off |
| Connectivity | Wi-Fi, micro USB, micro HDMI |
| Special Features | Wi-Fi remote control via SYMAGIX app (Android/iOS), infrared remote controller, webcam mode, U-disk mode, mute mode, continuous shot (3 photos), self-timer (0/2/10s) |
| Buttons | Shutter button, Power/Mode button, Wi-Fi switch |
| Indicators | Red status indicator (recording/connection), blue charging indicator, LED light |
| Audio | Built-in microphone, external microphone input |
| Infrared Receiver | Yes, for remote controller |
Frequently Asked Questions - PSC5300FW SALORA
User questions about PSC5300FW SALORA
0 question about this device. Answer the ones you know or ask your own.
Ask a new question about this device
Download the instructions for your Camcorder in PDF format for free! Find your manual PSC5300FW - SALORA and take your electronic device back in hand. On this page are published all the documents necessary for the use of your device. PSC5300FW by SALORA.
USER MANUAL PSC5300FW SALORA
Handleiding


Mode d'Emploi


User Manual
Thank you for buying our Wi-Fi DV. Before start using this product, please read this manual carefully to maximize its performance and extend the life of the product.
Appearance and Buttons
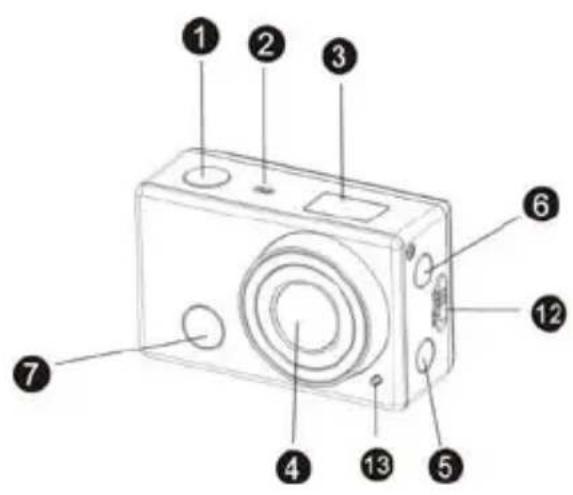
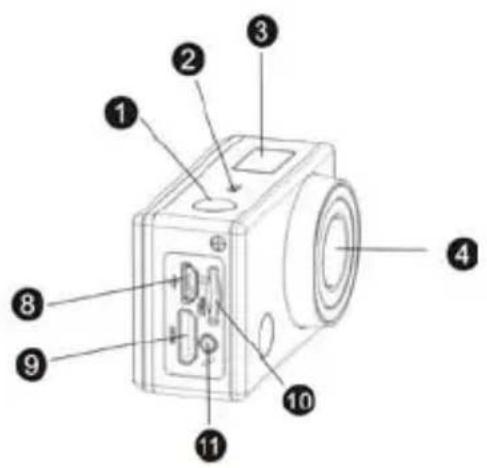
- Shutter button
- Microphone
- LCD display
- Lens
- Wi-Fi switch and status indicator (red)
- Power / Mode button
- Infrared signal reception light
- Micro USB port
- Micro HDMI port
- Micro SD card slot
- External microphone
- Battery cover push switch
- LED light
LCD Display Illustration
Turn on the Wi-Fi DV, the LCD will display the following status and settings:


- Camera mode
- Video recording mode (default)
- Wi-Fi icon (display when enabled)
- TF card icon (display when loaded)
- Resolution icon:
In camera mode, HI stands for 8 Mega Pixels (3264x2448), and in video recording mode, it stands for FHD (1920x1080,30fps);
In camera mode, LO stands for 5 Mega Pixels (2592x1920), and in video recording mode, it stands for 720P (1280x720,30fps);
HILO only displays in video recording mode, standing for 720P (1280x720,60fps).
- Mute mode, displays when enabled, and disabled by default.
- Counter, displays up to 999.
- Timer, displays hours and minutes.
- Battery icon: current battery level of the camera.
Note: The above icons may vary according to the status of the DV. Working Mode Flow Chart
After turn on the DV, you can press the Power/Mode button to switch the following modes in turn:

flowchart
graph TD
    A["Video preview mode (1080P default)"] --> B["Video mode (720P,30fps)"]
    B --> C["Video mode (720P,60fps)"]
    C --> D["Camera mode (8MP)"]
    D --> E["Camera mode (5MP)"]
In video mode, press the Shutter button to start recording, LED flash, and press it again to stop; In camera mode, press the Shutter button to take photo.
Use your Wi-Fi DV
When you use the DV for the first time, please:
- Insert a micro SD or micro SDHC card, as shown in the following picture.

High speed card at least Class 4 is recommended; When using time delay function or recording video in professional mode, the card of Class 10 is required. Turn off the DV before inserting or removing the card.
- Use the battery
2.1 Install the battery.
Please install the lithium battery correctly as shown in the following graphic.
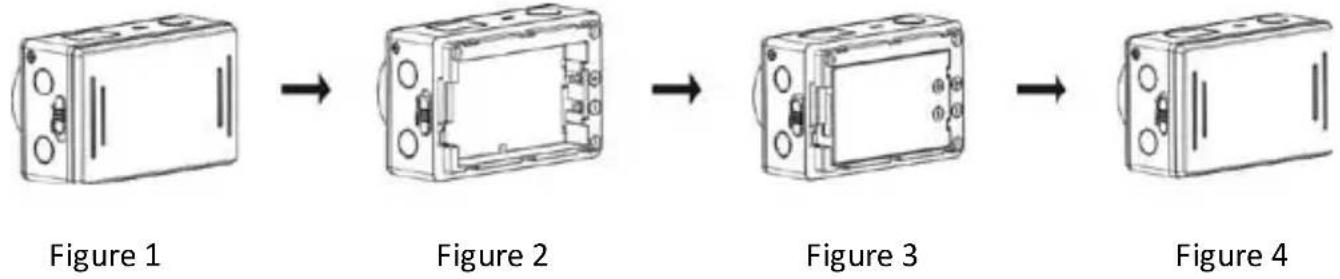

Step 1. Push the battery cover switch to the lock position(), and remove the battery cover.
As shown in figure 1.
Step 2. Put the lithium battery into the battery slot. Make sure the electrodes of the battery are

corresponding to the symbols of the DV shell( ). As shown in figure 2 and figure 3.

Step 3. Install the battery cover back in place, and lock the switch to the lock position( )to fix the battery. As shown in figure 4.
2.2 Charging the battery.
The DV uses removable rechargeable lithium battery. When the DV is off, connect it to the PC via
USB cable to charge the battery. During charging, the status indicator (blue) will light on, and the indicator off when charging completes.
Note: When the DV is on, connecting it to the PC will not charge.
Turn on/off
- Turn on: press and hold the button for about 3 seconds, LCD displays "ON" and a beep can be heard from buzzer.

9

- Turn off: press and hold the button for about 3 seconds, LCD displays "OFF" and a beep can be heard from buzzer.

Note: The DV will turn off automatically if it is idle for 5 minutes.
Start to Use
Default setting: After turn on the DV, the default setting is as below:

 | Video recording mode icon | The DV is in video recording mode. |
 | Video resolution | FHD: 1080p@30fps |
 | Recording time Stands for 0 hour and 00 minute. | |
 | TF card icon | Display when a TF card is inserted, otherwise no display. |
 | Battery level Battery is full | |
 | Mute icon | The DV is in Mute mode, no Beep will be heard when pressing the buttons. It displays only when Mute mode is activated. |
 | Wi-Fi icon | Display when activated. |
Shooting modes. The DV provides different shooting modes. Press the button is repeatedly, the following first two modes will show on the DV screen, and other models display on the APP operation.
 | Video | HI stands for FHD (1920x1080,30 fps) video |
| Lo stands for 720P (1280x720,30 fps) video | ||
| HILO stands for 720P (1280x720,60 fps) video | ||
 | Photo | HI stands for 8M (3264 x 2448) resolution |
| Lo stands for 5M (2592 x 1920) resolution | ||
 | Continuous shot | The DV supports taking 3 photos continuously (only via App) |
 | Self-timer | In self-timer mode, you can set 0s, 2s or 10s (only via App) |
1.

To record a video, please check whether the DV is under Video mode. If the icon is not displayed on the screen, press the button repeatedly until it appears.
Start recording: Press and release the button, the icon and [:] displayed in LCD will flash. At the same time the red indicator will flash too, meaning the recording is in process.
Stop recording: Press and release the button, the icon and [:] displayed in LCD will stop flashing. At the same time the red indicator will stop flashing either, meaning the recording
is stopped.
When the TF card is full, or the battery runs out, the recording will stop automatically, and the recorded video will be saved before the DV turns off.
2. Photo
To take a photo, please check whether the DV is under Camera mode. If the icon is not
displayed on the screen, press the button repeatedly until it appears.

Press and release the button, a beep will be heard and the red indicator will flash, meaning a photo is taken.(If you take photos more than 999 copies, the LCD screen display only 999)
3. Enable/disable Wi-Fi
The Wi-Fi is disabled by default. Press the Wi-Fi button on the side of the DV to enable it. When starting connecting to Wi-Fi network, the indicator will flash, and when a Wi-Fi network is connected, the indicator will remain on, and the Wi-Fi icon will display on LCD screen.( In order to save power, Wi-Fi will be automatically disabled if no terminal is connected after 30 seconds)


Wi-Fi icon will display on LCD
4. Enable/disable Mute mode
The buzzer is enabled by default. Under the Video or Photo mode, press and hold the Shutter button to disable the buzzer and indicator to enter Mute mode. Under Mute mode, the icon

will display on the screen; press and hold the Shutter button again to exit Mute mode.

5. Connecting to HDTV
5.1 Connect the DV to HDTV via HDMI cable (optional)
If you need to transfer the image and audio to an HDTV for playback, insert the Com end of the HDMI cable to the DV, and the other end (output) to the HD input of the HDTV, as shown in the following figure:
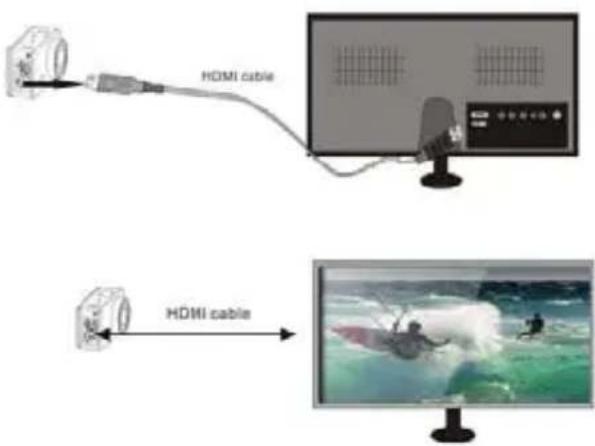
Note: Before connecting or removing the HDMI cable, please stop video recording, playback and disconnect Wi-Fi first.
5.2 When HDTV is connected, it enters Playback mode, the LCD displays as below:
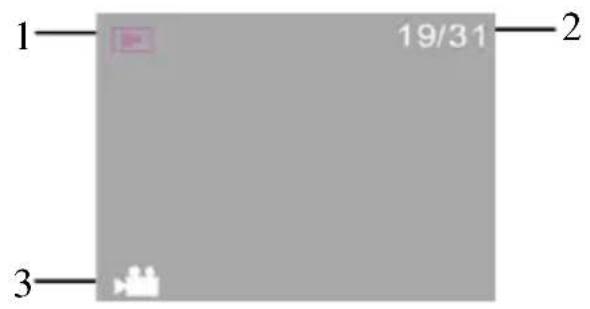
| S/N Icon name Description | ||
| 1 | Playback mode | Under Playback mode currently. |
| 2 | File number | There are 31 files and you are viewing the 19^th one. |
| 3 | Video icon | The file is a video. |

In Playback mode, press the Power button to switch between photos and videos. When
there are several photos or videos, press the Wi-Fi button to select the photo or video.
When a video file is selected, press the Shutter button to play it, and press the Shutter button again to stop playing.
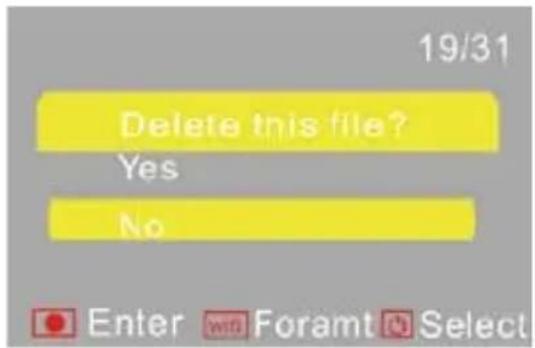
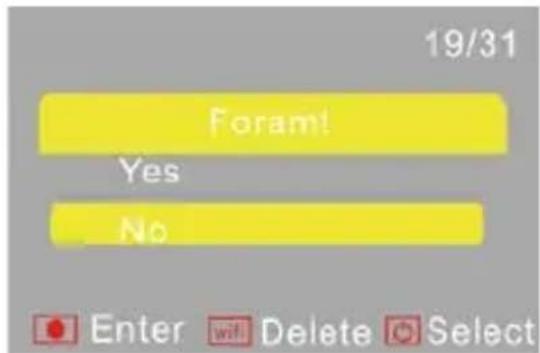
In Playback mode, press and hold the Shutter button y a prompt of deleting the file or formatting will appear. Press the Wi-Fi button to switch between deleting or formatting, then Press the Power button to select Yes or No, and press the Shutter button to confirm and exit.
6. Connecting to PC
6.1 Turn on the DV and connect it to the USB port of the PC via the attached USB cable. The DV will enter U-disk mode and the LCD will display as below after connection:
PCU
Now you can view the photos or videos taken by DV on PC.
Note: After the DV connecting to PC to enter U-disk mode, you will see two removable disks displayed in My computer of Windows, one is the TF card, storing all the photos taken and video recorded by users; the other one stores the system file information, including a file named SSID_PW.CFG, containing the AP ID of the DV and the password for AP login. Users can view these information but cannot modify, delete or format them.
6.2 In U-disk mode (PCU mode), press the Shutter button

to switch to web cam mode (PCC
mode), and the LCD will display as below:
PCC
Now you can start the web cam through application. To return to U-disk mode (PCU mode),
press the

button again.
Note: Driver is not required for web cam mode (PCC mode) on Windows XP(SP3) version or above.
Remote Controller Application
Buttons

Power off button
Photo button
Video button
Instruction
You can use the remote controller to record videos, take photos and shut down the DV. When using the remote controller, aim the signal emission port to the infrared signal reception light of the DV, and press the video button, photo button or power off button.

APP (support Android and iOS)
1. How to install an APP
1.1 Search for "SYMAGIX" in Google Play (for Android OS), or scan the QR code
printed on the gift box to find the APP and install it according to the instruction.
1.2 Search for "SYMAGIX" in APP Store (for iOS) or scan the QR code

printed on the gift box to find the APP and install it according to the instruction.
2. Android APP
2.1 Install SYMAGIX APP (provided by dealer or via internet) on Android phone or tablet. When

installation completes, the LCD will display icon
2.2 Insert the TF card and turn on the DV, then press the Wi-Fi button to enable it. Now you can see the Wi-Fi icon on the LCD.
2.3 Enable Wi-Fi on Android phone or tablet and search for wireless AP signal SALORAPSC5300FW _WIFI, then connect it to DV, until the system displays "Connected successfully".

2.4 Click the icon SYMAGIX in the App list of the Android phone or tablet to open it. Now you can preview the image sent by the DV on the phone or tablet and start some operating. The operation interface on terminal is shown in the following figure.
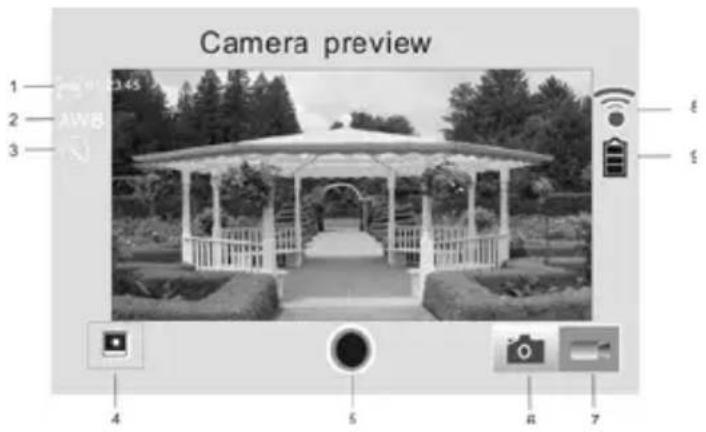
- Video resolution
- Photo mode
- White balance
- Video mode
- Setup (enter setup menu)
- Wi-Fi signal icon
- Enter Playback mode
- DV battery icon
- Shutter button
3. iOS APP
3.1 Install SYMAGIX APP (provided by dealer or via internet) on iOS phone or tablet. When

installation completes, the LCD will display icon SYMAGIX.
3.2 Insert the TF card and turn on the DV, then press the Wi-Fi button to enable it. Now you can see the Wi-Fi icon on the LCD.
3.3 Enable Wi-Fi on iOS phone or tablet and search for wireless AP signal SALORAPSC5300FW _WIFI, then connect it to DV, until the system displays "Connected successfully".

3.4 Click the iconSYMAGIX in the App list of the iOS phone or tablet to open it. Now you can preview the image sent by the DV on the phone or tablet and start some operating. The operation interface on terminal is shown in the following figure.

1.DV battery icon
2. Video resolution
3. White balance
4. Setup (enter setup menu)
5. Enter Playback mode
6. Shutter button
7. Photo mode
8. Video mode
Note:
- A TF card must be inserted if you need to take a photo, record a video, or download files on the terminal;
- The Wi-Fi indicator will remain on when the terminal is connected to DV.

- LCD Display Illustration
- Use your Wi-Fi DV
- When you use the DV for the first time, please:
- Start to Use
- Photo
- Enable/disable Wi-Fi
- Enable/disable Mute mode
- Connecting to HDTV
- Connect the DV to HDTV via HDMI cable (optional)
- Connecting to PC
- Remote Controller Application
- Buttons
- Instruction
- APP (support Android and iOS)
- How to install an APP
- Android APP
- iOS APP
- Note:
Brand : SALORA
Model : PSC5300FW
Category : Camcorder