
WP-DC23 - Camera CANON - Free user manual and instructions
Find the device manual for free WP-DC23 CANON in PDF.
| Product type | Waterproof case for Canon digital cameras |
| Brand | Canon |
| Model | WP-DC23 |
| Maximum underwater depth | 40 meters (130 feet) |
| Sealing | Sealing device, O-ring (conforms to JIS class 8 protection) |
| Materials | Polycarbonate, ABS, transparent glass plate, EPDM, etc. |
| External dimensions (excluding protruding parts) | 128.1 x 86.8 x 68.2 mm |
| Volume | Approximately 460 cm³ |
| Weight (case only, including diffusion plate) | Approximately 305 g |
| Camera operating temperature | 0 to 40 °C (32 to 104 °F) |
| Package contents | Waterproof case, collar, wrist strap, diffusion plate, silicone grease for seal, instruction manual |
| Accessories sold separately | Canon WW-DC1 waterproof case weight (1 weight recommended) |
| Main functions | Allows use of Canon camera underwater up to 40 m, at the beach, in rain, or on ski slopes. Features external controls: shutter release, zoom lever, power button, mode dial, function buttons. |
| Maintenance and cleaning | Wash the exterior with clean water (≤ 30 °C) after each use, especially in salt water. Wipe with a soft dry cloth. Do not wash the interior with water. |
| Safety | Do not use at depths exceeding 40 m. Do not leave in direct sunlight or near a heat source. Do not disassemble or modify. Use only the supplied silicone grease. |
| Spare parts and repairability | Replaceable O-ring (recommended once a year). Contact Canon customer service for any repair or part replacement. |
| O-ring | Apply a drop of silicone grease to the clean O-ring before each use. Do not use sharp objects to remove it. |
| General information | Manual available in French, English, German, Spanish, Italian, Chinese, Japanese. Compatible with compatible Canon camera series (refer to camera manual). |
Frequently Asked Questions - WP-DC23 CANON
User questions about WP-DC23 CANON
0 question about this device. Answer the ones you know or ask your own.
Ask a new question about this device
Download the instructions for your Camera in PDF format for free! Find your manual WP-DC23 - CANON and take your electronic device back in hand. On this page are published all the documents necessary for the use of your device. WP-DC23 by CANON.
USER MANUAL WP-DC23 CANON
natural_image
Close-up of a mechanical component with no visible text or symbolsnatural_image
Line drawings of two camera modules with no visible text or symbolstext_image
Diagram showing device status change with numbered instructions for opening a devicenatural_image
Technical line drawing of a mechanical assembly with no visible text or symbolsnatural_image
Technical line drawing of a mechanical device with no visible text or symbolsnatural_image
Diagram of a mechanical device with rotating components and circular elements (no text or symbols)撮影

text_image
Diagram showing a camera with a circular component being connected to a display case, with an inset close-up highlighting the lens mechanism.natural_image
Illustration of a car's front bumper with visible seatbelt and dashboard (no text or symbols)バックル
取り外しかた
手前に引いて取り外します。

natural_image
Line drawing of a hand holding a camera module with a black arrow indicating the adjustment (no text or symbols present)再生
text_image
Diagram of a device with numbered parts and an inset showing a device labeled 'Open' with control buttons.保管するときは
- While every effort has been made to ensure that the information contained in this guide is accurate and complete, no liability can be accepted for any errors or omissions. Canon reserves the right to change the specifications of the hardware and software described herein at any time without prior notice.
- No part of this guide may be reproduced, transmitted, transcribed, stored in a retrieval system, or translated into any language in any form, by any means, without the prior written permission of Canon.
- Canon makes no warranties for damages resulting from corrupted or lost data due to a mistaken operation or malfunction of the camera, the software, the memory cards, personal computers, peripheral devices, or use of non-Canon memory cards.
Copyright © 2008 Canon Inc. All rights reserved.
Please read this manual carefully to operate the Waterproof Case correctly.
Store this manual in a safe place for further reference once you have read it.
Introduction
- Thank you for purchasing this Waterproof Case. Once installed in the Waterproof Case, you can use your Canon Digital Camera in the rain, at the beach or on the ski slopes. You can also use it underwater at depths down to 40 meters (130 ft.) and in wet or dusty environments.
About this Guide
Illustrations of the WP-DC22 are used for explanatory purposes in this guide, but the operational procedures shown are the same as for the WP-DC23.
- Before you use the Waterproof Case, please make sure the case is functioning correctly and does not leak. Close the Waterproof Case before installing the camera and hold it underwater at an approximate depth of 15 cm (5.9 in.) for around three minutes to check for leaks. Perform a similar check after you install the camera. If it leaks, contact your Canon Customer Support Help Desk.
- Canon Inc., its subsidiaries and affiliates, and distributors of the Waterproof Case are not liable for any consequential damages arising from corrupted or lost data due to mistaken operation or malfunction of the Waterproof Case, the camera, the battery or the memory card that results in the failure of an image to be recorded. - Please carefully read the Camera User Guide supplied with your camera also.
Unpacking
The Waterproof Case is shipped with the items listed below. Please check your package now to confirm that it is complete. Contact your Canon dealer if anything is missing.
- Waterproof Case
- Neck Strap
- Wrist Strap
- Diffusion Plate
- Silicone Grease for the Waterproof Seal
- User Guide (this guide)
Sold Separately
- Canon Waterproof Case Weight WW-DC1 Weights used for the Canon Waterproof Case to prevent it from floating while taking pictures underwater. Refer to the specifications (p. 20) for the number of weights needed for this Waterproof Case. For details on installing the weights, refer to the Waterproof Case Weight user guide.

Safety Precautions
Before you use the Waterproof Case, thoroughly read these precautions to ensure correct use. The precautions described below are for ensuring safe use of the Waterproof Case and for preventing danger and damage to yourself and others. Thoroughly understand the details of these precautions before reading the rest of this manual.
• After you use the Waterproof Case, be sure to remove the camera from it. If you leave the Waterproof Case containing the camera in direct sunlight or in a high-temperature place, this may cause a fire or the case to burst.
- Do not use the Waterproof Case in place of a personal flotation device (life jacket).
- Do not use the neck strap underwater. Remove the neck strap and attach the wrist strap before use underwater. There is danger that the neck strap will become entangled and cause strangulation or another mishap.
- Do not use the Waterproof Case at water depths exceeding 40 meters (130 ft.). The case may malfunction, suffer damage or leak.
- Do not press the buttons or the lever of the Waterproof Case with unnecessary force when in the water. This may warp the casing and cause leaks.
- When cleaning the case, do not spray water at the waterproof seal under pressure. This may cause leaks.
- Do not disassemble or modify the Waterproof Case. This may cause leaks.
- Do not damage the waterproof seal, scratch its contact surfaces, or allow dirt, sand, hair or other debris to accumulate between the waterproof seal and the case. This may cause leaks.
- Do not use the Waterproof Case in water at temperatures above 40 °C (104 °F). Heat may warp the casing and cause leaks.
- Do not leave the Waterproof Case in direct sunlight, inside a car in hot weather, or near a heater. Heat may warp the casing and cause leaks. Cover it with a towel, for example, if you have to leave it in the sun.
Handling Precautions
- Do not drop or throw the Waterproof Case.
- Use only the supplied silicone grease. Use of other waterproofing products may impair the strength of the Waterproof Case. If any other waterproofing product is mistakenly applied, wipe it off immediately.
- Avoid opening or closing the Waterproof Case near water. When you are installing the camera or changing the memory card or the battery, choose a place with low humidity well away from salty sea air.
- Avoid using the Waterproof Case for long periods of time in hot temperatures.
-
Battery life is reduced in cold temperatures. When you use the Waterproof Case in very cold places, keep it warm by putting it in a bag whenever you are not shooting. It is not advisable to use the Waterproof Case in temperatures below the freezing point.
-
Moving the Waterproof Case rapidly between hot and cold temperatures may cause condensation (water droplets) to form on its internal surfaces. If this occurs, stop using the camera immediately as the condensation may cause a malfunction. Remove the camera from the Waterproof Case and wipe off the condensation from the Waterproof Case and the camera with a soft and dry cloth, and wait until the moisture evaporates completely before resuming use.
About Water Leakage
Stop shooting immediately if the Waterproof Case leaks. If you use the camera in this state, this may cause a fire or electric shocks. Never use it in this state. Thoroughly wipe the Waterproof Case interior and the camera dry. Please contact your Canon Customer Support Help Desk.
Waterproof Seal
- Debris (e.g. sand, dirt or hair) stuck to the waterproof seal may cause water leakage. Catching a single strand of hair or a tiny grain of sand in the seal can cause leaks.
- When removing the seal from your Waterproof Case, use your fingers so you do not damage the waterproof seal (as shown in Fig 1.). Do not dig your fingernails into it or use pointed or metallic objects to remove it.
- Do not pull the waterproof seal. Pulling the seal may overstretch it, which may cause the case to not close properly and cause leaks.
- While mounting the waterproof seal, do not twist or pull the seal with force. Extreme care should be taken to ensure the waterproof seal is level around the mounting groove. Please check to ensure that the waterproof seal is working.

text_image
Waterproof Seal Fig. 1- Be careful not to apply too much grease. Applying too much grease to the seal may cause water leakage (about a droplet is sufficient).
- Do not use paper or cloth to apply the grease to the seal.
- A damaged or cracked waterproof seal may cause leaks. Please contact your Canon Customer Support Help Desk.
To ensure that the Waterproof Case remains waterproof, it is recommended to replace the seal once a year. Please contact your Canon Customer Support Help Desk.
Care and Maintenance
- Wash the exterior of the Waterproof Case with enough clean fresh water (tap water under 30 °C/86 °F, etc.) as soon as possible after using it.
It is particularly advisable to soak it in fresh water for several hours after use in salt water to remove salt deposits. Please check that you have locked the catch securely to prevent water from entering the case. Wipe it dry with a soft cloth after washing. To avoid scratching the
Waterproof Case, do not wipe it while any sand or grit remains on it. The metal parts may rust or the buttons may become hard to press if salt deposits remain.
Wipe the interior of the case with a soft, dry cloth. Do not wash it with water.

Components
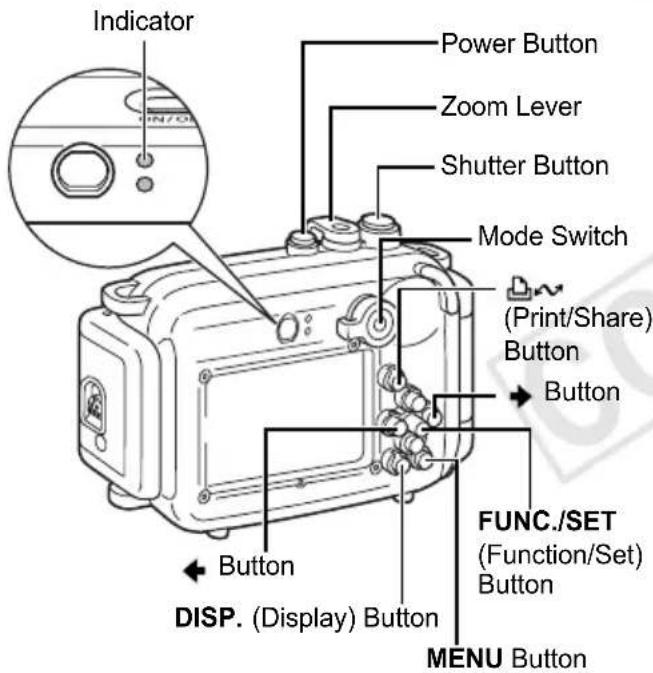
Front
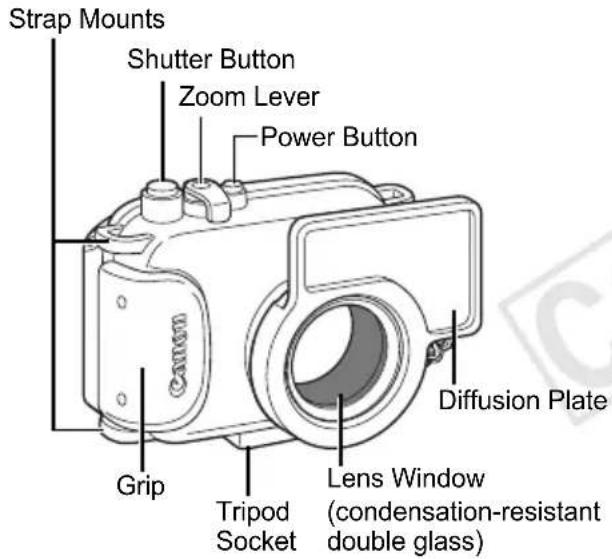
text_image
Strap Mounts Shutter Button Zoom Lever Power Button Diffusion Plate Grip Tripod Socket Lens Window (condensation-resistant double glass)Lens Window
Since dirt or smudges on the lens window may show in photographs, keep the lens window clean by wiping it gently with a soft, dry cloth.
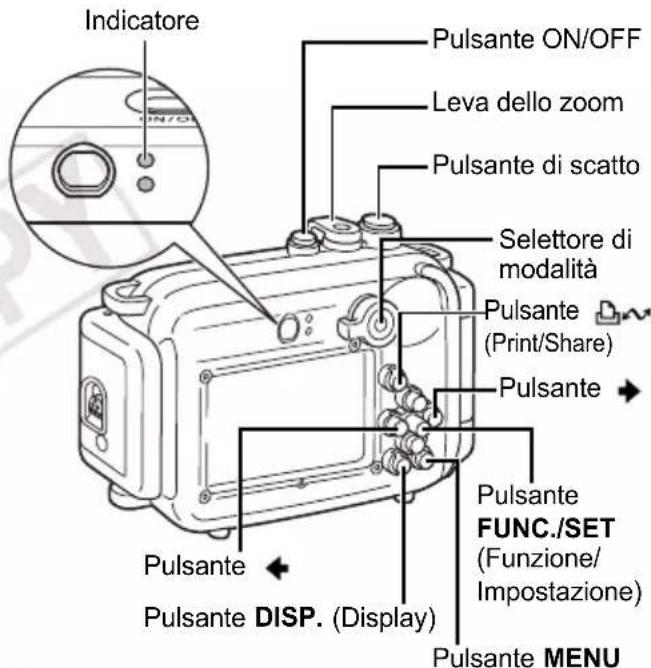
Back

text_image
Mode Switch (Print/Share) Button ISO (ISO Speed)/ (Jump)/ Button (Flash)/ Button FUNC./SET (Function/Set) Button MENU Button DISP. (Display) Button (Single Image Erase)/ (Continuous)/ (Self-timer)/ Button (Macro)/ Infinity/ Button Catch Lock ButtonApply the included controls layout sticker to this area to aid in using the camera controls.
Preparations
Preparing the Camera
Please also read the Camera User Guide for detailed instructions.
1 Confirm that the camera's power is off and open the memory card slot/battery cover.
2Insert the battery and the memory card.
- Please refer to the Camera User Guide for information regarding the type of battery to use with the camera and installation methods for the battery and memory card.
- Use a battery that is adequately charged.
- Check the estimated capacity (recordable images) of your memory card and ensure there is enough storage space on the card to record your images.

text_image
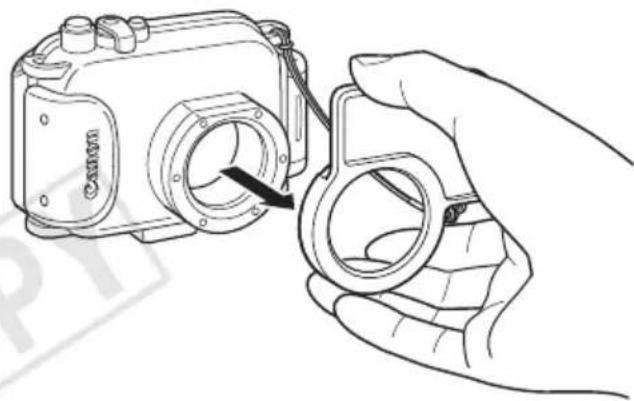
Canon CD-ROM Flash Battery3Remove the wrist strap from the camera.
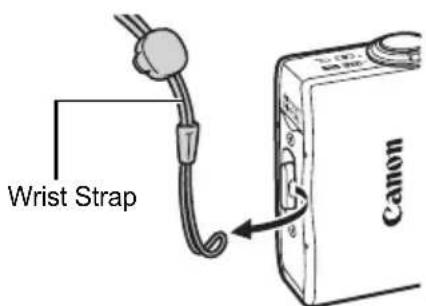
text_image
Wrist Strap CanonThe camera's strap may catch in the waterproof seal when opening or closing the Waterproof Case and cause leaks if it is not removed.
natural_image
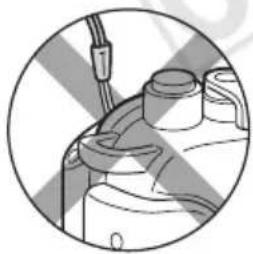
Close-up of a mechanical component with no visible text or symbolsDo not use the camera's wrist strap as a strap for the Waterproof Case.
Preparing the Waterproof Case
4 Fasten both ends of the neck strap to the strap mounts as shown, and adjust it to a comfortable length.

text_image
Canon When attaching the wrist strap
natural_image
Line drawing of two identical camera cases with attached lenses and a small lens (no text or symbols)Use the neck strap when carrying the camera on the beach. Remove the neck strap and attach the wrist strap before use underwater. There is danger that the neck strap will become entangled and cause strangulation or another mishap.
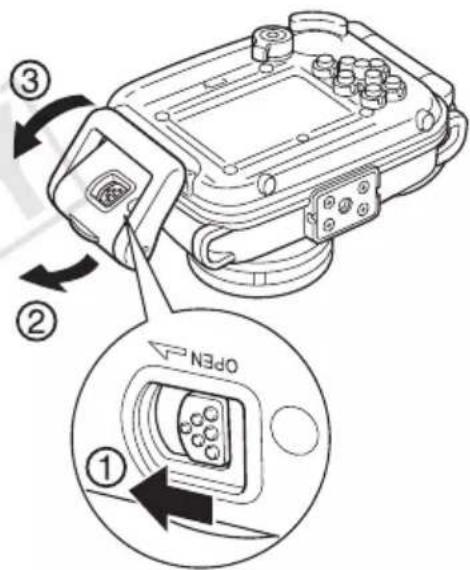
5Slide the lock button as shown, and release the catch to open the back cover.
- When using commercially available anticondensation products, the anticondensation solution should only be applied to the inside surface of the lens window using a soft cloth. If anticondensation solution comes in contact with any surface other than the inside of the lens window, wipe it off immediately with a soft, dry cloth, as it could lead to deterioration of the Waterproof Case.

text_image
Diagram showing three steps of a device control panel with Chinese labels indicating sequence and rotation.Apply a thin coat of grease to the entire seal before using the Waterproof Case in order to prevent abrasion and deterioration.
For waterproof seal handling precautions, see Waterproof Seal (p 6).
- Remove the waterproof seal.
- Using a cotton swab, wipe off any debris (e.g. sand, dirt or hair) which is present on the waterproof seal and on the seal mounting groove of the Waterproof Case.
- Apply a small amount (droplet) of grease to your fingertip.
- Evenly coat the entire surface of the waterproof seal, taking care not to scratch the surface.
- Place the waterproof seal back in the seal mounting groove of the Waterproof Case.
Installing the Camera
6 Insert the camera into the Waterproof Case as shown.

natural_image
Technical line drawing of a mechanical assembly with a device housing and internal components (no text or symbols)7 Close the Waterproof Case.
- Make sure that the waterproof seal and its contact surfaces are free of debris (e.g. sand, dirt or hair). Catching a single strand of hair or a tiny grain of sand in the seal can cause leaks.
• Make sure that the catch is fastened properly.

natural_image
Technical line drawing of a mechanical device with no visible text or symbols8Turn the mode switch in the direction of the arrow to engage the camera's mode switch.

natural_image
Diagram of a mechanical device with rotating components and a pile of circular components (no text or symbols)Shooting
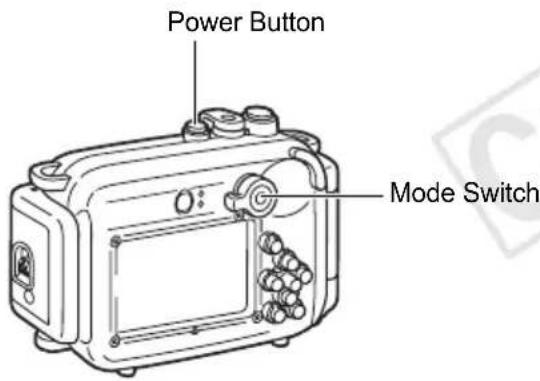
text_image
Indicator Power Button Zoom Lever Shutter Button Mode Switch (Print/Share) Button Button FUNC./SET (Function/Set) Button DISP. (Display) Button MENU Button7 Press the power button to turn on the power.
2Turn the mode switch to


3Adjust settings as required.
- You can adjust the zoom with the zoom lever.
- Press the DISP. button to turn on the LCD monitor.
Setting the Scene mode to (Underwater) to shoot

You can obtain more natural appearing coloration underwater if you set the Scene mode to This mode selects the optimal white balance for marine lighting and tones down the blue colors.
- Turn the mode switch to
- Press the FUNC./SET button.
- Use the or buttons to select * and press the DISP. button.
* The current setting is displayed. - Use the or buttons to select .
- Press the FUNC./SET button.


When shooting in the following modes, note that you can set the white balance manually with the press of a single button if you assign the 📁Custom White Balance) function to the 📁button. This is recommended for adjusting the white balance to the shooting conditions.
4 Use the LCD monitor to compose the shot. Press the shutter button halfway and wait until the indicator lights green or orange. After it lights, press the shutter button all the way.
• Make sure that the lens window is always clean.
- Ensure that your fingers do not obstruct the lens window, flash or diffusion plate when shooting.
- If the power saving function activates and shuts off the power, press the power button again.
5 When you are finished, press the power button to turn off the camera.
Using the Flash
In order to evenly distribute light from the flash, please attach the diffusion plate.
- Do not scratch the surface of the diffusion plate, as this may prevent flash light from being diffused properly.
- Attach the diffusion plate for flash photography because image edges may darken otherwise. Please note, however, that the effectiveness of the diffusion plate may be impaired if the subject is too close to the camera.
Attaching the Diffusion Plate
1 Thread the cord through the strap mount.

text_image
Canon Diffusion Plate2Fit the diffusion plate onto the Waterproof Case.

text_image
Diagram showing a camera with an attached ring and a close-up of the lens, illustrating the use of lens imaging.Be sure not to trap the cord of the diffusion plate when closing the catch of the Waterproof Case.

natural_image
Illustration of a car front bumper with visible seatbelt and rearview mirror (no text or symbols)Catch
Removing the Diffusion Plate
Pull the diffusion plate towards you to remove it.
natural_image
Line drawing of a hand holding a camera module with a magnifying glass (no text or symbols)Playback
1 Press the power button to turn on the power.
2Turn the mode switch to (Playback).
text_image
Power Button Mode Switch3 When you are finished, press the power button to turn off the camera.
After you use the Waterproof Case, be sure to remove the camera from it. If you leave the Waterproof Case containing the camera in direct sunlight or in a high-temperature place, this may cause a fire or the case to burst.
Removing the Camera
1 After use, be sure to completely dry all the water from the Waterproof Case.
- Remove any dirt, sand, hair or other debris from the Waterproof Case, and wash it with clean, running tap water to remove salt deposits.
2 Slide the lock button as shown, and release the catch to open the back cover. Remove the camera from the case.
- Be careful not to allow drops of water from your hair or body to fall on the camera or Waterproof Case interior when the case is open.
- Do not wash the interior of the Waterproof Case with water. Wipe it with a soft, dry cloth.
text_image
Diagram of a GPS scanner with labeled parts and directional arrows indicating rotation and component positioning.Storage
- Store your Waterproof Case carefully, in an opened state to prevent the waterproof seal from deforming and to maintain its waterproof effect.
- Protect the waterproof seal from dust or scratches during storage.
- Do not store the Waterproof Case in hot, cold or humid places, or near substances such as naphthalene or insecticides.
Specifications
WP-DC22/23
Maximum Depth: 40 m (130 ft.) (Meets JIS protection class 8 for waterproofing.)
Waterproofing: Seal, O-ring, etc.
Main Materials: Polycarbonate, ABS, clear plate glass, EPDM, etc.
Camera's Operating Temperature:
0 to 40 °C
(32 to 104 °F)
Dimensions: 128.1 x 86.8 x 68.2 mm
(5.04 × 3.42 × 2.69 in.)
(excluding protrusions)
Volume: Approx. 460 cm ^3
(15.6 fl. oz.(US))
Weight: WP-DC22:
Approx. 295 g (10.4 oz.)
WP-DC23:
Approx. 305 g (10.8 oz.)
(Waterproof Case only*)
Number of Separately Sold Waterproof Case Weights (WW-DC1) Recommended for Mounting:
1 weight
* Including diffusion plate
Subject to change without notice.
Deutsch
Haftungsausschluss
natural_image
Close-up of a mechanical component with no visible text or symbolsnatural_image
Line drawing of two identical camera cases viewed from front and side (no text or symbols)text_image
Diagram showing three steps of a device lock or latch mechanism, labeled ①, ②, and ③ with arrows indicating sequence.natural_image
Technical line drawing of a device chassis with an open box and cable, showing internal components and a downward arrow indicating motion (no text or symbols present)natural_image
Technical line drawing of a mechanical device with no visible text or symbolsnatural_image
Technical line drawing of a mechanical component with circular components and an arrow indicating rotation (no text or symbols)Aufnahme

text_image
Technical diagram showing a camera device with an attached circular component and its internal components, including a magnified inset view.natural_image
Technical line drawing of a mechanical component with no visible text or symbolsVerriegelung
natural_image
Line drawing of a hand holding a camera module with a circular lens (no text or symbols)Wiedergabe
text_image
Diagram of a device with numbered parts and an open button labeled 'OPEN', showing mechanical components and directional arrows.Lagerung
natural_image
Close-up of a mechanical component with no visible text or symbolsnatural_image
Line drawing of two identical camera cases viewed from front and side (no text or symbols)text_image
Diagram showing two steps of a device with labeled components and directional arrows indicating motion or transformation.natural_image
Technical line drawing of a device chassis with an internal component and cable (no text or symbols)7 Cierre la funda impermeable.
natural_image
Technical line drawing of a mechanical device with no visible text or symbolsnatural_image
Technical diagram of a mechanical assembly with circular components and directional arrow (no text or labels)Fotografiado

natural_image
Line drawing of a camera with an attached lens and close-up view of the lens (no text or symbols)natural_image
Technical line drawing of a mechanical assembly with no visible text or symbolsCierre
natural_image
Line drawing of a hand holding a camera module with a black arrow indicating the adjustment (no text or symbols present)Reproducción
text_image
Diagram of a camera with labeled parts and directional arrows indicating motion or operation, including 'OPEN' button.Almacenamiento
natural_image
Close-up of a mechanical component with no visible text or symbolsnatural_image
Line drawing of two identical camera cases with attached lenses and no text or symbolstext_image
① OPEN钮 ③ ②natural_image
Technical line drawing of a mechanical assembly with no visible text or symbolsnatural_image
Technical line drawing of a mechanical device with no visible text or symbolsnatural_image
Technical line drawing of a mechanical component with circular components and an arrow indicating rotation (no text or symbols)Prise de vue

text_image
Diagram showing a device with a ring and cable, annotated with magnified views of the component.natural_image
Technical line drawing of a mechanical component with no visible text or symbolsCliquet
natural_image
Line drawing of a hand holding a camera module with a black arrow indicating the adjustment (no text or symbols present)Lecture
text_image
Diagram of a device with numbered parts and an open button labeled 'OPEN', showing mechanical components and directional arrows.Stockage
natural_image
Close-up of a mechanical component with no visible text or symbolstext_image
Technical diagram of a Canon motor assembly with three circular insets showing mechanical components and directional arrows.natural_image
Line drawing of two identical camera cases with lenses and frame (no text or symbols)text_image
Diagram showing two steps of a device with labeled components and directional arrows indicating motion or transformation.natural_image
Technical line drawing of a device chassis with an open lid and cable housing (no text or symbols)natural_image
Technical line drawing of a mechanical device with no visible text or symbolsnatural_image
Mechanical assembly diagram showing a cam mechanism with rotating components and a directional arrow (no text or labels)Ripresa
text_image
Diagram showing a device connected to a ring, with magnified views highlighting the components.natural_image
Line drawing of a hand holding a camera module with a magnifying glass (no text or symbols)Riproduzione
text_image
Diagram of a GPS device with labeled parts and directional arrows indicating motion or assembly stepsConservazione
natural_image
Close-up of a mechanical component with no visible text or symbols请勿将相机的腕带作为防水套的腕带。
准备防水套
natural_image
Line drawing of two identical camera modules with no text or symbolstext_image
Diagram illustrating device change steps with labeled arrows and a magnified view of the device's internal structure.natural_image
Technical line drawing of a mechanical assembly with no visible text or symbols7 关上防水套。
natural_image
Technical line drawing of a mechanical device with a black arrow indicating rotation (no text or symbols present)natural_image
Diagram of a mechanical device with rotating components and circular elements (no text or symbols)拍摄

text_image
Diagram showing a camera with a ring and cable, and a magnified inset of the device's lens assembly.natural_image
Line drawing of a hand holding a Canon digital camera module (no text or symbols present)播放
text_image
Diagram of a device with numbered parts and an inset showing a labeled component 'OPN' with arrows indicating rotation.存放
CDI-M399-010 XXXXXXX © CANON INC. 2008
PRINTED IN JAPAN
IMPRIMÉ AU JAPON