
GLH90 - LED Lighting Duronic - Free user manual and instructions
Find the device manual for free GLH90 Duronic in PDF.
| Brand | Duronic |
| Model | GLH90 |
| Product type | LED horticultural grow light |
| Number of LED bulbs | 60 (39 red, 19 blue, 2 UV) |
| Power | 900W |
| Dimensions (L x W x H) | 40 x 18.5 x 6 cm |
| Weight | 2.04 kg |
| Power supply voltage | 100-240V, 50-60Hz |
| Cable length | 1.5 m |
| LED lifespan | 50,000 hours |
| Light spectrum | Red 660nm, Blue 450nm, IR 935nm |
| LED angle | 120° |
| Light modes | VEG (blue), BLOOM (red), VEG & BLOOM (combined) |
| Recommended hanging height | 46 to 61 cm depending on plant stage |
| Digital hygrometer included | Yes, with temperature and humidity measurements |
| Warranty | 1 year |
| Usage | Indoor only |
| Maintenance and cleaning | Unplug before cleaning, use a dry cloth |
| Safety | Do not use outdoors, avoid moisture, do not repair yourself |
Frequently Asked Questions - GLH90 Duronic
User questions about GLH90 Duronic
0 question about this device. Answer the ones you know or ask your own.
Ask a new question about this device
Download the instructions for your LED Lighting in PDF format for free! Find your manual GLH90 - Duronic and take your electronic device back in hand. On this page are published all the documents necessary for the use of your device. GLH90 by Duronic.
USER MANUAL GLH90 Duronic
Creative Consumer Products
natural_image
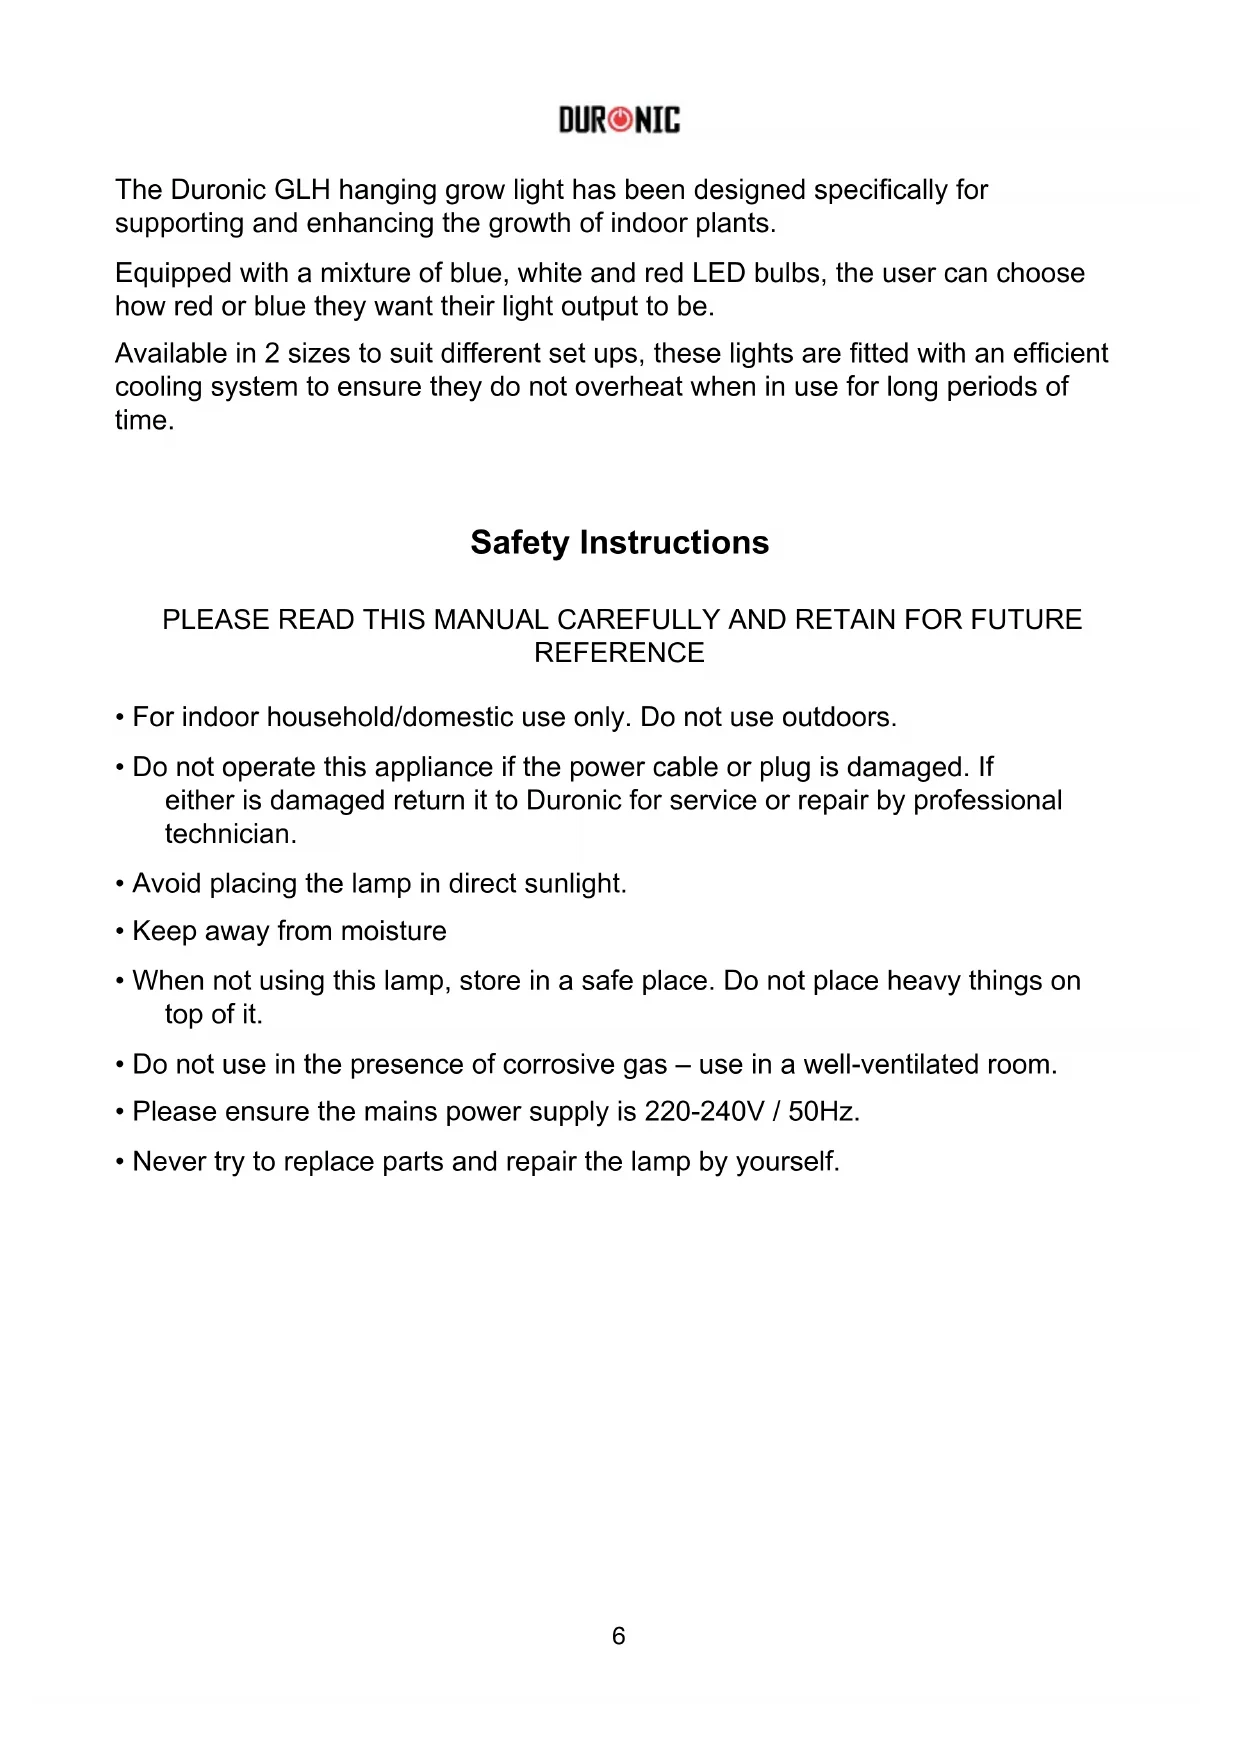
Exterior view of a black rectangular LED light fixture with purple and pink LED lighting (no text or symbols visible)GLH60 / GLH90 Hanging LED Grow Light
PLEASE READ ALL THE INSTRUCTIONS BEFORE USE

duronic.com

duronic

@duronicmedia

Duronic

@duronicmedia
DURONIC
Contents
English Manual 5
The Duronic GLH hanging grow light has been designed specifically for supporting and enhancing the growth of indoor plants.
Equipped with a mixture of blue, white and red LED bulbs, the user can choose how red or blue they want their light output to be.
Available in 2 sizes to suit different set ups, these lights are fitted with an efficient cooling system to ensure they do not overheat when in use for long periods of time.
Safety Instructions
PLEASE READ THIS MANUAL CAREFULLY AND RETAIN FOR FUTURE REFERENCE
- For indoor household/domestic use only. Do not use outdoors.
- Do not operate this appliance if the power cable or plug is damaged. If either is damaged return it to Duronic for service or repair by professional technician.
- Avoid placing the lamp in direct sunlight.
- Keep away from moisture
- When not using this lamp, store in a safe place. Do not place heavy things on top of it.
- Do not use in the presence of corrosive gas – use in a well-ventilated room.
- Please ensure the mains power supply is 220-240V / 50Hz.
- Never try to replace parts and repair the lamp by yourself.
Specifications
| Model Number GLH60 GLH90 | ||
| Number of LEDs 60 (39x red, 19x blue, 2x UV) | 60 (39x red, 19x blue, 2x UV) | |
| LED bulb wattage 10W COB LEDs 10W COB LEDs | ||
| LED angle 120° 120° | ||
| PPFD / PAR 863.38 lm 810 umol/m2 | ||
| Bulb lifespan 50,000 hours 50,000 hours | ||
| Spectrum Special Spectrum for plants | Special Spectrum for plants | |
| Wavelengths RED: 660 | Blue: 450IR: 935 nm | RED: 660Blue: 450IR: 935 nm |
| Frequency 50HZ-60HZ 50HZ-60HZ | ||
| Working | -15°~ 55° | -15°~ 55° |
| Voltage | 100V-240V | 100V-240V |
| Cable length | 1.5M | 1.5M |
| Dimensions | 40 x 17 x 6 cm | 40 x 18.5 x 6 cm |
| Weight | 2.04kg | 2.04kg |
| Power | 600W | 900W |
Introduction
LED grow lights are the newest trend for the cultivation of indoor plants. Using an advanced full spectrum LED grow light will provide your plant/s with a broad spectrum of light that is similar to natural sunlight and so enhances the process of photosynthesis.
Red and blue LED lights have been proven best for encouraging plant growth, and so this light provides the user with the option to use red, blue or a combination of the two colours to obtain the best kind of light for their plant/s.
The main part of the GLH light is blue (peak 450nm) and red (peak 660nm), which supplies the most efficient wavelength to enhance photosynthesis performance. This model allows you to choose between having more red or blue light, or a balance of the two.
DURONIC
Installation
Setting up your grow light is simple to do.
Remove all packaging and set aside.
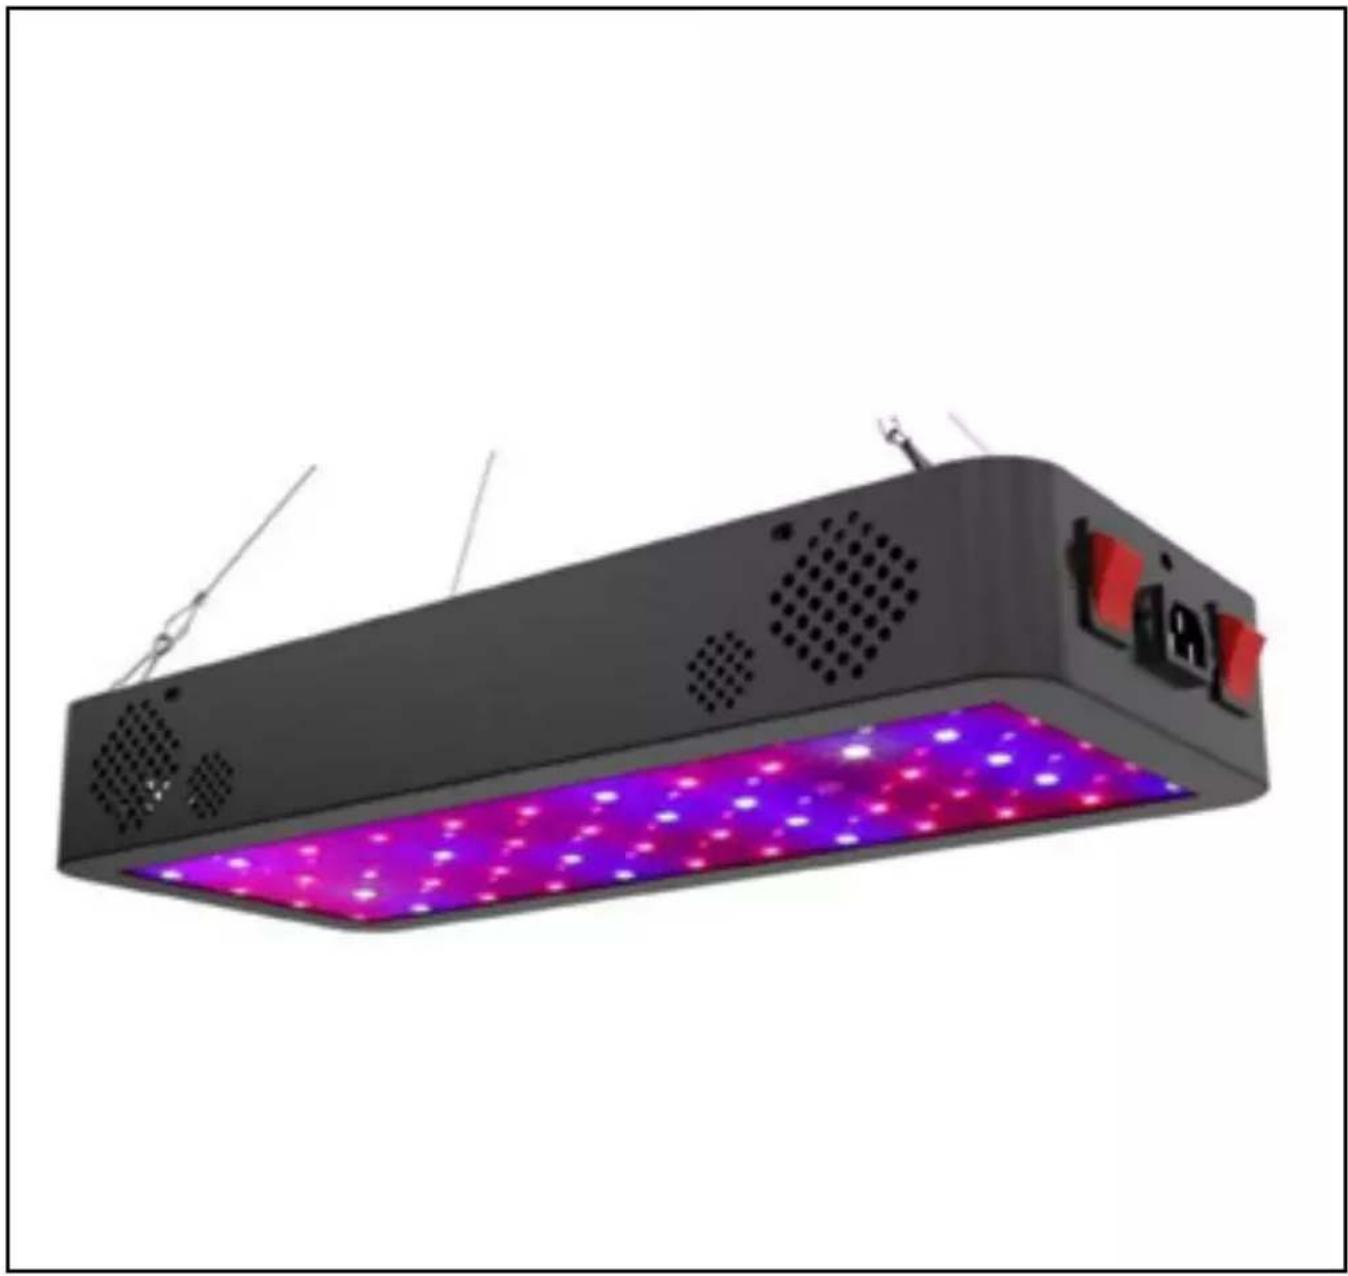
Attach the hanging wire to the top of the light unit as shown (right).
Find a suitable place to hang the light, taking into account the optimal distance needed for the growth of your plants.
Hang up onto a place strong enough to support the weight of the light.
natural_image
Simple line drawing of a rope tied with a hook and hook attachment, no text or symbols presentCare and Maintenance
Before cleaning ensure the lamp is unplugged from the mains socket.
Do not submerge this lamp in water or any other liquid.
Do not use corrosive cleaning products on it.
To clean, simply use a dry cloth to dust and clean all over the lamp.
If not being used for a long period of time, store inside a protective box in a cool dry place.
DURONIC
Using Your Grow Light
For best results create a space specifically for growing your plants.
Placing reflective walls around the space will enhance the effects of the LED lights as they will redirect escaping photons back towards the plants.
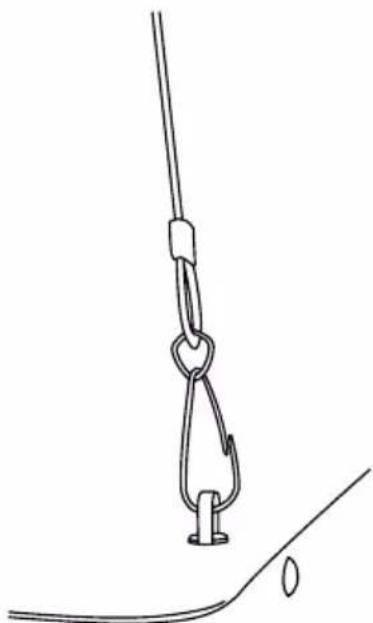
Recommended Hanging Height and Time Guide
| Plant Lifecycle | Power On | Power Off | Mounting Height |
| Seeding stage 8h 16h 24” | |||
| Growing stage 14h 10h 22-24’ | |||
| Vegetable stage 14h 10h 20-22” | |||
| Bloom stage 12h 12h 18” |
It is important to consider the optimal hanging height and distance the lamp will be from your plants. To get the best results from your grow light, we recommend the heights and time cycles in the table above for a successful yield.
Note: keep an eye on your plants to see how receptive they are to the light mode you are using. If the leaves start to look dry, limp or discoloured, consider changing the mode or using the light for less time.
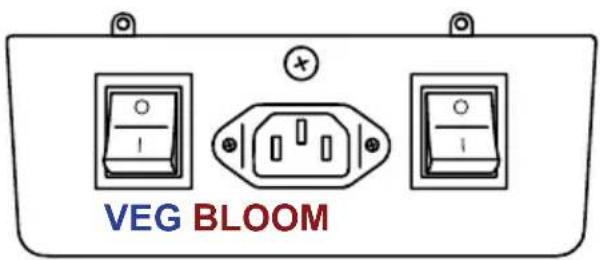
The 3 Light Modes
VEG: blue light mode
BLOOM: red light mode
VEG & BLOOM: red and blue light combined
To activate VEG & BLOOM mode both switches need to be switched on together
PPFD value at different heights (GLH60)
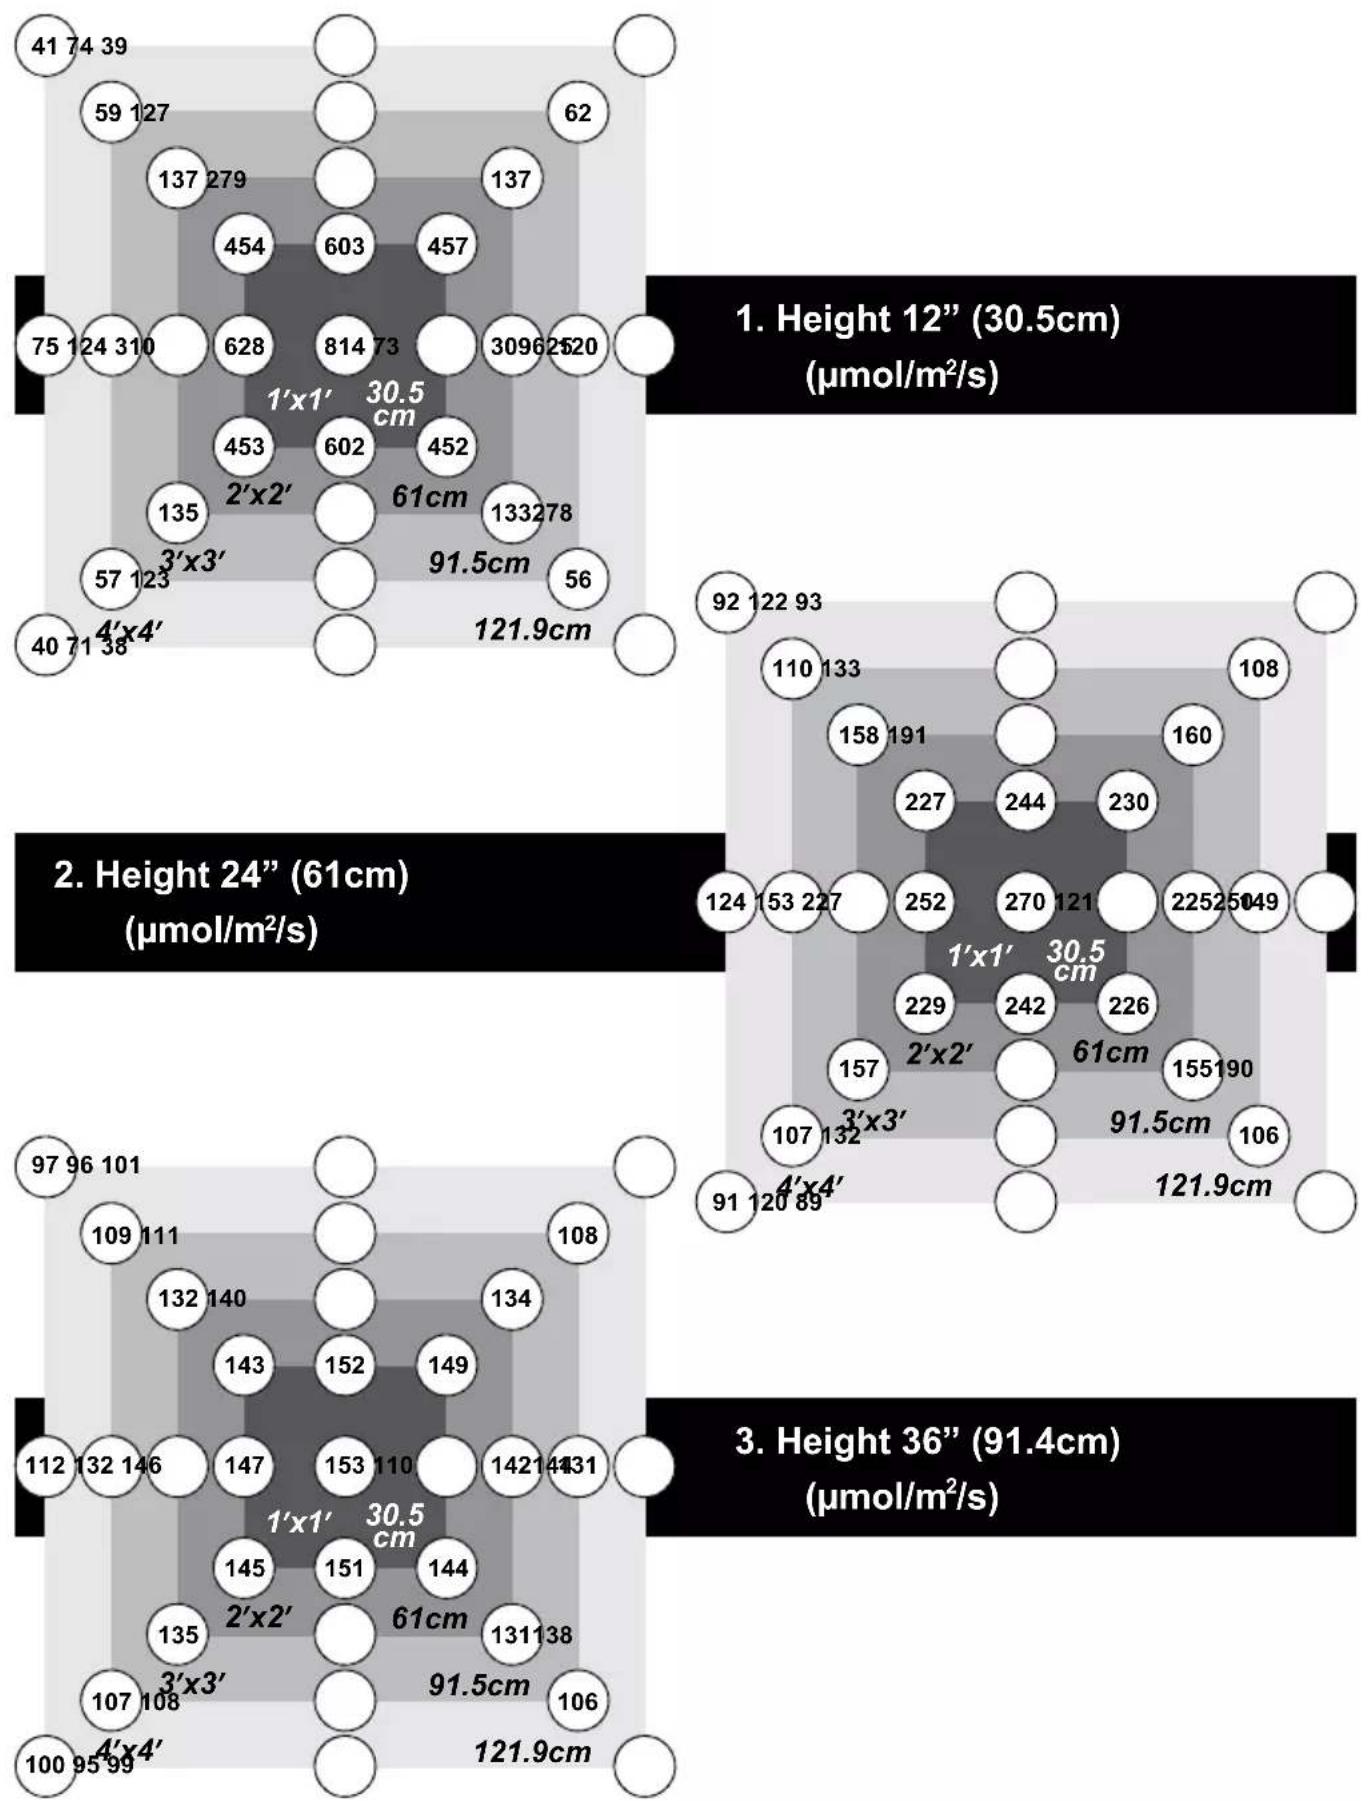
heatmap
| Height | Value | |--------|-------| | Height 12" | 30.5 | | Height 24" | 61 | | Height 36" | 91.4 |PPFD value at different heights (GLH90)
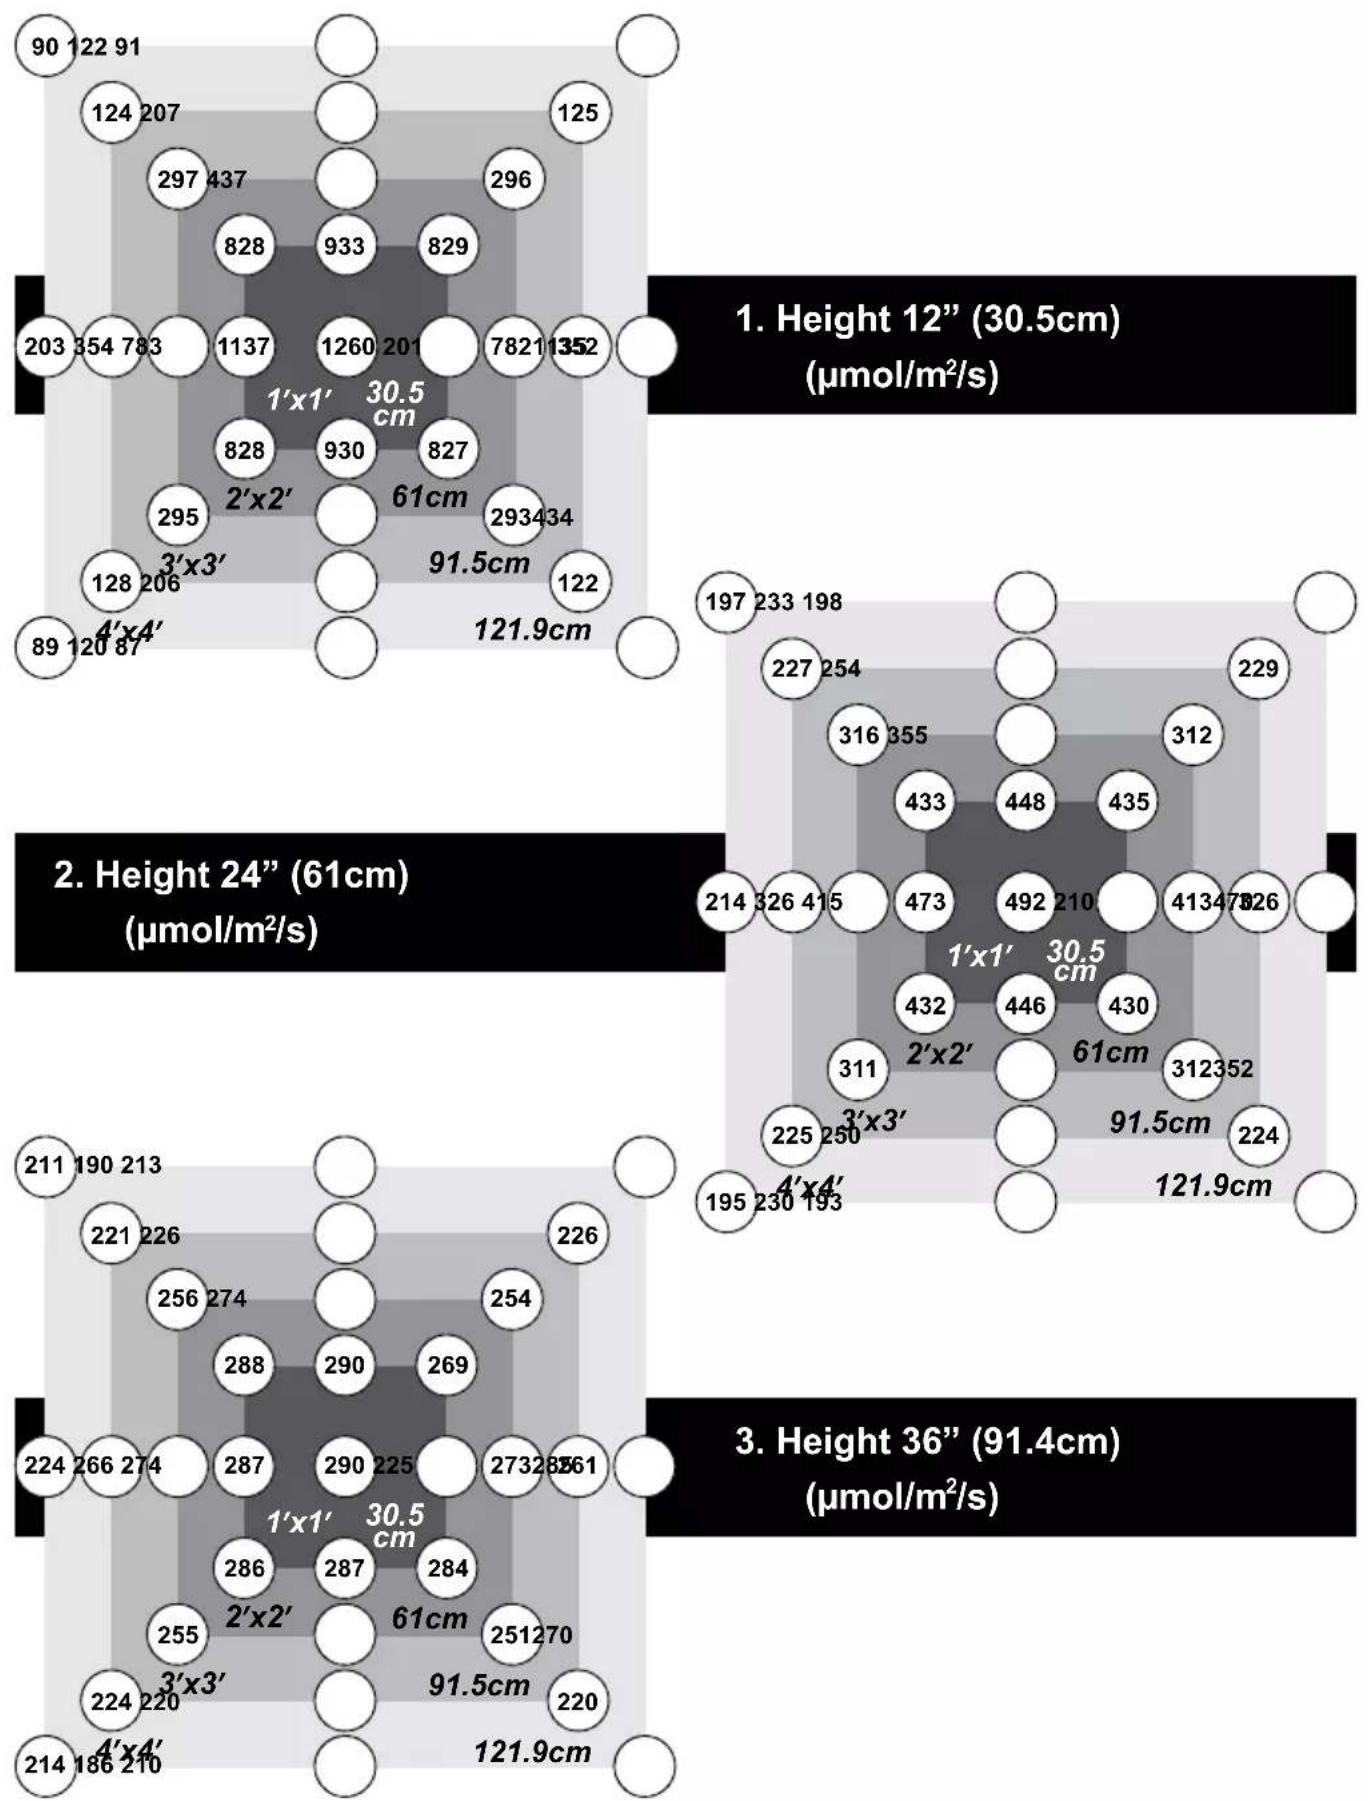
heatmap
| Height | Value (μmol/m²/s) | | :--- | :--- | | Height 12" | 30.5 | | Height 24" | 61 | | Height 36" | 91.4 |DURONIC
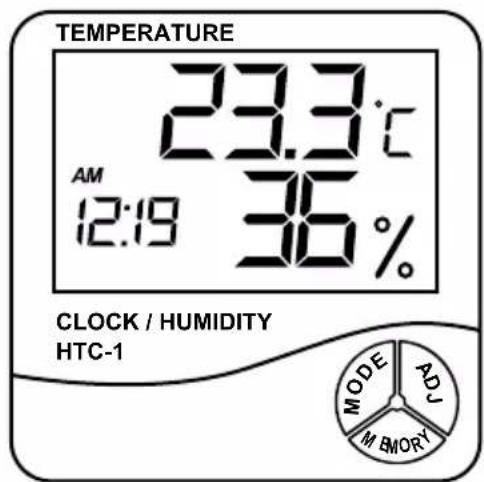
Digital Hygrometer
Included with your GLH grow light is a digital hygrometer which can be used to measure the humidity and temperature in the surrounding environment. This is ideal for using alongside your growing plants to monitor and ensure that they have the correct amount of humidity for them to thrive and grow well.
FUNCTIONS
• Measures temperature and humidity
- Provides measurements in both °C/°F
- Daily alarm
- Calendar display
• Memory function: records minimum/maximum temperature and humidity
SPECIFICATIONS
| Temperature measurement range | -10°C~+50°C (-14°F~+122°F) |
| Temperature measurement accuracy | ±1°C (1.8°F) |
| Temperature resolution +0.1°C (0.2°F) | |
| Humidity measurement range | 10%--99%RH |
| Humidity measurement accuracy | ±5%RH |
| Humidity resolution 1% | |
| Battery required AAA 1.5V |
BUTTONS
MODE: allows you to switch between time – clock format – set calendar/set the alarm.
ADJ: allows you to adjust the values when changing the settings.
MEMORY: allows you to display or clear the saved temperature and humidity values.
SAFETY INSTRUCTIONS
- Keep the digital hygrometer clean and in good condition.
- Protect the device from static electricity, high temperatures, thermal shock caused by rapid ambient temperature change, and anything that lets off an electro-magnetic field.
- Do not get the device wet or use it in damp/ wet locations or areas where there is condensation.
- Do not use the device in areas where there is steam, dust or smoke. These conditions may result in erroneous readings.
- DO NOT use the meter for any purpose other than that for which it is designed.
HOW TO USE
Ensure the batteries are inserted properly into the battery compartment.
The hygrometer can be wall mounted or can be freestanding using the flip-out stand on the back of the device.
Set the time
- Press and hold the 'MODE' button for 2 seconds until you hear a beep sound and the clock minutes start to flash.
- Press the 'ADJ' button to adjust the minute digits.
- Press the 'MODE' button again to adjust the hour digits in the same way.
Set the clock format
- Press the 'MODE' button again you can set the clock to either a 12-hour format or 24-hour format.
- Press the 'ADJ' button to select which format you prefer.
DURONIC
Digital Hygrometer (continued)
Set the calendar
- Press the 'MODE' button again to move from clock mode to calendar mode.
- You will see the year show on the screen, which you can adjust by pressing the 'ADJ' button.
- Press the 'MODE' button again which will show the month and day. First the month digits will be flashing, so you can set this by using the 'ADJ' button.
- Next, press the 'MODE' button again, now the day will be flashing. Press the 'ADJ' to set the day.
- Press 'MODE' once more to exit the calendar mode and return to the home screen.
Set the alarm
- From the home screen, you will see the ‘:’ between the time digits is flashing
- Press the 'MODE' button once to change the mode to 'alarm mode'.
- Once in 'alarm mode' the display will show the current alarm time set.
- To change the alarm time, press and hold the 'MODE' button down until it beeps and the minute digits start flashing.
- Press the 'ADJ' button to change the minute digits.
- Then press the 'MODE' button again which will make the hour digits flash. Press the 'ADJ' button to change the hour digits.
- Press 'MODE' once more to choose between a silent or sounded alarm.
Change the units of measurement
To change the units, lift up the kickstand on the back of the device and press the small button underneath it. This will allow you to change it from Centigrade to Fahrenheit.
The Memory
The memory function records the highest and lowest levels of humidity and temperature.
- To view the recorded highest and lowest levels from the previous day, press the 'MEMORY' button. This will show last recorded highest levels. Press 'MEMORY' again to show the lowest recorded levels.
- To return to the home screen press the 'MEMORY' button again or leave it idle for 20 seconds and it will return to the home screen.
- If you want to delete the recorded measurements, press and hold the 'MEMORY' button. Once deleted, the screen will return back to the home screen.
Note: if you experience any issues with the hygrometer, remove the battery and re-insert it again. This will resent the device and should resolve any problem you were experiencing.
DURONIC
Warranty
1 Year Guarantee from Shine-Mart Ltd, Trademark owners of Duronic Products. NOTE: THESE STATEMENTS DO NOT AFFECT YOUR STATUTORY RIGHTS AS A CONSUMER
This product has been manufactured under the strictest or quality control procedures, and using the highest quality of materials, to ensure excellent performance and reliability. It will give very good and long lasting service, provided it is properly used and maintained. The product is guaranteed for 1 years from the date of original purchase. If any defect arises due to a faulty materials or poor workmanship, the faulty product must be returned to the original place of purchase. Refund or replacement is at the discretion of that company.
Duronic Products are offered with a 1 year guarantee under the following conditions:
- The product must be returned to the retailer with original proof of purchase.
- The product must be installed and used in accordance with the instruction's contained in this operating manual.
- It must be used only for domestic purposes.
- It does not cover wear and tear, malicious damage, misuse, neglect, inexpert repairs or consumable parts.
- Shine-Mart Ltd has no responsibilities for accidental or consequential loss or damage.
- Shine-Mart Ltd are not liable to carry out any type of servicing work, under the guarantee
- Valid in the UK only
This product is fitted with CE:1363 plug and fuse Imported by Shine-Mart Ltd, RM3 8SB
Information on waste Disposal for Consumers of Electrical & Electronic Equipment.
This mark on a product and/or accompanying documents indicates that when it is to be disposed of, it must be treated as Waste Electrical & Electronic Equipment, (WEEE).
Any WEEE marked products must not be mixed with general household waste, but kept separate for the treatment, recovery and recycling of the materials used.
For proper treatment, recovery and recycling; please take all WEEE marked waste to your Local Authority Civic waste site, where it will be accepted free of charge.
If customers dispose of Waste Electrical & Electronic Equipment correctly, they will be helping to save valuable resources and preventing any potential negative effects upon human health and the environment, of any hazardous materials that the waste may contain.
Follow Us

natural_image
Simple line drawing of a rope tied with a hook and hook attachment (no text or symbols)radar
| Position | Value | |---|---| | Top Left | 92 122 93 | | Top Right | 110 133 | | Bottom Left | 158 191 | | Bottom Right | 160 | | Bottom Center | 227 | | Center | 244 | | Center | 230 | | Center | 270 121 | | Center | 2252 5049 | | Center | 1'x1' 30.5 cm | | Center | 229 | | Center | 242 | | Center | 226 | | Center | 157 | | Center | 61cm | | Center | 155190 | | Bottom Left | 107 132 | | Bottom Right | 106 | | Bottom Center | 3'x3' | | Bottom Center | 91.5cm | | Bottom Center | 4'x4' | | Bottom Left | 91 120 89 | | Bottom Right | 121.9cm | The center cell contains the dimension '30.5 cm'. The top-left cell contains the number of numbers (e.g., 92, 122, 93). The bottom-left cell contains the number of numbers (e.g., 153, 227).radar
| Position | Value (cm) | |---|---| | 1 | 211 190 213 | | 2 | 221 226 | | 3 | 256 274 | | 4 | 288 | | 5 | 290 | | 6 | 269 | | 7 | 290 225 | | 8 | 273 285 61 | | 9 | 286 | | 10 | 287 | | 11 | 284 | | 12 | 255 | | 13 | 251 270 | | 14 | 3'x3' | | 15 | 91.5cm | | 16 | 220 | | 17 | 121.9cm | | 18 | 214 186 210 | The chart displays a single data point at position 1, with the center value explicitly labeled as '1'×1' and '30.5 cm'. The values are annotated on the grid cells.- Höhe 91,4 cm (36") (μmol/m²/s)
Digitales Hygrometer
natural_image
Simple line drawing of a rope tied with a hook and hook attachment (no text or symbols)natural_image
Simple line drawing of a rope tied with a hook and rope, no text or symbols presentCura e manutenzione
radar
| Position | Value | |---|---| | Top Left | 90 122 91 | | Top Right | 124 207 | | Bottom Left | 297 437 | | Bottom Right | 296 | | Center | 828 933 | | Center Right | 829 | | Bottom Right | 7821 1352 | | Bottom Left | 203 354 783 | | Bottom Right | 1137 | | Bottom Left | 1260 201 | | Bottom Right | 1352 | | Center | 1'x1' 30.5 cm | | Center Right | 828 | | Center Left | 930 | | Center Right | 827 | | Bottom Left | 2'x2' | | Bottom Right | 61cm | | Bottom Left | 295 | | Bottom Right | 293434 | | Bottom Left | 3'x3' | | Bottom Right | 91.5cm | | Bottom Right | 122 | | Bottom Left | 4'x4' | | Bottom Right | 121.9cm | | Bottom Left | 89 120 87 | The center value is labeled as '1'×1'. The right side contains the number of 'x' labels at each position.natural_image
Simple line drawing of a rope knot with a hook and base, no text or symbols presentradar
| Node | Value | |---|---| | 97 | 96 | | 101 | 101 | | 109 | 111 | | 112 | 132 | | 113 | 140 | | 114 | 143 | | 115 | 152 | | 116 | 149 | | 117 | 153 | | 118 | 110 | | 119 | 142 | | 120 | 143 | | 121 | 131 | | 122 | 146 | | 123 | 147 | | 124 | 145 | | 125 | 151 | | 126 | 144 | | 127 | 2'x2' | | 128 | 61cm | | 129 | 135 | | 130 | 131 | | 131 | 138 | | 132 | 3'x3' | | 133 | 3'x3' | | 134 | 134 | | 135 | 135 | | 136 | 91.5cm | | 137 | 91.5cm | | 138 | 91.5cm | | 139 | 91.5cm | | 140 | 91.5cm | | 141 | 91.5cm | | 142 | 91.5cm | | 143 | 91.5cm | | 144 | 91.5cm | | 145 | 91.5cm | | 146 | 91.5cm | | 147 | 91.5cm | | 148 | 91.5cm | | 149 | 91.5cm | | 150 | 91.5cm | | 151 | 91.5cm | | 152 | 91.5cm | | 153 | 91.5cm | | 154 | 91.5cm | | 155 | 91.5cm | | 156 | 91.5cm | | 157 | 91.5cm | | 158 | 91.5cm | | 159 | 91.5cm | | 160 | 91.5cm | | 161 | 91.5cm | | 162 | 91.5cm | | 163 | 91.5cm | | 164 | 91.5cm | | 165 | 91.5cm | | 166 | 91.5cm | | 167 | 91.5cm | | 168 | 91.5cm | | 169 | 91.5cm | | 170 | 91.5cm | | 171 | 91.5cm | | 172 | 91.5cm | | 173 | 91.5cm | | 174 | 91.5cm | | 175 | 91.5cm | | 176 | 91.5cm | | 177 | 91.5cm | | 178 | 91.5cm | | 179 | 91.5cm | | 180 | 91.5cm | | 181 | 91.5cm | | 182 | 91.5cm | | 183 | 91.5cm | | 184 | 91.5cm | | 185 | 91.5cm | | 186 | 91.5cm | | 187 | 91.5cm | | 188 | 91.5cm | | 189 | 91.5cm | | 190 | 91.5cm | | 191 | 91.5cm | | 192 | 91.5cm | | 193 | 91.5cm | | 194 | 91.5cm | | 195 | 90.5cm | | 196 | -0.0000000000000000000000000000000000000000000000000000000000000000000000000000000000000000000000000000heatmap
| Row | Column | Value | |---|---|---| | 1 | Wysokość 12" (μmol/m²/s) | 30.5 | | 1 | Wysokość 24" (μmol/m²/s) | 61 | | 1 | Wysokość 36" (μmol/m²/s) | 91.4 | The image contains four panels with varying circle sizes and numbers, but specific numerical labels are not provided in the image.DURONIC
Cyfrowy higrometr
EU DECLARATION OF CONFORMITY
(In accordance with EN ISO/IEC 17050-1)
| Declaration number: | DOCIP 2194867 |
| Name and address of manufacturer / EU-AR: | UK Representative: Shine-Mart Ltd1 Spilsby Road RM3 BSB Harold Hill, Romford United KingdomEU Representative: Shinemart GmbHBrandenburger Str. 40 Ratingen 40880 Germany |
THIS DECLARATION OF CONFORMITY IS ISSUED UNDER THE SOLE RESPONSIBILITY OF:
| Name and address of manufacturer: | Shine-Mart Ltd1 Spilsby RoadRM3 8SB Harold Hill, RomfordUnited Kingdom |
| Product identification: | GLH90GLH60 |
THE PRODUCTS MENTIONED IN THIS DECLARATION ARE IN CONFORMITY WITH:
| EU Community Legislation: | Restriction of Hazardous Substances (RoHS) Directive 2011/65/EU [OJEU L174/88-110, 01.07.2011]Electromagnetic Compatibility (EMC) Directive 2014/30/EU [OJEU L96/79-106, 29.03.2014]Ecodesign energy-related products Directive 2009/125/EC [OJEU L285/10-35, 31.10.2009]Low Voltage Directive (LVD) 2014/35/EU [OJEU L96/357-374, 29.03.2014] |
| Harmonised standards: | Safety of electrical equipmentEN 60598-1:2015 + AC:2015 + AC:2016 + AC:2017 + A1:2018 + EN 60598-1:2008 + A11:2009 + EN IEC 60598-1:2021 + A11:2022EN 60598-2-4:2018EN IEC 62031:2020 + A11:2021 + EN 62031:2008 + A1:2013 + A2:2015EN 62471:2008Exposure of humans to electromagnetic fields (EMF)EN 62493:2015 + A1:2022 + EN 62493:2010Electromagnetic Compatibility (EMC)EN IEC 55015:2019 + A11:2020EN 61000-3-2:2014 + EN IEC 61000-3-2:2019 + A1:2021EN 61000-3-3:2013 + A1:2019 + A2:2021 + A2:2021/AC:2022-01EN 61547:2009 + EN IEC 61547:2023Restricted substances in electrical productsEN IEC 63000:2018Ecodesign, Energy performanceRegulation (EU) 2019/2020 - Ecodesign lighting |
SIGNED FOR AND ON BEHALF OF:
| Place and date of issue: | Harold Hill, Romford, 1 May 2021 |
| Signature: | Sarad |
| Name, function: | Abdus Samad, Product Development Manager |
| Company name: | Shine-Mart Ltd |