
IMC4535GT - Microwave Oven INVENTUM - Free user manual and instructions
Find the device manual for free IMC4535GT INVENTUM in PDF.

| Product type | Built-in microwave oven |
| Brand | Inventum |
| Model | IMC4535GT |
| Capacity | 50 litres |
| Dimensions (W x H x D) | 454 x 595 x 565 mm (without handle) |
| Net weight | 38.8 kg |
| Power supply | 230 V ~ 50 Hz, 3000 W (input), 900 W (microwave) |
| Cooking modes | Microwave, Oven (conventional, hot air, conventional+fan, single grill, double grill+fan, double grill, pizza, bottom heat), Combi, Defrost |
| Automatic programs | 13 programs (vegetables, potatoes, chicken, cake, quiche, pizza, etc.) |
| Special functions | Rapid preheat, Delayed start, Timer, Child lock |
| Display | Digital with function indicators, clock, temperature, power |
| Insert levels | 5 levels |
| Included accessories | Glass cooking plate, Enamel cooking plate, Grill rack |
| Installation | Built-in (integrated) into a kitchen cabinet |
| Protection class | Class I (earthing mandatory) |
| Safety | Child lock, automatic shutdown at end of cooking, secure door |
| Care and cleaning | Clean interior after each use with a damp cloth and mild detergent. Do not use steam or high-pressure cleaners. Descaling possible with lemon. |
| Warranty | 5 years Inventum (conditions applicable in the Netherlands) |
| Spare parts | Only use accessories and spare parts from the manufacturer suitable for the appliance |
Frequently Asked Questions - IMC4535GT INVENTUM
User questions about IMC4535GT INVENTUM
0 question about this device. Answer the ones you know or ask your own.
Ask a new question about this device
Download the instructions for your Microwave Oven in PDF format for free! Find your manual IMC4535GT - INVENTUM and take your electronic device back in hand. On this page are published all the documents necessary for the use of your device. IMC4535GT by INVENTUM.
USER MANUAL IMC4535GT INVENTUM
text_image
1 A B C D A G F E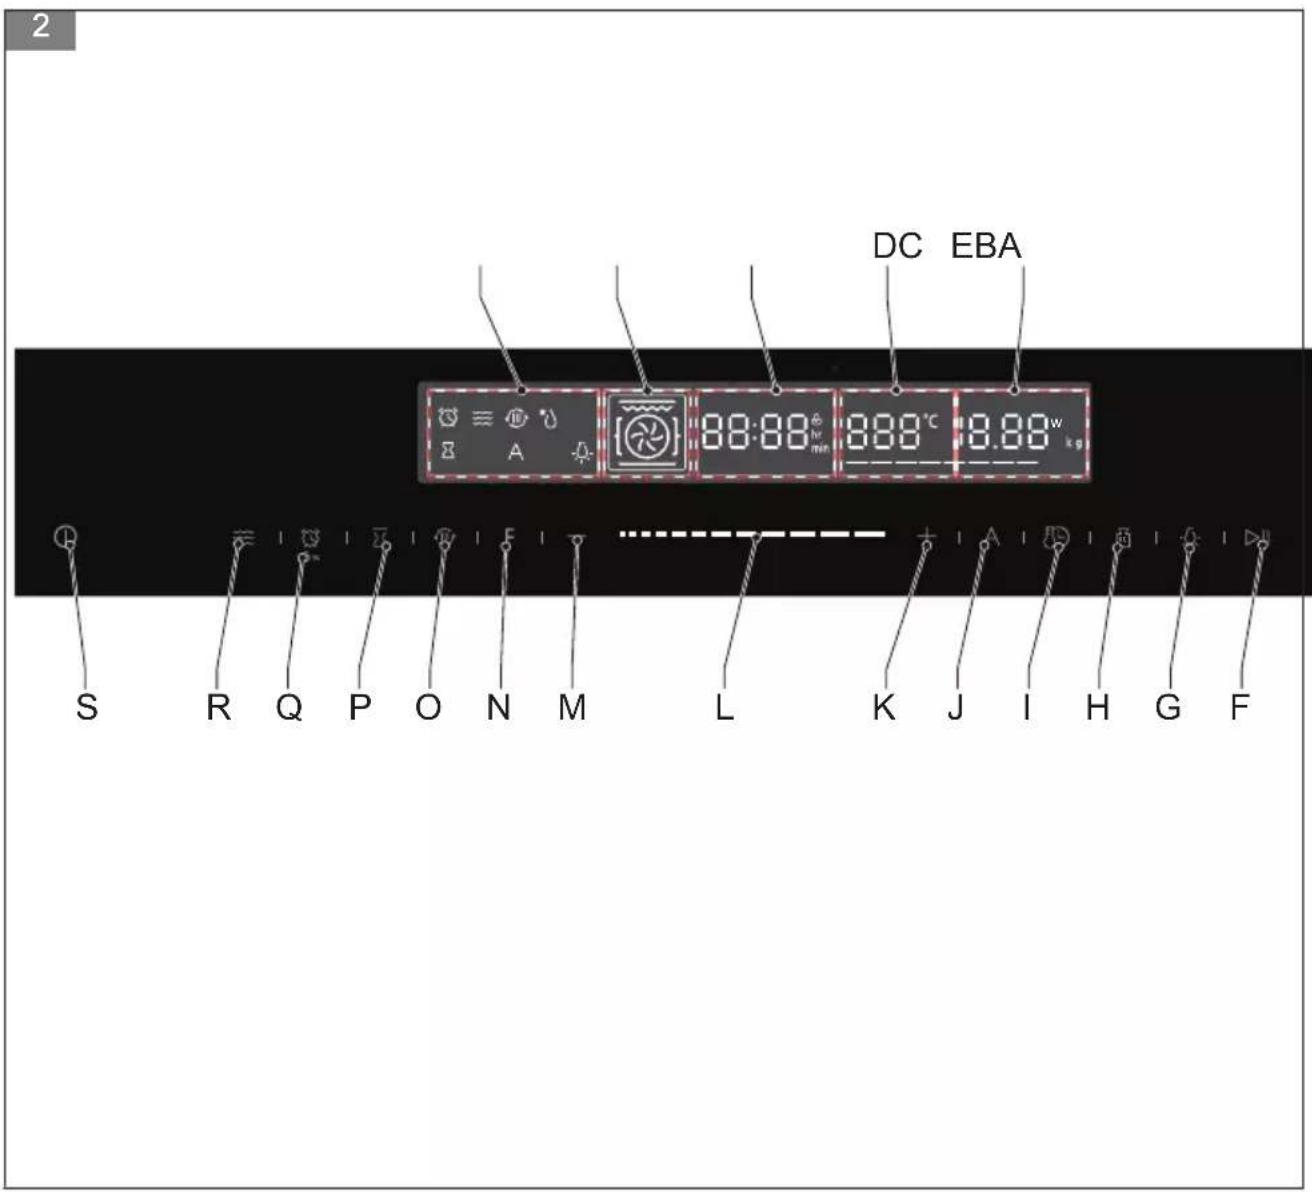
text_image
2 DC EBA 88:88 km 888°C 8.88 kg S R Q P O N M L K J I H G F3
natural_image
Technical line drawing of two coiled heat exchangers labeled A and B (no text or symbols on the diagram itself)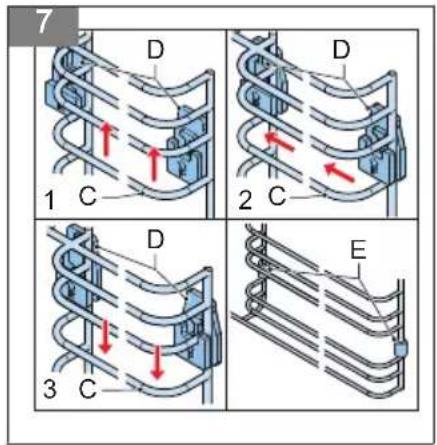
text_image
7 D 1 C D 2 C D 3 C E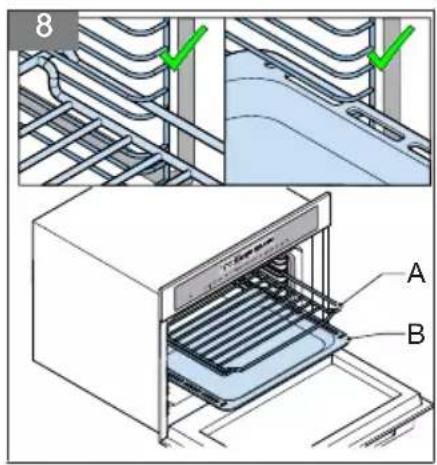
text_image
8 A B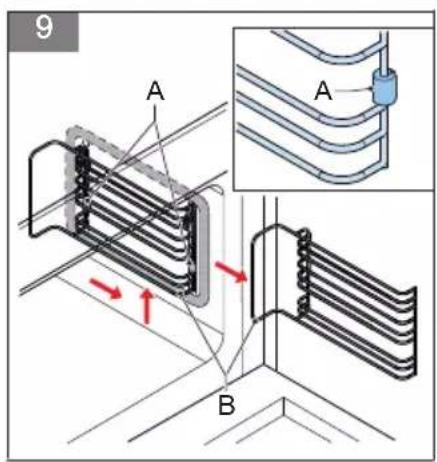
text_image
9 A A BInhoudsopgave
HET APPARAAT STOPPEN
1 Introduction....28
2 Safety....28
3 Description....33
4 Installation....34
5 Operation....36
6 Cleaning and maintenance....44
7 Extra information....44
8 Troubleshooting....45
9 Product fiche....46
10 General terms and conditions of service and warranty....46
1 Introduction
HOW TO USE THIS DOCUMENT
- Read this document completely. Make sure that you know and understand all the instructions.
- Obey the safety instructions to prevent injury and/or damage to the appliance and its surroundings.
- Do the procedures completely and in the given sequence.
- Keep this document in a safe area for future use. This document is a part of the appliance.
SYMBOLS USED IN THIS DOCUMENT
| Safety symbol Function Description | ||
 | Warning | "Warning" means that injury or death is possible if you do not obey the instructions. |
 | Caution | "Caution" means that damage to the appliance is possible if you do not obey the instructions. |
 | Note | "Note" is used to give additional information. |
2 Safety
SAFETY INSTRUCTIONS
- Read the instructions before operating the appliance and keep the instructions for future use.
- The appliance is only intended for domestic use within a home. Do not use corrosive chemicals or vapors in this appliance. This appliance is specifically designed to heat. It is not designed for industrial or laboratory use.
-
Do not attempt to operate the appliance with the door open. This can result in harmful exposure to microwave energy.
-
Do not place any object between the door of the appliance. Do not allow soil or cleaner residue to accumulate on the sealing surfaces.
- If the door or the door seal is damaged, the appliance must not be operated until it has been repaired by a competent person.
- Do not heat liquids and other foods in sealed containers because the container can explode.
- Only a competent person is allowed to carry out any service or repairs that involve opening the base unit that protects against exposure to microwave energy.
- Keep the appliance out of reach of children. Children do not understand the danger of handling electrical appliances.
- This appliance cannot be used by children from 0 to 8 years. This appliance can be used by children aged from 8 years and above if they are continuously supervised. The appliance can also be used by people with reduced physical, sensory or mental capabilities or lack of experience or knowledge, if they have been given supervision or instruction concerning use of the appliance in a safe way and understand the hazards involved. Keep the appliance and its cord out of reach of children aged less than 8 years.
- Cleaning and maintenance cannot be done by children.
• Children must not play with the appliance. - Only use materials that are suitable for use in (microwave) ovens.
- The appliance must be cleaned regularly and any food deposits must be removed.
- When heating food in plastic or paper containers, keep an eye on the appliance for possible ignition.
- When you see smoke, switch off and unplug the appliance. Keep the door closed in order to stifle any flames.
- Do not overcook the food.
-
Do not place items on the door of the appliance.
-
Do not use the inside of the appliance for storage purposes. Do not store items, such as bread, cookies, etc. inside.
- Remove metal wire twisties and metal handles from paper or plastic containers/bags before placing them in the appliance.
- Install the appliance only in accordance with the installation instructions.
- Eggs in the shell and whole hard-boiled eggs must not be heated in the appliance since the eggs can burst, even after the appliance is switched off.
- Always carry out regular checks of the appliance and the mains cable to make sure that no damage is evident. Should there be any signs that the appliance or the mains cable is damaged in the slightest degree, the entire appliance should be returned to the Customer Service Department. For your own safety, only use the accessories and spare parts from the manufacturer which are suitable for the appliance.
- Only use and store the appliance indoors.
- Do not use the appliance near water, in a wet basement/garage or near a swimming pool.
- Avoid touching hot surfaces, especially the inside of the appliance.
- Do not cover any vents of the appliance.
- Do not bend the mains cable and keep it away from the heated surface.
- Failure to keep the appliance clean could lead to deterioration of the surface that could adversely affect the life of the appliance and possible result in a hazardous situation.
- The contents of feeding bottles and baby food jars must be stirred or shaken and the temperature must be checked before consumption, in order to avoid burns.
-
Heating beverages in the appliance can result in delayed eruptive boiling. Always place a plastic or ceramic spoon in the cup. Be careful when handling the container.
-
The appliance is not intended to be operated by means of an external timer or separate remote-control system.
- The appliance can only be used when it is built in kitchen furniture.
- Never leave the appliance unattended when in use.
- For your own safety, only use the accessories and spare parts from the manufacturer that are suitable for the appliance.
- Never unplug the appliance from the mains socket by pulling the mains cable.
- Always make sure that your hands are dry before handling the mains cable, mains plug or switch.
- Should you decide not to use the appliance anymore, make it inoperative by cutting the mains cable after removing the mains plug from the mains socket. Make all potentially dangerous parts of the appliance harmless, particularly for children who might be tempted to play with it.
- Never immerse any part of the main body, lid, mains cable and mains plug in water or any other liquid to protect against electrical hazards.
- If the appliance is used for other purposes than intended, or if it is not handled in accordance with the instruction manual, the full responsibility for any consequences will rest with the user. Any damages to the appliance or other things are not covered by the warranty.
- This appliance is intended to use in household and similar applications, such as shops, offices and other working environments, farm houses, customers of motels, hotels and other residential environments and bed and breakfasts.
- The appliance is intended for heating food and beverages. Drying of food or clothing and heating of warming pads, slippers, sponges, damp cloth and similar may lead to risk of injury, ignition or fire.
-
Never use a pressure cleaner or steam cleaner to clean the appliance.
-
Be careful if materials can be used in the appliance. For an overview, refer to section Materials suitable for use in the appliance.
- Legislation requires that all electrical and electronic equipment must be collected for reuse and recycling. Electrical and electronic equipment marked with the symbol indicating separate collection of such equipment must be returned to a municipal waste collection point.
- Do not use the microwave function when the appliance is empty.
- Do not cover the bottom of the appliance with aluminium foil. The aluminium foil stops the heat and causes poor results and damage to the enamel.
- The appliance has a fan that continues after operation.
- Only a qualified installer is allowed to install the appliance.
- In case of incorrect installation or connection, the warranty becomes invalid.
- If the mains cable is damaged, it may only be replaced by the manufacturer, its service organisation or similarly qualified persons, in order to prevent hazardous situations.
- The electrical connection must meet national and local regulations.
- The mains socket and mains plug must always be within reach.
- The appliance may not be connected to the mains supply via a power strip or extension cable. If this is not observed, the safety of the appliance cannot be guaranteed.
• The appliance must be earthed. - Only connect the appliance to alternate current, to an earthed mains socket. Make sure that the voltage in your home corresponds with the voltage printed on the type plate of the appliance.
ENVIRONMENTALLY-FRIENDLY DISPOSAL
Note:
- Recycling - WEEE
- Dispose of packaging in an environmentally-friendly manner.
- This appliance is labelled in accordance with European Directive 2012/19/EU concerning used electrical and electronic appliances (waste electrical and electronic equipment - WEEE). The guideline determines the framework for the return and recycling of used appliances as applicable throughout the EU.
3 Description
INTENDED USE
The appliance is intended to be used for preparing food.
Do not use the appliance for any other purpose than described in this document.
BUILT-IN MICROWAVE OVEN
(Figure 1)
| A Insert levels | E Glass baking tray |
| B Door | F Enamel baking tray |
| C Door handle | G Grill rack |
| D Control panel |
| Item Function | |
| Insert levels Refer to section | Using the insert levels. |
| Door To open the appliance. | |
| Door handle To open and close the door. | |
| Control panel Refer to section | Control panel. |
| Glass baking tray To cook food. | |
| Enamel baking tray | To cook food.Use the enamel baking tray for cake rolls and roasting. |
| Grill rack | To cook food.Use the grill rack for grilling meat and for toasting bread. |
CONTROL PANEL
(Figure 2)
| A Function indicator | K Up button |
| B Oven indicator | L Slider |
| C Clock | M Down button |
| D Temperature indicator | N Function button |
| E Power indicator | O Quick-preheat button |
| F Start/pause button | P Delayed-start button |
| G Lamp button | Q Timer/child-lock button |
| H Weight button | R Microwave button |
| I Clock/temperature button | S Cancel button |
| J Automatic-program button |
| Item Function | |
| Function indicator | To show the selected function (timer, microwave, quick preheat, defrost, delayed start, automatic programs, light). |
| Oven indicator | To show the available and selected oven functions.Refer to section Oven modes |
| Clock | • To show the remaining time during operation.• To show the current time when the appliance is off. |
| Temperature indicator To show the selected temperature. | |
| Power indicator To show the selected microwave power. | |
| Start/pause button To start or pause the appliance. | |
| Lamp button To activate/deactivate the lamp inside the appliance. | |
| Weight button To select the weight. | |
| Clock/temperature button To set the clock or select the temperature. | |
| Automatic-program button To select an automatic program. | |
| Up button To adjust the settings. | |
| Slider | To adjust the settings.Touch and hold the slider to the left to decrease the setting.Touch and hold the slider to the right to increase the setting. |
| Down button To adjust the settings. | |
| Function button To select a function. | |
| Quick-preheat button To select the quick-preheat function. | |
| Delayed-start button To select the delayed-start function. | |
| Timer/child-lock button To use the timer or to activate/deactivate the child lock. | |
| Microwave button To select the microwave function. | |
| Cancel button To cancel a function or program. |

Note: You can use both the up/down button or the slider to adjust the settings of the appliance. All three buttons have the same function.
4 Installation
SAFETY INSTRUCTIONS FOR INSTALLATION
- Safety during use can only be guaranteed if installation was done correctly and according to the instructions. The installer is liable for damage caused by incorrect installation.
- The electrical installation must be carried out by a qualified electrician. The electrician must comply to national and local regulations.
- The appliance has protection class I and may only be used in combination with an earthed connection.
- The appliance must be connected to a permanent installation in which provisions for switching off are integrated, in accordance with the installation instructions.
- Make sure that the mains cable does not get jammed during installation or is running along sharp edges. The mains cable must be placed in such a way that no contact is made with hot parts of the appliance.
-
The connection point, mains socket and/or mains plug must always be accessible.
-
The kitchen furniture in which the appliance is installed must be heat resistant to at least 90^ . This also applies to the doors or front of the furniture.
- Make sure that the kitchen furniture in which the appliance is installed is firmly attached, for example by fastening the furniture to adjacent elements.
- In case of incorrect installation or connection the warranty becomes invalid.
- Changes to the appliance, including replacing the mains cable, must be carried out by a certified installer.
- Make sure that there is sufficient ventilation and fresh air around the appliance.
UNPACKING
- Remove the packaging.
- Examine the appliance for damage.
- Make sure that the voltage is the same as on the type plate.
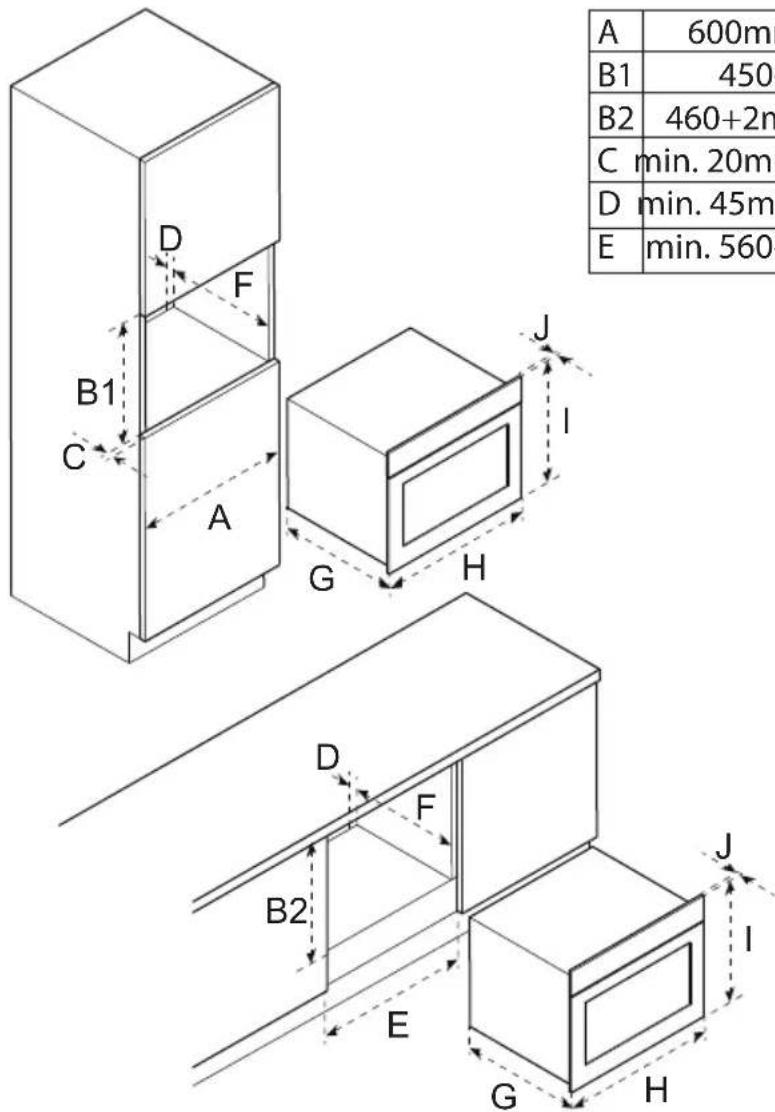
PREPARING FOR INSTALLATION
(Figure 3)

Note:
Make sure that the kitchen furniture is prepared according to the dimensions of the appliance.
INSTALLING THE APPLIANCE
Preliminary requirements

- Make sure that the kitchen furniture is prepared according to the correct dimensions.

Warning:
Two persons are required to install the appliance.

Caution:
Make sure that the mains cable does not get jammed during installation or is placed on top of the appliance.

Caution:
Do not cover the opening between the kitchen furniture and the top of the appliance. The opening is required for ventilation.

Note:
It is possible to connect the appliance to the mains supply before positioning the appliance.
Procedure
- Put the appliance (A) in the center of the kitchen furniture.
(Figure 4)

Caution:
Make sure that there is a minimum space of 2 mm between the appliance and the walls of the kitchen furniture.
- Open the door (D) of the appliance.
- Install the appliance in the kitchen furniture. Use the screws (C).
- Install the covers (B).
- Close the door.
- Connect the appliance. Refer to section Connecting the appliance.
CONNECTING THE APPLIANCE
- Make sure that the voltage in your home corresponds with the voltage of the appliance.
- Make sure that the electrical system in your home is supplied with a 16Amp fuse.

Note:
If you replace the supplied mains cable, make sure that the new mains cable has a minimum core cross section of 2.5 mm ^2 and a length of 1.5 m. If you use a mains cable that is too short, you cannot connect the appliance and position it in the kitchen furniture before connecting the appliance to the mains socket.
- Use the supplied mains cable to connect the appliance to the mains socket.
After connecting, the clock shows '00:00' and you will hear a sound signal.
5 Operation
PREPARING FOR OPERATION
- Clean the appliance and the accessories. Use warm water and a mild cleaning agent.
- Rinse the appliance and the accessories thoroughly with water.
- Dry the appliance and the accessories.
- Use the oven function for 60 minutes with a temperature of 250^ C to remove any production residues, such as oil and to prevent bad smells. Refer to section Using the oven function.

Warning:
Make sure that the room is properly ventilated.
- Let the appliance cool down.
- Clean the appliance again. Use warm water and a mild cleaning agent.
- Rinse the appliance thoroughly with water.
- Dry the appliance.
- Install the guide racks. Refer to sections Installing the hooks for the guide racks and Installing the guide racks.
INSTALLING THE HOOKS FOR THE GUIDE RACKS
- Identify the hooks for the rear (A) and the front (B).
- Install the hook (C) in the top opening (D).
- Install the hook in the bottom opening (E).
- Push the hook down.
- Repeat the procedure for the other hooks.
(Figure 5)
INSTALLING THE GUIDE RACKS

Note:
The procedure shows the installation for the guide rack of the right side of the appliance. The procedure for the left side is the same, however the hooks are mirrored.
- Identify the guide racks for the left side (A) and the right side (B).
(Figure 6) - Carefully push the guide rack (C) in the hook (D).
(Figure 7) - Push the rack to the rear of the appliance.
- Push the rack down.
- Install the clamping bushes (E).
SETTING THE CLOCK
- Touch the clock/temperature button. The clock display shows '00:00' and the value for hours flashes.
- Touch the up/down button or the slider to adjust the hours.

Note:
The value must be between 0 and 23.
- Touch the clock/temperature button again. The value for minutes on the clock display flashes.
- Touch the up/down button or the slider to adjust the minutes.

Note:
The value must be between 0 and 59.
- Touch the clock/temperature button to save the settings. The ‘:’ in the clock display flashes.
- Repeat the procedure to adjust the time.
SETTING THE KITCHEN TIMER
The kitchen timer can be used independently from the cooking timer.
- Touch the timer/child-lock button. '00:00min' flashes on the clock display.
- Touch the up/down button or the slider to set the kitchen timer.

Note:
The value must be between 0 and 23.
- Touch the timer/child-lock button again. The ‘:’ in the clock display flashes and the timer counts down.
When the kitchen timer finishes, you will hear a sound signal 5 times and the clock display shows the current time. The appliance does not automatically switch off and the program or function continues.
SETTING THE COOKING TIME
The cooking time can be set for the oven function, the microwave function and the combi function.
- Touch the clock/temperature button. '00:00' flashes on the clock display.
- Touch the up/down button or the slider to set the cooking time.
When the cooking time finishes, you will hear a sound signal times and the appliance returns to the standby state.
USING THE DELAYED-START FUNCTION
You can use the delayed-start function to make sure that your dish is ready at a preset time. The appliance will automatically start.

Note:
Make sure that the clock is set before you use the delayed-start function. Refer to section Setting the clock.

Note:
You cannot use the kitchen timer when the delayed-start function is active.
- Touch the delayed-start button. The indicator for the delayed-start function on the display is on and the value for hours flashes.
- Touch the up/down button or the slider to adjust the hours.

Note:
The value must be between 0 and 23.
- Touch the delayed-start button again. The values for minutes on the display flashes.
- Touch the up/down button or the slider to adjust the minutes.

Note:
The value must be between 0 and 59.
- Touch the delayed-start button to save the settings.
- Touch the function button to select a desired function (e.g. oven, microwave etc.).
- Touch the up/down button or the slider to select the temperature.
- Touch the start/pause button to finish. The indicator for the delayed-start function on the display flashes.
When the delayed-start time finishes, you will hear a sound signal and the appliance starts.
USING THE INSERT LEVELS
The appliance has 5 insert levels to ensure that you can partly remove the grill rack or baking tray without tilting. As a result, you can safely remove the dish from the appliance and the grill rack or baking tray will not accidentally fall from the appliance.

Caution:
For safety reasons, the baking tray should be placed in one of the insert levels. Do not place the baking tray on the bottom of the appliance.
- Use the guide racks to correctly place the grill rack (A) or baking tray (B) in the appliance. (Figure 8)
- Make sure that the accessories are fully placed in the appliance and that they do not make contact with the door.
USING THE OVEN FUNCTION
For an overview of the available oven modes, refer to section Oven modes.
- Touch the function button. The oven indicator shows the conventional mode.
- Touch the function button again to select the desired oven mode. The oven indicator shows the selected mode.
- Touch the up/down button or the slider to select the temperature.
- Set the cooking time. Refer to section Setting the cooking time.
- Touch the start/pause button to start the appliance.

Note:
If you open the door of the appliance during cooking, you must touch the start/pause button to continue the cooking.
USING THE QUICK-PREHEAT FUNCTION
You can use the quick-preheat function to quickly preheat the appliance to a set temperature.

Note:
The quick-preheat function cannot be used for automatic or defrost programs.
-
Touch the function button to select the desired oven mode.
-
Touch the quick-preheat button. The indicator for the quick-preheat function on the display is on.
When the appliance is preheated, a sound signal sounds and the indicator for the quick-preheat function flashes on the display. You can now place your dish in the appliance.
OVEN MODES
| Oven mode Description | Temperature range | ||
| Conventional | The upper and lower heating elements are both used for perfect baking results, such as cake and puff pastry. | 100-235°C | |
 | Hot air | Used for baking at several levels, for example baking trays with cookies. The heat comes from the heating elements at the rear of the appliance. | 50-250°C |
| Conventional + fan | Used for baking at several levels, for example baking trays with cookies. The fan distributes the heat from the heating elements evenly throughout the appliance. | 50-235°C | |
| Single grill | Used for grilling small portions and for browning food. Place the dish in the middle of the appliance. | 100-235°C | |
 | Double grill + fan | Used for grilling a layer of food or to gratin dishes. 100-250°C | |
| Double grill Used for grilling large portions of meat. 100-235°C | |||
 | Pizza | Used for pizzas and dishes that require heat from below. The heat comes from lower and rear heating elements. | 50-250°C |
| Heat from below | Used for extra browning of pizza bottoms, quiches and pies. The heat comes from the lower heating element. | 50-235°C | |
Only use materials that are suitable for use in a microwave oven.

Warning:
Heating beverages can result in delayed eruptive boiling. Always place a plastic or ceramic spoon in the cup. Be careful when handling the container.

Warning:
The contents of feeding bottles and baby food jars must be stirred or shaken and the temperature must be checked before consumption, in order to avoid burns.

Caution:
Always use heat resistant oven dishes made of pottery, glass or plastic. These materials allow the microwaves to pass properly. Do not use oven dishes made of metal or with metal decorations.

Caution:
Do not use the enamel baking tray when you use the microwave function.

Note:
Use the glass baking tray when you use the microwave function. For the best cooking result place the glass baking tray on insert level 1.
For an overview of the suggested power for microwave cooking, refer to section Power settings for microwave cooking.
- Touch the microwave button. The power indicator shows the default microwave power (900 W) and the default cooking time (1 minute) flashes on the clock display.
- Touch the up/down button or the slider to set the cooking time. The cooking time increases gradually. Refer to section Values for increasing the cooking time for an overview.
- Touch the microwave button again to set the microwave power.
- Touch the up/down button or the slider to set the power.

Note:
The microwave power can be set to 900 W for a maximum of 30 minutes. For the other microwave power settings the maximum cooking time is 1 hour and 30 minutes.
- Touch the start/pause button to start the appliance.
When the cooking time finishes, a sound signal sounds and the appliance returns to the standby state.

Note:
If you open the door of the appliance during cooking, you must touch the start/pause button to continue the cooking.

Note:
You can change the cooking time at any time during the microwave function by touching the up/down button or the slider.
| Microwave power (W) | Application |
| 100 Softening ice cream, defrosting, proving dough. | |
| 300 Softening butter, melting chocolate, defrosting. | |
| 500 Cooking rice and soup. | |
| 700 | Heating fish, cooking mushrooms (for example), or dishes that contain eggs and cheese. |
| 900 | Heating, boiling water, cooking chicken, fish and vegetables and heating drinks. |
VALUES FOR INCREASING THE COOKING TIME
| Minutes | Steps |
| 0-1 5 seconds | |
| 1-3 10 seconds | |
| 3-15 30 seconds | |
| 15-60 1 minute | |
| > 60 5 minutes |
USING THE COMBI FUNCTION
The combi function allows you to use the microwave and the oven at the same time. The microwave function ensures quick cooking and because of the oven function your dishes are nicely browned.
For an overview of the available combination menus, refer to section Combi functions.

Note:
Always use the grill rack during the combi function. Do not use the enamel or glass baking tray. For the best cooking result place the grill rack on insert level 2.
- Touch the microwave button. The power indicator shows the default microwave power (900 W) and the default cooking time (1 minute) flashes on the clock display.
- Touch the function button to select the desired oven mode. The oven indicator shows the selected mode.
- Touch the up/down button or the slider to select the temperature.
- Set the cooking time. Refer to section Setting the cooking time.
- Touch the microwave button to set the microwave power.
- Touch the up/down button or the slider to set the power.
- Touch the start/pause button to start the appliance.
COMBI FUNCTIONS
| Microwave function | Microwave power (W) | Standard temperature | Temperature range Time range |
| Microwave 900 - - 00:01-30:00 min | |||
| Microwave + hot air 300 160°C 50-250°C 00:01-1:30 hour | |||
| Microwave + double grill + fan 300 180°C 50-250°C 00:01-1:30 hour | |||
| Microwave + pizza 300 150°C 50-250°C 00:01-1:30 hour |
USING THE AUTOMATIC PROGRAMS
When using the automatic programs you only have to select a program and set the weight. The microwave power, the time and the temperature are preset.
For an overview of the available automatic programs, refer to section Automatic programs.

Caution:
Do not preheat the appliance when using automatic programs.
- Touch the automatic-program button two times. The display shows the first automatic program number (P01).
- Touch the up/down button or the slider to select an automatic program. The display shows the selected program, the time and the weight.
- Touch the weight button.
- Touch the up/down button or the slider to select the weight.

Note:
For some automatic programs you cannot select the weight.
- Touch the start/pause button to start the appliance.
When the automatic program finishes, you will hear a sound signal and the appliance returns to the standby state.

Note:
- Once you selected an automatic program you cannot change it.
- You cannot change the cooking time.
- Some automatic programs use preheating.

Note:
If you open the door of the appliance during cooking, you must touch the start/pause button to continue the cooking.
AUTOMATIC PROGRAMS
| Program Application Weight (g) | ||
| P01 (**) Fresh vegetables 200, 400 or | 600 | |
| P02 (**) Potatoes peeled and cooked | 240, 480 or 720 | |
| P03 Baked potatoes 450 or 1000 | ||
| P04 Chicken (frozen) 450 | ||
| P05 (*) Cake 400, 500 or 600 | ||
| P06 (*) Apple pie 2400 | ||
| P07 (*) Quiche 1000 | ||
| P08 (**) Reheat soup 200, 400 or 600 | ||
| P09 (**) Reheat plate 250 or 350 | ||
| P10 (**) Reheat sauce or stew 100, 200 or 300 | ||
| P11 Frozen pizza 200, 400 or 600 | ||
| P12 (*) Frozen oven chips 300, 400 or | 500 | |
| P13 Lasagna 1600 |
(*) These programs use preheating. During preheating the cooking time pauses and the display shows the preheat icon. When preheating is finished, you will hear a sound signal and the pre-heat icon on the display flashes. You can place your dish in the appliance.
(**) These automatic programs only use the microwave function.
USING THE DEFROST PROGRAMS
For an overview of the available defrost programs, refer to section Defrost programs.

Note:
- Only use frozen food stored at -18°C. Make sure that you freeze food in portions and as flat as possible to fasten the defrosting process.
- Remove the packaging and weigh the defrosted food. You need to set the weight for the defrost programs.
- Liquid can be produced during defrosting meat and poultry. Drain the liquid when you turn the food. Make sure that the liquid does not come into contact with other food.
-
Place the food on the glass baking tray or in a dish that is suitable for a microwave oven.
• After defrosting, leave the food to rest for 10 to 30 minutes to make sure that the complete dish has the same temperature. Large pieces of meat require more time. -
Touch the automatic-program button one time. The display shows the first defrost program number (d01).
- Touch the up/down button or the slider to select a defrost program. The display shows the selected program.
- Touch the weight button.
- Touch the up/down button or the slider to select the weight.
- Touch the start/pause button to start the appliance.
When the defrost program finishes, you will hear a sound signal and the appliance return to the standby state.

Note:
When you defrost meat or poultry, you will hear a sound signal 2 times that indicates that the food must be turned. Consequently, touch the start/pause button to continue the program.
DEFROST PROGRAMS
| Program Application Weight (g) | ||
| d01 Meat 100-1500 | ||
| d02 Poultry 100-1500 | ||
| d03 Fish 100-800 |

Note:
The defrost programs only use the microwave function.
CHANGING THE TEMPERATURE DURING COOKING
You can change the temperature at any time.
- Touch the up/down button or the slider to adjust the temperature. The temperature indicator shows the selected temperature.
CHANGING THE POWER SETTING DURING COOKING
You can change the power setting at any time.
-
Touch the microwave button.
-
Touch the up/down button or the slider to adjust the power. The power indicator shows the selected power.
CHANGING THE COOKING TIME DURING COOKING
For the oven function and the combi function you can change the cooking time at any time.
-
Touch the clock/temperature button.
-
Touch the up/down button or the slider to adjust the time.
PAUSING THE APPLIANCE
-
Push the start/pause button to pause the appliance.
-
Push the start/pause button again to start the appliance again.
ACTIVATING AND DEACTIVATING THE CHILD LOCK
When the child lock is activated, you cannot operate the touch buttons.
Activating the child lock
- Touch and hold the timer/child-lock button for 3 seconds to activate the child lock. You will hear a long sound signal and the clock display shows a lock.
Deactivating the child lock
- Touch and hold the timer/child-lock button for 3 seconds to deactivate the child lock. You will hear a long sound signal and the clock display no longer shows a lock.
STOPPING THE APPLIANCE
- Touch the start/pause button to stop the appliance.

Note:
When you are choosing a cooking function, the cancel button can also be used to cancel the function at any time.
6 Cleaning and maintenance
CLEANING THE APPLIANCE

Warning:
Make sure that the appliance is switched off and cooled down before cleaning.

Caution:
Do not use a pressure cleaner or steam cleaner to clean the appliance.

Caution:
Do not use abrasive cleaning agents or sharp scrapers.
- Clean the inside of the appliance after every use. Use a damp cloth.

Note:
You can remove the guide racks to easily clean the inside. Refer to section Removing the guide racks.
- In case of heavy dirt, clean the inside of the appliance with warm water and a mild cleaning agent. Thoroughly rinse and dry the inside after cleaning.
- Clean the accessories. Use warm water and a mild cleaning agent. Dry the accessories after cleaning.
- Clean the outside of the appliance. Use a damp cloth or sponge.
- In case of heavy dirt, clean the outside of the appliance with a mild detergent.
- If necessary, you can remove bad smells from the appliance:
a. Place a cup of water with a few drops of lemon juice in the appliance. Make sure that you also place a (plastic) spoon in the cup to avoid delayed eruptive boiling.
b. Use the microwave function at the highest power setting for 1 to 2 minutes. Refer to section Using the microwave function
REMOVING THE GUIDE RACKS
- Remove the clamping bushes (A).
- Remove the guide racks (B).
- After cleaning, install the guide racks again. Refer to section Installing the guide racks.
(Figure 9)
7 Extra information
MATERIALS SUITABLE FOR USE IN THE APPLIANCE
| Material | Suitable |
| Aluminium foil Yes (*) | |
| Paper Yes (**) | |
| Cling film Yes | |
| Aluminium tray No | |
| Microwave dishes Yes | |
| Heatproof plastic Yes | |
| Unglazed pottery No | |
| Metal cooking utensils No | |
| Material Suitable | |
| Ovenproof glass and ceramics Yes | |
| Normal glass Yes | |
| Metallic twists No | |
| Plate with metallic decoration No | |
| Mercury thermometer No | |
| Closed jar No (***) | |
| Bottle with a narrow neck No | |
| Roasting bags Yes |
(*) By covering thinner parts of foods (such as chicken legs), you prevent them from cooking too quickly.
(**) Use undecorated kitchen paper to cover food and to absorb grease.
(***) Remove the lid and make sure that the jar is not heated too long. The jar may break.
8 Troubleshooting
GENERAL TROUBLESHOOTING PROCEDURE
- Try to find a solution for the problem with the help of the troubleshooting table.
- If you cannot find a solution for the problem, contact the Inventum-servicedienst.
TROUBLESHOOTING TABLE
| Problem Possible cause Possible solution | ||
| The appliance does not start. | There is no power supply. | Do a check on the fuse, if necessary replace the fuse. |
| The mains cable is not connected. | Make sure that the mains cable is correctly connected to the mains socket. | |
| The power is interrupted. | Do a check if the power in the kitchen is working. | |
| The appliance does not start and the clock display shows a lock. | The child lock is activated. | Deactivate the child lock. Refer to section Activating and deactivating the child lock. |
| The display shows '00:00'. The power was interrupted. | Set the clock. Refer to section Setting the clock. | |
| The microwave function does not start. | The door is not closed correctly. | · Do a check if something blocks the door. If so, remove the blockage. · Close the door correctly. |
| Heating food with the microwave function takes longer. | The selected microwave power is too low. | Select a higher microwave power. Refer to section Power settings for microwave cooking. |
| The portion of food is larger. | Larger portions of food take longer to heat. Select a longer cooking time. | |
| The food is cold. Stir the food during the cooking. | ||
| A function or setting cannot be selected. | The temperature, power or combined setting is not available for the selected function. | Make sure that you select a setting that is available for the selected function. |
| The display shows E-01. There is an error. Contact the Inventum-servicedienst. | ||
| The display shows E-04. There is an error. Contact the Inventum-servicedienst. | ||
| The display shows E-17. There is an error. Contact the Inventum-servicedienst. | ||
9 Product fiche
TECHNICAL SPECIFICATIONS
| Item Specification | |
| Model IMC4535GT | |
| Voltage 230 Volt ~50Hz | |
| Input power 3000 Watt | |
| Microwave power 900 Watt | |
| Capacity 50 liter | |
| External dimensions (without door handle) 454 x 595 x 565 mm | |
| Net weight 38.8 kg | |
10 General terms and conditions of service and warranty
5-year Inventum warranty!
- Customers enjoy a 5-year full manufacturer's warranty on all Inventum products.
- Within this period, a defective product or part, which makes normal functioning of the product or part impossible, will always be repaired free of charge or, if repair is not possible and/or does not provide a solution, replaced (by the same or equivalent products). The assessment of this lies with Inventum.
- In order to make a claim under the 5-year Inventum warranty, you must, within two months after discovering the fault or defect, either return the product to the shop where you bought it, or contact the Inventum customer service department by using the form at 'https://www.inventum.eu/service'.
- The warranty period starts from the date stated on the product's original sales receipt.
- To invoke the warranty, you must always send a copy of the original proof of purchase with the service request and present the original proof of purchase to the service technician.
- The 5-year warranty applies only to normal domestic use of Inventum products within the Netherlands.
Warranty exclusions
- The 5-year Inventum guarantee does not apply in case of: normal wear and tear, consumables, improper use, insufficient or incorrect maintenance, incorrect and/or inexpert assembly and installation of the appliance, repairs by unauthorized third parties, business or commercial use, missing serial number, damage caused by an external cause. This enumeration is not exhaustive.
- B-choice products and products that have been built-in in a showroom are not covered by the 5-year Inventum warranty. All optical damage such as dents, scratches and slight traces of use are excluded from any warranty.
Reporting malfunctions on Inventum products
- Faults or defects on Inventum products can be reported by using the service request form on the website 'https://www.inventum.eu/service' or through the seller of the product.
- A copy of the original proof of purchase must be included with the request.
- Inventum's service department determines whether the product will be repaired or replaced, based on the request and the sales receipt.
Important to know
- Products sent without prior notification will not be accepted. Further to the notification, you will be informed by Inventum whether a warranty applies and whether you must return the product.
- The replacement or repair of a defective product, or a part thereof, does not lead to an extension of the original warranty period.
- Products eligible for replacement or repair must be emptied and clean.
For a detailed explanation of the warranty conditions and items excluded from them, please visit Inventum's website 'https://www.inventum.eu/algemene-voorwaarden'
These general warranty and service conditions apply to Inventum brand products purchased after 27th of April 2022 and intended for use within the Netherlands.
For Inventum products used outside the Netherlands, but within a EU Member State, the warranty rules of that country apply. Inventum provides warranty and service by a white goods technician only in the Netherlands.
As a consumer, you are entitled by law to a properly working product. Does the product break down sooner than you might expect? This means that the product is not in conformity. In that case, the law offers you, the buyer, with a number of legal remedies for your protection. This legal protection is not affected by the above commercial warranty given by Inventum on Inventum products used within the Netherlands.
4 Installation....55
5 Bedienung....57
1 Introduction....69
2 Sécurité....69
3 Description....74
4 Installation....76
5 Utilisation....77
Modifications and errors reserved
INVENTUM
facebook.com/inventum1908
pinterest.com/inventum1908
youtube.com/inventum1908
instagram.com/inventum1908


