
NQ5B6753CAA - Oven SAMSUNG - Free user manual and instructions
Find the device manual for free NQ5B6753CAA SAMSUNG in PDF.
| Product Type | Combined microwave and convection oven |
| Brand | Samsung |
| Model | NQ5B6753CAA |
| Dimensions (W x H x D) | 595 x 456 x 570 mm (exterior) ; 560 x 446 x 549 mm (built-in) |
| Net weight | 39.9 kg |
| Capacity | 50 L |
| Power supply | 230 V ~ 50 Hz |
| Maximum power | 2800 W |
| Microwave power | 1650 W (output 100-850 W) |
| Grill power | 2550 W |
| Convection power | 2500 W |
| Microwave frequency | 2450 MHz |
| Cooking modes | Convection, Classic fan heat, Large grill, Fan grill, Top heat + Convection, Bottom heat + Convection, Intensive cooking, Pro-Roasting, Air fry, Microwave, MWO + Grill, MWO + Convection, MWO + Roast |
| Automatic programs | 31 automatic cooking programs and 4 quick cooking programs |
| Special functions | Multi-level cooking, Keep warm, Auto defrost, Timer, Steam cleaning, Odor removal |
| Included accessories | Ceramic plate, Baking tray, Metal tray, Oven grid, Air fry grid, Pro Steamer (steam plate, steam tray, stainless steel lid), 3 fixing screws |
| Connectivity | Wi-Fi, SmartThings, Smart control, Remote management |
| Display | Non-touch LCD display with control dial |
| Safety | Child lock (control panel), door safety lock |
| Cleaning | Steam cleaning, odor removal function, enamel coating |
| Standby consumption (Wi-Fi active) | 1.9 W |
| Off mode consumption | 0.5 W |
Frequently Asked Questions - NQ5B6753CAA SAMSUNG
User questions about NQ5B6753CAA SAMSUNG
0 question about this device. Answer the ones you know or ask your own.
Ask a new question about this device
Download the instructions for your Oven in PDF format for free! Find your manual NQ5B6753CAA - SAMSUNG and take your electronic device back in hand. On this page are published all the documents necessary for the use of your device. NQ5B6753CAA by SAMSUNG.
USER MANUAL NQ5B6753CAA SAMSUNG
natural_image
3D diagram of a rectangular grid structure with a circular hole on the right side (no text or symbols)www.samsung.com/uk/aboutsamsung/sustainability/environment/our-commitment/data/
Instalación
Qué se incluye
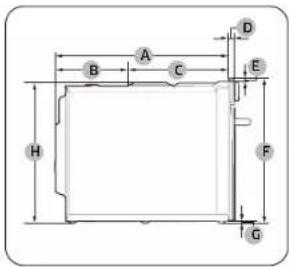
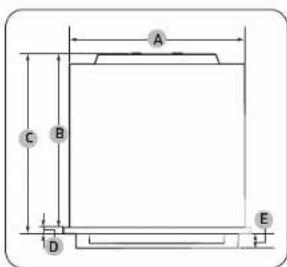
Horna (mm)
| A 560 F 595 | ||
| B 446 G 354 | ||
| C 549 H 85 | ||
| D 21 I 456 | ||
| E 341 | ||

Horno (mm)
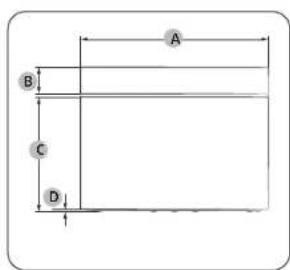
| A 595 |
| B 85 |
| C 360 |
| D 6 |
Instalación
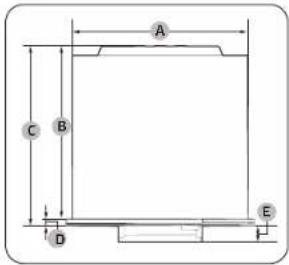
Horno (mm)
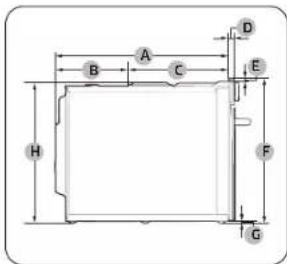
| A | 549 | E | 10 |
| B | 233 | F | 456 |
| C | 316 | G | 6 |
| D | 21 | H | 446 |
Horno (mm)
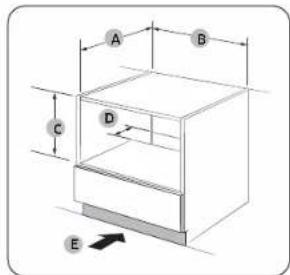
| A 560 D 21 | ||
| B 549 | E | 45 |
| C 570 | ||
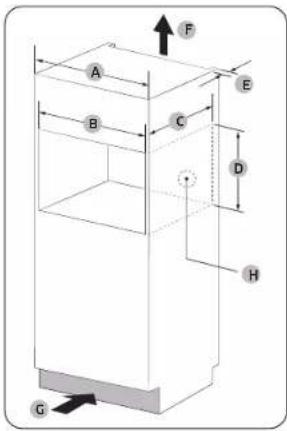
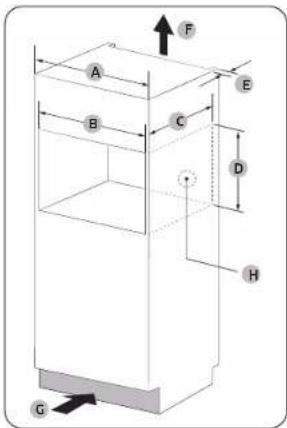
Armario empotrado (mm)
| A 600 |
| B Min. 564-568 |
| C Min. 550 |
| D Min. 446 / Máx. 450 |
| E Min. 50 |
| F 200 cm2 |
| G 200 cm2 |
| H Espacio para la toma de corriente(Agujero de 30 ∅) |
natural_image
Pure technical line drawing of a mechanical component or assembly (no text or symbols)natural_image
Diagram of a mechanical assembly with two stacked blocks and an upward force arrow (no text or symbols)natural_image
Simple 3D diagram of a rectangular block mounted on a vertical wall, with no text or symbols present.natural_image
Simple line drawing of a room with a window and ceiling, no text or symbols presentnatural_image
Simple line drawing of a cabinet with a lid and top mount (no text or symbols)natural_image
Simple line drawing of a chicken inside a grid, no text or symbols presentnatural_image
Technical line drawing of a metal railing structure with an arrow indicating direction (no text or symbols)
natural_image
Technical line drawing of a metal-framed door frame with an open lock and handle, showing no text or symbols.Notas
natural_image
Technical line drawing of a rectangular grid structure with a circular end (no text or symbols)www.samsung.com/uk/aboutsamsung/sustainability/environment/our-commitment/data/

Four (mm)
| A 560 F 595 | ||
| B 446 G 354 | ||
| C 549 H 85 | ||
| D 21 I 456 | ||
| E 341 | ||
Four (mm)
| A 595 |
| B 85 |
| C 360 |
| D 6 |
Installation
Four (mm)
| A 5 | 49 E | 10 | ||
| B 2 | 33 F | 456 | ||
| C 3 | 16 G | 6 | ||
| D | 21 | H 4 | 46 | |
Four (mm)
| A 560 D | 21 | ||
| B 549 E | 45 | ||
| C 570 | |||
Meuble encastré (mm)