
Saeco GranAroma Deluxe SM6685 - Coffee maker PHILIPS - Free user manual and instructions
Find the device manual for free Saeco GranAroma Deluxe SM6685 PHILIPS in PDF.
| Product type | Fully automatic coffee machine |
| Brand and model | Philips Saeco GranAroma Deluxe SM6685 |
| Dimensions (W x H x D) | 262 x 383 x 448 mm |
| Weight | 8.3 to 8.8 kg |
| Power cord | 1,200 mm |
| Rated voltage / Power | Refer to the label inside the access door |
| Water tank capacity | 1.8 liters |
| Bean hopper capacity | 300 g |
| Coffee grounds container capacity | 12 servings |
| Milk container capacity | 600 ml |
| Adjustable dispensing spout height | 87-147 mm |
| Wi-Fi connectivity | 2.4 GHz 802.11 b/g/n |
| Grinder | Ceramic grinder with 12 grind settings |
| Main functions | CoffeeMaestro (Delicato, Intenso, Forte profiles), CoffeeEqualizer Touch, HygieSteam (steam milk cleaning), ExtraShot, milk-based drinks preparation, hot water, pre-ground coffee, profile customization |
| Water filter | AquaClean (replace every 3 months or 95 L) |
| Maintenance and cleaning | Automatic cleaning of the brewing unit, descaling with Philips solution, cleaning the cappuccinatore, lubricating the brewing unit every 2 months |
| Spare parts and accessories | AquaClean filter CA6903, descaling solution CA6700, grease HD5061, degreasing tablets CA6704, milk circuit cleaner CA6705, maintenance kit CA6707 |
| Safety | Automatic shut-off, overheat detection, EU compliance |
| General information | Online registration via Wi-Fi, automatic software updates, Alexa and Amazon Smart Reorders compatibility (depending on country) |
Frequently Asked Questions - Saeco GranAroma Deluxe SM6685 PHILIPS
User questions about Saeco GranAroma Deluxe SM6685 PHILIPS
0 question about this device. Answer the ones you know or ask your own.
Ask a new question about this device
Download the instructions for your Coffee maker in PDF format for free! Find your manual Saeco GranAroma Deluxe SM6685 - PHILIPS and take your electronic device back in hand. On this page are published all the documents necessary for the use of your device. Saeco GranAroma Deluxe SM6685 by PHILIPS.
USER MANUAL Saeco GranAroma Deluxe SM6685 PHILIPS
natural_image
Modern saeco coffee machine with two glass cups filled with brown liquid, displayed on a digital screen (no visible text or symbols on the main device)EN USER MANUAL
text_image
GranAroma DELUXE B2 Select your drink B1 B3 B4 B5 B6 B8B7C
text_image
A7 A8 A21 A26 A20 A5 A19 A17 A1 A10 A14 A16 A18 A22 A23English 6
Azərbaycanca 25
Čeština 45
Crnogorski 65
Dansk 86
Deutsch 106
Eesti 129
Español 149
Français 170
Hrvatski 191
Italiano 212
Latviešu 234
Lietuviškai 254
Magyar 274
Nederlands 295
Norsk 316
O'zbek 336
Polski 357
Português 378
Română 399
Shqip 419
Slovenščina 440
Slovensky 460
Srpski 481
Suomi 502
Svenska 522
Türkmençe 542
Ελληνικά 562
Български 585
Кыргызча 607
Македонски 630
Русский 653
Точикй 677
Українська 700
Қазақша 722
Ruijtntu 743
phosphorus 767
790
Contents
Machine overview (Fig. A) 6
Introduction 7
Adjusting machine settings 11
AquaClean water filter 12
Removing and inserting the brew group 13
Cleaning and maintenance 13
Descaling procedure 16
Error codes 17
Ordering accessories 18
Software updates 18
Troubleshooting 19
Technical specifications 24
Declaration of Conformity 24
Wi-Fi 24
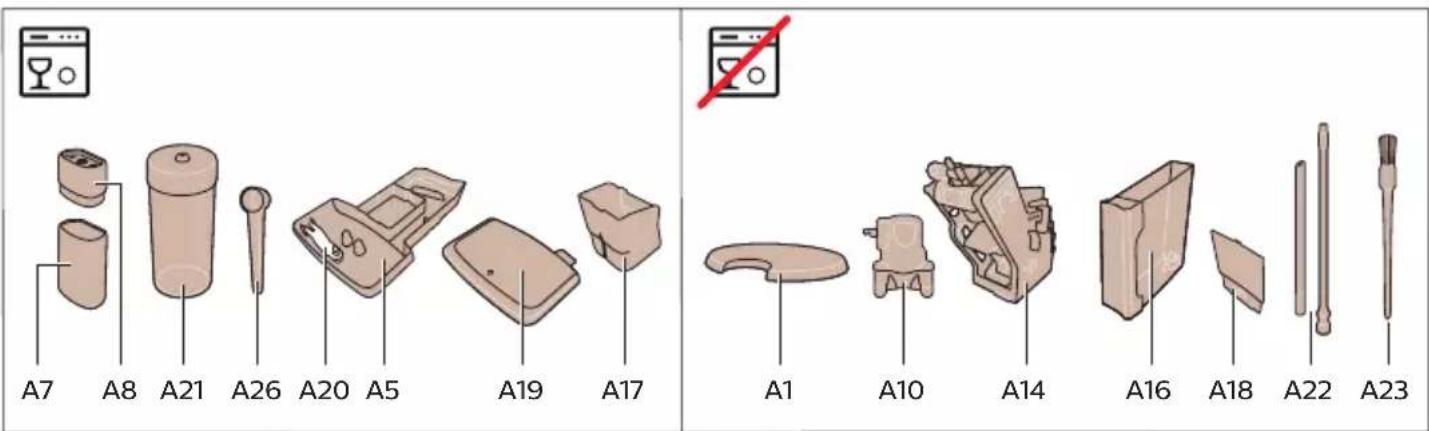
Machine overview (Fig. A)
A1 Lid of bean hopper
A2 Lid of pre-ground coffee compartment
A3 Control panel
A4 Socket for cord
A5 Drip tray
A6 Drip tray release grip
A7 HygieSteam container
A8 HygieSteam cover with milk tube holder
A9 Height-adjustable coffee and milk dispensing spout
A10 Internal cappuccinatore
A11 Power cord with plug
A12 Grind setting knob (to learn more, visit www.saeco.com/care)
A13 Bean hopper
A14 Brew group (to learn more, visit www.saeco.com/care)
A15 Service door
A16 Water tank
A17 Coffee grounds container
A18 Front panel of coffee grounds container
A19 Drip tray cover
A20 'Drip tray full' indicator
Accessories
A21 Milk container
A22 Milk tube
A23 Cleaning brush
A24 Grease tube
A25 AquaClean filter
A26 Measuring spoon
A27 Water hardness test strip
Control panel
Refer to figure B for an overview of all icons. Below you can find the descriptions.
B1 On/off icon
B2 Drinks
B3 Drinks menu
B4 Personal profiles
B5 Machine settings
B6 Status menu
B7 Shop
B8 Start/stop ▶icon
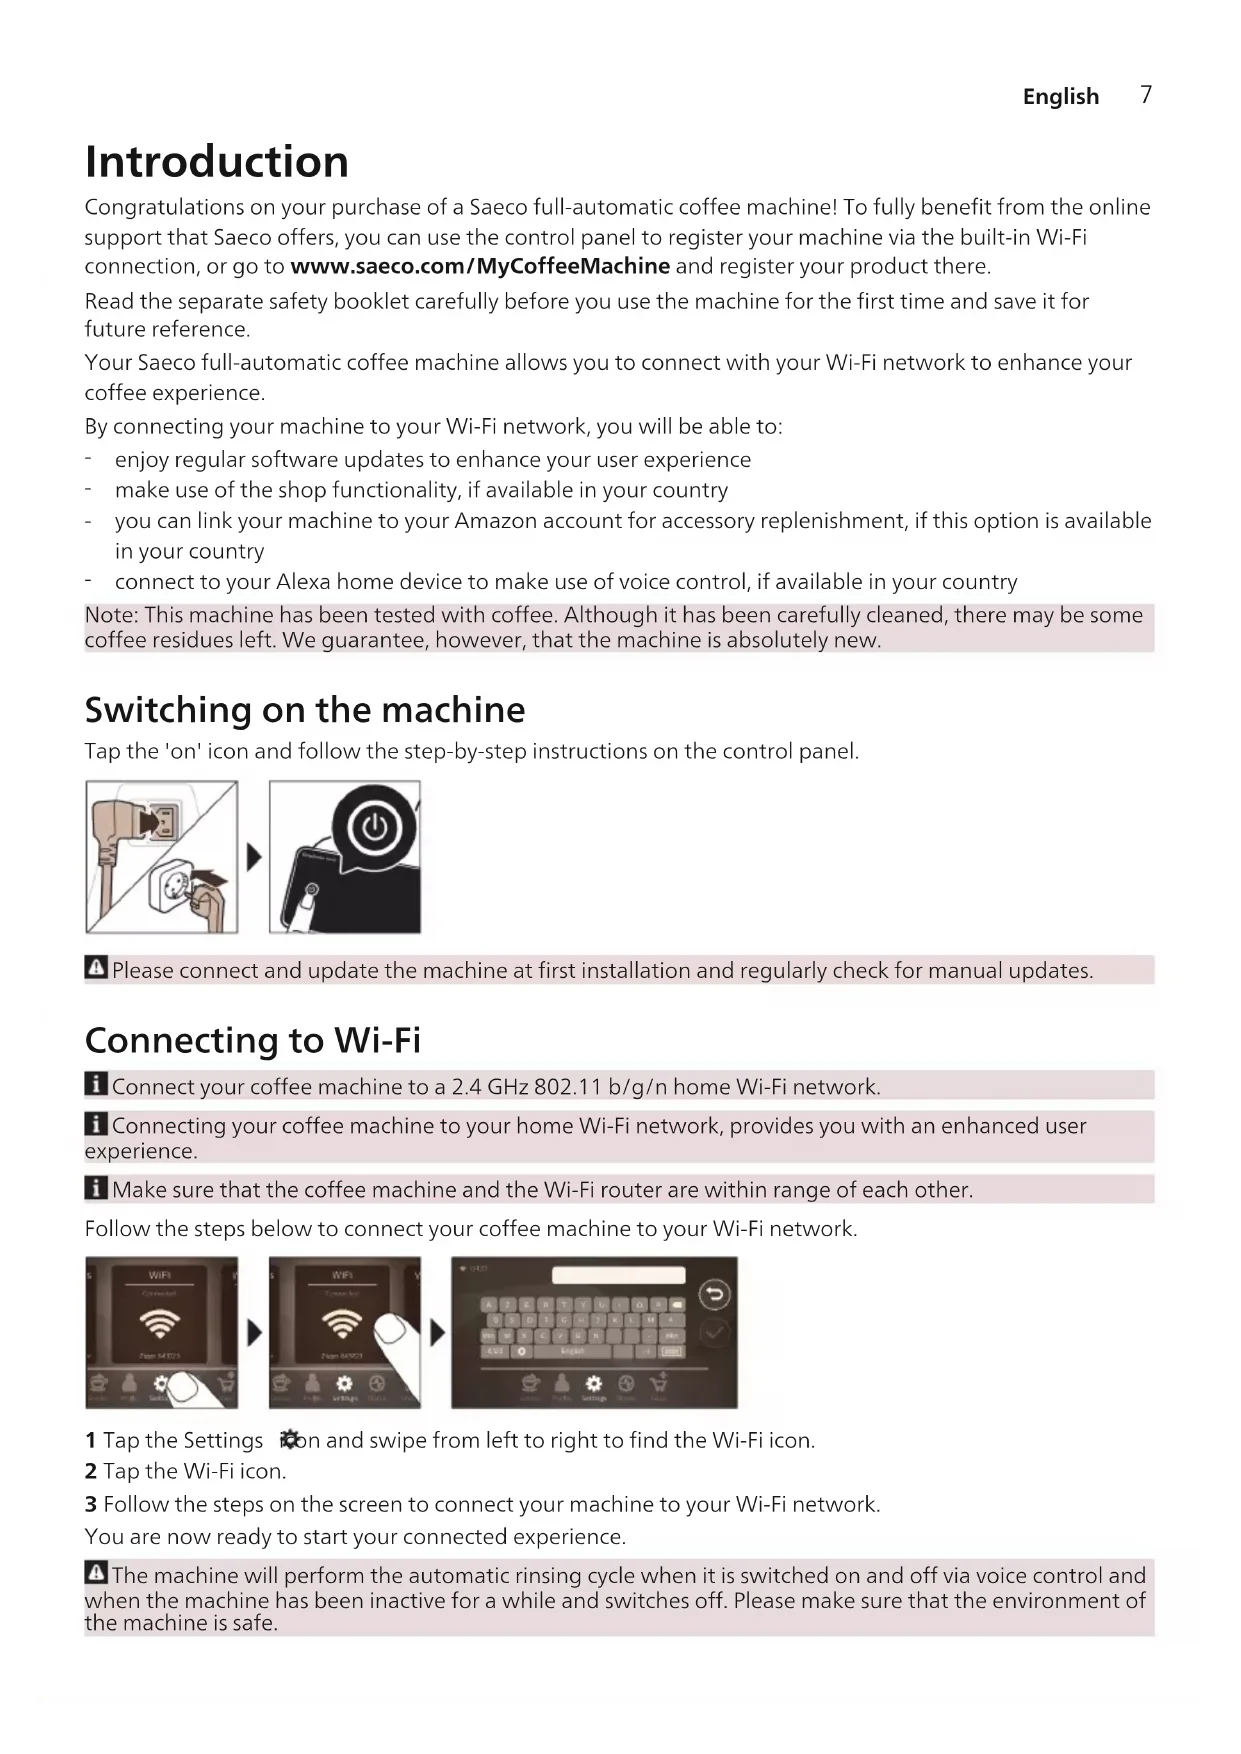
Introduction
Congratulations on your purchase of a Saeco full-automatic coffee machine! To fully benefit from the online support that Saeco offers, you can use the control panel to register your machine via the built-in Wi-Fi connection, or go to www.saeco.com/MyCoffeeMachine and register your product there.
Read the separate safety booklet carefully before you use the machine for the first time and save it for future reference.
Your Saeco full-automatic coffee machine allows you to connect with your Wi-Fi network to enhance your coffee experience.
By connecting your machine to your Wi-Fi network, you will be able to:
- enjoy regular software updates to enhance your user experience
- make use of the shop functionality, if available in your country
- you can link your machine to your Amazon account for accessory replenishment, if this option is available in your country
- connect to your Alexa home device to make use of voice control, if available in your country
Note: This machine has been tested with coffee. Although it has been carefully cleaned, there may be some coffee residues left. We guarantee, however, that the machine is absolutely new.
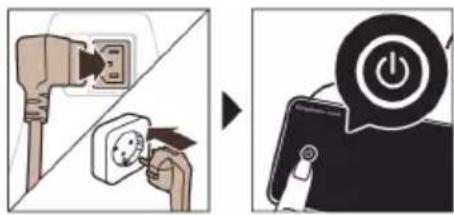
Switching on the machine
Tap the 'on' icon and follow the step-by-step instructions on the control panel.
text_image
Diagram illustrating the process of removing a power plug into an electrical socket, with a smartphone icon showing power button and battery.⚠️ Please connect and update the machine at first installation and regularly check for manual updates.
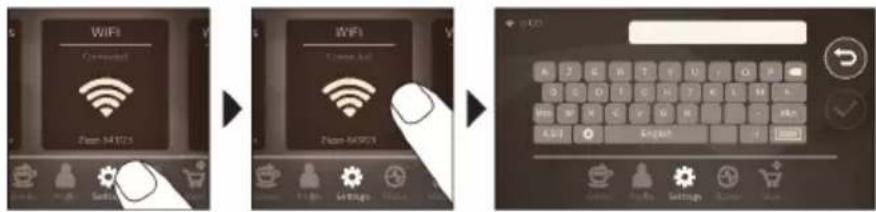
Connecting to Wi-Fi
Connect your coffee machine to a 2.4 GHz 802.11 b/g/n home Wi-Fi network.
i Connecting your coffee machine to your home Wi-Fi network, provides you with an enhanced user experience.
i Make sure that the coffee machine and the Wi-Fi router are within range of each other.
Follow the steps below to connect your coffee machine to your Wi-Fi network.
text_image
WiFi Connected Phone: MT23 WiFi Connected Phone: MT23 Windows Settings Logic OK Cancel1 Tap the Settings icon and swipe from left to right to find the Wi-Fi icon.
2 Tap the Wi-Fi icon.
3 Follow the steps on the screen to connect your machine to your Wi-Fi network.
You are now ready to start your connected experience.
The machine will perform the automatic rinsing cycle when it is switched on and off via voice control and when the machine has been inactive for a while and switches off. Please make sure that the environment of the machine is safe.
Special functions
Special function Purpose
 | With CoffeeMaestro you can personalize your coffee by selecting a pre-set taste profile (Delicato, Intenso, Forte) for your beverage instead of changing the settings yourself. |
 | HygieSteam function automatically cleans the milk system, removing microorganisms: use it after brewing cappuccino or other milk-based drinks. |
 | Our durable grinder is made from 100% ceramic to be exceptionally hard and precise. It can be adjusted to your taste with 12-step levels. |
 | The Maintenance Dashboard gives you a helpful overview and notifies you with status information on things like that the AquaClean is running low. |
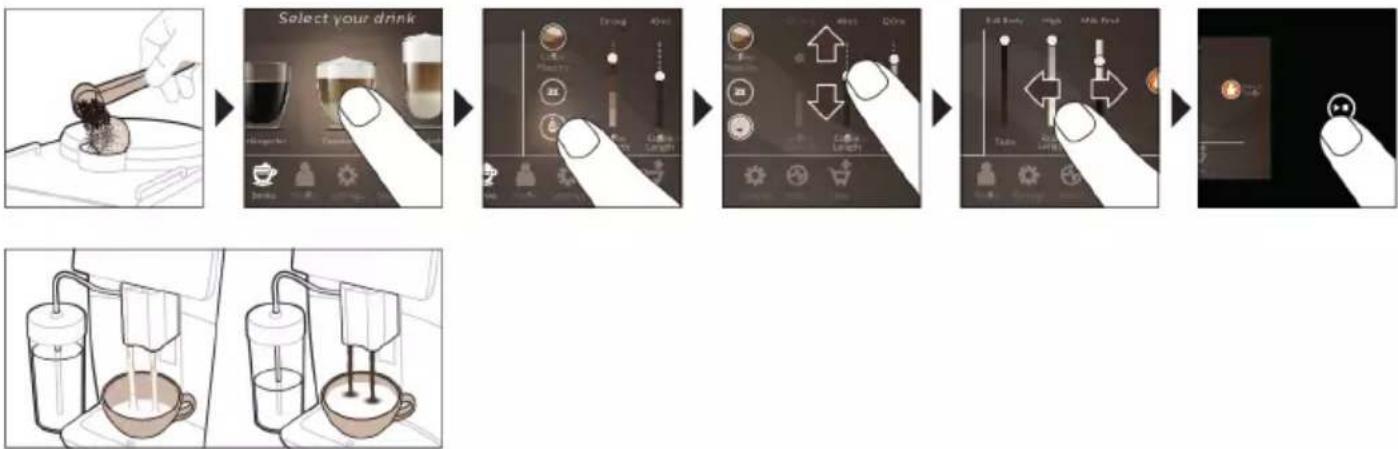
Brewing drinks
General steps
To brew a drink, you need to follow a few simple steps.

flowchart
graph LR
    A["Select your drink"] --> B["Make a coffee cup"]
    B --> C["Close up, High, Low, Medium, Low"]
    C --> D["Make a coffee machine, High, Medium, Low, Medium"]
    D --> E["Make a coffee machine, High, Medium, Low, Medium"]
    E --> F["Make a coffee machine, High, Medium, Low, Medium"]
    F --> G["Make a coffee machine, High, Medium, Low, Medium"]
    G --> H["Make a coffee machine, High, Medium, Low, Medium"]
1 Fill the water tank with tap water and fill the bean hopper with beans.
2 Place one or two cups under the height-adjustable dispensing spout. Slide the dispensing spout up or down to adjust the height to the size of the cup or glass you are using.
3 Tap the Drinks 🎨 icon to enter the 'Drinks' menu. Swipe from left to right to select your drink by tapping on it.
- Tap the '2x' icon if you want to brew two cups. The machine automatically carries out two grinding cycles in sequence of the selected drinks.
The '2x' icon is not available for all drinks.
4 After selecting a drink you can adjust the settings to your preference by swiping the adjustable bars up and down.
5 Press the start/stop icon to start brewing the selected drink.
Do not use caramelized or flavored coffee beans.
Support on drink parameters
To get additional information about a specific drink parameter, press and hold an item for 3 seconds.
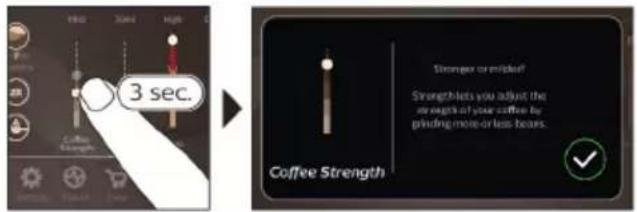
text_image
3 sec. Simmer or filled? Strengthless you adjust the strength of your coffee by grinding more or less hours. Coffee StrengthBrewing milk-based drinks
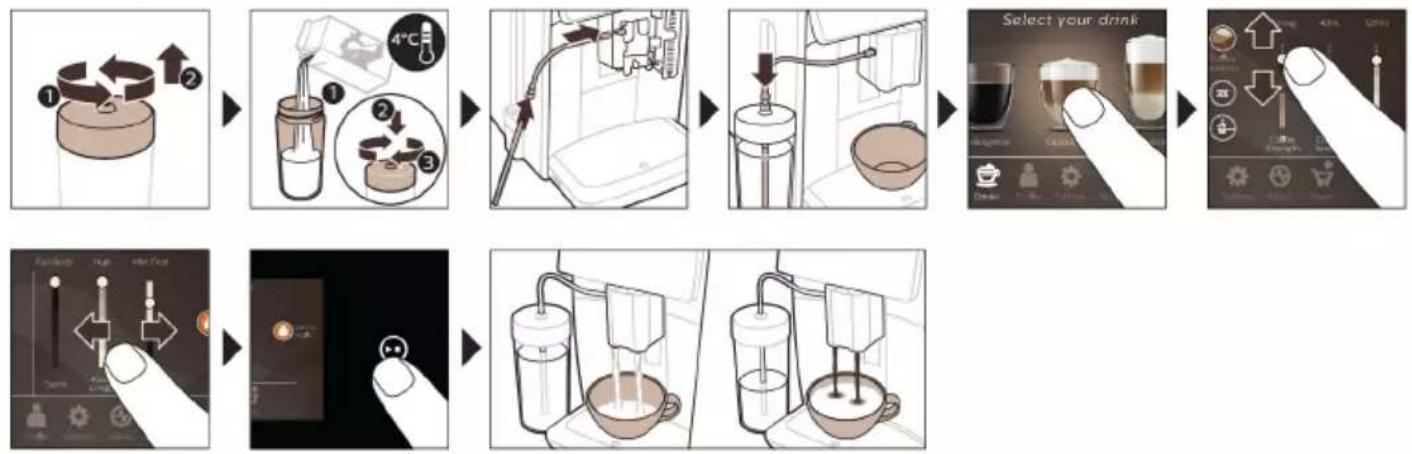
To brew milk-based drinks, you need to follow a few simple steps.

flowchart
graph TD
    A["1: Mixing with 4°C"] --> B["2: Stopping with 4°C"]
    B --> C["3: Stopping with 4°C"]
    C --> D["4°C Screening into refrigerator"]
    D --> E["5: Stopping with 4°C"]
    E --> F["6: Stopping with 4°C"]
    F --> G["7: Stopping with 4°C"]
    G --> H["8: Stopping with 4°C"]
    H --> I["9: Stopping with 4°C"]
    I --> J["10: Stopping with 4°C"]
    J --> K["11: Stopping with 4°C"]
    K --> L["12: Stopping with 4°C"]
    L --> M["13: Stopping with 4°C"]
    M --> N["14: Stopping with 4°C"]
    N --> O["15: Stopping with 4°C"]
    O --> P["16: Stopping with 4°C"]
    P --> Q["17: Stopping with 4°C"]
    Q --> R["18: Stopping with 4°C"]
    R --> S["19: Stopping with 4°C"]
    S --> T["20: Stopping with 4°C"]
1 Fill the water tank with tap water and fill the bean hopper with beans.
2 Unscrew the lid of the milk container and fill the milk container with milk.
Always use milk coming directly from the fridge for optimal results.
3 Connect the flexible milk tube to the cappuccinatore.
4 Place the metal milk tube in the container.
5 Tap the Drinks icon, scroll and select the milk-based drink icon of your choice.
6 You can adjust the settings to your preference by swiping the adjustable bars up and down.
7 Press the start/stop▶icon at any time to start brewing the selected drink.
- For specific drinks, the machine first dispenses milk and then coffee. For a number of other drinks this is the other way around, the machine will first dispense coffee and then milk.
- To stop dispensing milk before the machine has dispensed the preset amount, press the start/stop icon.
- To stop dispensing the complete drink (milk and coffee) before the machine is finished, press and hold the start/stop icon.
Directly after dispensing the milk, the 'HygieSteam Shot' is performed. The machine shoots steam through the internal milk system to rinse it quickly. The metal part of the milk tube may become hot. To avoid the risk of burns, let it cool down first.
Tip: You can also use a regular milk carton to brew your milk-based drinks. Place the metal milk tube directly into the milk carton.
Brewing coffee with pre-ground coffee
To brew coffee with pre-ground coffee, you need to follow a few simple steps.
1 Open the lid of the pre-ground coffee compartment and pour one measuring spoon of pre-ground coffee into it. Then close the lid.
2 Tap the Drinksicon, scroll from left to right and select your drink.
3 Tap the pre-ground coffee icon.
4 You can adjust the settings to your preference by swiping the adjustable bars up and down.
5 Press the start/stop icon to start brewing the selected drink.
i If you select pre-ground coffee, you cannot adjust the coffee strength or brew more than one drink at the same time.
Dispensing hot water
1 Make sure that the internal cappuccinatore is correctly attached to the machine (Fig. 1).
2 Place a cup under the spout.
3 Tap 'Hot Water' (Fig. 2).
4 Slide the adjustable bars up and down to adjust the hot water quantity or temperature to your preference (Fig. 3).
5 Press the start/stop▶icon.
6 To stop dispensing hot water before the machine is finished, press the start/stop ▶■ icon again.
Personalization
The machine allows you to adjust the settings of a drink to your own preference and to store the adjusted drink in a personal profile. You can choose your own icon and your own profile name.
Speed up with CoffeeMaestro
Your machine offers the possibility to select taste profiles instead of adjusting all settings separately with the CoffeeMaestro function. You can choose between Delicato, Intenso and Forte. To select a CoffeeMaestro taste profile:
1 Tap the drink icon of your choice (Fig. 4).
2 Tap the CoffeeMaestro icon repeatedly (Fig. 5).
- The main settings of the drink are now adjusted accordingly.
3 Press the start/stop icon to start brewing the drink.
Personalize your drink with the CoffeeEqualizer Touch function
After selecting a drink, the CoffeeEqualizer Touch function is activated automatically, allowing you to adjust the drink settings. Long press on each of the items on the display to activate the help function and receive further information.
With the CoffeeEqualizer Touch function you can adjust the following settings:
1 Aroma strength
5 Drink temperature
2 Coffee quantity
6 Foam amount
3 Milk quantity
7 You can also decide to prepare 1 or 2 cups
4 Water quantity
8 The order of first dispensing coffee or milk
Note: It depends on the drink you choose which settings you can adjust.
Save your favorite drinks in a profile
The machine allows you to adjust the settings of a drink to your own preference and to store the adjusted drink in a personal profile. You can select a profile and store a recipe using the profiles.
You can create a profile and add a drink using the profile 🖱con.
1 Tap the profile icon on the main menu (Fig. 6).
2 Tap the Plus icon (Fig. 7).
3 Type your name and select your favorite icon.
4 You are ready to add a drink. Tap the drink icon of your choice.
5 Personalize the drink via the CoffeeEqualizer Touch or the CoffeeMaestro function.
6 Tap on the 'Safe to profile' icon to store it in your personal profile (Fig. 8).
Extra shot (ExtraShot)
Your machine offers you the possibility to add an extra shot of Ristretto to your coffee and milk drinks, for example if you want to have a stronger coffee.
1 Place a cup under the spout.
2 Tap one of the one-touch drinks icons to select a drink (Fig. 4).
3 Slide the adjustable bar up to set the strength to the top level and select the ExtraShot function (Fig. 9).
4 Then press the start/stop icon to start brewing the drink.
5 To stop dispensing the drink before the machine has finished, press the start/stop ▶■ icon again.
When you have selected the ExtraShot function, you can only brew one coffee at the time.
i The extra shot function is not available for all drinks.
Adjusting machine settings
You can adjust most machine settings by tapping the Settings icon and follow the steps on the screen.
For online support (frequently asked questions, movies etc.), scan the QR code on the cover of this booklet or visit www.saeco.com/care
Setting the water hardness
We advise you to adjust the water hardness setting to the water hardness level in your region for optimal performance and a longer lifetime of the machine. This also prevents you from having to descale the machine too often. The default water hardness setting is 4: hard water.
Use the water hardness test strip supplied in the box to determine the water hardness in your region:
1 Immerse the water hardness test strip in tap water or hold it under the tap for 1 second (Fig. 10).
2 Wait 1 minute. The number of squares on the test strip that turn red indicate the water hardness (Fig. 11).
Set the machine to the correct water hardness:
1 Tap the Settings ☐ on and scroll from left to right to select 'Water hardness'.
2 Select the water hardness level. The number of red squares selected on the display should be the same as the number of red squares on the test strip (Fig. 12).
3 When you have set the correct water hardness, tap the confirmation icon to confirm.
Adjusting the grind setting
You can change the coffee strength with the grind setting knob inside the bean container. The lower the grind setting, the finer the coffee beans are ground and the stronger the coffee becomes. There are 12 different grind settings you can choose from.
The machine has been set up to get the best taste out of your coffee beans. Therefore we advise you not to adjust the grind setting until you have brewed 100-150 cups (approx. 1 month of use).
i You need to brew 2 to 3 drinks before you can taste the full difference.
Do not turn the grind setting knob more than one notch at a time to prevent damage to the grinder.
1 Tap the Settings on in the main menu .
2 Tap on "Grinder".
3 Watch the how to video.
Restoring factory settings
The machine offers you the possibility to restore the factory settings at any moment.
1 Tap the Settings icon.
2 Scroll from left to right to select 'Factory settings'. Confirm by tapping the confirmation √ icon.
- The settings are now restored.
i The following factory settings are restored to default: water hardness, standby time, display brightness, sound, front illumination, profiles, measure/units, home screen settings, Wi-Fi credentials, software update preferences, Saeco credentials, Amazon credentials.
AquaClean water filter
Your machine is AquaClean enabled. You can place the AquaClean water filter in the water tank to preserve the taste of your coffee. It also diminishes the need for descaling by reducing limescale build-up in your machine. You can purchase an AquaClean water filter from your local or online retailer or from authorized service centers.
AquaClean filter status indication
The status of the AquaClean filter is always visible in the 'Status' menu as a percentage.
- If the status of the AquaClean filter is 10% or less, the screen shows a message for 2 seconds each time you switch on the machine. This message advises you to buy a new filter.
- If the status of the filter is 0%, the machine asks you to replace the AquaClean filter every time you switch on the machine.
Activating the AquaClean water filter (5 min.)
i The machine does not automatically detect that a filter has been placed in the water tank. Therefore you need to activate each new AquaClean water filter that you install in the 'Status' menu.
When the machine stops showing the filter activation message, you can still activate an AquaClean water filter, but you will need to descale the machine first.
Your machine has to be completely limescale-free before you start using the AquaClean water filter.
Before activating the AquaClean water filter, it has to be prepared by soaking it in water as described below. If you don't do this, air might be drawn into the machine instead of water, which makes a lot of noise and prevents the machine from being able to brew coffee.
1 Tap the 'Status' icon and scroll from left to right to select 'AquaClean'.
2 Tap the confirmation √ icon again when the activation screen appears. Follow the instructions on the screen.
Replacing the AquaClean water filter (5 min.)
After 95 liters of water have flowed through the filter, the filter will cease to work. The AquaClean status indicator drops to 0% to remind you to replace the filter. If you do not replace the AquaClean water filter in time, you can still replace the filter but you first need to descale the machine.
When the AquaClean status indicator drops to 0% or when the machine reminds you to replace the AquaClean filter:
1 take out the old AquaClean water filter.
2 install a new filter and activate it as described in chapter 'Activating the AquaClean water filter (5 min).'
i Replace the AquaClean water filter at least every 3 months, even if the machine does not yet indicate that replacement is required.
Removing and inserting the brew group
Go to the 'Status' menu on the screen and select 'Brew group clean' or visit www.saeco.com/care for detailed video instructions on how to remove, insert and clean the brew group.
Removing the brew group from the machine
1 Remove the water tank and open the service door (Fig. 13).
2 Press the PUSH handle (Fig. 14) and pull at the grip of the brew group to remove it from the machine (Fig. 15).
When you remove the brew group from the machine, make sure to empty the drip tray and the coffee grounds container.
Reinserting the brew group
Before you slide the brew group back into the machine, make sure it is in the correct position.
1 Check if the brew group is in the correct position. The arrow on the yellow cylinder on the side of the brew group has to be aligned with the black arrow and N (Fig. 16).
- If they are not aligned, push down the lever until it is in contact with the base of the brew group (Fig. 17).
2 Slide the brew group back into the machine along the guiding rails on the sides (Fig. 18) until it locks into position with a click (Fig. 19). Do not press the PUSH button.
3 Close the service door and place back the water tank.
Cleaning and maintenance
Your machine will advise you when to perform cleaning and maintenance.
Regular cleaning and maintenance keeps your machine in top condition and ensures good-tasting coffee for a long time with a steady coffee flow.
Consult the table below for a detailed description of when and how to clean all detachable parts of the machine. You can find more detailed information and video instructions on www.saeco.com/care. See figure C for an overview of which parts can be cleaned in the dishwasher.
Item When to clean How to find in the control panel/
What to do
| AquaClean filter When the machine asks you or every three months. | STATUS->CLEANING->AQUACLEAN. Follow the steps to activate the AquaClean filter. |
| i The machine does not automatically detect that a filter has been placed in the water tank. Therefore you need to activate each new AquaClean filter that you install in the 'Status' menu. | |
| i Your machine has to be completely limescale-free before you start using the AquaClean filter. | |
| i Replace the AquaClean filter at least every 3 months, even if the machine does not yet indicate that replacement is required. | |
| Brew group Weekly STATUS -> PERFORMANCE ->BREW GROUP | |
| CLEAN. Follow the steps to remove and clean the brew group. | |
| i When you remove the brew group from the machine, make sure to empty the drip tray and the coffee grounds container. | |
| i Before you slide the brew group back into the machine, make sure it is in the correct position.The arrow on the yellow cylinder on the side of the brew group has to be aligned with the black arrow and N (Fig. 16). | |
| Monthly STATUS -> PERFORMANCE ->COFFEE OIL | |
| REMOVAL. Follow the steps of the self-cleaning process to automatically remove coffee oil residues from the brew group. | |
| Milk system/internal cappuccinatore | After every day of use STATUS -> HYGIESTEAM. Follow the steps of the self-cleaning process to clean the milk system. Wipe the outside of the metal milk tube with a damp cloth before placing it into the milk tube holder. |
| Weekly Remove and disassemble the internal cappuccinatore. Rinse all parts under the tap with some washing-up liquid. | |
| Monthly STATUS -> HYGIESTEAM -> DEEP MILK CLEAN. Follow the steps of the self-cleaning process to clean the milk system. | |
| Milk container Weekly Disassemble the milk container (Fig. 20) and push out the ball using the pin of the milk tube (Fig. 21). Clean all parts of the milk container under the tap or in the dishwasher. | |
| HygieSteam container (milk tube holder) | Weekly or when the machine reminds you Remove the HygieSteam container from the machine (Fig. 22) and remove the HygieSteam cover (Fig. 23). Clean the HygieSteam container and cover under the tap or in the dishwasher. Let the container and cover air-dry and place them back into the machine. |
Item When to clean How to find in the control panel/
| What to do | ||
| Pre-ground coffee compartment | Check the pre-ground coffee compartment weekly to see if it is clogged | Unplug the machine and remove the brew group. Open the lid of the pre-ground coffee compartment and insert the spoon handle into it. Move the handle up and down until the clogged ground coffee falls down (Fig. 24). Go to www.saeco.com/care for detailed video instructions. |
| Coffee grounds container | Empty the coffee grounds container when prompted by the machine. Clean it weekly | Remove the coffee grounds container while the machine is switched on. Clean it under the tap with some washing-up liquid or in the dishwasher.Note: The front panel of the coffee grounds container is not dishwasher proof. |
| Drip tray Empty the drip tray daily or as soon as the red 'drip tray full' indicator pops up through the drip tray (Fig. 25). Clean the drip tray weekly | Remove the drip tray (Fig. 26) and clean it under the tap with some washing-up liquid or in the dishwasher. | |
| Lubrication of the brew group | Every 2 months Lubricate the brew group with the by-packed grease (see 'Lubricating the brew group'). Go to www.saeco.com/care for detailed video instructions. | |
| Water tank Weekly Rinse the water tank under the tap. | ||
| Machine front Weekly Clean with a non-abrasive cloth. | ||
| Descaling of the machine | When the machine asks you to descale | STATUS -> DESCALING. Follow the steps to descale the machine. When descaling is needed, the machine asks you to descale it, press the OK icon to start and follow the steps. |
Cleaning the brew group
Regular cleaning of the brew group prevents coffee residues from clogging up the internal circuits. Go to the 'Status' menu on the screen and select 'Brew group clean' or visit www.saeco.com/care for support videos on how to remove, insert and clean the brew group.
Cleaning the brew group under the tap
1 Tap the 'Status' icon and scroll to select 'Brew group clean'.
2 Tap the confirmation icon to confirm and then follow the instructions on the screen.
Cleaning the brew group with the coffee oil remover tablets
Only use Philips coffee oil remover tablets.
1 Tap the 'Status' icon and scroll to select 'Brew group clean'.
2 Tap the confirmation icon to confirm and then follow the instructions on the screen.
Lubricating the brew group
To improve your machine's performance, we suggest that you lubricate the brew group every 2 months, to ensure that the moving parts continue to move smoothly.
1 Apply a thin layer of grease on the piston (grey part) of the brew group (Fig. 27).
2 Apply a thin layer of grease around the shaft (grey part) in the bottom of the brew group (Fig. 28).
3 Apply a thin layer of grease to the guiding rails on both sides (Fig. 29).
Cleaning programs for the internal cappuccinatore
i The machines tells you when to clean the internal cappuccinatore.
The machine has three programs to clean the internal cappuccinatore:
- 'HygieSteam Shot': during the preparation of a milk-based drink, the machine automatically shoots steam through the internal cappuccinatore to rinse it quickly.
- 'HygieSteam': the machine thoroughly cleans the internal milk system with steam. Make sure that the HygieSteam container is correctly assembled (Fig. 30) and attached to the machine (Fig. 31). Place the milk tube in the milk tube holder (Fig. 32) and follow the instructions on the screen.
- 'Deep Milk Clean': Perform the 'Deep Milk Clean' procedure with the Philips milk circuit cleaner for a thorough cleaning of the internal milk system.
Cleaning the internal cappuccinatore under the tap
1 Open the door of the internal cappuccinatore (Fig. 33).
2 Remove the internal cappuccinatore by pulling it down (Fig. 34).
3 Disassemble the internal cappuccinatore by pulling the bottom part off the top part (Fig. 35).
4 Disassemble all parts (Fig. 36) and clean them under the tap.
5 Reassemble the internal cappuccinatore.
6 To place back the internal cappuccinatore, put it in upright position and make sure the holes are aligned with the two tubes on the machine. Then move the internal cappuccinatore upwards until it locks into place (Fig. 1).
7 Close the door.
Visit www.saeco.com/care for detailed video instructions.
Descaling procedure
Please use Philips descaler only. Under no circumstances should you use a descaler based on sulfuric acid, hydrochloric acid, sulfamic or acetic acid (vinegar) as this may damage the water circuit in your machine and will not dissolve the limescale properly. Not using the Philips descaler will void your warranty. Failure to descale the appliance will also void your warranty. You can buy Philips descaler from your local or online retailer or from authorized service centers.
1 When the machine asks you to descale it, tap the confirmation √ icon to start. To start descaling without being prompted by the machine, tap the 'Status' icon and select 'Descale'.
2 Remove the drip tray, the coffee grounds container and the HygieSteam container (Fig. 22), empty them and put them back into place.
3 Remove the water tank and empty it. Then remove the AquaClean filter.
4 Pour the whole bottle of Philips descaler into the water tank and then fill it with water up to the CALC CLEAN level (Fig. 37). Then place the water tank back into the machine.
5 Place a large container (1.5 l) under the coffee dispensing spout.
6 Make sure that the HygieSteam container is correctly assembled (Fig. 30) and attached to the machine (Fig. 31). Place the milk tube in the milk tube holder.
7 Follow the instructions on the screen to start the descaling procedure. The descaling procedure lasts approx. 30 minutes and consists of a descaling cycle and a rinsing cycle.
8 Once the descaling cycle is finished, you need to rinse the water tank and water circuit. Follow the instructions on the screen.
9 Place a new AquaClean filter in the water tank and activate it (see 'Activating the AquaClean water filter (5 min).').
Tip: Using the AquaClean filter reduces the need for descaling!
What to do if the descaling procedure is interrupted
You can exit the descaling procedure by pressing the on/off icon on the control panel. If the descaling procedure is interrupted before it is completely finished, some descaling liquid may remain in the water tank or the water circuit. In that case, do the following:
1 Empty and rinse the water tank thoroughly.
2 Fill the water tank with fresh water up to the CALC CLEAN level indication and switch the machine back on. The machine will heat up and perform an automatic rinsing cycle.
3 Before brewing any drinks, perform a manual rinsing cycle. To perform a manual rinsing cycle, first dispense half a water tank of hot water and then brew 2 cups of pre-ground coffee without adding ground coffee.
Note: If the descaling procedure was not completed, the machine will require another descaling procedure as soon as possible.
Error codes
Below you find a list of the error codes showing problems that you can solve yourself. Video instructions are available on www.saeco.com/care. If another error code appears, please contact the Consumer Care Center in your country. For contact details, see the warranty leaflet.
Error code Problem Possible solution
| 01 The coffee funnel is clogged. | Switch off the machine and unplug it. Remove the brew group. Then open the lid of the pre-ground coffee compartment and insert the spoon handle. Move the handle up and down until the clogged ground coffee falls down. Visit www.saeco.com/care for detailed video instructions. |
| 03 The brew group is dirty or not well-greased. | Switch off the machine. Rinse the brew group with fresh water, let it air-dry and then lubricate it (see 'Lubricating the brew group'). Consult chapter 'Cleaning the brew group' or visit www.saeco.com/care for detailed video instructions. Then switch the machine on again. |
| 04 The brew group is not positioned correctly. | Switch off the machine. Remove the brew group and reinsert it. Make sure that the brew group is in the correct position before you insert it. Consult chapter 'Handling the brew group' or visit www.saeco.com/care for detailed video instructions. Then switch the machine on again. |
| 05 There is air in the water circuit. | Restart the machine by switching it off and on again. If this works, dispense 2-3 cups of hot water. Descale the machine if you have not done so for a longer period of time. |
Error code Problem Possible solution
| The AquaClean filter was not prepared properly before installation or it is clogged. | Remove the AquaClean filter and try to brew a coffee again. If this works, make sure that the AquaClean filter is prepared properly before you place it back (see 'Activating the AquaClean water filter (5 min.)'). Put the AquaClean filter back into the water tank. If this still does not work, the filter might be clogged and needs to be replaced. | |
| 11 | The machine needs to adjust to room temperature | Allow some time for the machine to adjust from transport/outdoor temperature to room temperature. Switch off the machine for 30 minutes and switch it on again. If this does not work, contact the Consumer Care Center in your country. For contact details, see the warranty leaflet. |
| 14 | The machine is overheated. | Switch off the machine and switch it back on after 30 minutes. |
| 19 | The machine is not connected to the wall socket properly. | Make sure that the small plug of the power cord is properly connected to the socket on the back of the machine. |
Ordering accessories
To clean and descale the machine, only use Philips maintenance products. These products can be purchased by enabling Amazon Smart Reorders, from your local or online retailer or from authorized service centers.
i To be able to use Amazon Smart Reorders, you first need to activate this service on Amazon. Then follow the steps on the screen of your machine to connect your Amazon account to your Saeco account. After you have completed these steps, you can use the Amazon Smart Reorder service.
In the 'Shop' menu on the control panel of the machine you can view the availability of Philips maintenance products and accessories at local retailers.
To find a full list of spare parts online, enter the type number of your machine. You can find the type number on the inside of the service door.
Maintenance products and type numbers:
- Descaling solution CA6700
- AquaClean filter CA6903
- Brew group grease HD5061
- Coffee oil remover tablets CA6704
- Milk circuit cleaner CA6705
- Maintenance kit CA6707
Software updates
Updating is essential to safeguard your privacy and proper functioning of your coffee machine. You can set whether you want to update your machine manually or whether you want it to be done automatically.
When you have selected automatic updates, make sure that the machine is also plugged in at night and Wi-Fi is enabled, so that the machine can receive the software updates overnight.
i Updates are made available when there are software improvements, new features for the machine and to prevent a possible security issue.
i Mandatory firmware updates are started automatically when the coffee machine is in stand-by mode. During a firmware update the coffee machine cannot be used.
Troubleshooting
This chapter summarizes the most common problems you could encounter with the machine. Support videos and a complete list of frequently asked questions are available on www.saeco.com/care. If you are unable to solve the problem, contact the Consumer Care Center in your country. For contact details, see the warranty leaflet.
Problem Cause Solution
| There are some coffee residues inside my new coffee machine. | This machine has been tested with coffee. | Although it has been carefully cleaned, there may be some coffee residues left. However, the machine is absolutely new. |
| The machine is in DEMO mode. | You pressed the standby icon for more than 8 seconds. | Switch the machine on and off by unplugging the power cord and then plugging it in again. |
| The drip tray fills up quickly / there is always some water in the drip tray. | This is normal. The machine uses water to rinse the internal circuit and brew group. Some water flows through the internal system directly into the drip tray. | Empty the drip tray daily or as soon as the red 'drip tray full' indicator pops up through the drip tray cover. Tip: place a cup under the dispensing spout to collect rinsing water that comes out of it. |
| The 'empty coffee grounds container' icon remains on. | You emptied the coffee grounds container while the machine was unplugged from the wall socket, or you placed it back too fast. | Remove the coffee grounds container, wait at least 5 seconds and then insert it again. |
| The machine prompts to empty the coffee grounds container even though the container is not full. | The machine did not reset the counter the last time you emptied the coffee grounds container. | Always wait approx. 5 seconds when you place back the coffee grounds container. In this way, the coffee pucks counter will be reset to zero and the number of coffee pucks is counted correctly. |
| The coffee grounds container is too full and the 'empty coffee grounds container' icon did not appear on the display. | You removed the drip tray without emptying the coffee grounds container. | When you remove the drip tray, also empty the coffee grounds container even if it contains only a few coffee pucks. This ensures that the coffee pucks counter is reset to zero and that the number of coffee pucks is counted correctly. |
| I cannot remove the brew group. | The brew group is not in the correct position. | Reset the machine in the following way: close the service door and place back the water tank. Switch the machine off and back on again and wait for the lights in the drink icons to come on. Try to remove the brew group again. See chapter 'Removing and inserting the brew group' for step-by-step instructions. |
Problem Cause Solution
| I cannot insert the brew group. | The brew group is not in the correct position. | Reset the machine in the following way: close the service door and place back the water tank. Leave the brew group out. Switch off the machine and unplug it. Wait for 30 seconds and then plug the machine back in, switch it on and wait for the lights in the drink icons to come on. Then put the brew group in the correct position and reinsert it into the machine. See chapter 'Removing and inserting the brew group' for step- by-step instructions. |
| The coffee is watery. The brew group is dirty or needs to be lubricated. | Remove the brew group, rinse it under the tap and leave it to dry. Then lubricate the moving parts (see 'Lubricating the brew group'). | |
| The machine is performing its self-adjustment procedure. This procedure is started automatically when you use the machine for the first time, when you change to another type of coffee beans or after a long period of non-use. | Brew 5 cups of coffee initially to allow the machine to complete its self-adjustment procedure. | |
| The grinder is set to a too coarse setting. | Set the grinder to a finer (lower) setting. Brew 2 to 3 drinks to be able to taste the full difference. | |
| The coffee is not hot enough. | The temperature is set too low. Set the temperature to the maximum setting (Fig. 38). | |
| A cold cup reduces the temperature of the drink. | Preheat the cups by rinsing them with hot water. | |
| Adding milk reduces the temperature of the drink. | Regardless of whether you add hot or cold milk, adding milk always reduces the temperature of the coffee. Preheat the cups by rinsing them with hot water. | |
| Coffee does not come out or coffee comes out slowly. | The AquaClean water filter was not prepared properly for installation. | Remove the AquaClean filter and dispense some hot water. If this works, the AquaClean filter was not installed properly. Reinstall and activate the AquaClean filter and follow all steps in chapter 'AquaClean water filter'. |
| After a long period of non-use, you need to prepare the AquaClean water filter for use again and dispense 2-3 cups of hot water. | ||
| The AquaClean water filter is clogged. | Replace the AquaClean water filter every 3 months. A filter that is older than 3 months can become clogged. | |
Problem Cause Solution
| The grinder is set to a too fine setting. | Set the grinder to a coarser (higher) setting. Note that this will impact the coffee taste. |
| The brew group is dirty. Remove the brew group and rinse it under the tap (see 'Cleaning the brew group under the tap'). | |
| The coffee dispensing spout is dirty. | Clean the coffee dispensing spout and its holes with a pipe cleaner or needle. |
| The pre-ground coffee compartment is clogged | Switch off the machine and remove the brew group. Open the lid of the pre-ground coffee compartment and insert the spoon handle into it. Move the handle up and down until the clogged ground coffee falls down (Fig. 24). |
| The machine circuit is blocked by limescale. | Descale the machine with Philips descaler (see 'Descaling procedure'). Always descale when the machine prompts you. |
| The milk does not froth. The internal cappuccinatore is dirty or not inserted correctly. | Clean the internal cappuccinatore and make sure that you position and insert it correctly (see 'Cleaning the internal cappuccinatore under the tap'). |
| The type of milk used is not suitable for frothing. | Different types of milk result in different amounts of froth and different froth qualities. |
| The milk is splashing. The milk you use is not cold enough. | Make sure you use cold milk coming directly from the fridge. |
| The flexible milk tube is not connected properly. | Open the door of the coffee dispensing spout (Fig. 33) and check if the flexible milk tube is fully connected to the cappuccinatore (Fig. 39). Note that the cappuccinatore and milk tubes may be hot. Let the cappuccinatore and the tubes cool down before you touch them. |
| The cappuccinatore and milk tubes are not clean. | Remove and disassemble the internal cappuccinatore (see 'Cleaning the internal cappuccinatore under the tap'). Rinse all parts under the tap. For thorough cleaning, use Philips milk circuit cleaner and perform the Deep Milk Clean procedure via the 'Status' and 'Hygiesteam' menu. Note that if the parts have been cleaned in the dishwasher, they may have become clogged by food particles or detergent residues. A visual check that they are not obstructed is also recommended. |
Problem Cause Solution
| We advise you to perform the HygieSteam program every day: 1) Press 'Status' on the control panel. 2) Select 'HygieSteam'. 3) Then confirm all steps on the display. | ||
| The milk tubes are clogged. Always store the milk container without the milk tubes in the refrigerator. Leftover milk could accumulate inside the milk tubes and block the flow of milk through the tubes. Rinse the milk tubes before storage. | ||
| The machine seems to be leaking. | The machine uses water to rinse the internal circuit and brew group. This water flows through the internal system directly into the drip tray. This is normal. | Empty the drip tray every day or as soon as the 'drip tray full' indicator pops up through the drip tray cover. Tip: Place a cup under the dispensing spout to collect rinsing water and reduce the amount of water in the drip tray. |
| The drip tray is too full and has overflowed which makes it look like the machine is leaking. | Empty the drip tray every day or as soon as the 'drip tray full' indicator pops up through the drip tray cover. | |
| The water tank is not fully inserted, some water is leaking out of the water tank and air is drawn into the machine. | Make sure the water tank is in the correct position: remove it and reinsert it into the machine as far as possible. | |
| The brew group is dirty/clogged. Rinse the brew group. | ||
| The machine is not placed on a horizontal surface. | Place the machine on a horizontal surface so that the drip tray does not overflow and the 'drip tray full' indicator works properly. | |
| I cannot activate the AquaClean water filter and the machine asks for descaling. | The filter has not been installed or replaced in time after the screen showed the AquaClean reminder. This means your machine is not completely free of limescale anymore. | Descale your machine first and then install the AquaClean water filter. |
| The new water filter does not fit. | You are trying to install another filter than the AquaClean water filter. | Only the AquaClean water filter fits into the machine. |
| The rubber ring on the AquaClean water filter is not in place. | Place back the rubber ring on the AquaClean water filter. | |
| The machine is making a loud noise. | It is normal that your machine makes some noise during use. | If the machine starts to make a different kind of noise, clean the brew group and lubricate it (see 'Lubricating the brew group'). |
Problem Cause Solution
| The AquaClean water filter was not prepared properly and air is now drawn into the machine. | Remove the AquaClean water filter from the water tank and prepare it for use properly before you place it back. See chapter 'AquaClean water filter' for step-by-step instructions. | |
| The water tank is not fully inserted and air is drawn into the machine. | Make sure the water tank is in the correct position: remove it and reinsert it by pushing it into the machine as far as possible. | |
| When I try to connect the machine to Wi-Fi for the first time, the machine cannot connect to the Wi-Fi network. | Your Wi-Fi name and password are not correct. | Check your Wi-Fi name and password. |
| The coffee machine and the Wi-Fi router are not within range of each other. | Ensure that the coffee machine and the Wi-Fi router are within range of each other.or use a Wi-Fi repeater. | |
| The machine is not able to find the home Wi-Fi network. | The Wi-Fi router is not working properly. | Please make sure that the Wi-Fi router is working properly and is connected to the internet. |
| The machine is not within range of the router. | Make sure the machine is within range of the router. You can also use a Wi-Fi signal repeater. | |
| The router your coffee machine is trying to connect to is 5 GHz dual-band and your coffee machine is not trying to connect to a 2.4 GHz network. | 5 GHz networks are not supported.Temporarily switch off the 5 GHz band in your router and try to pair your coffee machine again to another band of the same router (2.4 GHz). Switch on your 5 GHz band again after successful pairing | |
| I cannot use Alexa and Amazon Smart Reorders yet. | You have not yet connected to your Amazon to your Saeco account. | Please follow the instructions on the control panel of the machine to connect your Amazon account to your Saeco account to be able to use Alexa voice control and Amazon Smart Reorders.Note: To be able to use these features you need to have an Alexa app or an Alexa device and you need to enable the Smart Reorders service on Amazon. |
| The Wi-Fi connectivity of the machine used to work but is not working anymore. | Your Wi-Fi name and/or password has changed. | Follow the instructions of section 'Connecting to Wi-Fi' and choose the network with the new Wi-Fi name to connect to. |
| The Wi-Fi password has changed. | Follow the instructions of section 'Connecting to Wi-Fi' and enter the new Wi-Fi password. |
Problem Cause Solution
| Your Wi-Fi router is not working properly. | Check the router and make sure it is working. | |
| The Wi-Fi connectivity can be interrupted by electromagnetic or other interferences. | Keep the appliance away from other electronic devices that may cause interferences. | |
| None of the solutions mentioned above work. | Switch off the machine and unplug it, then plug the machine back in and switch it on to recheck the Wi-Fi connection. |
Technical specifications
The manufacturer reserves the right to improve the technical specifications of the product. All the preset quantities are approximate.
Description Value
| Size (w x h x d) 262 x 383 x 448 mm |
| Weight 8.3 - 8.8 kg |
| Power cord length 1200 mm |
| Water tank 1.8 liters |
| Bean hopper capacity 300 g |
| Coffee grounds container capacity 12 pucks |
| Milk container capacity 600 ml |
| Height-adjustable spout height 87 - 147 mm |
| Nominal voltage - Power rating - Power supply See data label on inside of service door |
| Wi-Fi frequency band 2.4 GHz 802.11 b/g/n |
Declaration of Conformity
Hereby, DAP B.V. declares that the fully automatic espresso machines SM6685, SM6682 and SM6680 are in compliance with Directive 2014/53/EU.
The full text of the EU declaration of conformity is available at the following internet address:
https://www.saeco.com.
The fully automatic espresso machines SM6685, SM6682 and SM6680 are equipped with a Wi-Fi module, 2.4 GHz 802.11 b/g/n (channels 1..13). Maximum transmitting power <100 mW(20 dBm).
Wi-Fi
The machine is a networked equipment, in compliance with reg. (EU) No 801/2013, and it is intended to be used permanently connected to a 2.4 GHz 802.11 b/g/n network.
Mündəricat
text_image
Diagram illustrating the process of installing a power outlet into a plug, with a power button icon and magnified view.flowchart
graph LR
    A["Start: Tap with coffee cup"] --> B["Select your drink"]
    B --> C["Add coffee to match"]
    C --> D["Add coffee to add coffee into table"]
    D --> E["Make coffee to add coffee into table"]
    E --> F["End: Tap with coffee cup using coffee lamp"]
text_image
3 sec. Simmer or filled? Strength lets you adjust the strength of your coffee by grinding more or less hours. Coffee Strengthflowchart
graph TD
    A["1: Mixing with 4°C"] --> B["2: Stacking with 4°C"]
    B --> C["3: Stopping with 4°C"]
    C --> D["4°C is added to a kitchen appliance"]
    D --> E["5: Stopping with 4°C"]
    E --> F["6: Stopping with 4°C"]
    F --> G["7: Stopping with 4°C"]
    G --> H["8: Stopping with 4°C"]
    H --> I["9: Stopping with 4°C"]
    I --> J["10: Stopping with 4°C"]
    J --> K["11: Stopping with 4°C"]
    K --> L["12: Stopping with 4°C"]
    L --> M["13: Stopping with 4°C"]
    M --> N["14: Stopping with 4°C"]
    N --> O["15: Stopping with 4°C"]
    O --> P["16: Stopping with 4°C"]
    P --> Q["17: Stopping with 4°C"]
    Q --> R["18: Stopping with 4°C"]
    R --> S["19: Stopping with 4°C"]
    S --> T["20: Stopping with 4°C"]
    T --> U["21: Stopping with 4°C"]
    U --> V["22: Stopping with 4°C"]
    V --> W["23: Stopping with 4°C"]
    W --> X["24: Stopping with 4°C"]
    X --> Y["25: Stopping with 4°C"]
    Y --> Z["26: Stopping with 4°C"]
    Z --> AA["27: Stopping with 4°C"]
    AA --> AB["28: Stopping with 4°C"]
    AB --> AC["29: Stopping with 4°C"]
    AC --> AD["30: Stopping with 4°C"]
    AD --> AE["31: Stopping with 4°C"]
    AE --> AF["32: Stopping with 4°C"]
    AF --> AG["33: Stopping with 4°C"]
    AG --> AH["34: Stopping with 4°C"]
    AH --> AI["35: Stopping with 4°C"]
    AI --> AJ["36: Stopping with 4°C"]
    AJ --> AK["37: Stopping with 4°C"]
    AK --> AL["38: Stopping with 4°C"]
    AL --> AM["39: Stopping with 4°C"]
    AM --> AN["40: Stopping with 4°C"]
    AN --> AO["41: Stopping with 4°C"]
    AO --> AP["42: Stopping with 4°C"]
    AP --> AQ["43: Stopping with 4°C"]
    AQ --> AR["44: Stopping with 4°C"]
    AR --> AS["45: Stopping with 4°C"]
    AS --> AT["46: Stopping with 4°C"]
    AT --> AU["47: Stopping with 4°C"]
    AU --> AV["48: Stopping with 4°C"]
    AV --> AW["49: Stopping with 4°C"]
    AW --> AX["50: Stopping with 4°C"]
text_image
Diagram illustrating the process of installing a power outlet into a wall-mounted device, with a power button icon and smartphone interface.flowchart
graph LR
    A["Select your drink"] --> B["Close the cup"]
    B --> C{Measure: High, Medium, Low}
    C -->|Yes| D["Check for coffee mixture"]
    C -->|No| E["Adjust it to coffee mixture"]
    D --> F["Check for coffee mixture"]
    F --> G{Check for coffee mixture}
    G -->|Yes| H["Check for coffee mixture"]
    G -->|No| I["Adjust it to coffee mixture"]
    H --> J["Check for coffee mixture"]
    J --> K["End"]
text_image
3 sec. Strengthen or emblobed? Strengths you adjust the strength of your coffee be grinding more or less bears. Coffee StrengthA7 HygieSteam posuda
text_image
Diagram illustrating the process of installing a power outlet into a wall-mounted switch, with a smartphone icon showing power button and power symbol.Povežite i ažurirajte aparat prilikom prve instalacije i redovno provjeravajte postoje li ručna ažuriranja.
flowchart
graph LR
    A["Start: Tap with coffee cup"] --> B["Select your drink"]
    B --> C["Check for coffee cup with icons and arrows"]
    C --> D["Check for coffee cup with icons and arrows"]
    D --> E["Check for coffee cup with icons and arrows"]
    E --> F["End: Tap with coffee cup icon"]
1 Napunite rezervoar vodom iz česme i napunite posudu za kafu zrnima kafe.
2 Stavite jednu ili dvije šolje ispod mlaznika za ispuštanje koji je podesiv po visini. Prevucite nagore ili nadole mlaznik za ispuštanje da biste prilagodili njegovu visinu veličini šolje ili čaše koju koristite.
3 Dodirnite ikonu Drinks 🚙️ (Napici) da biste pristupili meniju „Drinks” (Napici). Prevucite prstom slijeva nadesno i izaberite napitak tako što ćete ga dodirnuti.
- Dodirnite ikonu „2x“ ako želite da skuvate dvije šolje. Aparat automatski obavlja dva ciklusa mljevenja u nizu za izabrane napitke.
text_image
3 sec. Stronger or emitted? Strength lets you adjust the strength of your coffee by grinding more or less bears. Coffee StrengthKuvanje napitaka na bazi mlijeka
Da biste napravili napitke na bazi mlijeka, morate da slijedite nekoliko jednostavnih koraka.
flowchart
graph TD
    A["1: Cover"] --> B["2: Cooling"]
    B --> C["3: Washing"]
    C --> D["4°C Control"]
    D --> E["5: Dish Washing"]
    E --> F["6: Discharge"]
    F --> G["7: Air Condition"]
    G --> H["8: Discharge & Washing"]
    H --> I["9: Discharge & Air Condition"]
    I --> J["Select your drink"]
COFFEE OIL REMOVAL (UKLANJANJE
MASNOĆE OD KAFE). Slijedite korake procesa samočišćenja kako biste automatski uklonili tragove ulja iz kafe iz bloka za kuvanje.
Stavka Kada se čisti Kako da pronadete na komandnoj tabli/
text_image
Diagram illustrating the process of installing a power outlet, showing installation and power transfer steps.text_image
WiFi Connected Page 54123 WiFi Connected list Page 54123 + 100% A B C D E F G H I J K L M N O P Q R S T U V W X Y Z Z A A B C D E F G H I J K L M N O P Q R S T U V W X Y Z Z A A B C D E F G H I J K L M N O P Q R S T U V W X Y Z Z A A B C D E F G H I J K L M N O P Q R S T U V W X Y Z Z A A B C D E F G H I J K L M N O Pflowchart
graph LR
    A["Start: Tap with coffee cup"] --> B["Select your drink"]
    B --> C["Check up coffee machine"]
    C --> D["Check up coffee machine"]
    D --> E["Check up coffee machine"]
    E --> F["Check up coffee machine"]
    F --> G["End: Tap with coffee machine"]
text_image
3 sec. Coffee Strength Strengthen or emboss? Strength lets you adjust the strength of your coffee be grinding more or less beans. Coffee Strengthflowchart
graph TD
    A["1: Feed & Reaction"] --> B["2: Stabilization"]
    B --> C["3: Cooling & Receiving"]
    C --> D["4°C & Refrigerator"]
    D --> E["5: Dish Washing"]
    E --> F["6: Cover & Dish"]
    F --> G["7: Press & Paper"]
    G --> H["8: Packaging & Collection"]
    H --> I["9: Display & Watch"]
    I --> J["Select your drink"]
text_image
Diagram showing electrical installation and power button interaction with a devicetext_image
WiFi Connected Zoos-MD23
text_image
WiFi Current app 2page-16327
text_image
Screenshot of a mobile keyboard interface with control buttons and navigation iconsflowchart
graph LR
    A["Start: Select your drink"] --> B["Step 1: Hand press, click coffee cup"]
    B --> C["Step 2: Click coffee cups with color adjustment and navigation icons"]
    C --> D["Step 3: Click coffee cups with color adjustment and navigation icons"]
    D --> E["Step 4: Click coffee cups with color adjustment and navigation icons"]
    E --> F["End: Pressing coffee cup with drop in color"]
text_image
3 sec. Coffee Strength Stronger or irritable? Strength lets you adjust the strength of your coffee by grinding more or less because.text_image
Diagram showing electrical installation and power switch application on a device, with Chinese text labels.text_image
HygieSteamnatural_image
Simple line drawing of a ceramic grinder with no text or symbolstext_image
Maintenance Dashboardflowchart
graph LR
    A["Start: Click cup on refrigerator"] --> B["Select your drink"]
    B --> C["Check up coffee cup with color gradient"]
    C --> D["Check up coffee machine with red indicator"]
    D --> E["Check up coffee machine with green indicator"]
    E --> F["Check up coffee machine with red indicator"]
    F --> G["End: Take the coffee machine with a coffee cup icon"]
text_image
3 sec. Simmer or filled? Strengthless you adjust the strength of your coffee by grinding more or less hours. Coffee Strengthflowchart
graph TD
    A["1: Mixing with 4°C"] --> B["2: Stopping with 4°C"]
    B --> C["3: Stopping with 4°C"]
    C --> D["4°C is added to a kitchen interior"]
    D --> E["5: Stopping with 4°C"]
    E --> F["6: Stopping with 4°C"]
    F --> G["7: Stopping with 4°C"]
    G --> H["8: Stopping with 4°C"]
    H --> I["9: Stopping with 4°C"]
    I --> J["10: Stopping with 4°C"]
    J --> K["11: Stopping with 4°C"]
    K --> L["12: Stopping with 4°C"]
    L --> M["13: Stopping with 4°C"]
    M --> N["14: Stopping with 4°C"]
    N --> O["15: Stopping with 4°C"]
    O --> P["16: Stopping with 4°C"]
    P --> Q["17: Stopping with 4°C"]
    Q --> R["18: Stopping with 4°C"]
    R --> S["19: Stopping with 4°C"]
    S --> T["20: Stopping with 4°C"]
    T --> U["21: Stopping with 4°C"]
    U --> V["22: Stopping with 4°C"]
    V --> W["23: Stopping with 4°C"]
    W --> X["24: Stopping with 4°C"]
    X --> Y["25: Stopping with 4°C"]
    Y --> Z["26: Stopping with 4°C"]
    Z --> AA["27: Stopping with 4°C"]
    AA --> AB["28: Stopping with 4°C"]
    AB --> AC["29: Stopping with 4°C"]
    AC --> AD["30: Stopping with 4°C"]
    AD --> AE["31: Stopping with 4°C"]
    AE --> AF["32: Stopping with 4°C"]
    AF --> AG["33: Stopping with 4°C"]
    AG --> AH["34: Stopping with 4°C"]
    AH --> AI["35: Stopping with 4°C"]
    AI --> AJ["36: Stopping with 4°C"]
    AJ --> AK["37: Stopping with 4°C"]
    AK --> AL["38: Stopping with 4°C"]
    AL --> AM["39: Stopping with 4°C"]
    AM --> AN["40: Stopping with 4°C"]
    AN --> AO["41: Stopping with 4°C"]
    AO --> AP["42: Stopping with 4°C"]
    AP --> AQ["43: Stopping with 4°C"]
    AQ --> AR["44: Stopping with 4°C"]
    AR --> AS["45: Stopping with 4°C"]
    AS --> AT["46: Stopping with 4°C"]
    AT --> AU["47: Stopping with 4°C"]
    AU --> AV["48: Stopping with 4°C"]
    AV --> AW["49: Stopping with 4°C"]
    AW --> AX["50: Stopping with 4°C"]
text_image
Diagram illustrating the process of installing a power outlet into a device, with a power button icon and directional arrow.text_image
WiFi Copriest Zigg At1023 WiFi Copriest Zigg At1023 LEDtext_image
3 sec. Stronger or mitten? Strength lets you adjust the strengths of your coffee by pinching more or less bases. Coffee Strengthflowchart
graph TD
    A["1: Mixing"] --> B["2: Cooling"]
    B --> C["3: Color Adjustment"]
    C --> D["4°C & 2% change"]
    D --> E["5: Washing"]
    E --> F["6: Air Condition"]
    F --> G["7: Air Condition"]
    G --> H["8: Air Condition"]
    H --> I["9: Air Condition"]
    I --> J["Select your drink"]
B2 Drinks (Boissons)
B3 Drinks menu (Menu des boissons)
B4 Personal profiles (Profils personnels)
text_image
Diagram illustrating the process of installing a power outlet into a device, with a power button icon and directional arrow.flowchart
graph LR
    A["Start: Tap with coffee cup"] --> B["Select your drink"]
    B --> C["Check up, Edit, Save, Print, Apply"]
    C --> D["Check up, High, Reduce"]
    D --> E["Check down, High, Reduce"]
    E --> F["End: Tap with coffee cup"]
text_image
3 sec. Steinners or irides? Strengthless you adjust the strength of your coffee by grinding more or less beans. Coffee Strengthflowchart
graph TD
    A["1: Feed & Reaction"] --> B["2: Stimulation"]
    B --> C["3: Refrigeration & Washing"]
    C --> D["4°C Control"]
    D --> E["5: Dish Washing"]
    E --> F["6: Cover & Wash"]
    F --> G["7: Packaging & Packaging"]
    G --> H["8: Display & Capture"]
    H --> I["9: Select your drink"]
    I --> J["Select the product with 10% of the container"]
natural_image
Two experimental setups showing a mixing bowl and two washers with liquid, no text or symbols present.B8 Start/stop ▶ion (Ikona
text_image
Diagram illustrating the process of removing a power plug into an electrical socket, with a smartphone icon showing power button and power symbol.Spojite i ažurirajte uredaj pri prvoj instalaciji i redovito provjeravajte jesu li dostupna ručna ažuriranja.
text_image
WiFi Connected Page MDDS WiFi Connected Page MDDS Windows Settings Actions English1 Dodirnite ikonu Settings ⚙ (Postavke) i prijedite prstom slijeva udesno da biste pronašli ikonu Wi-Fi.
2 Dodirnite ikonu Wi-Fi.
3 Za povezivanje uredaja s Wi-Fi mrežom slijedite korake navedene na zaslonu. Spremni ste za početak povezivanja.
flowchart
graph LR
    A["Input Cup with Coffee Tap"] --> B["Select your drink"]
    B --> C["Display with Digital Interface"]
    C --> D["Check up Coffee Tap"]
    D --> E["Display with Display"]
    E --> F["Control Panel with Mask"]
    F --> G["Close-up of Coffee Tap"]
    G --> H["Hold Coffee Tap"]
text_image
3 sec. Stronger or emitted? Strength lets you adjust the strength of your coffee by grinding more or less beams. Coffee Strengthflowchart
graph TD
    A["1: Mixing with 4°C"] --> B["2: Stopping with 4°C"]
    B --> C["3: Stopping with 4°C"]
    C --> D["4°C is added to a kitchen interior"]
    D --> E["5: Stopping with 4°C"]
    E --> F["6: Stopping with 4°C"]
    F --> G["7: Stopping with 4°C"]
    G --> H["8: Stopping with 4°C"]
    H --> I["9: Stopping with 4°C"]
    I --> J["Select your drink in the kitchen environment"]
    J --> K["10: Stopping with 4°C"]
    K --> L["11: Stopping with 4°C"]
    L --> M["12: Stopping with 4°C"]
    M --> N["13: Stopping with 4°C"]
    N --> O["14: Stopping with 4°C"]
    O --> P["15: Stopping with 4°C"]
    P --> Q["16: Stopping with 4°C"]
    Q --> R["17: Stopping with 4°C"]
    R --> S["18: Stopping with 4°C"]
    S --> T["19: Stopping with 4°C"]
    T --> U["20: Stopping with 4°C"]
text_image
Diagram illustrating the process of removing a power plug into an electrical socket, with a smartphone icon showing power button and power symbol.flowchart
graph LR
    A["Start: Tap with coffee cup"] --> B["Select your drink"]
    B --> C["Check up, Edit, Save, Replace"]
    C --> D["Close, High, Select"]
    D --> E["Close, High, Select"]
    E --> F["Close, High, Select"]
    F --> G["Close, High, Select"]
    G --> H["Close, High, Select"]
    H --> I["Close, High, Select"]
text_image
3 sec. Stronger or irriter! Strength lists you adjust the strengths of your coffee by grinding more or less bases. Coffee Strengthflowchart
graph TD
    A["1: Cover with 4°C"] --> B["2: Stacking into a bottle"]
    B --> C["3: Stacking into a glass tube"]
    C --> D["4°C is added to the refrigerator"]
    D --> E["5: Stacking into a sink with a pipette"]
    E --> F["6: Stacking into a cup with liquid"]
    F --> G["7: Stacking into a glass with a glass of milk"]
    G --> H["8: Stacking into a hand holding a cup with liquid"]
    H --> I["9: Stacking into a bag with a glass of milk"]
    I --> J["10: Stacking into a cup with liquid"]
    J --> K["11: Stacking into a hand holding a cup with liquid"]
    K --> L["12: Stacking into a hand holding a cup with liquid"]
    L --> M["13: Stacking into a hand holding a cup with liquid"]
    M --> N["14: Stacking into a hand holding a cup with liquid"]
    N --> O["15: Stacking into a hand holding a cup with liquid"]
    O --> P["16: Stacking into a hand holding a cup with liquid"]
    P --> Q["17: Stacking into a hand holding a cup with liquid"]
    Q --> R["18: Stacking into a hand holding a cup with liquid"]
    R --> S["19: Stacking into a hand holding a cup with liquid"]
    S --> T["20: Stacking into a hand holding a cup with liquid"]
    T --> U["21: Stacking into a hand holding a cup with liquid"]
    U --> V["22: Stacking into a hand holding a cup with liquid"]
    V --> W["23: Stacking into a hand holding a cup with liquid"]
    W --> X["24: Stacking into a hand holding a cup with liquid"]
    X --> Y["25: Stacking into a hand holding a cup with liquid"]
    Y --> Z["26: Stacking into a hand holding a cup with liquid"]
    Z --> AA["27: Stacking into a hand holding a cup with liquid"]
    AA --> AB["28: Stacking into a hand holding a cup with liquid"]
    AB --> AC["29: Stacking into a hand holding a cup with liquid"]
    AC --> AD["30: Stacking into a hand holding a cup with liquid"]
    AD --> AE["31: Stacking into a hand holding a cup with liquid"]
    AE --> AF["32: Stacking into a hand holding a cup with liquid"]
    AF --> AG["33: Stacking into a hand holding a cup with liquid"]
    AG --> AH["34: Stacking into a hand holding a cup with liquid"]
    AH --> AI["35: Stacking into a hand holding a cup with liquid"]
    AI --> AJ["36: Stacking into a hand holding a cup with liquid"]
    AJ --> AK["37: Stacking into a hand holding a cup with liquid"]
    AK --> AL["38: Stacking into a hand holding a cup with liquid"]
    AL --> AM["39: Stacking into a hand holding a cup with liquid"]
    AM --> AN["40: Stacking into a hand holding a cup with liquid"]
    AN --> AO["41: Stacking into a hand holding a cup with liquid"]
    AO --> AP["42: Stacking into a hand holding a cup with liquid"]
    AP --> AQ["43: Stacking into a hand holding a cup with liquid"]
    AQ --> AR["44: Stacking into a hand holding a cup with liquid"]
    AR --> AS["45: Stacking into a hand holding a cup with liquid"]
    AS --> AT["46: Stacking into a hand holding a cup with liquid"]
    AT --> AU["47: Stacking into a hand holding a cup with liquid"]
    AU --> AV["48: Stacking into a hand holding a cup with liquid"]
    AV --> AW["49: Stacking into a hand holding a cup with liquid"]
    AW --> AX["50: Stacking into a hand holding a cup with liquid"]
natural_image
Two diagrams showing a mixing machine with a bowl and a side arm, both without any text or symbols.text_image
Diagram showing electrical installation and power button interaction with a smartphonetext_image
Wi-Fi Connected Zigg-840023 Wi-Fi Connected Zigg-840023 T125text_image
3 sec. Coffee Strength Strenger or eroded? Strengthless you adjust the strength of your coffee be pinding more or less bears. Coffee Strengthflowchart
graph TD
    A["1: Stirrer with 4°C"] --> B["2: Stacking into sink"]
    B --> C["3: Stopping into sink"]
    C --> D["4: Refrigeration in refrigerator"]
    D --> E["5: Washing in sink"]
    E --> F["6: Dish cleaning in refrigerator"]
    F --> G["7: Cover in sink"]
    G --> H["8: Packaging in container"]
    H --> I["9: Cover in sink"]
    I --> J["Select your drink in glass with 4°C and 2°C mark"]
    J --> K["Final packaging with 4°C and 2°C mark"]
text_image
Diagram illustrating the process of installing a power outlet into a mobile phone, with a power button icon highlighting the function.flowchart
graph LR
    A["Input: Tap with coffee mug"] --> B["Select your drink"]
    B --> C["Smart glasses with icons"]
    C --> D["Smart display with icons"]
    D --> E["Close-up display with icons"]
    E --> F["Output: Tap with icon"]
text_image
3 sec. Coffee Strength Stronger or altered? Strength lets you adjust the strength of your coffee for printing more or less beans. Coffee Strengthflowchart
graph TD
    A["1: Mixing"] --> B["2: Cooling"]
    B --> C["3: Color Adjustment"]
    C --> D["4°C & 2% change"]
    D --> E["5: Washing"]
    E --> F["6: Dish & Bottle"]
    F --> G["7: Clearing"]
    G --> H["8: Select your drink"]
    H --> I["9: Handheld with color adjustment icons"]
    I --> J["10: Screen capture"]
    J --> K["11: Mask & Camera"]
    K --> L["12: Filtered glass"]
text_image
Diagram showing electrical installation and power button interaction with a smartphonetext_image
WiFi Download Zigg-44203 WiFi Connect to: Zigg-WI2031 Windows Settings Englishtext_image
3 sec. Coffee Strength Stronger or embled? Strengthless you adjust the strength of your coffee for pinding/more/or less bears. Coffeeflowchart
graph TD
    A["1: Top mixing bottle"] --> B["2: Top washing bottle with 4°C drop"]
    B --> C["3: Top washing bottle with 2°C drop"]
    C --> D["4: Top washing bottle with 1°C drop"]
    D --> E["5: Top washing bottle with 1°C drop"]
    E --> F["6: Top washing bottle with 1°C drop"]
    F --> G["7: Top washing bottle with 1°C drop"]
    G --> H["8: Top washing bottle with 1°C drop"]
    H --> I["9: Top washing bottle with 1°C drop"]
    I --> J["Select your drink"]
B8 Start/stop ▶ion (Pictogram Start/stop)
Introductie
text_image
Diagram showing electrical installation and power button interaction with a smartphonetext_image
WiFi Download Zigg-44203 WiFi Connect to: Zigg-WI2031 Windows Settings Englishtext_image
3 sec. Stronger or mitten? Strength lets you adjust the strengths of your coffee by pinching more or less bases. Coffee Strengthflowchart
graph TD
    A["1: Mixing"] --> B["2: Cooling"]
    B --> C["3: Color Adjustment"]
    C --> D["4°C & 2% change"]
    D --> E["5: Washing"]
    E --> F["6: Air Condition"]
    F --> G["7: Air Damage"]
    G --> H["8: Air Dissulfur"]
    H --> I["9: Air Compression"]
    I --> J["Select your drink"]
Extra shot (ExtraShot)
A7 HygieSteam beholder
A8 HygieSteam deksel med melkerørholder
A9 Høydejusterbar kaffe- og melketut
A10 Integrert, automatisk melkeskummer
A11 Strømledning med kontakt
A12 Innstillingsknapp for kverning (du kan gå til www.saeco.com/care)
A13 Bønnetrakt
B8 Start/stop ▶icon (Ikon for B8 Start/stopp)
Innledning
text_image
Diagram illustrating the process of installing a power socket into a wall, with a smartphone icon showing power button and battery.text_image
WiFi Connected 2page-14322 WiFi Connected 2page-14321 LEDflowchart
graph LR
    A["Start: Click cup on refrigerator"] --> B["Select your drink"]
    B --> C["Check up coffee cup with color gradient"]
    C --> D["Check up coffee machine with red indicator"]
    D --> E["Check up coffee machine with orange indicator"]
    E --> F["Check up coffee machine with red indicator"]
    F --> G["End: Take the coffee machine with a coffee icon"]
text_image
3 sec. Stronger or milled? Strengthless you adjust the strength of your coffee for pinching more or less times. Coffee Strengthflowchart
graph TD
    A["1: Cover with 4°C"] --> B["2: Stacking into a bottle"]
    B --> C["3: Stacking into a glass tube"]
    C --> D["4°C above the sink"]
    D --> E["5: Stacking into a refrigerator"]
    E --> F["6: Stacking into a washing machine"]
    F --> G["7: Stacking into a coffee cup"]
    G --> H["8: Stacking into a water bath"]
    H --> I["9: Stacking into a coffee cup"]
    I --> J["Select your drink"]
AquaClean-vannfilter
text_image
Diagram illustrating the process of installing a power outlet into a device, with a power button icon and directional arrow.A Birinchi marta o'rnatishda mashinani ulang va yangilang hamda qo'llanma yangilanishlarini muntazam ravishda tekshirib turing.
Wi-Fi tarmog'iga ulanish
i Qahva mashiningizni 2,4 GGs 802,11 b/g/n uy Wi-Fi tarmog'iga ulang.
i Qahva mashinangizni uy Wi-Fi tarmog'iga ulash sizga yaxshilangan foydalanuvchi taassurotini taqdim etadi.
i Qahva mashinasi va Wi-Fi router bir-birining diapazonida ekanini tekshiring.
Qahva mashinangizni Wi-Fi tarmoqqa ulash uchun quyidagi ko'rsatmalarni bajaring.

text_image
WiFi Connected Zigg-10123 WiFi Connected Zigg-10123 Windows Settings Settings Windows Settings Settings Windows Settings Settings Windows Settings Settings Windows Settings Settings Windows Settings Settings Windows Settings Settings Windows Settings Settings Windows Settings Settings Windows Settings Settings Windows Settings Settings Windows Settings Settings Windows Settings Settings Windows Settings Settings Windows Settings Settings Windows Settings Settings Windows Settings Settings Windows Instructions1 Sozlamalar belgisini bosing va Wi-Fi belgisini topish uchun chapdan o'ngga suring.
2 Wi-Fi belgisini bosing.
3 Mashinangizni Wi-Fi tarmoqqa ulash uchun ekrandagi ko'rsatmalarni bajaring.
flowchart
graph LR
    A["Start: Open cup on phone"] --> B["Select your drink"]
    B --> C["Check inside, Edit, Save, Print, Apply"]
    C --> D["Close hands, High intensity, Close hands, High intensity"]
    D --> E["Close hands, High intensity, Close hands, High intensity"]
    E --> F["Close hands, High intensity, Close hands, High intensity"]
    F --> G["Close hands, High intensity, Close hands, High intensity"]
    G --> H["Close hands, High intensity, Close hands, High intensity"]
1 Suv idishini vodoprovod suvi bilan, qahva donlari idishini esa qahva donlari bilan to'ldiring.
2 Balandligi sozlanadigan chiqarish jo'mragi ostiga bir yoki ikki finjonni qo'ying. Balandlikni siz foydalanadigan finjon yoki stakanning o'lchamiga sozlash uchun dispenserni yuqoriga yoki pastga suring.
3 "Ichimliklar" menyusiga kirish uchun Ichimliklar belgisini bosing. Ichimligingizni unga bosish orqali tanlash uchun chapdan o'ngga suring.
- Agar ikki finjon qahva tayyorlamoqchi bo'lsangiz, "2x" belgisini bosing. Mashina tanlangan ichimliklar ketma-ketligida yanchish siklini avtomatik bajaradi.
text_image
3 sec. Stronger or nickled? Strength lets you adjust the strength of your coffee by grinding more or less beurs. Coffee StrengthSutli ichimliklar damlash
Sutli ichimliklar damlash uchun quyidagi oddiy amallarni bajaring.
flowchart
graph TD
    A["1: Feed & Reaction"] --> B["2: Stabilization"]
    B --> C["3: Cooling & Reuse"]
    C --> D["4°C Control"]
    D --> E["5: Process Step"]
    E --> F["6: Refrigeration & Washing"]
    F --> G["7: Storage & Recycling"]
    G --> H["8: Select your drink"]
    H --> I["9: Display & Interface"]
    I --> J["Final Packaging & Beverage"]
1 Suv idishini vodoprovod suvi bilan, qahva donlari idishini esa qahva donlari bilan to'ldiring.
2 Sut idishining qopqog'ini burab oching va idishni sut bilan to'Idiring.
Maqbul natijalar uchun har doim bevosita sovitkichdan olingan sut ishlating.
3 Egiluvchan sut naychasini kapuchinatorga ulang.
4 Metal sut naychasini idishga soling.
5 Ichimliklar 📋 belgisini bosing, aylantiring va xohishingizga qarab sutli ichimlik belgisini bosing.
6 Boshqariladigan chiziqlarni yuqoriga va pastga surish orqali sozlamalarni xohishingizga moslashingiz mumkin.
7 Tanlangan ichimlikni damlashni boshlash uchun har qaysi vaqtda start/stop-belgisini bosing.
flowchart
graph LR
    A["Start: Hand Triggering Drink"] --> B["Select your drink"]
    B --> C["Action: Drinking 40%"]
    C --> D["Action: Drinking 12%"]
    D --> E["Action: Drinking 50%"]
    E --> F["Action: Drinking 30%"]
    F --> G["Action: Drinking 10%"]
    G --> H["Action: Drinking 5%"]
    H --> I["Action: Drinking 2%"]
    I --> J["Action: Drinking 1%"]
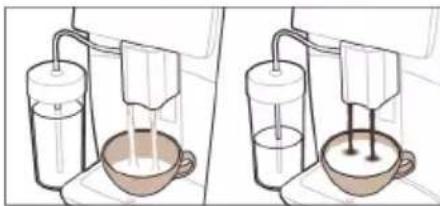
natural_image
Two identical illustrations of a hand mixer with liquid, showing the bulb and side arm (no text or symbols)1 Yanchilgan qahva bo'linmasining qopqog'ini oching va ichiga bir o'lchovli qoshiqda yanchilgan qahva soling. Keyin qopqoqni yoping.
2 Ichimliklarbelgisini bosing, chapdan o'ngga suring va ichimlikni tanlang.
3 Yanchilgan qahva bo'linmasi-belgisini bosing.
4 Boshqariladigan chiziqlarni yuqoriga va pastga surish orqali sozlamalarni xohishingizga moslashingiz mumkin.
5 Tanlangan ichimlikni damlashni boshlash uchun start/stop-belgisini bosing.
i Agar birlamchi yanchilgan qahvani tanlasangiz, qahva qattiqligini sozlay olmaysiz va bir vaqtda bir finjondan ortiq qahva damlay olmaysiz.
Qaynoq suv quyish
1 Ichki kapuchinator mashinaga to'g'ri biriktirilganini tekshiring (Rasm 1).
2 Finjonni jo'mrak tagiga qo'ying.
3 "Qaynoq suv" bandini bosing (Rasm 2).
4 Qaynoq suv miqdori yoki haroratini o'zingiz istagandek o'zgartirish uchun sozlanuvchi panelni yuqoriga va pastga suring (Rasm 3).
5 Start/Stop▶belgisini bosing.
6 Mashina ishni yakunlaguncha qaynoq suv quyishni to'xtatmoqchi bo'lsangiz, start/stop ▶ belgisini yana bosing.
Moslashtirish
B7 Sklep B8 Start/stop icon (Ikona
text_image
Diagram showing electrical installation and power switch operation, with a power button icon highlighting the function.text_image
WiFi Connected Zigg M1023 WiFi Connected Zigg M1023 A123 Options Settings Home Logicflowchart
graph LR
    A["Input: Tap with coffee mug"] --> B["Select your drink"]
    B --> C["User Interaction: Click, Save, Replace, Print, Apply"]
    C --> D["User Interaction: Click, High, Reduce"]
    D --> E["User Interaction: Click, High, Reduce"]
    E --> F["User Interaction: Click, High, Reduce"]
    F --> G["User Interaction: Click, High, Reduce"]
text_image
3 sec. Stronger or mbike? Strengthless you adjust the strength of your coffee be grinding more or less boars. Coffee Strengthflowchart
graph TD
    A["Step 1: Mixing with 4°C"] --> B["Step 2: Stabilizing in a refrigerator"]
    B --> C["Step 3: Stabilizing in a washing machine"]
    C --> D["Step 4: Select your drink"]
    D --> E["Final inspection of coffee cupping"]
flowchart
graph LR
    A["Start Screen"] --> B["Select your drink"]
    B --> C["Lock/Zoom/Quick"]
    C --> D["Zoom/Light/Quick"]
    D --> E["Close/Light/Quick"]
    E --> F["Next Step"]
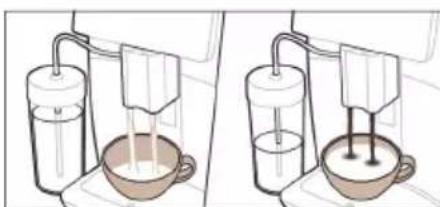
natural_image
Two identical illustrations of a milk cart being poured into a bowl using a stand mixer (no text or symbols visible)A7 Recipiente HygieSteam
text_image
Diagram illustrating the process of installing a power outlet into a device, with a power button icon symbolizing power.flowchart
graph LR
    A["Select your drink"] --> B["Make a coffee cup"]
    B --> C["Click for high volume of coffee in the window"]
    C --> D["Check up and drop volume of coffee in the window"]
    D --> E["Close and go back"]
    E --> F["Close and go back inside the window"]
    F --> G["Close and go back inside the window"]
    G --> H["Close and go back inside the window"]
text_image
3 sec. Stronger or irriter? Strength less you adjust the strength of your coffee for finding more or less boxes. Coffee Strengthflowchart
graph TD
    A["1: Stirrer with 4°C"] --> B["2: Washer with 3°C"]
    B --> C["3: Washer with 2°C"]
    C --> D["4: Washer with 2°C"]
    D --> E["5: Washer with 1°C"]
    E --> F["6: Washer with 1°C"]
    F --> G["7: Washer with 1°C"]
    G --> H["8: Washer with 1°C"]
    H --> I["9: Washer with 1°C"]
    I --> J["Select your drink"]
Encomendar acessórios
A7 Recipient HygieSteam
www.saeco.com/MyCoffeeMachine.
text_image
Diagram illustrating power switch installation and battery charging process, showing plug, socket, and power button iconstext_image
WiFi Connected WiFi Wireless Job WiFi Wireless Job LED2 A 2 B C D E F G H I J K L M N O P Q R S T U V W X Y Z Z A B C D E F G H I J K L M N O P Q R S T U V W X Y Z Z A B C D E F G H I J K L M N O P Q R S T U V W X Y Z Z A B C D E F G H I J K L M N O P Q R S T U V W X Y Z Z A B C D E F G H I J K L M N O P Q R S Zips ATDCS Windows Server Settings Tools Windowflowchart
graph LR
    A["Start: Tap with coffee cup"] --> B["Select your drink"]
    B --> C["Make a drink using coffee can inside the refrigerator"]
    C --> D["Check up for cooking steps"]
    D --> E["Take steps to make a drink in the refrigerator"]
    E --> F["Close hands to check for cooking steps"]
    F --> G["End: Tap with coffee can inside the refrigerator"]
text_image
3 sec. Coffee Strength Stronger or milder? Strength lets you adjust the strength of your coffee by grinding more or less bears. Coffee Strengthflowchart
graph TD
    A["Raw Material Mixing"] --> B["4°C & 2% preparation"]
    B --> C["Recovery, Washing, Dish cleaning"]
    C --> D["Drain, Dish, Water"]
    D --> E["Select your drink"]
    E --> F["Product with 40% lighting and color gradient"]
    F --> G["Final packaging with 100% water supply"]
text_image
Diagram illustrating the process of installing a power outlet, showing installation and power transfer steps with a power button icon.text_image
3 sec. Stronger or milled? Strength lists you adjust the strengths of your coffee by printing more or less bounds. Coffee Strengthflowchart
graph TD
    A["Raw Material Mixing"] --> B["4°C & 2% preparation"]
    B --> C["Recovery, Washing, Dish cleaning"]
    C --> D["Close-up of kitchen sink"]
    D --> E["Select your drink with color palette and interface icons"]
    E --> F["Product packaging with hand gesture"]
    F --> G["Final product with glass container and cup holder"]
text_image
Diagram showing electrical installation and power button interaction with a smartphonetext_image
Wi-Fi Connected Zigg-840023 Wi-Fi Connected Zigg-840023 T125flowchart
graph LR
    A["Start: Coffee Cup"] --> B["Select your drink"]
    B --> C["Make a coffee cup with a brush and pencil icon"]
    C --> D["Make a coffee cup with a brush and pencil icon using a mouse and pencil icon"]
    D --> E["Make a coffee cup with a brush and pencil icon using a mouse and pencil icon using a mouse and pencil icon"]
    E --> F["Make a coffee cup with a brush and pencil icon using a mouse and pencil icon using a mouse and pencil icon"]
    F --> G["End: Coffee Cup Usage"]
text_image
3 sec. Coffee Strength Stronger or milled? Strength lists you adjust the strengths of your coffee for ginding more or less boxes.flowchart
graph TD
    A["1: Cover with 2°C"] --> B["2: Stacking into a bottle"]
    B --> C["3: Stopping into a glass tube"]
    C --> D["4°C oven with inlet"]
    D --> E["5: Stacking into a refrigerator"]
    E --> F["6: Stopping into a sink"]
    F --> G["7: Stacking into a coffee cup"]
    G --> H["8: Stopping into a washing machine"]
    H --> I["9: Stacking into a coffee cup with lid"]
    I --> J["Select your drink in the refrigerator"]
Vodni filter AquaClean
www.saeco.com/MyCoffeeMachine.
text_image
Diagram illustrating the process of installing a power socket into a wall, with a smartphone icon showing power button and power symbol.text_image
WiFi Connect bus Zigor M4120 WiFi Connect bus Zigor M4121 Windows Windows Settings Settings Windows Windows Settings Settings Windows Windows Settingsflowchart
graph LR
    A["Start: Tap with coffee cup"] --> B["Select your drink"]
    B --> C["Make a coffee maker using icons for steps 1-3"]
    C --> D["Check up menu actions like 'Take' and 'Hold', 'Save', 'Finish'"]
    D --> E["Close hands to test coffee maker with icons for steps 4-5"]
    E --> F["Check up menu actions like 'Take', 'Hold', 'Finish'"]
    F --> G["End: Tap with coffee maker icon"]
text_image
3 sec. Stronger or milled? Strength lists you adjust the strengths of your coffee by printing more or less beans. Coffee Strengthflowchart
graph TD
    A["Raw Material Mixing"] --> B["4°C Control"]
    B --> C["Recovery to Dish with Paper"]
    C --> D["Drain Washing"]
    D --> E["Select your drink"]
    E --> F["Product Package with Cover, Bag, and Snack"]
    F --> G["Final Packaging & Packaging"]
A7 HygieSteam posuda
A8 HygieSteam poklopac sa držačem cevi za mleko
text_image
Diagram showing electrical installation and power button interaction with a smartphonePovežite se i ažurirajte aparat prilikom prve instalacije i redovno proveravajte da li postoje ručne ispravke.
text_image
WiFi Wireless Zipin-44023 WiFi Wireless Zipin-44023 Windows iTunes Settings Settings Windows1 Dodirnite ikonu Postavke prevucite sleva nadesno da biste pronašli Wi-Fi ikonu.
2 Dodirnite Wi-Fi ikonu.
3 Sledite korake na ekranu da biste povezali aparat sa Wi-Fi mrežom.
Sada ste spremni da započnete svoj povezani doživljaj.
text_image
3 sec. Stronger or milled? Strength lists you adjust the strengths of your coffee by printing more or less bounds. Coffee Strengthflowchart
graph TD
    A["Raw Material Mixing"] --> B["4°C & 2% preparation"]
    B --> C["Recovery, Washing, Dish cleaning"]
    C --> D["Close-up of kitchen tube with liquid"]
    D --> E["Select your drink in a glass with color palette"]
    E --> F["Product packaging with hand gesture icons"]
    F --> G["Final product with water tank and cup"]
1 Napunite rezervoar vodom iz česme i napunite posudu za kafu zrnima kafe.
2 Odvojte poklopac sa posude za mleko i sipajte mleko u posudu.
text_image
Diagram illustrating the process of installing a power socket into an electrical outlet, with a smartphone icon showing power button and power symbol.flowchart
graph LR
    A["WiFi Connection"] --> B["WiFi Command"]
    B --> C["Keyboard Usage"]
flowchart
graph LR
    A["Start: Tap with coffee cup"] --> B["Select your drink"]
    B --> C["Make color change icons"]
    C --> D["Close-up of color change icons"]
    D --> E["Close-up of color change icons"]
    E --> F["Close-up of color change icons"]
    F --> G["Close-up of color change icons"]
    G --> H["End: Tap with coffee cup icon"]
text_image
3 sec. Simmer or mblote? Strength lets you adjust the strength of your coffee by grinding more or less hours. Coffee Strengthflowchart
graph TD
    A["Raw Material Mixing"] --> B["4°C Reuse"]
    B --> C["Reuse to Dish with Paper"]
    C --> D["Close-up of Dish with Paper"]
    D --> E["Select your drink"]
    E --> F["Product Handling with Drink"]
    F --> G["Final Beverage & Packaging"]
B8 Start/stop icon (Start/stopp-ikon)
Inledning
text_image
Diagram showing electrical installation and power button interaction with a smartphonetext_image
WiFi Connecticut Zigga-44023 WiFi Connecticut Zigga-44023 12:25 A B C D E F G H I J K L M N O P Q R S T U V W X Y Z Z A S B C D E F G H I K L M N O P Q R S T U V W X Y Z A S B C D E F G H I K L M N O P Q R S T U V W X Y Z A English - 1flowchart
graph LR
    A["Select your drink"] --> B["Make a coffee cup"]
    B --> C["Make a coffee maker"]
    C --> D["Make a coffee maker with a coffee maker icon"]
    D --> E["Make a coffee maker with a coffee maker icon and a coffee maker icon with a coffee maker icon"]
    E --> F["Make a coffee maker with a coffee maker icon and a coffee maker icon with a coffee maker icon"]
    F --> G["Make a coffee maker with a coffee maker icon and a coffee maker icon with a coffee maker icon"]
    G --> H["Make a coffee maker with a coffee maker icon and a coffee maker icon with a coffee maker icon"]
text_image
3 sec. Strengthen or emblobed? Strengths you adjust the strength of your coffee be grinding more or less bears. Coffee Strengthflowchart
graph TD
    A["Step 1: Mixing with 4°C"] --> B["Step 2: Cooling in a bottle"]
    B --> C["Step 3: Washing in a refrigerator with 2°C cooling"]
    C --> D["Step 4: Washing in a sink with 1°C cooling"]
    D --> E["Step 5: Select your drink in a glass with 2°C cooling"]
    E --> F["Step 6: Hand press down using a brush and lock"]
    F --> G["Step 7: Replace liquid with a glass with 2°C cooling"]
    G --> H["Step 8: Replace liquid with a glass with 1°C cooling"]
    H --> I["End"]
flowchart
graph LR
    A["Start: Hand Stamped Drink"] --> B["Select your drink"]
    B --> C["Check for Beverage"]
    C --> D["Check for Drink"]
    D --> E["Check for Drink"]
    E --> F["Check for Drink"]
    F --> G["Check for Drink"]
    G --> H["End: Touch to Screen"]
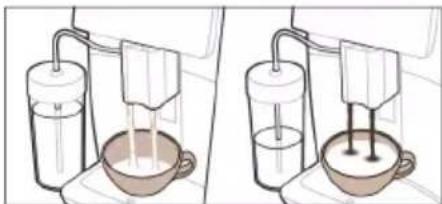
natural_image
Two diagrams showing a washing machine with liquid and a bowl, no text or symbols present.text_image
Diagram illustrating the process of installing a power outlet into a wall socket, with a smartphone icon showing power button and control buttons.Gaýnadyjyny birinji gezek gurnanyňyzda birikdiriň we täzelään, täzelenmeleri yzygiderli görünüşde elde barlap duruň.
Wi-Fi-a birikmek
i Kofe gaýnadyjyňyzy 2,4 GHz 802.11 b/g/n home Wi-Fi toruna birikdiriň.
i Kofe gaýnadyjyňyzy öýdäki Wi-Fi toruňyza birikdirmeklik size ulanyjy tejribănizi güýçlendirmäge mümkinçilik beryär.
i Kofe gaýnadyjysy bilen Wi-Fi routeriň birek-birege arabaglanyşyk çâklerinde bolmagyna üns beriň. Kofe gaýnadyjyňzy Wi-Fi toruňyza birikdirmek üçin aşağıdaki ädimlere eýeriň.
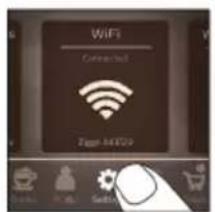
text_image
WiFi Connected Zapp-44129
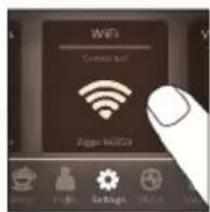
text_image
WIFI Connect card Ziggo M2023
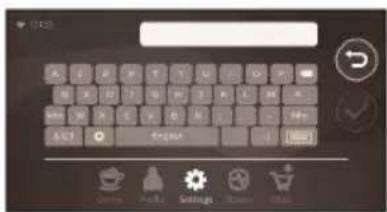
text_image
Screenshot of a mobile keyboard interface with menu bar, function buttons, and control iconstext_image
3 sec. Stronger or irriter? Strength lists you adjust the strength of your coffee by grinding more or less bounds. Coffee Strengthtext_image
Diagram showing electrical installation and power button interaction with a devicetext_image
WiFi Connect toll Zapp-MET23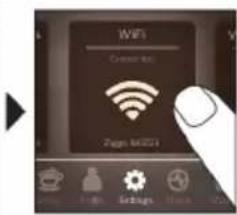
text_image
Wi-Fi Create it Page 6021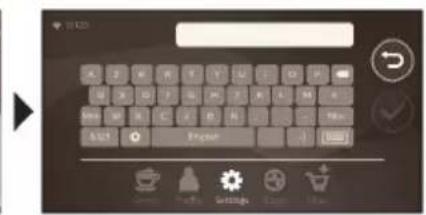
text_image
Screenshot of a mobile keyboard interface with control buttons and navigation iconsflowchart
graph LR
    A["Start: Click cup on laptop"] --> B["Select your drink"]
    B --> C["Make a coffee cup with red light icon"]
    C --> D["Make a coffee cup with white icons, blue gear, and black outline"]
    D --> E["Output: 100% coffee cup using digital interface and output: 100% coffee cup with red light icon"]
    E --> F["Final: Pressing coffee cup with white circular icon"]
text_image
3 sec. Coffee Strength Stronger or erlotter? Strengthless you adjust the strengths of your coffee for piniding more or less bears. Coffee Strengthflowchart
graph TD
    A["1: Feed & Reaction"] --> B["2: Stacking & Packaging"]
    B --> C["3: Cooling & Refrigeration"]
    C --> D["4°C & 100% Water Supply"]
    D --> E["5: Washing & Dish & Refrigerator"]
    E --> F["6: Bagging & Washing Machine"]
    F --> G["7: Select your drink with 100% volume"]
    G --> H["8: Handheld & Screen with 100% mark"]
    H --> I["9: Process & Packaging & Refrigerator"]
    I --> J["10: Packaging & Paper & Glass & Paint"]
natural_image
Two diagrams showing a mixing machine with liquid and a bowl, no text or symbols present.text_image
Diagram illustrating power switch installation and battery charging process, showing power input and power button iconsnatural_image
HygieSteam logo with circular design and wavy line inside (no text or symbols beyond the logo)natural_image
Simple line drawing of a gear and a doughnut on a brown background (no text or symbols)text_image
Maintenance Dashboardflowchart
graph LR
    A["Select your drink"] --> B["Add coffee cup"]
    B --> C["Close mixing with hot pot"]
    C --> D["Adjusting to coffee lamp"]
    D --> E["Change in coffee lamp size"]
    E --> F["Final setup with coffee lamp icon"]
text_image
3 sec. Coffee Strength Stronger over blanket! Strength less you adjust the strength of your coffee by grinding more or less beans. Coffee Strengthflowchart
graph TD
    A["1: Stirrer with 4°C"] --> B["2: Microwel with 2°C"]
    B --> C["3: Microwel with 2°C"]
    C --> D["4: Water inlet, 4°C outlet"]
    D --> E["5: Dish funnel, 4°C outlet"]
    E --> F["6: Cover cup, 4°C outlet"]
    F --> G["7: Process container, 4°C outlet"]
    G --> H["8: Refrigerator, 4°C outlet"]
    H --> I["9: Dish funnel, 4°C outlet"]
    I --> J["10: Cover cup, 4°C outlet"]
    J --> K["11: Process container, 4°C outlet"]
    K --> L["12: Cover cup, 4°C outlet"]
    L --> M["13: Process container, 4°C outlet"]
    M --> N["14: Refrigerator, 4°C outlet"]
    N --> O["15: Cover cup, 4°C outlet"]
    O --> P["16: Process container, 4°C outlet"]
    P --> Q["17: Cover cup, 4°C outlet"]
    Q --> R["18: Process container, 4°C outlet"]
    R --> S["19: Cover cup, 4°C outlet"]
    S --> T["20: Process container, 4°C outlet"]
text_image
Diagram illustrating the process of installing a power outlet into a device, with a power button icon and directional arrow.text_image
HygieSteamtext_image
Ceramic Grindertext_image
Maintenance Dashboardflowchart
graph LR
    A["Start: Cup with coffee cup"] --> B["Select your drink"]
    B --> C["Adjustment: Mid/High, Close/Close"]
    C --> D["Adjustment: 30ms High, 20ms Delay"]
    D --> E["Take time: Open, Close, Drop"]
    E --> F["End: Drop with coffee cup"]
text_image
3 sec. Stronger or emboss? Strength lets you adjust the strength of your coffee by plinding more or less beans. Coffee Strengthflowchart
graph TD
    A["1: Roundup with 4°C"] --> B["2: Stimulation with 4°C"]
    B --> C["3: Cooling in refrigerator"]
    C --> D["4: Irrigation device"]
    D --> E["5: Dish cleaning"]
    E --> F["6: Pressurbing into sink"]
    F --> G["7: Select your drink"]
    G --> H["8: Display screen with icons for color, size, and filter"]
    H --> I["9: Hand press with hand icon"]
    I --> J["10: Broadcast display with lock, zoom, and lock icons"]
    J --> K["11: Pressurbing into sink with lock, zoom, and lock icons"]
    K --> L["12: Broadcast display with lock, zoom, and lock icons"]
text_image
Diagram showing electrical installation and power button interaction with a devicetext_image
WiFi Connect toll Zapp-MET23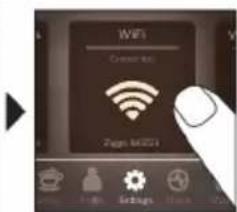
text_image
WiFi Create it Page 60231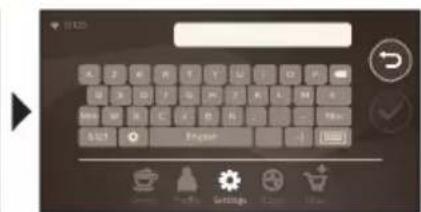
text_image
Screenshot of a mobile keyboard interface with control buttons and navigation iconsnatural_image
HygieSteam logo with circular design and wavy line inside (no text or symbols beyond the logo)natural_image
Simple line drawing of a gear and grinding wheel on a dark background (no text or symbols)text_image
Maintenance Dashboardnatural_image
Simple line drawing of a mug placed on a shelf next to a wall-mounted cabinet (no text or symbols)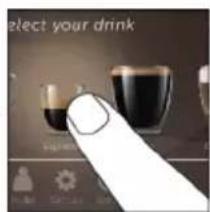
text_image
select your drink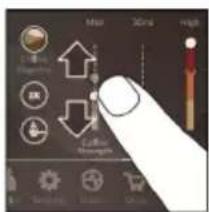
text_image
Main 32nd High Camera Objectives OK Camera Dimensions 100mm 100mm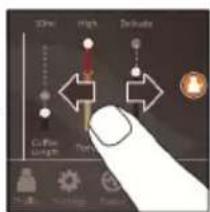
text_image
10min High Durator CuRine Length Port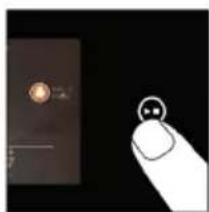
natural_image
Close-up of a finger pointing at a small electronic device with a circular lens (no visible text or symbols)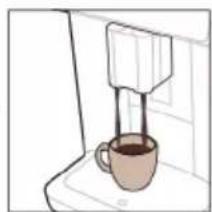
natural_image
Simple line drawing of a coffee cup being poured into a stand (no text or symbols)text_image
3 sec. Coffee Strength Stronger or erlotter? Strengthless you adjust the strengths of your coffee by printing more or less times. Coffee Strengthflowchart
graph TD
    A["1: Roundup with 4°C mark"] --> B["2: Stopping cup with 4°C lamp"]
    B --> C["3: Stopping cup with 2°C lamp"]
    C --> D["4: Refrigerator with liquid bath"]
    D --> E["5: Stopping cup with 2°C lamp"]
    E --> F["6: Stopping cup with 4°C lamp"]
    F --> G["7: Stopping cup with 2°C lamp"]
    G --> H["8: Stopping cup with 4°C lamp"]
    H --> I["9: Stopping cup with 2°C lamp"]
    I --> J["Select your drink in a glass bowl"]
    J --> K["10: Stopping cup with 4°C lamp"]
    K --> L["11: Stopping cup with 2°C lamp"]
    L --> M["12: Stopping cup with 4°C lamp"]
flowchart
graph LR
    A["Start: Hand with brush and spoon"] --> B["Select your drink"]
    B --> C["Drive: 40% Length, 30% Length"]
    C --> D["Drive: 40% Length, 30% Length"]
    D --> E["Close: 100% Length"]
    E --> F["Close: 100% Length"]
    F --> G["Close: 100% Length"]
    G --> H["Close: 100% Length"]
    H --> I["Close: 100% Length"]
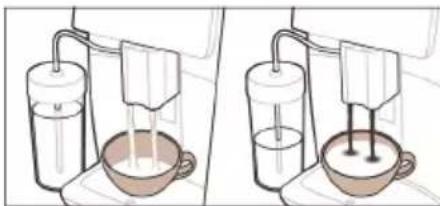
natural_image
Two diagrams showing a water filtration setup with a beaker and pump, no text or symbols present.text_image
Diagram illustrating the process of removing a plug into an electrical socket, with a power button icon and smartphone interface.text_image
Wi-Fi Download Zigg M4CCs Zigg M4CCs Wi-Fi Connection Zigg M4CCs LED Settings| Maintenance Dashboard |
flowchart
graph LR
    A["Start: Tap with coffee cup"] --> B["Select your drink"]
    B --> C["User Interaction with 'Close' icon"]
    C --> D["User Interaction with 'High' icon"]
    D --> E["User Interaction with 'Deliver'"]
    E --> F["User Interaction with 'Close' icon"]
    F --> G["User Interaction with 'Deliver'"]
    G --> H["User Interaction with 'Close' icon"]
text_image
3 sec. Stronger or misticler? Strengthless you adjust the strength of your coffee by phiding more or less bears. Coffee Strengthflowchart
graph TD
    A["1: Stirrer with 4°C"] --> B["2: Stacking into tank"]
    B --> C["3: Recycling into bottle"]
    C --> D["4: Washing in refrigerator"]
    D --> E["5: Clearing into sink"]
    E --> F["6: Select your drink with glass"]
    F --> G["7: Hand press to clean water"]
    G --> H["8: Clearing through hand"]
    H --> I["9: Watch the cup or bowl"]
    I --> J["10: Watch the cup or bowl"]
flowchart
graph LR
    A["Input: Glass with liquid"] --> B["Select your drink"]
    B --> C["Control panel: 100% volume, 20% length, 30% width"]
    C --> D["Display screen: Full body, high, low, clean"]
    D --> E["Final screen: Touch, Edit, Paste"]
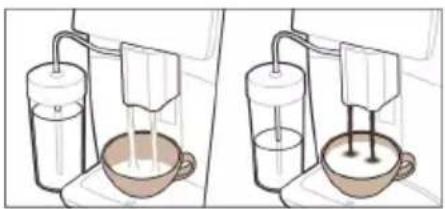
natural_image
Illustration of two experimental setups showing a mixing machine with liquid and a bowl, no text or symbols present.text_image
Diagram illustrating the process of removing a power plug into an electrical socket, alongside a smartphone with a power button icon.flowchart
graph LR
    A["select your drink"] --> B["Make a cup with a red candle"]
    B --> C["Make a coffee maker with a red candle icon"]
    C --> D["Make a coffee maker with a red candle icon inside the game box"]
    D --> E["Make a coffee maker with a red candle icon inside the game box"]
    E --> F["Make a coffee maker with a red candle icon inside the game box"]
    F --> G["Make a coffee maker with a red candle icon inside the game box"]
text_image
3 sec. Stronger or milled? Strength lets you adjust the strength of your coffee for grinding more or less beans. Coffee Strengthflowchart
graph TD
    A["1: Feed & Washing"] --> B["2: Cooling & Washing"]
    B --> C["3: Refrigeration & Washing"]
    C --> D["4°C Control & Washing"]
    D --> E["5: Dish & Washing"]
    E --> F["6: Water & Washing"]
    F --> G["7: Discharge & Washing"]
    G --> H["8: Discharge & Washing"]
    H --> I["9: Discharge & Washing"]
    I --> J["Select your drink"]
flowchart
graph LR
    A["Start: Hand holding bottle"] --> B["Select your drink"]
    B --> C["Add 10% volume, 25% weight, 40% light"]
    C --> D["Adjust 10% volume, 25% weight, 40% light"]
    D --> E["Close 10% volume, 25% weight, 40% light"]
    E --> F["Adjust 10% volume, 25% weight, 40% light"]
    F --> G["Close 10% volume, 25% weight, 40% light"]
    G --> H["Adjust 10% volume, 25% weight, 40% light"]
    H --> I["Close 10% volume, 25% weight, 40% light"]
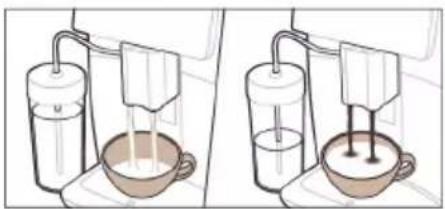
natural_image
Illustration of two experimental setups showing a mixing bowl and a stand mixer with liquid, no text or symbols present.text_image
Diagram illustrating the process of removing a power plug into an electrical socket, alongside a smartphone with a power button icon.text_image
HygieSteamnatural_image
Simple line drawing of a gear and a tool icon labeled 'Ceramic Grinder' (no additional text or symbols)text_image
Maintenance Dashboardflowchart
graph LR
    A["Input Cup with teapot"] --> B["Select your drink"]
    B --> C["Close-up display with icons for color, size, and interaction"]
    C --> D["Close-up display with icons for color, size, and interaction"]
    D --> E["Close-up display with icons for color, size, and interaction"]
    E --> F["Close-up display with icons for color, size, and interaction"]
    F --> G["Close-up display with icons for color, size, and interaction"]
text_image
3 sec. Stronger committed? Strength less you adjust the strength of your coffee by phinding more or less beans. Coffee Strengthflowchart
graph TD
    A["1: Feed & jar with 4°C"] --> B["2: Stacking into refrigerator"]
    B --> C["3: Stopping into sink"]
    C --> D["4: Cutting down funnel"]
    D --> E["5: Stopping into washing machine"]
    E --> F["6: Select your drink in glass"]
    F --> G["7: Touch the cup or cup with coffee bag"]
    G --> H["8: Replace cup or cup with coffee bag"]
    H --> I["9: Replace cup or cup with water tap"]
    I --> J["10: Replace cup or cup with handbell"]
text_image
Diagram illustrating power switch installation and battery charging process, showing power plug, switch, and power button icontext_image
HygieSteamnatural_image
Simple line drawing of a ceramic grinder with gear and blade (no text or symbols)text_image
Maintenance Dashboardflowchart
graph LR
    A["Start: Click cup on laptop"] --> B["Select your drink"]
    B --> C["Click 30ml, High intensity"]
    C --> D["Close 30ml, High intensity"]
    D --> E["Close 30ml, High intensity"]
    E --> F["Close 30ml, High intensity"]
    F --> G["Close 30ml, High intensity"]
    G --> H["Close 30ml, High intensity"]
    H --> I["Close 30ml, High intensity"]
text_image
3 sec. Coffee Strength Stronger or inhibitor? Strengthless you adjust the strength of your coffee for grinding more or less towards. Coffee Strengthflowchart
graph TD
    A["1: Stirrer with 4°C"] --> B["2: Washer with 3°C"]
    B --> C["3: Washer with 2°C"]
    C --> D["4: Washer with 1°C"]
    D --> E["5: Washer with 1°C"]
    E --> F["6: Washer with 1°C"]
    F --> G["7: Washer with 1°C"]
    G --> H["8: Washer with 1°C"]
    H --> I["9: Washer with 1°C"]
    I --> J["Select your drink"]
Utptüwjh wylüwnly (Uywn A) 743
Utunwðnupjntü 744
Utptüwjh lqwnqwlnnniüütnh lqwunwnniü 749
AquaClean qnh qunh2 750
Unǎtúh huúph hīnwǔnǚ lù unṭnwnpnnǚ 751
Uwwpnniu la uwwuuwnplniu 752
Unwihu unuwoputnh uwpnuwu wngtnnnwu 755
Uhuih lynntan 756
Tuwhtuunwudwutnh wwwunuhnnw 757
758
Uuuwnpnuyniuutnh 2unlnui 758
Sthuuhlywlywù pùnǚwqntn 765
Ruwuuwunwuhuwunipajwuhwjwnwnwnwnqn 765
Wi-Fi 766
Utptuwjh wlywny (Uwn A)
A1 Uninǎh hwnhlútph unnuhh ywwhwnhz
A2 Unwgwð unipǎh pudwùnìuph ywihwnhs
A3 Чинии childhood childhood
A4 Lwnh hwúwn pùhy
A5 ۴۶۸۹۵۱۷۱۶۱۷۰۲۳۷۶
A6 Чушрэhlwljhù consuminglyh wǔgwinnúwù lynǎwù
A7 HygieSteam qnlnn2ni wnàwlniú lynùntjutn
A8 HygieSteam qnlnn2ni wnàwyniw lwwihwnhş' lwwah hunnluwuh pnùhznul
A9 Uninǎh lù ywīh úwùnwúwùnúwù δnnuì pwnànníjwù ywnqwúnnúwù hùwnwúnníjwùp
A10 Utnphü ywwynişhùwunn
A11 3nuwuph [wn` hunngwynu]
A12 Unwgúwù lwnqwùnnúwù prùwù (lnwgnighs untntlywùnúnjānìu unwùwùnì huúwùn wjgtībp www.saeco.com/care)
A13 Unipah hwnhylutph unnuh
A14 Unātūh hūnūp (lnwgnighz untnīqwwuyniŋjniù uunwùwlni hwuīwn wjgtitp www.saeco.com/care)
A15 Uwwuwnluywù nzuwù
A16 Ωnh ρωρ
A17 Unipah ̈uunulwðph ynùuntjutn
A18 Unipoh uunuwodph ynuntjutinh wngluh wwutl
2tn uwnpn Wi-Fi gwughu ćhwgutni 2ünphhul nnip lquwnnnwuuup.
- uunwùwì dǎnwqnwjhù wùwuhnúlúwù wùnptínwlywù jāwnúwgniútún` oqunwuhhng zhnnàwuhnuajniúŋ nǔnjiwjǔtínì huuúwùn
- oqunulti huiuuniyeh qnpouwnnyaputinhg, tpat nnwup atn tlnynniú huuuutih tu
- uwnpn ywwuwlygtl àtn Amazon hw2yhu li hwúwintl wùhnwdt2un wwnnwquuttn, tpat wju hùwnwulnnniajniùn hwwuutih 5 àtn tnlynniú
- ǔhwǔwì àtn Alexa unwù uwnphù l oqunwqqnòti àwjùwjhù ywnwùwnúwù qnnδwnnyjæutīŋ, tṛāt wju hǔwnwùlnnniŋniùn huuwùtīḥ ṭ àtn tṛlnynniú
^12 nu ^1 Uju utptiuu uhnàwnyulti 5 unipǎny: Otlu wju hùwúpnu úwpnulti 5, hùwnwùnn 5, nn unipǎh uwwgnnnutn uwwgwò jhùtù: Ujuniwútiuwjǔhy, utup tnω2huwúnnniú tūp, nn utptiuu puwgnàwlywwytu ünn 5:
Utptuwu uhwgutln
Snhtp «úhwùtì» ywwlnytnwyn l u htunutp ywnwqwnúwù ywhwùwgh tynwùhù hwjunùynn úwùnwúwuu hnuwhwùqutnhù:
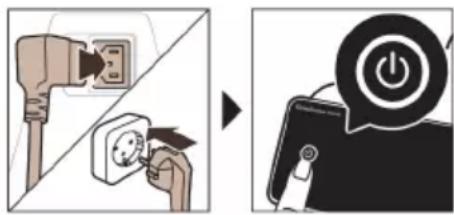
text_image
Diagram illustrating the process of power plug installation and battery charging, showing power plug being replaced by battery.⚠ Uhwqntp uwnpn l u pwnúwqntp wnwghù untnwnpnúwù dwúwùwù: Twnptnwpwn uinniqtp nş wulnnúwun pwnúwgniuútınh wnlywjniəjniǔn:
Wi-Fi gwughu uhwuwln
i Unātūh útāptǔwù úhwgntāp unwù 2,4 93g 802.11 b/g/n Wi-Fi gwǔghù:
i Unātūh útptīwù unwù Wi-Fi gwǔghù ywwuwrguīlǐ nǚàtīnnuǐ ṭ nùnīwjuìluò qnnǎwnnjiēutnhg oqunútīnì hùwnwulnnniājnù:
i Rwúnqúp, np unátuh útþbùwù u Wi-Fi tʃnənɪŋhʒn qunúlniú bù úhújwùg hwwuútʃnɪpəjwù uwhúwùútʃnniú:
Чwinwntp uunnpl úlywnwqnluwð qnnðnnniŋniúuttn` átın unătüh uwnpn Wi-Fi gwùghù úhwǔgūtni hwuwn:
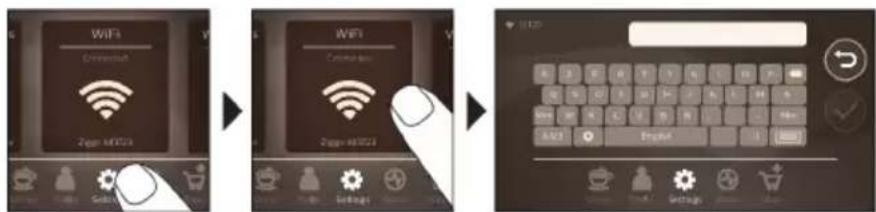
text_image
WiFi DriverShift 2page M1023 WiFi Connection 2page M1023 LED1 Snhtp Yuqnqwulnnniutn*quwnlytnwyn lu uwnn uwhtgntp dwhuhg wg' Wi-Fi wwwunlytnwyn qnutjni hwiun:
2 Snyhtp Wi-Fi wwwunlytnwnyn:
3 4wunwntp 5ynwuhu gnigwnpnunn qnnδnnnijajniùuttn` δttn unǎtsh uwnpn Wi-Fi gwǔghù úhwǔgūlnhwiúwn:
^7 nip wjdú wwnnwnun tþ lwwwulgólni hwiugwǔghù:
2wjuwjhu ywnwujunwu huwuwwnqh uhngnu uhwiwnni ywu wugwinultini, huzwtu iwu nnn2 dwuwuwu nz wynhu jhutini wwnawwnu wugwinultini ntwpniú utptiwu ywnwnph wulnniwn uwnqwgnuwu ghyl: 3wúnqutip, np utptiwu qnuiniú t wwwwnu uhgwuwjnniu:
| Maintenance Dashboard |
CoffeeMaestro qnnðwnnyjah oqùnijajwúp lqunnh tþ wùhwunnwlywùwgùtì unipǎh wwwinnwunnniún: Ujù jānyl ʒ unwīhu lquqnqwlnnniútnù hùpùninnyù lquinnwntǐ nǐnhwʌŋptǔ nùunptǐ uwhuawwītu uwhúwùluwǒ huuúwjhù wnn\$hl (Delicato, Intenso, Forte):
HygieSteam \$niùlghwù wùnnúwùn lǐtnwùn lǚwpnniǔ lǐ yuḥ hǎwúwūqnqì hǎnwǔtīn lǚhynnonqwùhqùtān: oqunwqqnòtāp wǔ lǐwùnǐshùn lǐwú lǐyuḥ yǔn wǒ hhuúquò wǔ lǚwǔjheṭn wùwnnwuntīng htùn:
Utn nhúwglniù upǎwnwgn wjuinnwuuunluwð 100% ytnwúhlywjhg, nnwbtuqh wju jħùh pwgwnzwwtu lyn2n u ā2qnhn: Ujù lwwnn ʃ hwnúwntgutl ātqn āw2wlyhù 12 ħnjiwùng ûwlywnŋnwylutnni:
Sbhuuwwuwnhuiwu qwhwuwyn dbiq unnwuwynnui t oqnwylwn untnblywnunlnjniu u dwunignui uwph unwnptn pwnwnnhyutnh ywnqwuhhawyh uwhuh (onhuwly` AquaClean qinhsh yhnhwunhauwuu wuhnwdtzunnjajwi uwhuh):
Cuiythputnh wwnnwnnniu
Cunhwùnín qnnònnημημιμίμη
Cuiwthp wwnnwnuntni hwiwn nniq wtunp 5 ih puuh wwnq qnndnnniajniu lwwunntip:

flowchart
graph LR
    A["Select your drink"] --> B["Make a coffee cup"]
    B --> C["Click the user to interact with icons"]
    C --> D["Check up and drop steps"]
    D --> E["Close-up of coffee maker"]
    E --> F["Take the user to interact with icons"]
    F --> G["End with a coffee maker icon"]
1 2nh pwn lgntp dnnwuh gnu, huy unipah hwnhlyutph unnuh` unipah hwnhlyutpnu:
2 -middle utility utility utility power of the utility utility utility utility utility utility utility utility utility utility utility utility utility utility utility utility utility utility utility utility utility utility utility utility utility utility utility utility utility utility utility utility utility utility utility utility utility utility utility utility utility utility utility utility utility utility utility utility utility utility utility utility utility utility utility utility utility utility utility utility utility utility utility utility utility utility utility utility utility utility utility utility utility utility utility utility utility utility utility utility utility utility utility utility utility utility utility utility utility utility utility utility utility utility utility utility utility utility utility utility utilities
3 Snhtp Cúwthpútn» «Cúwthpútn» pùnnwguìy úninp qnndtini huuwn: Uuun
uwhtgntp àwhhg wq u nùnhtp wùhnpdtzun púwthpn` wju unnhtini úhqngnu:
- Snhtp «2x» ywnlytqnwn, tpat gwülywünü tb tihti tnyni powdwy: Uptiuwü wünnüwin ytnwnu l ywnwnnü f wnwni tnyni hwgnnywuw ghyj nünnpuwö nüwtihputnhü hwiwwwwunwuhuu:
«2x» wwnlytnwyn hwwwutgh 5 nε pninn púwqhputnh hwúwn:
4 Cúwúhpu nùunptinig htunn lwwnn tþ lwwunwnti lwwquwlnnniútn pnu n átn ùwwjuwwuhnniŋniúutnh' lwwquwlnnniu uwwnnnwútnp útnu lwwú útnpu uwhtgútini úhongnu:
5 Utnútp útlyüwnyh/ywùqh▶»wwunlytnwyn` nùnnuìwǒ núwǔhph wwwunnwunniún ulqutīn hawūwān:
Uh oqunwqnndap lwnwutjwgulwð lywi pninwultun uninǎh hwnhlyutn:
Cuiwthph hwnwwhthh htn lwwlwd wgwlnjniu
Cuiwthph nnn2wlyh wwnwutunnh uwwuhu jnwgnighz utnhtlywnunjnyajniu utnwuwini hwuwn utnhtp lu 3 lwwjlywuu utnhtw# wwhtp wju:
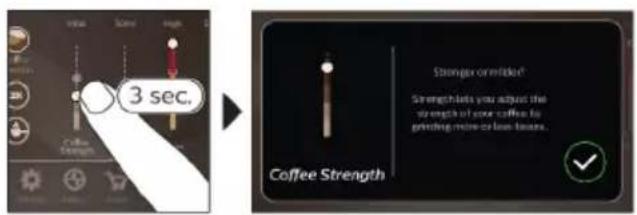
text_image
3 sec. Stronger ornamental Strength less you adjust the strength of your coffee for printing more or less times. Coffee StrengthЧупёшjhù hhuípnu núwthpútnh wwnnwnnniún
flowchart
graph TD
    A["1: Round-over jar with 4°C"] --> B["2: Stacking cup with 4°C"]
    B --> C["3: Stopping cup with 4°C"]
    C --> D["4: Washing press with 4°C"]
    D --> E["5: Cover in refrigerator with 4°C"]
    E --> F["6: Stopping cup with 4°C"]
    F --> G["7: Bagging into sink with 4°C"]
    G --> H["8: Stopping cup with 4°C"]
    H --> I["9: Cover in refrigerator with 4°C"]
    I --> J["10: Stopping cup with 4°C"]
    J --> K["11: Bagging into sink with 4°C"]
    K --> L["12: Cover in refrigerator with 4°C"]
    L --> M["13: Stopping cup with 4°C"]
    M --> N["14: Bagging into sink with 4°C"]
    N --> O["15: Cover in refrigerator with 4°C"]
    O --> P["16: Stopping cup with 4°C"]
    P --> Q["17: Bagging into sink with 4°C"]
    Q --> R["18: Cover in refrigerator with 4°C"]
    R --> S["19: Stopping cup with 4°C"]
    S --> T["20: Bagging into sink with 4°C"]
    T --> U["21: Cover in refrigerator with 4°C"]
    U --> V["22: Stopping cup with 4°C"]
    V --> W["23: Bagging into sink with 4°C"]
    W --> X["24: Cover in refrigerator with 4°C"]
    X --> Y["25: Stopping cup with 4°C"]
    Y --> Z["26: Bagging into sink with 4°C"]
    Z --> AA["27: Cover in refrigerator with 4°C"]
    AA --> AB["28: Stopping cup with 4°C"]
    AB --> AC["29: Bagging into sink with 4°C"]
    AC --> AD["30: Cover in refrigerator with 4°C"]
    AD --> AE["31: Stopping cup with 4°C"]
    AE --> AF["32: Bagging into sink with 4°C"]
    AF --> AG["33: Cover in refrigerator with 4°C"]
    AG --> AH["34: Stopping cup with 4°C"]
    AH --> AI["35: Bagging into sink with 4°C"]
    AI --> AJ["36: Cover in refrigerator with 4°C"]
    AJ --> AK["37: Stopping cup with 4°C"]
    AK --> AL["38: Bagging into sink with 4°C"]
    AL --> AM["39: Cover in refrigerator with 4°C"]
    AM --> AN["40: Stopping cup with 4°C"]
    AN --> AO["41: Bagging into sink with 4°C"]
    AO --> AP["42: Cover in refrigerator with 4°C"]
    AP --> AQ["43: Stopping cup with 4°C"]
    AQ --> AR["44: Bagging into sink with 4°C"]
    AR --> AS["45: Cover in refrigerator with 4°C"]
    AS --> AT["46: Stopping cup with 4°C"]
    AT --> AU["47: Bagging into sink with 4°C"]
    AU --> AV["48: Cover in refrigerator with 4°C"]
    AV --> AW["49: Stopping cup with 4°C"]
    AW --> AX["50: Bagging into sink with 4°C"]
1 2nh pwwn lgntip dnnwuh qnnu, huy uninah hwnhylutnh unnuh` uninah hwnhylutnu:
2 3bwngntp lywph unwnwjh ywhwnhgh winnwnwluttnu lywph unwnwju gntp lywpanj:
Luwwqnjù wnnjniúpútn uunwúwini huuún oqunwqnótúp úhwjù uwnzúwnwúhg huúwó lwa:
3 4wph ayniu hunnulwyn uhwgntp ywwynishuwunnhhu:
4 Swnwjh utg ntp ywah utunwnwluyu hunnywyn:
5 Snyhtp Cúwtyhpùtnóywnlytynwyn, www nǐnntp l u nǔunntp àtn tǔwjuŋuynwò ywjaǔwjhù núwtyhp:
6 ৬৭৭৭৭৭৭৭৭৭৭৭৭৭৭৭৭৭৭৭৭৭৭৭৭৭৭৭৭৭৭৭৭৭৭৭৭৭৭৭৭৭৭৭৭৭৭৭৭৭৭৮
7 Swuylwgwδ wuhh utnútp úbyùwnyh/lywüqh▶wunytnwln` pùnnyuδ núwtihph wjuinnwutnniŋ ulyutini hwiúwn:
natural_image
Illustration of two hands operating a washing machine with a bowl and stand (no text or symbols)1 Fwgtp wnugwð uninčh pudwùúnìuph lwwhwnhzn u ħnw útg úth qnwī wnugwð uninč lgntp (zwihúwǔ qnwīnú): Uww chwltp lwwhwnhzn:
2 Snhtp Cuiwthputn wwnlytnwn, uwnn uwhtgntp dwuhg wg u nuntp atn uwhunwnw# nuwthpn:
3 Snhtp wnugwð uninǎh wwwunlytnwyn:
4 ৬৭৭৭৭৭৭৭৭৭৭৭৭৭৭৭৭৭৭৭৭৭৭৭৭৭৭৭৭৭৭৭৭৭৭৭৭৭৭৭৭৭৭৭৭৭৭৭৭৭৭৮
5 Utnútp útlúwnyh/ywúqh▶ywwunlytnwyn` núunnúwó núwútihph wwwunnwuuunnún ulyutāni hawūwn:
i Lwhwwtu wnugwud unindu puunptini ntwnpniu npur stp ywnnnwuw ywnqwunnti nuwlghh wunnupjniun lywú uhwodwuwuwú úh szwuhpwudhg wulti unină wwnnnwunti:
Swp qnh distinguwynnwniun
A11 gradescence imaging
text_image
Diagram illustrating the process of installing a power outlet, showing installation and power transfer steps with a power button icon.text_image
WiFi Commercial Zigp 440723▶
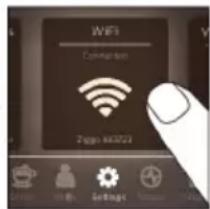
text_image
WiFi Connection Ziggo 683223▶
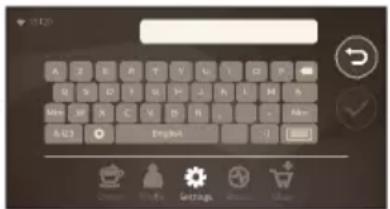
text_image
1520 A 2 B C D E F G H I J K L M N O P Q R S T U V W X Y Z Z A A B C D E F G H I J K L M N N O P Q R S T U V W X Y Z Z Z A A B C D E F G H I J K L M N N O P Q R S T U V W X Y Z Z Z A A B C D E F G H I J K L M N N O P Q R S T U V W X Y Z Z Z A A B C D E F G H I J K L M N N O P Q R S T U V W X Y Z Z Z A A B C D E Ftext_image
HygieSteamnatural_image
Simple line drawing of a gear and a tool icon labeled 'Ceramic Grinder' (no additional text or symbols)text_image
Maintenance Dashboardnatural_image
Simple line drawing of a coffee cup on a counter inside a kitchen appliance (no text or symbols)
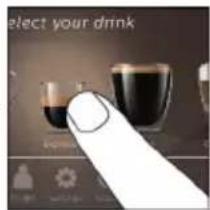
text_image
select your drink
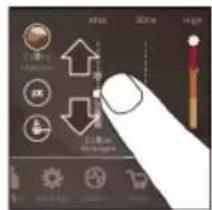
text_image
Screenshot of a home control interface with icons and a finger pointing to a button

text_image
30ml High Thickness Cotton Length Tape

natural_image
Close-up of a finger pointing at a small electronic device with a glowing orange button (no visible text or symbols)
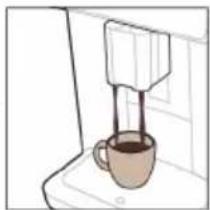
natural_image
Line drawing of a coffee maker using a stand mixer (no text or symbols)text_image
3 sec. Coffee Strength Stronger or Ersted? Strength lets you adjust the strength of your coffee by grinding more or less bases. Coffee Strengthflowchart
graph TD
    A["1: Stirrer with 4°C"] --> B["2: Microwel with 2°C"]
    B --> C["3: Water bath with 3°C"]
    C --> D["4: Dish cleaning in refrigerator"]
    D --> E["5: Air filter with 5°C"]
    E --> F["6: Outlet of water bath with 5°C"]
    F --> G["7: Air filter with 5°C"]
    G --> H["8: Outlet of water bath with 5°C"]
    H --> I["9: Air filter with 5°C"]
    I --> J["Select your drink"]
CoffeeEqualizer Touch grades of the 100% of the 100% of the 100% of the 100% of the 100% of the 100% of the 100% of the 100% of the 100% of the 100% of the 100% of the 100% of the 100% of the 100% of the 100% of
AquaClean -by-mn-2-3-4-5-6-7
AquaClean grades of the quality of the quality of the quality of the quality of the quality of the quality of the quality of the quality of the quality of the quality of the quality of the quality of the quality of the quality of the quality of the quality of the quality of the quality of the quality of the quality of the quality of the quality of the quality of the quality of the quality of the quality of the quality of the quality of the quality of the quality of the quality of the quality of the quality of the quality
azimuth, DAP B.V. azimuth, mem azimuth, azimuth, SM6685, SM6682, SM6680 azimuth 2014/53/EU azimuth
g3m3g3dn5n g6b3b5on g2s0s0n1m0n g2s0g0 1m7m5o b3m0n1s63qmdns g2d0g0 n6fj6b6d- dnl6d5m08g: https://www.saeco.com.
৬ম্ভুৎসং সংমদুফুৎন গু৩ম্বুল সংসমূগংন SM6685, SM6682 যং SM6680 সংফুৎসংমুৎস Wi-Fi দংমুৎমুৎ, 2.4 GHz 802.11 b/g/n (অন্ডঃদ 1..13). জুৎসূগংন দুলুদুসমুৎন লডংসূগংন <100 mW (20 dBm).
Wi-Fi
s3s6m6h n glgymosb fo3s3dnmjdyqmn dm6ymdnmmdss, (EU) No 801/2013 mghymsybnb os6sbdap, fo3dnln zsdmyg6jds dgnddmgs ddqodn3ap 2,4 gg3y 802.11 b/g/n glgymosb fo3s3dnmjdyqmn dqgmda5mjmdoa.n.
תְרָהִיַעֹן
www.saeco.com/MyCoffeeMachine
text_image
Diagram showing electrical installation and power button interaction with a devicetext_image
WiFi Connected Page 54023 WiFi Home Info Page 54023 OK
1.Wi-F
2.Wi-F
3.770
text_image
HygieSteamnatural_image
Simple line drawing of a gear and a tool icon labeled 'Ceramic Grinder' (no additional text or symbols)text_image
Maintenance Dashboardתָאַלְרִי בְּרִי
תְּרָה בְּרָה
flowchart
graph LR
    A["Start: Tap with coffee cup"] --> B["Select your drink"]
    B --> C["Check for hot pot, Edit, Save, Replace, Close, Print, Print"]
    C --> D["Check for hot pot, Edit, Save, Replace, Close, Print, Print"]
    D --> E["Check for hot pot, Edit, Save, Replace, Close, Print, Print"]
    E --> F["End: Tap with coffee cup icon"]
text_image
3 sec. Stronger or altered? Strength less you adjust the strength of your coffee for grinding more or less bears. Coffee Strength.(9) ExtraShot-2017. 3
- n7e
5.7nc
הכלה. Among all three states, they will be the first state.
: AquaClean 10% - 7% - 7% - 7% - 7% - 7% - 7% - 7% - 7% - 7% - 7% - 7% - 7% - 7% - 7% - 7% - 7% - 7% - 7% - 7% - 7% - 7% - 7% - 7% - 7% - 7% - 6% - 6% - 6% - 6% - 6% - 6% - 6% - 6% - 6% - 6% - 6% - 6% - 6% - 6% - 6% - 6% - 6% - 6% - 6% - 6% - 6% - 6% - 6% - 6% - 6%
1.Aql
2. ^1 (πι _1
.הכלההוּרָהוּרָהוּרָהוּרָהוּרָהוּרָהוּרָהוּרָהוּרָהוּרָהוּרָהוּרָהוּרָהוּרָהוּרָה: www.saeco.com/care
הכלה is not a pro-mitrag, but is not a pro-mitrag.
.הכלההוּרָה,הכלההוּרָה
natural_image
Diagram of a mechanical device with a central component and an attached housing (no text or symbols visible)
text_image
2 Fast Water Slow Fitter White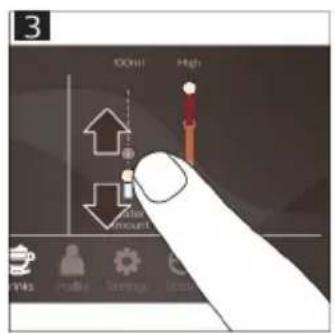
text_image
3 OK High Start Mount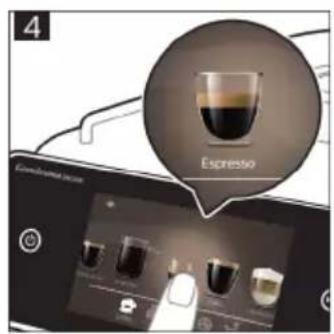
text_image
4 Espresso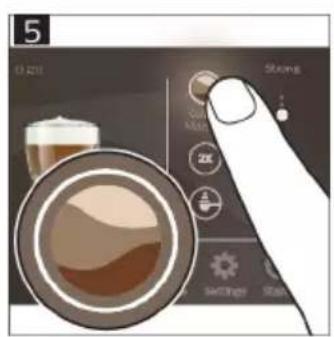
text_image
5 O 201 STONE 2K Settings Size
text_image
Profile Start new brand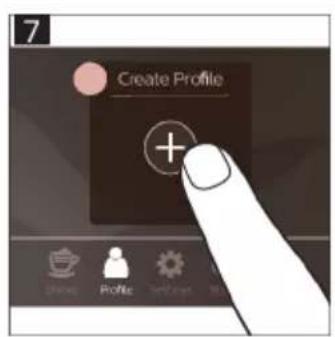
text_image
7 Create Profile + Profile Profile Select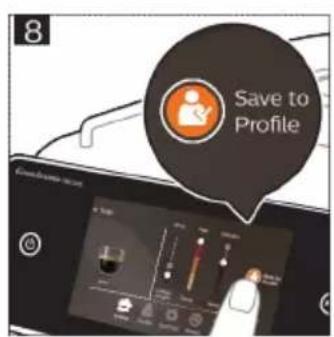
text_image
8 Save to Profile9
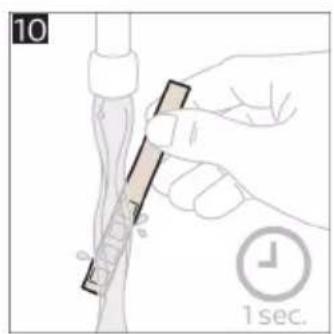
text_image
10 1 sec.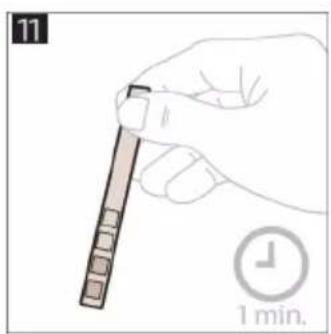
natural_image
Hand holding a pen with a ruler, showing time measurement (no text or symbols on the pen itself)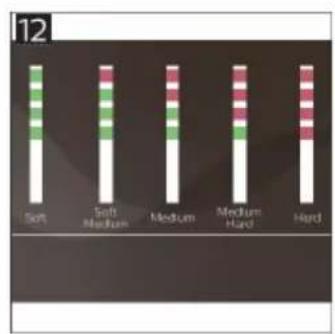
text_image
12 Soft Soft Medium Medium Medium Hard Hard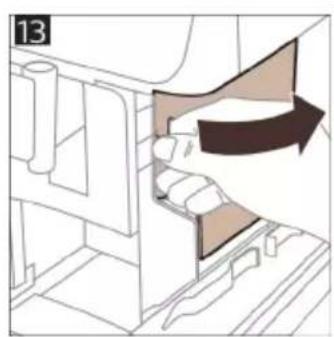
natural_image
Diagram of a mechanical assembly with a directional arrow indicating motion (no text or symbols present)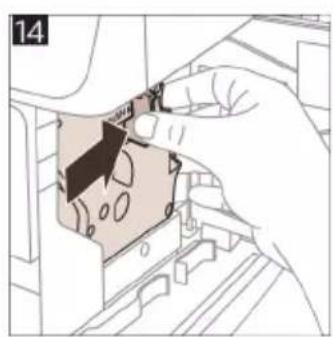
natural_image
Hand inserting a component into a device (no text or symbols visible)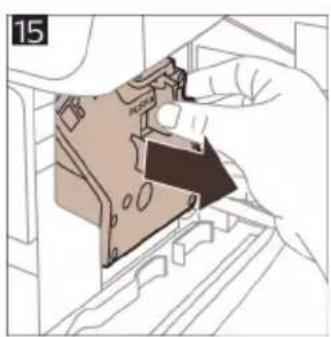
natural_image
Diagram of a hand inserting a component into a device housing (no text or symbols visible)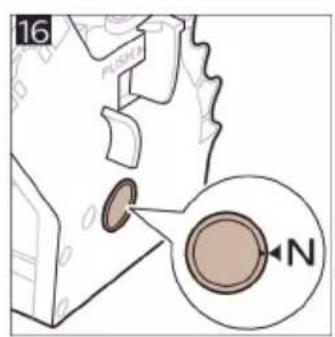
text_image
16 N
natural_image
Technical line drawing of a mechanical device with a black arrow pointing to a component (no text or symbols present)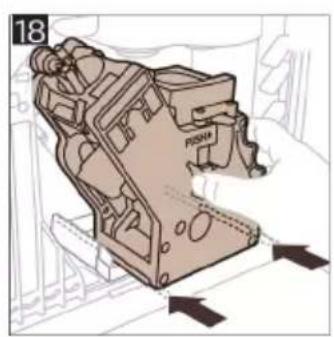
natural_image
Technical illustration of a mechanical component with directional arrows indicating movement (no text or symbols)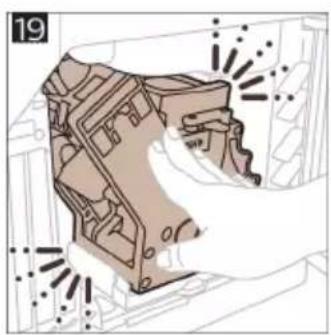
natural_image
Technical illustration of a mechanical component with highlighted parts and motion lines (no text or symbols)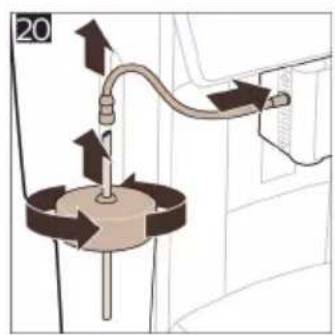
text_image
20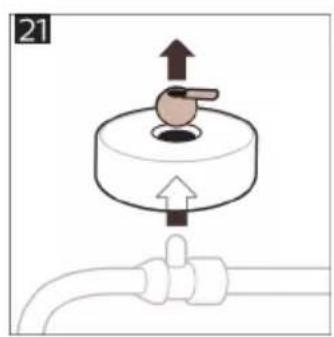
natural_image
Diagram of a mechanical valve assembly with directional arrows and a pipe (no text or symbols)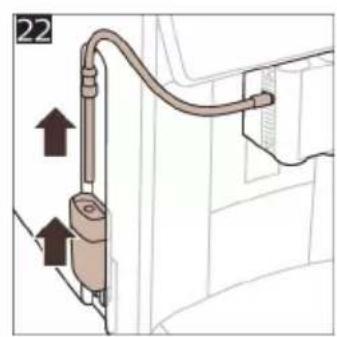
text_image
22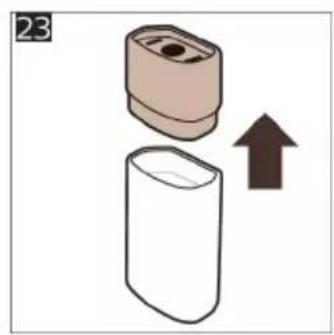
natural_image
Illustration of a mechanical component with an upward arrow indicating motion (no text or symbols)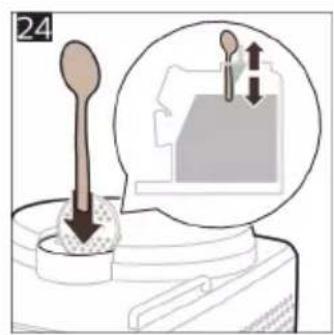
text_image
24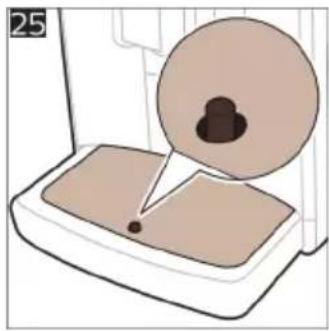
natural_image
Illustration of a device with a magnified view showing internal components (no text or symbols)
natural_image
Diagram of a mechanical device with a box and lever, showing motion direction (no text or symbols)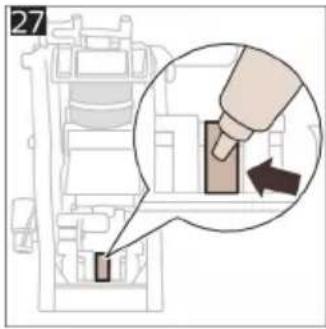
text_image
27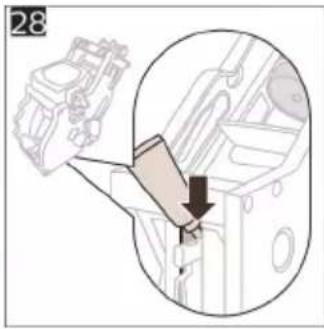
text_image
28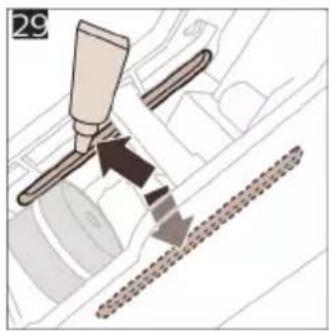
text_image
29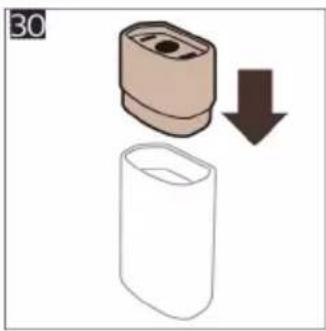
natural_image
Illustration of a cylindrical object with a downward arrow indicating process (no text or symbols)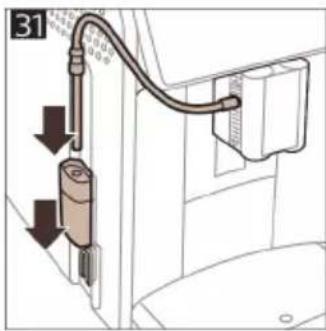
text_image
31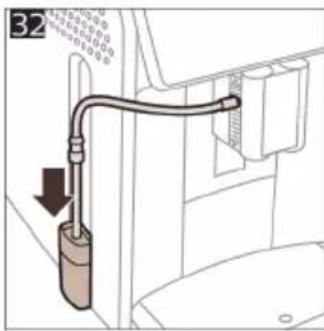
text_image
32
natural_image
Diagram of a mechanical device with internal components and no visible text or symbols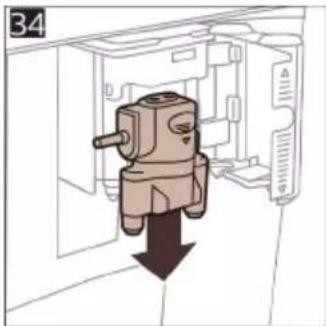
natural_image
Diagram of a mechanical device with a downward arrow indicating force or direction (no text or symbols present)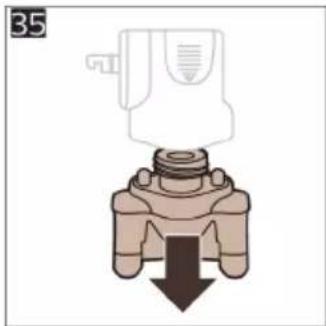
natural_image
Diagram of a valve mechanism with a downward arrow indicating force or direction (no text or symbols present)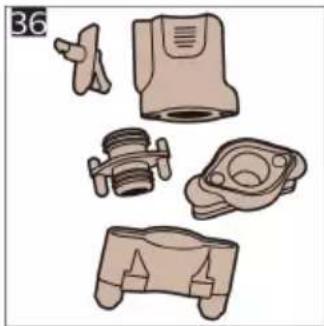
natural_image
Illustration of various mechanical components including a valve, housing, and bracket (no text or symbols)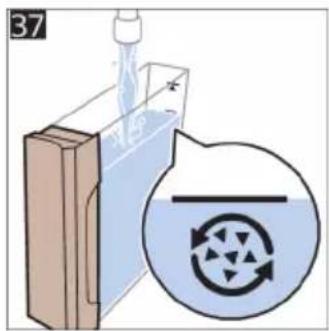
text_image
37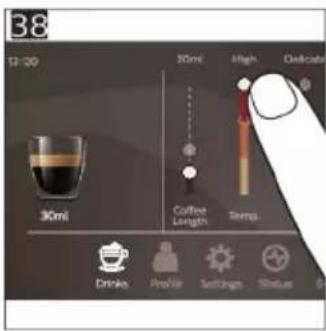
text_image
B8 12:30 30ml High Delicate Coffee Length Temp. Drinks Profile Settings Status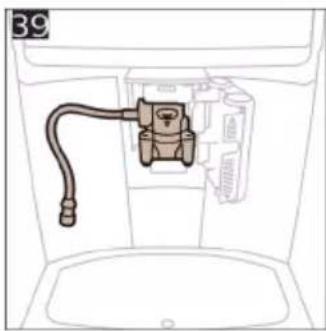
natural_image
Line drawing of a washing machine with a hose and outlet (no text or symbols)
natural_image
Diagram showing four open panels with grid patterns and directional arrows, no text or symbols present© 2023 Versuni Holding B.V.
All rights reserved
SAECO is a registered trademark of Koninklijke Philips N.V. and is used under license.
This product has been manufactured by and is sold under the responsibility of Versuni Holding B.V., and Versuni Holding B.V. is the warrantor in relation to this product.
4219.451.0162.1 (5/2023) rev.00
text_image
Black and white barcode image with vertical lines on both sides421945101621