A560+ - Digital Radio Noxon - Free user manual and instructions
Find the device manual for free A560+ Noxon in PDF.

User questions about A560+ Noxon
0 question about this device. Answer the ones you know or ask your own.
Ask a new question about this device
Download the instructions for your Digital Radio in PDF format for free! Find your manual A560+ - Noxon and take your electronic device back in hand. On this page are published all the documents necessary for the use of your device. A560+ by Noxon.
USER MANUAL A560+ Noxon
natural_image
Close-up of a metallic wrench and screwdriver tool against a black background (no text or symbols visible)Senderliste
- Read through the operating manual carefully and keep it in a safe place.
- Observe all warnings and follow the instructions to avoid damage.
• Use this device indoors only. - Place the device on a level, dry surface to prevent fire and electrical shock hazards as well as possible damage to the player itself.
- Do not use the device close to water or other liquids.
- Keep the device away from direct sunlight, radiators, open flames and other sources of heat.
- Only use the accompanying power supply cable. If you are not going to use the device for an extended period, disconnect it from the power supply. To avoid short-circuits, never pull on the cable itself. In addition, be sure to unplug the device from the AC outlet in the event of a thunderstorm.
- If the device has been exposed to extreme differences in temperature, allow it to adjust to the room temperature for one hour before plugging it in. Condensation may have formed inside the device, which impairs its functionality.
- Use a dry or slightly moistened, lint-free cloth to clean the NOXON. Do not use cleaning products as they may damage the finish of the unit.
- To put it simply, just use the device sensibly. The warranty does not cover deliberate damage to the device, of course. Thank you.
Environment
- The product contains batteries that are subject to European Directive EC and must not be disposed of in the normal household waste.
- This product fulfils EC Directive EC and must not be disposed of in th normal household waste.
- Please obtain information on correct disposal from your local authorities – this will help protect the environment!
Scope of delivery
Start by making sure that the contents of the package are complete. The NOXON package should contain at least the following items:
- NOXON A560+
- Power supply
• Remote control with battery
• FM telescopic antenna - W-LAN antenna
- Bluetooth antenna
• Quick Start Guide (DE, EN, FR, IT, ES, NL)
Quick Start Guide for pros
This Quick Start Guide shows you how to get started using your NOXON device. You will find detailed descriptions and special configurations in the advanced manual, which you can download from our website (www.noxonradio.com).
Pretest
Like any network device, your NOXON needs to be connected to your network before you can get started.
What do you need?
• A fast Internet connection (for example, DSL, ideally with a flat rate).
- A router for Internet access; for wireless operation, what is called a WLAN (Wireless LAN) router
• A network cable, if you do not want a wireless Internet connection for your device
• For WLAN integration: your network key (WEP, WPA or WPA2)
This key, just like any key, protects your network from unauthorised access and was generated when your network was set up. To allow NOXON access to a key-protected network, you will need to enter the network key into NOXON in a later step. If your network does not have a key, the NOXON can connect to the Internet without a network key.
Note: If you are not sure whether you are using a key of this type in your network, just give it a try without entering anything! If this does not work, repeat the setup process from the beginning. However, you will need to know your network key at this point.
Please ask the person who set up your network for assistance.
Overview: front

- Navigation dial with push function for selection: Scroll through the men by turning the dial in the list view. To select a menu item, press the dial once.
- Back button: This takes you one step back the selection.
- Display
- Menü: Here you can reach the main menu quickly.
- Standby On/Off – here, you can wake up the A560+ or put it back to sleep.
- USB-Port – Here, you can connect USB mass storage media.
back
-
DIGITAL OUT: Connect this optical jack (TOSlink) to a digital amplifier that understands the S/PDIF protocol.
-
DIGITAL COAXIAL OUT: Connect this coaxial jack to a digital amplifier that understands the S/PDIF protocol.
-
ANALOG OUT: Connect this analog jack (RCA) with a analog amplifier.
-
LAN: For wired network operation, use this RJ45 jack.
-
POWER: Connect the provided power adapter to this jack.
-
WLAN antenna: For wireless reception, you have to connect the WLAN antenna na provided here.
-
Bluetooth antenna: For Bluetooth reception, you have to connect the Bluetooth antenna provided here.
-
FM/ DAB Antenna: You can connect the provided telescopic antenna here. If you want to connect a cable here instead, please use the provided antenna adapter.
natural_image
Close-up of a metal wrench gripping a black mechanical component (no text or symbols visible)Remote Controller
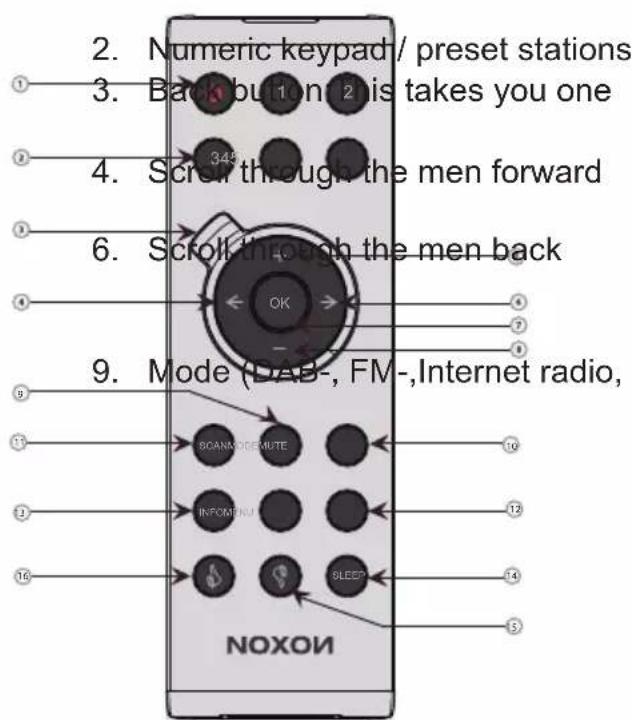
- Standby On/Off
| step | back | the | |
| 5. | Volume | lauder | |
| 7. | Select | with | |
| 8. | Volume | quieter | |
| USB | playback | ||
| 10. | Mute | / | |
| 11. | scan | for | |
| 12. | Main | menu | |
| 13. | Info | ||
| 14. | Sleep | / | |
| 15. | - | ||
| 16. | - |
Setup
Once your A560+ has been activated initially, follow these steps to link it to your network for the first time:
You are greeted by the setup wizard, which asks politely if you want to start it up. Use the navigation dial to select a language for the menu and confirm – as in all other menus – the selection by pressing the navigation dial. Then, enter the time format (12/24-hour).
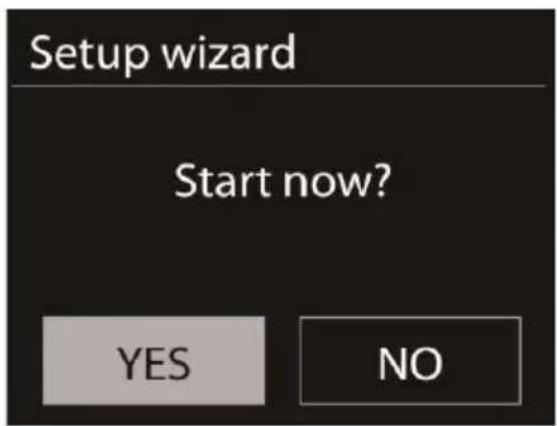
However, we recommend that you set the date and time immediately (Day, Month, Year, Time), as well as the WLAN region you are located in.
Once you have done so, all that remains to be done is to connect to the network. Don't worry, even this should not be complicated – the network wizard will give you all the help you need.
We'll explain the ins and outs of this in the detailed manual later on. For now, we offer just a brief overview (after all, you are still in the „Overview“ chapter), as we do not want to bore anybody.
The setup wizard gives you the ability to choose between the cable connection and the wireless WLAN port. If you prefer the cable version, select [Wired].
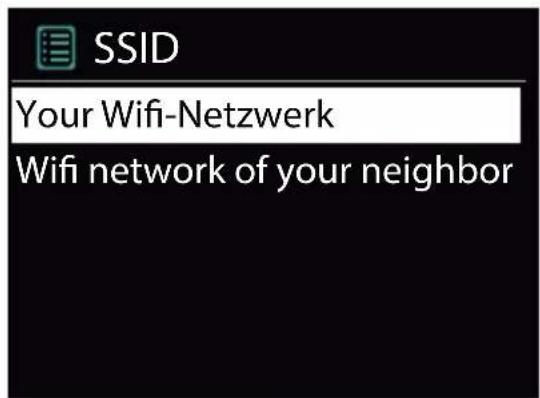
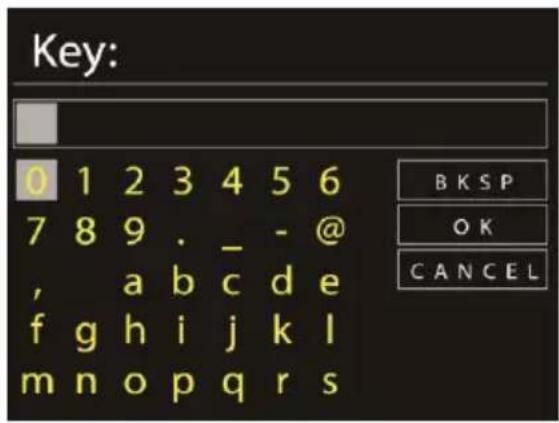
The setup wizard connects to your router automatically and that's it – you're in! However, if the A560+ is integrated via WLAN, please select your WLAN network on the display. After selecting the desired network, you then have to enter the password to connect to the WLAN.
Navigate through the selection in the usual way using the navigation dial, push function and Back button.
When you have finished entering the key, confirm with OK. You likewise reach this field via the navigation dial.
There, you're finished already! Just press the navigation dial again to go to the main menu – and use your NOXON A560+ to plunge into the wonderful world of Internet radio.
Note: We recommend checking the device's firmware from time to time to ensure that you have the latest version and to update it if necessary – only in this way can you access the latest functions of your device. We'll explain how to do so later on in this manual. Listen and enjoy
After you have set the device up successfully, the (almost) infinite variety of Internet radio is at your fingertips.
Listen and enjoy
After you have set the device up successfully, the (almost) infinite variety of Internet radio is at your fingertips.
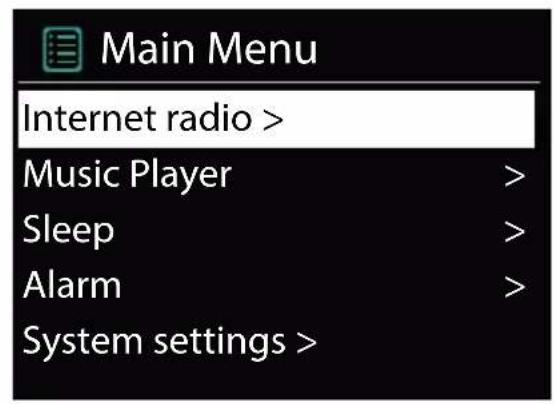
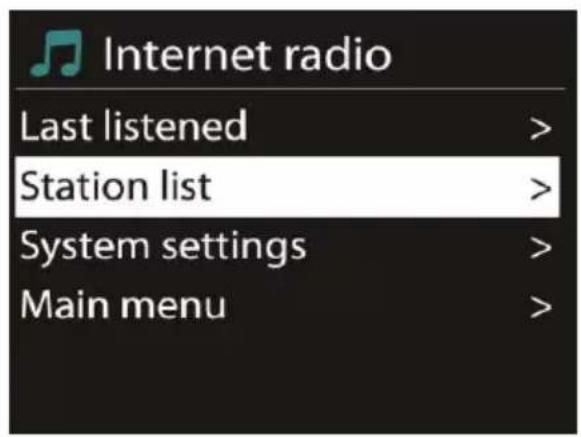
From the main menu, select „Internet Radio“ and confirm the selection.
In the submenu that follows, navigate to the station of your choice according to your personal taste.
To accommodate the large number of stations available from around the world, our database is conveniently sorted into countries, genres, popular stations etc. and is updated on an ongoing basis.
To adjust the volume during playback, use the button on +/- - on the remote control of A560+ or on your amplifier.
Volume

15

DAB
Stations: 15
Scanning

DAB, DAB+ and FM
In addition to numerous Internet radio stations your A560+ can receive all stations broadcasted on DAB, DAB+ and FM! Please note that you need an adequate reception facility (antenna or cable) for this. DAB and DAB+ might not be broadcasted area-wide or evennot at all in your country.
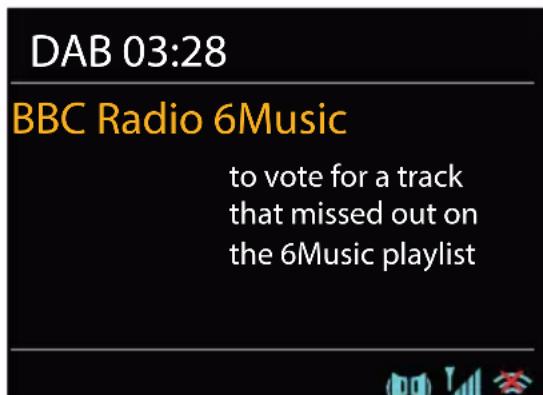
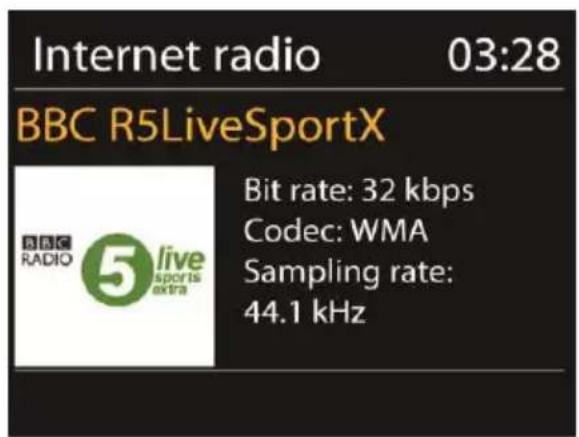
DAB 03:28
BBC Radio 6Music
to vote for a track that missed out on the 6Music playlist

Connection
Establishing the connection is really easy: Just use a standard antenna cable with coax plugs (not included) to connect the tuner jack of your iRadio and your antenna or cable socket.
Scan stations
Starting from the main menu, use the navigation wheel to locate the submenu “DAB” and confirm your choice by pressing the navigation wheel once. Choose “Full Scan” as the next step, which will make the iRadio find all DAB and DAB+ stations available in your area for you.
Station list
In the “DAB” menu you will also find the submenu “Station list”. This list shows all the stations that have been found by the scan performed earlier. Just press the navigation wheel to start listening to a selected station. Pressing the wheel further times will show diverse information about the active station. You can navigate to the next or previous station with the Skip Back/Skip Forward buttons located on the iRadio or the remote control without the need to return to the station list first.
If you come across a station you especially like, you can save it by pressing one of the favourites buttons on the iRadio or the remote control for a longer period. You can recall saved stations at any time by pressing the corresponding favourites button shortly without taking the detour via the menus.
Prune invalid
If a station name shows a questions mark in front of it, the iRadio cannot receive this station anymore. This can be caused by a loss in reception quality or by a restructuring on the part of the broadcasting companies.
In order to clear the station list of such entries which just make it less well-arranged, choose the submenu "Prune invalid" in the "DAB" menu and confirm the security query with "Yes".
Station order
The submenu "Station order" in the "DAB" menu lets you decide whether you would like to have your stations sorted alphanumerically or by ensembles (these are groups of several stations broadcasted together in one, package').
Have fun with your new NOXON A560+!
Here's how to reach NOXON:
http://www.noxonradio.de/en/support
Support-Hotline: +49 2157 - 3027155
NOTE: The structure and function of the software can be changed with a firmware update! Please do not remove the power cable during the firmware update process!