O2 - Surveillance Camera Laxihub - Free user manual and instructions
Find the device manual for free O2 Laxihub in PDF.

| Product Type | Outdoor Surveillance Camera |
| Brand | Laxihub |
| Model | O2 |
| Resolution | 2304x1296 (3 MP) |
| Viewing Angle | 110° |
| Night Vision | Yes, infrared up to 10 meters |
| Motion Detection | Yes, push notifications |
| Audio | Built-in microphone and speaker, two-way talk |
| Power Supply | DC 5V, 1A (power adapter included) |
| Wireless Connectivity | Wi-Fi 2.4 GHz (IEEE 802.11b/g/n) |
| Local Storage | Micro SD card up to 128 GB |
| Weatherproof Rating | IP65 |
| Operating Temperature | -20 °C to 50 °C |
| Dimensions | 137 x 65 x 75 mm |
| Security | AES-128 encryption |
| Compatibility | iOS 9 / Android 5.0 and later |
| App | Arenti (free) |
| Installation | Screw mount, wall mounting |
| Package Contents | Camera, power adapter, power cable, mounting kit, quick guide |
| After-Sales Service | support@arenti.com, www.arenti.com/support |
Frequently Asked Questions - O2 Laxihub
User questions about O2 Laxihub
0 question about this device. Answer the ones you know or ask your own.
Ask a new question about this device
Download the instructions for your Surveillance Camera in PDF format for free! Find your manual O2 - Laxihub and take your electronic device back in hand. On this page are published all the documents necessary for the use of your device. O2 by Laxihub.
USER MANUAL O2 Laxihub
A Safer and Smarter Life for Everyone
Outdoor Smart WiFi Camera
Quick Guide
EN Outdoor Wi-Fi Camera
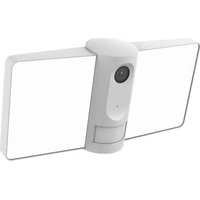
natural_image
Exterior view of a modern cylindrical security camera with a side-mounted lens and mounting bracket (no text or symbols visible)Product description
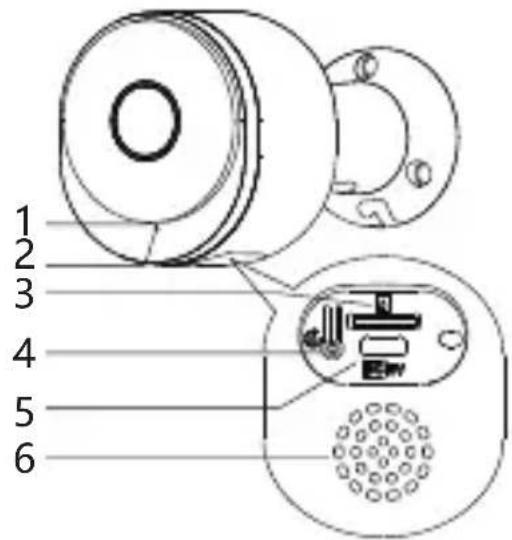
Please read this manual carefully before using the product and keep it properly. Label information is located on the side of the camera.
- Microphone
- LED indicator
- SD card slot
- Reset
- Micro USB
- Speaker
Packing list:
Camera, Power adaptor, Power cable, Mounting accessory bag, Quick guide.
LED Indicator:
| Constant blue | Connection succeeded |
| Blue slow flashing | Manual configuration mode |
| Red flashing slowly | Waiting to connect |
| Red flashing fast | Network abnormal |
Set up Camera
• What you'll need:
- Wi-Fi and a working broadband internet connection with at least 2 Mbps upload speed.
- A phone or tablet with iOS 9/Android 5.0 or later.
- A power outlet.
- A Phillips screwdriver or power drill with Phillips driver bit.
- Power on
Plug the power cable into the Micro-USB power port on the back of the camera, the camera will automatically turn on, wait for 30s, the indicator light will flash red slowly means boot up is finished.
- Connect Arenti APP
Scan QR code to download and install the Arenti APP. Also, you can search "Arenti" on App Store (IOS) or Play Store (Android). Download and install Arenti APP. Open APP home page, Click "+" at the right top page. Follow the guide on the APP to add the camera step by step.


After connection is successful, the indicator is solid blue.
Troubleshooting
- Camera is not powering on:
- Try to use another outlet.
- Try to use another 5V power adapter/cable to power up.
-
Failed to scan the QR code from Arenti APP:
-
Remove the film from the Camera Lens.
- Keep distance 10-15 cm (4-6 inch) between the camera and mobile phone.
- Confirm the camera indicator is red flashing slowly.
- Failed to connect WiFi:
- Confirm that scan QR code is successful: After scanning, the camera has the prompt sound, and network indicator turns to red fast flashing.
- Make sure input correct WiFi password, the WiFi password you set not contain special characters such as =\';
- Make sure the WiFi band meets the network requirement of camera that camera only supports 2.4GHz.
- Confirm camera is near the WiFi router.
If there doesn't work please share the wifi router setting screenshot and camera SN (Find on camera body) to support@arenti.com to get help.
Installation
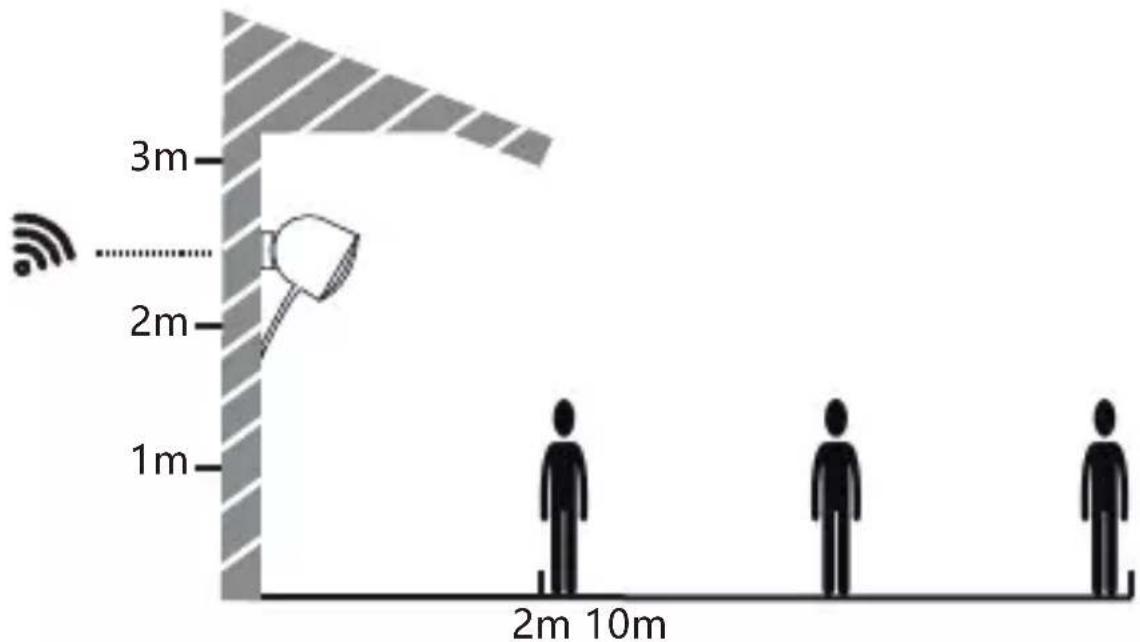
Find a position where you can get the desired field of view. Consider the below factors:
- Avoid direct sunlight.
- Keep it in range of your router WiFi.
- Avoid the front of the lens facing the plant or porch light; Avoid facing a busy road.
- Place it 2-3 meters (79-118 inch) above the ground - close enough to see someone's face and talk to them through the camera. Make sure that the camera can see what you want to see.
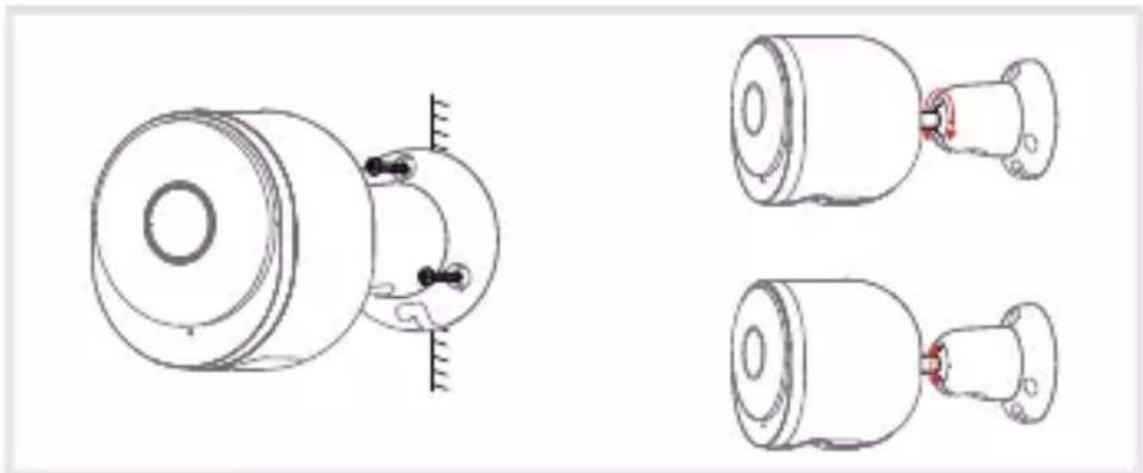
- Screw Bracket Installation
- Fix the screw bracket on the wall with screws.
- Install the device in the bracket and lock it with the bottom screw.
natural_image
Technical line drawings of mechanical components with no visible text or symbolsCamera Using tips
• Live video viewing:
In the camera control interface of APP, you can view the camera monitoring in real-time, adjust the resolution, capture images, record video, and make 2-way talking.
• Infrared night vision:
The camera can automatically switch to night vision mode (black&white) at night according to the degree of change in surrounding light. With built-in red Infrared LED lights, the night vision distance can reach 10 meters, and it can be viewed super clearly in the dark.
- Motion detection:
The camera can detect the movement changes in the camera's view, and push the notification of the movement changes to the APP.
Set from: APP >> Device (tap device to live video page) >> Settings >> Alert Settings >> Motion Detection.
Basic Parameter
| Product name | O2 | Size | 137x65x75mm |
| Image sensor | 1/2.8" 3MP CMOS | Resolution | 2304(H)*1296(V) |
| Angle of view | 110° | Power | DC 5V, 1A |
| Security | AES-128 | Waterproof | IP65 |
| Working temp | -20 °C to 50 °C | Supported phone OS | iOS 9 / Android 5.0 and above version |
| Local storage | Micro SD card (up to 128GB) | Wireless connection | IEEE802.11b/g/n 2.4GHz |
FAQ
• How to disable the LED indicator/blue light with my camera?
Arenti APP >> Device (tap device to live video page) >> Settings >> Basic Function >> Network Indicator: Disable it.
- How to change WiFi or update WiFi password for device? Please delete the camera on APP, tap "Add" follow the steps to use the new WIFI network to add the camera again.
- How to share Arenti devices with friends and family?
Arenti APP >> Device (Tap device to live video page) >> Settings >> Device Share >> Add, follow the guide to share your device.
- Failed to access the Live video, prompts offline?
- Please ensure the camera is in the power-on state: camera network indicator will on.
- Check the WiFi network is in good condition and restart the router.
- Try to move the camera near the router, and check again.
- Delete the camera from Arenti APP ad add it again. Confirm the APP and camera firmware are the latest versions.
If there doesn't work please share the camera indicator status and camera SN (Find on camera body) to support@arenti.com to get help.
Precautions
- The applicable working temperature of this product is -20 ^ C\~50 ^ C, please do not use it in an environment where the temperature is too high or too low use this product.
- To use this product better, avoid the front and side of the lens close to the glass, white walls, etc. light objects, so as not to cause the picture to be bright near, dark, or whitish in the distance.
- Please make sure that the camera is installed within the range covered by Wi-Fi signal, and placed as far as possible on the location where the signal is better, and try to install it away from metal and microwave ovens that may affect the signal.
After-Sale Service and Technical Support
- Access Support Articles, Videos, and Documentation. www.arenti.com/support/
- Access Support from the Arenti App, Simply login your Arenti App tap to get support.
- You can send an email to support@arenti.com. Describe the camera issue, inform us the camera model and SN from the camera body. We will reply to you in 24h.
Legal notice
Symbols: —— Direct current (DC)
Don't throw batteries or out of order products with the household waste (garbage). The dangerous substances that they are likely to include may harm health or the environment. Make your retailer take back these products or use the selective collect of garbage proposed by your city.

Hereby, Laxihub, declares the radio equipment type 'O2' is in compliance with the Directive 2014/53/EU The full test of the EU declaration of conformity is available at the Internet address: www.laxihub.com

natural_image
Technical line drawings of mechanical components, showing front and side views with no visible text or symbols
Nadat de verbinding tot stand is gebracht, brandt de indicator continu blauw.
Probleemoplossen
natural_image
Technical line drawings of mechanical components, showing front and side views with no visible text or symbols

natural_image
Technical line drawings of mechanical components, showing front and side views with no visible text or symbols

natural_image
Technical line drawings of mechanical components with no visible text or symbols

natural_image
Technical line drawings of mechanical components, showing front and side views with no visible text or symbolsKamera mit Tipps

natural_image
Technical line drawings of mechanical components, showing front and side views with no visible text or symbols

natural_image
Technical line drawings of mechanical components with no visible text or symbols

natural_image
Technical line drawings of mechanical components with no visible text or symbolsThis equipment has been tested and found to comply with the limits for a Class B digital device, pursuant to part 15 of the FCC Rules. These limits are designed to provide reasonable protection against harmful interference in a residential installation. This equipment generates, uses and can radiate radio frequency energy and, if not installed and used in accordance with the instructions, may cause harmful interference to radio communications. However, there is no guarantee that interference will not occur in a particular installation. If this equipment does cause harmful interference to radio or television reception, which can be determined by turning the equipment off and on, the user is encouraged to try to correct the interference by one or more of the following measures:
—Reorient or relocate the receiving antenna.
—Increase the separation between the equipment and receiver.
—Connect the equipment into an outlet on a circuit different from that to which the receiver is connected.
—Consult the dealer or an experienced radio/TV technician for help.
FCC Radiation Exposure Statement
This device complies with FCC radiation exposure limits set forth for an uncontrolled environment and it also complies with Part 15 of the FCC RF Rules. This equipment must be installed and operated in accordance with provided instructions and the antenna(s) used for this transmitter must be installed to provide a separation distance of at least 20 cm from all persons and must not be co-located or operating in conjunction with any other antenna or transmitter. End-users and installers must be provide with antenna installation instructions and consider removing the no-collocation statement.
This device complies with Part 15 of the FCC Rules. Operation is subject to the following two conditions: (1) this device may not cause harmful interference, and (2) this device must accept any interference received, including interference that may cause undesired operation.
Caution!
Any changes or modifications not expressly approved by the party responsible for compliance could void the user's authority to operate the equipment.
© 2022 Laxihub. All rights reserved.
All trade names are registered trademarks of respective companies Apple, the Apple logo, iPhone are trademarks of Apple Inc. registered in the U.S. and other countries. Google, the Google logo, Android are trademarks of Google Inc. App Store is a service mark of Apple Inc. Google Play is a service mark of Google Inc.