
ESO936 - Saucepan ELECTROLUX - Free user manual and instructions
Find the device manual for free ESO936 ELECTROLUX in PDF.

| Product type | Electric oven |
| Brand | Electrolux |
| Model | ESO936 |
| External dimensions (H x W x D) | 358 x 513 x 436 mm |
| Internal dimensions (H x W x D) | 293 x 365 x 334 mm |
| Internal volume | Approximately 36 liters |
| Weight | 10.0 kg |
| Power supply | 220-240 V~ 50/60 Hz |
| Power | 1600 W |
| Temperature range | 90 °C to 230 °C |
| Timer | 0 to 120 minutes with automatic shut-off and beep |
| Cooking functions | Off, Top heat, Bottom heat, Top+bottom heat, Top heat+rotisserie, Fan forced (top+bottom+fan), Top+rotisserie+fan |
| Included accessories | Metal rack, Baking tray, Crumb tray, Rotisserie with handle |
| Interior light | Yes, turns on with timer |
| Door | Tempered safety glass |
| Cleaning | Do not immerse; use a damp cloth; avoid abrasive products |
| Safety | Hot surfaces, supervised use, do not cover, do not use unsuitable metal utensils |
| After-sales service | Fnac hotline 0 969 324 334, Vanden Borre hotline +32 2 334 00 00 |
Frequently Asked Questions - ESO936 ELECTROLUX
User questions about ESO936 ELECTROLUX
0 question about this device. Answer the ones you know or ask your own.
Ask a new question about this device
Download the instructions for your Saucepan in PDF format for free! Find your manual ESO936 - ELECTROLUX and take your electronic device back in hand. On this page are published all the documents necessary for the use of your device. ESO936 by ELECTROLUX.
USER MANUAL ESO936 ELECTROLUX
natural_image
Exterior view of a black Electrolux microwave oven with control knobs and a blank display (no text or symbols on main body)EN INSTRUCTIONBOOK
FR MODED'EMPLOI
Language of introduction Page
| English | 1 - 9 |
| French | 10-19 |
| Dutch | 20-28 |
| Spanish | 29-37 |
| Portuguese | 38-46 |
EN
IMPORTANT SAFETY INSTRUCTIONS
PLEASEREADTHEFOLLOWINGSAFETYWARNINGSANDTHEINSTRUCTIONSCAREFULLY
BEFOREUSINGTHEAPPLIANCEANDKEEPFORFUTUREREFERENCE.
Warnings
- This appliance is intended to be used in household and similar applications such as:
—staffkitchenareasinshops, officesandotherworkingenvironments;
-farmhouses;
—byclientsinhotels,motelsandotherresidentialtypeenvironments;
—bedandbreakfasttypeenvironments.
- If the supply cord is damaged, it must be replaced by the manufacturer, its service agentorsimilarlyqualifiedpersonsinordertoavoidahazard.
- This appliance can be used by children aged from 8 years and above and persons with reduced physical, sensory or mental capabilities or lack of experience and knowledge if they have been given supervision or instruction concerning use of the appliance in asafeway and understand the hazards involved.
Childrenshallnotplaywiththeappliance.
Cleaningandusermaintenanceshallnotbemadebychildrenunlessstheyareolder than8andsupervised.
- Keep the appliance and its cord out of reach of children less than 8 years.
- The appliance is not intended to be operated by means of an external timer or separateremote-control system.
- Thetemperatureofaccessiblesurfacesmaybehighwhentheapplianceisoperating.
- The door or the outer surface may get hot when the appliance is operating.
• Therearsurfaceofapplianceshallbeplacedagainstawall. - Do not place the appliance in or near hot gas or electric burner, or permit to touch a heatedovenorminioven.
- Donottouchhotsurface. Useth ehandlewhilemovingtheproduct.
- Regarding the instructions for cleanings surfaces in contact with food, referto the section "CLEANING AND MAINTENANCE" on page 7-8 of the manual.
• Caution:HotSurface.
Thesurfacesareliabletogethotduringuse.
Safety Information
- Toprotectagainstfire,electricshockandpersonalinjurydonotimmersecord, plugs,oranypartsoftheoveninwateroranyotherliquid.
- Do not let cord hang over edge of table or counter, or touch hot surfaces.
- Theuseofaccessoryattachmentsthatarenotrecommendedbythemanufacturermay causehazardorinjury.
- Unplug from the mains socket when not in use and before cleaning. Allow cooling beforeputtingonortakingoffparts,andbeforecleaning.
- Todisconnecturnthetimercontrolknobto"0", thenremovetheplug. Always holdtheplug, andneverpullthecord.
- Extremecutionmustbeusedwhenmovinganappliancecontaininghotoilor food.
- Donotcoveranypartoftheovenwithmetalorcloth,itmaycauseoverheatingof theoven
- Donotplaceanyitemontheovenorcovertheoven.
• Useextremec cautionwhenremovingtrayordisposingofhotgreaseorotherhotliquids. - Donotleavetheapplianceunattendedwheninoperation.
- Donotc leantheinsideoftheovenwithmetalscouringpadsaspiecescanbreak offthepadandtouchelectricalparts,creatingariskofelectricshock.
- Oversizedfoodsormetalutensilscannotbeputintotheapplianceastheymay createafireorriskofelectricshock.
- Afiremayoccuriftheoveniscoveredornearanyflammablematerial,including curtains,draperies,etc,wheninoperation.Donotstoreanyitemontheovenduring operation.
- Extremecautionshouldbeexercisedwhenusingcookingorbakingcontainers constructedofanythingotherthanmetalorovenproofglass.
- Besurethatnothingtouchesthetoporbottomelementsoftheoven.
- Donotplaceanyofthefollowingmaterialsintheoven:plastic,paper,oranything similar.
- Alwayswearprotective,insulatedovengloveswheninsertingorremovingitems fromthehotoven.
EN
b This appliance has a tempered, safety glass door. The glass is stronger than glass and will be more resistant to breakage. Be aware that tempered glass break, especially around the edges. Avoid scratching the door surface or ni edges.
b Children should be supervised to ensure that they do not play with the app. b Do not use outdoors.
b Do not use this oven for anything other than its intended purpose.
b The lamp is only for use by ovenblendorshinasehold room illumination.
PRODUCT OVERVIEW
natural_image
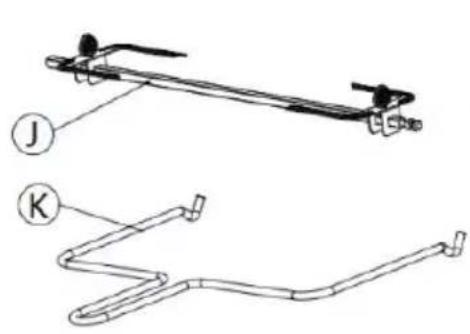
Technical line drawing of two mechanical components labeled J and K (no text or symbols beyond labels)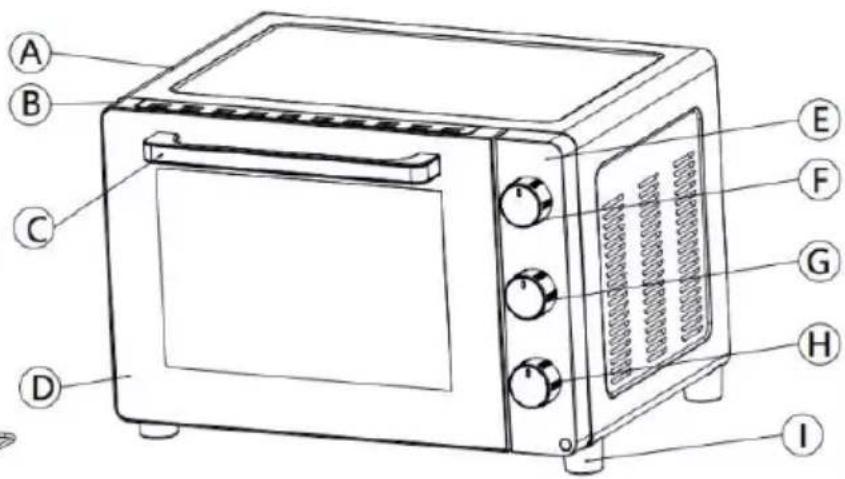
natural_image
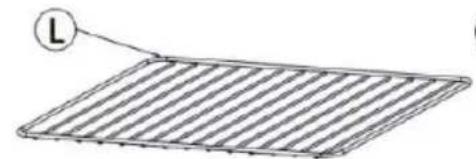
Diagram of a grid-like structure with a labeled point 'L' pointing to its edge (no text or symbols beyond the label)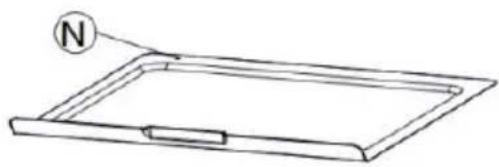
natural_image
Simple line drawing of a rectangular tray with a circular indicator labeled 'N' pointing to the top section (no text or symbols beyond the label)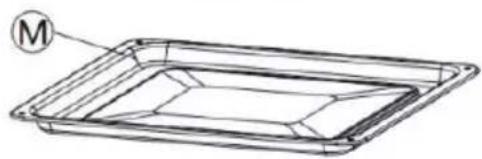
natural_image
Line drawing of a rectangular tray with a circular label marked 'M' pointing to the top-left corner (no text or symbols on the tray itself)A.Housing
B. Doorframe
C. Doorhandle
D.Glassdoor
E.Controlpanel
F.Temperaturecontrolknob
G.Functioncontrolknob
H. Timercontrolknob
I.Ovenfoot
J.Rotisserie
K.Rotisseriehandle
L.Wirerack
M.Baketray
N.Crumbtray
BEFOREFIRSTUSE
Beforeusingyourelectricovenforthefirsttime,besureto:
- Readallinstructionsinthemanual.
- Makesuretheovenisunpluggedandthetimercontrolknobisinthe"0"position.
- Washallaccessoriesinwarmsoapywater.
- Thoroughly dry all accessories and then re-assemble in the oven. Plug the oven in the mains socket and then you are ready to set the oven.
- Once reassembled for the first time, it recommends that you run the oven at the highest temperature
(230°C)onthefunctionfor15minutestoburnoffthepackingresidue.Thiswillremoveall tracesofodourthatwilloccuronthefirstuse.
PleaseNote: When using the oven for the first time, the oven may produce an odor and demits smoke. The oven is burning off the excess oils in the heating elements and this is normal.
Please familiarise yourself with the followingovenfunctions and accessories before first use:
TemperatureControl: Choosethedesiredtemperature(90°C-230°C).
FunctionControl: There are several function controls depending upon your cooking requirements.
 | OffUpperheating&Rotisserie | ||
 | Upperheating | Stirredair:upperandlowerheating+fan | |
 | LowerheatingUpperheating&Rotisserie&fan | ||
 | Upperandlowerheating |
Timer Control: Set cooking time up to 120 minutes. The oven will automatically turn off once the timer runs out, and a bell will sound to inform you that it has completed. To manually turn off the oven, turn thisknobtothe "0" position.
Whenthesettimeislessthan20minutes,turnthisknobformorethan20minutesandthenturnbackto setthetimeyouwant.
Powerindicatorlight:Itwillilluminatewhentheovenisturnedon.
Baketray:Forusewhenbroilingorroastingmeat,poult ry,fishorvariousotherfoods.Itcanalsoused asadriptraytocollectgrease,oil,andliquidwhichcomefromthefoodbeingrotisseriecooked.
Wirerack: Fortoasting, baking and general cooking incasseroledishes and standard pans.
Wirerack cannot be used individually. Always put with baketray. Placethebaketry in the shelf position under wirerack.
Crumb tray: Always keep the crumb tray in place while cooking to collect crumbs and drips during cooking. Thistrayis usually placed at the every bottom of the oven. Cleanthistray regularly.
EN
OPERATION
Placetheovenonaclean, flatandheatresistantsurface.
- Ensure that there is enough ventilation around the oven.
- Ensure that theovenis completely dry before use.
- Ensure that the crumb tray is properly installed before use.
• Theovenshouldnotbeplacedonuntreatedwoodensurface.
Plugintheoven.
Forbestresults, it recommends that you prepare the oven for 15 minutes at 230°C.
CAUTION: Thesurface of the oven will get hot during and after use. Keep your hand safe by not touching the surface.
Alwaysuseextremecarewhenremovingbaketray,wirerackoranyhot containerfromahotoven.Alwaysusetherackhandle,oranovenmittwhen removinghotitemsfromtheoven.
HowtoBroil(UpperHeating

TheBROILfunctionisidealforcookingopen-facedsandwiches,thincutsofmeat(likeBacon),poultry andfish,sausagesandvegetables.Broilingcanalsobeusedtobrownthetopsofcasseroles,gratinsand desserts.
- Placethebaketrayattheuppermostposition.
- Placethefoodtobecookedontothebaketrayandclosetheovendoor.
3.Turnthefunctioncontrolknobto - Turnthetemperaturecontrolknobtothedesiredtemperature.
- Turnthetimer control knob to the desired cooking time.
6.Whenbroilingiscomplete,abellwillringtosignifytheendofthebroilcycle.Turnthefunction
controlknobto □.

- Beforethesetcookingtimehasbeenreached,youmayalsoturnthetimercontrolknobtothe "0"positiontofinishcooking.
HowtoBake(LowerHeating

TheBAKEfunctionisidealforbakingcakes,muffins,browniesandpastries.
- Placethewirerackonthelowestormiddleracksupportguide.
- PositioningtheWireRacks: Cookies–Usethebottomandmiddlesupportguides. LayerCakes–Usethebottomsupportguideonly(bakeoneatatime). Pies–Usebottomandmiddlesupportguides.
-
Placethefoodontothewirerackandclosetheovendoor.
-
Foodshouldbeplacedascloseaspossibletothelowerheatingelementwithouttou chingit.
• Brushthefoodwithsaucesoroil, asdesired.
3.Turnthefunctioncontrolknobto

- Turnthetemperaturecontrolknobtothedesiredtemperature.
5.Turnthetimercontrolknobtothedesiredcookingtime.
• Turnthefoodovermidwaythroughthesetcookingtime.
- When baking is complete, abell will ring to signify the end of the bake cycle. Turn the function
controlknobto.
- Beforethesetcookingtimehasbeenreached,youmayalsoturnthetimercontrolknobtothe "0" positiontofinishcooking.

HowtoToast(Upperandlowerheating
The TOAST function browns and crispsthe outside of your bread while keeping the inside soft and moist.
ThisfunctionisalsoidealforEnglishmuffinsandfrozenwaffles.
- Placethewirerackorbaketrayintothedesiredposition.
- Placethefoodtobetoastedontothewirerackorbaketrayandclosetheovendoor.
3.Turnthefunctioncontrolknobto

- Turnthetemperature control knob to the desired temperature.
- Turnthetimer control knob to the desired cooking time.
6.Whentoastingiscomplete,abellwillringtosignifytheendofthetoastcycle.Turnthefunction
controlknobto □.
- Beforethesetcookingtimehasbeenreached,youmayalsoturnthetimercontrolknobtothe "0"positiontofinishcooking.

Stirredair:upperandlowerheating+fan
This cooking function combines hot air movement using a fan with the toast function. The fangently sends air to every area of the food, quickly browning, crisping and sealing in moisture and flavour.
This function is ideal for use when cooking baked potatoes, roasting meat and vegetables, ready meals, casseroles, stews, bread, cakes and desserts.
- Placethebaketry into themiddle position.
- Placethefoodtobecookedontothebaketrayandclosetheovendoor.
3.Turnth efunctioncontrolknobto.

- Turnthetemperaturecontrolknobtothedesiredtemperature.
5.Turnthetimercontrolknobtothedesiredcookingtime. - When cooking is complete, abell willing to signify the end of the cooking cycle. Turn the function
controlknobto □.
- Before the set cooking time has been reached, you may also turn the timer control knob to the "0" positiontofinishcooking.

/Upperheating&Rotisserie&fan

Upperheating&Rotisserie
- Insert the first spit onto the skewer by pointing inward. Secure the first spit with thumbscrew provided.
- Insertthemeatorpoultrythatyouaregoingtocookontotherotisserieskewer,makingsurethatthe meatorpoultryisatthecenterbeforeinsertingthesecondspitontotheskewer.Securethesecond spitwiththethumbscrew.
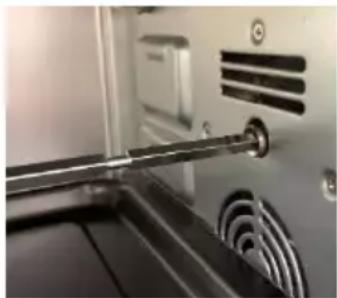
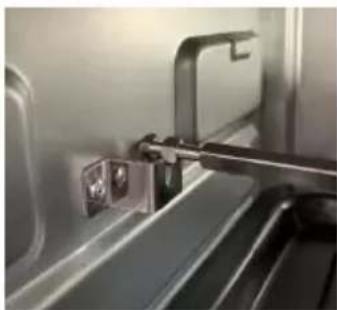
- Insert the pointed end of the therotis series, sewer into the drive socket located on the right-hand side of the oven wall.
natural_image
Close-up of a metallic mechanical component with a lever and circular base (no visible text or symbols)EN
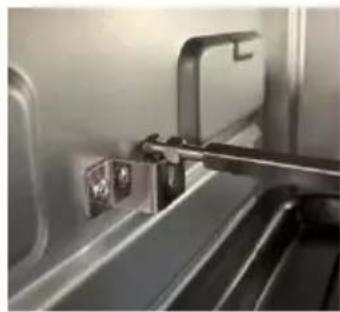
- Makesurethatthesquareendoftherotisserieskewerrestsonthe rotisserieskewersupportlocatedontheleft-handsideoftheoven wall.
natural_image
Close-up of a metallic mechanical component inserted into a train compartment, showing no visible text or symbols.- Placethebaketrayontothelowestpositiontocatchthefooddrippings.
6.Turnthefunctioncontrolknobto
7.Setthetemperaturecontrolknobto230°C.Turnthetimercontrolknobtothedesiredcookingtime.
• Normallyittakesapproximately45minutestoroasta2kgchicken.
- When cooking is complete, the oven bell will ring. Turn the function control knob to

-
Remove the rotisserie skewer from the oven by placing the hooks of the rotisserie handle under the groovesoneithersideoftherotisserieskewer.Lefttheleftsideoftheskewerfirstbyliftingitupand out.Thenpulltherotisserieskeweroutofthedrivesocketandcarefullyremovetheroastfromthe oven.
-
Takethemealorpoultryofftherotisserieskewerandplaceitonacuttingboardorplatter.
Interiorlightilluminationfunction
Alightisprovidedinsidetheo venandwillbeonwhenthetimerisset.
This facilitates easy viewing of the cooking process inside the oven.
Attheendofcookingprocess,thelightwillturnoff.Ifyouwanttocheckyourfoodwithoutopeningthe door,turnthetimercontrolknobandthelightwillturnonagain.
CLEANINGANDMAINTENANCE
Unplugtheapplianceandallowittocoolbeforecleaning.
Aftereach, useadampclothocleantheinteriorandexterioroftheovenanddoor, thendrythemthoroughly.
Washalltheaccessoriesinwarmsoapywaterwithaspongeorcloth.Rinseanddry thoroughly.
Neveruseabrasiveorchemicalcleaningagents.
Surfacesincontactwithfoodshouldbecleanedregularlytoavoidcrosscontamination fromdifferenttypesoffood,theuseofadampclothisadvisablewhendealingwith surfacesthatcomeintocontactwithfood.
Correctfoodhygienepractices should always be followed at all times to avoid possibility of food poisoning/cross contamination.
Dryallpartsandsurfacesthoroughlybeforeuse.
Makesurethatallpartsandsurfacesarecompletelydrybeforeplugginginthe appliance.
SPECIFICATIONS
Ratings:220-240V\~50-60Hz 1600W
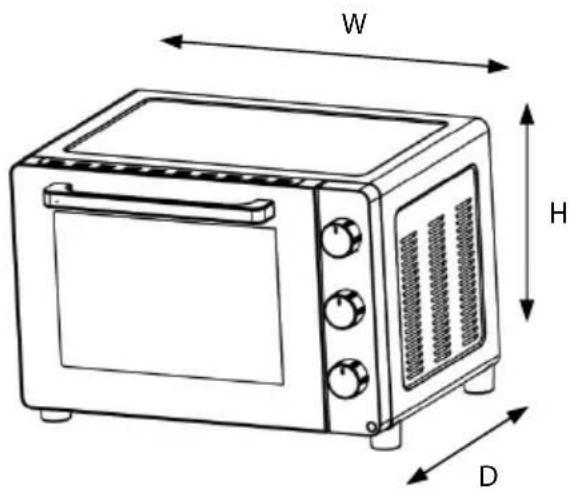
| Dimensions(outerdimensions) | (H)358x(W)513x(D)436mm |
| Dimensions(cavity/innerdimensions) | (H)293x(W)365x(D)334mm |
| Weight(approx.)10.0kg |
EN
DISPOSAL

Asaresponsiblecompanywecareabouttheenvironment.Assuchweurgeyoutofollowthe correctdisposalprocedurefortheapplianceandpackagingmaterials.Thiswillhelpconservenatural resourcesandensurethatitisrecycledinamannerthatprotectshealthandtheenvironment.
Youmustdisposeofthisapplianceanditspackagingaccordingtolocallawsandregulations.
Becausethisappliancecontainselectroniccomponents,theapplianceanditsaccessoriesmust be disposedofseparatelyfromhouseholdwastewhentheappliancereachesitsendoflife.
Contact your local authority to learn about disposaland recycling.
The appliances should be taken to your local collection point for recycling. Some collection points accept appliance free of charge.
Weapologiseforanyinconveniencecausedbyminorinconsistenciesintheseinstructions,whichmay occurasresultofproductimprovementanddevelopment.
ELECTROLUX16/05/20
MISESEN GARDE IMPORTANTES
MERCIDEBIEN VOULOIR LIRE LES CONSIGNES DE SÉCURITÉ ATTENTIVEMENT AVANT D'UTILISER L'APPAREIL ET DE LES CONSERVER POURRÉFÉRENCE ULTÉRIEURE.
Avertissements
natural_image
Close-up of a mechanical device with metallic components and ventilation slots (no visible text or symbols)natural_image
Close-up of a metallic mechanical component with a bracket and mounting bracket (no visible text or symbols)FR
Hotline Darty France
—bed-and-breakfasts.
natural_image
Close-up of a metallic tool interacting with a black electronic device (no visible text or symbols)natural_image
Close-up of a metallic mechanical component inserted into a jet cabin (no visible text or symbols)natural_image
Close-up of a metallic mechanical component with a lever and circular base (no visible text or symbols)natural_image
Close-up of a metallic mechanical component with a metal bracket and mounting holes (no visible text or symbols)A.Estrutura
B.Estruturadaporta
C.Pegadaporta
D. Portadevidro
E.Paineldecontrolo
natural_image
Close-up of a metallic mechanical device with a handle and circular components (no visible text or symbols)4.Certifique-sedequeaextremidad equadradadoespetode churrasqueiraseapoianosuportedoespetodechurrasqueira localizadonapartelateralesquerdadoforno.
natural_image
Close-up of a metallic mechanical component with mounting holes and a lever mechanism (no visible text or symbols)EU Declaration of Conformity
Product Description:
natural_image
Black electric stove with control knobs and a brand logo (no visible text or symbols on main body)Marque –
Brand /Merk /Marca:
Electrolux
The object of the declaration described above is in conformity with the relevant Union harmonisation legislation:
Low Voltage Directive (LVD)
Eco design requirements for energy-related products (ErP)
RoHS
EMC:
EN 55014-1:2017+A11:2020
EN 55014-2:2015
EN IEC 61000-3-2: 2019
EN 61000-3-3:2013+A1:2019
LVD :
EN 60335-2-9:2003+A1:2004+A2:2006+A12:2007+A13:2010
EN 60335-1:2012+A11:2014+A13:2017+A1:2019+A14:2019+A2:2019
EN 62233:2008
ErP :
(EC) No. 1275/2008
(EU) No. 2016/2282
(EU) No. 801/2013
EN 50564:2011
IEC 62301:2011
This declaration of conformity is drawn up under the sole responsibility of the manufacturer.
The person responsible for this declaration is:
Place, Date / Lieu :
Ivry-sur-Seine, mai 13, 2022


natural_image
Abstract geometric design with three white petal-like shapes on a black background (no text or symbols)3484 E ESO936 02 01 0322
Share more of our thinking at www.electrolux.com
electrolux.com/shop

Electrolux Appliances AB
S:t Göransgatan 341
S-105 45 m lohkcotS
Sweden
- EN
- IMPORTANT SAFETY INSTRUCTIONS
- PLEASEREADTHEFOLLOWINGSAFETYWARNINGSANDTHEINSTRUCTIONSCAREFULLY
- BEFOREUSINGTHEAPPLIANCEANDKEEPFORFUTUREREFERENCE.
- Warnings
- Safety Information
- PRODUCT OVERVIEW
- BEFOREFIRSTUSE
- OPERATION
- HowtoBroil(UpperHeating
- HowtoBake(LowerHeating
- HowtoToast(Upperandlowerheating
- Stirredair:upperandlowerheating+fan
- /Upperheating&Rotisserie&fan
- Upperheating&Rotisserie
- Interiorlightilluminationfunction
- CLEANINGANDMAINTENANCE
- SPECIFICATIONS
- DISPOSAL
- MISESEN GARDE IMPORTANTES
- Avertissements
- FR
- Hotline Darty France
- Marque –
- Electrolux
- EMC:
- LVD :
- ErP :
Brand : ELECTROLUX
Model : ESO936
Category : Saucepan