DLEV833W - Tumble drier LG - Free user manual and instructions
Find the device manual for free DLEV833W LG in PDF.

User questions about DLEV833W LG
0 question about this device. Answer the ones you know or ask your own.
Ask a new question about this device
Download the instructions for your Tumble drier in PDF format for free! Find your manual DLEV833W - LG and take your electronic device back in hand. On this page are published all the documents necessary for the use of your device. DLEV833W by LG.
USER MANUAL DLEV833W LG
Owner's manual Electric Dryer
DLEV833W
Thank you for buying a LG Dryer.
Please read your manual carefully, as it provides instructions on safe Installation, Use and Maintenance. Record the Model and Serial Numbers, and retain the manual for future reference.
website: http://www/lg.ca
e-mail: http://www.LGEservice.com/techsup.html
P/No.:3828EL3006B
Ultra Big Capacity Drum
The LG Dryer has a large capacity.
Reduced drying time
Drying time is shortened by efficient air flow mechanism and optimized heater.
Innovative Noise Reduction
Noise is reduced by optimized design of air flow system and vibration reduction technology.
Ease of Use
Large LED display and electronic control.
What are Sensor Dry and Manual Dry?
Your dryer provides sensor drying and manual drying programs.
Sensor Dry Dryer electronically senses laundry moisture level and it automatically determines operation time based on the dryness of the load and the selected program. At times, you can see sudden increase or decrease of operation time. It happens because a sensor will detect laundry humidity with a certain period. Sudden change of operation time is not a malfunction.
Manual Dry Manual Dry allows you to set operation time manually to complete drying. Or use Manual Dry if clothes are still damp after sensor dry cycle is finished. Manual Dry is more effective for heavyweight and bulky items such as king-size bed sheets and thick work clothes.

contents
Safety Instructions 3
Installation Instructions 5
Exhaust Requirements And Maintenance 10
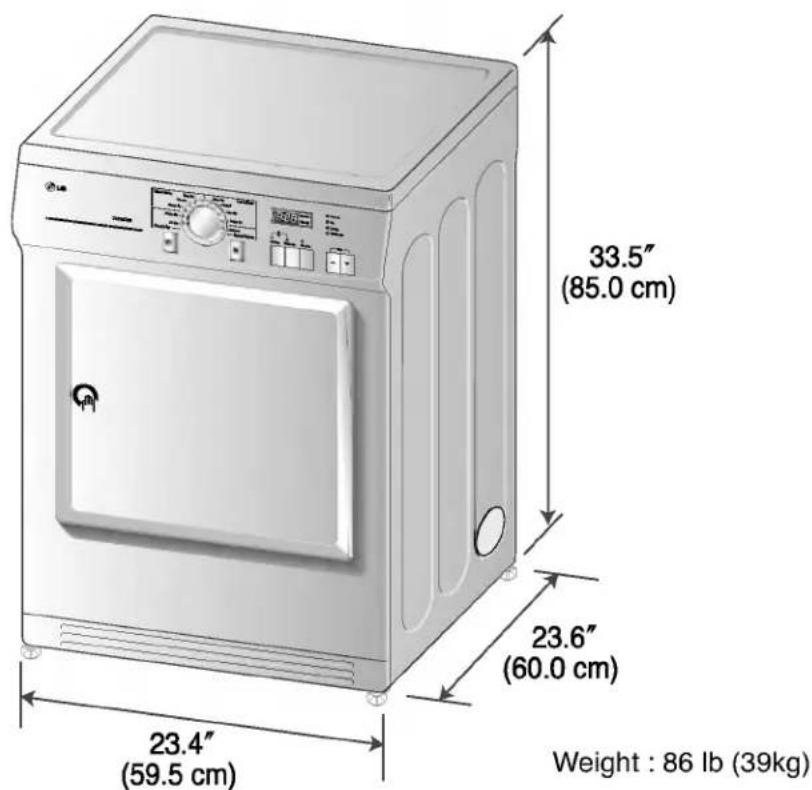
Appearance And Design 12
Operating Your Dryer 13
Additional Functions 16
Caring For Your Dryer 17
Additional Tips For Smart Use 20
Troubleshooting Guide 22
Technical Data 26
Warranty 27
Safety Instructions
IMPORTANT SAFETY INSTRUCTIONS

WARNING!
To help reduce any risk of electric shock, fire, or other personal injury or property damage when using your dryer, please exercise care and follow basic safety precautions, including the following:
1) Read all instructions before using the appliance.
2) Do not dry articles that have come into contact with gasoline, dry-cleaning solvents, or other flammable or explosive substances, as they give off vapors that could ignite or explode.
3) Do not allow children to play on or in the appliance. Close supervision of children is necessary when using the appliance.
4) Before the appliance is removed from service or discarded, remove the door to the drying compartment.
5) Do not reach into the appliance if the drum is rotating.
6) Do not install or store this appliance where it will be exposed to the weather.
7) Do not tamper the with the controls.
8) Do not repair or replace any part of the appliance or attempt any servicing unless specifically recommended in the user-maintenance instructions.
9) Do not use heat to dry articles containing foam rubber or similarly textured rubber-like materials.
10) Clean lint screen before or after each load.
11) Keep area around the exhaust opening and adjacent surrounding areas free from the accumulation of lint, dust, and dirt.
12) The interior of the appliance and exhaust duct should be cleaned periodically by qualified service personnel.
13) Do not place items exposed to cooking oils in your dryer. Items contaminated with cooking oils may contribute to a chemical reaction that could cause a load to catch fire.
14) Do not use fabric softners or products to eliminate static unless recommended by the manufacturer of the fabric softner or product.
SAVE THESE INSTRUCTIONS
GROUNDING INSTRUCTIONS
This appliance must be grounded. In the event of malfunction or breakdown, grounding will reduce the risk of electric shock by providing a path of least resistance for electric current. This appliance is equipped with a cord having an equipment-grounding conductor and a grounding plug. The plug must be plugged into an appropriate outlet that is properly installed and grounded in accordance with all local codes and ordinances.
WARNING - Improper connection of the equipment-grounding conductor can result in a risk of electric shock. Check with a qualified electrician or service person if you are in doubt as to whether the appliance is properly grounded.
Do not modify the plug provided with the appliance: if it will not fit the outlet, have a proper outlet installed by a qualified electrician.
This appliance must be connected to a grounded metal, permanent wiring system or an equipment-grounding conductor must be run with the circuit conductors and connected to the equipment-grounding terminal or lead on the appliance.

Safety Instructions

WARNING
To reduce the risk of fire or explosion, electric shock, property damage, personal injury, or death when using this appliance, please follow all instructions and information, including those in this manual and instructions provided by your gas supplier.
- Do not store or use any gasoline, dry-cleaning solvents any other flammable vapors or liquids in the area surrounding this appliance.
- Do not dry anything that has ever had anything flammable on it, even after washing.
- No washer can completely remove oil. Do not dry any articles that have ever had any kind of oil on them, including cooking oil.
- Articles containing foam, rubber, rubber-like materials, plastic or similar materials should be air dried.
- Failure to follow these instructions can result in fire, death or serious injury.
- A qualified service person or company must perform installation and service of this appliance.

WARNING!
- Keep flammable materials and vapors, such as gasoline, away from dryer.
- Place dryer at least 18 inches above the floor for a garage installation.
- Failure to do so can result in death, explosion or fire.
Installation Instructions
The following instructions will help guide you through the initial steps of setting up your dryer for use. Please note that every section of this manual provides important information regarding the preparation and use of your dryer, and it is important that you review this entire manual before proceeding with any installation or use. More detailed instructions concerning electrical connections, gas connections, and exhaust requirements are provided in other parts of this manual.
STEP1 Positioning the Dryer.
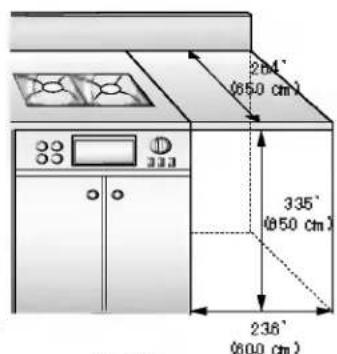
Choose a location with a solid floor for your dryer. Place the dryer at least eighteen inches above the floor for a garage installation. After placing the dryer in the desired location, please make sure that it has the required clearances shown below and sections on Exhaust and Maintenance requirements, page10.
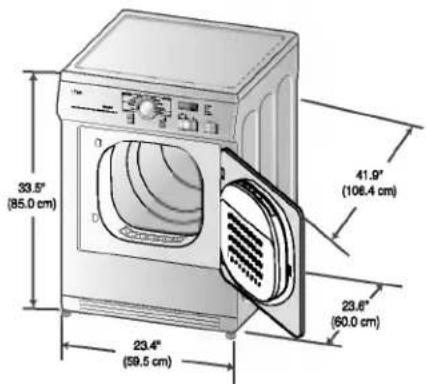
* Most installations require a minimum 5 1/2 in. (14 cm) clearance behind the dryer for the exhaust vent with elbow.
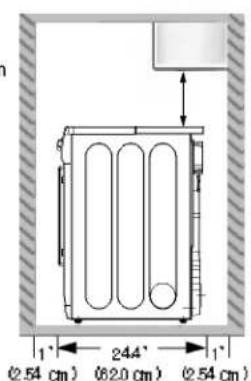
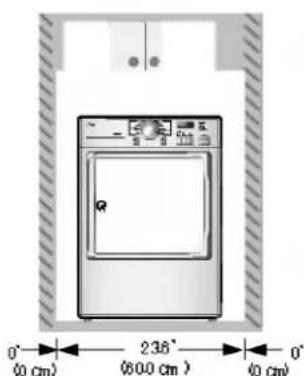
Certain minimum clearances are required above, behind, and to the sides of the unit, as shown below. Those required minimum clearances are set forth in the picture below. Please keep the following instructions in mind when installing in a closet or recessed area:
- Consider allowing additional clearance for installation and servicing.
- Wall, door, and floor molding may force additional clearances.
An additional inch of clearance is recommended to minimize noise transfer. - Consider space needed for companion appliances.
- For closet installations, the picture below shows the minimum required ventilation openings for the door. A louvered door with comparable ventilation openings is also acceptable.
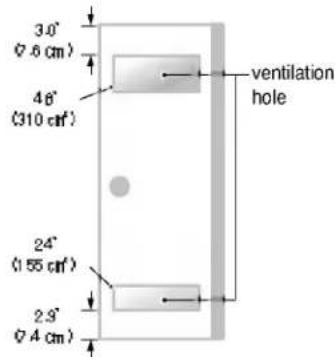
Closet door
Closet side view
Note
Leveling legs should be secured.
All four legs are stably placed on the solid and even floor.
If dryer is not level, laundry may not tumble properly and sensor will not detect the accurate humidity information.
When leveling, please be cautious not to injure your fingers and toes.
Closet Front view
Built in
Installation Instructions
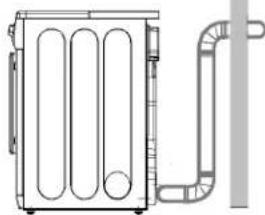
STEP 2 Connecting the Exhaust and Venting System.

WARNING!
- Use a heavy metal vent.
- Do not use plastic or thin foil duct.
- Failure to follow these instructions can result in death or fire.
- Clean old ducts before installing this dryer
Note
Vent end will face to the outside home and improper taping and unstable installation of vent will cause undesirable drying performance.
In addition to the following warnings, please refer to manual section on Exhaust Requirements and Maintenance, page 10.
IMPORTANT: To reduce the risk of fire, combustion, and gas accumulation, the dryer must be vented to the outdoors. Please follow the instructions (and all others in this manual) very carefully.

- Do not use Plastic or thin foil duct.
- Use 4^ (10.2 cm) diameter rigid or Semi-rigid metal duct (note: venting materials are not supplied with the dryer, and you should obtain the venting materials necessary for proper installation)
- Position the Dryer so that the exhaust duct run is as short as possible.
- Clean old ducts before installing this dryer
- The male end of each section of exhaust duct must point away from the dryer
- Use as few elbow joints as possible.
- Use duct tape on all duct joints
- Insulate ductwork that runs through unheated areas in order to reduce condensation and lint build-up on pipe walls.
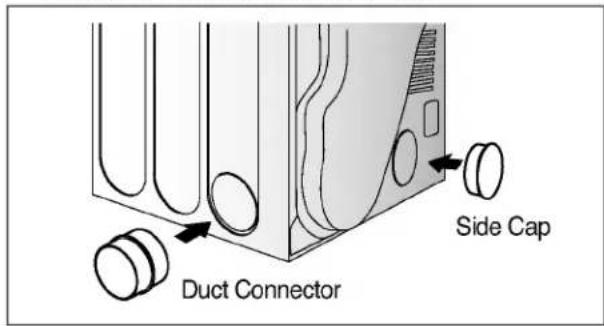
Note
During transportation side cap can come out slightly. If that is so, push and fit it to the hole to prevent possible lint leakage.
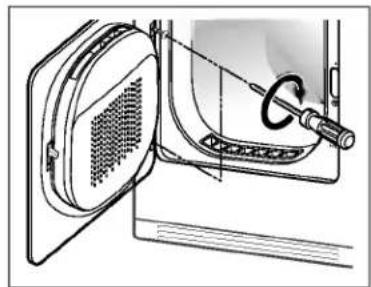
To change duct direction, follow these steps.
- Remove Duct Connector.
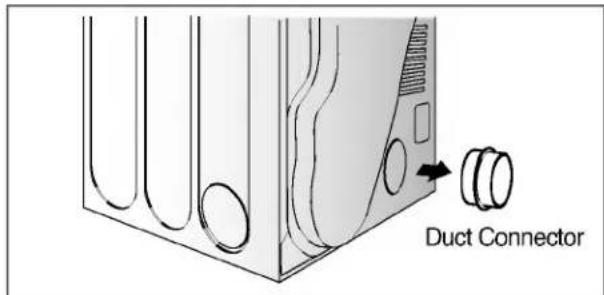
- Remove the right (or left) Side Cap by (-) driver.
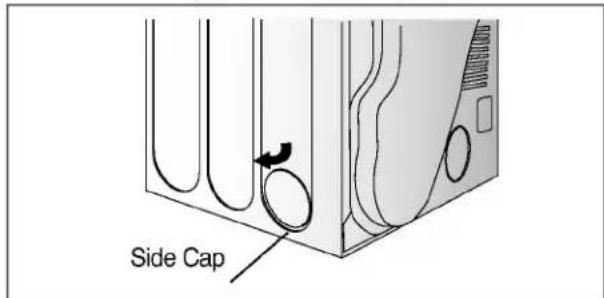
- Assemble the Duct Connector to the hole and close the back hole by the Side Cap.
- PLEASE BE AWARE THAT FAILURE TO EXHAUST THE DRYER CORRECTLY WILL VOID THE DRYER'S WARRANTY.
Installation Instructions
STEP3 Electrical Plug Connections
Following are several warnings and instructions concerning making the electrical connection for electric dryers.

WARNING!
- Do not plug with several other appliances power cord.
- Do not grasp power cord or switch with wet hands.
- Do not use damaged power cord, plug, and socket.
Use power supply (Socket) rated 240Volts, 30 ampere.
STEP4 Preparation of the Dryer.
Prior to the first use of this appliance, use all-purpose cleaning products or a solution of detergent and water, with damp cloth to remove from the inside of the dryer drum/drying compartment any dust or dirt that may have accumulated inside the dryer. Plug-in your dryer after reviewing the following parts on your dryer's Electrical Requirements.
STEP5 Confirming Heat Source Operation
Close the door to the dryer drum/drying compartment and, after completing all steps in this manual for proper installation of this dryer, start the dryer on a heat setting, as described more fully in the operating instructions that accompany the dryer. The exhaust air or the exhaust pipe should be warm after the dryer has been operating for three minutes.
STEP 6 Additional Instructions for Installation of Your Dryer in a Manufactured or Mobile Home
The following instructions are applicable to installations of the dryer in a manufactured or mobile home. If you are uncertain whether your proposed installation will comply with these standards, please contact a service and installation professional for assistance.

WARNING!
DO NOT connect exhaust ducts with metal screws or fasteners that extend into the duct.
The following instructions apply to any installation of the dryer in a manufactured or mobile home:
1) Electric dryers may be vented to the outside using the back, left, or right.
2) The dryer exhaust duct must be affixed securely to the manufactured or mobile home structure, and the exhaust duct must be made of a material that will resist fire and combustion, and it is recommended that you use a rigid or flexible metal pipe.
3) Make sure the dryer has adequate access to outside fresh air to ensure proper operation. The opening for outside fresh air must be at least 25 in ^2 (163cm)
4) It is important that the clearance of the duct from any combustible construction be at least 2 inches (5 cm), and, when venting the dryer to the outdoors, the dryer can be installed with a clearances of 1 inch (2.5 cm) at the sides and back of the dryer.
5) DO NOT connect the exhaust duct with any other duct, vent, chimney, or other exhaust duct.
6) Make sure the dryer has adequate access to outside fresh air to ensure proper operation. The opening for outside fresh air must be at least 25 in ^2 (163cm).
7) Please be aware that venting materials are not supplied with the dryer. You should obtain the venting materials necessary for proper installation.

WARNING!
DO NOT vent the exhaust duct under the manufactured or mobile home.
Installation Instructions
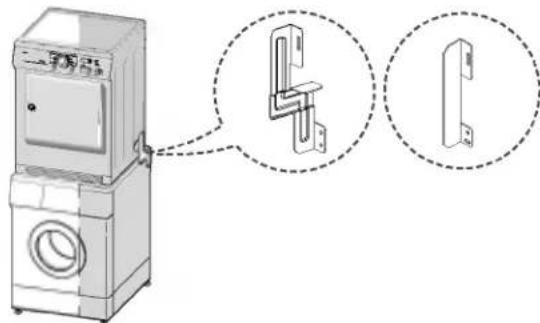
Stacking Kit
In order to stack this dryer on an LG washing machine, an LG stacking kit is needed.
Washer top plate size
| 550 mm | 600 mm |
Installation Procedure
- Place the LG dryer on the LG Washing machine.
- Unscrew Rear cover in the Base by unscrewing 2 screws.

WARNING!
Incorrect installation can cause serious accidents.
The weight of the dryer and the height of installation makes the stacking procedure too risky for one person. This procedure should be performed by 2 or more experienced service personnel.
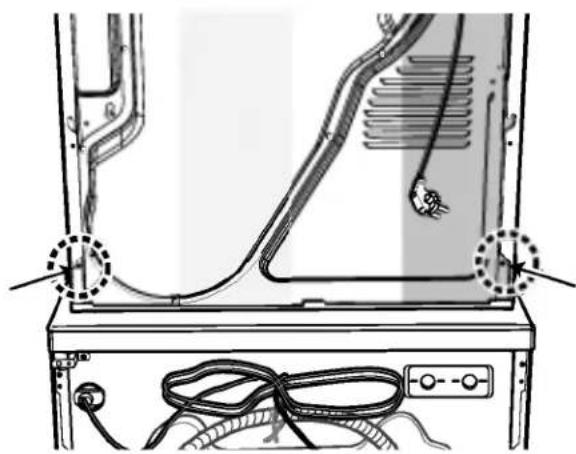
- After detaching protection sheet of double-side tape, align stacking kit holes rear cover holes and then attach tape to the washer by pressing hard.
-
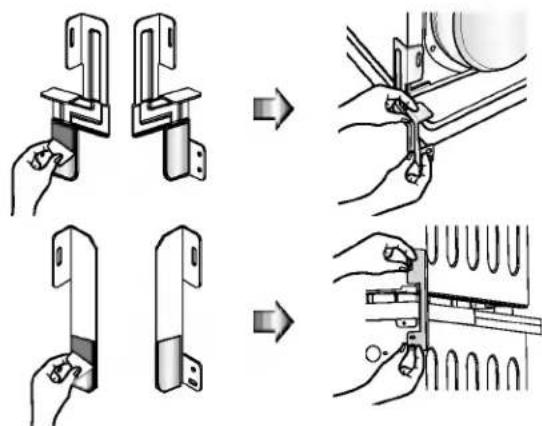
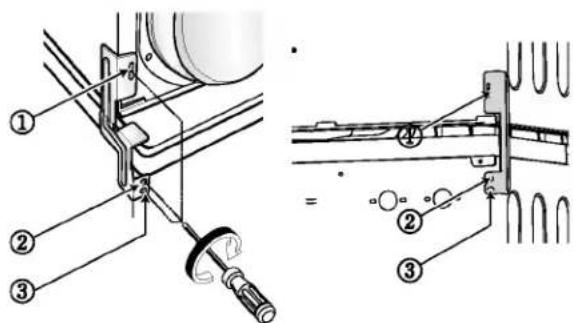
Assemble a stacking kit as following.
-
Screw 2 screws which is unscrewed earlier to assemble dryer rear back and stacking kit. (①)
- Use accessory screws to assemble washer rear covers and stacking kit. (2,3)
The procedure for the opposite side will be the same.
Installation Instructions

Level the dryer
- Leveling the dryer is to prevent undesirable noise and vibration.
Place your dryer in a solid and level area where water is not dripping or freezing.

- If the dryer is not properly level, adjust the levelling legs up and down as necessary.
Turn them clockwise to raise and counterclockwise to lower until the dryer is not wobbling both front-to-back and side-to-side.
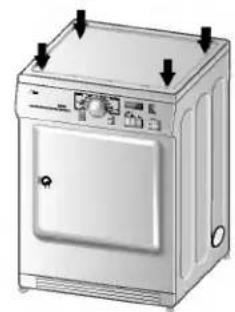
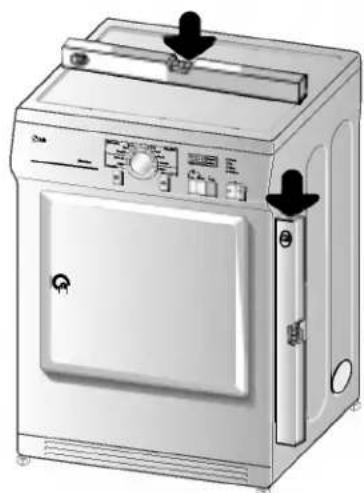
*Diagonal Check When pushing down the edges of the machine, the machine should not move up and down at all. (Please, check both directions) If machine rocks when pushing the machine top plate diagonally, adjust the feet again.
Exhaust Requirements And Maintenance
Following are important instructions and information concerning the exhaust requirements for your dryer. Important Warning: To reduce the risk of fire, combustion, or accumulation of combustible gases, DO NOT exhaust dryer air into an enclosed and unventilated area, such as an attic, wall, ceiling, crawl space, chimney, gas vent, or concealed space of a building. To reduce the risk of fire, DO NOT exhaust the dryer with plastic or thin foil ducting.
| Weather Hood Type | Number of 90° Elbows | Maximum length of 4" (10.2 cm) diameter rigid metal duct | Maximum length of 4" (10.2 cm) diameter flexible metal duct |
| Recommended | 0 | 65 feet (19.8 m) | 45 feet (13.7 m) |
| 1 | 55 feet (16.8 m) | 35 feet (10.7 m) | |
| 2 | 47 feet (14.3 m) | 30 feet (9.1 m) | |
| 3 | 36 feet (11.0 m) | 25 feet (7.6 m) | |
| 4 | 28 feet (8.5 m) | 20 feet (6.1 m) | |
| Use Only for Short Run Installations | 0 | 55 feet (16.8 m) | 35 feet (10.7 m) |
| 1 | 47 feet (14.3 m) | 27 feet (8.2 m) | |
| 2 | 41 feet (12.5 m) | 21 feet (6.4 m) | |
| 3 | 30 feet (9.1 m) | 17 feet (5.2 m) | |
| 4 | 22 feet (6.7 m) | 15 feet (4.5m) |
NOTE : Deduct 6 feet (1.8 m) for each additional elbow. It is not recommended to use more than 490^ elbows.
Exhaust Requirements and Instructions:
- Venting materials are not provided with the dryer and you should obtain the necessary venting materials locally. For example, the outer end of exhaust pipe must have a weather hood with hinged dampers to prevent back-draft when the dryer is not in use.
-
The exhaust duct must be four inches (10.2cm) in diameter with no obstructions. The exhaust duct should be kept as short as possible. Make sure to clean any old ducts before installing your new dryer.
-
Rigid or semi-rigid metal ducting is recommended for use as transition ducting between the dryer and and the wall. In special installations when it is impossible to make a connection with the above recommendations, then a UL-listed flexible metal transition duct may be used between the dryer and wall connection only. The use of this ducting will affect dry time.
- DO NOT use sheet metal screws on exhaust pipe joints or other fastening means which extend into the duct that could catch lint and reduce the efficiency of the exhaust system. Secure all joints with duct tape.
- To maximize operating results, please observe the duct length limitations noted in the chart above.

Xhaust Requirements And Maintenance
Exhaust and Dryer Maintenance

WARNING!
Disconnect the dryer's electric power prior to any cleaning or maintenance.
-
After one year of use, the interior and complete exhaust system of the dryer should be examined and cleaned if necessary.
-
Before one year of use, when drying performance has become unsatisfactory, please examine and clean the exhaust duct for better drying performance.
-
Check the weather hoods frequently to ensure the dampers are moving freely, that the dampers are not pushed in and that nothing has been set against the dampers.
-
A qualified service person or company should be used to perform this maintenance.
-
A Flexible Metal Vent Kit, available at extra cost, can be used to exhaust the dryer when it is placed in hard to reach places. This Kit comes in two pieces, one of which is attached to the dryer and the other is attached to the wall exhaust outlet. Following attachment of the two separate pieces to the dryer and the wall, the dryer may be returned to its final position, after which the two pieces themselves can be connected.
-
Ordinarily, the dryer drum will need no care. Wipe the exterior of the dryer as required, and always wipe the exterior of the dryer in the event any detergent, bleach, or other washing products is spilled on the dryer.
-
Clean the control panel with a damp cloth as necessary. Warning: spray pre-wash products may damage the finish of the control panel.
-
Please clean the lint filter either before drying each load or after drying each load.
-
Always make sure the lint filter is clean before starting a new load, because a clogged lint filter may increase drying times.
-
Annually remove the lint filter and attach it to the vacuum duct. See item #2 above.
-
Please note that the wiring diagram is provided inside the dryer control hood. Label all wires prior to disconnection when servicing the dryer, because wiring errors can cause serious injury to you and your dryer.
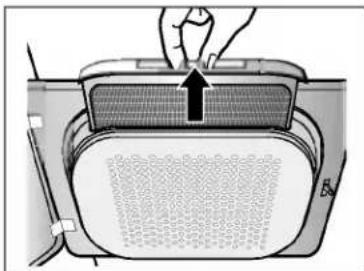
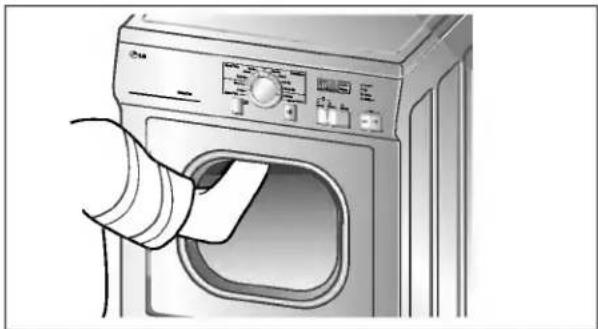
Cleaning the Lint Screen
- Clean the lint filter either before drying each load or after drying each load. Always make sure the lint filter is clean before starting a new load, because a clogged lint filter may increase drying times.
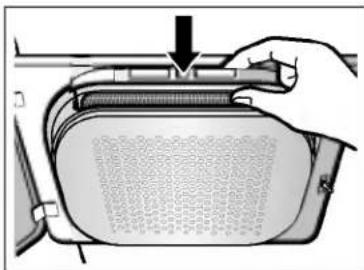
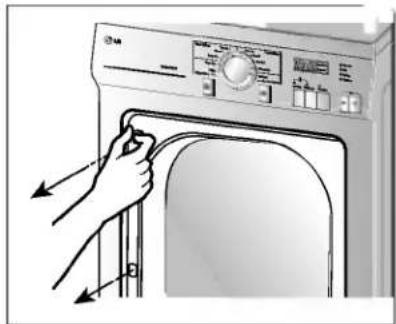
- To clean, pull the lint screen straight up and roll any lint off the screen with your fingers. Do not rinse or wash screen to remove lint. Push the lint screen firmly back into place.
- Always ensure the lint screen is firmly secured before running the dryer. Running the dryer with a loose lint screen may cause overheating and damage to the dryer and articles being dried.
- Some articles of clothing may shed more lint than others (towels for example), causing the Lint Screen to rapidly fill. Remove lint from the lint screen before and after drying these articles, such as new towels.
- In the event lint falls off of the lint screen and into the dryer during removal, inspect the exhaust hood and remove any lint.
- Laundry detergent and fabric softener residue can build up on the lint screen, causing longer drying times. The screen is likely blocked if lint falls off the screen. In order to prevent this type of build up, and help ensure proper operation of your dryer, clean the lint screen with a nylon brush every six months or, if necessary, more frequently. The lint filter can also be washed as follows:
a) After rolling the lint off of the screen with your fingers, wet both sides of the screen with hot or warm water.
b) Wet a nylon brush with hot water and liquid detergent and scrub the lint screen with the brush to remove the buildup of detergent and fabric softener.
c) After the residue has been removed, rinse screen with hot water.
d) After drying the lint screen with a clean towel, firmly replace the lint screen in your dryer.

Appearance And Design
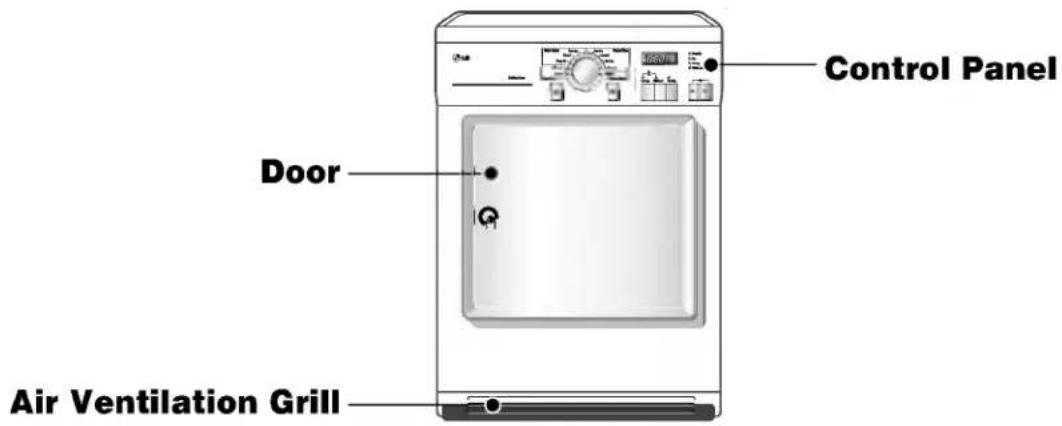

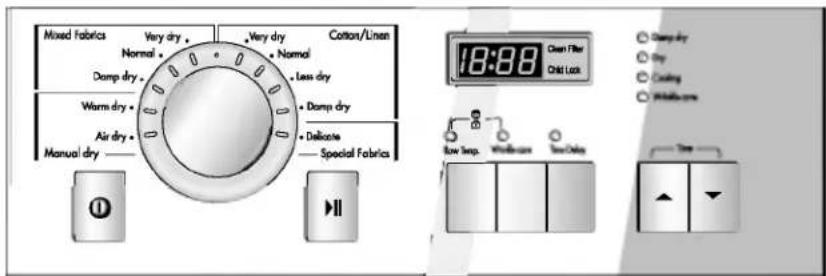
Control Panel
LED Display
Time Display
Indicator lamps
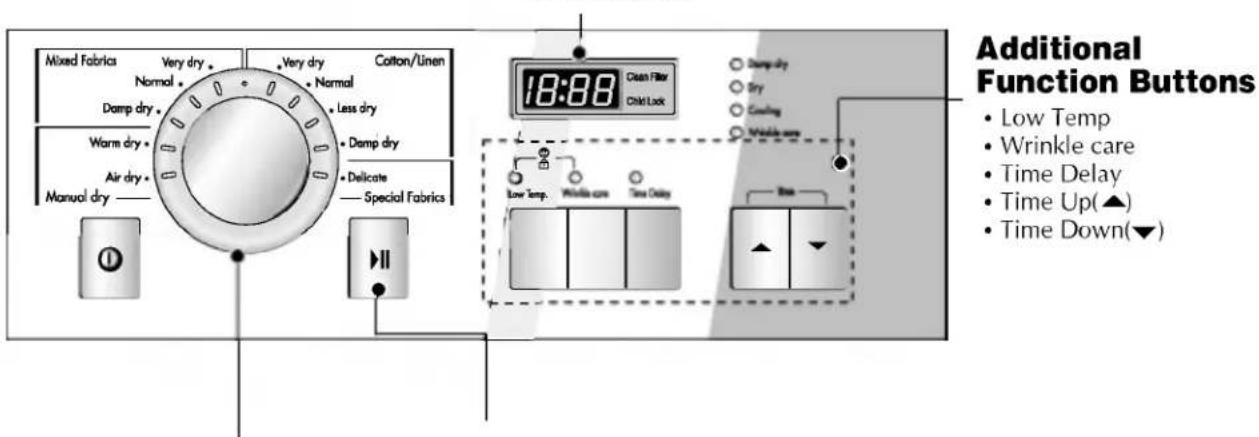
Program Selector Start/Pause

Cycle Selection Table
| Electronic Auto Dry Cycles | Standard Program | |
| Mixed-Fabric cycles (Note) Press the Low Temp. button for heat-sensitive items | ||
| Bed linen and table linen, tracksuits, blankets | For thick and quilted fabrics which do not need to be ironed. | Very Dry |
| shirts, blouses and sportswear | For fabrics which do not need to be ironed. | Normal |
| Trousers, dressers, skirts, blouses | For fabrics which do need to be ironed. | Damp Dry |
| Cotton (Whites and colors) (Note) press the Low Temp. button for heat-sensitive items | ||
| Terry towelling, tea towels, towel, bed linen | For thick and quilted fabrics which do not need to be ironed. | Very Dry |
| Bath towels, tea towels, underwear, cotton socks | For fabrics which do not need to be ironed. | Normal |
| T-shirts, trousers, underwear, work clothes | For fabrics which do need to be ironed lightly, not completely. | Less Dry |
| Bed linen, table linen, towels, T-shirts, Polo shirts, and work clothes | For fabrics which do need to be ironed. | Damp Dry |
| Manual dry Cycles for selected length of time | ||
| Bath towels, bath robes, dishclothes, Quilted fabrics made of acrylic | Small clothes & pre-dried laundry Normal fabrics using hot temperature 40,minutes | Warm dry |
| All fabrics needing fresh-ing, tumbles without heat | Air dry | |
| Special Fabrics | ||
| Silk, Women's thin clothes, lingerie | For fabrics which are heat-sensitive like synthetic fabrics. | Delicate |

WARNING!
If the load is less than 1kg please use Manual Dry Course Heat-sensitive fabrics including silk, underwears, lingerie should be used in delicates courses. Otherwise, these clothes can be damaged.
Before first use of the dryer
Before you use the dryer for the first time, there are some points that you have to check. After removing the dryer from the package, check the product has no problem and is properly installed.
- Check the dryer is well balanced by using a level. In order to check this, you can see and adjust legs which are supposed to stay put.
- Check major parts, such as the door control panel and drum.
- Check the operation of the dryer by running it for 5 minutes to be sure it heats.
- At the first use, there might be a slight odor as dust is burned off the heating element. Leave the door open and it will dissipate.
1. Turn the power on.
First, press the Power button. The indicator light above the button will become illuminated indicating that the machine is all set to run.
2. Open the door.
3. Check the lint filter.
The lint filter near the door should be emptied after or before drying operation. Open the door and check if lint filter is cleaned. If not, clean it.
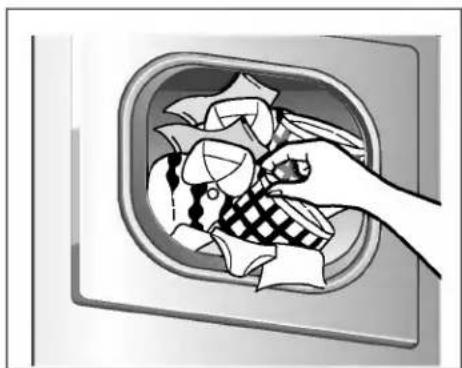
4. Place laundry into the drum after sorting.
The clothes should be sorted by fabric type and dryness level. All the strings and belts of clothes should be well tied and fixed before being put into the drum. It is desired that you push laundry all the way back to keep it away from the door seal. If not, door seal and clothes may be damaged.
Note
Be careful not to put buttons, small laundry, and any kind of small items into the holes below the door
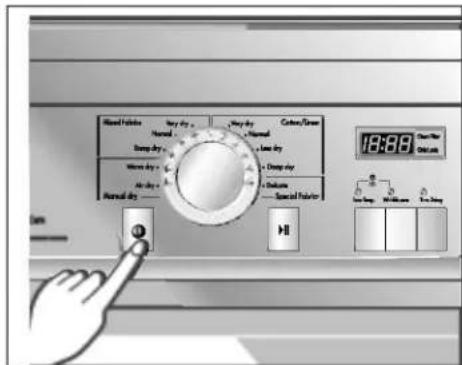
Turn on.
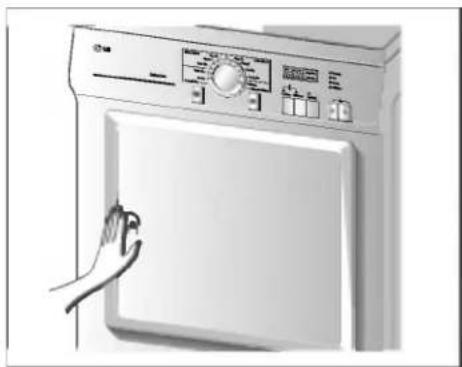
Open the Door.
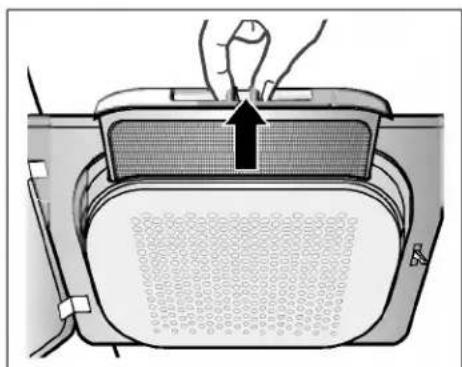
Check the lint filter.

operating Your Dryer
5. Close the Door.
Before you close the door, make sure fabrics are well placed inside and that foreign objects are not caught around door.
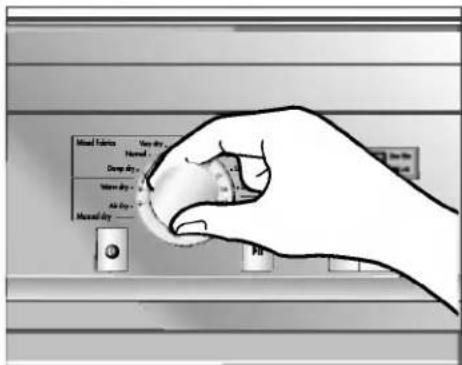
6. Select the Drying Cycle you want.
You can choose a cycle by turning the program control knob until the required program reaches to its indicator. If you only press the Start/Pause button without choosing any cycle, the dryer will proceed with the standard program. [Please refer to following Cycle Selection table (page 13) for detailed information]
7. Press the Start button.
You can hear drum rotating.
8. After operation is completed, open the door and remove the laundry.
Careful! The drum inside could be still hot. (Operation time varies depending on your cycle selection or options.)
9. Clean the Lint Filter.
The lint filter should be cleaned after each load.
10. Turn off the Dryer.
Press the Power button.
Note
- Be careful the filter isn't torn when using a vacuum cleaner. If there is a little residue buildup on filter, you can scrub the lint screen with a soft brush to remove.
If you want to open the door while dryer is operating, press the Start/Pause button first, wait until drum completely stops and then open the door.
Select the desired cycle.
Take out the laundry.
Clean the door lint filter.
Low Temp.
Low temp is functioning to decrease dry temperature.
Wrinkle care
Wrinkle care is functioning to prevent creases and rumples that are formed when the laundry is not unloaded promptly at the end of drying cycle. In this function, the dryer repeatedly runs and pauses to the cycle end.
If the door is open during Wrinkle care process, this function is cancelled. If the door is opened during normal operation without selecting Wrinkle care, this function will be remembered and processed.
Time Delay
You can use the Time Delay function to delay the finishing time of drying cycle.
Maximum Time Delay is 19 hours.
- Turn the dryer on
- Select cycle
- Set time delay hour
- Press Start/Pause button
Child Lock
For the safety of your children, press Low Temp. and Wrinkle care buttons at the same time for about 3 seconds. You can check this function by seeing the dryer display on LED window.
Caring For Your Dryer
Care and Cleaning is
It's not very difficult to care for your dryer. All you have to do is to follow the information below.
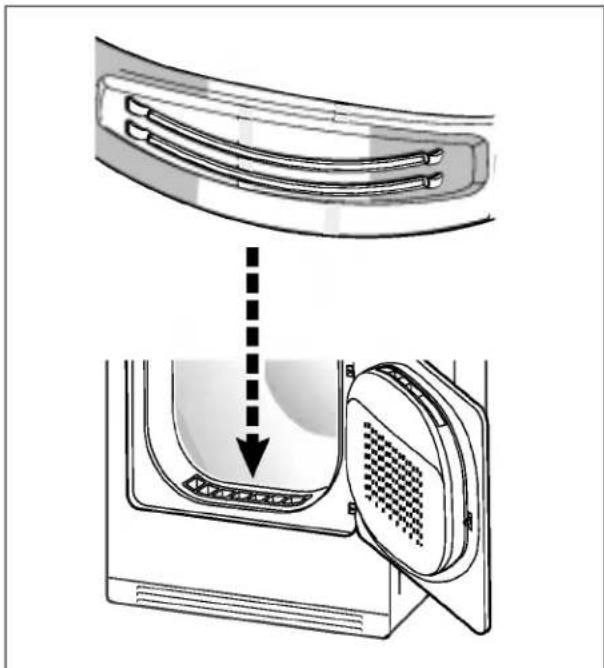
Clean Lint Filter
Clean lint filter after each use and check it before each use. It should also be cleaned if the Clean Filter light lights and the buzzer sounds during operation of the dryer: Cleaning or emptying the filter will reduce drying times and energy consumption and lengthen the dryer life.
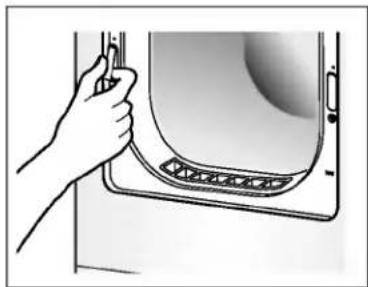
- Open the door.
2.Pull the filter out.
- Clean the filter by using a vacuum cleaner or rinsing under the tap.

-
Replace the filter.
-
Push the filter all the way down to avoid Interference with the door.
- Close the door.
Clean filter
This lamp blinks at the start of each use just to remind you to clean the filter.
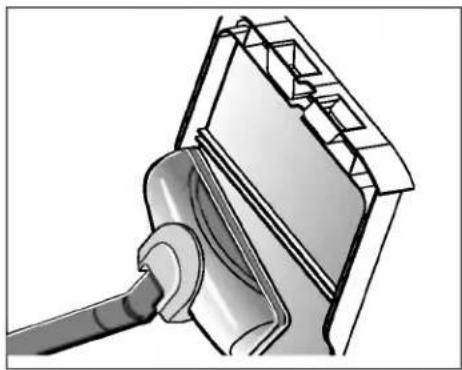
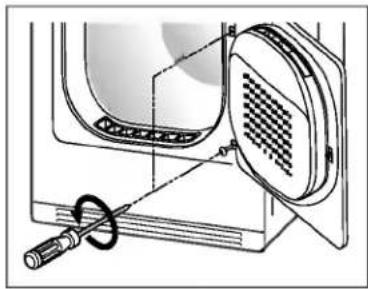
Moisture Sensor
This device senses the moisture remaining in the laundry during operation, which means it must be cleaned all the time. The main reason of cleaning this part is to remove the build-up of lime scale on the surface of sensor. Wipe the sensors inside drum (shown in the picture).
Note
In the case you wash the lint screen using water, dry it thoroughly.

Airing For Your Dryer
Reverse the door
The door can be reversed to fit to your own installation conditions. From the factory, the door hinge is located on the right side.
Note
- This work may cause the injury of your hands so you must be careful to handle some sharp devices like torx screwdriver or slotted screwdriver.
-
When the door is revered, the hand sticker on the door also must be replaced. Do not use an electric screwdriver.
-
Unscrew the bottom hinge of the door first and top hinge. And then place on the blanket to prevent scratches.
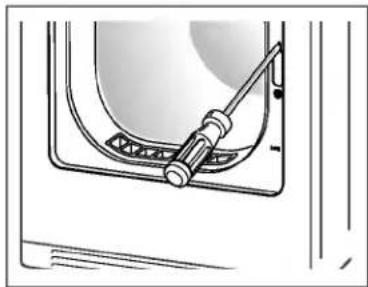
- Remove the door lock cover.
- Remove the door lock and replace where door lock cover is located.
- Detach both hinge point covers.
- Unscrew two door hinges.
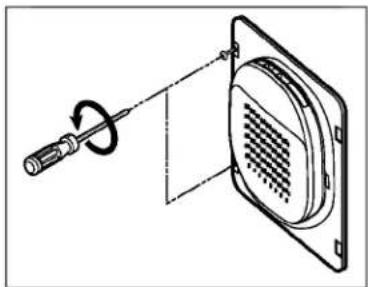
- Replace both hinge point covers where door hinge is located.

- Replace the door catch to the reverse location.
- Tighten the screws in the door hinges.
Caring For Your Dryer
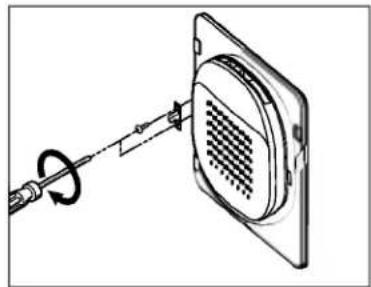
Change the Bulb
The bulb itself could be very hot when the dryer just finishes its operation. So before changing the bulb, be sure that the inside of the drum is cool down.
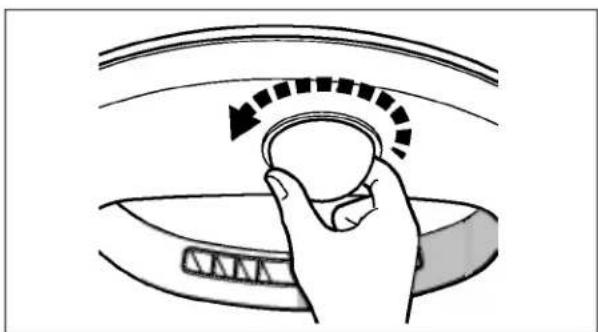
- Open the door, put a hand into the drum and grasp the bulb cover.
- With bulb held by hand gently, turn the bulb cover clockwise.
- Separate the bulb cover from the socket housing.

WARNING!
Power cord must be unplugged before this work to avoid danger of electric shock.
- Remove the current bulb turning it to Counter clockwise. Be careful that it does not fall off.
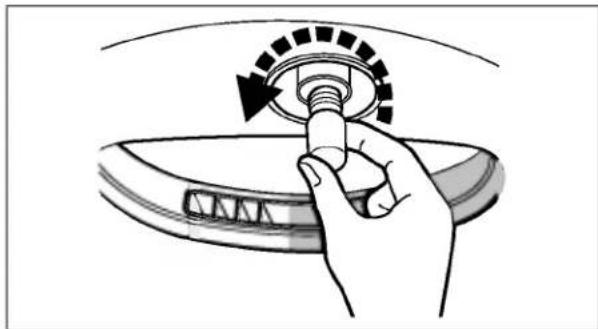
- Replace in the new bulb in the reverse unscrewing direction.
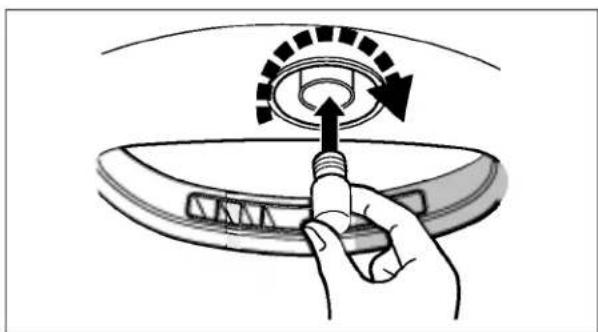
Note
No any special tool is needed for this work. All steps can be done by hand.

Drying Guide
Woven and Knit Materials
Some woven and Knit materials may shrink, depending on their quality.
Permanent Press and Synthetics
Do not overload your dryer.
Take out permanent press article as soon as the dryer stops to reduce wrinkles.
Baby Clothes and Night Gowns
Always check the manufacturer's instructions.
Rubber and Plastics
Do not dry any items made from or containing rubber or plastics such as:
a) Aprons, bibs, and chair covers
b) Curtains and table clothes
c) Bathmats
Fiberglass
Do not dry fiberglass articles in your dryer.
Glass particles left in the dryer could be picked up by your clothes the next time you use the dryer and irritate your skin.
Fabric Care Labels
Clothes have its own wash care labels so drying according to wash care labels is recommended.
Not only that, the laundry must be sorted according to size and fabric type.
Do not overload in order to save you energy, time and best dry performance.
Below are fabric care labels.
| Symbols | Instructions |
| □ | Dry |
| ○ | Tumble dry |
| ○ | Permanent Press / Wrinkle resistant |
| ○ | Gentle / Delicate |
| × | Do not tumble dry |
| × | Do not dry |
| ○ | High heating |
| ○ | Medium heating |
| ○ | Low heating |
| ○ | No heat / air |
| ○ | Line Dry / hang to dry |
| ○ | Drip dry |
| - | Dry flat |
| ○ | In the shade |

Additional Tips For Smart Use
Replacement Parts
Replacement parts ineeded for repairs are provided under the terms of warranty. Components covered by warranty are provided free of charge. If coverage is expired, spare parts must be purchased from LG service center.
Disposal of the Dryer
Dispose of the dryer safely to keep your children away from possible injury.
The door and other protruded items must be taken away and power cord must be cut off to avoid future use. After that, the dryer may be discarded safely.
Service contact
If there is something wrong with your dryer, first look through the troubleshooting guide.
If you can't find the same trouble and you can not handle by yourself, please contact the service centre.
A service person will ask you some questions like these:
- Your name, address, and postcode.
- Your phone number.
3.Description of trouble. - The model Namber and the serial Namber of your dryer.
- The date of purchase.
Accessory parts
Your dryer comes with accessories such as:
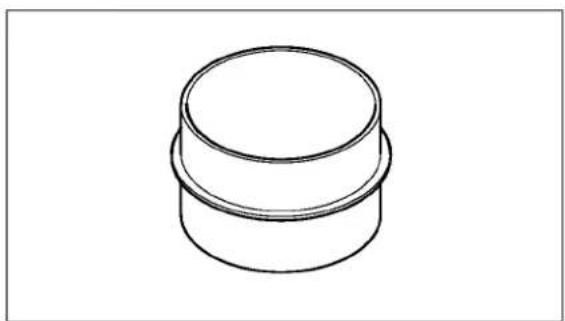
1. Duct Connector
2. Stacking Kit
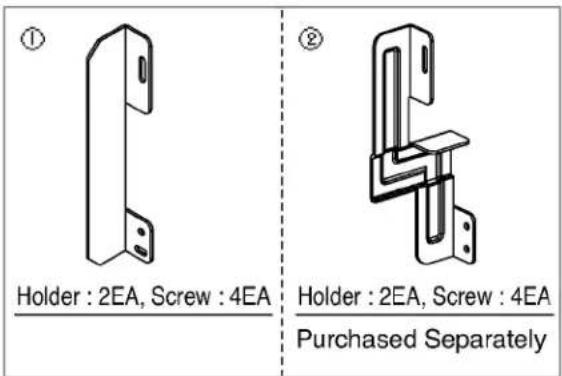
-
Stacking kit Use condition
-
fig ①: Washer top plate size 550
- fig ②: Washer top plate size 600
Note
If stacking is needed, you may stack the dryer upon an LG washing machine. Both the washer and dryer must be the LG brand and designed to work with the stacking kit.
Troubleshooting Tips
Save time and money! Review the charts on the following pages first and you may not need to call for service.
1.Problem:My Dryer Won't Start
| Question | What to Do |
| ·Is the dryer plugged in? | Confirm that the dryer's plug is securely and completely pushed into the laundry room's power outlet |
| ·Is the fuse blown, or is the circuit breaker tripped? | Check your home's or laundry room's fuse box/circuit breaker box and replace the fuse or reset the circuit breaker. |
2.Problem:My Dryer Doesn't Heat
| Question | What to Do |
| • Is the fuse blown, or is the circuit breaker tripped? | If the fuse is blown or the circuit breaker tripped, the dryer might tumble but not heat. Check your home's or laundry room's fuse box / circuit breaker box and replace the fuse or reset the circuit breaker. |
3.Problem:There are Greasy Spots on My Clothes
| Question | What to Do |
| Did you follow the instructions on your fabric softener product? | Confirm and follow the instructions provided with your fabric softener product. |
| Are you drying clean and dirty clothes together? | Make sure to use your dryer to dry only clean items, because dirty items can soil clean clothes placed in the same load or later placed in the dryer drum. |
| Were your clothes entirely clean? | Stains on dried clothes are actually stains that weren’t cleansed during the washing process. Please review and confirm that you are following your washing instructions and that the clothes are being completely cleaned. |
4.Problem:There is Lint on my Clothes
| Question | What to Do |
| ·Is your lint filter full? | Please refer to the manual section on cleaning the lint filter, and please confirm that the lint filter is clean. It is important that the lint filter is clean before each new load of laundry. |
| ·Did you properly sort your load of laundry? | In order to reduce the amount of lint in a load of laundry, sort lint producers (like a fuzzy white cotton towel) separately from clothes that might catch lint (such as a pair of black linen pants). |
| ·Do your clothes have excess static electricity? | See comments below under There is static in my clothes after drying. |
| ·Did you overload your dryer? | Divide your larger load into smaller loads. |
| ·Did you place any paper, tissue, or other similar material in the load? | Sometimes a person might forget to take a piece of paper or a tissue out of the pocket of a pair of pants, and this paper, tissue, or similar material can cause excess lint in a load of laundry. Confirm that the pockets of pants, shirts, and other articles of clothing are empty before washing and drying. |
5.Problem:There is static in my clothes after drying
| Question | What to Do |
| Did you use fabric softener? | Try using a fabric softener to reduce static electricity. |
| Did you over dry the load of laundry? | Over-drying a load of laundry can cause a build up of static electricity. Try using a fabric softener or adjust your settings and use a shorter drying time. |
| Are you drying synthetic, permanent press and blends? | These materials can cause static to build up in a load of dried clothes. Try using a fabric softener. |
6.Problem:The drying time is not consistent
| Question | What to Do |
| • Are you using consistent heat settings and consistent load sizes? | The drying time for a load will vary depending on the heat setting, the type of heat used (electric, natural or LP gas), the size of the load, the type of fabrics, the wetness of the clothes and the condition of the exhaust ducts and lint filer. |
7.Problem:It takes too long for my clothes to dry
| Question | What to Do |
| Did you properly sort your loads of laundry? | Separate heavy weight items from light weight items when creating loads. |
| Are you drying large loads of heavy fabrics? | Heavy fabrics take longer to dry because they tend to retain more moisture. To help reduce and maintain more consistent drying times for large and heavy fabrics, separate these items into smaller loads of a consistent size. |
| Are the dryer controls properly set? | Use the appropriate control settings for the type of load you are drying. |
| Is the lint filter clean before each new load of laundry? | Please confirm that the lint filter is clean prior to each new load of laundry. |
| Are the exhaust ducts clear and properly configured? | Confirm through review of the appropriate sections of this manual that the exhaust venting ductwork is properly configured. Confirm that the venting is free of obstructions. Confirm that the outside wall dampers are moving freely, that the dampers are not pushed in, and that nothing has been set against the dampers. |
| Is the fuse blown, or is the circuit breaker tripped? | Check your home's or laundry room's fuse box/circuit breaker box and replace the fuse or reset the circuit breaker. |
| Did you overload your dryer? | Divide your larger load into a number of smaller loads. |
| Did you under load your dryer? | If you are only drying a handful of items, add a few extra pieces to help ensure proper tumbling action. |
8.Problem:My clothes are wrinkled
| Question | What to Do |
| ·Are you over drying your laundry? | Over drying a load of laundry can lead to wrinkled clothes. Try a shorter drying time, and remove items while they still retain a slight amount of moisture. |
| ·Are you removing your laundry from the dryer soon after the drying cycle is complete? | Remove your laundry from the dryer after the drying cycle ends and either hang or fold the items. |
9.Problem:My clothes are shrinking
| Question | What to Do |
| • Are you following the care instructions for your garment? | To avoid shrinkage, please carefully follow the care and use instructions for your garment, because some fabrics will naturally shrink when washed. Other fabrics can be washed but will shrink when dried in a dryer. |
Troubleshooting Guide

Error Mode
LED displays dE in case of the door open. Close the door and press START to resume operation.
High temperature and high humidity of air continues to remain in the contained dryer by drying object during drying if the dryer suddenly stops due to power failure or other different causes while drying is in progress. Leaving the dryer continuously in such status may reduce durability of the dryer or have a bad effect on major electrical parts.
Open the door so that high temperature and high humidity of air discharges outside if the dryer must be stopped for a long time while drying is in progress.
- 12 E / 12 E32 If E / E error occurred, unplug the power cords and then call to the service center.
- LE If LE error occurred, restart the cycle after 30 minutes. If LE is not released, call to the service center.
Technical Data
Electrical Requirements
| Volts | Hertz | Watts |
| 115/230 V | 60 Hz | 2900 |
You are sure to check the rating plate on the dryer to make sure the dryer has right rating.
| Alcove or Under Counter | Closet | |
| Sides | 0 inch (0 cm) | 0 inch (0 cm) |
| Top | 0 inch (0 cm) | 10 inch (25 cm) |
| Rear | 1 inch (2.5 cm) | 5 inch (12.5 cm) |
Ventilation Requirement
| Alcove or under counter | Closet |
| Ensure air flow of 112 cu.ft./min through dryer | Closet door must have 2 (louvered) openings, each having a minimum area of 60 sq. inches (387 sq.cm), located 3 inches (8 cm) from bottom and top of door. |
SEEKING WARRANTY ASSISTANCE
Warranty Service is available by contacting your nearest LG Service Center. If this product is installed and operated per this manual, LG will repair or replace any parts defective in material or workmanship throughout the warranty period, beginning with the date of purchase.

WARNING!
For your safety, the recommendations in this manual must be followed. To reduce the risk of fire or explosion, electric shock, or to prevent property damage, personal injury, or death when using your appliance, follow basic precautions, including the following.
Warranty Restriction: If the dryer is subjected to other than private family use, all warranty coverage is effective for only 90 days.
You will need the complete Model and Serial Number when requesting Warranty Service. Proof of purchase date is required.
Use the space below to record the model number and serial number of your new LG dryer.
Model No.
Serial No.
Date of Purchase
- Staple your receipt HERE.
LG Electronics Inc. will repair or at its option replace, without charge, your product if it proves to be defective in material or workmanship under normal use during the warranty period set forth below, effective from the date of original consumer purchase of the product. This limited warranty is good only to the original purchaser of the product and effective only when used in the United States including Alaska, Hawaii, and U.S. Territories.
WARRANTY PERIOD:
Labor: 2 Year from the Date of Purchase.
All Parts: 2 Year from the Date of Purchase.
Motor, Controller: 3 Year from the Date of Purchase.
Drum Tub : 5 Years from the Date of Purchase.
HOW SERVICE IS HANDLED:
Call1-888-542-2623(1-888-LG-CANADA)and choose the appropriate prompt. Please have product type (Dryer), model number, serial number, and Postcode ready.
The warranted 2-year of labor covers the cost of In-Home Service on all parts including the Drum Tub and Motor.
THIS WARRANTY IS IN LIEU OF ANY OTHER WARRANTYES, EXPRESS OR IMPLIED, INCLUDING WITHOUT LIMITATION, ANY WARRANTY OF MERCHANTABILITY OR FITNESS FOR A PARTICULAR PURPOSE. TO THE EXTENT ANY IMPLIED WARRANTY IS REQUIRED BY LAW, IT IS LIMITED IN DURATION TO THE EXPRESS WARRANTY PERIOD ABOVE. LG WILL NOT BE LIABLE FOR ANY CONSEQUENTIAL, INDIRECT, OR INCIDENTAL DAMAGES OF ANY KIND, INCLUDING LOST REVENUES OR PROFITS, IN CONNECTION WITH THE PRODUCT. SOME STATES DO NOT ALLOW LIMITATION ON HOW LONG AN IMPLIED WARRANTY LASTS OR THE EXCLUSION OF INCIDENTAL OR CONSEQUENTIAL DAMAGES, SO THE ABOVE LIMITATIONS OR EXCLUSIONS MAY NOT APPLY TO YOU.
THIS LIMITED WARRANTY DOES NOT APPLY TO:
- Service trips to your home to deliver, pick up, and/or install the product, instruct, or replace house fuses or correct wiring, or correction of unauthorized repairs; and
- Damages or operating problems that result from misuse, abuse, operation outside environmental specifications or contrary to the requirements or precautions in the Operating Guide, accident, vermin, fire, flood, improper Installation, acts of God, unauthorized modification or alteration, incorrect electrical current or voltage, or commercial use, or use for other than Intended purpose.
- Therefore, the cost of repair or replacement of such a defective product shall be borne by the consumer.
CUSTOMER INTER-ACTIVE CENTER NUMBERS:
| To Prove Warranty Coverage | Retain your Sales Receipt to prove date of purchase. A copy of your Sales Receipt must be submitted at the time warranty service is provided. |
| To Obtain Nearest Authorized Service Center or Sales Dealer, or to Obtain Product, Customer, or Service Assistance | Call 1-888-542-2623 (1-888-LG-CANADA) (Monday ~ Friday, 7 AM ~ 8 PM CT; and Saturday, 8 AM ~ 5 PM CT) and choose the appropriate prompt from the menu, and have your product type (Dryer), model number, serial number, and Postcode; or visit our website at http://www/lg.ca |