
WPG300T - Grill plate Waring Commercial - Free user manual and instructions
Find the device manual for free WPG300T Waring Commercial in PDF.

| Product Type | Double Grill/Panini Press |
| Model | WPG300T |
| Brand | Waring Commercial |
| Usage | Commercial |
| Power Supply | 240 V, 3200 W |
| Plate Dimensions | 43 cm x 23.5 cm |
| Plate Type | Ribbed plates (grill) |
| Plate Material | Cast Iron |
| Temperature Control | Adjustable Thermostat |
| Preheat Indicator Light | Yes, lights up when temperature reached |
| Timer | CAC124 (included), programmable up to 19:59 minutes |
| Grease Collection Tray | Removable, dishwasher safe |
| Cleaning Brush/Scraper | Included (CAC105) |
| Insulated Handles | Yes |
| Housing | Stainless Steel |
| Safety | Automatic shutdown in case of overheating |
| Grounding | Three-prong plug, temporary adapter possible |
| Maintenance | Clean warm plates with warm water and detergent, do not pour cold water |
| Warranty | 1 year against defects in material and workmanship |
| Country of Origin | United States (Waring Commercial, Torrington, CT) |
Frequently Asked Questions - WPG300T Waring Commercial
User questions about WPG300T Waring Commercial
0 question about this device. Answer the ones you know or ask your own.
Ask a new question about this device
Download the instructions for your Grill plate in PDF format for free! Find your manual WPG300T - Waring Commercial and take your electronic device back in hand. On this page are published all the documents necessary for the use of your device. WPG300T by Waring Commercial.
USER MANUAL WPG300T Waring Commercial
natural_image
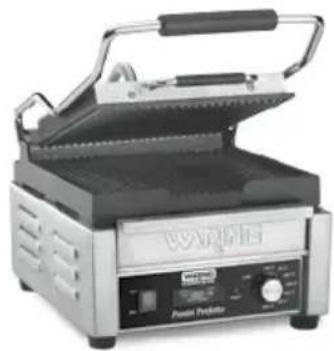
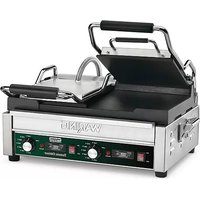
Exterior view of a stainless steel grating with open lid and control panel (no visible text or symbols)WPG300T
WFG300T/WDG300T
(not shown/ no ilustrado/ non illustré)
natural_image
Exterior view of a modern stainless steel grating with open lid (no visible text or symbols)WPG150T
WFG150T/WPG150TB
(not shown/ no ilustrado/ non illustré)

natural_image
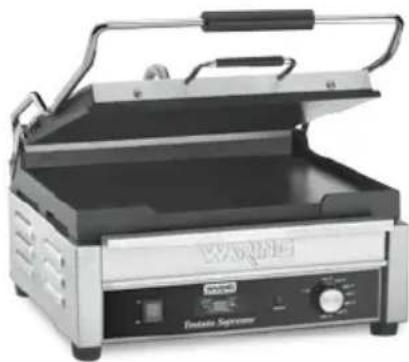
Exterior view of a stainless steel grating with open lid and control panel (no visible text or symbols)WPG250T
WFG250T/WDG250T/WPG250TB
(not shown/ no ilustrado/ non illustré)
natural_image
Exterior view of a portable stainless steel grating with open lid (no visible text or symbols)WFG275T
WDG275T/WPG275T
(not shown/ no ilustrado/ non illustré)
For your safety and continued enjoyment of this product, always read the instruction book carefully before using.
When using electrical appliances, basic safety precautions should always be followed, including the following:
- READ ALL INSTRUCTIONS.
- Unplug from outlet when not in use, before putting on or taking off parts and before cleaning.
- Always unplug from outlet prior to handling or cleaning.
- To protect against risk of electrical shock, do not put appliance in water or other liquids.
- This appliance is not intended for use by persons (including children) with reduced physical, sensory or mental capabilities, or lack of experience and knowledge, unless they have been given supervision or instruction concerning use of the appliance by a person responsible for their safety.
- Do not touch surfaces that may be hot. Use handles and knobs provided.
- Avoid contact with moving parts.
- Do not operate the Waring® Commercial Panini/Toasting Grill or any other electrical equipment with a damaged cord or plug, or after the unit malfunctions or is dropped or damaged in any manner. Return it to the nearest authorized service center for examination, repair, and/or adjustment.
- The use of attachments not recommended or sold by Waring may cause fire, electric shock, or injury.
- Do not use outdoors.
- Always check that the control is off before plugging cord into wall outlet. To disconnect, turn the control knob to OFF, then remove plug from wall.
- Do not place near a hot gas or electric burner or heated oven.
- Do not let cord hang over edge of table or counter, or touch hot surfaces.
- When ON, the Waring® Commercial Panini/Toasting Grill should always be on a stable countertop or table.
- Close supervision is necessary when any appliance is used by or near children.
- Do not use appliance for other than intended use.
SAVE THESE INSTRUCTIONS
APPROVED FOR COMMERCIAL USE
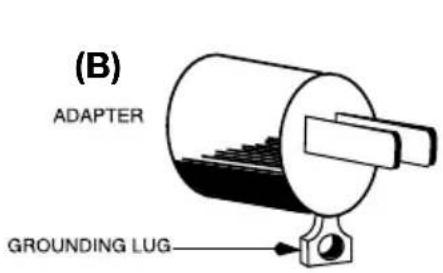
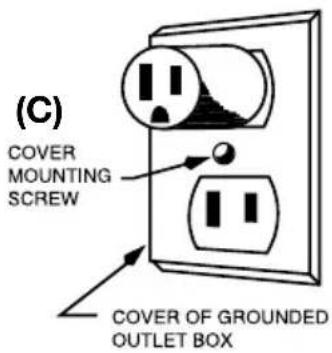
GROUNDING INSTRUCTIONS
This appliance must be grounded while in use to protect the operator from electrical shock. The appliance is equipped with a 3-conductor cord and 3-prong grounding-type plug to fit the proper grounding-type receptacle. The appliance has a plug that looks like the plug in drawing (A). An adapter, as in drawing (B), should be used for connecting the appliance plug to two-prong receptacles. The grounding tab that extends from the adapter must be connected to a permanent ground such as a properly grounded outlet box as shown in drawing (C) using a metal screw.
CAUTION: Before using an adapter, it must be determined that the outlet cover plate screw is properly grounded. If in doubt, consult a licensed electrician. Never use an adapter unless you are sure it is properly grounded.
NOTE: Use of an adapter is not permitted in Canada and Europe.


GROUNDING METHOD
The lightning flash with arrowhead symbol within an equilateral triangle is intended to alert the user to the presence of uninsulated dangerous voltage within the product's enclosure that may be of sufficient magnitude to constitute a risk of fire or electric shock to persons.

The exclamation point within an equilateral triangle is intended to alert the user to the presence of important operating and maintenance (servicing) instruction in the literature accompanying the appliance.
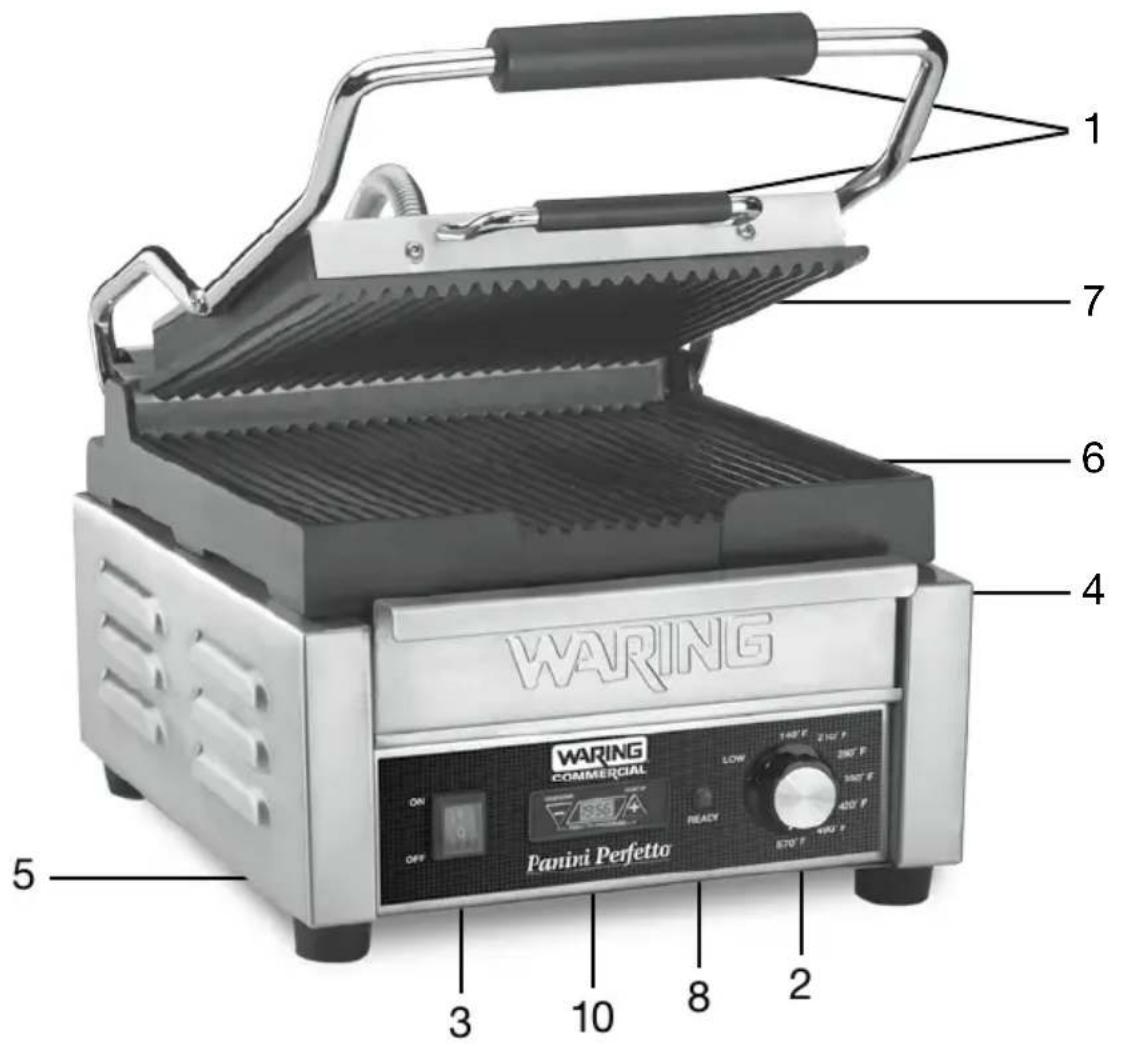
PARTS

natural_image
Close-up of a black textured brush with spiky texture, labeled with number 9 (no text or symbols on the brush itself)- Thermo-insulated handles
- Temperature dial
- ON/OFF power switch
- Removable drip tray
- Stainless steel housing
- Bottom grill plate (ribbed or flat)
- Top grill plate (ribbed or flat)
- Ready indicator light
- Cleaning brush/scraper
- Reprogrammable timer: CAC124
| Model Description Voltage Power | Cooking Surface | |||
| WPG150T | Compact Panini Grill with Ribbed Plates | 120 Volt | 1800 Watt | 9.75" x 9.25" |
| WFG150T | Compact Panini Grill with Flat Plates | 120 Volt | 1800 Watt | 9.75" x 9.25" |
| WPG150TB | Compact Panini Grill with Ribbed Plates | 208 Volt | 2400 Watt | 9.75" x 9.25" |
| WPG250T | Large Panini Grill with Ribbed Plates | 120 Volt | 1800 Watt | 14.5" x 11" |
| WPG250TB | Large Panini Grill with Ribbed Plates | 208 Volt | 2800 Watt | 14.5" x 11" |
| WFG250T | Large Panini Grill with Flat Plates | 120 Volt | 1800 Watt | 14.5" x 11" |
| WDG250T | Large Panini Grill with Ribbed Top and Flat Bottom Plates | 120 Volt | 1800 Watt | 14.5" x 11" |
| WFG275T | Full-Size Panini Grill with Flat Plates | 120 Volt | 1800 Watt | 14" x 14" |
| WPG275T | Full-Size Panini Grill with Ribbed Plates | 120 Volt | 1800 Watt | 14" x 14" |
| WDG275T | Full-Size Panini Grill with Ribbed Top and Flat Bottom Plates | 120 Volt | 1800 Watt | 14" x 14" |
| WPG300T | Double Panini Grill with Ribbed Plates | 240 Volt | 3200 Watt | 17" x 9.25" |
| WFG300T | Double Panini Grill with Flat Plates | 240 Volt | 3200 Watt | 17" x 9.25" |
| WDG300T | Double Panini Grill with Flat and Ribbed Plates | 240 Volt | 3200 Watt | 17" x 9.25" |
These panini grills are compatible with the CAC124 Reprogrammable Timer (included).
INSTRUCTIONS FOR USE
- Remove Waring® Commercial Panini/Toasting Grill from packaging.
- Place on a firm and stable surface.
- Remove all packaging and instruction book.
- Please read all instructions prior to first use.
- Keep this instruction book in a safe location for future reference.
-
It is highly recommended that you clean the plates before first use.
-
Warm up unit in closed position for 10 minutes. This will allow all oils and other sediment to burn off.
- After cleaning (see page 9), the Waring® Commercial Panini/Toasting Grill is ready for use.
- Turn unit on. Allow grill to warm up. Depending on size and model, this could take 10–25 minutes. The READY indicator light will illuminate once temperature is reached.
- Lift the handle to open panini grill.
- Carefully place food on bottom plate.
- F or double-sided cooking, push handle down; this will press top plate down on food and cook both sides simultaneously.
- For single-sided cooking, simply keep handle raised in open position.
REPROGRAMMABLE TIMER INSTRUCTIONS
Installation
The CAC124 Reprogrammable Timer can only be installed in Waring Commercial appliances that have the appropriate port compatible with the CAC124.
NOTE: Always be sure the appliance is unplugged and cool prior to installing or removing the reprogrammable timer.
-
Installing the batteries
-
Remove batteries from packaging
- Open battery box cover
• Install batteries as displayed on the inside of the battery box - Once batteries are properly secured, slide battery cover back into position until you hear a click and the cover is securely closed
-
Check timer to ensure power is supplied by pressing
-
Installing timer into the unit
-
Always be sure the appliance is unplugged and cool prior to installing the timer
- Insert timer into the port until side tabs lock into place
-
Your timer is now installed, operational and ready for use
-
Removing the reprogrammable timer
-
Always be sure that the appliance is unplugged and cool prior to removing the timer
- To remove the timer, place your fingers on the two tabs on
the sides of the timer and firmly depress while gently pulling towards you. This will release the timer unit.
- If you have trouble using your fingers, you may use a flat head screw driver to gently press tabs and pull the timer out of position. Always use caution when using a metal tool to remove the timer so that you do not cause harm to the timer, the appliance or yourself.
Programming the Timer
NOTE: The CAC124 Timer will not automatically shut off your unit. Once your programmed time has lapsed, the unit will beep 5 times and the screen will go blank.
Program Manually
To manually program the timer, hold both and at the same time for four seconds. The timer will beep twice. After the second beep, use the ▼ and ▲ to scroll to your desired time setting up to 19:59. HINT: For fast scroll, hold the button down until you’ve reached your desired time setting. The timer will automatically program the setting after five seconds. Now that you’ve programmed your time, you may press the ▼ button any time to start the timer. Once programmed, the timer will always default to the time setting until otherwise changed.
Program Using Count-Up Mode
Your reprogrammable timer allows you to program your time using count-up mode. This is convenient for when you need to first measure the time required to grill your sandwich before programming. Once you’ve started grilling, press the ⚠ button to start the timer. When you’ve finished grilling, press both ▼ and ⚠ to set the time. Once programmed, the timer will always default to this time setting until otherwise changed.
NOTE: When batteries are removed, the timer automatically defaults to the factory setting of 10 seconds.
SAFETY AND TROUBLESHOOTING
Please note that the Waring® Commercial Panini/Toasting Grill will be too hot to handle immediately after use.
The panini grill has a thermal cutoff safety device to avoid overheating. If panini grill shuts off automatically, unplug it and allow it to cool for 30 minutes in the open position. Plug back in and continue use.
CLEANING AND MAINTENANCE
For best results, your panini grill must be cleaned thoroughly after each use with warm soapy water. Daily buildup of sediment left over from cooking can affect the performance of the grill plates.
The Waring® Commercial Panini Grills come with a cleaning brush (CAC105). The cleaning brush features heavy-duty bristles for initial removal of sediment from the cast iron plates. The brush also features a scraper custom designed to clean in between the ribs as well as the flat surfaces.
The exterior of unit may be cleaned by carefully wiping with a damp cloth.
Clean plates while the unit is warm, using warm soapy water and the cleaning tool provided. DO NOT USE COLD WATER ON WARM PLATES.
To clean drip tray, carefully remove tray, wash with warm soapy water and dry, or you may place the tray in the dishwasher. Tray must be completely dry before putting back into the unit.
LIMITED ONE-YEAR WARRANTY
Waring warrants every new Waring® Commercial Panini Grill to be free from defects in material and workmanship for a period of one year from the date of purchase when used with foodstuffs, nonabrasive liquids (other than detergents) and nonabrasive semi-liquids, provided it has not been subject to loads in excess of the indicated rating. Under this warranty, Waring will repair or replace any part which, upon our examination, is defective in materials or workmanship, provided the product is delivered prepaid to the Waring Service Center at 314 Ella T. Grasso Ave. Torrington, CT 06790, or any Factory Approved Service Center. This warranty does not: a) apply to any product that has become worn, defective, damaged or broken due to use or due to repairs or servicing by other than the Waring Service Center or a Factory Approved Service Center, or due to abuse, misuse, overloading or tampering; or b) cover incidental or consequential damages of any kind. Warning: This warranty is void if appliance is used on Direct Current (DC).
WARING COMMERCIAL 314 Ella T. Grasso Ave. Torrington, CT 06790
ADVERTENCIA
natural_image
Close-up of a black textured brush with spiky texture, labeled with number 9 (no text or symbols on the brush itself)AVERTISSEMENT
RISQUE D'INCENDIE OU DE CHOC ÉLECTRIQUE – NE PAS OUVRIR

AVERTISSEMENT: AFIN D'ÉVITER LES RISQUES D'INCENDIE OU D'ÉLECTROCUTION, NE PAS OUVRIR LE BOÎTIER DE L'APPAREIL. CET APPAREIL NE CONTIENT AUCUNE PIÈCE POUVANT ÊTRE RÉPARÉE PAR L'UTILISATEUR. TOUTE RÉPARATION DOIT ÊTRE EFFECTUÉE PAR UN TECHNICIEN AUTORISÉ.
MÉTHODE DE MISE À LA TERRE

natural_image
Close-up of a black textured brush with spiky texture, labeled with number 9 (no text or symbols on the brush itself)GARANTIE LIMITÉE D'UN AN
©2013 Waring Commercial
314 Ella T. Grasso Avenue
Torrington, CT 06790
www.waringcommercialproducts.com
Printed in China
Impreso en la China
Imprimé en Chine
13WC139154
WFG/WPG/WDG Timer Series IB

- SAVE THESE INSTRUCTIONS
- APPROVED FOR COMMERCIAL USE
- GROUNDING INSTRUCTIONS
- GROUNDING METHOD
- PARTS
- INSTRUCTIONS FOR USE
- REPROGRAMMABLE TIMER INSTRUCTIONS
- Installation
- Programming the Timer
- Program Manually
- Program Using Count-Up Mode
- SAFETY AND TROUBLESHOOTING
- CLEANING AND MAINTENANCE
- LIMITED ONE-YEAR WARRANTY
- ADVERTENCIA
- AVERTISSEMENT
- MÉTHODE DE MISE À LA TERRE
- GARANTIE LIMITÉE D'UN AN
Brand : Waring Commercial
Model : WPG300T
Category : Grill plate