
SN74016 - Snow blower Earthwise - Free user manual and instructions
Find the device manual for free SN74016 Earthwise in PDF.
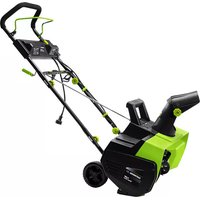
| Product Type | Cordless Snow Blower |
| Brand | Earthwise |
| Model | SN74016 |
| Rated Voltage | 40 V DC |
| Battery Type | Lithium-ion 40 V, 4 Ah |
| Charge Time | 2.5 hours |
| Runtime | 25 to 40 minutes |
| No-Load Speed | 2,000 RPM |
| Clearing Width | 406 mm (16 in) |
| Max Clearing Depth | 200 mm (8 in) |
| Max Throwing Distance | 9.75 m |
| Clearing Capacity | 136 kg/min |
| Weight | 8.8 kg |
| Motor | Brushless, 40 V |
| Wheels | 2 wheels with hubcaps |
| Auger | Rubber blades |
| Chute Direction | By adjustment knob |
| Auxiliary Handle | Yes, height adjustable |
| Safety Devices | Unlock button + trigger |
| Battery Indicator | 3-level LED |
| Protection | Overcurrent, temperature |
| Charger Included | Yes (model CHL80040) |
| Warranty | 2-year limited |
| Certifications | Intertek, FCC Class B |
Frequently Asked Questions - SN74016 Earthwise
User questions about SN74016 Earthwise
0 question about this device. Answer the ones you know or ask your own.
Ask a new question about this device
Download the instructions for your Snow blower in PDF format for free! Find your manual SN74016 - Earthwise and take your electronic device back in hand. On this page are published all the documents necessary for the use of your device. SN74016 by Earthwise.
USER MANUAL SN74016 Earthwise
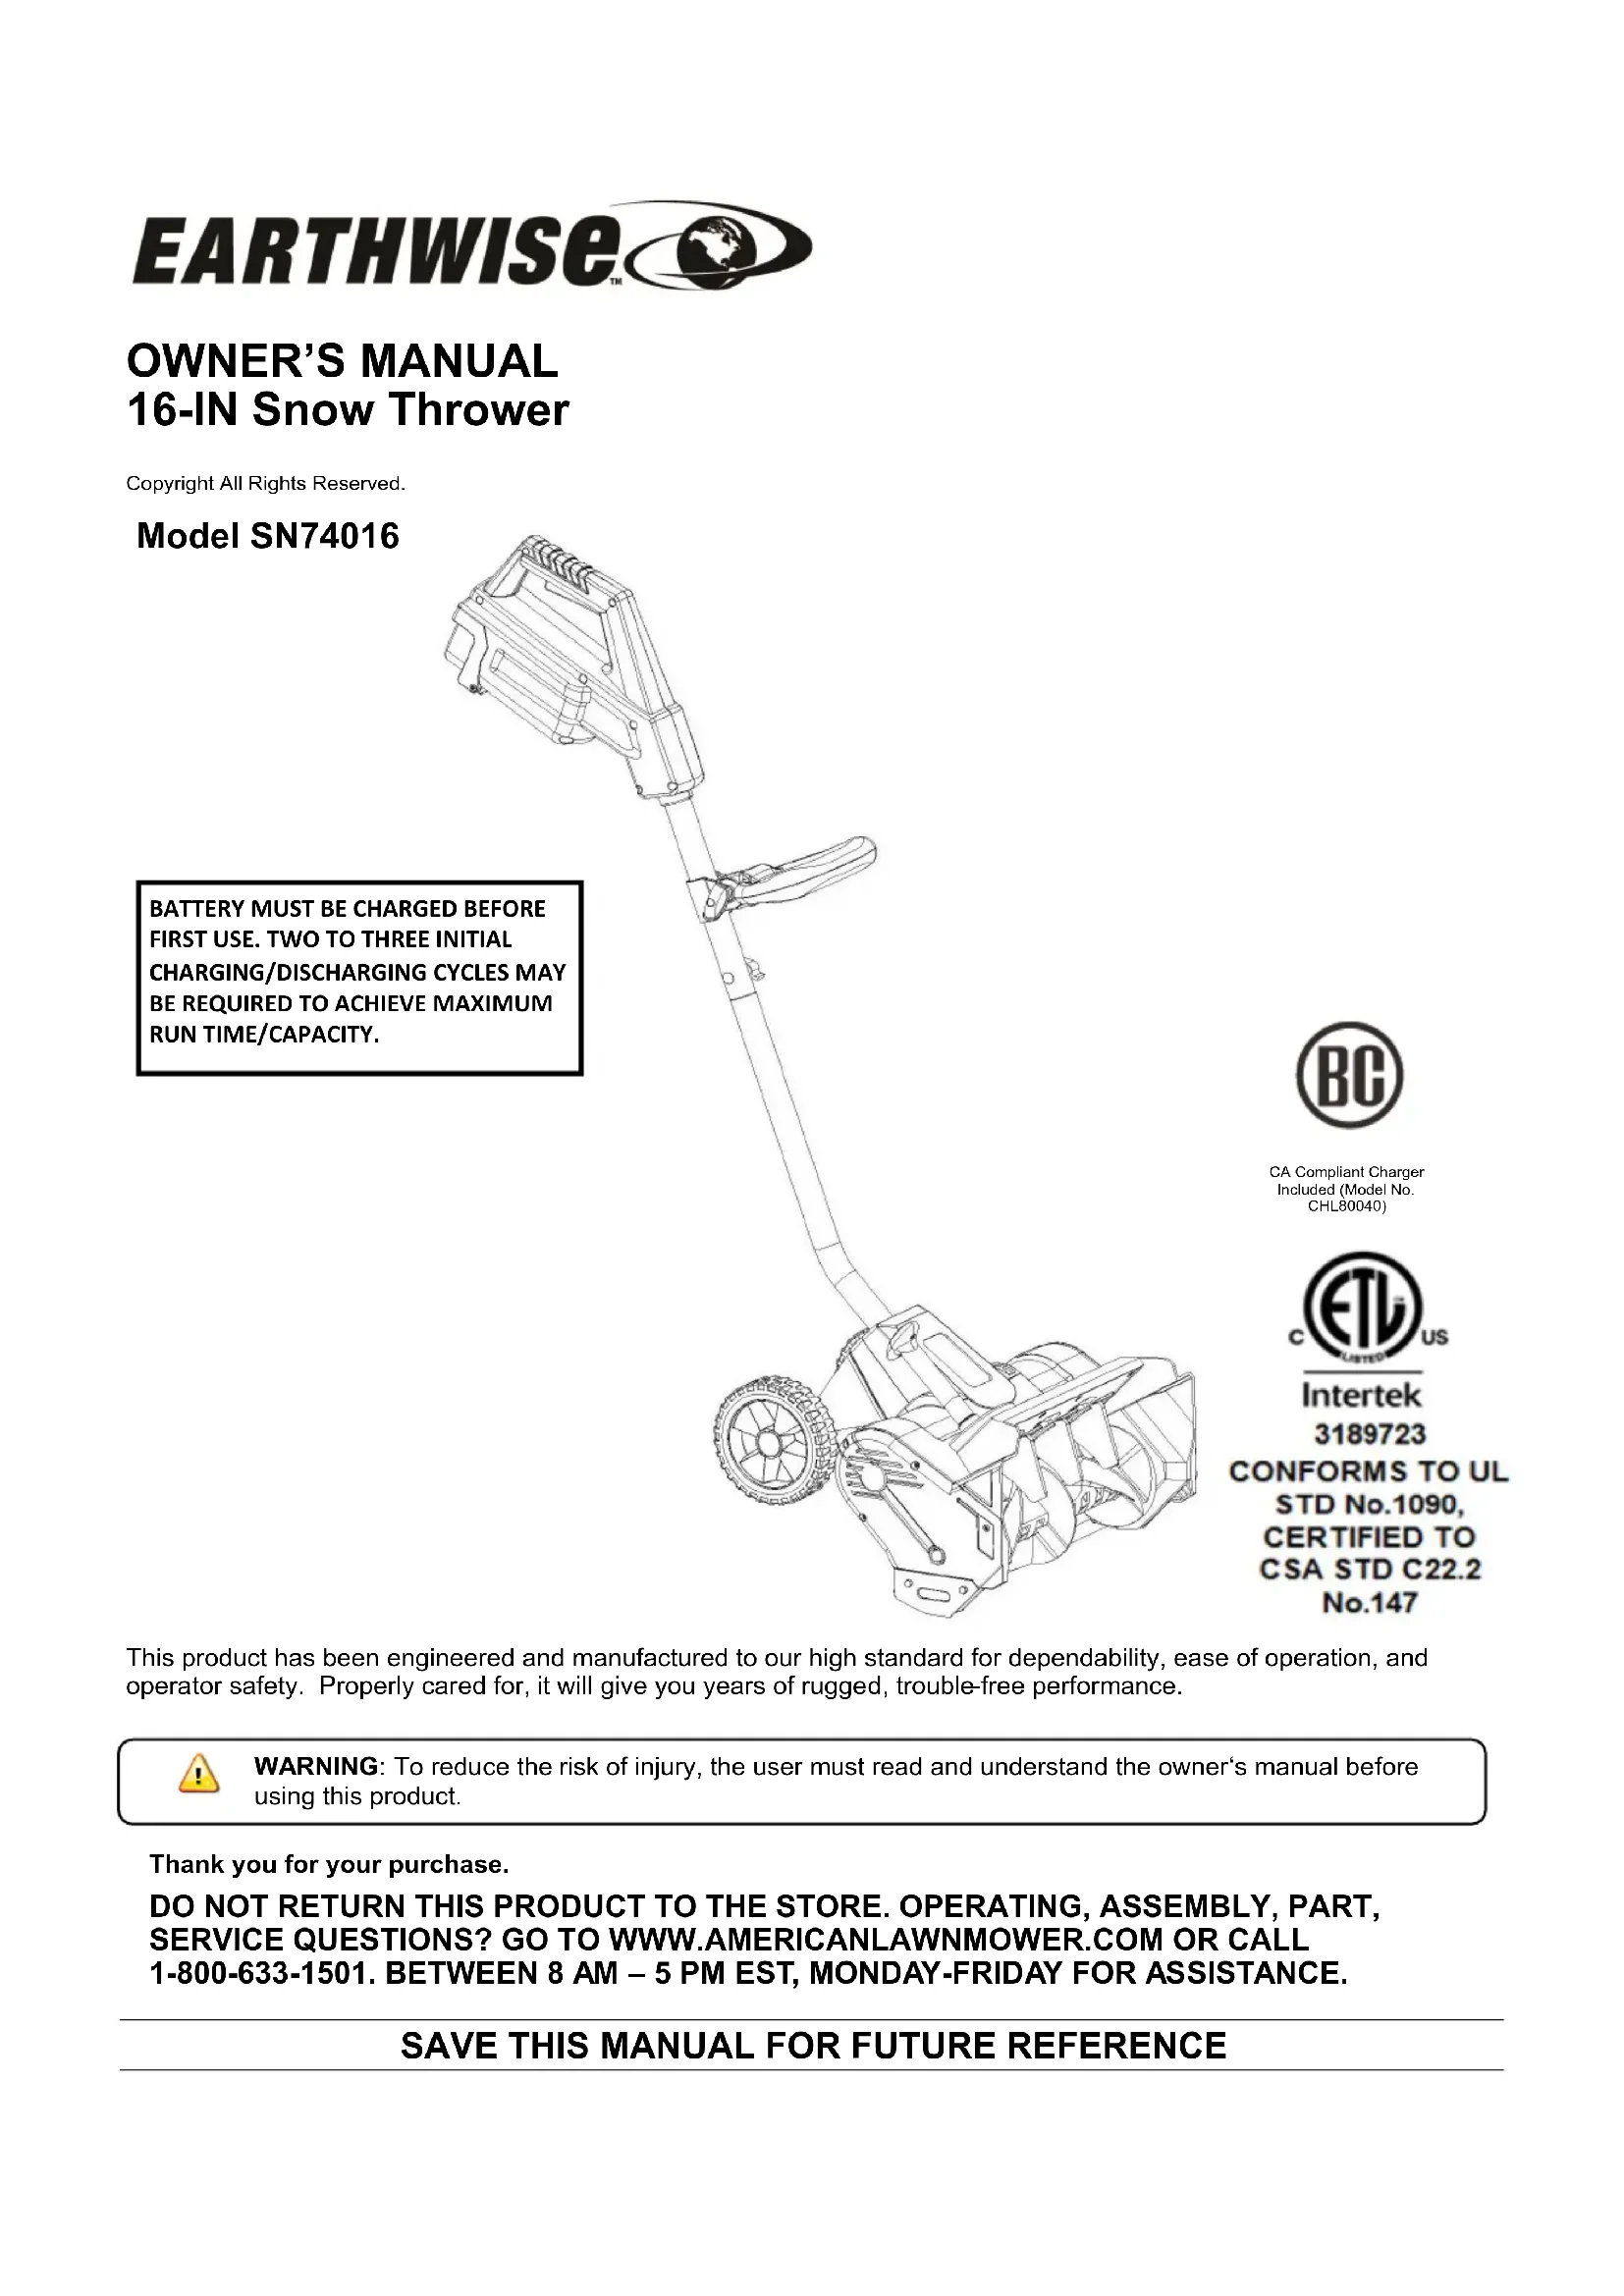
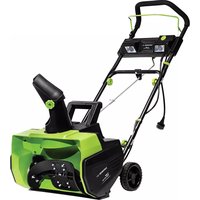
OWNER'S MANUAL 16-IN Snow Thrower
Copyright All Rights Reserved.
Model SN74016
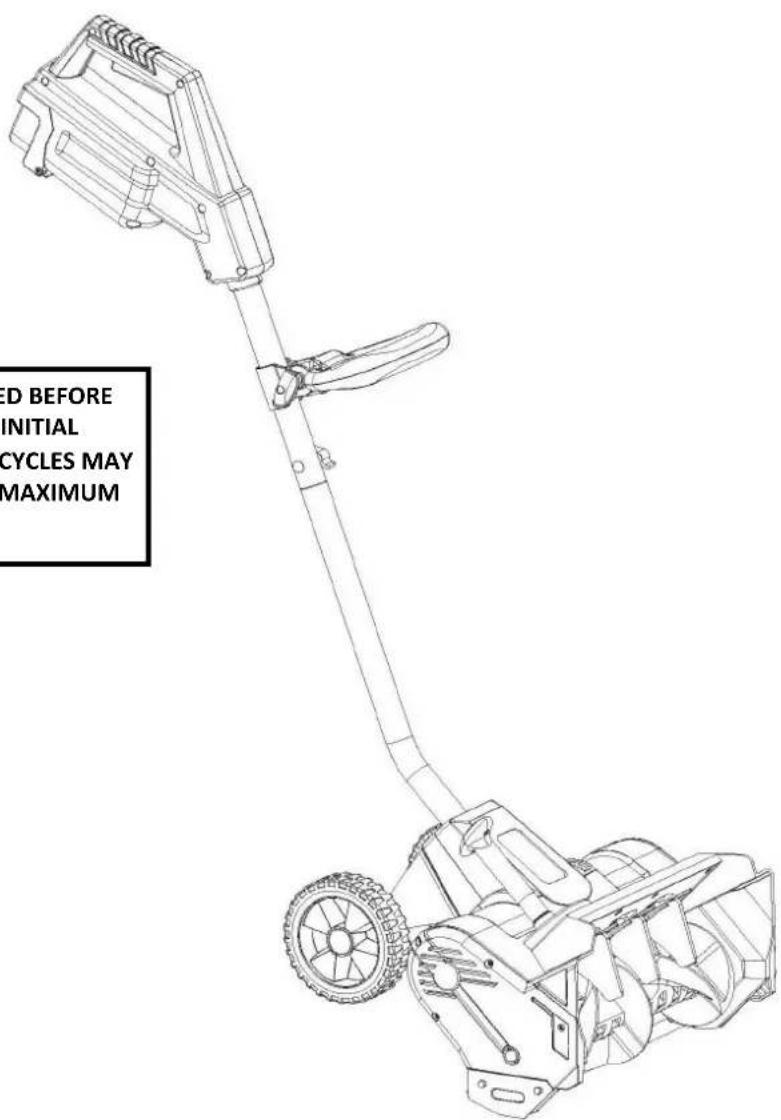
BATTERY MUST BE CHARGED BEFORE FIRST USE. TWO TO THREE INITIAL CHARGING/DISCHARGING CYCLES MAY BE REQUIRED TO ACHIEVE MAXIMUM RUN TIME/CAPACITY.

CA Compliant Charger Included (Model No. CHL80040)

Intertek 3189723 CONFORMS TO UL STD No.1090, CERTIFIED TO CSA STD C22.2 No.147
This product has been engineered and manufactured to our high standard for dependability, ease of operation, and operator safety. Properly cared for, it will give you years of rugged, trouble-free performance.

WARNING: To reduce the risk of injury, the user must read and understand the owner's manual before using this product.
Thank you for your purchase.
DO NOT RETURN THIS PRODUCT TO THE STORE. OPERATING, ASSEMBLY, PART, SERVICE QUESTIONS? GO TO WWW.AMERICANLAWNMOWER.COM OR CALL 1-800-633-1501. BETWEEN 8 AM – 5 PM EST, MONDAY-FRIDAY FOR ASSISTANCE.
SAVE THIS MANUAL FOR FUTURE REFERENCE
SYMBOLS
Some of the following symbols may be used on this product. Please study them and learn their meaning. Proper interpretation of these symbols will allow you to operate the product better and safer.

Precautions that involve your safety.

CAUTION! Read the instruction manual and follow the warning and safety instructions!

CAUTION! Remove plug from outlet immediately if the cable is damaged or cut.

CAUTION! Always wear eye and ear protection.

Wear safe, sturdy, nonskid footwear!

DANGER! objects may be thrown out at high speed when motor is running. Do not walk in front of running machine.

Keep bystanders at a safe distance.

DANGER! Rotating auger. Keep hands and feet at a safe distance.

Do not place hand under auger.

Do not place hand in front of chute deflector.

Do not place feet under auger.

DANGER! Risk of electric shock.

Do not use in rain or electrical storms.
Waste electrical products should not be disposed of with household waste. Please recycle where facilities exist. Check with your Local Authority or retailer for recycling advice.

IMPORTANT SAFETY WARNINGS


TO REDUCE RISK OF INJURY: Before any use be sure everyone using this product reads and understands all safety instructions and other information contained in this manual.

CAUTION: Wear appropriate personal hearing protection during use. Under some conditions and duration of use, noise from this product may contribute to hearing loss.
Save these instructions and review frequently prior to use and in instructing others.

WARNING: When using electric appliances, basic safety precautions should always be followed to reduce risk of fire, electric shock, and personal injury, including the following:
READ ALL INSTRUCTIONS
GENERAL SAFETY
CHECK FOR DAMAGED PARTS - Before further use of the product, any part that is damaged should be carefully checked to determine that it will operate properly and perform its intended function. Check for alignment of moving parts, binding of moving parts, breakage of parts, mounting and any other condition that may affect its operation. Any part that is damaged should be properly repaired or replaced. For assistance call our customer service help line at 1-800-633-1501.
AVOID DANGEROUS ENVIRONMENTS - Don't use this product in rainy or stormy conditions. Do not operate in gaseous or explosive atmospheres. Motors in these products normally spark, and the sparks might ignite fumes.
KEEP CHILDREN AWAY - All visitors, children and pets should stay at a safe distance from the work area.
DRESS PROPERLY- Don't wear loose clothing or jewelry and wear protective hair covering to contain long hair. They can be caught in moving parts.
Wear rubber boots when operating the snow thrower. Maintain good footing at all times, especially on slopes.
USE SAFETY GLASSES - Wear safety glasses with side shields or goggles that are marked to comply with ANSI Z87.1 standard when operating this product.

WARNING: Keep hands away from moving parts. Never put your hands near the auger to remove snow, sticks or other debris. Blocked auger can "spring back" when cleared and may cause personal injury even when the snow thrower is stopped. Always use a wooden stick such as a broom handle to clear blockages.
REMOVE THE BATTERY from the snow thrower when not in use or when servicing or cleaning. Do not leave unattended.
USE RIGHT APPLIANCE - Do not use this product for any job except that for which it is intended.
Avoid Accidental Starting—Don't carry snow thrower with finger on switch when the battery is installed. Be sure switch is off when installing battery.
DO NOT FORCE SNOW THROWER - It will perform better and safer at the rate for which it was designed.
DON'T OVERREACH - Guide the snow thrower at a walking pace only. Keep proper footing and balance at all times.
LIGHTING - Only operate your snow thrower in daylight or good artificial light.
STORE IDLE UNIT INDOORS-When not in use, the snow thrower should be stored indoors in a dry area out of children's reach.
MAINTAIN UNIT WITH CARE-Keep clean for best performance and to reduce the risk of injury. Keep handles dry, clean and free from oil.
Do not operate the snow thrower on a slope that is too steep for safe operation. When on slopes, slow down and make sure you have good footing.
Before starting the snow thrower make sure the auger is not touching any object and is free to move.
Do not use on graveled surface unless the snow thrower is adjusted for such a surface in accordance with the owner's manual.
Operation of the show thrower in the hand-held position is unsafe, except in accordance with the special instructions for such use provided in the owner's manual.

CAUTION: Never throw snow towards people, pets or cars and never allow anyone in front of the snow thrower while in operation.
Objects that might clog the snow thrower or cause other damage can be hidden in the snow. Clear the area of doormats, sleds, boards, wires and other debris prior to use.
If the auger strikes a foreign body, examine the snow thrower for signs of damage and make any necessary repairs before restarting and continuing to work.
STAY ALERT - Watch what you are doing. Use common sense. Do not operate the snow thrower when you are tired or under the influence of drugs, alcohol or medications.
GENERAL SAFETY
If the snow thrower starts to vibrate abnormally, turn it off immediately and check for the cause. Vibration is generally a warning of trouble.
Always turn off the snow thrower, remove the battery from the snow thrower and wait until the auger comes to a complete stop before carrying out maintenance or repairs.

CAUTION: Auger does not stop immediately after the snow thrower is turned off.
CAUTION: Risk of injury. Do not put hands, feet or any body part or clothing near the rotating auger.

WARNING: California Proposition 65: This product contains chemicals known to the State of California to cause cancer, birth defects or other reproductive harm.

WARNING: Cancer and Reproductive Harm - www.P65Warnings.ca.gov.
SAFETY RULES FOR CHARGER
Do not abuse the cord. Never use the cord for carrying, pulling or unplugging the power tool. Keep cord away from heat, oil, sharp edges or moving parts. Damaged or entangled cords increase the risk of electric shock.
Use of an attachment not recommended or sold by the battery charger manufacturer may result in a risk of fire, electric shock, or injury to persons. Following this rule will reduce the risk of electric shock, fire, or serious personal injury.
Do not service snow thrower with battery, switch key, or charger installed.
Do not use the charger when the ambient temperature is above 37.8°C (100°F) or below 0°C (32°F)
Do not operate charger with a damaged cord or plug which could cause shorting and electric shock. If damaged, replace the charger with an identical charger.
Do not operate charger if it has received a sharp blow, been dropped or otherwise damaged in any way. Take it to a qualified individual for electrical check to determine if the charger is in good working order. Unplug charger from outlet before attempting any maintenance or cleaning to reduce the risk of electric shock.
Disconnect charger from the power supply when not in use to prevent damage to the charger during a power surge.
Risk of electric shock, Do not touch uninsulated portion of output connector or uninsulated battery terminal.
Do not expose charger to wet or damp conditions, Water entering charger will increase the risk of electric shock.
Make sure cord is located so that it will not be stepped on, tripped over, come in contact with sharp edges or moving parts or otherwise subjected to damage or stress. This will reduce the risk of accidental falls, which could cause injury and damage to the cord, which could result in electric shock.
Keep cord and charger away from heat to prevent damage to housing or internal parts.
Do not let gasoline, oils, petroleum-based products, etc. come in contact with plastic parts. They contain chemicals that can damage, weaken or destroy plastic.
An extension cord should not be used unless absolutely necessary. Use of improper extension cord could result in a risk of fire and electric shock.
If extension cord must be used, make sure:
a. That pins on plug of extension cord are the same number, size and shape as those of plug on charger
b. That extension cord is properly wired and in good condition; and
c. That wire size is large enough for AC ampere rating of charger as specified below:
Cord length (Feet) - 25' 50' 100'
Cord Size (AWG) - 16 16 16
NOTE: AWG= American Wire Gauge
Save these instructions. Refer to them frequently and use them to instruct others who may use this product. If you loan someone this snow thrower, loan them these instructions also.

WARNING: Keep all connections dry and off the ground. Do not touch plug with wet hands.

FCC WARNING:
Please note that changes or modifications to this product not expressly approved by the party responsible for compliance could void the user's authority to operate the equipment.
NOTE: This equipment has been tested and found to comply with the limits for a Class B digital device, pursuant to Part 15 of the FCC Rules. These limits are designed to provide reasonable protection against harmful interference in a residential installation. This equipment generates, uses and can radiate radio frequency energy and, if not installed and used in accordance with the instructions, may cause harmful interference to radio communications. However, there is no guarantee that interference will not occur in a particular installation. If this equipment does cause harmful interference to radio or television reception, which can be determined by turning the equipment off and on, the user is encouraged to try to correct the interference by one or more of the following measures:
-- Reorient or relocate the receiving antenna.
-- Increase the separation between the equipment and receiver.
-- Connect the equipment into an outlet on a circuit different from that to which the receiver is connected.
-- Consult the dealer or an experienced radio/TV technician for help.
PRODUCT SPECIFICATIONS
Model: SN74016
Input: 40V, DC only
Battery: 40V, 4.0 Ah Lithium-ion
Charging time: 2.5 hours
Battery run time: 25-40 minutes
Speed: 2000 RPM
Sweep width: 16 inches (406 mm)
Max clearing depth: 8 inches (200 mm)
Throwing distance: Up to 32 feet
Clearing capacity: 300 pounds/minute
Weight: 19.4 pounds
PACKING LIST
UNPACKING
This product requires assembly.
Carefully remove the product from the box. Make sure that all items listed in the packing list are included.
Inspect all items carefully to make sure no breakage or damage occurred during shipping.
Do not discard the packing material until you have carefully inspected and satisfactorily operated the snow thrower.
If any parts are damaged or missing please call our customer service help line at 1-800-633-1501 for assistance.
| QTY | DESCRIPTION |
| 1 | Snow Thrower |
| 1 | Lower & Upper Handle |
| 1 | M6x45 Carriage Bolt & Wing Nut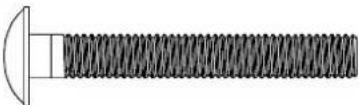 |
| 4 | ST4.2x30 Philips Head Self Tapping Screw |
| 1 | Adjust Knob |
| 1 | ST4.0x50 Philips Head Self Tapping Screw |
| 1 | Adjust Knob Cover |
| 1 | Wheel Bracket |
| 2 | Wheel |
| 2 | Wheel Cover |
| 2 | ST3.9x45 Philips Head Self Tapping Screw |
| 2 | ST3.9x55 Philips Head Self Tapping Screw |
| 1 | Auxiliary Handle |
| 1 | M6x50 Hex Head Bolt & Wing Nut |
| 1 | Owner's Manual |
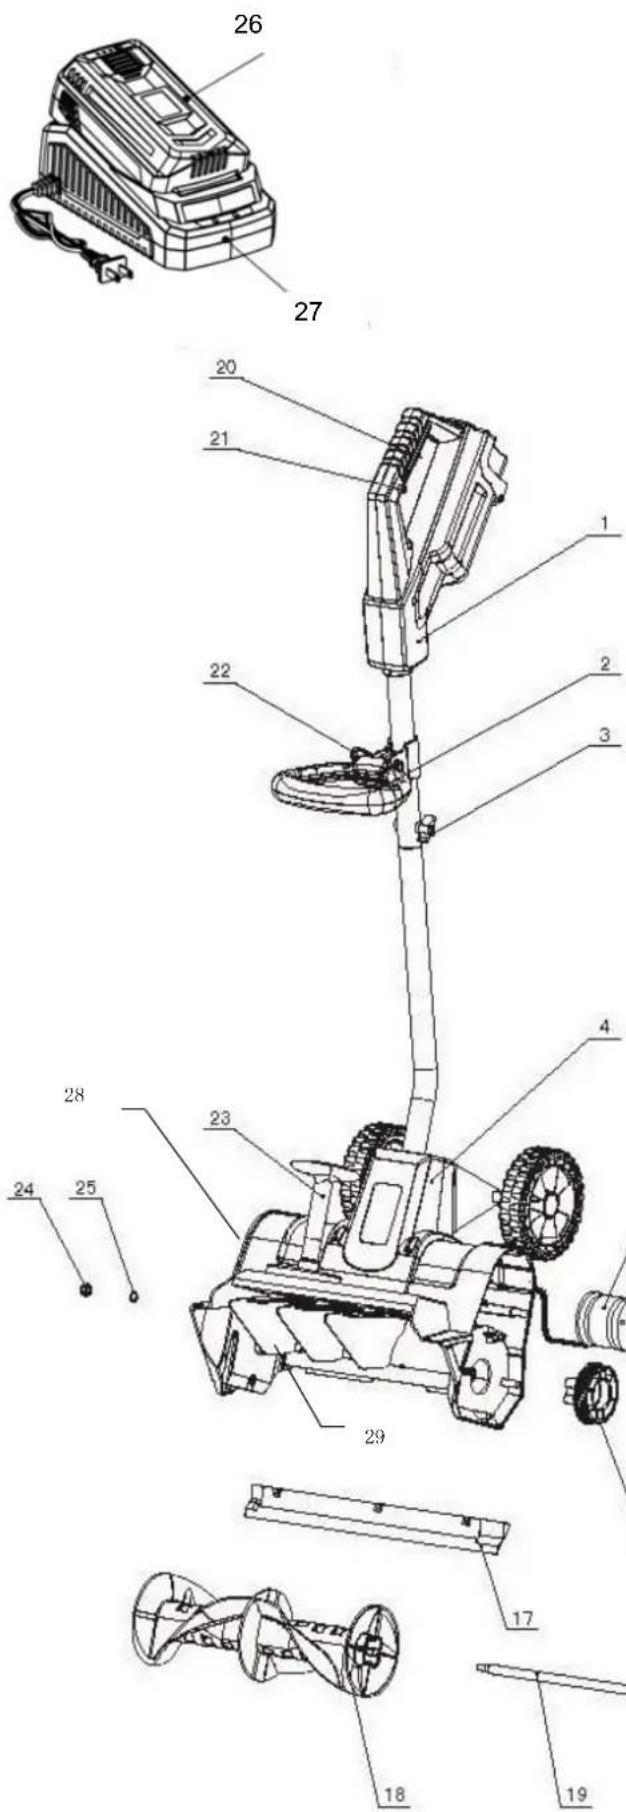
PARTS LIST
| Pos. | Description Qty | |
| 1 | Handle 1 | |
| 2 | Auxiliary handle 1 | |
| 3 | Wing nut (M6x45 Carriage Bolt) | 1 |
| 4 | Upper Cover 1 | |
| 5 | Motor 1 | |
| 6 | Drive belt 1 | |
| 7 | Wiring trough 1 | |
| 8 | Left cover plate Assembly 1 | |
| 9 | Small pulley 1 | |
| 10 | M8 Nut 1 | |
| 11 | Left side plate 1 | |
| 12 | Drive pulley 1 | |
| 13 | Fix Plate 1 | |
| 14 | Washer | 1 |
| 15 | Bolt M5x12 | 1 |
| 16 | Friction plate | 2 |
| 17 | Scraper blade | 1 |
| 18 | Auger | 1 |
| 19 | Auger axle | 1 |
| 20 | Trigger Switch | 1 |
| 21 | Safety lock off button | 1 |
| 22 | Wing nut (M6 x 50 Hex Hd. Bolt) | 1 |
| 23 | Adjusting knob | 1 |
| 24 | Acorn nut M8 1 | |
| 25 | Steel wave washer | 1 |
| 26 | Battery | 1 |
| 27 | Charger | 1 |
| 28 | Motor Housing | 1 |
| 29 | Baffle 3 |

ASSEMBLY
This product must be correctly assembled before use.
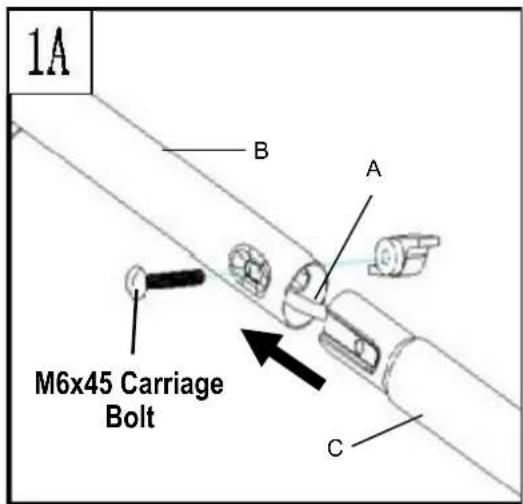
Handle (Fig. 1A)
Slide the lower section (C) into the upper section (B). Line up the holes on each tube, and make sure the cable (A) is clear of the mounting holes. Secure the two sections together with the M6x45 carriage bolt and wing nut.
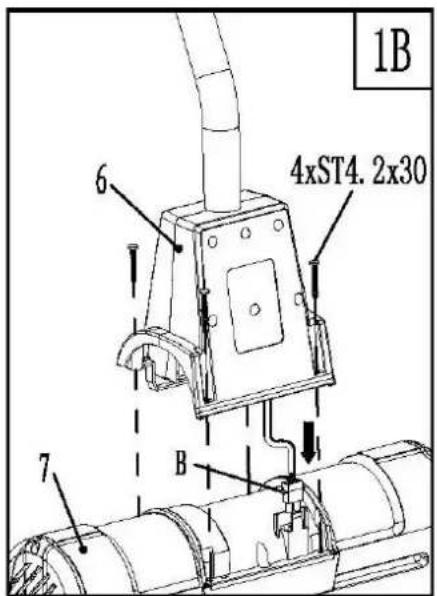
Motor housing (Fig. 1B)
Remove the plug guard and connect socket (B) on the upper cover (6) to the plug on the motor housing (7). Secure the upper cover to the motor housing with the ST4.2 x 30 Philips head self tapping screws.
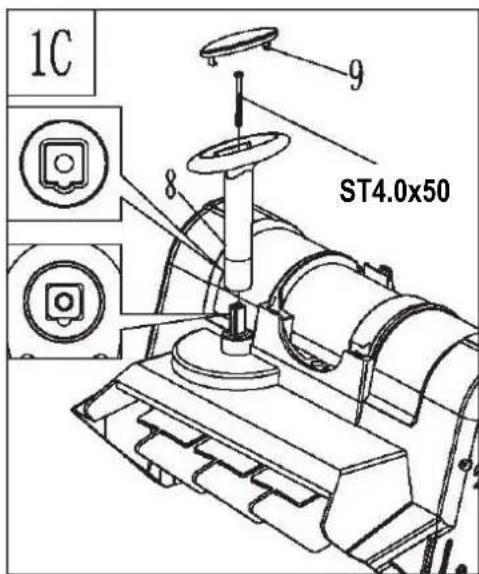
Align the rib on the spindle with the notch on the adjusting knob and push the adjusting knob onto the spindle. Secure the knob with the ST4.0x50 Philips head self tapping screw. Place the adjust knob cover onto the top and push to secure into place.
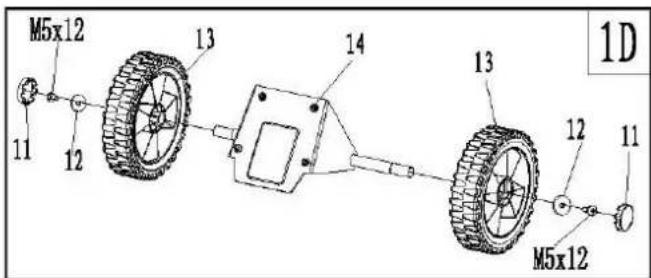
Wheel (Fig. 1D)
Remove the screws and washers from the wheel bracket. Install the wheels (13) and secure into place with the washers and M5 x 12 screws. Push wheel covers into place.
ASSEMBLY
Wheel bracket (Fig. 1E)
Align the holes on the wheel bracket with the holes on the upper cover. Secure into place with ST3.9x45 Philips head self tapping screws in the two (2) top holes and the ST3.9x55 Philips head self tapping screws in the two (2) bottom holes.

Auxiliary handle (Fig. 2)
Position the auxiliary handle so that the holes are in alignment with the holes in the handle support bracket. Insert the M6X50 hex head bolt into the hex shaped bolt hole of the bracket. Secure by tightening the wing nut onto the bolt.
Loosen the wing nut and adjust the angle and height of the handle to a safe and comfortable position. Secure into place by tightening the wing nut onto the bolt.

OPERATING
This snow thrower is intended to be used to sweep snow from sidewalks, steps, patios, decks and other hard flat surfaces such as paved driveways. Use it only on hard, flat surfaces free of sand, stone and debris, wires or any other objects. The manufacturer is not liable for any damage or injury resulting from misuse.
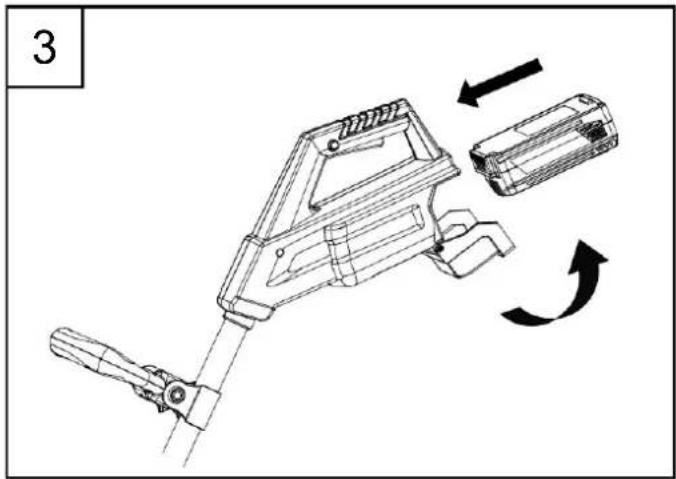
Install battery
Open the battery compartment cover and slide the battery down until it clicks to lock it into position, then close the battery department cover (Fig. 3)
natural_image
Technical line drawing of a mechanical device with directional arrows indicating motion (no text or symbols)OPERATING
On/Off Switch (Fig. 4)

WARNING: The auger starts rotating immediately after the snow thrower is switched on. Keep hands and feet away from the auger.
To switch ON, hold the snow thrower firmly with two hands, make sure the auger is not touching any surface and press the Safety Lock Off Button (2) while squeezing the On/Off trigger switch (3).
Once the snow thrower is started you can release the Safety Lock Off Button.
To switch Off simply release the trigger.

Removing snow

WARNING: Before starting work, make sure that the area to be cleared is free of stones, debris, wires and any other objects.
Make sure all fasteners on the snow thrower (screws, nuts, etc.) are fully tightened.
Check the auger for wear and tear at regular intervals.
Position the snow thrower so that snow will discharge in a safe direction away from the operator and bystanders.
Clear snow often, before it gets too deep. It is best to remove the snow as soon as possible after it falls.
Lift the auger up slightly before starting the snow thrower.
Switch on and tilt the snow thrower forward until the scraper blade contacts the ground. Push the snow thrower forward at a comfortable rate of speed, yet slow enough to clear the path completely. The width and depth of the snow determines your forward speed.
Pull up and turn the adjusting knob to direct the snow to the right or to the left. For the most efficient snow removal, throw the snow downwind and slightly overlap each swath. (Fig. 5)
The snow thrower can remove up to 8" deep in one pass.

When clearing deeper drifts, hold the snow thrower by the upper and lower handles and use a swinging or sweeping motion. Shave off the top layer and make multiple passes. (Fig. 6).

OPERATING
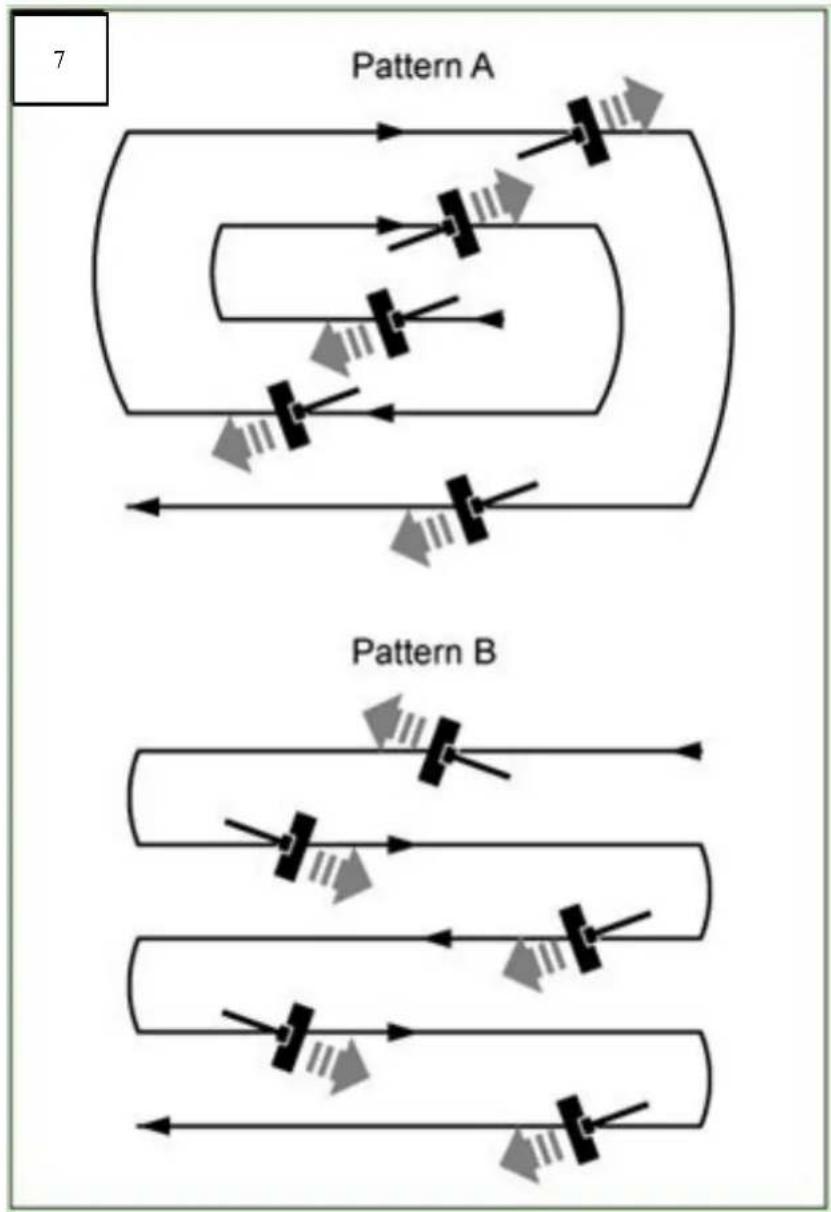
For large areas a definite pattern of operation is required to thoroughly clean an area of snow. These patterns will avoid throwing snow in unwanted places as well as eliminating a second removal of snow. (Fig. 7)
Pattern A: Throw the snow to the right or left side where it is possible. For areas such as a long driveway it is advantageous to start in the middle. Plow from one end to the other, throwing snow to both sides.
Pattern B: If the snow can only be thrown to one side of the area to be cleared, start on the opposite side.
Scraping the snow all the way down to the pavement will wear out the scraper and auger. To protect these parts, one or two inches of snow can be left behind and cleared
with de-icing salt or a shovel.
After clearing the snow, continue to run the snow thrower for a few minutes to prevent ice from freezing on moving parts. Then switch off the motor, wait for all moving parts to stop, remove the battery pack, and wipe the ice and snow from the snow thrower with a clean rag.

WARNING: To avoid serious personal injury, do not use hands or feet to unclog the chute.
Your lithium snow thrower is equipped with overcurrent protection. When the current reaches a certain pre-determined level, the unit will automatically slow down until the current drops. When the current drops to a safe level, the snow thrower will resume normal operation.
flowchart
graph TD
    subgraph Pattern_A
        A1["Component 1"] --> A2["Component 2"]
        A3["Component 3"] --> A4["Component 4"]
        A5["Component 5"] --> A6["Component 6"]
        A7["Component 7"] --> A8["Component 8"]
        A9["Component 9"] --> A10["Component 10"]
    end
    subgraph Pattern_B
        B1["Component 1"] --> B2["Component 2"]
        B3["Component 3"] --> B4["Component 4"]
        B5["Component 5"] --> B6["Component 6"]
        B7["Component 7"] --> B8["Component 8"]
        B9["Component 9"] --> B10["Component 10"]
    end
MAINTENANCE AND STORAGE
Before carrying out maintenance operations, remove the battery pack.
Regular cleaning and maintenance of your snow thrower will ensure efficiency and prolong the life of the product.
After each use, take apart and clean out the ice and debris from the ventilator and its slots, the auger and the housing.
Only use a cloth soaked with hot water and a soft brush to clean the snow thrower. Never wet or spray water on the machine!
Do not use detergents or solvents as these could cause irreparable damage to the snow thrower. Chemicals can destroy the plastic parts.
To protect the snow thrower from corrosion when storing for long periods, lightly oil the metal parts.
Store the appliance in a dry area out of reach of children.
For the user's safety, worn or damaged parts must be replaced. Replace with original replacement parts only. Parts from another snow thrower may not fit properly causing an unsafe situation.
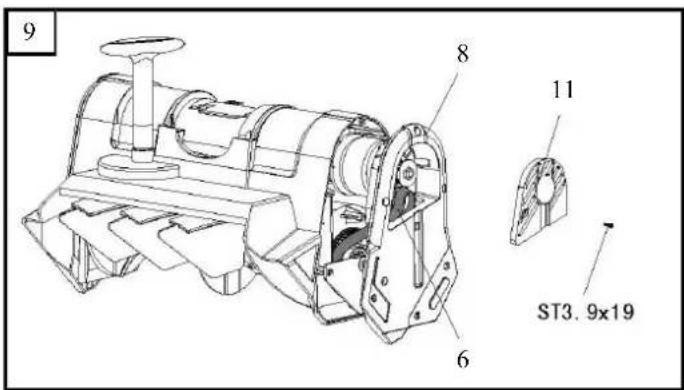
Changing the belt (Fig. 8, 9, 10, 11, 12)
-
Remove friction plate (16) and loosen left side cover (8) from main body. (Fig. 8)
-
Remove the side plate (11) from the left plate cover (8). (Fig. 9)

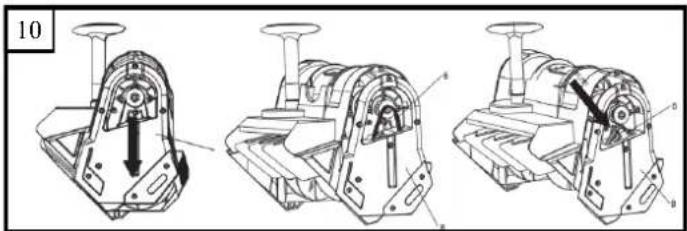
- Move the left plate cover (8) downward to loosen the belt (6). Remove the belt (6) from the wheel and push it down through the slot in the left plate cover (8). (Fig. 10)
- Turn the left plate cover (8) counterclockwise to expose fix plate (13). Remove M5x12 bolt, washer (14), fix plate (13), and then remove the belt (6).


- Replace worn belt with new belt and install the fix plate (13), left side cover (8), side plate (11), and friction plate (16) by following the above steps in reverse order.
MAINTENANCE AND STORAGE
Auger (Fig. 8, 13)

CAUTION Check fasteners before each use. A loose auger can result in excessive vibration and damage the snow thrower.
To replace the auger:
- Remove cover (8) and friction plate (16). Remove bolt (15), washer (14), fix plate (13), and drive belt (6).
- Loosen the nut (24) from the other side of the auger (18) and dismount the pulley (12) and auger axle (19).
-
Replace the auger with a new one.
-
When reassembled, ensure all screws and nuts are properly tightened.
Scraper blade (Fig. 14)
The scraper blade is a wear item and should be replaced when necessary. A worn scraper blade can cause extreme vibration and damage the auger.
To replace the scraper blade:
- Remove the three screws from the bottom of the blade and slide the blade forward to remove.
- Install new scraper blade.
- Secure with the three screws.
- Ensure the screws are properly tightened.


CHARGING THE BATTERY PACK
BATTERY METER
Since the snow thrower battery is shipped in a low charge condition, the battery must be charged before use. The battery has 3 LED lights to indicate battery capacity. These lights will only illuminate when the light indicator button is pushed.
If three GREEN lights illuminate, the battery is charged and ready for use. Two green lights are equal to 25%-80% charge, while one green light is equal to 5%-25% charge.
It is recommended to charge battery pack when one light is illuminated.
CHARGING THE BATTERY PACK
The snow thrower comes with maintenance free, sealed 40 volt storage batteries.
- Charge the battery pack only with the charger provided.
- Allow at least two hours of charge time before initial use of the snow thrower.
• Make sure the power supply is normal household voltage, 120 volts, 60Hz, AC only.
- The battery should be charged in a cool, dry place.
- To improve battery life, store battery indoors in a controlled climate. Fully charge battery pack every 3 months.
- Since the battery will not develop a memory, it does not have to be fully discharged before recharging.
- 2 to 3 initial charging/discharging cycles may be required to achieve maximum run time/capacity.
- When fully charged, the battery can be safely stored in temperatures down to -4^(-20^) for a period of up to one month before requiring charging. Fully charge battery pack every 3 months.
- The battery charger should be operated in temperatures between 32°F and 100°F(0°C and 37.8°C).
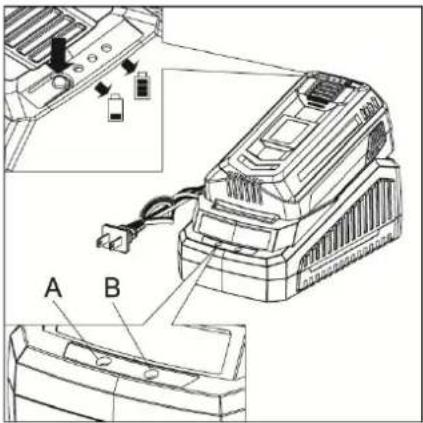
TO CHARGE
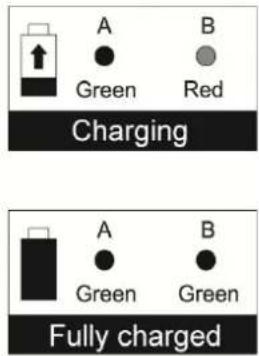
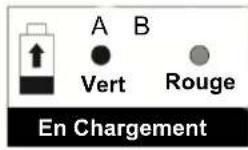
Insert the 120 volt plug of the charger into the wall receptacle. Light A will illuminate and stay green. (Fig. 12)

Fig. 12
- Slide the battery pack into the charger to lock it into position as shown in Fig 13. Light B will illuminate red to indicate that the battery is charging and the three lights on the battery pack will cycle in green.
- When the battery pack is fully charged, light B will turn green and the lights on the battery pack will shut off. (Fig 13)
NOTE: Typical time required to reach a full charge is 2 1/2 hours.
Fig. 13 NOTE: If light A remains green while light B
alternately flashes red and green, this indicates a temperature abnormality (i.e. that the battery pack is either too hot or too cold). If there is a red blinking light, this indicates that something is wrong with the battery. Contact Earthwise customer service center at 1-800-633-1501 for assistance.
If the charging light indicator Light B alternately blinks red and green or it does not come on at all, check that the


battery pack is fully seated into the bay. Remove the pack and reinsert. If the problem persists, contact the Earthwise customer service center at 1-800-633-1501 for assistance.
CHARGING THE BATTERY PACK
SLEEP MODE:
If the light indicator button is continuously pressed for more than 30 seconds, the lights will go into sleep mode. When light indicator button is pushed, no lights illuminate (This can occasionally occur during transportation).
To re-activate battery LED lights, place the battery on the charger and charge for one to two minutes. Battery indicator will function normally.
STORAGE
Run the snow thrower for a few minutes to melt away any snow on the snow thrower.
Remove the battery pack from the snow thrower.
Examine the snow thrower thoroughly for worn, loose, or damaged parts. Check connections and screws and tighten if necessary. To repair or replace parts, contact our customer service help line at 1-800-633-1501.
Store the snow thrower, along with the removed battery pack, in a clean, dry place out of reach of children. Cover loosely with a tarp for added protection.
TROUBLESHOOTING
| Problem Possible causes | Remedy | |
| Motor does not start Battery | not making contact. | Check battery is fully inserted. |
| Lock off not fully operated. | Check that lock off button is fully depressed prior to moving trigger. | |
| Battery not installed properly. | Check battery installation. | |
| Battery not charged. | Check battery charging requirements. | |
| Poor results Drive belt worn or damaged. | Replace the drive belt. | |
| Replace the auger. Ensure the screws and nuts are properly tightened. | ||
| Switch off the snow thrower, remove the battery pack, and clean the discharge. | ||
| Abnormal vibrations Drive belt worn or damaged. | Replace the drive belt. | |
| Replace the auger. Ensure the screws and nuts are properly tightened. | ||
| Replace the scraper blade. Ensure the screws are properly tightened. | ||
BATTERY DISPOSAL
Remove the battery pack from the snow thrower. Cover the terminals with heavy duty adhesive tape. Do not attempt to destroy or disassemble battery pack or remove any components. This product contains lithium-ion batteries which must be recycled or disposed of properly. Local, state or federal laws may prohibit disposal of these batteries in ordinary trash.

The RBRC seal on the li-ion battery pack indicates that the costs to recycle the battery pack at the end of its useful life has already been paid by The Great States Corporation American Lawn Mower Company. It is illegal to place spent li-ion batteries in the local municipal solid waste or in the trash. RBRC in cooperation with The Great States Corporation American Lawn Mower Company has provided an environmentally friendly and easy way to recycle spent li-ion batteries. Just contact your local recycling center or call 1-800-8BATTERY for information on where to drop off the spent battery.
For parts or service, please call 1-800-633-1501 or visit us online at www.americanlawnmower.com. Be sure to provide all relevant information when you call or visit.
REPAIR PARTS (KITS/ ITEMS)
The model/ serial number of this tool is found on a plate or label attached to the housing. Please record the serial number in the space provided below.
MODEL NUMBER SN74016
SERIAL NUMBER
Always mention the model number when ordering kits/items for this tool.
| No. | Kit/Item Number | Description | QTY |
| 1 | SN1416-AHK-1 | Auxiliary Handle Kit | 1 |
| 2 | SN1416-AKK-1 | Adjust Knob Kit | 1 |
| 3 | SN1416-WK-1 | Wheel Kit | 1 |
| 4 | SN1416-WBK-1 | Wheel Bracket Kit | 1 |
| 5 | SN4016-SB-1 | Drive Belt | 1 |
| 6 | SN1416-SBK-1 | Scraper Blade Kit | 1 |
| 7 | SN1416-AK-1 | Auger Kit | 1 |
CALL US FIRST !!
Call us first with questions about operating or maintaining your tool at 1-800-633-1501 between 8:00 a.m. – 5:00 p.m. Eastern Standard Time, or get assistance on www.americanlawnmower.com.
OWNER'S MANUAL SN74016 16-IN Lithium Snow Thrower
Copyright All Rights Reserved.
WARRANTY POLICY
Two (2) year limited warranty on Earthwise 40 volt outdoor power equipment.
Earthwise warrants to the original owner that each new product and service part is free from defects in materials and workmanship and agrees to repair or replace any defective product or part for the warranty period as stated above from the original date of purchase except for the conditions and circumstances listed below:
This warranty applies only to the original purchaser at retail and may not be transferred.
Warranty applies if the product is used for personal, household or family use. Warranty is void if product is used for commercial, industrial or rental purposes.
Warranty does not include repairs necessary due to operator's abuse or negligence (including overloading the product beyond capacity or immersion in water), or the failure to assemble, operate, maintain or store the product according to the instructions in the owner's manual.
This warranty is not transferable and only applies to product sold directly from an authorized
retailer. This warranty does not apply to any product, new or used, purchased through unauthorized third-party channels.
ANY INCIDENTAL, INDIRECT OR CONSEQUENTIAL LOSS, DAMAGE, OR EXPENSE THAT MAY RESULT FROM ANY DEFECT, FAILURE OR MALFUNCTION OF THE PRODUCT IS NOT COVERED BY THE WARRANTY. Some states do not allow the exclusion or limitation on how long an implied warranty lasts, so the above limitation may not apply to you.
Products sold damaged or incomplete, sold "as is", or sold as reconditioned are not covered under the warranty.
Damage or liability caused by shipping, improper handling, improper assembly, incorrect voltage, improper wiring, improper maintenance, improper modification or the use of accessories and/or attachments not specifically recommended is not covered by this warranty.
Expendable items that become worn during normal use are not covered by the warranty.
Warranty does not cover damage caused by cold, heat, rain, excessive humidity, corrosive environments and materials, or other contaminants.
Warranty does not include installation, assembly or normal adjustments explained in the owner's manual.
The expense of delivering the product to the vendor and the expense of returning the product or replacement parts to the owner is not covered by the warranty.
The warranty does not cover normal deterioration of the exterior finish, including but not limited to scratches, dents, paint chips or any corrosion or discoloration caused by heat, abrasive and chemical cleaners.
Proof of purchase, original dated sales receipt, must accompany all warranty claims.
American Lawn Mower Company
The Great States Corporation
830 Webster Street
Shelbyville, IN 46176 USA
Phone 1-800-633-1501
www.americanlawnmower.com
MANUAL DEL PROPIETARIO Sopladora de nieve de 406 mm (16 pulg.)
CONFORMS TO UL STD No.1090, CERTIFIED TO CSA STD C22.2
No.147
40V, 4.0 Ah Lithim-ion
2,5 horas
25-40 minutos
2000 RPM
LISTA DE PIEZAS
Mango auxiliar (Fig. 2)
natural_image
Technical line drawing of a mechanical device with directional arrows indicating motion (no text or symbols)FUNCIONAMIENTO
American Lawn Mower Company
The Great States Corporation
830 Webster Street
Shelbyville, IN 46176
Estados Unidos
CONFORMS TO UL STD No.1090, CERTIFIED TO CSA STD C22.2 No.147
LISTE DES PIÈCES
natural_image
Technical illustration of a mechanical device with directional arrows indicating motion (no text or symbols)UTILISATION

Copyright Tous droits reserves.
POLITIQUE DE GARANTIE
American Lawn Mower Company
The Great States Corporation
830 Webster Street
Shelbyville, IN 46176
États-Unis
Téléphone 1-800-633-1501
www.americanlawnmower.com

- OWNER'S MANUAL 16-IN Snow Thrower
- SYMBOLS
- IMPORTANT SAFETY WARNINGS
- GENERAL SAFETY
- SAFETY RULES FOR CHARGER
- FCC WARNING:
- PRODUCT SPECIFICATIONS
- PACKING LIST
- UNPACKING
- ASSEMBLY
- Handle (Fig. 1A)
- Motor housing (Fig. 1B)
- Wheel (Fig. 1D)
- Wheel bracket (Fig. 1E)
- Auxiliary handle (Fig. 2)
- OPERATING
- Install battery
- On/Off Switch (Fig. 4)
- Removing snow
- MAINTENANCE AND STORAGE
- Auger (Fig. 8, 13)
- To replace the auger:
- Scraper blade (Fig. 14)
- To replace the scraper blade:
- CHARGING THE BATTERY PACK
- BATTERY METER
- TO CHARGE
- SLEEP MODE:
- STORAGE
- BATTERY DISPOSAL
- REPAIR PARTS (KITS/ ITEMS)
- OWNER'S MANUAL SN74016 16-IN Lithium Snow Thrower
- WARRANTY POLICY
- This warranty is not transferable and only applies to product sold directly from an authorized
- Proof of purchase, original dated sales receipt, must accompany all warranty claims.
- MANUAL DEL PROPIETARIO Sopladora de nieve de 406 mm (16 pulg.)
- Mango auxiliar (Fig. 2)
- FUNCIONAMIENTO
- UTILISATION
- POLITIQUE DE GARANTIE
Brand : Earthwise
Model : SN74016
Category : Snow blower