
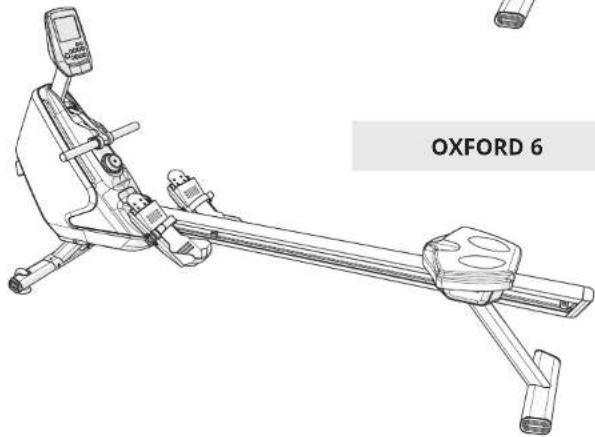
Oxford 6 - Rowing Machine Horizon Fitness - Free user manual and instructions
Find the device manual for free Oxford 6 Horizon Fitness in PDF.

| Brand | Horizon Fitness |
| Model | Oxford 6 |
| Product Type | Magnetic resistance rower |
| Dimensions (L × W) | 216 × 61.5 cm |
| Weight | 55 kg |
| Power supply | Mains (power cord included) |
| Resistance | Magnetic, adjustable by knob (multiple levels) |
| Console | LCD display: strokes, SPM, calories/heart rate, watts, time/500m, time, distance, race diagram |
| Training programs | Manual, Race (3 levels), Distance, Performance intervals, Interval training, Calorie consumption, Target heart rate |
| Connectivity | Wi-Fi, ViewFit app, wireless heart rate receiver (chest strap optional) |
| User memory | Up to 4 xID accounts |
| Energy saving mode | Yes, automatic activation after 15 minutes of inactivity |
| Power accuracy | ±10% for >50W, ±5W for <50W according to EN957-7:1998 |
| Vertical storage | Possible, with precautions (risk of tipping) |
| Cleaning | Water and mild soap, avoid solvents; clean rails and rollers |
| Maintenance | Check bolts monthly, clean under the device weekly, vacuum dust |
| Safety | Flat surface, 60 cm clearance around, do not use if cable damaged, unplug before maintenance |
| Spare parts | Available via technical support (contact details on information card) |
Frequently Asked Questions - Oxford 6 Horizon Fitness
User questions about Oxford 6 Horizon Fitness
0 question about this device. Answer the ones you know or ask your own.
Ask a new question about this device
Download the instructions for your Rowing Machine in PDF format for free! Find your manual Oxford 6 - Horizon Fitness and take your electronic device back in hand. On this page are published all the documents necessary for the use of your device. Oxford 6 by Horizon Fitness.
USER MANUAL Oxford 6 Horizon Fitness
Unpack the equipment where you will be using it. Place the carton on a level flat surface. It is recommended that you place a protective covering on your floor. Never open box when it is on its side.
IMPORTANT NOTES
During each assembly step, ensure that ALL nuts and bolts are in place and partially threaded. Several parts have been pre-lubricated to aid in assembly and usage. Please do not wipe this off. If you have difficulty, a light application of lithium grease is recommended.
SERIAL NUMBER LOCATION
Before proceeding, find your equipment's serial number located on a barcode sticker and enter it in the space provided below.
SERIAL NUMBER
MODEL NAME
OXFORD3 OXFORD6 HORIZON ROWER
- Use the information above when calling for service.
WARNING!
There are several areas during the assembly process that special attention must be paid. It is very important to follow the assembly instructions correctly and to make sure all parts are firmly tightened. If the assembly instructions are not followed correctly, the equipment could have parts that are not tightened and will seem loose and may cause irritating noises. To prevent damage to the equipment, the assembly instructions must be reviewed and corrective actions should be taken.
NEED HELP?
If you have questions or if there are any missing parts, contact Horizon Customer Tech Support.
TOOLS INCLUDED:
6mm L-Wrench
5mm L-Wrench
PARTS INCLUDED:
1 Main Frame
1 Front Stabilizer
1 Seat Rail
1 Rear Stabilizer
1 Foot Pad Assembly
1 Main Frame Cover
1 Seat Frame Assembly
1 Seat Rail End Cap
□1 Hardware Kit

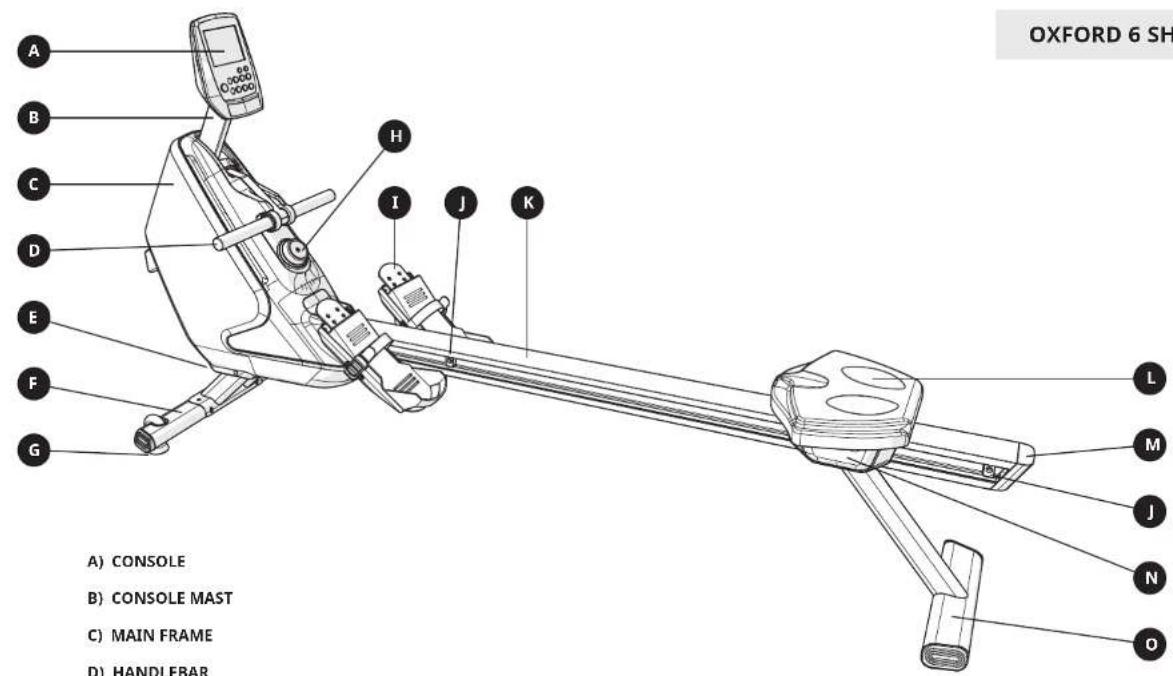
A) CONSOLE
B) CONSOLE MAST
C) MAIN FRAME
D) HANDLEBAR
E) POWER PLUG (OXFORD 6 ONLY)
F) FRONT STABILIZER / TRANSPORT WHEELS
G) LEVELER
H) RESISTANCE ADJUSTMENT KNOB
1) FOOT PADS
J) SEAT STOP BUMPERS
K) SEAT RAIL
L) SEAT AND SEAT FRAME ASSEMBLY
M) SEAT RAIL END CAP
N) SEAT FRAME ASSEMBLY COVER
O) REAR STABILIZER
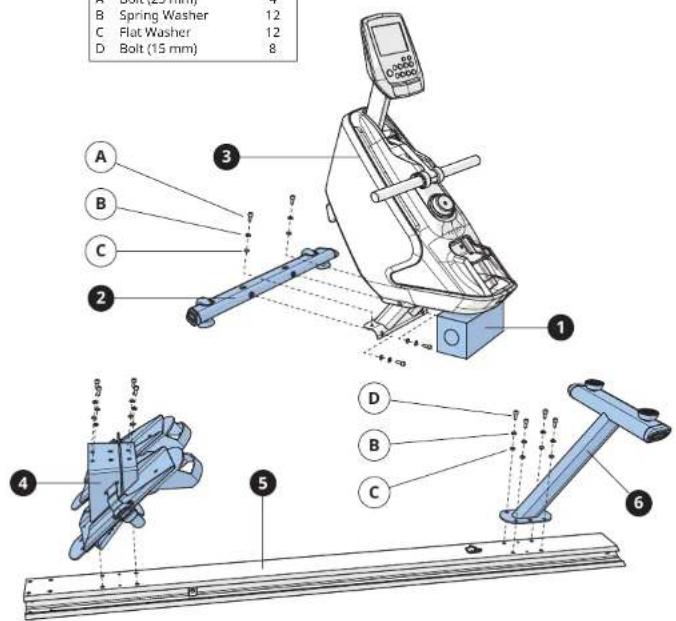
1
A Open HARDWARE FOR STEP 1. Remove STYROFOAM
BLOCK (1) from carton and rest MAIN FRAME (2) on STX80FOM BLOCK (1) as shown.
(3)OHTSYKROFOAM BLOCK(1)as shown
B Attach FRONT STABILIZER (2) to MAIN FRAME (3) using 4 BOLTS (A), 4 SPRING WASHERS (B), and 4 FLAT WASHERS (C).
C Attach FOOTPAD ASSEMBLY (4) to SEAT RAIL (5) using 4 BOLTs (D), 4 SPRING WASHERS (B) and 4 FLAT WASHERS (C).
D Attach REAR STABILIZER (6) to SEAT RAIL (4) using 4 BOLTS (D), 4 SPRING WASHERS (B) and 4 FLAT WASHERS (C).
Hardware For Step 1
| Description Qty | |
| A | Bolt (25 mm) 4 |
| B | Spring Washer 12 |
| C | Flat Washer 12 |
| D | Bolt (15 mm) 8 |
2
A Open HARDWARE FOR STEP 2.
B Oxford 6 only: Connect the SEAT RAIL WIRES (7).
C Slide SEAT RAIL (5) into the MAIN FRAME (3) as shown.
D Attach Seat RAIL (5) to MAIN FRAME (3) using 4 BOLTs (E), 4 SPRING WASHERS (B) and 4 FLAT WASHERS (C).
E Snap MAIN FRAME COVER (8) into place.
F Slide seat and SEAT FRAME ASSEMBLY (9) onto SEAT RAIL (5).
G Remove and discard STYROFOAM BLOCK (1).
Hardware For Step 2
| Description Qty | |
| E | Bolt (85 mm) 4 |
| B | Spring Washer 4 |
| C | Flat Washer 4 |
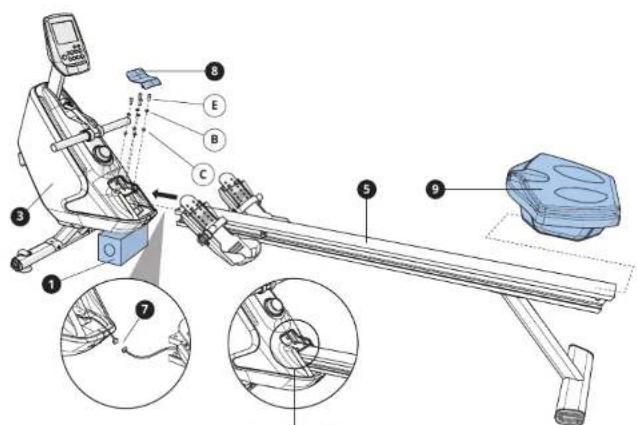
Tighten all 6 bolts

3
A Open HARDWARE FOR STEP 3.
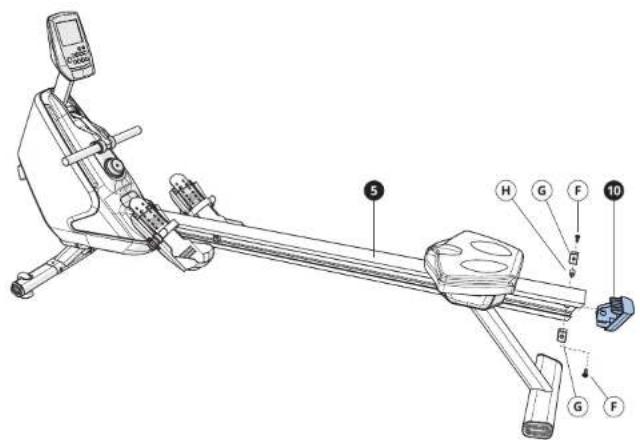
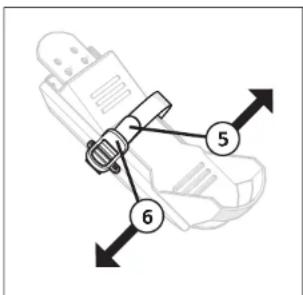
B Slide SEAT RAIL END CAP (10) onto SEAT RAIL (5).
C Attach SEAT STOP BUPMERS (G) to SEAT RAIL (S) using 2 BOLTs (F) and 1 BUSHING (H).
Hardware For Step 3
Description Qty
F Bolt(15L)
G Seat Stop Bumper
4
ASSEMBLY COMPLETE!

BASIC OPERATION
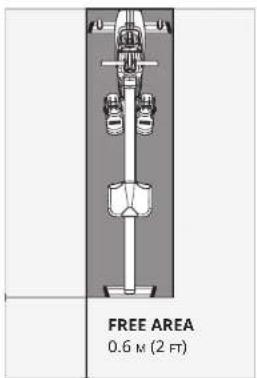
Place the Rower on a level surface. For ease of access, there should be an accessible space preferentially on both sides and the rear of the Rower that is at least 0.6 meters (24 inches). Do not place the Rower in any area that will block any vent or air openings. The Rower should not be located in a garage, covered patio, near water or outdoors.
ROWER FOOTPRINT
Oxford 3 - 213× 61.5cm / 83.9^× 24.25^ Oxford 6 - 216× 61.5cm / 85^× 24.5^
ROWWERWEIGHT
55 kg / 121 lbs.
MOVING THE EQUIPMENT
To move, firmly grasp rear frame and tilt the equipment up (1) and roll (2).
STORAGE
Fold console down (3). Tilt the frame into the upright position (4).
WARNING!
Our equipment is heavy, use care and additional help if necessary when moving or standing up. Failure to follow these instructions could result in injury.
CAUTION!
Caution should be used when storing rowers in an upright storage position. Rowers have been tested for stability when stored in an upright storage position. While testing has shown that the rowers can maintain their stability when tilted up to 10 degrees, accidental contact with an upright rower may potentially knock over the rower.
- Care should be used when handling rowers in the upright storage position.
- Any rower stored in the upright storage position shall be stored in a protected area to prevent accidental contact with the rower.
Unless people are storing a rower or retrieving a rower from storage, keep people away from upright stored rows.


LEVELING THE EQUIPMENT
It is extremely important that the levelers are correctly adjusted for proper operation. Turn leveling foot clockwise to lower and count-clockwise to raise unit. Adjust each side as needed until the equipment is level. An unbalanced unit may cause belt misalignment or other issues. Use of a level is recommended.


PROPER USAGE
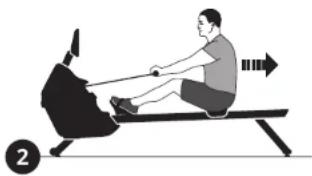
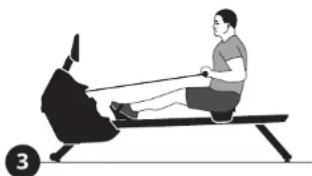
There are four phases to the rowing stroke:
- CATCH - Grasp the handle evenly with both hands. With the seat slid forward and the knees tucked into the chest (directly in line with the heel of the foot), stretch the arms out in front and lean slightly forward from the hips.
- DRIVE - Press firmly against the foot plates until the legs are fully extended, but not locked. Let the arms come with you and bring the torso to 90 degrees.
- FINISH - Pull the arms into the abdomen with legs fully extended, and lean back with the torso slightly beyond 90 degrees.
- RECOVERY - Extend the arms, bend the knees, and lean forward from the hips and slid forward on the seat.
All four phases should be performed smoothly and in a continuous manner.
BRAKE SYSTEM
This power utilizes magnetic resistance to set specific levels of resistance. The resistance level setting in addition to the SPM is used to determine the power (watts) output.
WIRELESS HEART RATE RECEIVER (OXFORD 6)
When used in conjunction with a wireless chest transmitter (sold separately), your heart rate can be transmitted wirelessly to the unit and displayed on the console.
WARNING!
Heart rate monitoring systems may be inaccurate. Over exercising may result in serious injury or death. If you feel faint, stop exercising immediately.
POWER (OXFORD 6)
The power cord must be plugged into the power socket, which is located in the front of the equipment. Unplug cord when not in use.
WARNING!
Never operate product if it has a damaged cord or plug, if it is not working properly, if it has been damaged, or immersed in water. Please reference contact information on the back cover of the INFORMATION CARD for assistance.


OXFORD 3 CONSOLE DESCRIPTION
Note: There is a thin protective sheet of clear plastic on the overlay of the console that should be removed before use.
A) LCD DISPLAY WINDOW: Displays workout feedback, program profile and more.
B) N/OFF: Press to turn off power to the console. The console will turn off automatically if there is no feedback for 30 seconds.
C) DW/START: Press to start workout or quick start.
D)OME:Press to return to select user screen.
E) USE:Press to pause or resume your workout.
F) ACK: Go to previous program setting. Press and hold to reset console.
6) TOP: Press to stop your workout.
H) : used to adjust program settings.
1) TER: Confirm each program setting.
J) RESISTANCE KNOB: Rotate clockwise to gradually increase the resistance and counter clockwise to reduce resistance.
AUTO POWER ON/OFF
The power will be turned on when you push the button on the console. After you have completed your workout, the console will display the data from your workout for 30 seconds. In order to conserve batteries, the power will automatically turn off if you DO NOT push any buttons on the console or pull the handlebar within 30 seconds.


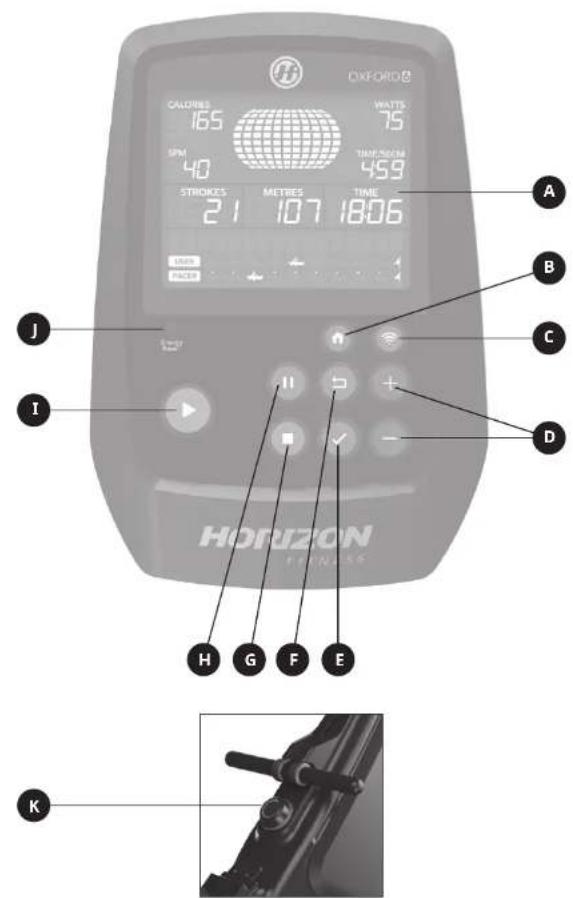
OXFORD 6 CONSOLE DESCRIPTION
Note: There is a thin protective sheet of clear plastic on the overlay of the console that should be removed before use.
A) LCD DISPLAY WINDOW: Displays workout feedback, program profile and more.
B) HOME: Press to return to select user screen.
C) F1:Press to connect your wireless internet connection. See next page for more info.
D) : used to adjust program settings.
E) ENTER: Confirm each program setting.
F) BACK: Go to previous program setting. Press and hold to reset console.
6) STOP: Press to stop your workout.
H) PAUSE: Press to pause or resume your workout.
I) ROW/START: Press to start workout or quick start.
J) ENERGY SAVER LIGHT: Indicates If machine Is In energy saver mode. Press any key to wake up the machine. See next page for more info.
K) RESISTANCE KNOB: Rotate clockwise to gradually increase the resistance and counter clockwise to reduce resistance.
SET UP XID ACCOUNT FOR VIA FIT CONNECTIVITY
Creating an xID account will allow you to save and share workout data using the Via Fit App. Up to four users can be saved on a machine. This process is the first step in connecting your equipment. It must be done from a computer, tablet, or mobile device.
1) Visit the web site: www.ViaFitness.com
2) Once at the web site, select the CONNECT YOUR EQUIPMENT.
3) The first step in connecting your equipment will to be creating your xID account. This will be your login to Via Fit.
4) Enter your phone number or another easy-to-remember 10-14 digit number. This will be your account number.
5) Fill in your profile information to finish the xID account set up process. You will be asked to provide an email address not associated with any other xID account. Check your email after the set-up process for a link to validate your account.
CONNECTWIFI
Once you have created your xID account, you will be able to move on to activating the WiFi on your equipment. Reminder, this requires you to use your computer, tablet, or mobile device that is connected to your home WiFi network.
1) Press and hold 3-5 second until the console beeps.
2) On your computer or other device, go to your WiFi settings. You should select the network with your product model name. Doing this enables you to connect your equipment to your wireless network.
3) A new window will pop up with the list of wireless networks your equipment can see. Select your home WiFi network and connect.
4) The remaining step is to reconnect your computer or other device back to your WiFi network. Go to your settings again and connect as you normally would.
Congratulations! You are now connected and ready to get started.
ENERGY SAVER (STANDBY MODE)
This machine has a special feature called Energy Saver mode. This mode is automatically activated. When Energy Saver mode is activated, the display will automatically enter standby mode (Energy Saver mode) after 15 minutes of inactivity. This feature saves energy by disabling most power to the machine until a key is pressed on the console. This feature can be turned on or off in the engineering menu.
To enter the engineering menu, press and hold and for 3-5 seconds. Use to navigate to SWITCH FUNCTION and press . Press to select Energy Saver mode, use to select ENERGY SAVE ON or OFF. Press and hold for 3-5 seconds to exit SWITCH FUNCTION. Press and hold again for 3-5 seconds to exit the engineering menu.

OXFORD 6

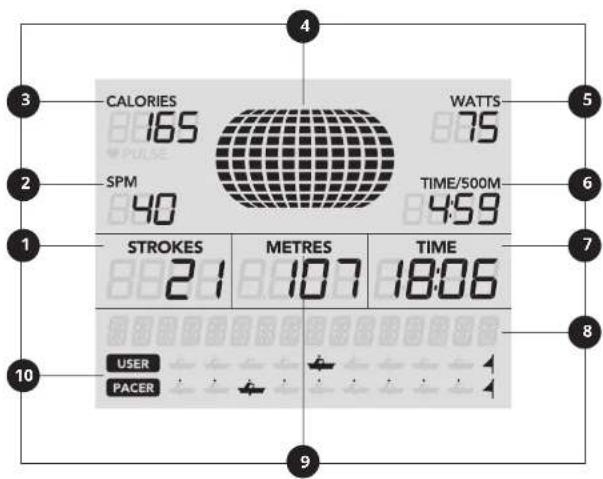
DISPLAY WINDOW
Note: There is a thin protective sheet of clear plastic on the overlay of the console that should be removed before use.
1) STROKES: Counts up to 9900 or counts down to zero from preset value.
2) SPM: Stroke per minute.
3) CALORIES/PULSE: Auto scans the heart rate and calories expended during exercise. If the computer does not detect a heart rate, only calories will display.
4) PROFILE DISPLAY: Shows the intensity of workout, watts profile and SPM profile.
5) WATTS: Shows the watts expended during exercise.
6) TIME/500M: Estimated time to reach 500M.
7) TIME: Measures total working time up to 99:59, or counts down to zero from preset time.
8)MESSAGE BAR: Shows the instruction message.
9) METERS: Tracks total distance covered from zero up to 9999 meters, or counts down to zero from the preset value. If the value exceeds 9999, the computer changes to kilometers. For instance, 10.0 represents 10000 meters.
10) RACING DIAGRAM: Shows the competition status of user and computer.
POWERACCURACY
This row displays power on the console. The power accuracy of this model has been tested using the test method of EN957-7:1998 to ensure a power accuracy within a tolerance of ± 10% for input power ≥ 50W and within a tolerance of ± 5W for input power < 50W .
For the display power was verified by calculating this input power and comparing the displayed power to the input (measured) power using the following conditions:
Nominal stroke length: 792 mm
Resistance settings:
- Minimum resistance setting at nominal stroke speed of 25 strokes per minute
- Medium resistance setting at nominal stroke speed of 25 strokes per minute
Maximum resistance setting at nominal stroke speed of 25 strokes per minute
In addition to the above testing conditions, the manufacturer tested the power accuracy using one additional resistance setting and nominal stroke speed. Then the power displayed was compared to the input (measured) power.
GETTING STARTED
Check to make sure no objects are nearby that will hinder the movement of the equipment.
OXFORD 3
- Install the batteries.
The console is powered by 2 AA batteries, which are replaceable through the back side of the console. Removing the batteries will erase all functional values (including TOTAL function).
OXFORD 6
- Plug in the power cord.
- Select your xID account, User, Guest, or Edit a User using
To add additional users that have an xID to the rower, visit www.viafitness.com
1) Login with your xID and Passcode.
2) From MENU, select MANAGE YOUR EQUIPMENT
3) Select an open user to add. You can attach up to four unique users to each piece of equipment. When you power on your machine, it will automatically sync all users to the console.
A) QUICK START
Simply press to begin working out. Time will count up from 0:00.
Oxford 6: The resistance level will default to level 1.
B) SELECT A PROGRAM
1) Select a PROGRAM using and press
2) Set workout program information using and press after each selection.
3) Press begin workout.
Oxford 6: You can adjust the resistance level during your workout using
When your workout is complete, the console will display "workout complete" and beep.
Your workout information will stay displayed on the console for 30 seconds and then reset.
TO CLEAR CURRENT SELECTION
To clear the current program selection or screen, press and hold for 3 seconds.


PROGRAMS
CATEGORIES OXFORD 3 OXFORD 6
| TRAINING Manual Manual | Fat Burn | |
| GOALS Distance Distance | ||
| RACE Beginner | Intermediate | Beginner |
| Advanced | Intermediate | |
| Advanced | ||
| TRAINING INTERVALS Time | Distance | |
| PERFORMANCE INTERVALS Endurance Intervals | Speed Intervals | |
| TARGET HEART RATE Max HR | Target HR | |
PROGRAM INFORMATION
MANUAL: Adjust your resistance level manually during workout. User sets time.
RACE: User chooses the difficulty of the RACE game. Options include BEGINNER (500M in 3:00), INTERMEDIATE (2,000M in 12:00) and ADVANCED (5,000M in 30:00).
DISTANCE: Push yourself and go further during your workout with 7 distance workouts. Choose from 500M, 1,000M, 2,000M, 4,000M, 5,000M, 6,000M and 10,000M. User sets starting resistance level.
OXFORD 6 ONLY
PERFORMANCE INTERVALS: Effective weight loss workouts that helps you improve your fitness level. Choose from Speed Intervals and Endurance Intervals.
TRAINING INTERVALS: User selects the number of intervals and then time or distance WORK and REST intervals to create a custom Intervals program.
FAT BURN: Promotes weight loss by increasing and decreasing the resistance.
TARGET HEART RATE: % Maximum Target Heart Rate (%THR) automatically adjusts resistance to bring you within 5 beats of your set % of maximum heart rate. Target Heart Rate (THR) automatically adjusts resistance to maintain your target heart rate. These workouts require you to wear a wireless heart rate strap.
The first step in knowing the right intensity for your training is to find out your maximum heart rate (max HR = 220 - your age). The age-based method provides an average statistical prediction of your max HR and is a good method for the majority of people, especially those new to heart rate training. The most precise and accurate way of determining your individual max HR is to have it clinically tested by a cardiologist or exercise physiologist through the use of a maximal stress test. If you are over the age of 40, overweight, have been sedentary for several years, or have a history of heart disease in your family, clinical testing is recommended. This chart gives examples of the heart rate range for a 30-year-old exercising at 5 different heart rate zones. For example, a 30-year-old's max HR is 220 - 30 = 190 bpm and 90% max HR is 190 × 0.9 = 171 bpm.
| Target Heart Rate Zone | Workout Duration | Example THR Zone (age 50) | Your THR Zone | Recommended For |
| VERY HARD 90 - 100% | < 5 MIN | 171 - 190 BPM | Fit persons and for athletic training | |
| HARD 80 - 90% | 2 - 10 MIN | 152 - 171 BPM | Shorter workouts | |
| MODERATE 70 - 80% | 10 - 40 MIN | 133 - 152 BPM | Moderately long workouts | |
| LIGHT 60 - 70% | 40 - 80 MIN | 114 - 133 BPM | Longer and frequently repeated shorter exercises | |
| VERY LIGHT 50 - 60% | 20 - 40 MIN | 104 - 114 BPM | Weight management and active recovery |
Target heart rate notes:
Warm-up and cool-down each last 4 minutes.
- After 4 minutes, the resistance will automatically adjust to bring you near your specified heart rate.
- If no heart rate is detected or signal is lost, the resistance will remain at the same level for 60 seconds and then begin decreasing 1 resistance level every 10 seconds until the minimum resistance is reached.
If your heart rate is 25 beats over your target zone the program will shut down.
TROUBLESHOOTING
COMMON PRODUCT QUESTIONS
ARE THE SOUNDMY ROWER MAKES NORMAL?
Our rowers are some of the quietest available because they use belt drives and friction free magnetic resistance. We use the highest grade bearings and belts to minimize noise. However, because the resistance system itself is so quiet, you will occasionally hear other slight mechanical noises. Unlike older, louder technologies, there are no fans, friction belts, or alternator noises to mask these sounds on our rowers. These mechanical noises, which may or may not be intermittent, are normal and are caused by the transfer of significant amounts of energy to a rapidly spinning flywheel. All bearings, belts and other rotating parts will generate some noise which will transmit through the casing and frame. It is also normal for these sounds to change slightly during a workout and over time because of thermal expansion of the parts.
WHY IS THE LOWER I HAS DELIVERED LOUDER THAN THE ONE AT THE STORE?
All fitness products seem quieter in a large store showroom because there is generally more background noise than in your home. Also, there will be less reverberation on a carpeted concrete floor than on a wood overlay floor. Sometimes a heavy rubber mat will help reduce reverberation through the floor. If a fitness product is placed close to a wall, there will be more reflected noise.
HOW LONG WILL THE DRIVE BELT LAST?
The computer modeling we have done indicated virtually thousands of maintenance free hours. Belts are now commonly used in far more demanding applications such as motorcycle drives.
CAN I MOVE THE ROWER EASILY ONCE IT IS ASSEMBLED?
Your rower has a pair of transport wheels built Into the front stabilizer tube. Please follow the MOVING THE ROWER section to transport your rower. It is important that you place your rower in a comfortable and inviting room. Your rower is designed to use minimal floor space. Many people will place their rowers facing the TV or a picture window. If at all possible, avoid putting your rower in an unfinished basement. To make exercise a desirable daily activity for you, the rower should be in a comfortable setting.
NEED ASSISTANCE?
If this troubleshooting section does not remedy the problem, discontinue use and turn the power off.

Please reference contact information on the INFORMATION CARD for assistance.
The following information may be asked of you when you call. Please have these items readily available:
- Model Name
- Serial Number
Proof of Purchase (receipt or credit card statement)
Some common troubleshooting questions that may be asked are:
How long has this problem been occurring?
- Does this problem occur with every use? With every user?
- If you are hearing a noise, does it come from the front or the back? What kind of noise is it (thumping, grinding, squeaking, chirping etc.)?
- Has the machine been maintained per the MAINTENANCE schedule?
Answering these and other questions will give the technicians the ability to send proper replacement parts and the service necessary to get you and your elliptical running again!
You may find more troubleshooting suggestions on the customer support section of our website.

TROUBLESHOOTING
PROBLEM: The console does not light up.
(Oxford 6) SOLUTION:
- The outlet the machine is plugged into is functional. Double check that the breaker has not tripped.
- The correct power cord is being used. Only use the power cord included. Test the voltage on the power cord to verify it provides the specified output voltage from the label.
- The power cord is not pinched or damaged and is properly plugged into the outlet AND the machine
- Unplug power cord. Remove the console and check that all connections to the console are secure and not damaged or pinched. Unplug and reconnect the console cable.
(Oxford 3) SOLUTION:
- Change the console batteries.
PROBLEM: The console lights up but the Distance/Watts/RPMs do not count.
SOLUTION:
- Unplug power cord. Remove the console and check that all connections to the console are secure and not damaged or pinched. Unplug and reconnect the console cable.
- If doing the above does not fix the problem, the speed sensor and/or magnet may have become dislodged or damaged.
PROBLEM: The resistance levels seem to be incorrect, seeming too hard or too easy.
(Oxford 6) SOLUTION:
- The correct power cord is being used. Only use the power cord provided.
- Reset the console and allow the resistance to reset to the default position. Restart and retry the resistance levels.
(Oxford 3) SOLUTION:
- Ensure resistance is set to 1.
PROBLEM: The roller wheels appear to be leaving particles on the guide rails.
SOLUTION:
- This is considered normal wear of the seat wheels. To remove, simply wipe off the roller wheels and rail with a damp cloth.
PROBLEM: The rower makes a squeaking or chirping noise.
SOLUTION: Verify the following:
The rower is on a level surface.
- Loosen all bolts attached during the assembly process, grease the joints, grease the threads and re-tighten. If bolts become loose, apply blue thread-locker and re-tighten.
- Apply a lithium-based grease to the top surface of the guide rails.
MAINTENANCE
WHAT KIND OF ROUTINE MAINTENANCE IS REQUIRED?
Minimal maintenance and cleaning is required. Adhering to this schedule will extend the life of your machine.
HOW DO I CLEAN MY MACHINE?
Clean with soap and water cleaners only. Never use solvents on plastic parts. Cleanliness of your machine and its operating environment will keep maintenance problems and service calls to a minimum. For this reason, it is recommended that the following preventive maintenance schedule be followed.
WARNING
To remove power from the Oxford 6, the power card must be disconnected from the wall outlet.
MAINTENANCE SCHEDULE
| ACTION FREQUENCY | |
| Clean the machine:· Oxford 6: Unplug the power cord from the wall outlet.· Clean entire machine using water and a mild soap applied to a soft cloth. Never use solvents, as they can cause damage to the machine. Never spray cleaner directly onto the machine or console.· Oxford 6: Inspect the power cord. If the power cord is damaged, please reference contact information on the back cover of the INFORMATION CARD for assistance.· Oxford 6: Make sure the power cord is not underneath the machine or in any other area where it can become pinched or cut during storage or use.· If any labels are damaged or illegible, please reference contact information on the INFORMATION CARD for replacement. | DAILY |
| Clean underneath the machine:· Move the machine to a remote location.· Wipe or vacuum any dust particles or other objects that may have accumulated underneath the machine.· Return the machine to its previous position. | WEEKLY |
| · Inspect and tighten all assembly bolts and pedals on the machine.· Clean any debris off of the seat rail. | MONTHLY |

MONTAGE
DEBALLAGE
PROGRAMMES DISPONIBLES
QUESTIONS FREQUENTES RELATIVES AU PRODUIT
LES SONS QUE FAIT MON RAMEUR SONT-ILS NORMAUX?
SOLUTION (Oxford 3):
© 2018 Johnson Health Tech
Rev 1.1 A ENG FRE SPE