
GSM-100 - Microphone GEMINI - Free user manual and instructions
Find the device manual for free GSM-100 GEMINI in PDF.
| Product Type | USB Condenser Microphone |
| Brand | Gemini |
| Model | GSM-100 |
| Dimensions (approx.) | Height 150 mm, base diameter 100 mm |
| Weight (approx.) | 500 g |
| Power Supply | USB 5V (bus-powered) |
| Interface | USB 2.0 (Type-C) |
| Sampling Rate | 48 kHz / 16-bit |
| Frequency Response | 20 Hz - 20 kHz |
| Polar Pattern | Cardioid |
| Sensitivity | -36 dB ± 3 dB |
| Maximum SPL | 115 dB (THD ≤ 1% at 1 kHz) |
| Signal-to-Noise Ratio | 92 dB (A-weighted) |
| Headphone Output Impedance | 16 - 60 Ω |
| Headphone Output Power (RMS) | 100 mW |
| Main Features | Plug and play, OTG function, touch mute with RGB, noise reduction, gain, real-time monitoring, 5/8" thread |
| Included Accessories | Microphone, microphone stand, USB-C to USB cable, user manual |
| Compatibility | Windows, macOS, iOS, Android (with OTG adapter) |
| Care and Cleaning | Clean with a damp cloth. Avoid solvents and detergents. |
| Safety | Do not open, do not expose to water or heat, use at moderate volume. |
| Spare Parts and Repairability | USB cable and stand replaceable. No user-serviceable internal parts. |
| Warranty | 1 year (limited) |
Frequently Asked Questions - GSM-100 GEMINI
User questions about GSM-100 GEMINI
0 question about this device. Answer the ones you know or ask your own.
Ask a new question about this device
Download the instructions for your Microphone in PDF format for free! Find your manual GSM-100 - GEMINI and take your electronic device back in hand. On this page are published all the documents necessary for the use of your device. GSM-100 by GEMINI.
USER MANUAL GSM-100 GEMINI
natural_image
Black gemini audio workstation microphone on a stand (no visible text or symbols on device body)USER MANUAL
| 2 | gemini®USB Microphone |
USB Microphone
gemini®
3
INDEX
INTRODUCTION 4
PRECAUTIONS 5
FEATURES & SPECIFICATIONS 6
PRODUCT FUNCTIONS ....7
OPERATION INSTRUCTIONS ....7
WARRANTY & REPAIR 10
LEGALITY & SAFETY 11
FCC COMPLIANCE STATEMENT 12
MANUAL EN ESPAÑOL 13
MANUEL EN FRANÇAIS 19
HANDBUCH IN DEUTSCH 25
Thank you for purchasing our GSM-100 USB Microphone. With proper care & maintenance, your unit will provide years of reliable, uninterrupted service. The GSM-100 is backed by a 1-year limited warranty*
Preparing for First Use
Please ensure that you find these accessories included with your GSM-100 USB Microphone:
(1) GSM-100 USB Microphone
(1) User Manual & Warranty
(1) Microphone Stand
(1) USB to Type-C Cable
Caution
① All operating instructions should be read before using this equipment.
② To reduce the risk of electrical shock, do not open the unit. There are no user replaceable parts inside. Please refer servicing to a qualified GEMINI service technician. Do not attempt to return the equipment to your dealer.
③ Do not expose this unit to direct sunlight or to a heat source such as a radiator or stove.
④ This unit should be cleaned only with a damp cloth. Avoid solvents or other cleaning detergents.
⑤ When moving this equipment, it should be placed in its original carton and packaging. This will reduce the risk of damage during transit.
⑥ Do not expose this unit to water or heat.
⑦ Do not use cleaning products or lubricants on the controls or switches.
Precautions
PLEASE READ CAREFULLY BEFORE PROCEEDING
Always follow the basic precautions listed below to avoid the possibility of serious injury or even death from electrical shock, short-circuiting, damages, fire, or other hazards.
- READ INSTRUCTIONS - All the safety and operating instructions should be read before the product is operated.
- RETAIN INSTRUCTIONS - The safety and operating instructions should be retained for future reference All the safety and operating instructions should be read before the product is operated.
- HEED WARNINGS - All warnings on the product and in the operating instructions should be adhered to.
- FOLLOW INSTRUCTIONS - All operating and use instructions should be followed.
- CLEANING - The product should be cleaned only with a polishing cloth or a soft dry cloth. Never clean with furniture wax, benzine, insecticides or other volatile liquids since they may corrode the cabinet.
- WATER AND MOISTURE - Do not use this product near water, for example, near a bathtub, wash bowl, kitchen sink, or laundry tub; in a wet basement; or near a swimming pool; and the like.
- DO NOT OPEN - Do not open the device or attempt to disassemble the internal parts or modify them in any way. The device contains no user-serviceable parts. If it should appear to be malfunctioning, discontinue use immediately and have it inspected by qualified GEMINI service personnel.
- REPLACEMENT PARTS - When replacement parts are required, be sure the service technician has used replacement parts specified by the manufacturer or have the same characteristics as the original part. Unauthorized substitutions may result in fire, electric shock, or other hazards.
Features
• Specially designed for network teaching, screen recording, video calls, conference, streaming, game talks, live broadcasting, suitable for computers, mobile phones and tablets.
• Built-in professional sound card chip, driver-free design for plug and play, compatible with systems like Windows, iOS, and Android.
- Standard USB 2.0 transmission, high sample rate and ultra-low delay, make recording and sound playback more clearly.
- With OTG (On-The-Go) function for high-definition recording and live broadcasting through USB connection with smart phones and tablets.
• Built-in professional condenser microphone with high sensitivity to easily capture sound details.
- Microphone gain knob to adjust the volume based on the venue.
- Mute switch to turn on or off the sound signal quickly at any time.
• Real-time monitoring, allows you to adjust microphone volume according listening situation, to achieve the ideal sound pickup and recording effect.
- Tap-to-mute sensor with RGB lighting indicator, if the lights is on, the mic is active, if the light is off, the mic is muted.
- Noise cancelling switch, upward to active noise cancelling system, downward to close it.
- Standard 5/8 27 threading, can be mounted to most standard microphone stands.
Specifications
Data Transmission: USB2.0
Sample Rate: 48KHz/16bit
Frequency Response: 20Hz \~ 20KHz
Condenser Type: 14mm
Polar Pattern: Cardioid
Sensitivity: -36dB33dB
Max SPL: 115dB(THD 1% at 1KHz)
Headphone Output Impedance: 16 \~ 60ff
Headphone Output Power (RMS): 100mW
S/N Ratio: 92dB (A-Weighted)
Frequency Response Graph
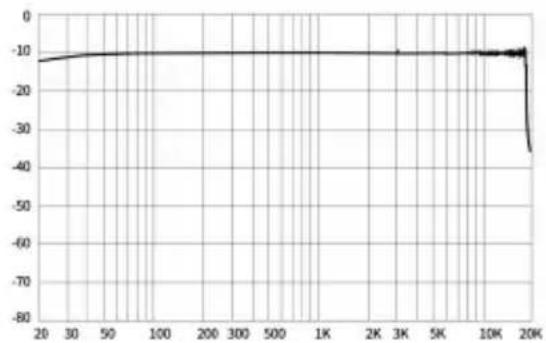
line
| x | y | | ---- | ----- | | 20 | -10 | | 30 | -10 | | 50 | -10 | | 100 | -10 | | 200 | -10 | | 300 | -10 | | 500 | -10 | | 1K | -10 | | 2K | -10 | | 3K | -10 | | 5K | -10 | | 10K | -10 | | 20K | -45 |Product Functions
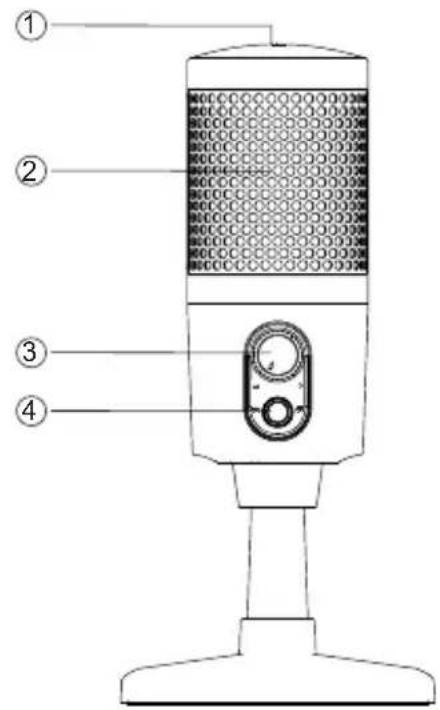
① Mute switch: Touch it to mute or unmute the microphone. When you touch the mute switch, the lights off and the microphone stops picking up sound. When you touch the mute switch again, the RGB lights are on and the microphone starts picking up sound.
② Mute RGB lights: When LED lights are on, microphone is live/picking up sound. When light is off, microphone is either muted or not receiving power.
③ Volume adjustment knob: Turn the clockwise to increase the microphone volume gradually and turn it counterclockwise to decrease the microphone volume.
④ Background Noise Reduction (BNR): Press BNR button to turn noise cancellation on/off.
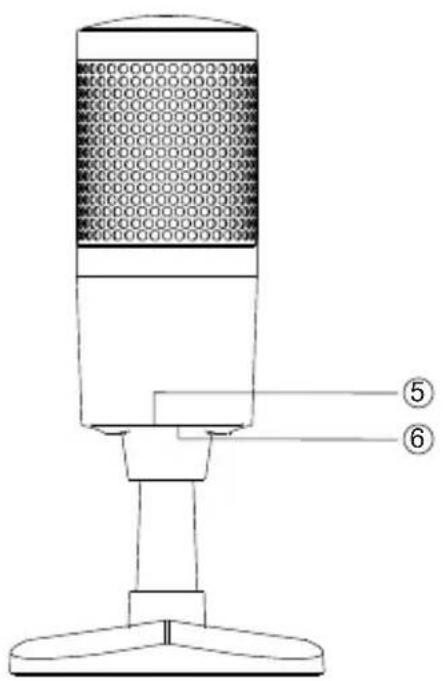
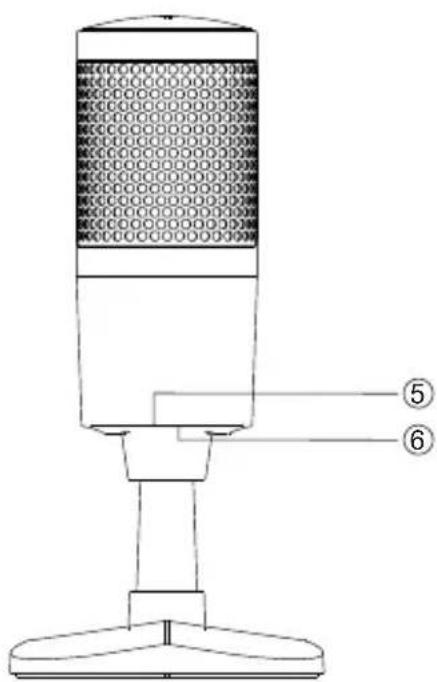
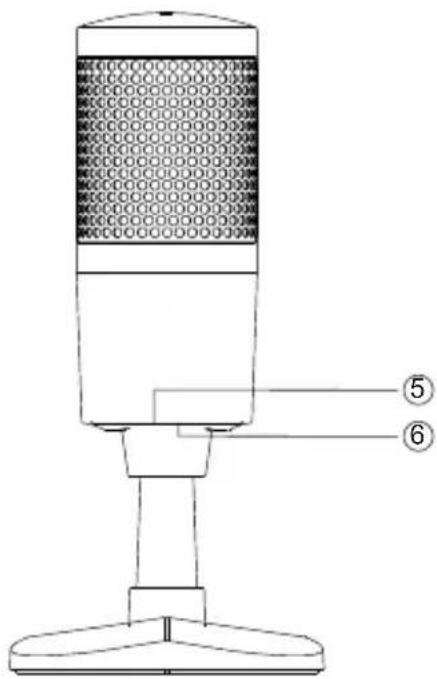
⑤ 3.5mm Port: Connect to a headphone for real-time monitoring.
⑥ USB interface: Connect microphone to Computer or mobile phone (adapter may be required)
Operation Instructions (PC / MAC)

| 8 | gemini® | USB Microphone |
| 1 Connect the microphone to a computer via USB-C to USB cable. The computer will identify the microphone and complete the driver installation automatically. | 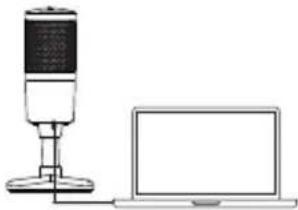 | |
| 2 Driver settings:Windows: Set the “Recording” device “GSM-100” of the system speaker as the default device. | 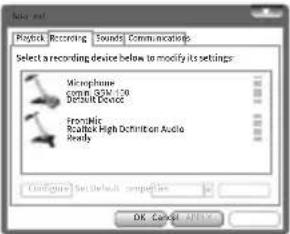 | |
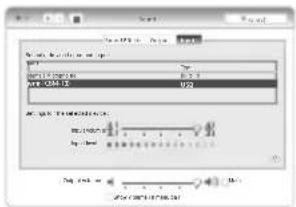
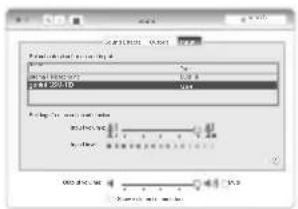
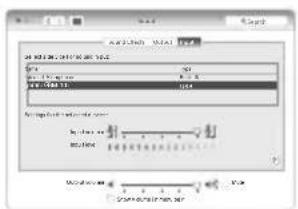
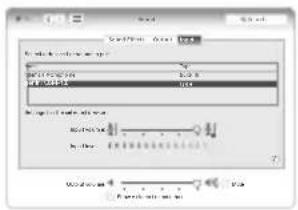
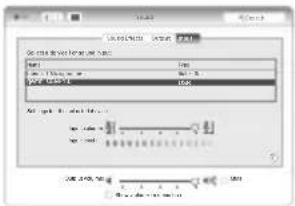
| Mac OS: Enter the sound settings under the System Preference Device and select “GSM-100” as the input device. | 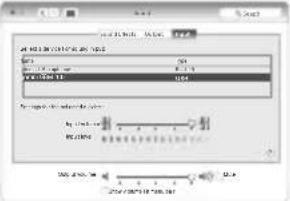 | |
| 3 Connect a headphone or an active speaker to the 3.5mm port on the back of the microphone for monitoring.4 Open the video conference software, instant messaging software or recording software for video conferences, voice chat, network broadcasting, etc. | ||
| OTG Operation Instructions (Android /iOS)Please note: You will need additional accessories to utilize the GSM-100’s OTG function. | ||
| Android: Standard USB-C cableiOS: USB-C to Lightning cable (or adapter) | ||
| 1Connect the microphone to phone or tablet via appropriate cable/adapter. The phone/tablet will identify the microphone set as audio input automatically.2Open your recording app, microphone should be ready to use. You can monitor Mic & Phone’s audio from the GSM-100’s headphone output.r video conferences, voice chat, network broadcasting, etc. | ||
③ Connect a headphone or an active speaker to the 3.5mm port on the back of the microphone for monitoring.
④ Open the video conference software, instant messaging software or recording software for video conferences, voice chat, network broadcasting, etc.
OTG Operation Instructions (Android /iOS)
Troubleshooting
The indicator does not light up when the microphone is turned on or the sound produced by the microphone cannot be monitored.
① Check whether the USB plug of the microphone is properly connected to the USB interface of the computer. If not, unplug it and try again.
② Check whether the headphone is properly connected to the 3.5mm port of the microphone. If not, unplug it and try again.
③ When the microphone is connected to a computer, you need to turn on the “Recording” device of the system speaker, and select “Monitor the device” in the properties tab of the “GSM-100” device.
The sound of the microphone cannot be recorded or the recording volume is too low.
① When the microphone is connected to a computer for use, check whether the microphone volume of the GSM-100 is too low. If yes, adjust the volume to see whether it goes back to normal.
② Check whether the volume adjustment knob is turned down low. If yes, turn the knob counterclockwise to see whether the volume goes back to normal.
There is acoustic feedback when the microphone is connected to a speaker.
① If your software has the echo cancellation function, please turn it on.
② Turn the pickup part of the microphone away from the active speaker while keeping a proper distance.
③ Lower the microphone volume or the output volume of the speaker.
| 10 | gemini® | USB Microphone |
| Warranty and RepairAll Gemini products are designed and manufactured to the highest standards in the industry. With proper care and maintenance, your product will provide years of reliable service.Limited Warrantya. GEMINI guarantees its products to be free from defects in materials and workmanship for one (1) year from the original purchase date. Exceptions: Laser assemblies on CD Players, batteries, cartridges, and crossfaders are covered for 90 days.b. This limited warranty does not cover damage or failure caused by abuse, misuse, abnormal use, faulty installation, improper maintenance or any repairs other than those provided by an authorized INNOVATIVE CONCEPTS AND DESIGN LLC.c. There are no obligations of liability on the part of GEMINI for consequential damages arising out of or in connection with the use or performance of the product or other indirect damages with respect to loss of property, revenues,of profit, or costs of removal, installation, or reinstallation. All implied warranties for GEMINI , including implied warranties for fitness, are limited in duration to one (1) year from the original date of purchase, unless otherwise mandated by local statutes. | Return/Repaira. Please call our helpful Customer Service Representatives at 732-346-0061 , and they will be happy to give you a Return Authorization Number (RMA) and the address of an authorized service center closest to you.b. After receiving an RMA, include a copy of the original sales receipt, with defective product and a description of the defect. Send by insured freight to: Gemini and use the address provided by your customer service representative. Your RMA must be written on the outside of the package, or processing will be delayed indefinitely!c. Service covered under warranty will be paid for by Gemini and returned to you. For non-warrantied products, Gemini will repair your unit after payment is received. Repair charges do not include return freight. Freight charges will be added to the repair charges.d. On warranty service, you pay for shipping to Gemini , we pay for return shipping within the continental United States. Alaska, Hawaii, Puerto Rico, Canada, Bahamas, and the Virgin Islands will be charged for freight.e. Please allow 2-3 weeks for return of your product. Under normal circumstances your product will spend no more than 10 working days at Gemini . We are not responsible for shipping times. | |
LEGALITY & SAFETY
The device is not intended for use by people (including children) with reduced physical, sensory or mental capacity. People who have not read the manual, unless they have received an explanation by someone responsible for their safety, should not use this unit. Children should be monitored to ensure that they do not play with the device. The device should always be readily accessible. The device should not be exposed to water. No objects filled with liquids, such as vases, shall be placed on the device. Always leave a minimum distance of 10 cm around the unit to ensure sufficient ventilation. Open flame sources, such as candles, should not be placed on top of the device. The device is intended for use only in a temperate climate. At full volume, prolonged listening may damage your hearing and cause temporary or permanent deafness, hearing drone, tinnitus, or hyperacusis. Listening at high volume is not recommended. One hour per day is not recommend either. Switch the device off where the use of the device is not allowed or where there is a risk of causing interference or danger - for examples: on an aircraft, or near medical equipment, fuel, chemicals or blasting sites. Check the current laws and regulations regarding the use of this device in the areas where you drive. Do not handle the device when driving. Concentrate fully on driving. All wireless devices are susceptible to interference which may affect their performance. All our devices conform to international/national standards and regulations, and we aim to limit user exposure to electromagnetic fields. These standards and regulations were adopted after the completion of extensive scientific research. This research established no link between the use of the mobile headset and any adverse effects on health if the device is used in accordance with standard practices. Only qualified people are authorized to install or repair this product. Only use batteries, chargers and other accessories which are compatible with this equipment. Do not connect incompatible products. This equipment is not waterproof. Keep it dry. Keep your device in a safe place, out of the reach of young children. The device contains small parts which may present a choking hazard to kids.
| 12 | gemini® | USB Microphone |
DECLARATION OF CONFORMITY
Safety And EMC Compliance Specifications
EN 550322:2015 Electromagnetic compatibility for multimedia devices: Radiation requirements
EN 550355:2017 Electromagnetic compatibility of multimedia devices: Anti-interference requirements
EN 61000-4-2:2009 Electrostatic discharge reactance (Ambient E2-standard B, 4 kV contact, 8 kV air discharge)
EN 61000-4-3:2006+A1:2008+A2:2010 Radio-frequency ELECTROMAGNETIC interference (AMBIENT E2, standard A)
EN 61000-4-4:2012 Electrical rapid transient/burst immunity (standard B)
EN 61000-4-5:2014+A1:2017 Surge immunity (standard B)
EN 61000-4-6:2014 Immunity from conductive disturbance caused by radio frequency fields (Standard A)
EN 61000-4-11:2004+A1:2017 Voltage sags, short breaks, and voltage variations
EN 62368-1:2014+A11:2017 Audio and video, information technology and communications technology equipment: Security requirements
FCC Compliance Statement
This device complies with Part 15 of the FCC Rules.
The operation is subject to the following two conditions:
(1) This device may not cause harmful interference, and (2) This device must accept any interference received, including interference that may cause undesired operation.
Note: This equipment has been tested and found to comply with the limits for a class B digital device, pursuant to Part 15 of the FCC Rules. These equipment generates uses and can radiate radio frequency energy and if not installed and used in accordance with the instructions, may cause harmful interference to radio communications. However, there is no guarantee that interference will not occur in a particular installation. If this equipment does cause interference to radio or television reception, which can be determined by turning the equipment off and then on, the user is encouraged to try to correct the interference by one or more of the following
measures:
- Reorient or relocate the receiving antenna.
- Increase the separation between the equipment and receiver.
- Connect the equipment to a different outlet so that the equipment and receiver are on different branch circuits.
- Consult the dealer or an experienced radio/TV technician for help.
Introducción
gemini®
USB Microphone
Features
natural_image
Simple line drawing of a desktop microphone next to a laptop (no text or symbols)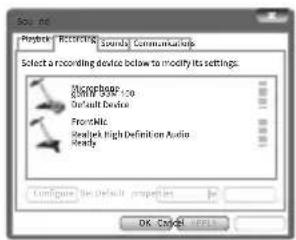
natural_image
Simple line drawing of a desktop microphone next to a laptop (no text or symbols)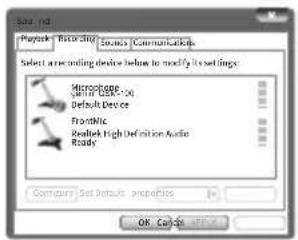

28
gemini®
USB Microphone
natural_image
Simple line drawing of a desktop microphone next to a laptop (no text or symbols)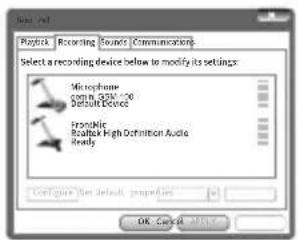
34
gemini®
USB Microphone
natural_image
Simple line drawing of a desktop microphone next to a laptop (no text or symbols)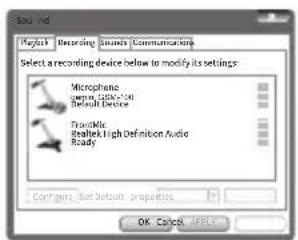
Sample Rate: 48KHz/16bit
Frequentiebereik: 20Hz - 20KHz
Condensor Type: Φ14mm
Polair patroon: Cardioïde
40
gemini®
USB Microphone
natural_image
Illustration of a desktop microphone next to a laptop (no text or symbols)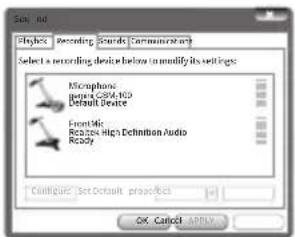
- INDEX
- Preparing for First Use
- Caution
- Precautions
- PLEASE READ CAREFULLY BEFORE PROCEEDING
- Features
- Specifications
- Product Functions
- Operation Instructions (PC / MAC)
- OTG Operation Instructions (Android /iOS)
- Troubleshooting
- LEGALITY & SAFETY
- DECLARATION OF CONFORMITY
- Safety And EMC Compliance Specifications
- FCC Compliance Statement
- Introducción
- gemini®
- USB Microphone
Brand : GEMINI
Model : GSM-100
Category : Microphone