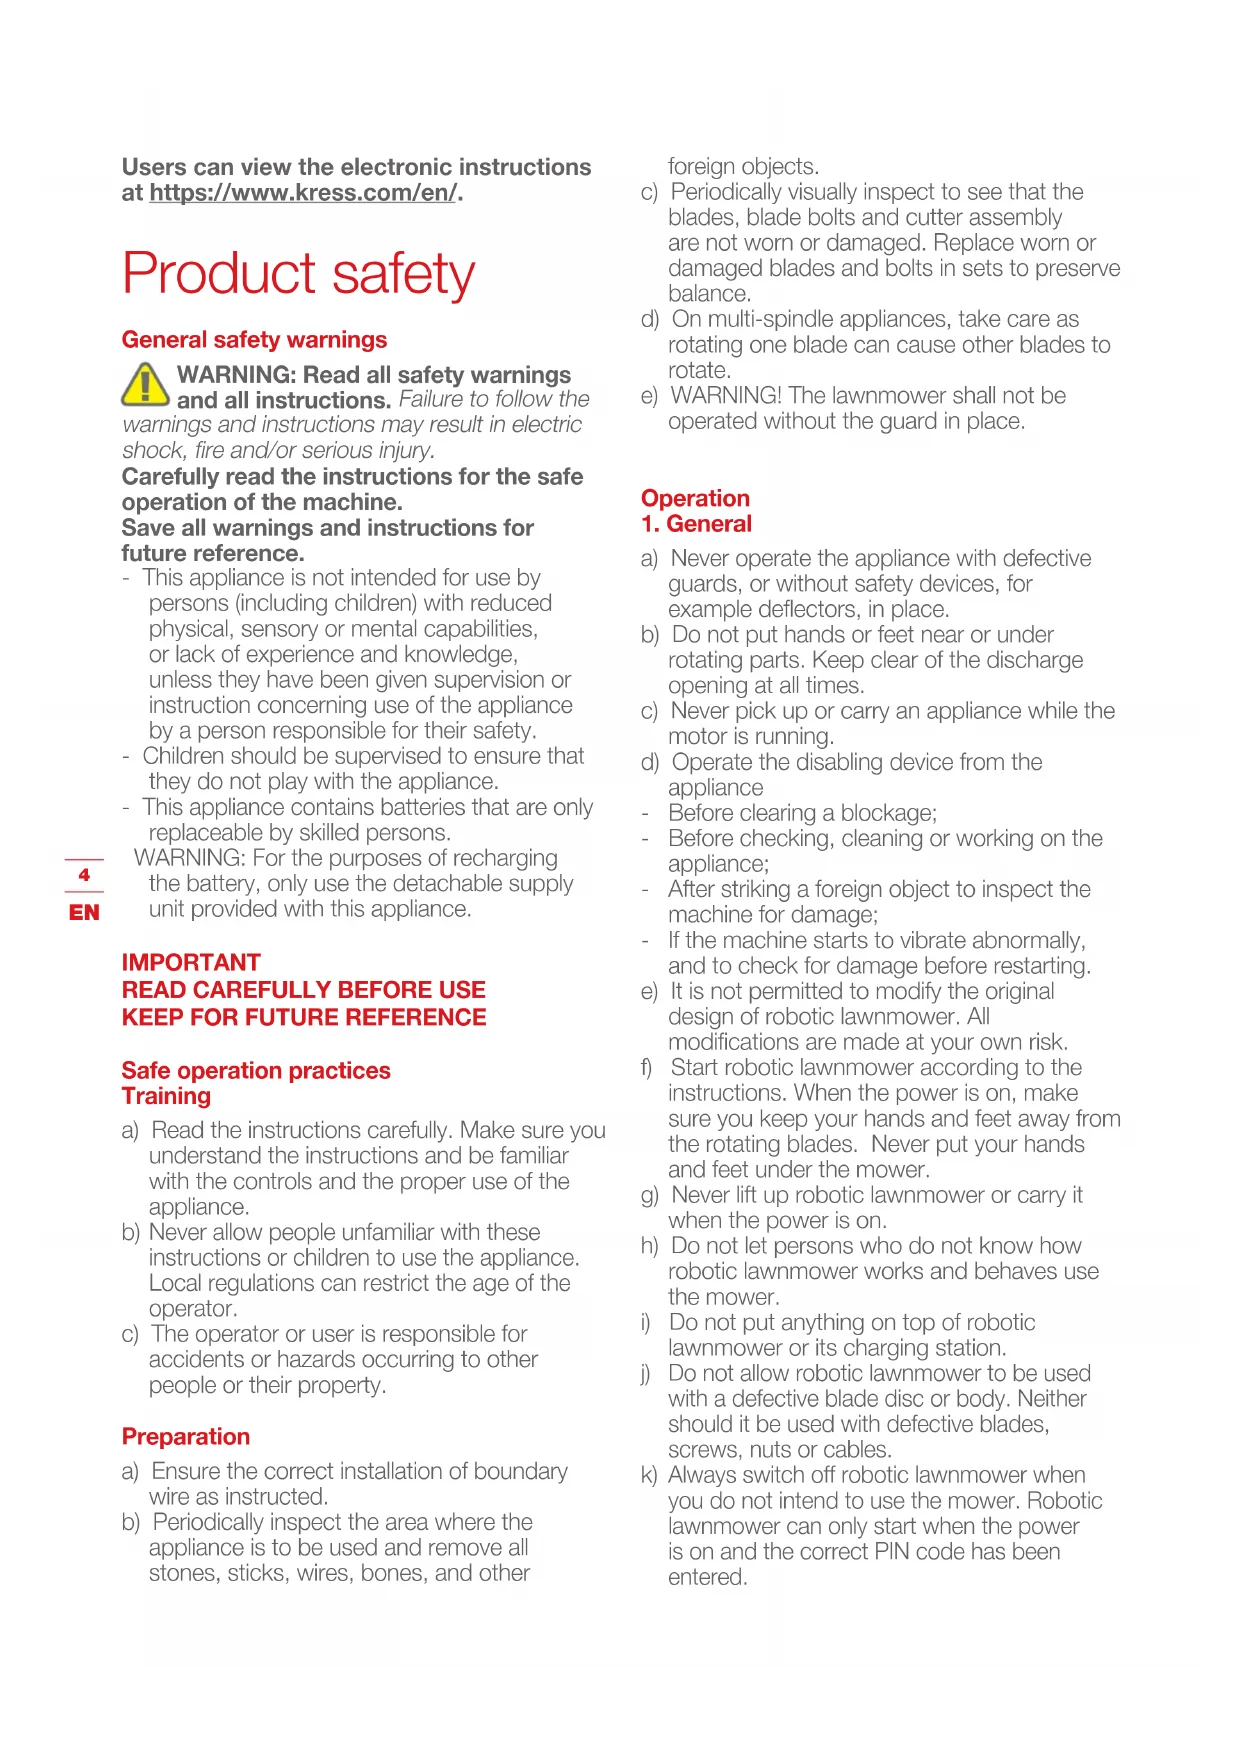
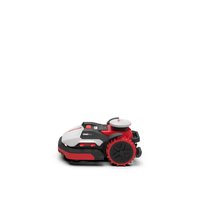
USER MANUAL Mission 1000 KR120E KRESS
En Original instructions
Users can view the electronic instructions at https://www.kress.com/en/.
Product safety
General safety warnings

WARNING: Read all safety warnings and all instructions. Failure to follow th
warnings and instructions may result in electric shock, fire and/or serious injury.
Carefully read the instructions for the safe operation of the machine.
Save all warnings and instructions for future reference.
- This appliance is not intended for use by persons (including children) with reduced physical, sensory or mental capabilities, or lack of experience and knowledge, unless they have been given supervision or instruction concerning use of the appliance by a person responsible for their safety.
- Children should be supervised to ensure that they do not play with the appliance.
- This appliance contains batteries that are only replaceable by skilled persons.
WARNING: For the purposes of recharging the battery, only use the detachable supply unit provided with this appliance.
IMPORTANT
READ CAREFULLY BEFORE USE KEEP FOR FUTURE REFERENCE
Safe operation practices Training
a) Read the instructions carefully. Make sure you understand the instructions and be familiar with the controls and the proper use of the appliance.
b) Never allow people unfamiliar with these instructions or children to use the appliance. Local regulations can restrict the age of the operator.
c) The operator or user is responsible for accidents or hazards occurring to other people or their property.
Preparation
a) Ensure the correct installation of boundary wire as instructed.
b) Periodically inspect the area where the appliance is to be used and remove all stones, sticks, wires, bones, and other
foreign objects.
c) Periodically visually inspect to see that the blades, blade bolts and cutter assembly are not worn or damaged. Replace worn or damaged blades and bolts in sets to preserve balance.
d) On multi-spindle appliances, take care as rotating one blade can cause other blades to rotate.
e) WARNING! The lawnmower shall not be operated without the guard in place.
Operation
1. General
a) Never operate the appliance with defective guards, or without safety devices, for example deflectors, in place.
b) Do not put hands or feet near or under rotating parts. Keep clear of the discharge opening at all times.
c) Never pick up or carry an appliance while the motor is running.
d) Operate the disabling device from the appliance
- Before clearing a blockage;
- Before checking, cleaning or working on the appliance;
- After striking a foreign object to inspect the machine for damage;
- If the machine starts to vibrate abnormally, and to check for damage before restarting.
e) It is not permitted to modify the original design of robotic lawnmower. All modifications are made at your own risk.
f) Start robotic lawnmower according to the instructions. When the power is on, make sure you keep your hands and feet away from the rotating blades. Never put your hands and feet under the mower.
g) Never lift up robotic lawnmower or carry it when the power is on.
h) Do not let persons who do not know how robotic lawnmower works and behaves use the mower.
i) Do not put anything on top of robotic lawnmower or its charging station.
j) Do not allow robotic lawnmower to be used with a defective blade disc or body. Neither should it be used with defective blades, screws, nuts or cables.
k) Always switch off robotic lawnmower when you do not intend to use the mower. Robotic lawnmower can only start when the power is on and the correct PIN code has been entered.
I) Keep your hands and feet away from the rotating blades. Never place your hands or feet close to or under the body when robotic lawnmower is in operation.
m) To avoid using the machine and its peripherals in bad weather conditions especially when there is a risk of lightning.
n) Not to touch moving hazardous parts before these have come to a complete stop.
o) For machines used in public areas, that warning signs shall be placed around the working area of the machine. They shall show the substance of the following text:
Warning! Automatic lawnmower! Keep away from the machine! Supervise children!
2. Additionally when the appliance is operating automatically
a) Do not leave the machine to operate unattended if you know that there are pets, children or people in the vicinity.
Maintenance and storage

WARNING! When the mower is turned upside down the power must always off.
The power should be off during all work on the mower's under frame, such as cleaning or replacing the blades.
a) Keep all nuts, bolts and screws tight to be sure the appliance is in safe working condition.
b) Inspect the robotic lawnmower each week and replace worn or damaged parts for safety.
c) Check especially that the blades and blade disc are not damaged. Replace all blades and screws at the same time if necessary so that the rotating parts are balanced.
d) Ensure that only replacement cutting means of the right type are used.
e) Ensure that batteries are charged using the correct charger recommended by the manufacturer. Incorrect use may result in electric shock, overheating or leakage of corrosive liquid from the battery.
f) In the event of leakage of electrolyte flush with water/neutralizing agent, seek medical help if it comes into contact with the eyes etc.
g) Servicing of the appliance should be according to manufacturers' instructions.
Recommendation
To connect the machine and/or its peripherals only to a supply circuit protected by a residual current device (RCD) with a tripping current of not more than 30 mA.
Residual risks
To avoid injuries, wear protective gloves when replacing the blades.
Transport
The original packaging should be used when transporting robotic lawnmower over long distances.
To safely move form or within the working area:
a) Press the STOP button to stop the mower.
You select the four digit PIN code when you start the mower for the first time.
b) Always switch off robotic lawnmower if you intend to carry the mower.
c) Carry the mower by the handle at the rear under the mower. Carry the mower with the blade disc away from the body.
RF exposure requirements
To satisfy RF exposure requirements, a separation distance of 200mm or more should be maintained between this device and persons during device operation.
To ensure compliance, operators at closer than this distance is not recommended. The antenna used for this transmitter must not be co-located in conjunction with any other antenna or transmitter.
This is a class III appliances and it must only be supplied at safety extra low voltage corresponding to the marking on the appliance.
a) Do not dismantle, open or shred battery pack.
b) Do not short-circuit a battery pack. Do not store battery packs haphazardly in a box or drawer where they may short-circuit each other or be short-circuited by conductive materials. When battery pack is not in use, keep it away from other metal objects, like paper clips, coins, keys, nails, screws or other small metal objects, that can make a connection from one terminal to another. Shorting the battery terminals together may cause burns or a fire.
c) Do not expose battery pack to heat or fire. Avoid storage in direct sunlight.
d) Do not subject battery pack to mechanical shock.
e) In the event of battery leaking, do not allow the liquid to come into contact with the skin or eyes. If contact has been made, wash the affected area with copious amounts of water and seek medical advice.
f) Seek medical advice immediately if a cell or battery pack has been swallowed.
g) Keep battery pack clean and dry.
h) Recharge only with the charger specified by Kress. Do not use any charger other than that specifically provided for use with the equipment.
i) Do not use any battery pack which is not designed for use with the equipment.
j) Keep battery pack out of the reach of children.
k) Retain the original product literature for future reference.
I) Dispose of properly.
m) Do not mix cells of different manufacture, capacity, size or type within a device.
n) Warning! Do not use non-rechargeable batteries.
User manual requirements for wireless product
a) Operation of this device is subject to the following two conditions:
(1) This device may not cause harmful interference, and
(2) this device must accept any interference received, including interference that may cause undesired operation.
b) Caution: Changes or modifications to this unit not expressly approved by the party responsible for compliance could void the user's authority to operate the equipment.
c) NOTE: This equipment generates, uses and can radiate radio frequency energy and, if not installed and used in accordance with the instructions, may cause harmful interference to radio communications. However, there is no guarantee that interference will not occur in a particular installation. If this equipment does cause harmful interference to radio or television reception, which can be determined by turning the equipment off and on, the user is encouraged to try to correct the interference by one or more of the following measures:
- Reorient or relocate the receiving antenna.
- Increase the separation between the equipment and receiver.
- Connect the equipment into an outlet on a circuit different from that to which the receiver
is connected.
- Consult the dealer or an experienced radio/TV technician for help.
Symbols
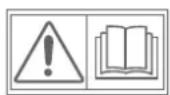
WARNING – robotic lawnmower can be dangerous if incorrectly used. Read through the Operator's manual carefully and understand the content before using your robotic lawnmower.

Batteries may enter water cycle if disposed improperly, which can be hazardous for ecosystem. Do not dispose of waste batteries as unsorted municipal waste.
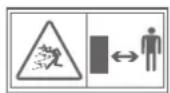
WARNING - Keep a safe distance from the machine when operating.

Do not wash the machine with a high pressure washer
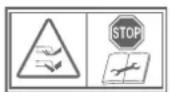
WARNING – Operate the disabling device before working on or lifting the machine.

Read operator's manual
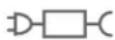
Detachable supply unit
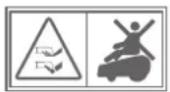
WARNING – Do not ride on the machine.

Class III appliance
Waste electrical products must not be disposed of with household waste. Please recycle where facilities exist. Check with your local authorities or retailer for recycling advice.

Li-Ion battery. This product has been marked with a symbol relating to ‘separate collection’ for all battery packs and battery pack. It will then be recycled or dismantled in order to reduce the impact on the environment. Battery packs can be hazardous for the environment and for human health since they contain hazardous substances.

Do not burn.
Component list
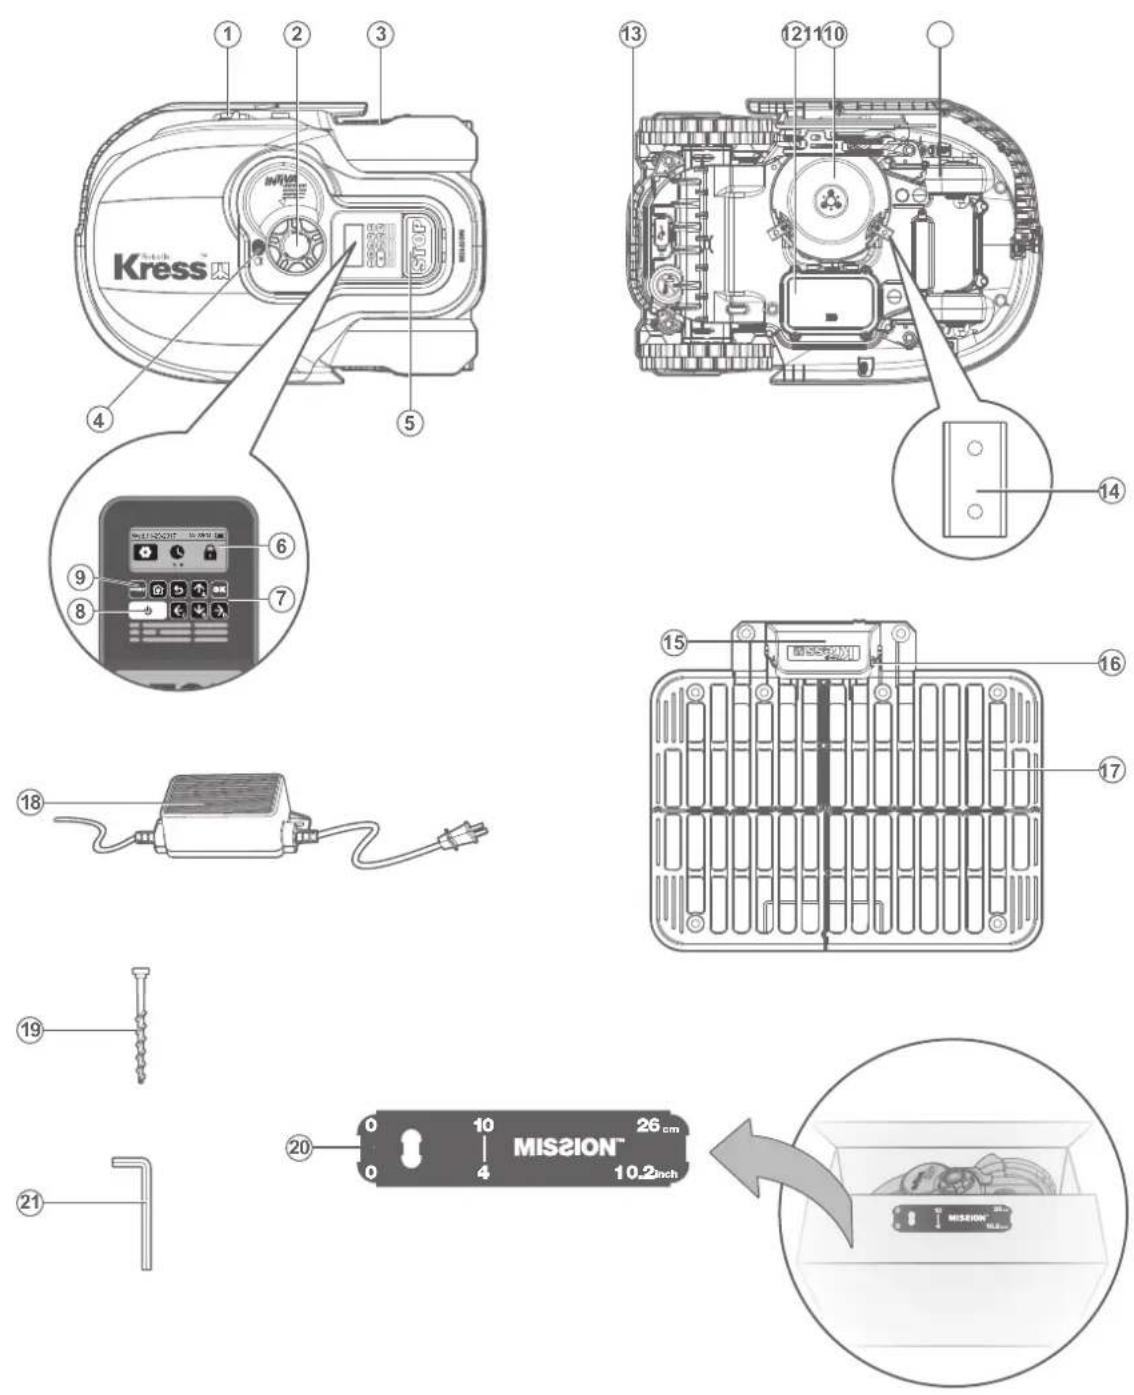
- Charging Strips
- Battery Pack
- Cutting Height Adjustment Knob 13. Handle
- Rear Driving Wheel 14. Cutting Blade
- Rain Sensor 15. Protective Cover
- STOP Button 16. Contact Pins
- Display 17. Charging Base
- Keypad 18. Power Adapter
- ON/OFF key
- Charging Base Fixing Nails
- START key
- Boundary Wire Distance Gauge
- Front Wheel
- Hex Key
- Blade Turning Disc
Technical data
Type KR120E (100-199 - designation of machinery, representative of Robotic Lawnmower)
| KR120E |
| Rated voltage | 20V = Max.* |
| No load speed | 2200/min |
| Cutting area | 1000m2 |
| Cutting diameter | 22cm |
| Cutting height | 30-60mm |
| Cutting height positions | 4 |
| Battery type | Lithium-ion |
| Battery model | KA0102/KA3024 |
| Charging time approx. | 160 min |
| Charger model | KA0200 / KA0201 |
| Charger rating | Input: 100-240V~50/60Hz, 38W, Output: 20V, 1.5A |
| Machinery weight | 11.6kg |
| Protection degree | III |
| App | Y |
| Maximum slope within the work surface | 35% |
| Frequency bands for Bluetooth (MHz) | 2400-2483.5 MHz |
| Maximum Transmitted Power for Bluetooth (dBm) | 8 dBm |
| Frequency bands for WIFI (MHz) | 2400-2483.5 MHz |
| Maximum Transmitted Power for WIFI (dBm) | 20 dBm |
| Frequency band of inductive loop systems | 77 Hz |
| Max. radio-frequency power of inductive loop systems | 82 dBμA/m |
* Voltage measured at no load. Initial battery voltage reaches maximum of 20 volts. Nominal voltage is 18 volts.
Noise data
| A weighted sound pressure L | pA = 47.72 dB (A), KpA = 2.06 dB(A) |
| A weighted sound power L | wA = 58.72 dB (A), KwA = 2.06 dB(A) |
| Wear ear protection when sound pressure is over | 80dB(A) [IMAGE] |
A degree of noise from the machine is not avoidable. Route noisy work is to be licensed and limits for certain periods. Keep rest periods and they may need to restrict the working hours to a minimum. For their personal protection and protection of people working nearby, an appropriate hearing protection shall be worn.
Accessories
| KR120E |
| Screw 9 |
| Charging base 1 |
| Charging base fixing nails 8 |
| Hex key 1 |
| Boundary wire distance gauge 2 |
| Blade 9 |
| Battery pack (KA0102/KA3024) 1 |
| Charger (KA0200 / KA0201) 1 |
We recommend that you purchase genuine accessories listed in the above list from the same store that sold you the tool. Refer to the accessory packaging for further details. Store personnel can assist you and offer advice.
Intended Use
The garden product is intended for domestic lawn mowing. It is designed to mow often, maintaining a healthier and better looking lawn than ever before. Depending on the size of your lawn, Mission™ may be programmed to operate at any time or frequency. It is not intended for digging, sweeping or snow cleaning.
Maintenance
Your Mission™ works hard and needs to be cleaned and checked from time to time. Some parts will require replacement as they become worn. Never use your Mission™ with defective on/off switch.
Switch off the machine before carrying out any service or maintenance.
Here's how to take care of your Mission™.
1
Keep it Sharp

WARNING: Before cleaning, adjusting, or replacing the blades, turn your Mission™ OFF and put on protective gloves.

WARNING: When fitting new blades, make sure you replace ALL the blades. Always use new screws when fitting blades. This is important to ensure blade retention and balance the blade ring disc. Failure to use new screws could cause serious injury.
The Mission™ does not cut grass like other mowers. Its cutting blades are razor sharp on 4 edges and rotate in both directions for maximum cutting capacity. Each blade of your Mission™ has 4 cutting edges. The blade turning disc will make forward and reverse rotation at random to use 4 cutting edges and minimize the frequency of replacing the blades. And with new material, the service life of each cutting blade will be 3 times longer than that of other brands' when it is programmed to mow every day. Always check to see if the blades are chipped or damaged and replace them if they are. When the cutting blades are dull and worn out, they should be replaced with the spare blades provided with your Mission™. Spare blades are also available at your nearest Kress retailer.
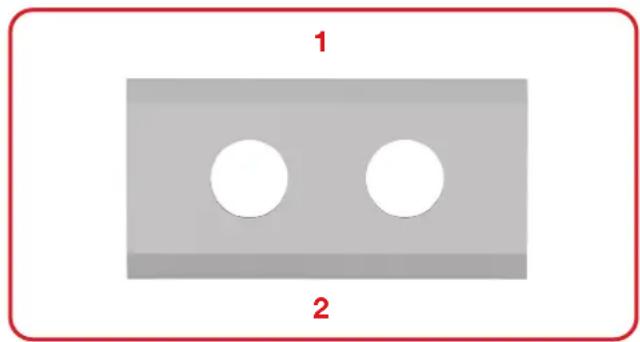
A. Replace the blades
Usually your Mission™'s blades need to be reversed each month and replaced each 2 months. When replacing the blades, make sure to replace all of them at the same time. You can replace them with one of the spare blade kits and extra blade screws supplied with your Mission™.
Before attempting to replace your Mission™'s blades, turn the power off and put on protective gloves and follow these steps:
- Gently flip the Mission TM over.
- Remove the battery cover and remove the battery.
- Take the screws off the blades with a screwdriver.
- Firmly screw on the new blades.
- Refit the battery and the battery cover.
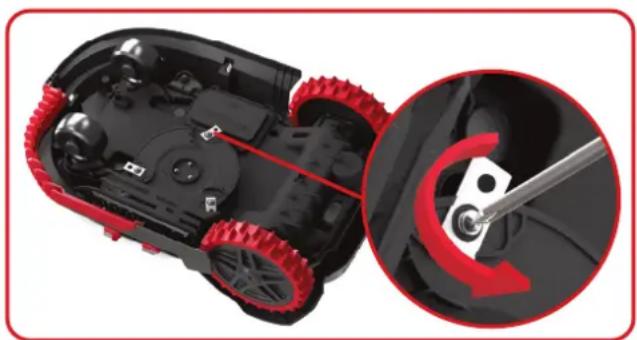
Important: After screwing the blade to the blade disc, make sure the blade is able to spin freely.
2
Keep it Clean

WARNING: Before cleaning, turn your Mission™ OFF. Put on protective gloves before cleaning the blade turning disc and do not rinse or flush with water.
A. Cleaning the Body
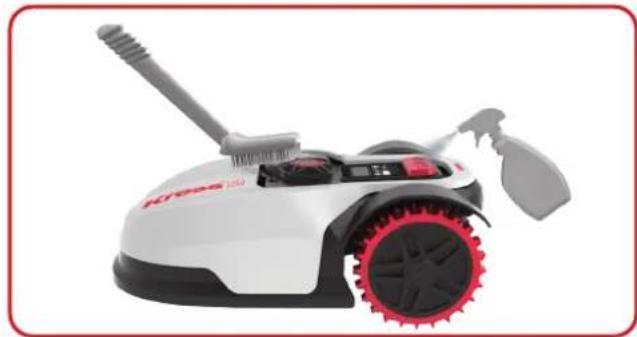
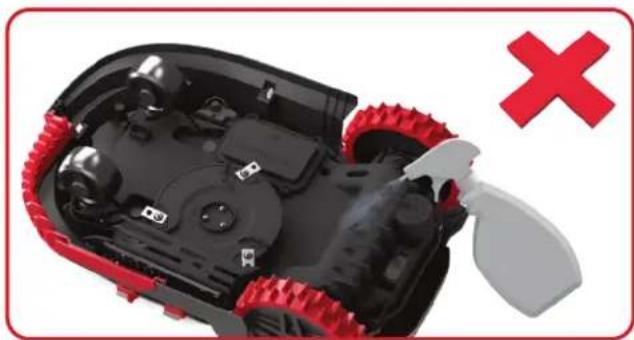
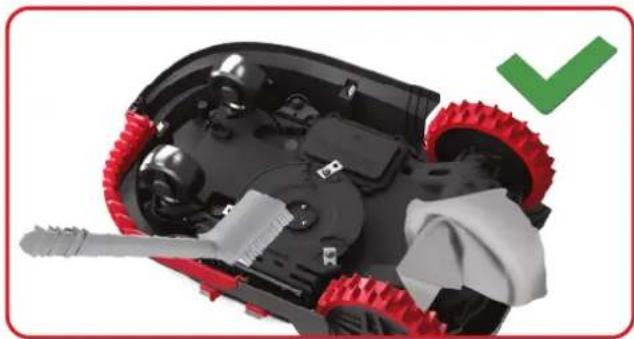
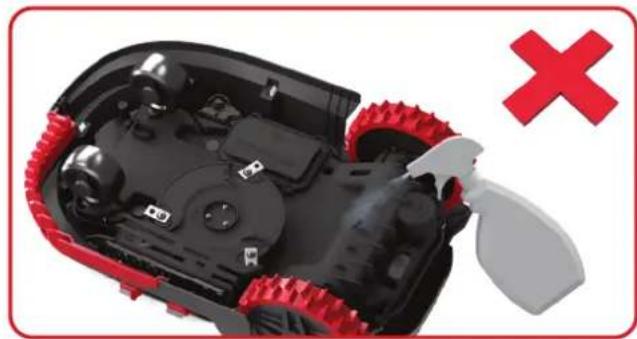
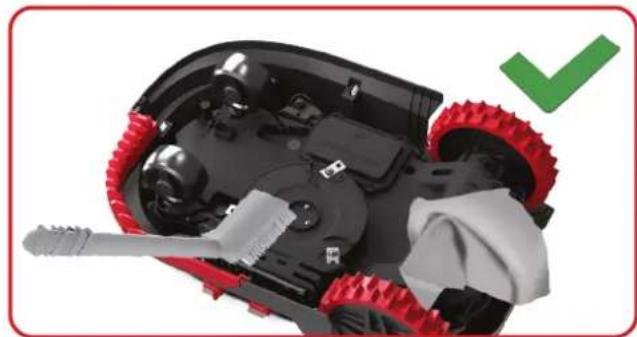
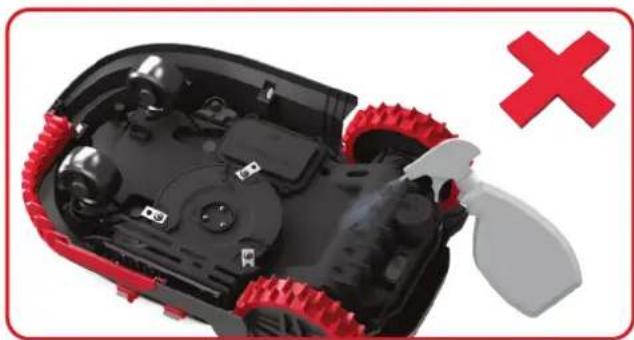
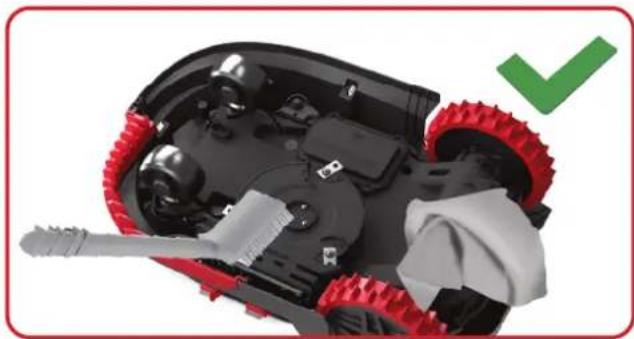
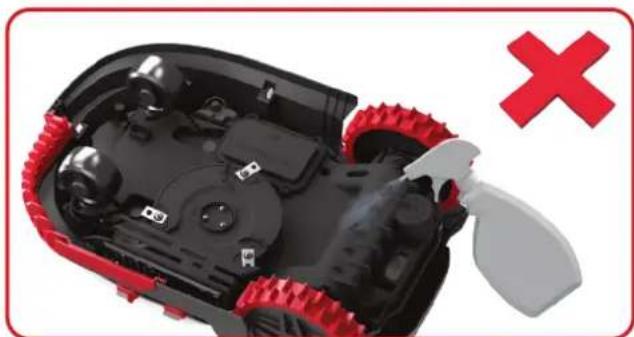
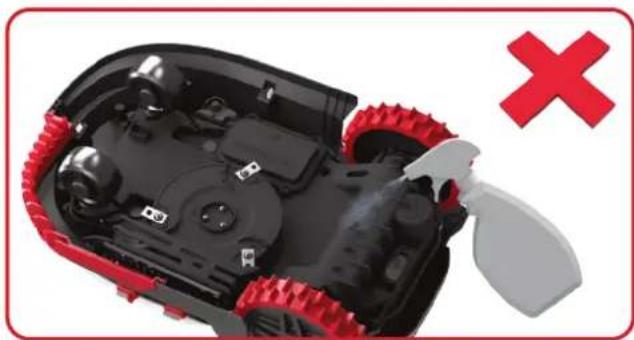
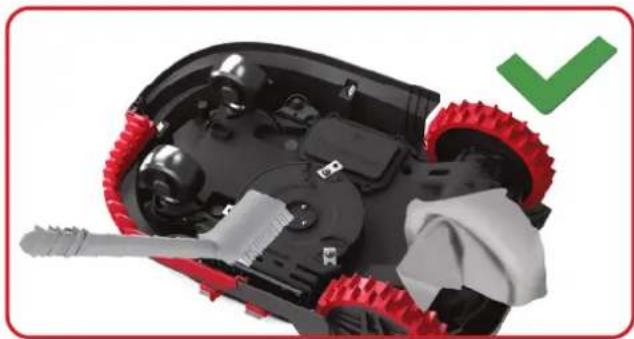
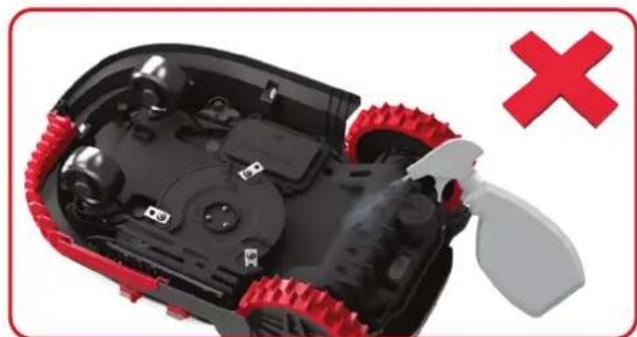
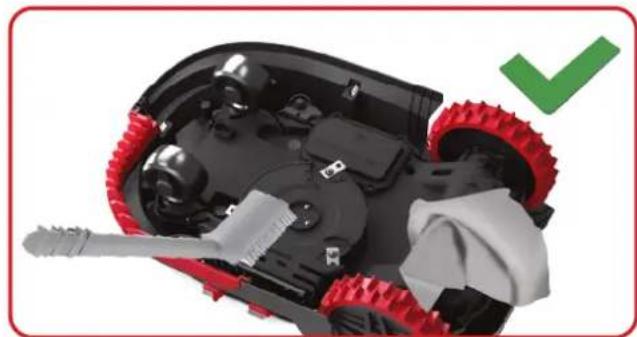
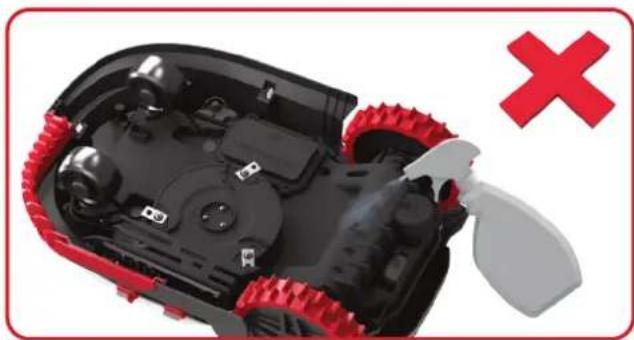
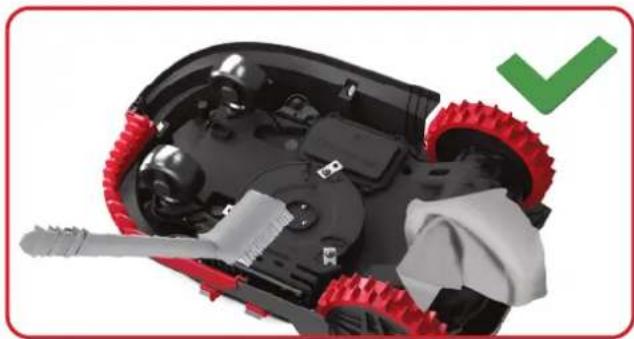
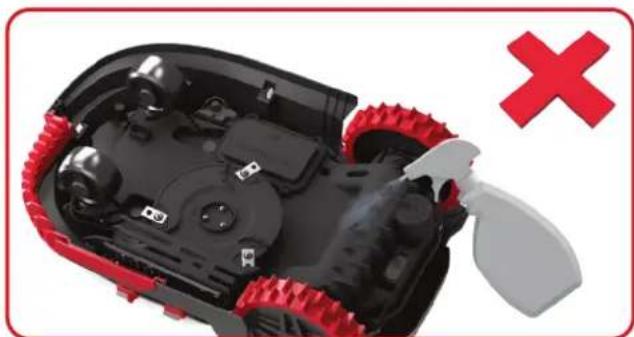
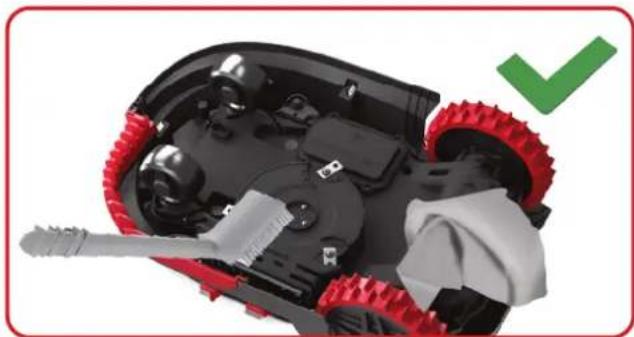
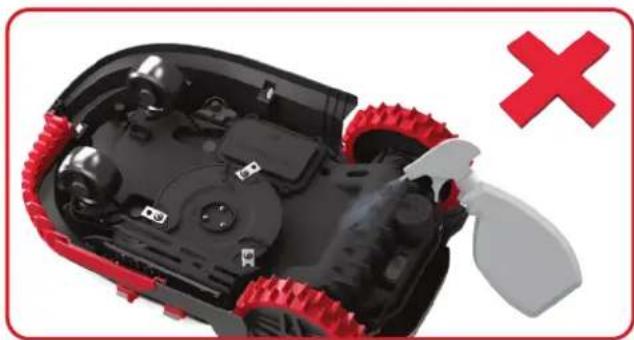
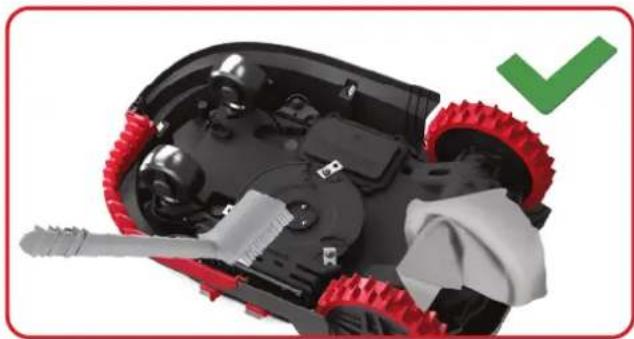
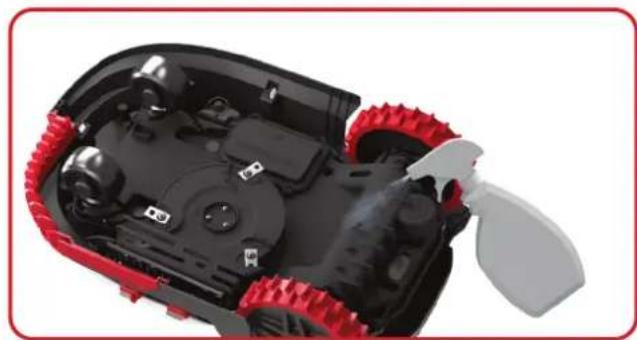
Your Mission™ will live a much happier and longer life if it is cleaned regularly. Since your Mission™ is an electric machine, you will need to take care when cleaning. DO NOT use a hose, high pressure washers or otherwise pour running water on your Mission™. It is best to use a spray bottle filled with water. When cleaning the machine body, use a soft brush or clean cloth and avoid using solvents or polishes. Lastly, remove all build up of grass clippings and debris.
B. Cleaning the underside
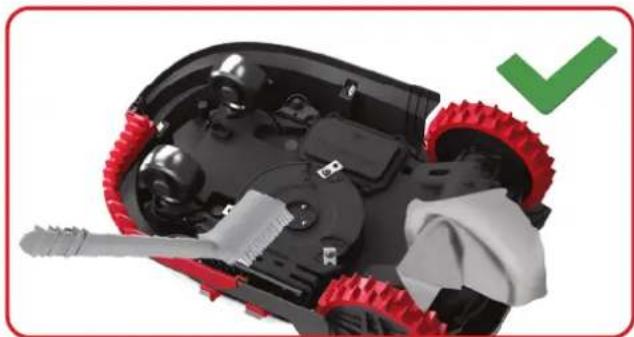
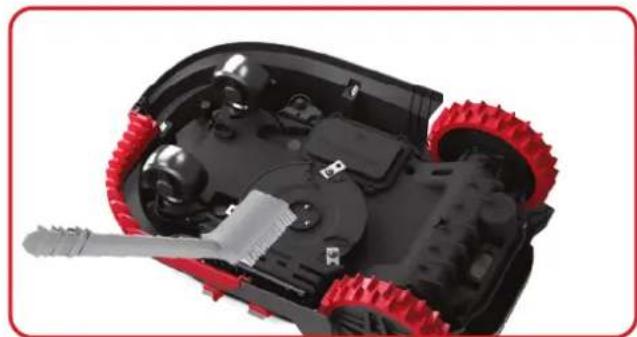
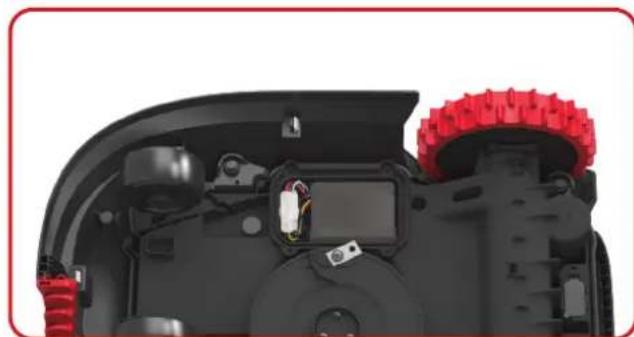
Again, it is important that you power the Mission™ OFF and wear protective gloves before touching the blade turning disc. First, flip your Mission™ upside down to expose its underside. Here you will see the blade disc, the chassis, and the front wheel and driving wheels. Clean everything thoroughly with a soft brush or moist rag.

WARNING: NEVER clean the underside of Mission™ with running water. Component damage can occur.
Rotate the blade disc to ensure it rotates freely. Check the blades spin freely around the fixing screws. Remove any obstructions.
IMPORTANT: Remove any lodged debris so that it does not cause a crack in the blade disc. Even the tiniest crack can decrease your Mission™'s mowing output.
Clean the contact pins located on the charging base and the charging strips located on the Mission ™ using a cloth. Remove any built up grass clippings or debris around the contact pins and charge strips periodically to ensure the Mission ™ successfully charges each time.
3
Battery Life
The heart of the Mission ™ is its 20V Li-Ion Battery. For proper storage of the battery, make sure it is fully charged and kept in a cool dry place between (20°C ± 5°C) .
NOTE: The recommend Mission™ operation temperature is between 0°C - 45°C.
The life-span of the Mission™'s battery depends on various factors, such as:
• The length of the mowing season in your region
• Amount of hours the Mission TM mows per day
- Battery maintenance during storage
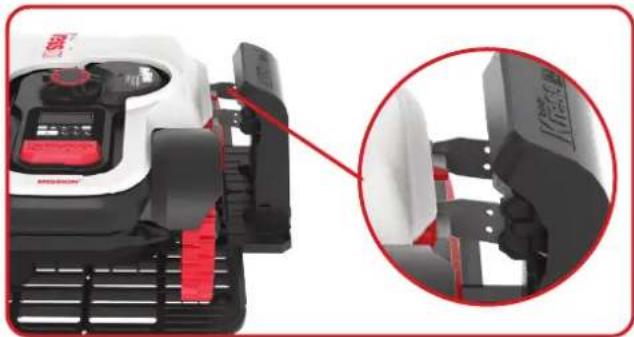
Mission TM can be charged manually without the boundary wire.
-
Connect the charging base to a suitable power supply. The green light on the charging base will turn on.
-
Manually dock the Mission TM into the charging base while the Mission TM is powered off.
-
The green light on the charging base will be flashing and Mission™ will begin to charge.
4
Winter Hibernation
Your Mission ™ will live longer and healthier if it is allowed to hibernate. So even though it is tough, we recommend storing your Mission ™ in your shed or garage during the winter.
Before you prepare your Mission™ for winter hibernation, we recommend you:
• Thoroughly clean your Mission™
• Fully charge the battery
- Turn the power off
To maximize the battery life, fully charge the battery before storage during winter.

WARNING: Protect the underside of Mission™ from water. NEVER store Mission™ upside down outdoors.
The boundary wire can be left in the ground although its ends should be protected, such as placed in a tin can with grease. If the charging base is left outside for the winter, leave the boundary wire connected.
NOTE: When bringing the Mission™ back to work after winter hibernation, make sure the charging strips and contact pins are clean. We recommend using a fine grade emery cloth to clean the contacts. Using the app, make sure the date and time are correct and send Mission™ back to what it loves doing: mowing.
5
Replacing the battery

WARNING: Power off before attempting any adjustment, replacement or repair. Before replacing the blades, turn your Mission™ OFF and put on protective gloves.
If you need to replace the battery, follow these steps:
- Gently turn your Mission™ upside down.
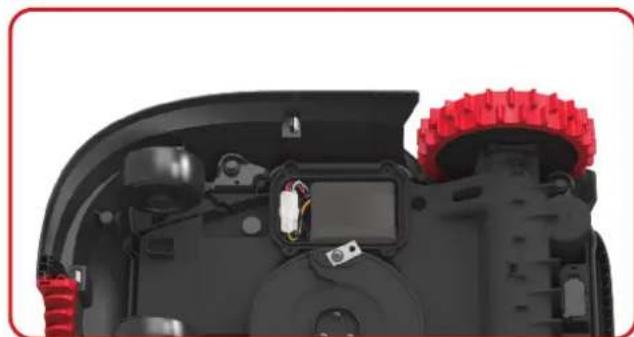
- Remove the screws on the battery cover. Remove the battery cover.
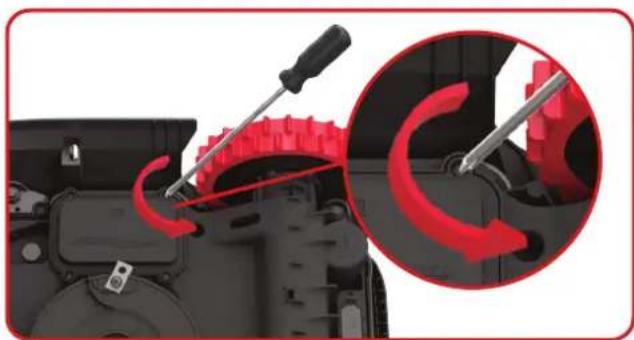
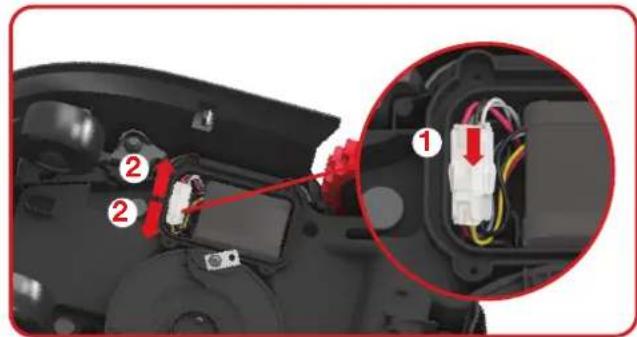
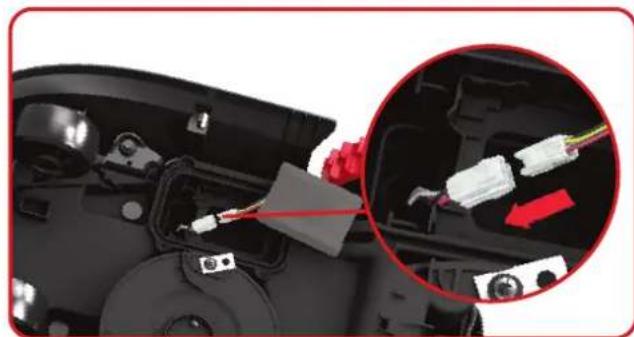
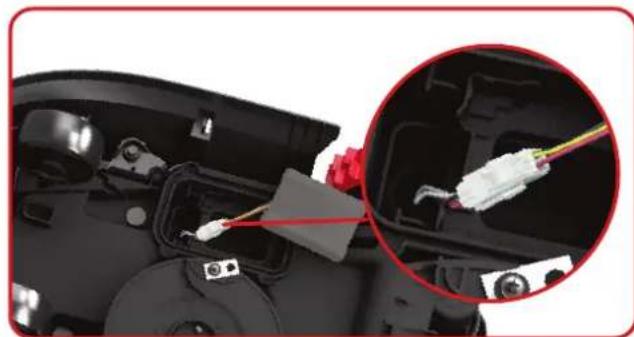
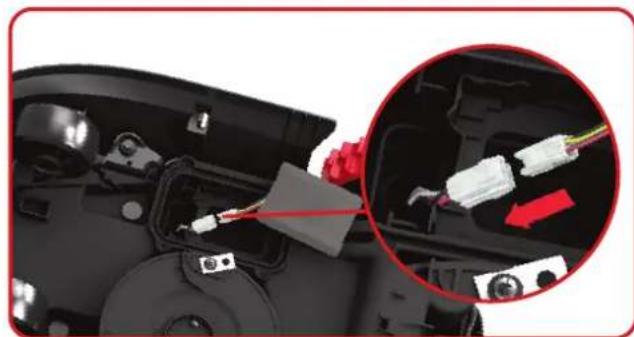
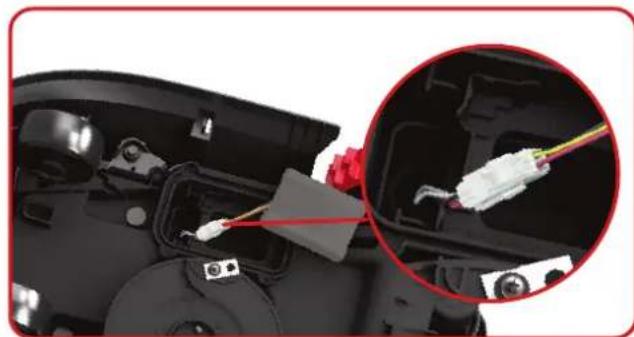
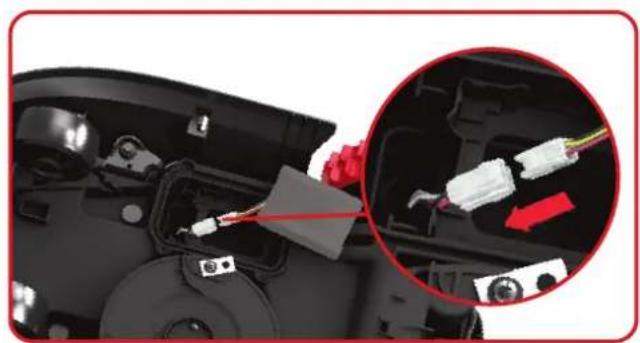
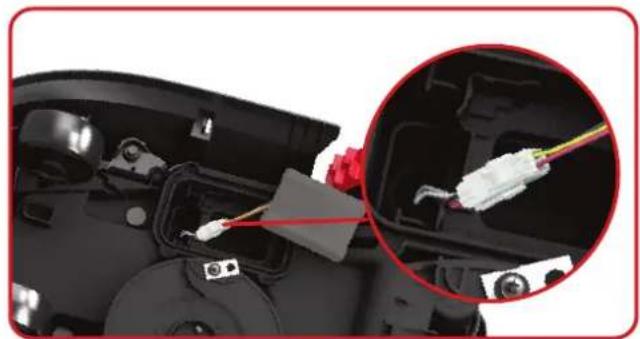
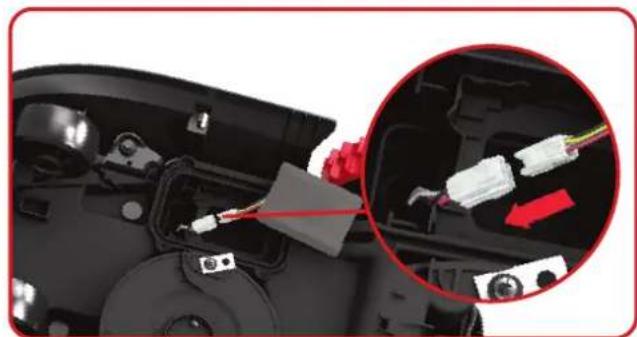
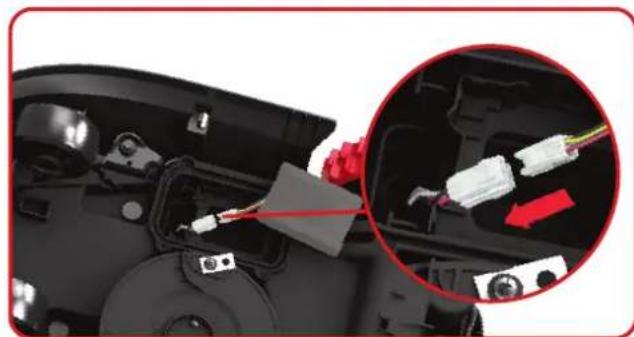
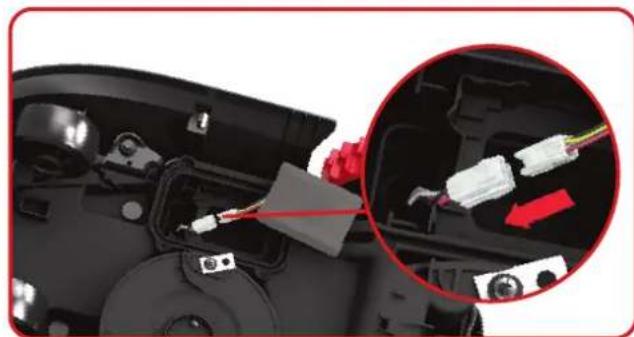
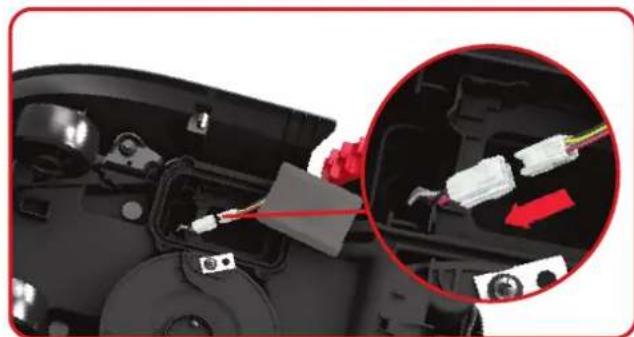
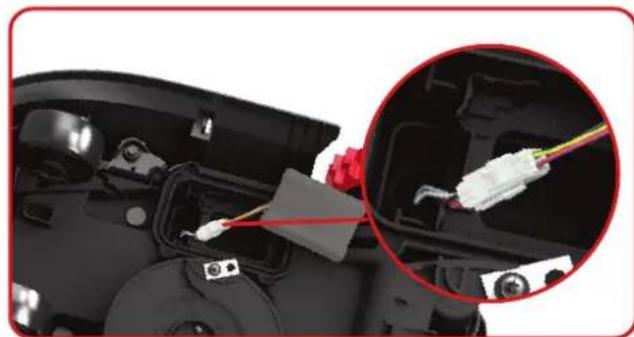
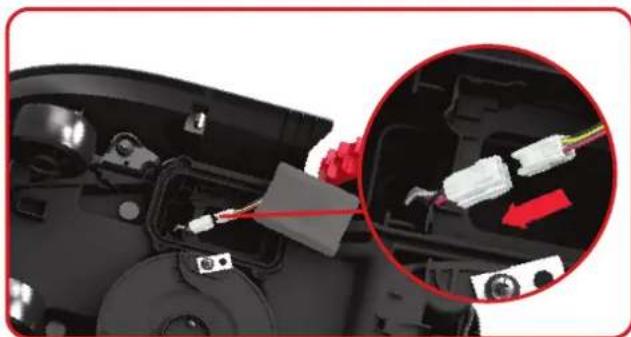
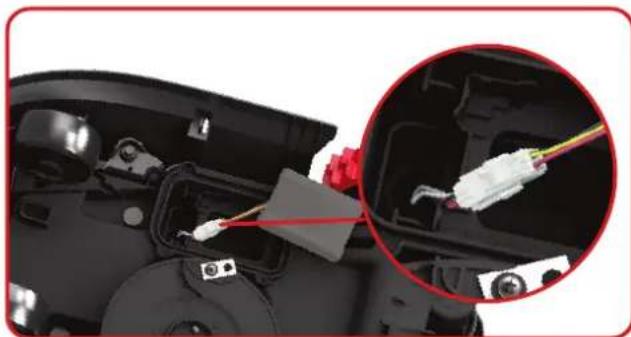
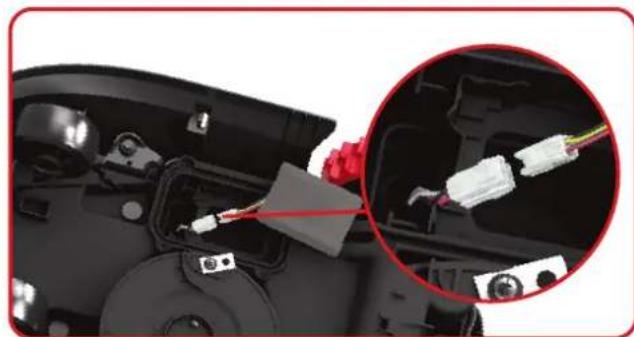
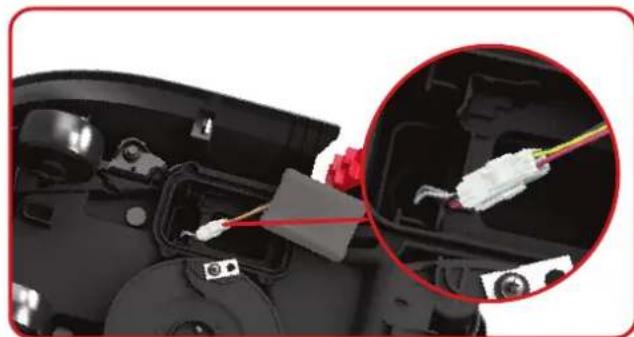
- Lift out the old battery carefully. Press the latch and release the connectors.
NOTE: Do not pull by the cables. Hold the connectors and release the latch.
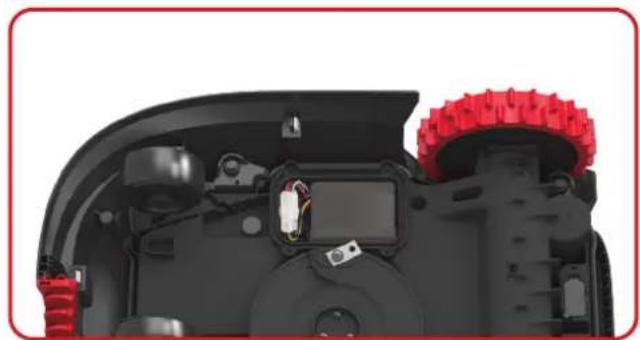
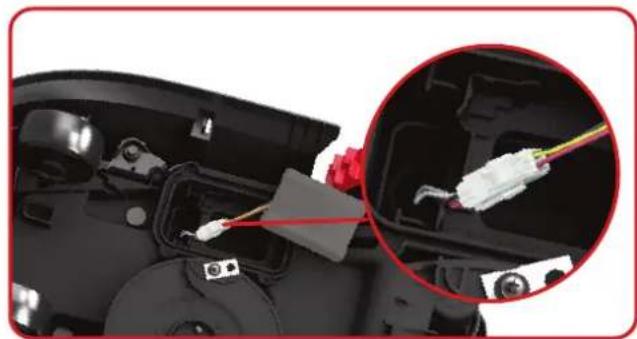
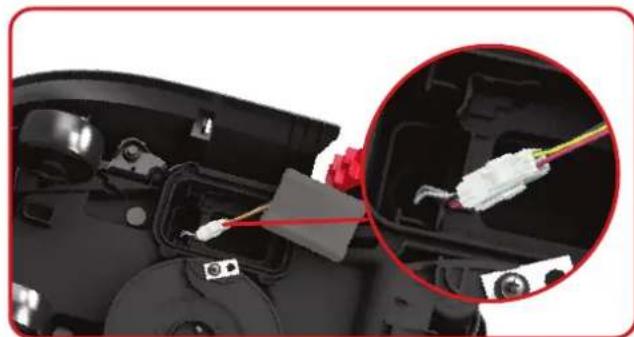
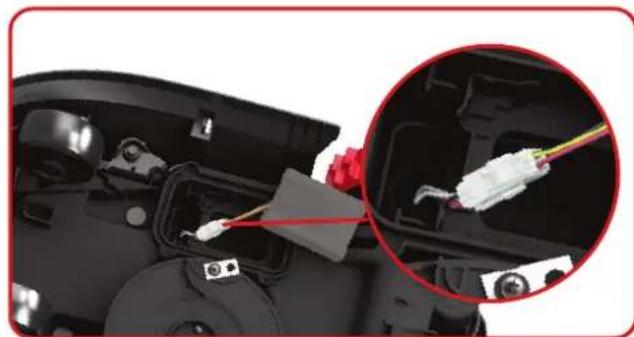
- Connect a new original battery by attaching the connectors until they click into position.
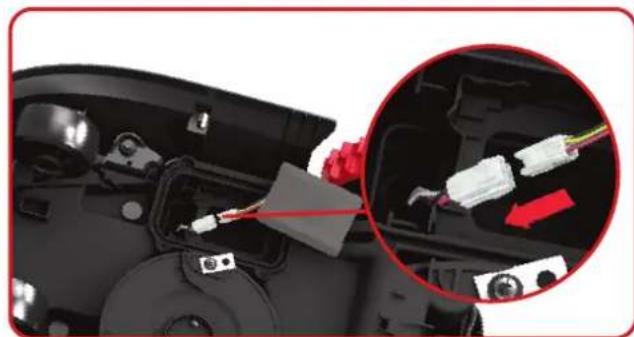
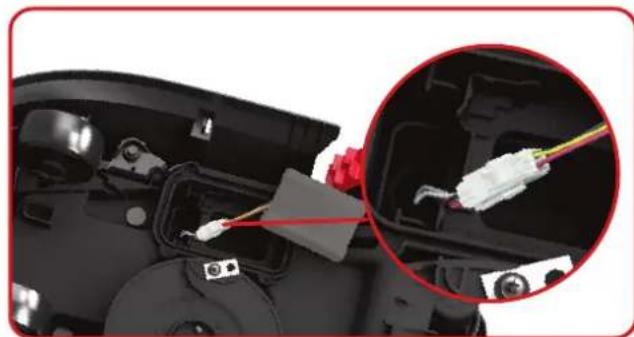
- Fit the battery as shown. Place the cover back in its position and tighten the screws.
Troubleshooting
If your Mission™ does not work correctly, follow the trouble shooting guide below. If the fault persists, contact your dealer.
| Symptom Cause Solution | | |
| The LED light on the charging base does not turn on. | There is no power. | Check the charging base is connected properly to the charger and the charger is connected to a suitable power supply. |
| Red light turns on the charging base. | The boundary wire isn't connected. | Check that the boundary wire has been connected correctly to the charging base. Check there are no breaks in the boundary wire, especially in the wire ends. |
| Your MissionTM is inside its working area but the display says “outside working area” and the LED is green. | The boundary wire ends are clamped incorrectly. | Reverse the boundary wire ends. |
| MissionTM cannot correctly dock with the Charging base. | Environmental influences. Restart | Mission TM. |
| Poor connection caused by debris on the charging strip. | Clean the contact pins located on the charging base and the charging strip on MissionTM using a cloth. |
| MissionTM runs outside the boundary wire. MissionTM does not mow an area within a boundary wire zone. MissionTM reverses or rotates erratically near the boundary wire. | The boundary wire of another MissionTM or another branded robotic mower is positioned too closely. | Ensure your MissionTM boundary wire has at least 1m of spacing between the neighboring boundary wire. |
| The boundary wire has been installed with acute angles. | Check the boundary wire to ensure the angles are smooth. |
| In wet conditions, the boundary wire electric signal may leak where wire has been joined or repaired. | Check boundary wire joints. Insulate to provide a fully waterproof connection. |
| There is boundary wire electric signal leakage due to broken insulation. | Repair damaged boundary wire insulation with insulation tape. |
| The cutting area is larger than the allowable cutting area for MissionTM. | Decrease the cutting area. |
| MissionTM exits the boundary wire due to high speed when going down a hill. | The boundary wire is placed on a slope steeper than 17% (10°). | Reposition the boundary wire away from slopes that are steeper than 17% (10°). |
Environmental protection

Waste electrical products should not be disposed of with household waste. Please recycle where facilities exist. Check with your Local Authority or retailer for recycling advice.
We,
Positec Germany GmbH
Postfach 32 02 16, 50796 Cologne, Germany
On behalf of Positec declare that the product
Description Robotic Lawnmower
Type KR120E (100-199- designation of machinery, representative of Robotic Lawnmower) (Year, article number and month of serial number are placed on the back page. The complete serial number is clearly stated on the enclosure of lawnmower) with battery charger KA0200 / KA0201 and charging base KA0071
Function Cutting grass
Complies with the following Directives,
2006/42/EC, 2014/30/EU, 2014/35/EU, 2011/65/EU&(EU)2015/863, 2000/14/EC amended by 2005/88/EC, 2014/53/EU
2000/14/EC amended by 2005/88/EC
- Conformity Assessment Procedure as per Annex V
- Measured Sound Power Level 58.72 dB (A)
- Declared Guaranteed Sound Power Level 61 dB (A)
The notified body Intertek, Semko AB, NB-No. 0413 has carried out an EU type examination according to Directive 2014/53/EU and issued the following EU type examination certificate: SE-RED-2200106
Standards conform to,
For Lawn mower: EN 50636-2-107:2015+A1:2018+A2:2020+A3:2021, EN 60335-1:2012+A11:2014+A
13:2017+A1:2019+A2:2019+A14:2019+A15:2021, EN IEC 62311:2020, EN IEC 55014-1:2021, EN IEC 55014-2:2021, EN IEC 61000-3-2:2019+A1:2021, EN 61000-3-3:2013+A1:2019+A2:2021
For Induction loop system: EN 303 447 V1.1.1
For Ultrasonic module: EN 55011:2016+A11:2020
For Bluetooth & WIFI module (2.4G): EN 301 489-1 V2.2.3, EN 301 489-17 V3.2.4, EN 300 328 V2.2.2
For charger: EN IEC 55014-1:2021, EN IEC 55014-2:2021, EN IEC 61000-3-2:2019+A1:2021, EN
61000-3-3:2013+A1:2019+A2:2021, EN IEC 60335-2-29:2021+A1:2021, EN 60335-1:2012+A11:2014+A
13:2017+A1:2019+A2:2019+A14:2019+A15:2021, EN 62233:2008
For Noise: EN ISO 3744:2005
For RoHS: EN IEC 63000:2018
The person authorized to compile the technical file,
Name Marcel Filz
Address Positec Germany GmbH Postfach 32 02 16, 50796 Cologne, Germany
2023/09/19
Allen Ding
Deputy Chief Engineer, Testing & Certification
Positec Technology (China) Co., Ltd.
18, Dongwang Road, Suzhou Industrial
Park, Jiangsu 215123, P. R. China
24
De
3
4
Überwintern
18, Dongwang Road, Suzhou Industrial Park, Jiangsu 215123, P. R. China
3
4
Hibernation
18, Dongwang Road, Suzhou Industrial
Park, Jiangsu 215123, P. R. China
50
I
3
4
18, Dongwang Road, Suzhou Industrial
Park, Jiangsu 215123, P. R. China
3
4
Hibernación
Para RoHS: EN IEC 63000:2018
18, Dongwang Road, Suzhou Industrial
Park, Jiangsu 215123, P. R. China
76
NL
3
4
Winteropslag
18, Dongwang Road, Suzhou Industrial
Park, Jiangsu 215123, P. R. China
A. Wymiana ostrzy
3
4
Dla RoHS: EN IEC 63000:2018
18, Dongwang Road, Suzhou Industrial
Park, Jiangsu 215123, P. R. China
BEHOLD TIL SENERE BRUG
To safely move form or within the working area:
2
Hold den ren

4
Opbevarelse om vinteren
105
DK
Fejlfinding
Til RoHS: EN IEC 63000:2018
18, Dongwang Road, Suzhou Industrial
Park, Jiangsu 215123, P. R. China
A. Erstatt bladene
2
Hold den ren

3
Batterilevetid
4
Vinterdvale
Mission™ får lengre levetid og fungerer bedre hvis den får gå i dvale om vinteren. Så selv om det er tøft, anbefaler vi at du lagrer Mission™ i uteboden eller garasjen om vinteren.
NOR
Feilsøking
Hvis Mission™ ikke fungerer som den skal, kan du bruke veiviseren for feilsøking nedenfor. Hvis problemet ikke løses, tar du kontakt med forhandleren.
For RoHS: EN IEC 63000:2018
18, Dongwang Road, Suzhou Industrial
Park, Jiangsu 215123, P. R. China
A. Byta ut bladen
128
SV
3
Batterilivstid
The life-span of the Mission™'s battery depends on various factors, such as:
4
Vinterförvaring
Felsymptom
18, Dongwang Road, Suzhou Industrial
Park, Jiangsu 215123, P. R. China

MIS2ION™
www.kress-robotik.com