
RM4eco - Video camera Revier Manager - Free user manual and instructions
Find the device manual for free RM4eco Revier Manager in PDF.

| Product type | Connected hunting camera 4G/LTE |
| Brand | Revier Manager |
| Model | RM4eco |
| Dimensions | 154 x 112 x 79 mm |
| Weight (without batteries) | 474 g |
| Power supply | 4, 8 or 12 AA batteries (1.5V alkaline) or external 6 V DC |
| Standby consumption | < 0.3 mA (< 7 mAh/day) |
| Protection | IP66 |
| Operating temperature | -20°C to +60°C |
| Frequencies | 4G (LTE), 3G (UMTS), 2G (GPRS/EDGE) |
| Image resolution | 3 / 5 / 8 / 12 / 16 / 20 MP (compressed transmission to 800 x 600) |
| Viewing angle | 58° |
| Motion sensor | Passive infrared multi-zone (PIR) |
| Detection range | 15 meters |
| IR flash range | 12 meters (adjustable) |
| Trigger time | 0.6 seconds |
| Shutter speed | 1/15 s (fast mode 1/20 s) |
| Number of images per trigger | 1 to 10 (adjustable, first image transmitted) |
| Trigger interval | 10 minutes (3 minutes with Premium license) |
| Storage | SD card up to 32 GB (Micro SD with adapter not recommended) |
| Antenna | 3 dB (removable) |
| Color | Camouflage |
| Password protection | Yes, adjustable (4 digits) |
| Application | Reviermanager (iOS, Android, Web) |
| Package contents | Camera with SIM and SD card, antenna, strap, manual |
| Warranty | 24 months (device), 6 months (accessories) |
Frequently Asked Questions - RM4eco Revier Manager
User questions about RM4eco Revier Manager
0 question about this device. Answer the ones you know or ask your own.
Ask a new question about this device
Download the instructions for your Video camera in PDF format for free! Find your manual RM4eco - Revier Manager and take your electronic device back in hand. On this page are published all the documents necessary for the use of your device. RM4eco by Revier Manager.
USER MANUAL RM4eco Revier Manager
BENUTZERHANDBUCH | USER MANUAL MANUEL DE L'UTILISATEUR
INHALTSVERZEICHNIS
Menü Einstellungen
flowchart
graph TD
    A["↑"] --> B["←"]
    B --> C["SHOT"]
    C --> D["↓"]

- Technical Specifications ...... 22
- Description of the buttons .... 24
- Description of the screen 27
- Insert/remove the batteries....28
- Initial start-up of the camera 29
- Activate your App account 30
- Features of the Reviermanager App....31
- Quick check 32
- General Information ...... 34
- Safety Instructions .... 35
- Information about Warranty and Usage 37
1. TECHNICAL SPECIFICATIONS
| MODEL | RM4eco (LF-E) |
| FREQUENCY | 4G (LTE)3G (UMTS)2G (GPRS/EDGE) |
| EXTERNAL ANTENNA | 3dBi |
| RESOLUTION | 3 / 5 / 8 / 12 / 16 / 20 MP adjustable transmission compressed |
| LENS | 58° field of view |
| MOTION DETECTOR | Passive Multi-Zone Infrared Sensor (PIR) |
| COVERAGE | 15 meter |
| IR-FLASH (RANGE) | max. 12 m adjustable in the cam menu |
| NIGHT MODE | 400 Lux |
| TRIGGER TIME | 0,6 sec. |
| MAX. EXPOSURE | 1/15 sec.,in quick mode 1/20 sec. |
| AMOUNT OF PICS/TRIGGER ON SD | 1-10 recordings adjustable |
| TRIGGER INTERVAL (MOTION)/MANUAL REQUEST | 10 min. /approx. 3 min. with active premium license* |
| DIMENSIONS | 154 x 112 x 79 mm |
| WEIGHT | 474 grams (w/o batteries) |
| SD-CARD | up to 32 GB (Micro-SD adapter not recommended) |
| POWER SUPPLY | 4, 8 or 12x AA batteries or 6 Volt DC |
| POWER CONSUMPTION (STANDBY) | < 0.3 mA (< 7 mAh / day) |
| OPERATING TEMPERATURE | - 20°C up to + 60°C |
| PROTECTION | IP 66 |
| COLOR | Camouflage |
| PASSWORD PROTECTION | yes, adjustable |
Dear Valued Customer!
We are very pleased that you have purchased our camera and want to use our Reviermanager application!
Included in the delivery: Camera incl. SIM card and SD Card, external antenna, fastening belt, manual including warranty card.

All-In-One Solution:
Additionally to the purchase of the camera the usage of the Reviermanager and the data transfer is free of charge for 1 year.

Plug & Play:
The contained SIM card and SD card are inserted already. The Reviermanager is ready for use in a few steps.

Easy & structured:
The camera is controlled by the user-friendly Reviermanager application. For more information please see „7. Activate your App account“.

Austrian quality product:
The cameras are assembled in Austria. Before a device will be delivered to a retailer, the camera is tested extensively.
This chapter includes some information about the safe and efficient operation. Please read the information, before activating the camera online.
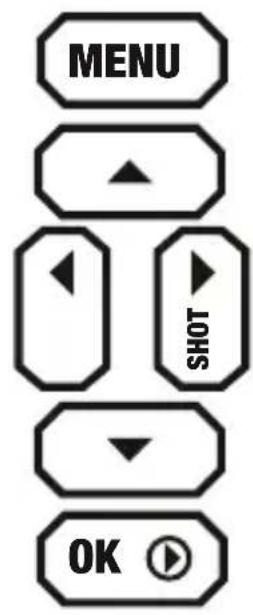
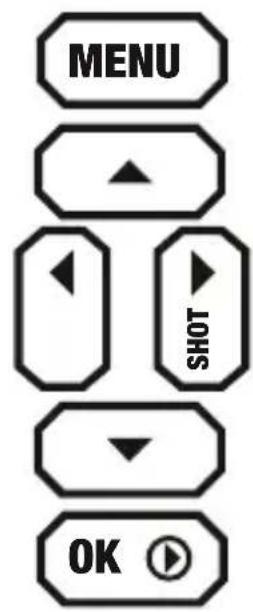
2. DESCRIPTION OF THE BUTTONS
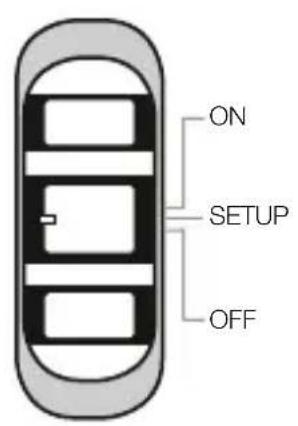
OFF/SETUP/ON-Switch

OFF
The camera is off, display and LED are dark.

SETUP
In the menu, camera settings can be changed and the status can be checked. The camera dials into the mobile network within 20-30 seconds. Only when the service provider is shown on the display, the camera can be switched to ON.

ON
The display turns dark, the red LED at the front flashes 10 times, after which the camera is “active”. It will now react to commands from the “Reviermanager” app and takes pictures when movement is detected.
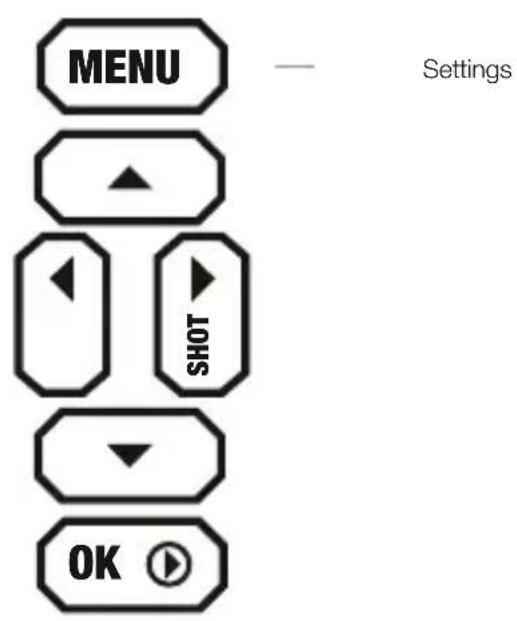
MENU-Button

the menu you can change the settings of language, time, number of images per trigger, password protection, PIR sensitivity, etc.
CAMERA MENU
CAM
- Photo Size: The resolution of the pictures on the SD cards can be set.
- Flash Power: The brightness of the flash can be set. Helpful for close and reflective obstacles.
- Photo Burst: On every photo triggered by movement or via app 1-10 photos per second (changeable) are shot. It's always the first photo which is transmitted.
- Shutter Speed: When shutter time is set to fast, pictures of moving objects are sharper but battery depletion is higher.
PIR
- PIR Sensitivity: The sensitivity of the movement sensor* can be set. This is helpful for precise adjusting to large or small objects.
* The movement sensor only reacts to changes in the infrared range. So pictures are only taken when heat signatures in sensor range change. With this the Reviermanager camera notices movement at night and day.
SYS
- Set Clock: Format of date (D = Day, M = Month, Y = Year), date and time can be set here.
- Language: Language of camera menu can be changed here.
- Password: The camera menu can be secured with a 4 character password so the camera can be protected from unauthorized access.
- Rename: Here the camera can be assigned a name which will then always be displayed in the picture.
- Diagnosis: The camera will be scanned for errors which can be used for troubleshooting when the camera isn't transferring pictures.
- Format SD card: With this function all pictures from the memory card will be deleted. Pictures in the Reviermanager app gallery are not affected by this.
- Default: The Reviermanager camera will be set back to default settings.
- Software Version: The currently installed firmware version will be shown. By confirming with a push of the OK button the settings will be saved. With the MENU button this sub menu will be closed without saving.
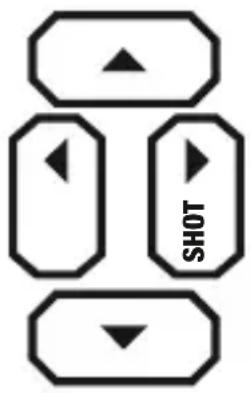
ARROW KEYS
flowchart
graph TD
    A["↑"] --> B["←"]
    B --> C["SHOT"]
    C --> D["↓"]
With the right arrow key a picture can be triggered.
This will be saved to the SD card (and not be transferred) later.
The other arrow keys are solely for navigating in the menu and in the gallery.
OK BUTTON

With the OK button you can open the gallery where all the saved pictures on the memory card will be displayed. With the left an right arrow keys the next picture will be shown. With the up and down arrow keys the zoom function can be used. By pushing the menu button pictures can be transferred to the reviermanager app gallery. By pushing the PLAY button again the camera returns to the homescreen.
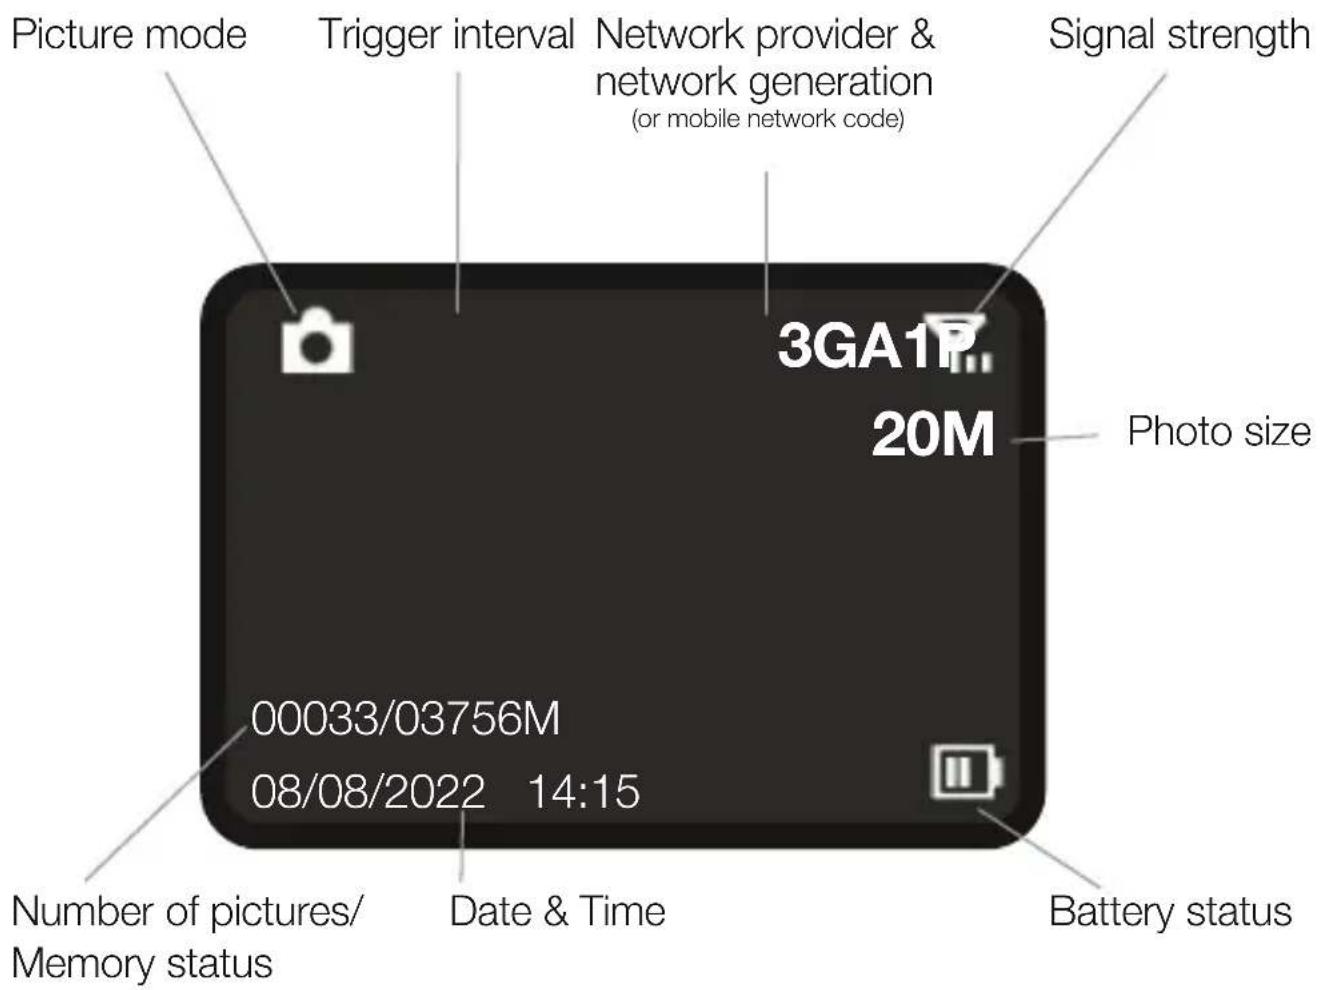
3. DESCRIPTION OF THE SCREEN
4. INSERT/REMOVE THE BATTERIES
- Open the camera by pulling the handle to the side, loosen the clasp and fold the front part forward on.
- Push the button under the keys, then the battery slot of the camera can be pulled downwards.
- VARIANT 1: 4, 8 or 12x AA batteries can be inserted, Please note the + and - polarity of the batteries!
Attention: Only 1.5V alkaline batteries, size AA, may be used. Other battery types can have a negative effect on the negatively influence the functionality.
VARIANT 2: Alternatively, the Reviermanager game camera can be externally powered with the Reviermanager battery case. You can find more information can be found at: www.reviermanager.at
VARIANT 3: With the new battery compartment with included charging circuit, you can now also operate the game camera with a 6V solar panel! In addition, rechargeable batteries are required in the battery compartment, 12 1.2V NiMH AA rechargeable batteries.
Attention: DO NOT use alkaline batteries (or other non-rechargeable batteries) in combination with the solar panel.
- Push the battery compartment back into the game camera until it clicks into place.
Note: Before removing the batteries, make sure the camera is switched off (switch to OFF). For the renewed See point 5 „Initial start-up of the camera“.
Hint: Check the time in the menu of the camera if the camera has been without power for a long time. The time can also be set easily via app when the camera is turned on (switch turned to ON).
Note: When closing the camera it should be noted that the locking mechanism isn't too loose. The rubber seals must be clean and shut tightly. Clean dirt cautiously. When the seal is damaged it must be replaced immediately. (Damages caused by moisture that entered the camera due to damaged seals are not covered by warranty and warranty is void).
5. INITIAL START-UP OF THE CAMERA
When the battery is put into the camera properly, please make sure that the SD card has been inserted properly and locked into place.
Slide the switch inside the wildlife camera to SETUP. After a few seconds the signal strength symbol will appear on the screen (see point 3 „Display“). After 20-30 seconds, the network operator should appear on the screen (e.g. „Vodafone“ etc.).
Please note: At least 2 bars should be displayed for the signal strength. Otherwise, please change location (additional accessories available for better signal strength). The camera refreshes the signal strength approximately every 10 minutes.
Attention: If the signal strength is too weak or the battery performance is too bad, it could happen that no pictures will be sent to the Reviermanager app gallery.
Tip: On SETUP you can check to see how the motion sensor works. The red LED on the front of the camera only flashes when movement is registered. This can also be used for optimal alignment and positioning of the camera.
When there is sufficient battery power and signal strength, slide the switch to ON.
When using the camera for the first time, check whether the camera triggers a picture when there is movement. As soon as the camera is switched to ON, the red LED flashes slowly for 10-15 seconds. After that the camera is active. It triggers a picture if there is movement and reacts to commands from the app.
Attention: To protect the Reviermanager camera from weather influences, please take care that water (for example rain or molten snow) can flow away freely and doesn't form a puddle under the camera.
All further information & videos for the explanation can be found at: www.reviermanager.at/faqs.html
6. ACTIVATE YOUR APP ACCOUNT
To use the features of the Reviermanager the Reviermanager app is needed. It is available for Apple iPhones in the “App store” and for Android devices in the “Google Play” store. You can also access the Reviermanager App via the web version at: https://webapp.reviermanager.at


When initialising the Reviermanager app for the first time a new account must be registered under the point „Registration“. Every fields are mandatory. After successful registration you will get a registration link via e-mail. As soon as this one is confirmed, registration is completed. If you didn't receive an e-mail (not even in your spam folder), please contact your system administrator (for contact information see point 11 „Warranty & Usage“).
Hint: Always use your current e-mail address because you will not only receive the confirmation link but also important notifications (license extensions, updates, requested new passwords etc.)
As soon as the registration is done successfully you can login with e-mail address and password. The camera ID and the activation code are found inside of the camera. Now you can add cameras under the point „add camera“.
As soon as a camera is added, the pictures from the Reviermanager camera are transferred into the gallery. A Reviermanager camera can only be active (simultaneously) at one e-mail address (to use more accounts see point 7.10 „Invite friends“).
7. FEATURES OF THE REVIERMANAGER APP
This chapter contains some information about the features of the Reviermanager application. These features are only available in the camera when it is connected to the mobile network over SETUP and then turned to ON (see point 5. „INITIAL START-UP OF THE CAMERA“ and point 6. „ACTIVATE YOUR APP Account“.
- Pictures/trigger: The default setting 3 pictures per trigger are saved onto the SD card. It is possible to change this setting (1 to 10 pictures per trigger). The first picture is transferred to the app. The other pictures won't be sent but only be saved to the SD card.
- Trigger interval: The camera takes a picture about every 10 minutes on movement and sends it to the Reviermanager application. With an activated premium-license you can set/reduce the trigger interval to about 3 minutes. For more information please visit our website: www.reviermanager.at
- Add camera: Here you can add more Reviermanager cameras via app so triggered pictures can be transferred to the gallery. WhenIf the camera is added, the correct date will bet set.
- Set position: You can set the position of the camera when you are near it. Please note that the camera doesn't have a GPS module. Because of this the Reviermanager needs access to the position of your smart phone (GPS must be activated on your phone).
- Trigger photo: A picture is triggered in the camera manually or over the Reviermanager app and transferred to the Reviermanager app. This function kann only be used every 10 minutes (3 minutes with the premium license).
- Update camera's status: The camera transfers current information about battery status, signal strength, firmware version and memory status of the SD card.
- Format camera: If you press this button, all pictures stored on the
SD card will be deleted. The pictures stored on the Reviermanager application will still be available and won't be deleted.
- Set date/time: Date and time can be refreshed with this feature. (This is helpful when the camera was has been without power or deactivated for a long time).
- Delete camera: If a camera is not in use anymore or used by another person the camera can be deleted from the Reviermanager app. By doing this all pictures transferred from this camera will be deleted from Reviermanager app gallery. Licenses are not affected by this and the license terms stay unaffected.
- Invite friends: With the “Invite friends” feature more people with different accounts can look at pictures of the same camera. Every friend must be registered with his e-mail address beforehand. After this, every single one can be invited. As soon as the invitation is accepted they can switch to the gallery of said friend and look at the transferred pictures.
- Gallery: All transferred recordings (of all cameras) are displayed in the gallery. You can use the filter button to restrict and sort the displayed pictures (for example, only the photos of a certain camera). Zooming, sharing, downloading and deleting of a picture can also be done here.
8. QUICK-CHECK
If your camera doesn't send pictures anymore even though you did point 5 „INITIAL START-UP OF THE CAMERA“ and point 6 „ACTIVATE YOUR APP ACCOUNT“, please check these possible error sources:
- Is your power supply working? Check the function again with a set of new, full batteries.
- Reset the camera to factory settings to delete the internal memory:
2.1. Switch the camera to SETUP.
2.2. Press the MENU button and switch to the „SYS“ submenu.
2.3. Navigate to „Default“ at the bottom of the submenu.
2.4. Confirm with OK. All settings are reset to the default and the internal memory is deleted.
- Has the SD card been unlocked (slider is set on the side and not on LOCK)?
If your SD card is defective, try a new SD card (max. Size: 32GB). Please do not use Micro SD cards with adapter!
- Does the camera not dial into cellular network (Error: "login fail")?
Check if the antenna is mounted tightly to the camera. If the mobile network sign is too weak there is still the possibility to use an additional antenna instead of the standard antenna. More informations on this topic on: www.reviermanager.at
-
Does the camera display „noSIM“ even though a SIM card has been inserted into the camera? Take out the SIM card cautiously and clean the gold contacts with a fine, clean cloth and put the SIM card back in. Has the antenna been properly installed and are the contacts at the antenna and onthe antenna socket clean?
-
Does the switch work properly? Does the switch lock between the positions OFF, SETUP, ON? How to check all functions of the switch:
6.1. - OFF: The display and the red LED are dark.
6.2. - SETUP: The display starts to light up, the red LED on the front of the camera flashes if there is movement.
6.3. - ON: The display is dark, the red LED on the front of the camera flashes slowly for 10-15 seconds.
- Check if the firmware version of the camera is up to date. Go to the camera overview to do so.
For all questions regarding the Reviermanager camera please contact support or your retailer. (see point 11 „WARRANTY AND USAGE“).
9. GENERAL INFORMATION
General information about the camera
- Please only use original accessories or accessories that have been approved by the manufacturer - see www.reviermanager.at. Other accessories may damage the camera, affect performance, or even become dangerous to your body, thereby violating local regulations for telecommunications devices.
- Don't scratch the display with needles, pens or other sharp objects, because the display could be damaged.
- Your camera can produce an electromagnetical field, thus could damage magnetic devices (such as harddrives).
- The camera could cause interferences when near electrical devices (such as TV, radio or computers).
- Don't expose the camera to strong direct sunlight and don't store the device in warm environment. High temperature could reduce the lifespan of electronical devices.
- Don't drop the device or put it at high pressure. Wrong handling could damage the printed circuit board of the camera.
- Don't try to disassemble the camera.
- Don't place the camera together with flammable or explosive substances or objects.
Please note:
For more information about the camera and the Reviermanager please visit our website: www.reviermanager.at/faqs.html
If damages (such as mechanical damages caused by forceful impact) are visible, please note that these damages are not covered by warranty.
The Reviermanager support team is at your disposal via e-mail (office@reviermanager.at) or over the phone.
You will find more information about the hotline on our website:
www.reviermanager.at/kontakt.html
10. SAFETY INSTRUCTIONS
Advices for battery usage
- Don't short-circuit the batteries. This could lead to overheating or ignition of the batteries.
- Don't store the batteries in a warm environment and don't throw them into fire. This could lead to an explosion.
- Don't disassemble or refill the batteries. This could lead to leakage of the batteries' liquid, overheating or explosion of the batteries.
- Please store the batteries at a cool, dry place, if you don't use them for a longer period.
- Please don't use batteries that are damaged or show a sign of aging.
- Return damaged batteries back to the supplier or dispose them appropriately. Don't throw them into the household waste.
Please note: If the batteries are damaged, don't use them. If any liquid comes in contact with your eyes or skin, rinse out the eyes and seek medical attention immediately.
Safe and general usage in vehicles
- Airbag, brake and cruise control should not be influenced by the wireless transfer. If problems occur, please contact the vehicle supplier.
- Don't put the camera in the area of the airbag or its area of expansion. Airbags open up with great force. The camera could be slung away and occupants could get hurt.
- Please switch off the camera, if you are at a gas station.
Precaution for potential explosive areas
- Switch off the camera before entering a potential explosive area, such as gas stations or places, where chemicals are stored.
- Don't remove, insert oder charge batteries at potential explosive areas. Sparks could cause an explosion or a fire.
- If you are near to eletrical detonators, blasting areas or areas, where you are called upon to switch off elecotrincal devices, carry out the instructions!
Precaution for electronic devices
Some electronic devices are susceptible for electromagnetic interferences, which could be caused by the camera, if they are poorly shielded. If necessary, please contact the manufacturer before using the camera.
Attention: Although the camera is IP54 certified, please pay attention that no liquid can flow into the camera. Because moisture can damage the camera, please check during closing of the camera that the sealing rubber is inserted properly.
Please note: Make sure that the antenna is screwed on cleanly and hand-tight. Dampness should also be avoided when changing the batteries.
Snow, ice or moisture can severely corrode the electronics and finally lead to the loss of all camera functions.
Disclaimer
TFK Handels GmbH cannot be held liable for lost profits direct or indirect, special, random or consequential damages, which arose out of or in connection with the usage of this product.
For more information about the warranty and after sales service please read the warranty card, which is part of the box contents or visit our website
www.tfk-austria.at

www.reviermanager.at
UOVision Technologies Co. Ltd. declares that the device complies with EU directive 2014/53/EU.
You can find a declaration of conformity at www.reviermanager.at
This device may be used in the LTE, 4G, 3G & 2G GSM network within the EU.
11. INFORMATION ABOUT WARRANTY & USAGE
The TFK Handels GmbH (hereinafter called TFK) grants a guarantee for this product against defects in materials and workmanship for a period of:
Twenty-four (24) months for the camera, six (6) months on accessories
The warranty period starts with the purchase date from your retailer.
The liability of TFK is limited to the costs of repairing and/or the exchange of products covered by the warranty policy unit.
- The guarantee is valid only by submitting the original sales invoice from the retailer, including the date of purchase, type designation and the serial/IMEI number.
- Warranty repairs must be done by a TFK authorized company, otherwise all claims forfeit.
- This warranty does not apply if other defects than materials or workmanship errors are detected, in particular in case of improper usage and force majeure.
- The warranty does not relate to changes in the software, Reviermanager application, and the GSM network.
Your retailer may help you with the handling. The product has to be sent post-paid to the service address, which is mentioned on www.reviermanager.at.
In the following cases no warranty is provided by TFK:
- The type, the serial/IMEI number or the product number on the product has been altered, deleted or made illegible.
• The product has been damaged (e.g. battery acid). - The SIM card contained in the product may not be removed and is
linked to the IMEI number of the device. Manipulating the SIM card can lead to data loss and malfunction.
- TFK explicitly points out that in case of fall damages and/or moisture damages no guaranteeing will be performed.
- Non-authorized product modifications to fulfill local or national technical standards/requirements in countries the TFK product was not designed/designated to.
Disclaimer:
SIM card, data stored; TFK is never liable for the loss of saved settings and data on the SIM card and/or the SD card. The proper functioning of the Reviermanager app is dependent on the Internet and thus not within the control of TFK.
Legal Notice:
The operating times depend on the local network conditions and SIM card settings, the usage and the ambient conditions and temperatures. The usage of TFK original accessories allows the best operation of the Reviermanager under a variety of operating conditions.
Contact:
For any questions concerning the warranty handling of the Reviermanager in general, please contact our support.
Email: office@reviermanager.at
Hotline: +43 6214 60199 (at local rates from the Austrian landline, mobile may vary)
Menü Einstellungen
flowchart
graph TD
    A["↑"] --> B["←"]
    B --> C["SHOT"]
    C --> D["↓"]

Typing and printing errors reserved.