
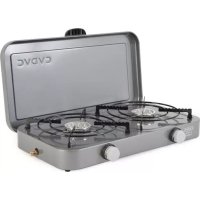
2 Cook 2 Classic - Cooker CADAC - Free user manual and instructions
Find the device manual for free 2 Cook 2 Classic CADAC in PDF.
| Product type | Gas cooker |
| Brand | CADAC |
| Model | 2 Cook 2 Classic |
| Use | Outdoor only |
| Fuel | Liquefied petroleum gas (LPG) |
| Operating pressure | 28-30 mbar (butane/propane), 37 mbar, 50 mbar depending on category |
| Gross nominal power | 4.0 kW (4.4 kW for some versions) |
| Gas consumption | 291 g/h (320 g/h for some versions) |
| Recommended vessel diameter | 150 mm to 300 mm |
| Minimum safety distances | Above: 1.2 m; sides and rear: 600 mm |
| Hose length | 800 mm minimum, 1.2 m maximum |
| Ignition type | Match or barbecue lighter (no built-in ignition) |
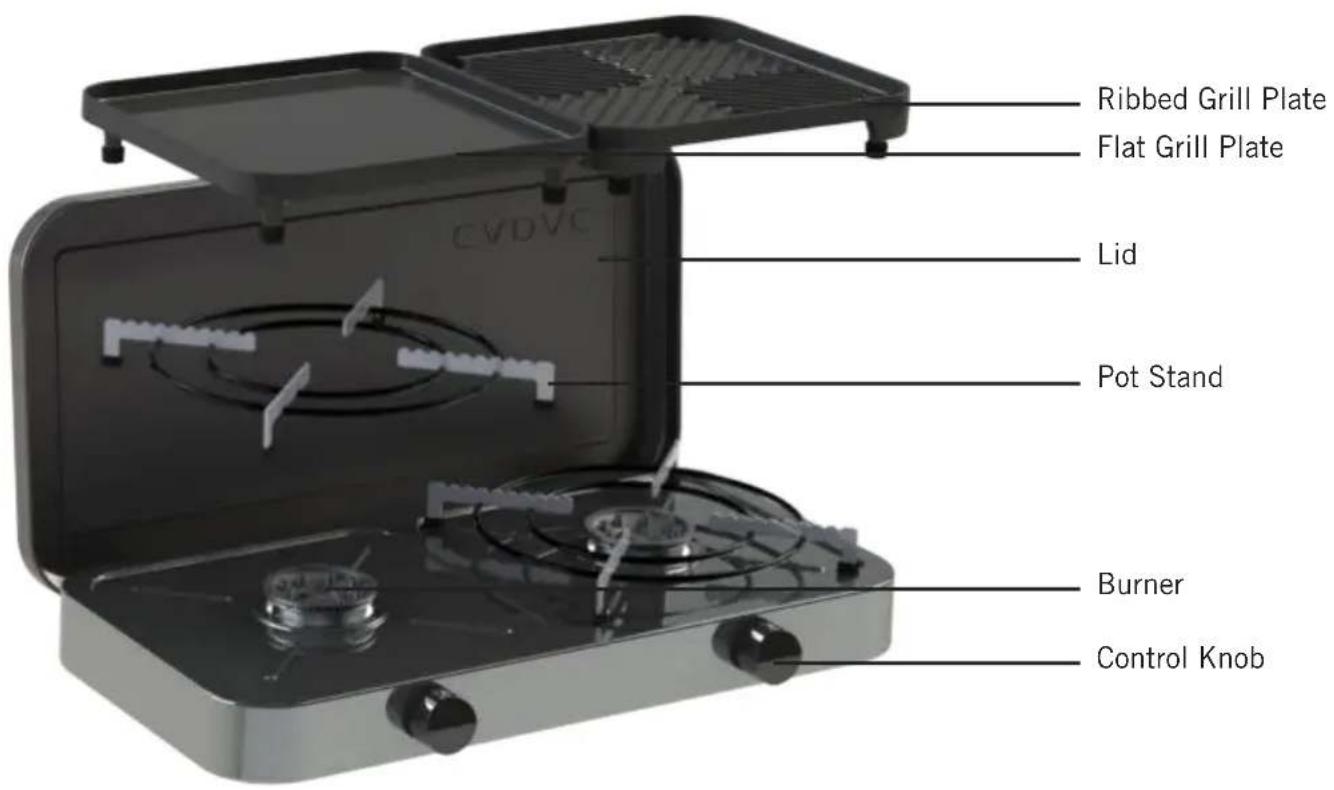
| Included components | Burner, pan support, lid, grill plates (grooved and flat) |
| Main material | Steel (enamel for some parts) |
| Warranty | Taps: 2 years; enamel parts: 2 years; burners: 1 year; plastic parts: no warranty |
| Cleaning | After each use; do not immerse in water; use a damp cloth and mild detergent |
| Safety | Ventilation mandatory; leak detection with soapy water; do not use indoors |
| Storage | In a dry and cool place; gas cylinder preferably stored outdoors |
| Spare parts | Use genuine CADAC parts (references provided in the manual) |
Frequently Asked Questions - 2 Cook 2 Classic CADAC
User questions about 2 Cook 2 Classic CADAC
0 question about this device. Answer the ones you know or ask your own.
Ask a new question about this device
Download the instructions for your Cooker in PDF format for free! Find your manual 2 Cook 2 Classic - CADAC and take your electronic device back in hand. On this page are published all the documents necessary for the use of your device. 2 Cook 2 Classic by CADAC.
USER MANUAL 2 Cook 2 Classic CADAC
natural_image
Exterior view of a three-tier gas stove with cooling fans and heat sinks (no text or symbols visible)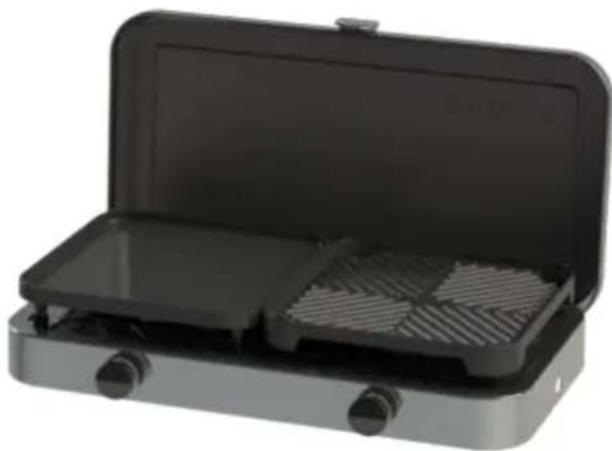
natural_image
Open black portable stove with two grilles and a side panel (no text or symbols visible)
natural_image
Open black gas stove with three fans and a flat lid (no visible text or symbols)UK CA

CE
PERMIT 1002-145/2-RSA-17-A
USER INSTRUCTIONS
GB DE DK ES FR IT NL NO PL SE SI FI □ □ □
CAUTION
Provide ample ventilation. This gas appliance consumes air (oxygen). Do not use this appliance in an unventilated space to
avoid endangering your life. If still more gas appliances and/or occupants using gas are added to the space, additional ventilation
must be provided.
IMPORTANT
Read these instructions carefully so as to familiarise yourself with the appliance before fitting the appliance to a gas cylinder.
Retain these instructions for future reference.
1. General
- This is an economic gas appliance designed for an optimal cooking experience using environment friendly LP gas.
• The appliance conforms to BS EN 484: 2019 and SANS 1539:2017 - This appliance may only be used with an approved hose and regulator (A 2.8kPa hose and regulator supplied with this unit in South Africa)
- Note that figures in this user manual are shown for visual purposes only and may differ to your appliance.
- Please read all the instructions and warnings on the appliance before use.
- It is important that all gas connections have been correctly connected to prevent any gas leaks.
- Do not use a leaking, damaged or malfunctioning appliance.
- This appliance requires a hose and regulator to operate.
- Ensure that the appliance is used in a well-ventilated area.
- Handle the appliance with care, do not drop it.
- When using a pot, the minimum recommended pot size is 150mm and maximum pot size is 300mm.
- The gas cylinder is to be used in an upright position only.
- Read the instructions before using the appliance.
- For outdoor use only!
2. Safety information
These instructions are for your safety and to help you avoid risk of injury and/or damage. All warranties will become void if you do not follow these instructions.
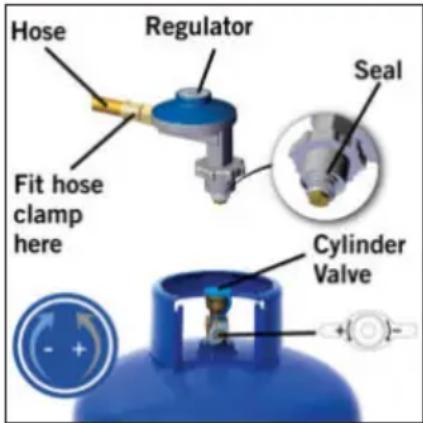
- The hose and seal on the regulator must be checked for wear or damage before every use and before connecting to the gas cylinder.
- In the event of light back (where the flame burns back and ignites at the jet) immediately turn off the gas supply by first closing the control valve onthe gas cylinder and then the appliance valve. After the flame is extinguished remove the regulator and check the condition of its seal, replace the seal if in doubt. Re-light the appliance. Should the flame persistently light back again return the product to your authorised CADAC repair agent.
- Ensure the appliance is used away from flammable materials. Minimum safe distances; above the appliance 1.2 m, at the rear and sides 600mm.
- Do not use an appliance that is leaking, damaged or which does not operate properly.
- Ensure that the gas cylinder is fitted or changed in a well-ventilated location, preferably outdoors, away from any sources of ignition, such as naked flames and away from other people.
- Keep gas cylinders away from heat and flame. Do not place on a stove or any other hot surface.
- Ensure that the assembled product is stable and does not rock.
- Never leave the appliance unattended when lit.
- If there is a leak on your appliance (smell of gas), turn off the gas supply, firstly at the gas cylinder and then on your appliance by turning the respective knobs fully clockwise. Take them outside immediately into a well-ventilated flame-free location where the leak may be detected and stopped.
- This appliance consumes oxygen and needs ventilation for optimum performance and for safety of those in close proximity.
- Room ventilation is important for the efficient performance of the appliance and for the safety of the occupants in the room.
- The room where this appliance is used should have a window or a door that can be opened or partially open during use. If there is no window or door available for room ventilation, extra ventilation must be installed for your safety.
- If you wish to check for leaks on your appliance, do it outside. Do not try to detect leaks using a flame, use soapy water. The correct way is to smear the joints with soapy water. If bubbles form then there is a gas leak. Immediately turn off the gas supply first by closing then the appliance valve, check that all the connections are properly fitted. Re-check with product to your CADAC dealer for inspection / repair.
- Do not modify the appliance. Do not use it for anything for which it has not been designed.
- Keep young children away from the appliance at all times.
- Do not twist or pinch the hose.
- Do not move the appliance during use.
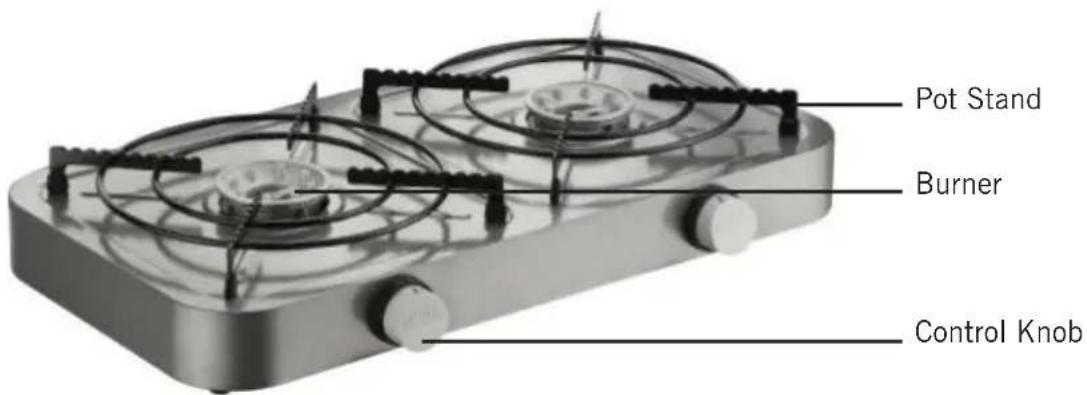
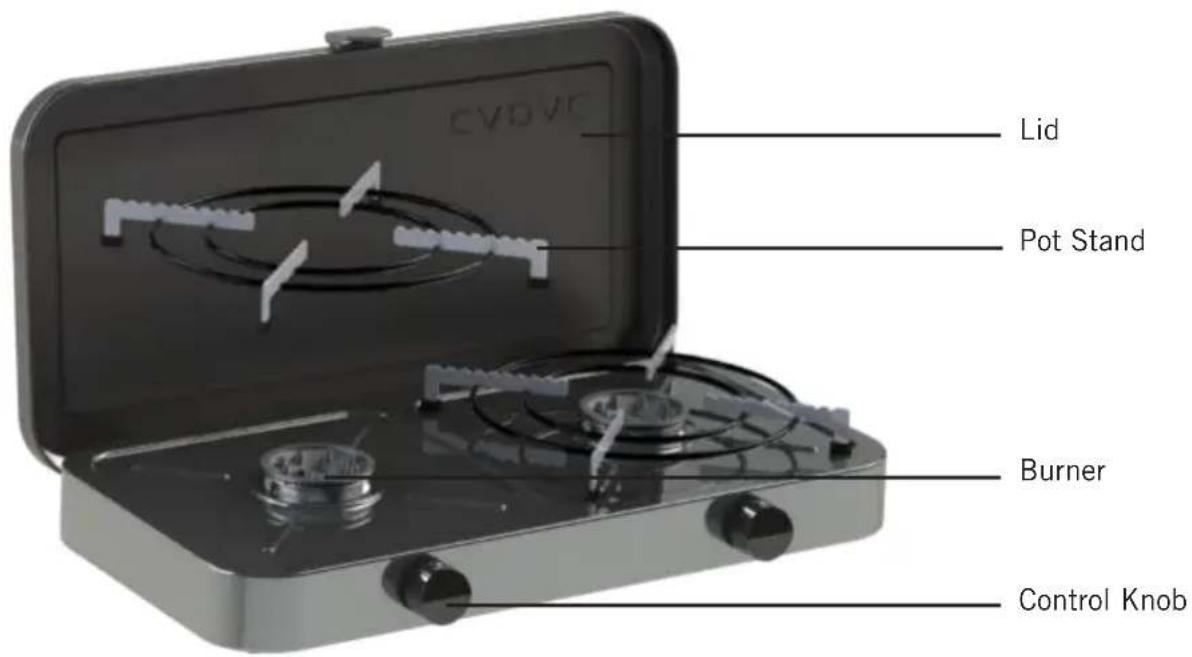
- Do not use the appliance without the Potstands being in place and properly located.
- Turn off the gas supply at the gas container after use.
- Do not modify the appliance, any modification may be dangerous.
- During use, parts of the appliance will become hot (particularly the burner) Avoid touching hot parts with bare hands. The use of gloves is recommended.

| Country of Use | BE, CH, CY, CZ, ES, FR, GB, GR, IE, IT, LT, LU, LV, PT, SK & SI | PL | BE, CY, DK, EE, FR, FI, HU, IT, LT, NL, NO, SE, SI, SK, RO, HR, TR, BG, IS, LU, MT, & ZA | AT, CH, DE & SK | |
| Appliance Catagories I | 3+(28-30/37) | I_3B/P (37) | I_3B/P (30) | I_3B/P (50) | |
| Allowable gasses Butane-30 Propane-31 Butane-30, Propane-31 or their mixture | |||||
| Gas Pressure 28-30mBar 37mBar 37mBar | 28-30mBar (2.8kPa for South Africa) | 50mBar | |||
| Jet Number 0.71 | 0.71 | 0.71 0.62 | |||
| Nominal Usage | 291g/hr 320g/hr 291g/hr 291g/hr | ||||
| Gross nom. heat input | 4.0kW 4.4kW | 4.0kW | 4.0kW | ||
| Country Name and Abbreviations | ||||
| AE = United Arab Emirates | AL = Albania | AT = Austria | BE = Belgium | CH = Switzerland |
| CZ = Czech Republic | DE = Germany | DK = Denmark | ES = Spain | FI = Finland |
| FR = France | GB = United Kingdom | GR = Greece | HR = Croatia | IT = Italy |
| JP = Japan | KR = Korea | NL = Netherlands | NO = Norway | PL = Poland |
| PT = Portugal | RO = Romania | RU = Russia | RS = Serbia | SI = Slovenia |
| SK = Slovakia | SE = Sweden | TR = Turkey ZA = South Africa | ||
3. Assembly Instructions
- PLEASE NOTE: Please ensure all protective packaging and plastic are removed from the appliance before use.
• This appliance may only be used with an approved hose and regulator (hose and regulator supplied with this unit in South Africa) - Connect the regulator to a CADAC 3kg, 5kg or 7kg LPG cylinder prior to use.
- If you wish to use the appliance with a 9kg cylinder, please ensure that you have purchased the correct hose and regulator suitable for a 9kg cylinder.
- The hose length should be no less than 600 mm and shall not exceed 1.2 m and replace when the hose is damaged or shows signs of brittleness or cracks.
- Do not twist or pinch the hose. Ensure that it is routed away from the Stove Body so as to prevent deterioration / damage to the hose caused by heat.
- Ensure that the appliance valves are in the off position by turning the knobs fully clockwise to the stop.
- Open the gas valve on the cylinder and test for any leaks.
- Check all gas connections for any signs of gas leaks.
- Your appliance is now ready to be used.
I 3B/P (30), I 3+ (28-30/37) and I 3B/P (37), Appliance categories: (DK, FI, NO, NL, SE, AT, DE, BE, ES, FR, IE, IT, PT, GB, CH)
Push an approved hose onto the valve tailpiece until it is properly seated. On the other end, attach a suitable low pressure regulator.
I3B/P(30): 30mbar Butane configurations regulator or 30mbar Propane configurations regulator.
13B/P(37): 37mbar Butane configurations regulator or 37mbar Propane configurations regulator.
13+(28-30/37): 30mbar Butane configurations regulator or 37mbar Propane configurations regulator.
Again making sure that the hose is properly seated. The type of hose used shall comply with the relevant EN standard and locate requirement. In South Africa the regulator used must comply with SANS 1237.
I 3B/P (50) Appliance category: (AT, DE)
I3B/P(50): 50mbar Butane configurations regulator or 50mbar Propane configurations regulator or 50mbar butane/propane mixture configurations regulator.
Screw a hose with the correct threaded fittings on each end, onto the left hand 1/4" BSP thread of the valve. Attache a suitable 50mbar low-pressure regulator on the end of the hose. The hose assembly used must comply with DIN 4815 part 2 or equivalent.
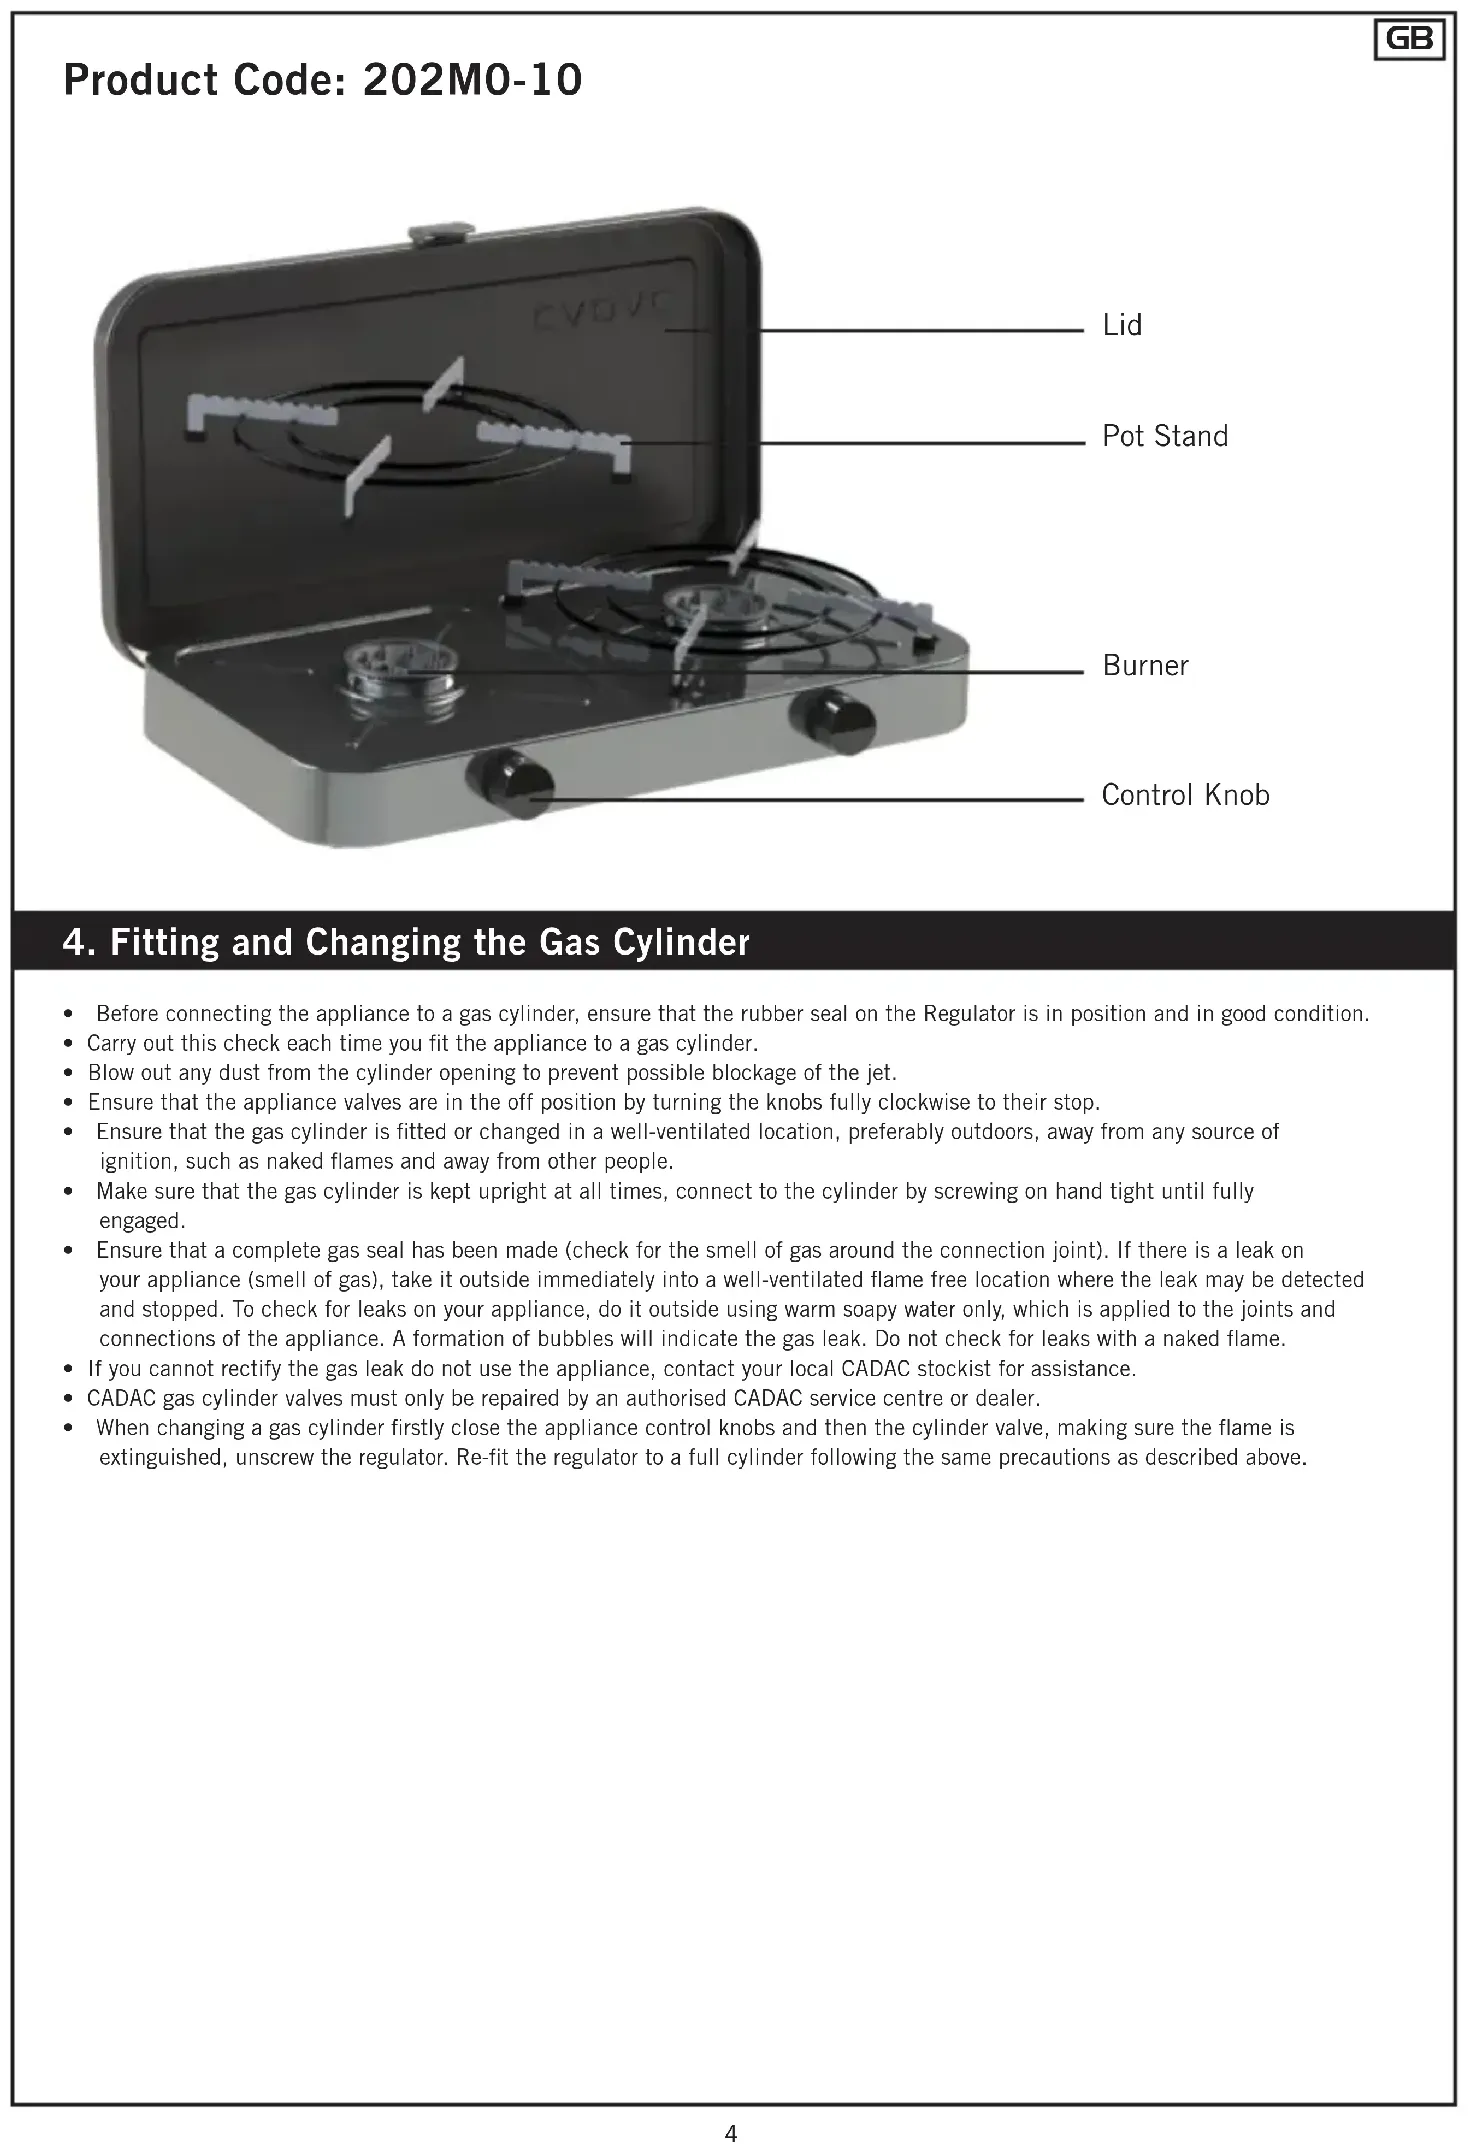
Product Code:202M0-10N
Product Code: 202M0-20
Product Code: 202M0-10
4. Fitting and Changing the Gas Cylinder
- Before connecting the appliance to a gas cylinder, ensure that the rubber seal on the Regulator is in position and in good condition.
- Carry out this check each time you fit the appliance to a gas cylinder.
- Blow out any dust from the cylinder opening to prevent possible blockage of the jet.
- Ensure that the appliance valves are in the off position by turning the knobs fully clockwise to their stop.
- Ensure that the gas cylinder is fitted or changed in a well-ventilated location, preferably outdoors, away from any source of ignition, such as naked flames and away from other people.
- Make sure that the gas cylinder is kept upright at all times, connect to the cylinder by screwing on hand tight until fully engaged.
- Ensure that a complete gas seal has been made (check for the smell of gas around the connection joint). If there is a leak on your appliance (smell of gas), take it outside immediately into a well-ventilated flame free location where the leak may be detected and stopped. To check for leaks on your appliance, do it outside using warm soapy water only, which is applied to the joints and connections of the appliance. A formation of bubbles will indicate the gas leak. Do not check for leaks with a naked flame.
- If you cannot rectify the gas leak do not use the appliance, contact your local CADAC stockist for assistance.
- CADAC gas cylinder valves must only be repaired by an authorised CADAC service centre or dealer.
- When changing a gas cylinder firstly close the appliance control knobs and then the cylinder valve, making sure the flame is extinguished, unscrew the regulator. Re-fit the regulator to a full cylinder following the same precautions as described above.
5. Operating the Appliance
The appliance is designed for use with cooking vessels of not less than 180mm in diameter and not greater than 250mm in diameter.
After lighting, do not move the gas cylinder and the appliance around, as liquefied gas may enter the appliance from the gas cylinder, causing it to flare (large yellow flames).
Always operate the appliance on a firm level surface with the gas cylinder in an upright position.
Warning: If the burner fails to ignite within 10 seconds, turn the control knob off (clockwise). Wait three minutes before attempting to re-light with ignition sequence.
Lighting the Appliance with a match:
- To light the appliance, light a match or barbecue lighter, turn on the appliance valve after connecting to and opening the cylinder valve, by turning the control knob (E) in an anti-clockwise direction. Light the appliance burners.
- Use the control knob to adjust the flame intensity to the desired level by turning the knob clockwise to decrease the flame and anti clockwise to increase it.
• Always light the match or the lighter first before opening the gas valve on the appliance.
6. General Maintenance
This appliance does not require scheduled maintenance.
- It is dangerous to use an appliance with a cracked or perished seal and / or hose. Inspect both seals and hose regularly and replace if they are not in order, before using the appliance.
- If the appliance was in use, it will be hot. Allow to cool sufficiently before attempting any maintenance.
- The Stoves are fitted with jets to regulate the correct amount of gas.
- Should the hole in the Jet become blocked this may result in a small flame or no flame at all.
- Do not attempt to clean the jet with a pin or other such device as this may damage the orifice, which could make the appliance unsafe.
Replacing a blocked jet:
- Ensure that the cylinder valve is closed, then disconnect the appliance from the gas cylinder.
- Remove the Potstand/cooking surfaces from the stove body.
- Turning the appliance upside down, unscrew the screws holding the bracket of the burner to the body.
- From the top now, you can safely remove the burners from the appliance.
- Unscrew the blocked jet from the valve with a suitable spanner and replace it with a new jet.
- Do not over tighten as this may damage the Jet. To re-assemble, reverse the above procedure.
- Do not use pliers on the jet as this may damage the jet making it unusable or impossible to remove.
7. Troubleshooting
- A normal flame is blue and may have a yellow tip. If the flame is completely yellow, it may be that the jet is not securely fitted. Retighten the jet to give a gas tight seal. An overfilled gas cylinder can also cause large yellow flames. Cylinder should be returned to filling station and checked by weight.
- Check that the inlet to the burner pipe is clear and free of obstructions.
- If the flame power drops or the gas will not light, check that the gas cylinder still contains gas (shake to hear the noise made by the liquefied gas). If there is still gas, the jet might have become blocked or partially blocked.
- If you suspect a blocked jet, follow the instructions above.
- Check for spider webs or insect nests in the gas tube or primary air inlet.
8. Cleaning
- It is recommended to clean your appliance after every use. This will prolong the life of your appliance.
- The Potstand is removed by lifting it from the stove top and can be washed in a detergent solution.
• To clean the stove body, simply wipe with a damp cloth using a little detergent, if necessary. - DO NOT IMMERSE IN WATER as this will allow water to get into the burner tube causing the appliance to malfunction.
- Do not use abrasive cleaners or scourers as this will cause permanent damage to the surface.
• To avoid ignition failure, keep the burners clean. - Use a brush to clean the burners.
- A tooth brush may be used to clean out the venturi should there be any obstacles within the venturi.
9. Storage
- Handle the appliance with care. Do not drop it.
- After use, wait until the appliance has cooled down, disconnect it from the gas cylinder and store them in a cool dry place. Store your cylinder in a well-ventilated place.
- It helps to place the appliance in a plastic bag when not in use as this will prevent the ingress of dirt and insects, which may affect the gas flow.
- Warning: An LP cylinder not connected for use shall not be stored in the vicinity of this or any other appliance.
- LPG cylinders should preferably be stored outdoors if not in use.
10. Spares
• Always use genuine CADAC spares as they have been designed to give optimum performance.

11. Returning the Appliance for Repair or Service
- Do not modify the appliance. Any modification of the appliance may be dangerous.
- Any modifications will render the CADAC warranty null and void.
• If you cannot rectify any fault by following these instructions, contact your local CADAC distributor for inspection/repair
12. Warranty
CADAC (Pty) Ltd hereby warrants to the ORIGINAL PURCHASER of this CADAC gas appliance for 2 years, that it will be free of defects in material and workmanship from the date of purchase as follows:
Valves:
2
Years
Plastic parts: No Warranty
Enamel parts: 2 Years
Cast Iron: 2 Years
Burners:
1
Year
The warranty will only apply if the unit is assembled and operated in accordance with the printed instructions.
CADAC may require reasonable proof of your date of purchase. THEREFORE, YOU SHOULD RETAIN YOUR SALES SLIP OR INVOICE.
This Limited Warranty shall be limited to the repair or replacement of parts that prove defective under normal use and service and which on examination shall indicate, to CADAC's satisfaction, they are defective. Before returning any parts, contact the customer service representative in your region using the contact information provided with your manual. If CADAC confirms the defect and approves the claim, CADAC will elect to replace such parts without charge. CADAC will return parts to the purchaser, freight or postage prepaid.
This Limited Warranty does not cover any failures or operating difficulties due to accident, abuse, misuse, alteration, misapplication, vandalism, improper installation or improper maintenance or service, or failure to perform normal and routine maintenance, including but not limited to damage caused by insects within the burner tubes, as set out in this owner's manual. Deterioration or damage due to severe weather conditions such as hail, hurricanes, earthquakes or tornadoes, discoloration due to exposure to chemicals either directly or in the atmosphere, is not cover by this Limited Warranty.
There are no other express warrants except as set forth herein and any applicable implied warranties of merchantability and fitness are limited in duration to the period of coverage of this express written Limited Warranty. Some regions do not allow limitation on how long an implied warranty lasts, so this limitation may not apply to you.
CADAC is not liable for any special, indirect or consequential damages. Some regions do not allow the exclusion or limitation of incidental or consequential damages, to this limitation or exclusion may not apply to you.
CADAC does not authorize any person or company to assume for it any obligation or liability in connection with the sale, installation, use, removal, return, or replacement of its equipment; and no such representations are binding on CADAC.
This Warranty applies only to products sold at retail.
To enjoy and ensure longevity of your CADAC product, please refer to the cleaning and maintenance section of the user manual with particular attention to the care of the Stainless Steel.
VORSICHT
| Country Name and Abbreviations | ||||
| AE = United Arab Emirates | AL = Albania | AT = Austria | BE = Belgium | CH = Switzerland |
| CZ = Czech Republic | DE = Germany | DK = Denmark | ES = Spain | FI = Finland |
| FR = France | GB = United Kingdom | GR = Greece | HR = Croatia | IT = Italy |
| JP = Japan | KR = Korea | NL = Netherlands | NO = Norway | PL = Poland |
| PT = Portugal | RO = Romania | RU = Russia | RS = Serbia | SI = Slovenia |
| SK = Slovakia | SE = Sweden TR = Turkey | ZA = South | Africa | |
3. Montageanleitung
| Country Name and Abbreviations | ||||
| AE = United Arab Emirates | AL = Albania | AT = Austria | BE = Belgium | CH = Switzerland |
| CZ = Czech Republic | DE = Germany | DK = Denmark | ES = Spain | FI = Finland |
| FR = France | GB = United Kingdom | GR = Greece | HR = Croatia | IT = Italy |
| JP = Japan | KR = Korea | NL = Netherlands | NO = Norway | PL = Poland |
| PT = Portugal | RO = Romania | RU = Russia | RS = Serbia | SI = Slovenia |
| SK = Slovakia | SE = Sweden | TR = Turkey | ZA = South Africa | |
| Country Name and Abbreviations | ||||
| AE = United Arab Emirates | AL = Albania | AT = Austria | BE = Belgium | CH = Switzerland |
| CZ = Czech Republic | DE = Germany | DK = Denmark | ES = Spain | FI = Finland |
| FR = France | GB = United Kingdom | GR = Greece | HR = Croatia | IT = Italy |
| JP = Japan | KR = Korea | NL = Netherlands | NO = Norway | PL = Poland |
| PT = Portugal | RO = Romania | RU = Russia | RS = Serbia | SI = Slovenia |
| SK = Slovakia | SE = Sweden TR = Turkey | ZA = South | Africa | |
natural_image
Mechanical assembly diagram showing a component with a central pin and two connected connectors (no text or symbols visible)| Country Name and Abbreviations | ||||
| AE = United Arab Emirates | AL = Albania | AT = Austria | BE = Belgium | CH = Switzerland |
| CZ = Czech Republic | DE = Germany | DK = Denmark | ES = Spain | FI = Finland |
| FR = France | GB = United Kingdom | GR = Greece | HR = Croatia | IT = Italy |
| JP = Japan | KR = Korea | NL = Netherlands | NO = Norway | PL = Poland |
| PT = Portugal | RO = Romania | RU = Russia | RS = Serbia | SI = Slovenia |
| SK = Slovakia | SE = Sweden | TR = Turkey | ZA = South Africa | |
3. Samleinstruktion

| Gjelder for bruk i følgende land | BE, CH, CY, CZ, ES, FR, GB, GR, IE, IT, LT, LU, LV, PT, SK & SI | PL | BE, CY, DK, EE, FR, FI, HU, IT, LT, NL, NO, SE, SI, SK, RO, HR, TR, BG, IS, LU, MT, & ZA | AT, CH, DE & SK | |
| Apparatkategorier I | 3-(28-30/37) | I_3B/P (37) | I_3B/P (30) | I_3B/P (50) | |
| Godkjente gasstyper Butan-30 Propan-31 Butan-30/Propan-31 -blandinger | |||||
| driftstrykk 28-30mBar 37mBar 37mBar | 28-30mBar(S. Afrika - LPG @ 2,8kPa) | 50mBar | |||
| Munnstykke nummer 0.71 | 0.71 | 0.71 0.62 | |||
| Kalkulert forbruk | 291gram/time 320gram/time | 291gram/time 291gram/time | |||
| Brutto, kalkulert varmeinput | 4.0kW 4.4kW | 4.0kW | 4.0kW | ||
| Country Name and Abbreviations | ||||
| AE = United Arab Emirates | AL = Albania | AT = Austria | BE = Belgium | CH = Switzerland |
| CZ = Czech Republic | DE = Germany | DK = Denmark | ES = Spain | FI = Finland |
| FR = France | GB = United Kingdom | GR = Greece | HR = Croatia | IT = Italy |
| JP = Japan | KR = Korea | NL = Netherlands | NO = Norway | PL = Poland |
| PT = Portugal | RO = Romania | RU = Russia | RS = Serbia | SI = Slovenia |
| SK = Slovakia | SE = Sweden | TR = Turkey | ZA = South Africa | |
| Country Name and Abbreviations | ||||
| AE = United Arab Emirates AL | = Albania AT = Austria BE | = Belgium CH = Switzerland | ||
| CZ = Czech Republic DE = Germany | many DK = Denmark ES = Spain | FI = Finland | ||
| FR = France | GB = United Kingdom | GR = Greece | HR = Croatia | IT = Italy |
| JP = Japan | KR = Korea | NL = Netherlands | NO = Norway | PL = Poland |
| PT = Portugal | RO = Romania | RU = Russia | RS = Serbia | SI = Slovenia |
| SK = Slovakia | SE = Sweden | TR = Turkey | ZA = South Africa | |
| Country Name and Abbreviations | ||||
| AE = United Arab Emirates | AL = Albania | AT = Austria | BE = Belgium | CH = Switzerland |
| CZ = Czech Republic | DE = Germany | DK = Denmark | ES = Spain | FI = Finland |
| FR = France | GB = United Kingdom | GR = Greece | HR = Croatia | IT = Italy |
| JP = Japan | KR = Korea | NL = Netherlands | NO = Norway | PL = Poland |
| PT = Portugal | RO = Romania | RU = Russia | RS = Serbia | SI = Slovenia |
| SK = Slovakia SE = Sweden | TR = Turkey | ZA = South Africa | ||
| Ime kartice države | ||||
| AE = United Arab Emirates A | = Albania AT = Austria BE | = Belgium CH = Switzerland | ||
| CZ = Czech Republic | DE = Germany | DK = Denmark | ES = Spain | FI = Finland |
| FR = France | GB = United Kingdom | GR = Greece | HR = Croatia | IT = Italy |
| JP = Japan | KR = Korea | NL = Netherlands | NO = Norway | PL = Poland |
| PT = Portugal | RO = Romania | RU = Russia | RS = Serbia | SI = Slovenia |
| SK = Slovakia | SE = Sweden | TR = Turkey ZA = South Africa | ||
Email: info@cadac.co.za
www.cadacinternational.com
CADAC UK
14 Deanfield Court,
Link59 Business Park,
Clitheroe, Lancashire,
BB7 1QS
United Kingdom.
Tel: +44 (0) 333 2000363
E:mail: info@cadacuk.com
www.cadacinternational.com
CADAC MOZAMBIQUE
Exclusive Brands Africa
492 Avenida Namaacha
Maputo, Mozambique
Tel: +258 21 406254
www.cadac.co.mz
CADAC IRAN
Robin Bazarganan Carin Co.
Unit D, 6th Floor, Negin Zafar
Building, No.1327,
Shariati Street, Tehran, Iran
Tel: +98 21 276 00 781
Mail: info@cadac.ir
CADAC CHINA
Room 807, Huayue International
Building, No.255 Tiangao Road, South
Yinzhou business district,
Ningbo, China
Tel:+86 574 87723937
Email: info@cadac.com.cn
CADAC SWEDEN & NORWAY
KAMA FRITID AB
0046 36 353700
info@kamafritid.se
CADAC EUROPE
Ratio 26, 6921 RW Duiven
The Netherlands
Tel: +31 26 319 7740
Email: info@cadaceurope.com
www.cadacinternational.com
CADAC SCANDINAVIA
Millarco International A/S
Rokhøj 26
8520 Lystrup, Denmark
Phone: +45 87 43 42 00
millarco@millarco.dk
www.millarco.com
CADAC MONTENEGRO
City kvart Z1L6
81000 Podgorica, Montenegro
Tel 38220671446,
38269020063
E-mail: coca@t-com.me
CADAC DENMARK
Camper Fritid
Industrivej 11
6640 Lunderskov, Denmark
Tel.: +45 7558 5255
Email: info@camper.dk
www.camper.dk
CADAC ZIMBABWE
Exclusive Brands Africa
Unit 8 Birkenhead Park
43 Josiah Chinamano Street
Belmont, Bulawayo
Tel: +263 971 740 (Bul)
Tel: +263 479 2564 (Har)
www.cadac.co.zw
CADAC GERMANY
Ratio 26, 6921 RW Duiven
The Netherlands
Tel: +31 26 319 7740
Email: info@cadaceurope.com
www.cadacinternational.com
CADAC Czech Rep.
32-007 Wola Batorska Poland
Tel: +48 12 635 1373
Email: handlowy@kamai.pl
www.kamai.pl
CADAC ZAMBIA
Exclusive Brands Africa Limited
7225A Kachidza Road
Light Industrial Area
Lusaka, Zambia
Tel: +260 211 842015
Tel: +260977 345034
Email: info@ebagrp.com
CADAC FRANCE
Le Viallon, 42520 Veranne
France
Tel: +33 4 74 78 13 65
Email: info@cadaceurope.com
www.cadacinternational.com
CADAC NEW ZEALAND
Riverlea Group (Pty) Ltd
2A Maui Street, Pukete,
Hamilton 3200, New Zealand
Tel: +64 7 847 0204
Email: sales@riverleagroup.co.nz
www.riverleagroup.co.nz
CADAC U.A.E.
Supreme Impex General Trading
LLC Office No. 1801-7 Latifa
Tower Sheikh Zayed Road
Dubai, UAE
CADAC ITALY
Brunner SRL/GMBH
via Buozzi, 8
39100 Bolzano (Italy)
Tel: +39 0471 542900
Email: info@brunner.it
www.brunnerinternational.com
CADAC SOUTH EAST EUROPE
Bulevar oslobodjenja 285
Tel: +381 11 339 2700
Email: sinisaj@cadac.rs
www.cadac.rs

natural_image
Exterior view of a black gas stove with open lid and two grilles (no text or symbols visible)


- CAUTION
- IMPORTANT
- General
- Safety information
- Assembly Instructions
- Product Code: 202M0-10
- Fitting and Changing the Gas Cylinder
- Operating the Appliance
- Lighting the Appliance with a match:
- General Maintenance
- Replacing a blocked jet:
- Troubleshooting
- Cleaning
- Storage
- Spares
- Returning the Appliance for Repair or Service
- Warranty
- VORSICHT
- Montageanleitung
- Samleinstruktion
- CADAC UK
- CADAC MOZAMBIQUE
- CADAC IRAN
- CADAC CHINA
- CADAC SWEDEN & NORWAY
- CADAC EUROPE
- CADAC SCANDINAVIA
- CADAC MONTENEGRO
- CADAC DENMARK
- CADAC ZIMBABWE
- CADAC GERMANY
- CADAC Czech Rep.
- CADAC ZAMBIA
- CADAC FRANCE
- CADAC NEW ZEALAND
- CADAC U.A.E.
- CADAC ITALY
- CADAC SOUTH EAST EUROPE
Brand : CADAC
Model : 2 Cook 2 Classic
Category : Cooker