
P-10 - Digital photo printer OLYMPUS - Free user manual and instructions
Find the device manual for free P-10 OLYMPUS in PDF.
| Product type | Digital photo printer |
| Brand | OLYMPUS |
| Model | P-10 |
| Dimensions (L × D × H) | 196 × 190 × 166 mm (without protruding parts) |
| Weight | 2.3 kg (including paper tray) |
| Power supply | 24 V DC (specific AC adapter), power consumption 82 W printing, 5.3 W standby |
| Printing method | Dye-sublimation 4-pass color transfer (Yellow/Magenta/Cyan + protective layer) |
| Resolution | 310 dpi |
| Supported paper sizes | 89 x 127 mm and 100 x 148 mm |
| Paper tray capacity | Up to 50 sheets |
| Print speed | Approximately 40 sec (89x127 mm) or 44 sec (100x148 mm) per sheet (excluding data transfer) |
| Interfaces | USB Type A (PictBridge for camera) and USB Type B (PC) |
| Compatible operating systems | Windows 98/Me/2000/XP |
| Ink ribbon cartridge | YMC 3 colors + protective layer (specific format per paper size) |
| Supported file formats | Exif 1.0-2.2 (JPEG/TIFF), DPOF 1.1 |
| Operating conditions | Temperature 5-35°C, relative humidity 20-80% |
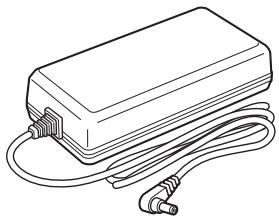
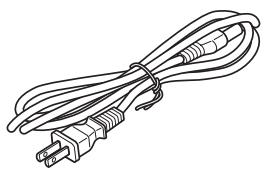
| Included accessories | AC adapter, power cord, paper tray, paper guide, starter kit (5 prints), manual, driver CD-ROM, warranty card |
| Maintenance | Clean the case with a soft cloth; do not use solvents |
| Important safety instructions | Do not disassemble, avoid contact with liquids, unplug before cleaning, do not block ventilation openings |
| Spare parts and repairability | OLYMPUS-specific print kits (cartridge + paper); AC adapter; OLYMPUS after-sales service (1-year warranty, parts available for 5 years after end of production) |
Frequently Asked Questions - P-10 OLYMPUS
User questions about P-10 OLYMPUS
0 question about this device. Answer the ones you know or ask your own.
Ask a new question about this device
Download the instructions for your Digital photo printer in PDF format for free! Find your manual P-10 - OLYMPUS and take your electronic device back in hand. On this page are published all the documents necessary for the use of your device. P-10 by OLYMPUS.
USER MANUAL P-10 OLYMPUS
Thank you for purchasing this OLYMPUS digital photo printer P-10. Read this manual carefully prior to use to ensure correct use of this product.
For customers in USA
This equipment has been tested and found to comply with the limits for a Class B digital device, pursuant to part 15 of the FCC Rules. These limits are designed to provide reasonable protection against harmful interference in a residential installation. This equipment generates, uses and can radiate radio frequency energy and, if not installed and used in accordance with the instructions, may cause harmful interference to radio communications. However, there is no guarantee that interference will not occur in a particular installation. If this equipment does cause harmful interference to radio or television reception, which can be determined by turning the equipment off and on, the user is encouraged to try to correct the interference by one or more of the following measures:
- Reorient or relocate the receiving antenna.
- Increase the separation between the equipment and receiver.
- Connect the equipment into an outlet on a circuit different from that to which the receiver is connected.
- Consult your nearest OLYMPUS service center or an experienced radio/TV technician for help.
WARNING: The connection of a non-shielded equipment interface cable to this equipment will invalidate the FCC Certification of this device and may cause interference levels which exceed the limits established by the FCC for this equipment. It is the responsibility of the user to obtain and use a shielded equipment interface cable with device. Changes or modifications not expressly approved by the manufacturer could void the user's authority to operate the equipment.
For customers in Canada
This class B digital apparatus complies with Canadian ICES-003.
For customers in Europe

"CE" mark indicates that this product complies with the European requirements for safety, health, environment and customer protection. "CE" mark printers are intended for sales in Europe.
Trademarks
- Windows is registered trademark of Microsoft Corporation.
Contents
Introduction
Safety precautions 4
Care and storage 9
What this printer can do 10
Unpacking the printer 11
Identifying the parts 12
Preparation
Connecting the power supply/Turning the printer on and off 14
Loading the ink ribbon cartridge 15
Loading paper 18
Loading paper into the paper tray. 18
Installing the paper tray into the printer 20
Printing
Printing images from digital camera 21
About PictBridge compatible digital cameras 21
Connecting a digital camera to the printer 21
Using the digital camera to control the print operation 22
Printing images from PC 23
Connecting the printer to a PC 23
Installing the Printer Driver (during initial setup) 24
Printing. 24
For Your Information
Replenishing the paper supply and replacing the ink ribbon cartridge..... 26
If paper runs out while printing 26
If ink ribbon runs out while printing 26
If indicators light steadily and blink 27
Troubleshooting 28
If paper is jammed 29
If the Ink ribbon cartridge is removed during printing. 30
About the print pack (ink ribbon cartridge and paper) 31
Specifications 33
Service and Maintenance 34
Definition of terms 35
Safety precautions
Various icons are used in this manual to indicate correct product use, and help prevent property damage and injury to customers and others. The meanings of these icons are described below.
| Icon | Description |
| WARNING | Failure to follow instructions indicated by this icon may lead to serious injury or death. |
| NOTE | Failure to follow instructions indicated by this icon may lead to injury or property damage. |
Precautionary notations are indicated by the following symbols.
| Icon | Description |
| Do not perform this action. | |
| You are strongly encouraged to perform this action. | |
| Unplug the device from the power source. | |
| Do not disassemble. | |
| Avoid contact with water and other liquids. | |
| Do not touch if your hands are wet. |

WARNING
If this device acts abnormally, unplug it
Do not use the printer if it emits smoke, unusual smells, strange sounds, or becomes unusually warm.
Use under these conditions may cause fire or electric shock.
Turn off and unplug the printer. Then contact your nearest
OLYMPUS service center.

Should any liquid or foreign objects get into the printer, unplug the power cord
Do not allow any liquids, metals, or flammable objects to get into the printer through the ventilation holes.
This may cause fire or electric shock.
Turn off and unplug the printer. Then contact your nearest
OLYMPUS service center.

If the printer cabinet is damaged, unplug the power cord
Do not use this device if the cabinet (body) is damaged.
Use in this condition may cause fire or electric shock.
Turn off and unplug the printer. Then contact your nearest
OLYMPUS service center.

If the power cord is damaged, unplug it
Do not use a damaged power cord.
Use in this condition may cause fire or electric shock.
Turn the printer off, and unplug the power cord being careful not to
touch any exposed wires. Then contact your nearest OLYMPUS
service center.


WARNING
Do not damage the power cord
Do not damage or modify the power cord.
A damaged power cord may result in fire or electric shock. To prevent the cord from becoming damaged, DO NOT: pull on the cord to unplug it, bend the cord excessively, or place heavy objects on the cord.
If the power cord is damaged, contact your nearest OLYMPUS service center.

Do not disassemble or modify the printer
The printer has both hot and high voltage parts on the inside.
Touching these parts may result in burns, electric shock, and/or damage to the printer. Never attempt to disassemble or modify the printer as this may lead to electric shock or printer malfunction.
For service or repair, contact your nearest OLYMPUS service center.

Do not allow liquids near the printer
If liquid gets into the printer, it may result in fire or electric shock.

Do not place heavy objects on the printer
Heavy objects may damage the printer cabinet, resulting in fire or electric shock.
Damage may also result from the printer being dropped or falling.

Do not install the printer in the following places
To prevent fire, electric shock, and printer malfunction, do not install the printer in the following places:
- Dusty, humid, or oily places
Should any dust or liquid get into the printer, it may result in fire or electric shock.
- Extremely hot places
Do not expose the printer to direct sunlight (for example, inside a car or near a window) or extremely high temperatures (for example, near a heater). Doing so may damage the printer cabinet, resulting in fire or electric shock.
Use the printer in an environment with an ambient temperature between 5 to 35^ (41 to 95^ ) and humidity of 20 to 80% .

Do not use the printer in the following places
- Unstable or inclined surfaces.
- Outdoors (particularly on beaches, etc.), or places that expose the printer to excessive dust or debris.
- Places subject to rain, dripping, or enclosed places where condensation could occur such as inside a plastic bag.

■ Do not use the printer with an AC adapter or power cord other than that specified/provided

■ Do not use the provided AC adapter or power cord with any other devices

Provide correct voltage

Incorrect voltage may damage printer parts.
Use with incorrect voltage may cause fire or electric shock.
Connect the power cord correctly/safely

For example, if the power cord is plugged in loosely, it may cause a fire or electric shock.
Push the plug all the way into the outlet.
Make sure that excessive dust and debris do not accumulate on the power cord

Dust and debris may conduct electricity, which can cause fire and electric shock.
If excessive dust and debris accumulate on the cord, unplug the cord and clean it.
Always unplug the power cord during an electrical storm

The induced electricity from storms may cause fire, electric shock, or printer malfunction.
Do not hold the power cord plug with wet hands

Doing so may result in electric shock.
Be sure your hands are dry before handling.
Plug the printer directly into an outlet

Avoid plugging into a socket that is already being used by several appliances.

NOTE
■ Do not block the ventilation holes
Do not block the ventilation holes on the front and back of this printer. Doing so may cause heat in the printer to build up, possibly resulting in fire or electric shock.
Do not put the printer where there is poor ventilation, or on a soft surface such as a rug or bed.

Do not put the printer on an unstable surface
Do not put the printer on an unstable surface such as a shaky table. Injury may result from the printer being dropped or falling. This could also damage the printer or cause the printer to malfunction.

Do not touch the non-user-serviceable parts inside the printer
Doing so may cause injury or burns. This applies especially to children and those unfamiliar with the printer.

Do not move the printer when the power cord is taut
Moving the printer when the power cord is taut may damage the cord.
Using the printer when damaged may cause fire or electric shock.
When moving the printer, unplug and bundle the power cord.

■ Do not unplug the printer by jerking or pulling on the power cord
To unplug the power cord, hold it by the plug.Pulling on the cord may damage it, possibly resulting in fire or electric shock.

Unplug the printer for servicing
Always unplug the printer before servicing or performing maintenance.

Unplug the printer if it will not be used for an extended period of time
Unplug the printer if it will not be used for an extended period of time, such as while you are away on a long trip.
Otherwise, deteriorated insulation or current leakage may cause fire or electric shock.

Care and storage
Protect against moisture condensation
Moisture condensation is water vapor in the air that becomes liquid, and collects on the printer surface.
This phenomenon occurs under the following conditions.
- The room in which the printer is placed is rapidly heated or cooled.
- The printer is directly subjected to cool air, such as from an air conditioner.
- The printer is moved from a cold place to a warm place.
Moisture in the air condenses on the paper, deteriorating print quality or causing paper jams.
Under conditions where condensation has occurred or may occur, do not operate the printer until it is dry or until there is no possibility that condensation will occur.
Do not spray on or allow volatile solvents to come in contact with the printer
Spraying an insecticide near the printer, or wiping it with thinner or benzene for example, may damage or discolor the printer cabinet.
Use a soft cloth to clean the outside of the printer cabinet. For difficult to remove stains, dampen a soft cloth with water or a mild detergent diluted with water, and wring out the cloth to remove as much of the moisture as possible before wiping the outside of the cabinet.
Do not allow the printer to be in contact with rubber or plastic products for an extended period of time
Deterioration and discoloration may occur if the printer is in contact with rubber or plastic products for an extended period of time.
Operate the printer at least once every six months
If the printer is not used for an extended period of time, it may malfunction. Operate the printer at least once every six months.
Carry the printer with both hands
When lifting or carrying the printer, use both hands.
Transport the printer carefully
When transporting the printer, place it in the original box with the original packing material. If you don't have the original packaging, pack the printer with enough cushioning material to absorb any impacts during transportation.
What this printer can do
Direct Print
This printer supports the PictBridge standard for communication between a digital camera and printer. Connect a PictBridge compatible digital camera to this printer using a USB cable, and create prints from the digital camera.
Making a variety of prints
This printer supports multi prints where multiple copies of one image are printed on a page, index prints where several different images are printed on a page, date print where the photograph date is printed, and bordered/borderless prints.
Caution
- Depending on the digital camera that is connected, some functions may be restricted.
Printing images from a PC
Connect this printer to a PC using a USB cable, and create prints from images stored on the PC.
High-quality overcoated prints
High-quality overcoated prints provide excellent storability and durability. You can protect your important pictures from the effects of time.
50-sheet continuous print
The supplied paper tray can continuously supply up to 50 sheets of paper to the printer. A single sheet of 3.5'' × 5'' Paper takes about 40 seconds to print (excluding data transmission time from digital camera or PC).
Unpacking the printer
Make sure that the following accessories are supplied with your printer. If you are missing any of these accessories, contact your nearest OLYMPUS service center immediately.
- AC adapter (1)
Power cord (1)
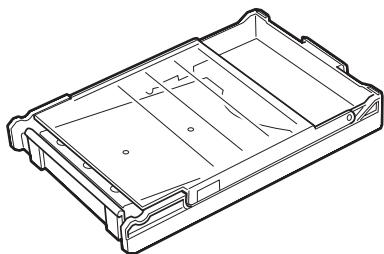
- Paper tray (1)
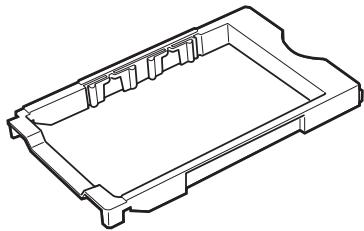
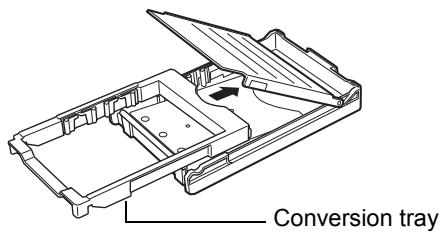
- Conversion tray (for 3.5'' × 5'' Paper) (1)
(Place this tray in the paper tray. Depending on country, may not be supplied with printer.)
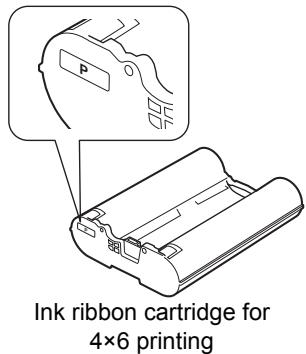
- Starter kit Ink ribbon cartridge for 4 × 6 printing (for 5 prints) and 4 × 6 Paper (5 sheets)
- Instruction manual (1)
- User registration card (1)
(Depending on country, may not be supplied with printer.)
Warranty card (1)
CD-ROM (Printer driver) (1)
Identifying the parts
Front
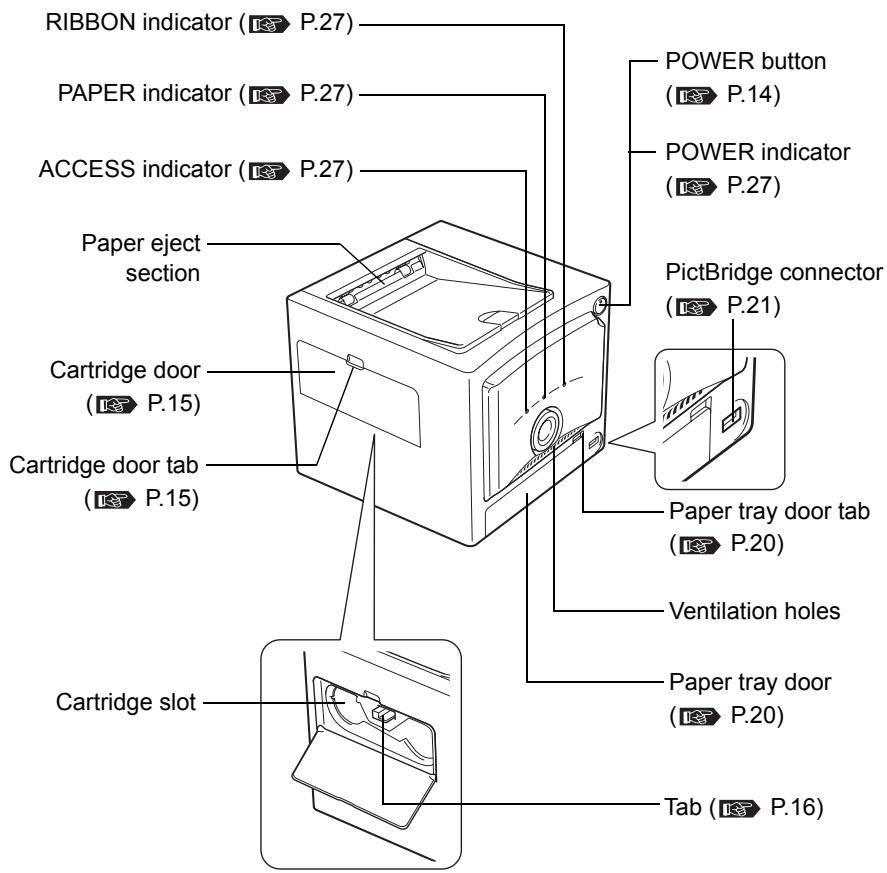
Paper tray
Back
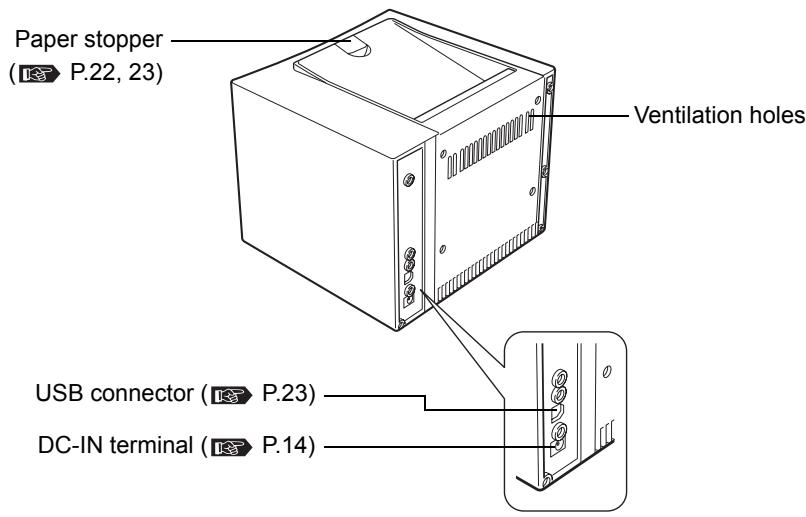
Bottom
Connecting the power supply/Turning the printer on and off
1 Plug the printer power cord into the AC adapter.

2 Plug the AC adapter power cord into a wall outlet, then plug the other end of the printer power cord into the printer's DC-IN terminal.
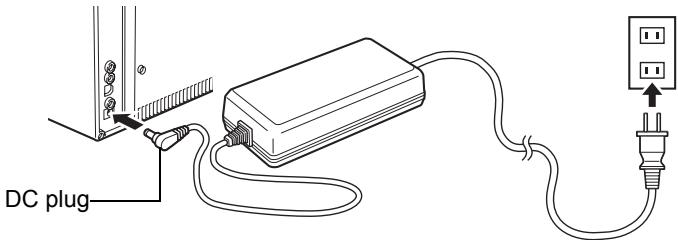
3 Press the POWER button.
The POWER indicator lights, and the printer turns on.
Caution
- If you are connecting to a digital camera, turn the printer on, connect the digital camera to the printer, and then turn on the digital camera. P.21
- If you are connecting to a PC, connect to the PC, and then turn the printer on before turning on the PC.
To turn off the printer
Press the POWER button to turn off the printer.
The POWER indicator goes out, and the printer turns off.
Caution
- If the printer power cord is accidentally unplugged from the printer during printing, turn the printer off, plug the printer power cord into the printer's DC-IN terminal, and then turn the printer on again. Leaving the printer unplugged in printing mode may cause it to malfunction.
Loading the ink ribbon cartridge
About the print pack
You need the provided starter kit or an optional print pack for printing.
- Always use the ink ribbon cartridge and print paper supplied together in the same carton.
- Do not use printed paper or paper that has been fed through the printer.
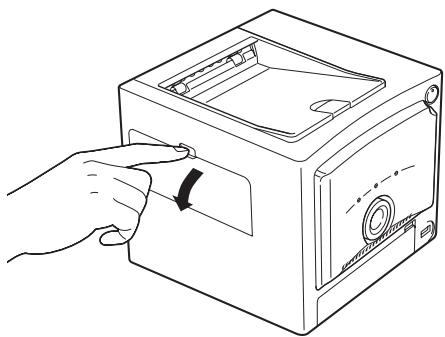
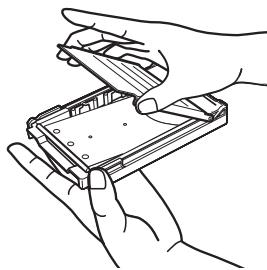
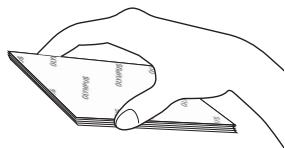
1 Open the cartridge door while pushing down on the cartridge door tab.
2 Release the ink ribbon cartridge stop, and wind the ink ribbon to remove the slack.
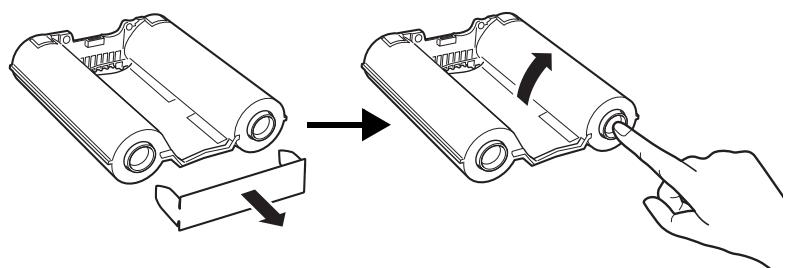
While pressing the center of the reel, wind the ink ribbon in the direction of the arrow.
- To continue using a partially used ink ribbon cartridge, insert after removing slack as shown in the drawing.
3 Insert the ink ribbon cartridge all the way into the compartment and close the cartridge door firmly.
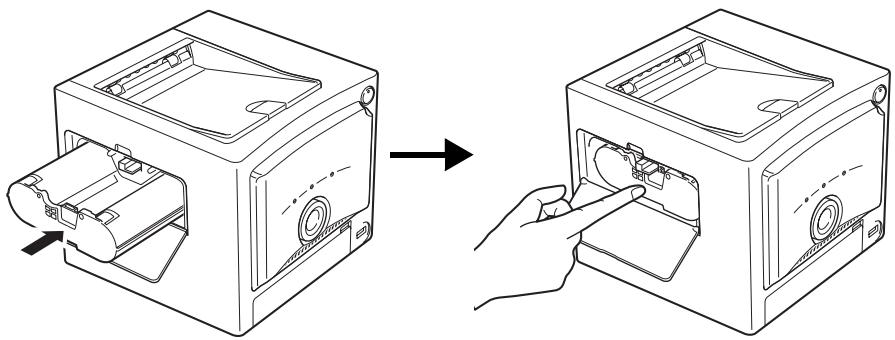
- Press from the center of the ink ribbon cartridge to slide it fully into the compartment, until you hear a locking sound.
- If you can't close the cartridge door, remove the ink ribbon cartridge, and then re-insert it.
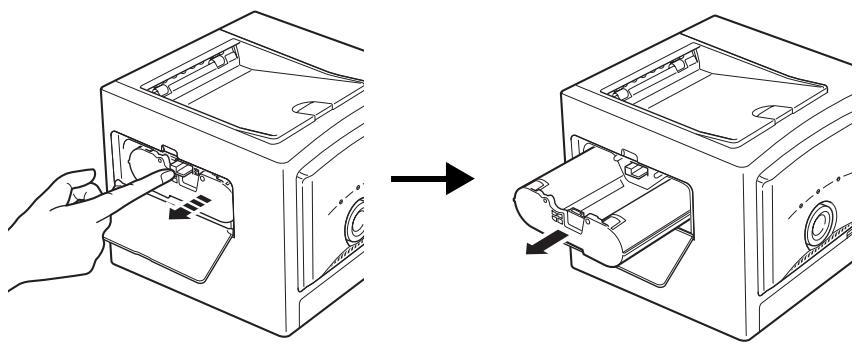
Removing the ink ribbon cartridge
Open the cartridge door, lift up on the tab to release the ink ribbon cartridge, and remove the cartridge.
Caution
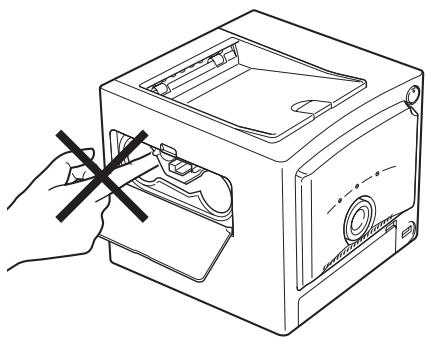
- The cartridge compartment may be very hot during or after operation. Do not insert your finger or hand into the cartridge compartment.
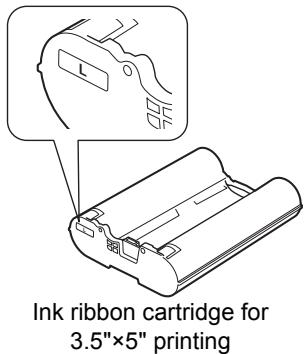
- The print packs are either for 4 × 6 or 3.5^ × 5^ paper. When printing on 4 × 6 paper, be sure to use an ink ribbon cartridge for 4 × 6 printing. When printing on 3.5^ × 5^ paper, use an ink ribbon cartridge for 3.5^ × 5^ printing.
- When setting an ink ribbon cartridge down, stand it on its side to avoid getting dust on the ink ribbon.
Do not touch the ink ribbon, or leave it where it may collect dust.
Fingerprints or dust on the ink ribbon may degrade print quality.
- If the ink ribbon tears, replace it with a new ink ribbon cartridge.

Storage considerations
- Do not store the ink ribbon cartridge in a place subject to high temperature or humidity, excessive dust or direct sunlight.
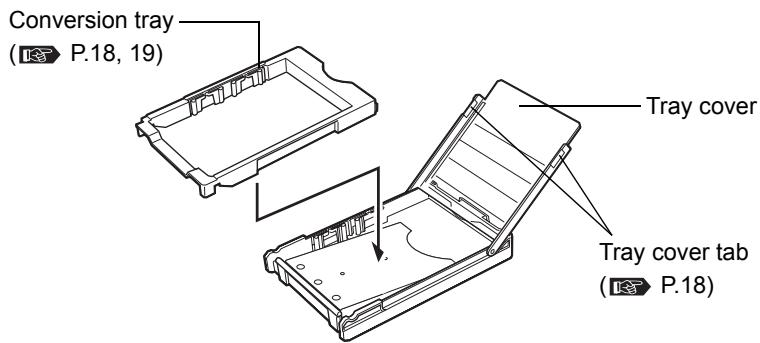
Loading paper into the paper tray
To print 4 × 6 Paper
1 Grasp both tray cover tabs to open the tray cover and remove the conversion tray.
2 Load paper into the paper tray with the print surface facing down.
- Remove the protective sheet, and insert the paper.
- Up to 50 sheets can be loaded into the tray cover.
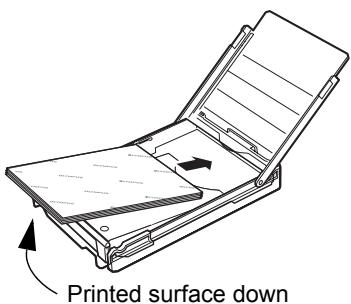
3 Close the tray cover of the paper tray.
- Make sure that paper is not pinched in the paper tray.
To print 3.5'' × 5'' Paper
When loading 3.5'' × 5'' Paper for printing, install the conversion tray to the paper tray before inserting the paper.
Caution
- Be careful not to stain or damage the conversion tray.
- Do not touch the print surface (the blank, glossy surface) when handling paper.
- Do not store in a place subject to high temperature, humidity or direct sunlight.
- Do not leave paper in a place subject to excessive dust. Fingerprints or dust on the print surface may degrade print quality.
- To prevent malfunction, use only the specialty paper recommended for this printer.
- A maximum of 50 sheets of paper can be placed in the paper tray. Be careful not to exceed this number when adding print paper. If too many print paper sheets are loaded, the printer may jam.
- To prevent paper from jamming, do not fold or bend print paper.
- Do not write on paper before printing images on it. If you want to write something, be sure to do so after printing, using an oil based ink. It is not possible to print word processor or typewriter characters on this paper.
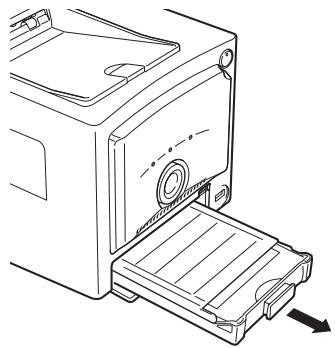
Installing the paper tray into the printer
1 Open the paper tray door by pulling the paper tray door tab.
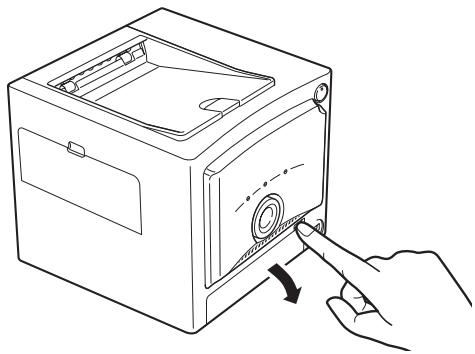
- To close the door, push it until the paper tray door tab locks with a click.
2 Insert the paper tray all the way.
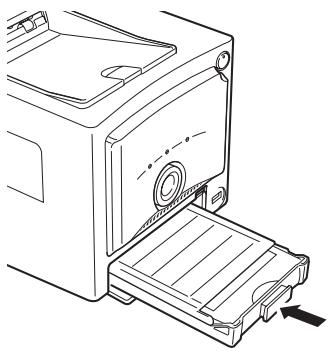
- Insert the paper tray until you hear a locking sound.
- To remove, grasp the portion indicated by the arrow and pull out toward you.
Printing images from digital camera
About PictBridge compatible digital cameras
This printer can print images directly from any PictBridge compatible digital camera.
Operations to print the images are issued from the digital camera, and vary depending on the digital camera. See the operations manual for the digital camera for details concerning printing.
Additionally, information concerning PictBridge-compatible digital cameras is available on the OLYMPUS web site.
Caution
- To print pictures that were not taken with a digital camera, print from a PC.
Connecting a digital camera to the printer
Use the cable supplied with the digital camera to connect.
1 First, turn the printer on.
See the Page 14. "Connecting the power supply/Turning the printer on and off".
2 Insert the USB cable into the digital camera USB connector, and plug the other end into the PictBridge connector on the front of the printer.
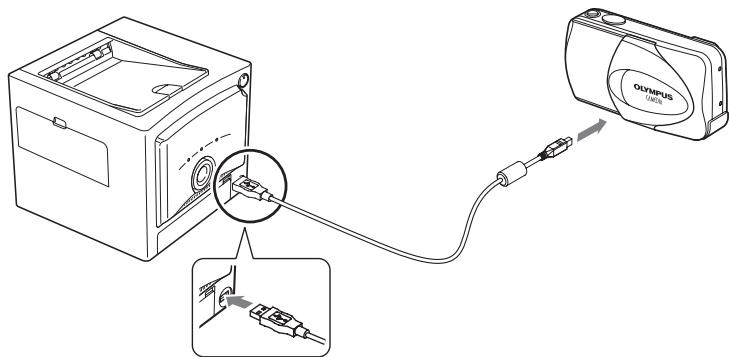
3 Turn the digital camera on and set it so it is ready to print.
The ACCESS indicator on the printer lights, and shortly thereafter turns off.
Refer to the digital camera's operation manual for details on digital camera operation.
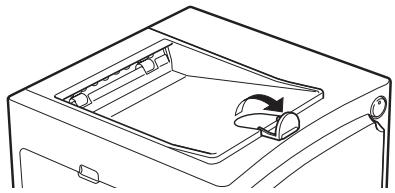
4 Pull the paper stopper on the top of the printer down toward the front.

Using the digital camera to control the print operation
1 Control print operations using the digital camera.
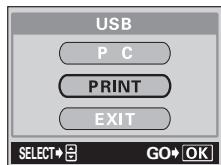
Sample Digital Camera display
After printing begins, the ACCESS indicator on the printer will blink. When printing is finished, the indicator turns off.

See the digital camera operations manual for details on digital camera operations.
2 After printing is complete, turn off the digital camera and printer before removing the USB cable.
Caution
- Never open the cartridge door or paper tray door during printing.
- Do not move the printer during printing.
- Do not turn off printer or digital camera, or remove the AC adapter during printing. In the event that power is interrupted or the AC adapter removed, restore power and perform the interrupted operations again. Leaving the printer unplugged in printing mode may cause it to malfunction.
Printing images from PC
Print images from a PC using any image processing application software.
Caution
- To print pictures that were not taken with a digital camera, print from a PC.
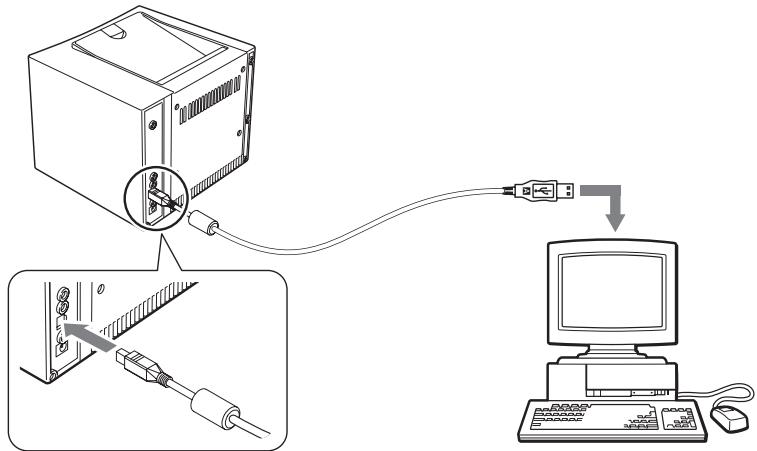
Connecting the printer to a PC
Use a commercially available USB cable (Type A-B) to connect the printer.
1 Insert the USB cable plug into the PC USB port, and plug the other end into the USB connector on the back of the printer.
2 Pull the paper stopper on the top of the printer down toward the front.
3 Turn the printer on.
Notes
- If both a PC and a PictBridge compatible digital camera are connected to the printer at the same time, the digital camera connection has priority over the PC. Disconnect the digital camera to print images from PC.
- This printer is not guaranteed to work on a network. Additionally, use of a commercial printer buffer is not protected by the limited warranty.
- This printer is not guaranteed to work when connected to a USB hub.
Installing the Printer Driver (during initial setup)
Supported Operating Systems: Windows 98/Me/2000/XP
1 Start the PC, and insert the CD-ROM supplied with the printer into the CD-ROM drive.
The [New Hardware Found] dialog is automatically displayed.
- If this dialog is not automatically displayed, start installation of the driver by selecting [Settings - Printers - Add Printer] from the Start menu.
If you are using Windows XP, start installation of the driver by selecting [Control Panel - Printers and Faxes - Add a printer] from the Start menu.
2 Follow the directions on the screen to install the printer driver.
See the PC operations manual for details.
Printing
1 Use the image processing application to display the desired image, and select the image for printing.
2 Select [Print] from the File menu, and select [OLYMPUS P-10] from the available printer list.
Notes
- [Print] operations and printer selection vary depending on the application. Refer to the instructions for the application you are using.
3 Click [Properties] to change settings before printing.
Printer settings
On the [Properties] window, use the [Paper] and [Graphics] tabs to change the paper size, number of copies, and to make adjustments to the color settings.
For details, refer to the ReadMe file contained in the CD-ROM.
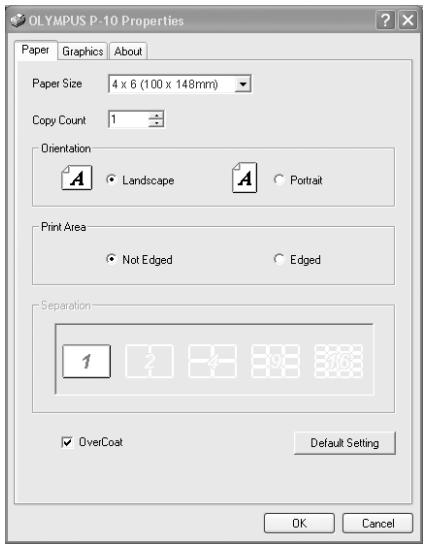
Example of the [Paper] tab window
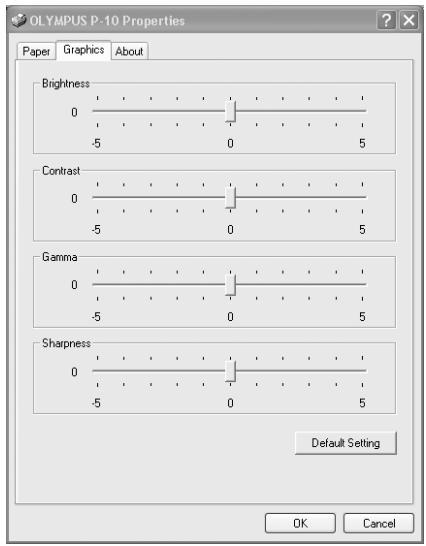
Example of the [Graphics] tab window
Caution
- Never open the cartridge door or paper tray door during printing.
- Do not move the printer during printing.
- Do not turn off the printer or PC, or remove the AC adapter during printing. In the event that power is interrupted or the AC adapter removed, restore power and perform the interrupted operations again. Leaving the printer unplugged in printing mode may cause it to malfunction.
Replenishing the paper supply and replacing the ink ribbon cartridge
If paper runs out while printing
The PAPER indicator blinks slowly. Replenish the paper supply in the paper tray. The remaining copies will automatically continue to print. The ink ribbon normally ends at the same time the paper in a print pack is used up, so please replace the ink ribbon cartridge at the same time.
If ink ribbon runs out while printing
The RIBBON indicator blinks fast. After the paper has ejected from the printer, replace the ink with a new ink ribbon cartridge. After closing the cartridge door, the remaining copies will automatically continue to print.
If indicators light steadily and blink
| Indicator | Lamp status | Printer status | Necessary countermeasure | Page |
| POWER | On | Power ON | — | 14 |
| Off | Power OFF | |||
| ACCESS | On * | Connecting to digital camera | Do not disconnect the digital camera or PC. | — |
| Blinking slowly | Communi-cating | |||
| Blinking very slowly | Printing | — | — | |
| PAPER | Blinking slowly | Out of paper | Remove the paper tray, refill paper in the tray, and replace the tray in the printer. | 18,26 |
| The paper and ink ribbon cartridge are incompatible | When printing on 4×6 paper, be sure to use an ink ribbon cartridge for 4×6 printing. When printing on 3.5"×5" paper, use an ink ribbon cartridge for 3.5"×5" printing. | 17 | ||
| RIBBON | Blinking rapidly | End of ink ribbon | Replace the ink ribbon cartridge with a new one. | 15,26 |
| Blinking slowly | Ink ribbon cartridge not installed | Install an ink ribbon cartridge on the printer. | 15 | |
| The paper and ink ribbon cartridge are incompatible | When printing on 4×6 paper, be sure to use an ink ribbon cartridge for 4×6 printing. When printing on 3.5"×5" paper, use an ink ribbon cartridge for 3.5"×5" printing. | 17 | ||
| ACCESS, PAPER | Blinking simultaneously | Paper jam | Remove jammed paper. | 29 |
| ACCESS, RIBBON | Blinking simultaneously | Communication error | Ensure that the digital camera is PictBridge compatible. | — |
| Turn the printer off and ON, then retry printing. If the error persists, consult your nearest OLYMPUS service center. | — | |||
| ACCESS, RIBBON, PAPER | Blinking simultaneously | Internal problem | Consult your nearest OLYMPUS service center. | — |
- When communication is successfully established, the light turns off.
Troubleshooting
Before sending your printer for service, check the following to try to resolve the problem. If the problem persists, contact your nearest OLYMPUS service center.
| Problem | Cause-Status | Resolution | Page |
| Cannot turn the printer on. | The AC adapter is not connected. | Connect the AC adapter properly. | 14 |
| Cannot remove the ink ribbon cartridge. | The printer turned off during the operation. | Push the ink ribbon cartridge in until you hear a locking sound. Turn the printer on again and wait until the mechanical sound stops. | — |
| Printing from the digital camera takes a long time to start. | The printer takes a long time to open a TIFF file. | Opening time varies depending on the image size. Wait until opening finishes. | — |
| Trimming selected by DPOF takes a long time. | Wait until opening finishes. | — | |
| Cannot print. | The ink ribbon cartridge is not Inserted. | Insert an ink ribbon cartridge. | 15 |
| Paper or the paper tray is not inserted. | Load paper into the paper tray and then install the paper tray. | 18, 20 | |
| Paper is jammed at the paper eject section. | Remove the paper. | 29 | |
| The printer driver is not properly installed on the PC. | Install or re-install the printer driver on the PC. | 24 | |
| Indicators light or blink | — | 27 | |
| Noise interferes with printed images. | Pictures that were not taken with a digital camera were printed from a digital camera. | Use a PC to print image data that has not been recorded by a digital camera. | 23 |
| Printing intervals have gotten longer. | Printing intervals are automatically extended during continuous printing to prevent the internal components from overheating. | This is not a malfunction. Wait a few minutes. | — |
If paper is jammed
If paper jams in the printer, the ACCESS indicator and PAPER indicator both blink, and printing stops.
Follow the steps below to clear a paper jam in the printer.
1 Turn the printer off.
2 After removing the paper tray, make sure that no print paper is bent or curled and that paper sheets are properly placed in the tray.
3 With the paper tray removed, turn the printer on again to automatically eject the paper from the printer.
- If paper is automatically ejected, continue with step 8.
- If paper is not automatically ejected, turn the printer off and continue with step 4.
4 Look in the paper tray door to see if the jammed paper is visible at the back.
- If the jammed paper is visible, go to Step 5.
- If the jammed paper is not visible, contact your nearest OLYMPUS service center for repairs.
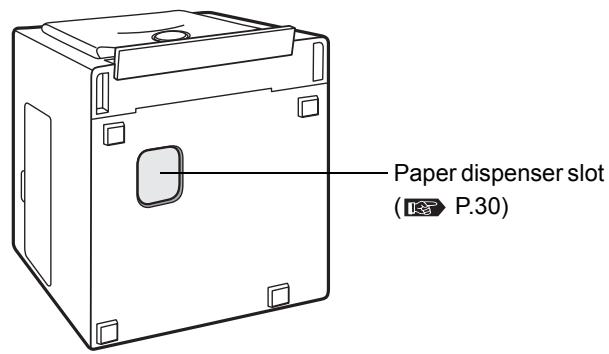
5 Set the printer on its rear so that the front of the printer is facing up. Insert your finger in the paper dispenser slot located on the bottom and slide the jammed paper towards the paper tray door.
- If you cannot move the paper with your finger, use tweezers or the like.
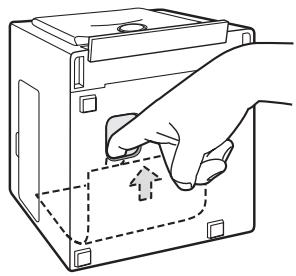
6 After the paper has moved partway, you will then be able to remove it through the paper tray door.
7 Turn the printer on.
8 Reinsert the paper tray in the paper tray door.
- If operation is normal, the paper jam has been successfully cleared and you can continue printing.
Caution
- After removing the jammed paper, do not attempt to use it again in the printer. Doing so may damage your printer.
If the Ink ribbon cartridge is removed during printing
1 Turn the printer off.
2 Insert the ink ribbon cartridge all the way into the compartment, and close the cartridge door firmly.
3 Turn the printer on.
About the print pack (ink ribbon cartridge and paper)
Always use print packs specified by OLYMPUS.
- The print packs are either for 4 × 6 or 3.5" × 5" paper. The print pack for 4 × 6 printing contains 4 × 6 paper and an ink ribbon cartridge for 4 × 6 printing. The print pack for 3.5" × 5" printing likewise contains 3.5" × 5" paper and an ink ribbon cartridge for 3.5" × 5" printing.
- The print pack for 3.5" × 5" printing may not be available in all locations.
- Always use the ink ribbon cartridge and paper from a print pack together.
The used ink ribbon cartridge is not reusable.
Exercise care when handling the ink ribbon cartridge to ensure that it remains clean.
Do not disassemble the ink ribbon cartridge.
■ Fingerprints, dirt, scratches, oil or other debris on the print surface may degrade print quality.
To avoid printer malfunction, never print more than once on a single sheet of paper. In addition, do not use paper that has been fed through the printer.
Do not open the print pack until ready to use.
Storage Considerations
Do not store the print pack in the following locations.
- Do not store the print pack where hot (above 30^ ), cold (below 5^ ), highly humid, or dusty.
- Do not store the print pack with chemicals.
- Do not store the print pack where exposed to direct sunlight or bright light.
Caution
- Do not place for long periods an environment exceeding 40^ . The same precautions are also necessary when installed in the printer. (Such as during transport, or by a window in direct sunlight.)
Storing prints
Do not store the prints with the printed surfaces facing each other.
- Do not allow the print surface to be in contact with cellophane tape, a desk pad or an eraser containing plastic for an extended period of time. Prolonged contact may cause the print surface to become discolored.
■ Do not allow organic solvents to come in contact with the print surface. Such contact may cause discoloration.
Avoid prolonged exposure of the print surface to sunlight or bright light. Prolonged exposure may cause the print surface to become discolored.
Use an oil-based pen when writing on the print surface.
Avoid locations that are subject to direct sunlight, high temperature/ humidity, or are in the reach of children.
OLYMPUS is not responsible for print discoloration or fading.
Disposing of used ink ribbon cartridge
■ Dispose of a used ink ribbon cartridge in compliance with the plastic waste disposal method prescribed by your local authorities.
If you experience problems
Exchange will be made for the same quantity of new product if a problem occurs as the result of an OLYMPUS manufacturing defect. OLYMPUS is not responsibility in other situations.
Specifications
Printer
| Printing Method | Sublimation dye transfer printing 4-pass printing (Yellow/Magenta/ Cyan and protective overcoat layer) |
| Resolution | 310 dpi |
| Print paper size | 3.5" × 5" Paper: 89 (H) × 127 (V) mm (3.5" × 5") 4 × 6 Paper: 100 (H) × 148 (V) mm (3.9" × 5.8") |
| Color expression | Over 16.77 million colors |
| Printing Speed | 3.5" × 5" Paper: Approx. 40 seconds per sheet 4 × 6 Paper: Approx. 44 seconds per sheet (excluding data transmission time from digital camera or PC) |
| Interfaces | PictBridge compatible digital camera connection: USB Type-A connector PC connection: USB Type-B connector |
| Compatible OS | Windows 98/Me/2000/XP |
| Ink ribbon cartridge | Y+M+C 3 layers and light-resistant overcoat (protective layer) |
| Compatible Graphics File Formats | Exif 1.0-2.2 compatible(JPEG/TIFF) DPOF 1.1 compatible |
| Power Source | DC 24V (Dedicated AC adapter) |
| Rated Power Consumption | 82 W (during printing), 5.3 W (during standby) |
| Operating Temperature | 5 - 35°C (41 - 95°F) |
| Operating Humidity | 20 - 80% |
| Dimensions | 196 (W) × 190 (D) × 166 (H) mm (7.7" × 7.1" × 6.5") (not including protruding parts) |
| Weight | 2.3 kg (5.1 lbs) (including paper tray) |
AC adapter
| Type | Switching regulator |
| Input voltage | AC100-120V or AC220-240V, 50/60Hz (AC adapter type and voltage differ by region) |
| Output voltage | DC 24V |
Design and specifications are subject to change without notice.
Service and Maintenance
- Your dealer gave you a limited warranty card that contains the dealer name and purchase date. If there are any mistakes on the card, please correct them with your dealer. Please read the limited warranty card, and keep it in a safe place.
- For questions concerning service, or in the event of a device problem, consult your nearest OLYMPUS service center. If a problem occurs with this device when used in accordance with the instruction manual, the limited warranty allows repair at no cost for one year after the date of purchase.
- There will generally be a charge for repairs performed after the warranty period has expired.
- OLYMPUS will attempt to maintain replacement parts for this product for 5 years after manufacture of this printer ends. Therefore, service for this printer will generally be available during this period. It may also be possible to receive service after this period. If necessary, please consult your nearest OLYMPUS service center.
- OLYMPUS is not responsible for any damages (costs or lost profits) as the result of device malfunction.
- When sending a product for repair, enclose documentation indicating device problem or malfunction, and ensure that the printer is adequately protected by packing material. In addition, use a traceable delivery service or registered mail. Postage costs are the responsibility of the customer.
Definition of terms
DPOF (Digital Print Order Format)
Recording format for automatic printing of digital camera data. Prints can easily be created from a media card at DPOF compatible photo shops or on printers by specifying the desired images, and number of copies.
PictBridge
A common standard used to connect a digital camera directly to a printer to print images. If the devices are PictBridge compatible, prints can be made using simple digital camera controls regardless of the device manufacturers. Various print options are available, such as automatic printing of DPOF specified images, index print, and image trimming.
RGB
The three colors comprising light: red (R), green (G) and blue (B). Colors are displayed on televisions and PC monitors using these three colors.
YMC
The three primary colors: cyan (C), magenta (M), and yellow (Y). Colors are printed using these three colors. The range of colors that can be displayed using YMC differs from the range of colors available using RGB. Therefore, some colors for images that are displayed on a monitor can not be reproduced exactly using a printer and are replaced with similar colors.
DPOF (Digital Print Order Format)
DPOF (Digital Print Order Format)
DPOF (Digital Print Order Format)
Shinjuku Monolith, 3-1 Nishi-Shinjuku 2-chome, Shinjuku-ku, Tokyo, Japan
OLYMPUS AMERICA INC.
Two Corporate Center Drive, Melville, NY 11747-3157, U.S.A. Tel. 631-844-5000
Technical Support (USA)
24/7 online automated help: http://www.olympusamerica.com/support
Phone customer support: Tel. 1-888-553-4448 (Toll-free)
Our phone customer support is available from 8 am to 10 pm
(Monday to Friday) ET
E-Mail: distec@olympus.com
Olympus software updates can be obtained at: http://www.olympus.com/digital
Olympus Europa GmbH
Premises/Goods delivery: Wendenstrasse 14-18, 20097 Hamburg, Germany
Tel: +49 40-23 77 3-0 / Fax: +49 40-23 07 61
Letters: Postfach 10 49 08, 20034 Hamburg, Germany
European Technical Customer Support:
Please visit our homepage http://www.olympus-europa.com
or call our TOLL FREE NUMBER*: 00800 - 67 10 83 00
for Austria, Belgium, Denmark, Finland, France, Germany, Italy, Luxembourg, Netherlands, Norway, Portugal, Spain, Sweden, Switzerland, United Kingdom
- Please note some (mobile) phone services/provider do not permit access or request an additional prefix to +800 numbers.
For all not listed European Countries and in case that you can't get connected
to the above mentioned number please make use of the following
CHARGED NUMBERS: +49 180 5 - 67 10 83 or +49 40 - 237 73 899
Our Technical Customer Support is available from 9 am to 6 pm MET (Monday to Friday)
- For customers in USA
- For customers in Canada
- For customers in Europe
- Trademarks
- Contents
- Introduction
- Preparation
- Printing
- For Your Information
- Safety precautions
- WARNING
- If this device acts abnormally, unplug it
- Should any liquid or foreign objects get into the printer, unplug the power cord
- If the printer cabinet is damaged, unplug the power cord
- If the power cord is damaged, unplug it
- Do not damage the power cord
- Do not disassemble or modify the printer
- Do not allow liquids near the printer
- Do not place heavy objects on the printer
- Do not install the printer in the following places
- Do not use the printer in the following places
- ■ Do not use the printer with an AC adapter or power cord other than that specified/provided
- ■ Do not use the provided AC adapter or power cord with any other devices
- Provide correct voltage
- Connect the power cord correctly/safely
- Make sure that excessive dust and debris do not accumulate on the power cord
- Always unplug the power cord during an electrical storm
- Do not hold the power cord plug with wet hands
- Plug the printer directly into an outlet
- NOTE
- ■ Do not block the ventilation holes
- Do not put the printer on an unstable surface
- Do not touch the non-user-serviceable parts inside the printer
- Do not move the printer when the power cord is taut
- ■ Do not unplug the printer by jerking or pulling on the power cord
- Unplug the printer for servicing
- Unplug the printer if it will not be used for an extended period of time
- Care and storage
- Protect against moisture condensation
- Do not spray on or allow volatile solvents to come in contact with the printer
- Do not allow the printer to be in contact with rubber or plastic products for an extended period of time
- Operate the printer at least once every six months
- Carry the printer with both hands
- Transport the printer carefully
- What this printer can do
- Direct Print
- Making a variety of prints
- Caution
- Printing images from a PC
- High-quality overcoated prints
- 50-sheet continuous print
- Unpacking the printer
- Identifying the parts
- Front
- Paper tray
- Back
- Bottom
- Connecting the power supply/Turning the printer on and off
- To turn off the printer
- Loading the ink ribbon cartridge
- About the print pack
- Removing the ink ribbon cartridge
- Storage considerations
- Loading paper into the paper tray
- To print 4 × 6 Paper
- To print 3.5'' × 5'' Paper
- Installing the paper tray into the printer
- Printing images from digital camera
- About PictBridge compatible digital cameras
- Connecting a digital camera to the printer
- Using the digital camera to control the print operation
- Printing images from PC
- Connecting the printer to a PC
- Notes
- Installing the Printer Driver (during initial setup)
- Printer settings
- Replenishing the paper supply and replacing the ink ribbon cartridge
- If paper runs out while printing
- If ink ribbon runs out while printing
- If indicators light steadily and blink
- Troubleshooting
- If paper is jammed
- If the Ink ribbon cartridge is removed during printing
- About the print pack (ink ribbon cartridge and paper)
- Storing prints
- Disposing of used ink ribbon cartridge
- If you experience problems
- Specifications
- Service and Maintenance
- Definition of terms
- DPOF (Digital Print Order Format)
- PictBridge
- RGB
- YMC
- OLYMPUS AMERICA INC.
- Technical Support (USA)
- Olympus Europa GmbH
- European Technical Customer Support:
Brand : OLYMPUS
Model : P-10
Category : Digital photo printer