
Ninebot KickScooter Blinker - Electric scooter SEGWAY - Free user manual and instructions
Find the device manual for free Ninebot KickScooter Blinker SEGWAY in PDF.

| Product type | Electric scooter turn signal kit |
| Brand | Segway / Ninebot |
| Model | Ninebot KickScooter Blinker (PH0801) |
| Front dimensions | 360 × 66 × 27 mm |
| Rear dimensions | 223 × 144 × 46 mm |
| Front weight | 306 g |
| Rear weight | 273 g |
| Power supply | Integrated rechargeable battery 2400 mAh, 3.6 V |
| Battery life | Approximately 2 hours of continuous operation |
| Charging time | Approximately 5.2 hours |
| Connectivity | USB-C |
| Protection rating | IPX5 |
| Operating temperature | -20°C to +50°C |
| Compatibility | Ninebot scooters series D, E, F, G (non-exhaustive list) |
| Main functions | Front and rear turn signals, battery indicator, automatic shut-off after 30 s |
| Maintenance and cleaning | Clean with a soft, dry cloth |
| Safety | Recycle the battery in accordance with directive 2006/66/EC |
| Spare parts and repairability | Contact Segway customer service for any repairs |
| Warranty | 180 days |
| Package contents | Front indicator, rear indicator, mounts, charging cable |
Frequently Asked Questions - Ninebot KickScooter Blinker SEGWAY
User questions about Ninebot KickScooter Blinker SEGWAY
0 question about this device. Answer the ones you know or ask your own.
Ask a new question about this device
Download the instructions for your Electric scooter in PDF format for free! Find your manual Ninebot KickScooter Blinker - SEGWAY and take your electronic device back in hand. On this page are published all the documents necessary for the use of your device. Ninebot KickScooter Blinker by SEGWAY.
USER MANUAL Ninebot KickScooter Blinker SEGWAY
Ninebot Indicators for Electric KickScooters
EN User Manual
IT Manuale Utente
Welcome 1 Packing List
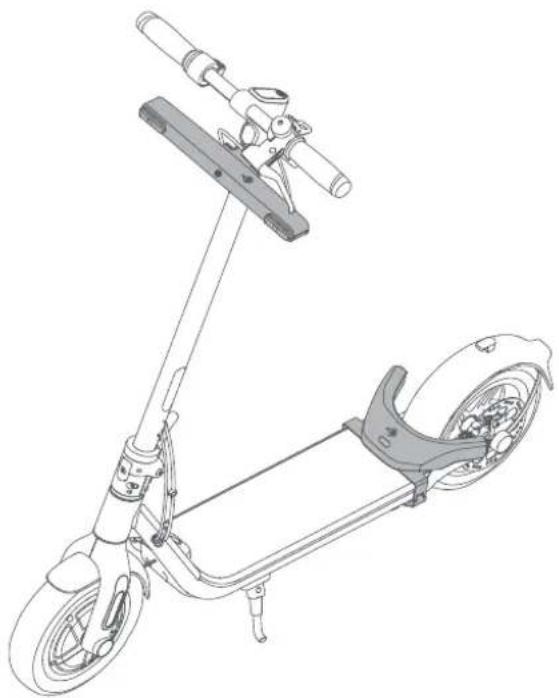
Ninebot indicators for electric kickscooters with three types of fixing bracket (which for D/F Series, G Series and E Series) respectively, are designed for Ninebot KickScooters. Please read the instructions in this manual and keep it for future reference.
natural_image
Line drawing of a small electric scooter with visible wheels and suspension components (no text or symbols)The pictures shown are for illustrations purposes only. The actual product may vary.
* Part is sold separately.
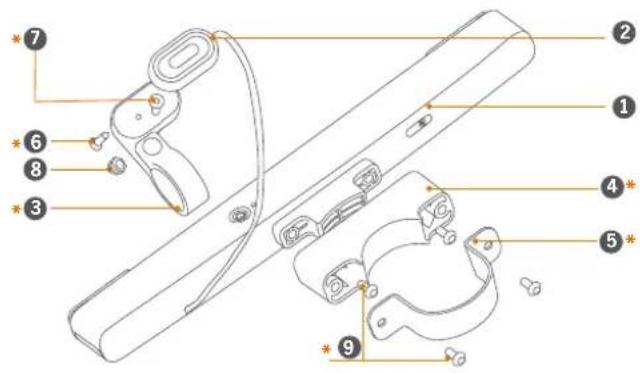
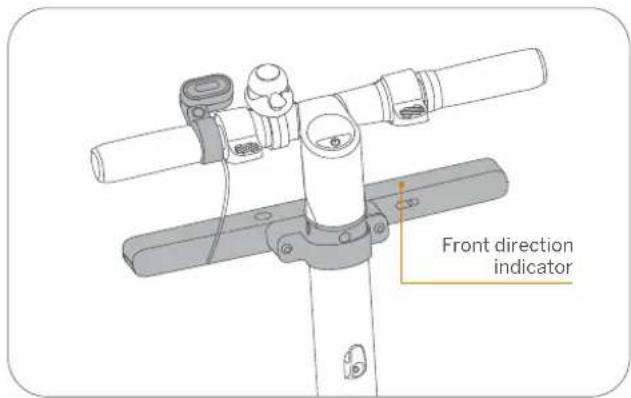
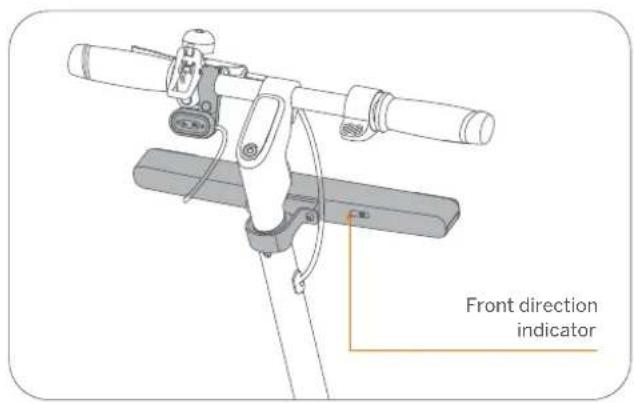
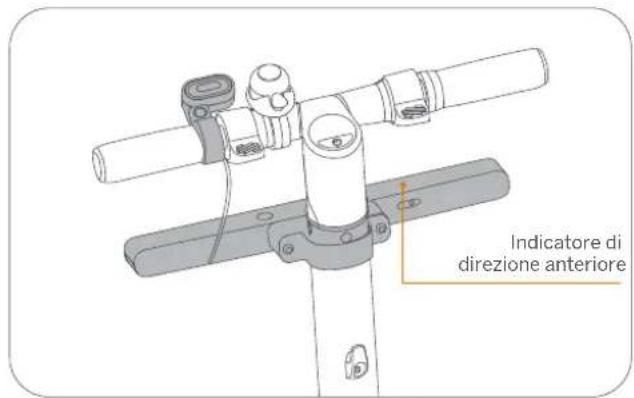
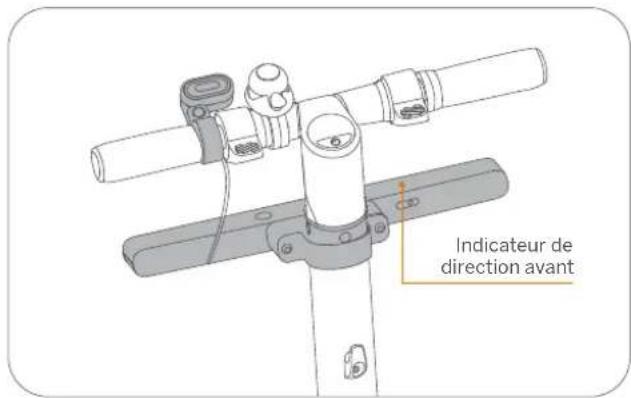
Front direction indicator
• For E Series (Bracket Model: PH1303)
natural_image
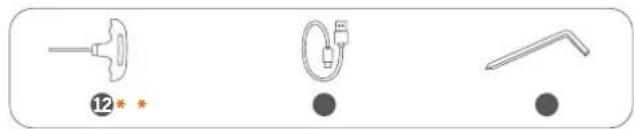
Three simple line drawings of objects: a bulb, a plug, and a tool, with no text or symbols.- For D/F and G Series (Bracket Model: PH1302/PH1301)

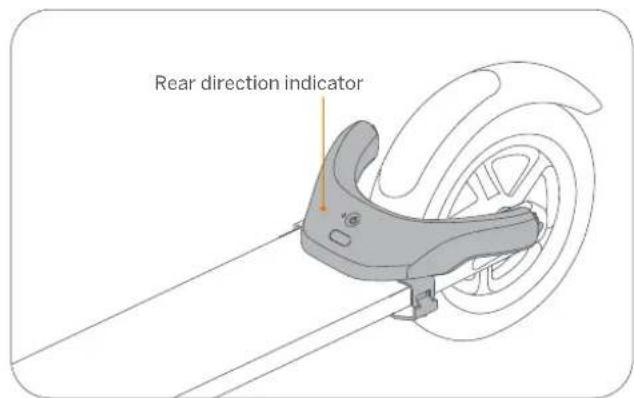
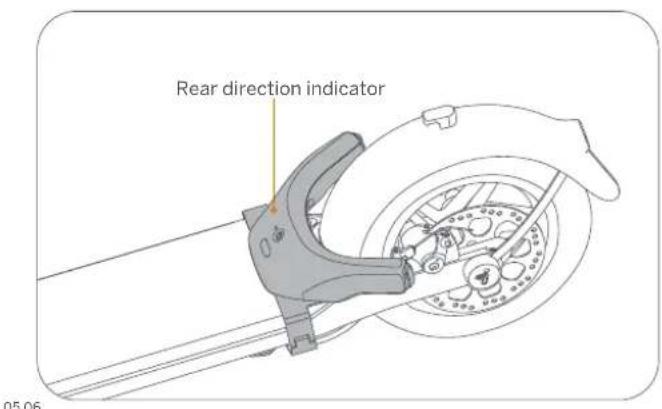
Rear direction indicator
- For D/F, G and E series
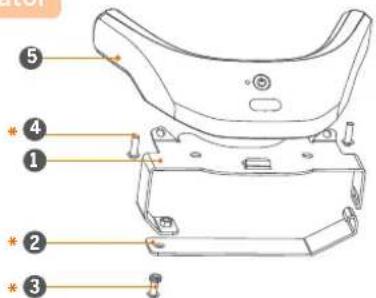
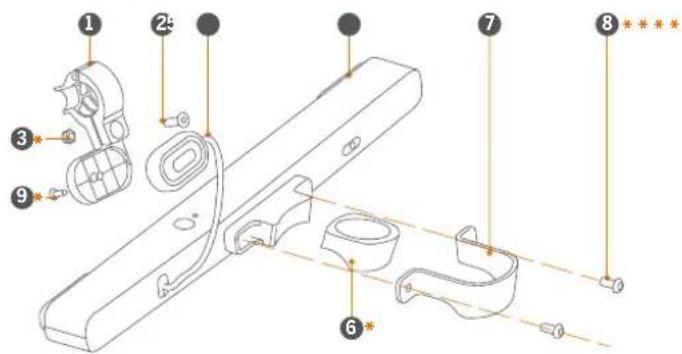
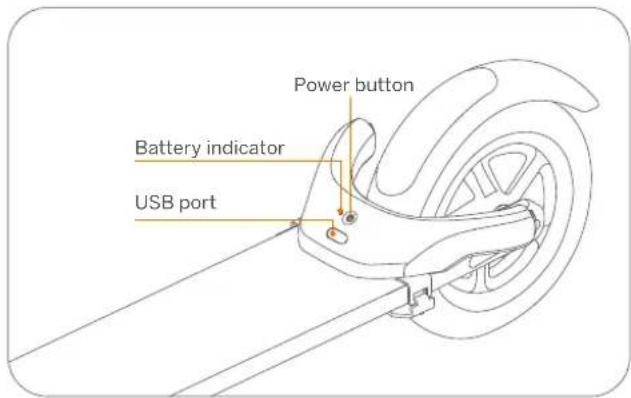
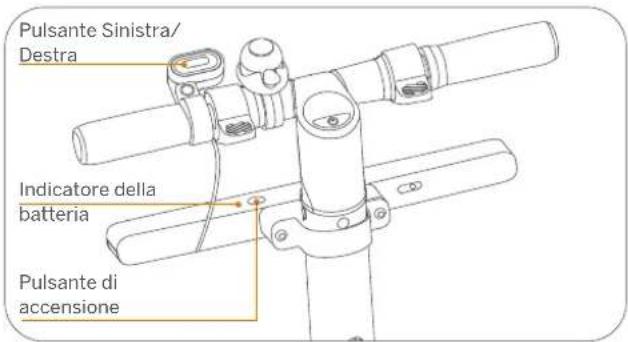
2 Diagram
- For E Series
- For D/F and G series
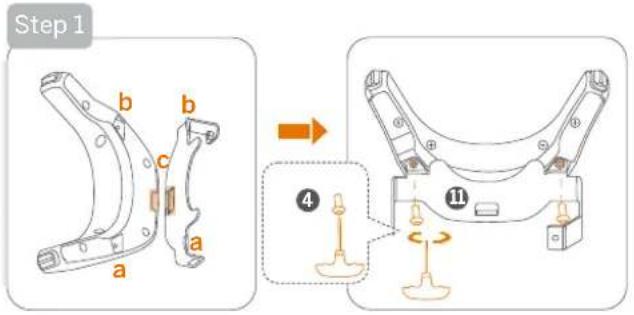
3 Installation
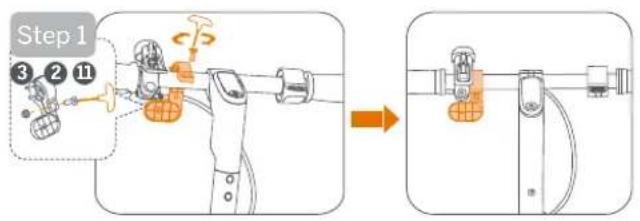
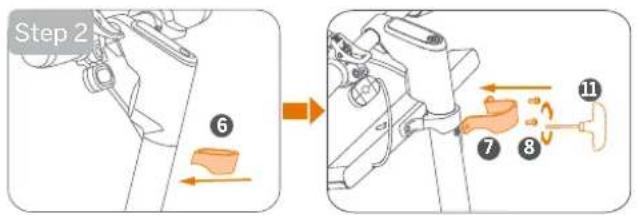
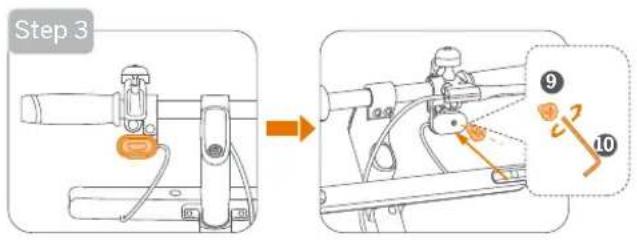
Front direction indicator installation
- For E series
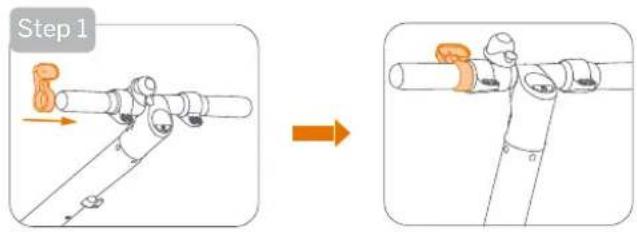
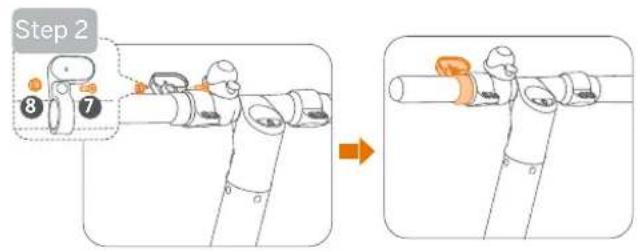

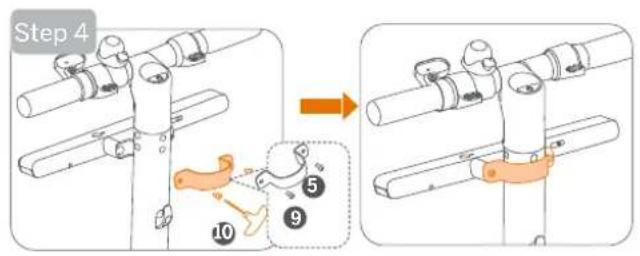
Front direction indicator installation
- For D/F and G series
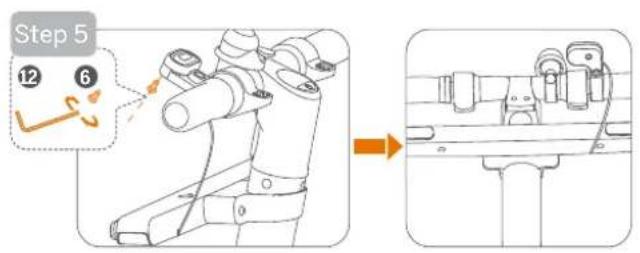
Rear direction indicator installation
- For D/F, G and E Series
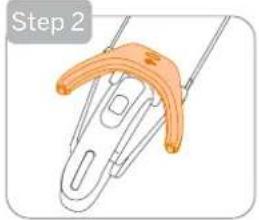
natural_image
Step 2 of a hairpin with an orange handle and metal clip (no text or symbols)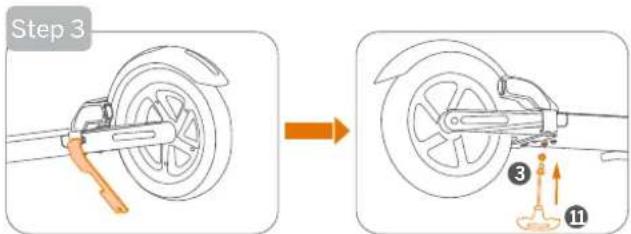
4 How to Use
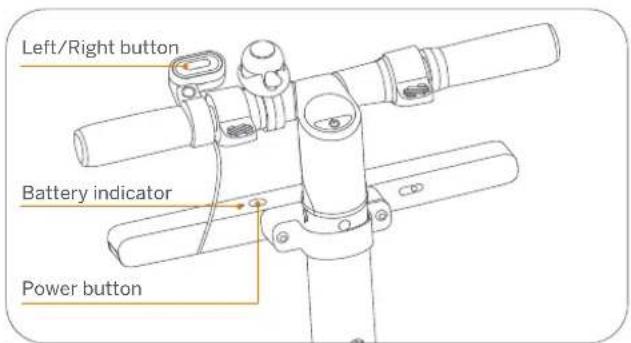
Power on
Press the Power button on the rear direction indicator, then press the Power button on the front direction indicator.
* The left and right direction indicators will flash twice respectively when powered on.
Use
When turning left/right, press the Left/Right button on the front direction indicator.
* The left/right direction indicators will flash and automatically turns off after 30 seconds.
Power off
Press and hold the Power button on the front direction indicator for three seconds.
* The left and right direction indicators will flash once respectively and automatically turns off.
Charging
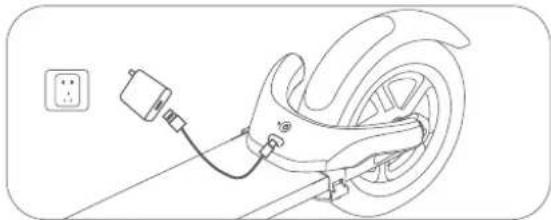
natural_image
Line drawing of a car wheel connected to a cable with a plug, no text or symbols presentThe direction indicators are fully charged when the battery indicator changes from yellow (charging) to green.
* The indicators are not available when charging.
5 Specifications
| Product | Item Rear direction indicator | ||
| Model PH0801 | |||
| Length × Width× Height | 360 × 66 × 27 mm(14.2 × 2.6 × 1.1 inch) | 223 × 144 × 46 mm(8.8 × 5.7 × 1.8 inch) | |
| Net Weight | Approx. 306 g Approx. 273 g | ||
| Rated Power | 2.5 W | 1.5 W | |
| Rated Voltage | 12 V±3V | —— | |
| Flashing Frequency | 90±30 times per minute | ||
| IP Rating | IPX5 | ||
| OperatingTemperature | -20 to 50°C (-4 to 122°F) | ||
| Suitable For | Ninebot KickScooter all series include but not limited to:●G series: G30/G30E II/G30D/G30D II/G30LE/G30LE II/G30LD:●F series: F20D/F25E/F30D/F30E/F40D/F40E;●D series: D18E/D28D/D28E/D38D/D38E;●E series: E22D/E22E/E25D/E25E/E45D/E45E/ES1LD/ES1//ES2/ES2L/ES4. | ||
| Function | Charging Cable | Type-C | |
| Standby Time | Approx. 20 days | ||
| Continuous Operating time | Approx. 2 hours | ||
| Duration of Charging | Approx. 5.2 hours | ||
| Battery | Type | Built-in | Built-in |
| Rated Capacity | 2400 mAh | ||
| Rated Voltage | 3.6 V— | ||
| Charging Ambient Temperature | 0 to 45°C (32 to 113°F) | ||
| Battery Management System | Short circuit, over-current, over-discharge and over-charge protection | ||
| Battery Indicator | Green: Sufficient battery.Flashing red: Low battery, please charge.Breathing yellow: Charging.Solid green: Fully charged. | ||
6 Common Failures
| Common failures | Possible causes and solution |
| The battery indicator on the front/rear direction indicator displays red and flashes three times, then abnormally powers off. | Battery undervoltage century to a power adapter and plug into a wall outlet for charging. |
| Fail to charge | 1. Check if the type-c cable is connected to the USB port properly.2. The charging ambient temperature is lower than 0°C (32°F) or higher than 45°C (113°F). |
| The front/rear direction indicator does not function. The left/right turn signal indicator flashes abnormally. | The front/rear direction indicator malfunctions. Contact the after-sales service for repairs. |
7 Certifications
European Union Compliance Statement
Battery recycling information for the European Union

Batteries or packaging for batteries are labeled in accordance with European Directive 2006/66/EC and amendment 2013/56/EU concerning batteries and accumulators and waste batteries and accumulators. The Directive determines the framework for the return and recycling of used batteries and accumulators as applicable throughout the European Union. This label is applied to various batteries to indicate that the battery is not to be thrown away, but rather reclaimed upon end of life per this Directive.
In accordance with the European Directive 2006/66/EC and amendment 2013/56/EU, batteries and accumulators are labeled to indicate that they are to be collected separately and recycled at end of life. The label on the battery may also include a chemical symbol for the metal concerned in the battery (Pb for lead, Hg for mercury, and Cd for cadmium). Users of batteries and accumulators must not dispose of batteries and accumulators as unsorted municipal waste, but use the collection framework available to customers for the return, recycling, and treatment of batteries and accumulators. Customer participation is important to minimize any potential effects of batteries and accumulators on the environment and human health due to the potential presence of hazardous substances.
Before placing electrical and electronic equipment (EEE) in the waste collection stream or in waste collection facilities, the end user of equipment containing baeries and/or accumulators must remove those baeries and accumulators for separate collection.
Waste Electrical and Electronic Equipment (WEEE) Directive

"All products bearing this symbol are waste electrical and electronic equipment (WEEE as in directive 2012/19/EU) which should not be mixed with unsorted household waste. Instead, you should protect human health and the environment by handing over your waste equipment to a designated collection point for the recycling of waste electrical and electronic equipment, appointed by the government or local authorities. Correct disposal and recycling will help prevent potential negative consequences to the environment and human health. Please contact the installer or local authorities for more information about the location as well as terms and conditions of such collection points".
Restriction of Hazardous Substances Directive (RoHS)
This Ninebot (Changzhou) Tech Co., Ltd. product, with included parts (cables, cords, and so on) meets the requirements of Directive 2011/65/EU on the
restriction of the use of certain hazardous substances in electrical and electronic equipment (“RoHS recast” or “RoHS 2”).
Radio Equipment Directive

Segway-Ninebot Europe
Dynamostraat 7, 1014 BN Amsterdam. The Netherlands.
This device meets the EU requirements on the limitation of exposure of the general public to electromagnetic fields by way of health protection. Hereby, Ninebot (Changzhou) Tech Co., Ltd. declares that the radio equipment type is in compliance with Directive 2014/53/EU.
8 Trademark and Legal Statement
Ninebot is the trademark of Ninebot (Beijing) Tech. Co., Ltd; The respective owners reserve the rights of their trademarks referred to in this manual. We have attempted to include description and instructions for all the functions of the Ninebot Indicators for Electric Kickscooters at the time of printing.
However, due to constant improvement of product features and changes of design, the product may differ slightly from the one shown in this document.
©2022 Ninebot (Beijing) Tech Co. Ltd. All rights reserved
9 Warranty
We offer 180 days warranty service for Ninebot Indicators for Electric Kickscooters purchased directly from Segway official website and authorized channels. In each case, the warranty period is measured starting on the date of purchase by the original consumer purchaser. The sales receipt from the first consumer purchase, is required in order to establish the start date of the warranty period. Please visit our official website at https://www.segway.com/international to find more about the Limited Warranty and Dispute Resolution Agreement.
Customer Services
Segway's online services are available at https://www.segway.com/international. For product issues, please contact Segway customer service at service@segway.eu.com, Segway's technical support personnel are available to assist you.
IT
Benvenuto
natural_image
Line drawing of a scooter with visible wheels, suspension components, and a handle (no text or symbols)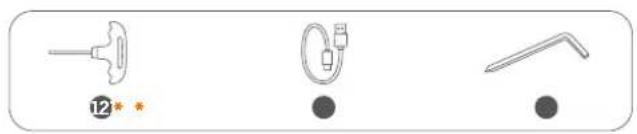
natural_image
Three medical or diagnostic tool icons: a syringe, a tube with internal components, and a catheter (no text or symbols)
2 Diagramma
- Per serie E
natural_image
Illustration of a hand holding a paperclip with orange bands (no text or symbols)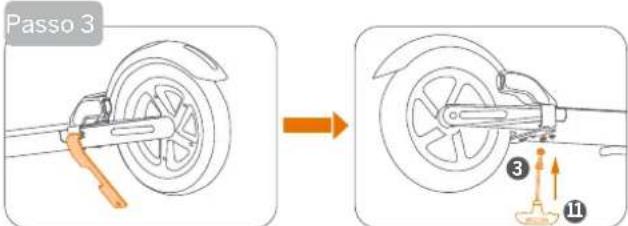
4 Come usare
natural_image
Line drawing of a car wheel connected to a cable with a plug, no text or symbols presentSegway-Ninebot Europe
Dynamostraat 7, 1014 BN Amsterdam, The Netherlands.
natural_image
Line drawing of a scooter with extended handle and seat (no text or symbols)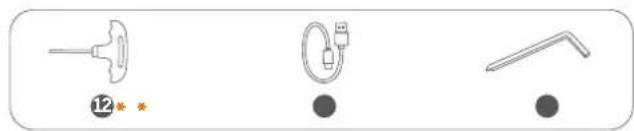
natural_image
Three simple line drawings of medical or laboratory equipment icons, no text or symbols present2 Diagramme
- Pour la série E

natural_image
Illustration of a hairpin with a curved orange handle, labeled 'Étape 2' (no other text or symbols)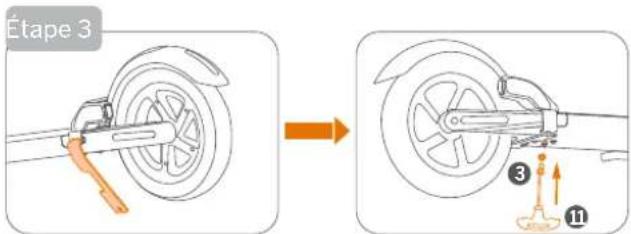
4 Comment utiliser

natural_image
Line drawing of a car wheel connected to a cable with a power outlet (no text or symbols)Segway-Ninebot Europe

Dynamostraat 7, 1014 BN Amsterdam, The Netherlands.
- Ninebot Indicators for Electric KickScooters
- Welcome 1 Packing List
- Front direction indicator
- Rear direction indicator
- Diagram
- Installation
- Front direction indicator installation
- Rear direction indicator installation
- Power on
- Use
- Power off
- Certifications
- Radio Equipment Directive
- Trademark and Legal Statement
- Warranty
- Customer Services
- Benvenuto
- Diagramma
- Diagramme
Brand : SEGWAY
Model : Ninebot KickScooter Blinker
Category : Electric scooter